在网线传输中,字节是基本单位,NIO使用ByteBuffer作为Byte字节容器, 但是其使用过于复杂,因此Netty 写了一套Channel,代替了NIO的Channel ,Netty 缓冲区又采用了一套ByteBuffer代替了NIO 的ByteBuffer ,Netty 的ByteBuffer子类非常多, 这里只是对核心的ByteBuf 进行详细的剖析 。
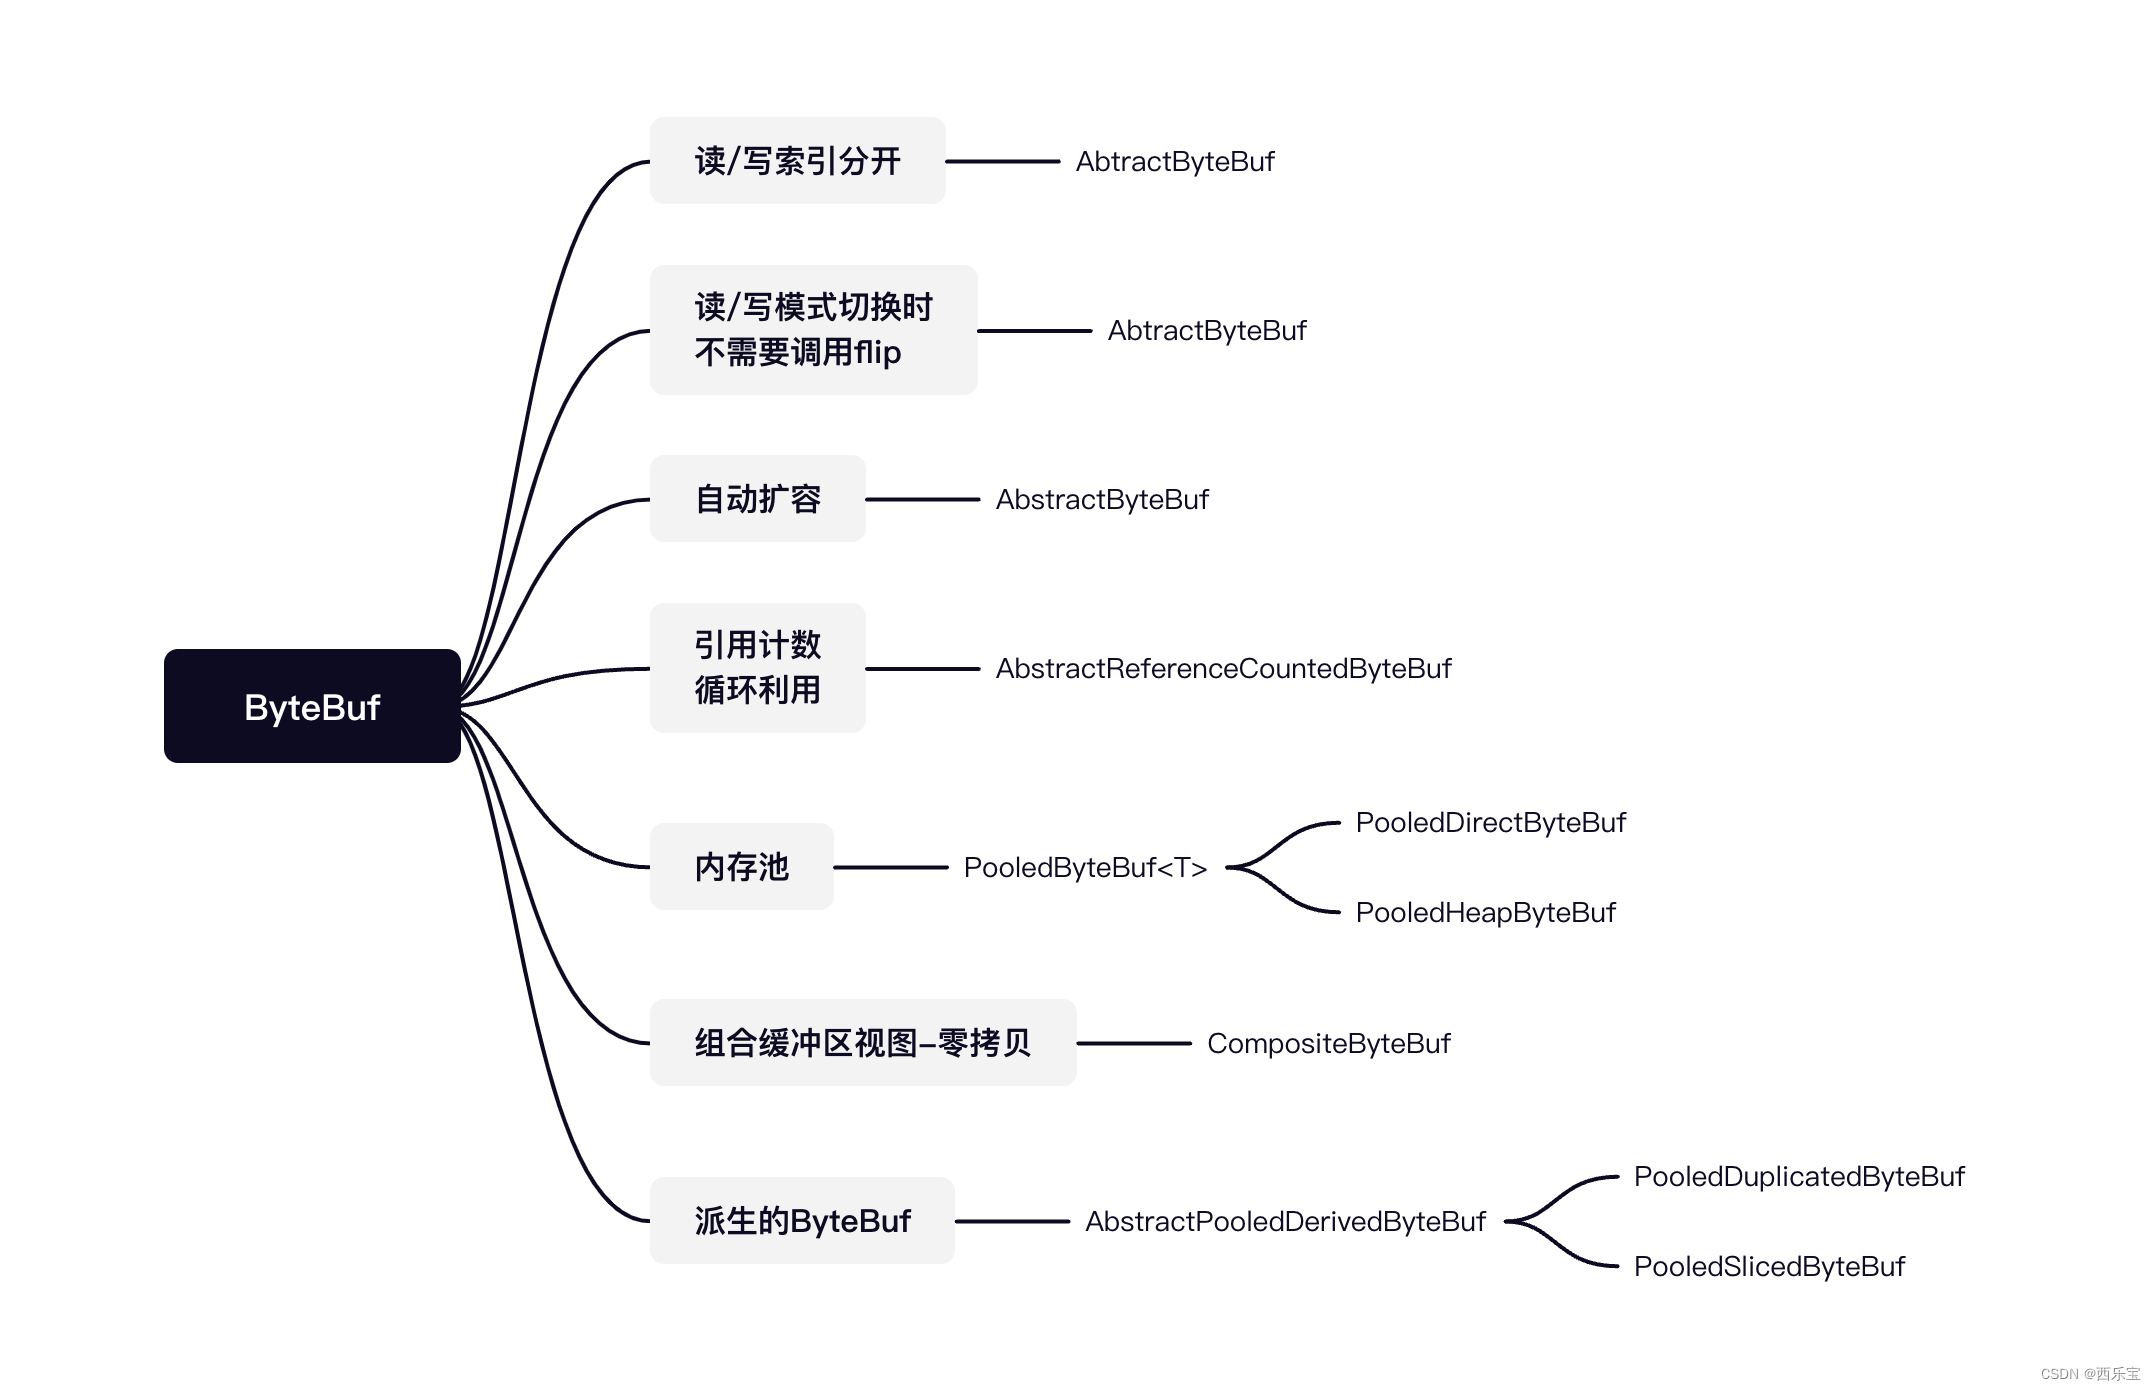
NIO ByteBuffer 只有一个位置的指针position, 在切换读/写状态时,需要手动调用flip()方法或rewind()方法 , 以改变position的值,而且ByteBuffer的长度是固定的, 一旦分配完成就不能再进行扩容和收缩,当需要放入或才存储的对象大于ByteBuffer的容量时会发生异常, 每次编码时都要进行可写空间的校验 。
ByteBuffer buffer = ByteBuffer.allocate(10);

System.out.println("capacity: " + buffer.capacity());


for (int i = 0; i < 5; ++i) {
    buffer.put((byte)i);
}

System.out.println("before flip limit: " + buffer.limit());

buffer.flip();

System.out.println("after flip limit: " + buffer.limit());

System.out.println("enter while loop");

while (buffer.hasRemaining()) {
    System.out.println("position: " + buffer.position());
    System.out.println("limit: " + buffer.limit());
    System.out.println("capacity: " + buffer.capacity());

    System.out.println(buffer.get());
    System.out.println("=======================================");
}
结果输出:
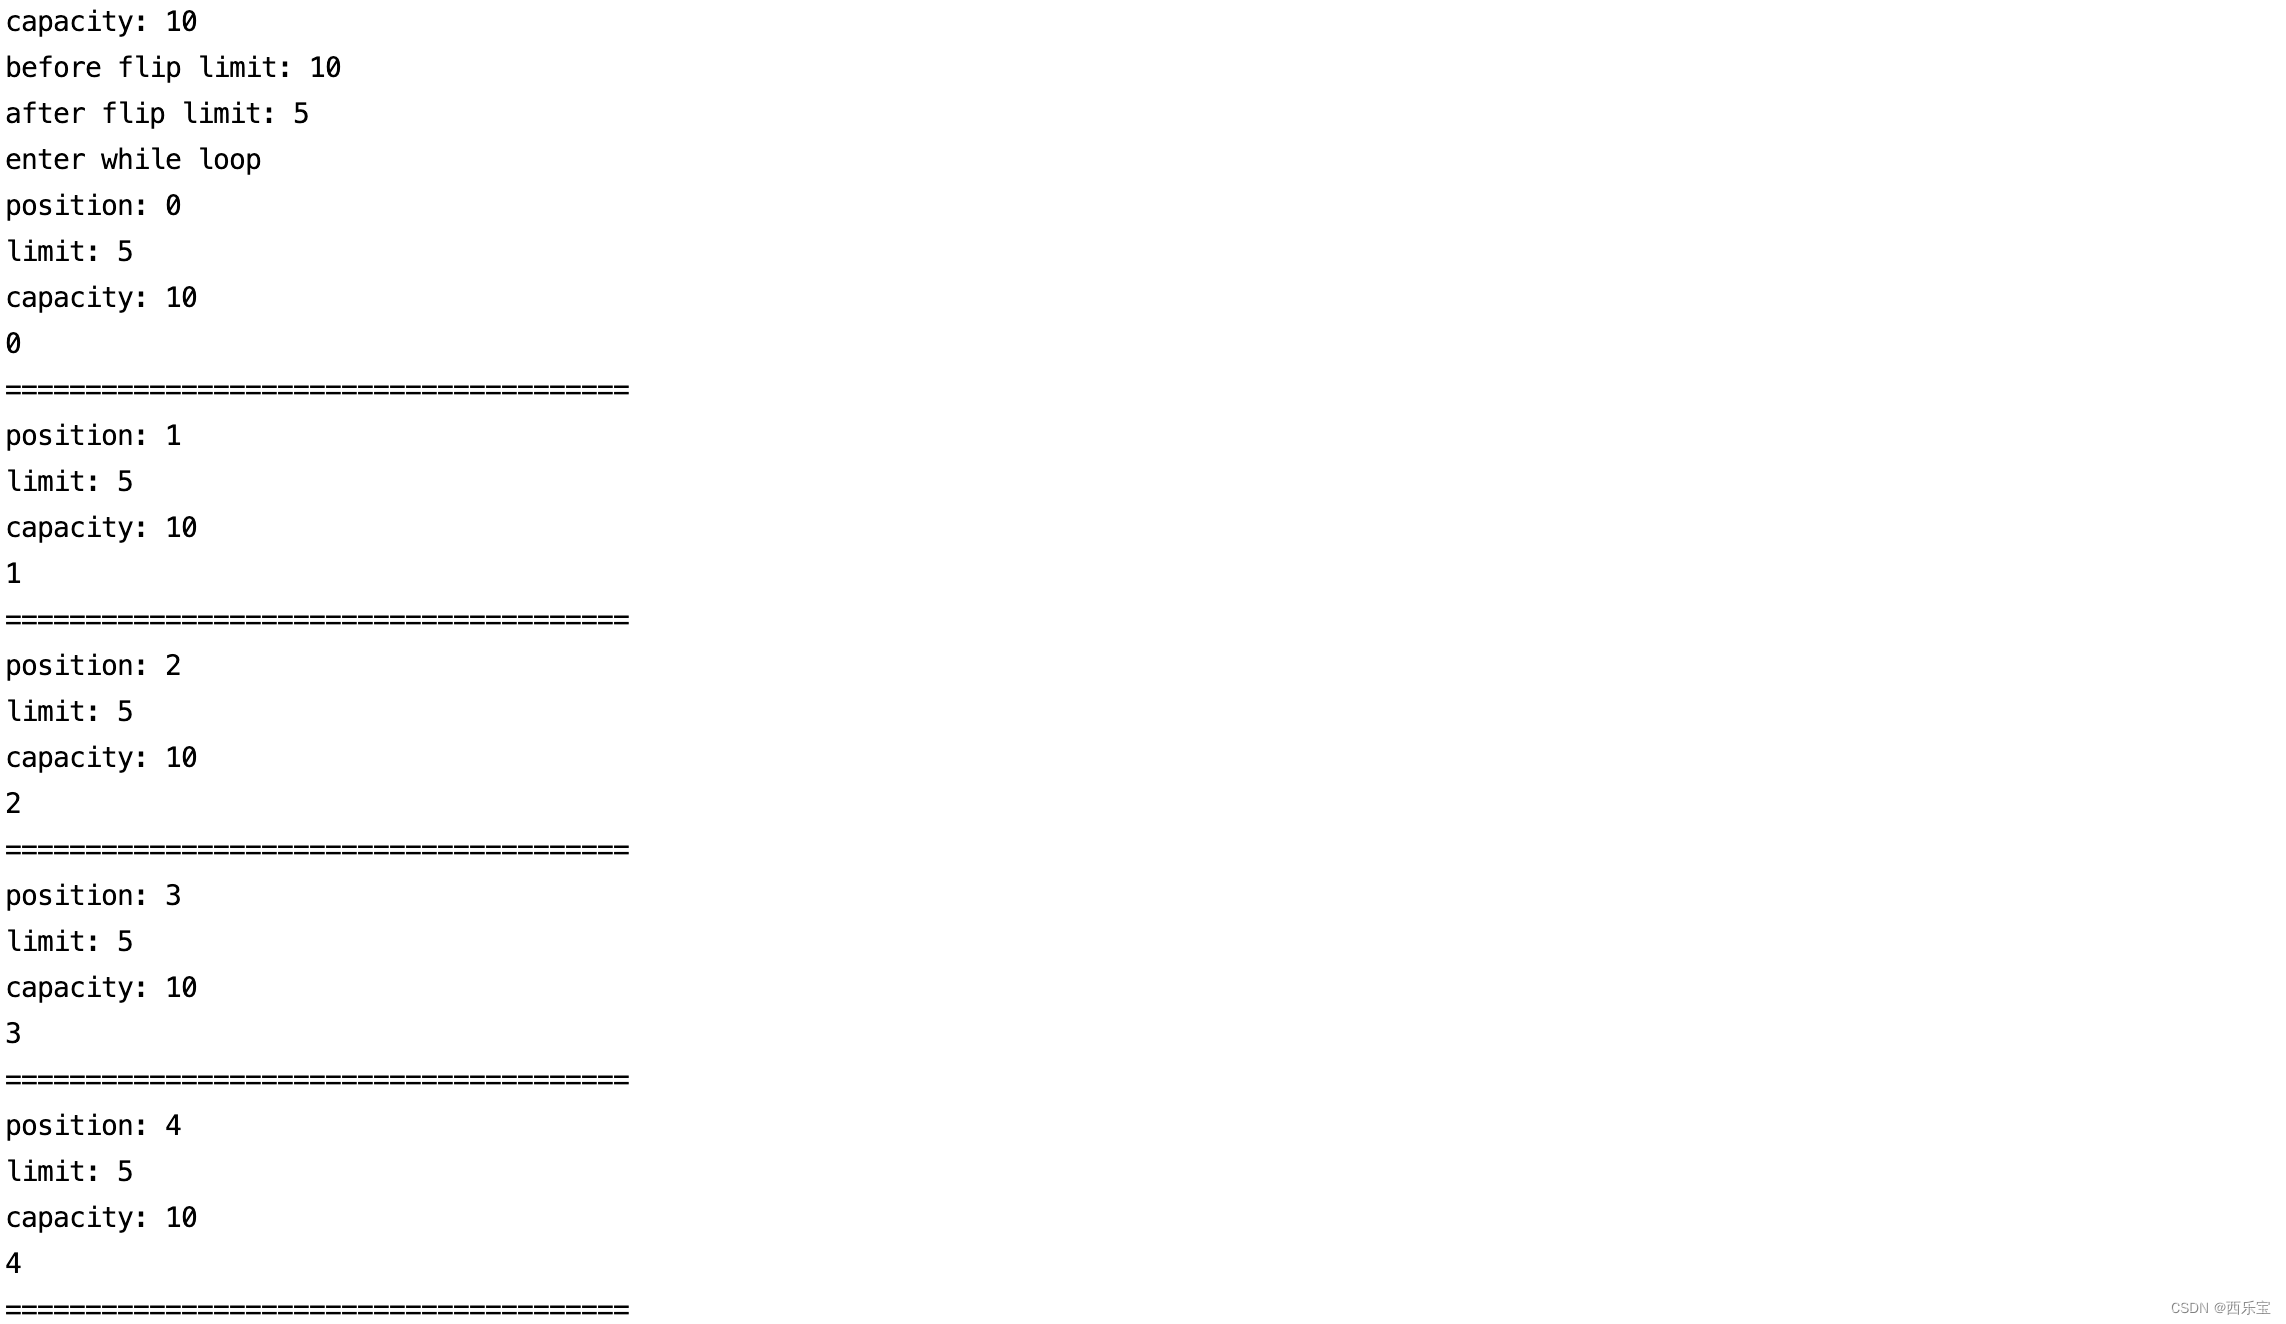
首先我们来看allocate()方法 。
private int mark = -1;
private int position = 0;
private int limit;
private int capacity;
final byte[] hb;                  // Non-null only for heap buffers
final int offset;

public static ByteBuffer allocate(int capacity) {
    if (capacity < 0)
        throw new IllegalArgumentException();
    return new HeapByteBuffer(capacity, capacity);
}

HeapByteBuffer(int cap, int lim) {            // package-private
    super(-1, 0, lim, cap, new byte[cap], 0);
    /*
    hb = new byte[cap];
    offset = 0;
    */
}

ByteBuffer(int mark, int pos, int lim, int cap,   // package-private
             byte[] hb, int offset)
{
    super(mark, pos, lim, cap);
    this.hb = hb;
    this.offset = offset;
}
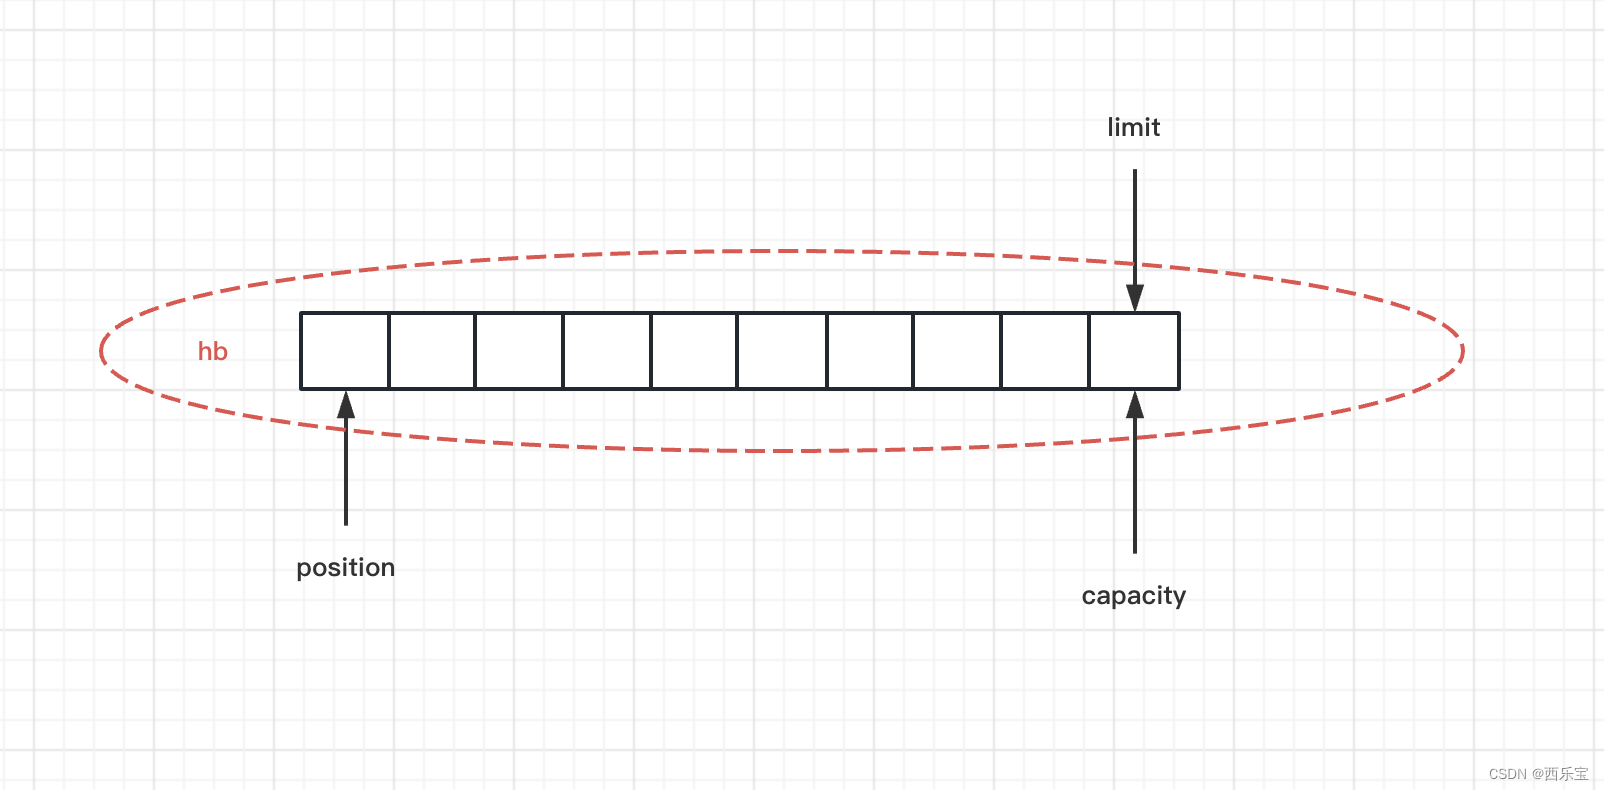
分析到这里,我们看到了mark,position,limit,capacity,hb,offset 偏移量这几个变量,而他们代表着什么意思呢? 后面使用时再来分析,还是继续看。
Buffer(int mark, int pos, int lim, int cap) {       // package-private
    if (cap < 0)
        throw new IllegalArgumentException("Negative capacity: " + cap);
    this.capacity = cap;
    limit(lim);
    position(pos);
    if (mark >= 0) {
        if (mark > pos)
            throw new IllegalArgumentException("mark > position: ("
                                               + mark + " > " + pos + ")");
        this.mark = mark;
    }
}

public final Buffer limit(int newLimit) {
    if ((newLimit > capacity) || (newLimit < 0))
        throw new IllegalArgumentException();
    limit = newLimit;
    if (position > newLimit) position = newLimit;
    if (mark > newLimit) mark = -1;
    return this;
}

public final Buffer position(int newPosition) {
    if ((newPosition > limit) || (newPosition < 0))
        throw new IllegalArgumentException();
    if (mark > newPosition) mark = -1;
    position = newPosition;
    return this;
}
allocate(10) 方法执行完,ByteBuffer结构如下 。
public ByteBuffer put(byte x) {
    hb[ix(nextPutIndex())] = x;
    return this;
}


final int nextPutIndex() {                          // package-private
    int p = position;
    if (p >= limit)
        throw new BufferOverflowException();
    position = p + 1;
    return p;
}
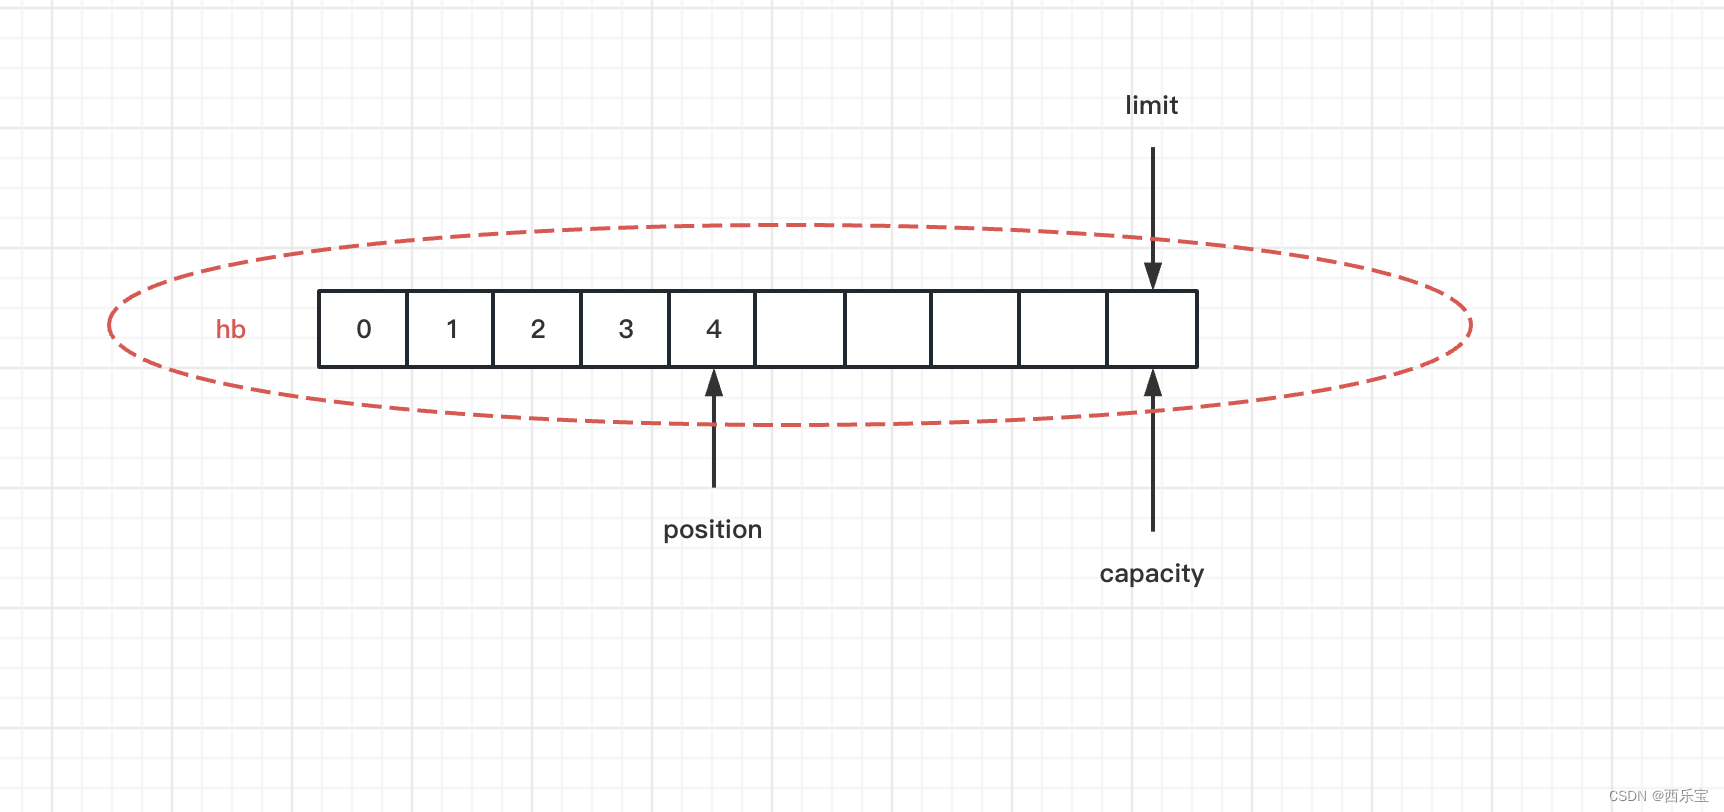
put()方法中,我们可以看到,每次put()方法调用之后,position= position + 1。因此向ByteBuffer中添加5个元素之后ByteBuffer的结构图如下图所示 。
接下来看flip()方法 。
public final Buffer flip() {
    limit = position;
    position = 0;
    mark = -1;
    return this;
}
flip()方法做了哪些事情呢?请看下图。
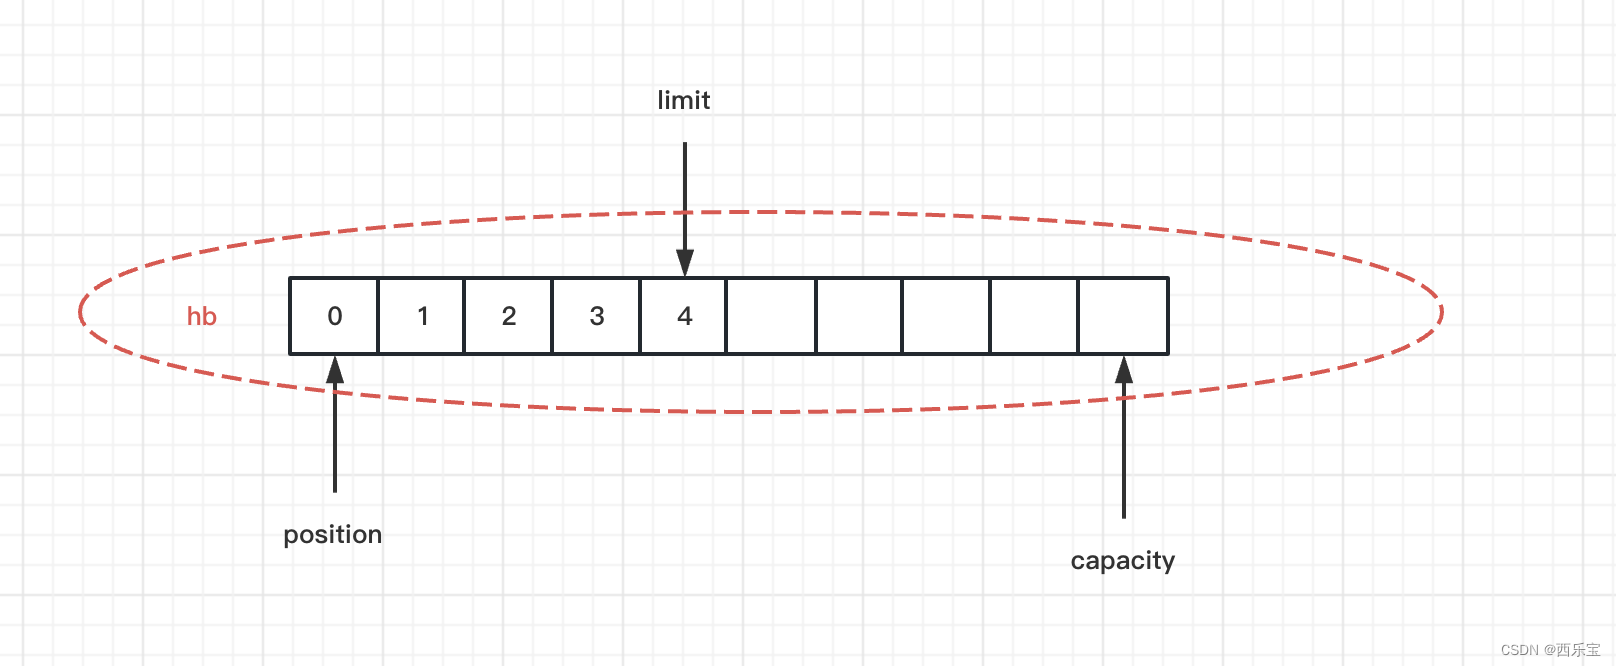
接下来看get()方法 。
public byte get() {
    return hb[ix(nextGetIndex())];
}

final int nextGetIndex() {                          // package-private
    int p = position;
    if (p >= limit)
        throw new BufferUnderflowException();
    position = p + 1;
    return p;
}
大家发现没有nextGetIndex()方法的实现原理和nextPutIndex()的实现原理很像,都是position = p + 1,当然position 的值不能大于limit,在之前一直有一个ix()函数没有分析,这里请看ix()函数
protected int ix(int i) {
    return i + offset;
}
关于ix这个函数怎么用呢 ? 请来看另外一个例子。
public class BufferSlice {


    public static void main(String[] args) {
        ByteBuffer buffer = ByteBuffer.allocate(10);
        System.out.println("-----------------" + buffer.capacity());

        for (int i = 0; i < buffer.capacity(); ++i) {
            buffer.put((byte) i);
        }

        buffer.position(2);
        buffer.limit(6);

        ByteBuffer sliceBuffer = buffer.slice();
        System.out.println("++++++++++++++++++" +  sliceBuffer.capacity());

        for (int i = 0; i < sliceBuffer.capacity(); ++i) {
            byte b = sliceBuffer.get(i);
            b *= 2;
            sliceBuffer.put(i, b);
        }

        buffer.position(0);
        buffer.limit(buffer.capacity());

        while (buffer.hasRemaining()) {
            System.out.println(buffer.get());
        }
    }
}
上面有一行加粗代码,这行代码很关键,请看slice()方法的实现。
public ByteBuffer slice() {
    int pos = this.position();
    int lim = this.limit();
    int rem = (pos <= lim ? lim - pos : 0);
    return new HeapByteBuffer(hb,
                                    -1,
                                    0,
                                    rem,
                                    rem,
                                    pos + offset);
}


protected HeapByteBuffer(byte[] buf,
                               int mark, int pos, int lim, int cap,
                               int off)
{
    super(mark, pos, lim, cap, buf, off);
    /*
    hb = buf;
    offset = off;
    */
}
slice()方法主要做的事情是设置offset的值 。
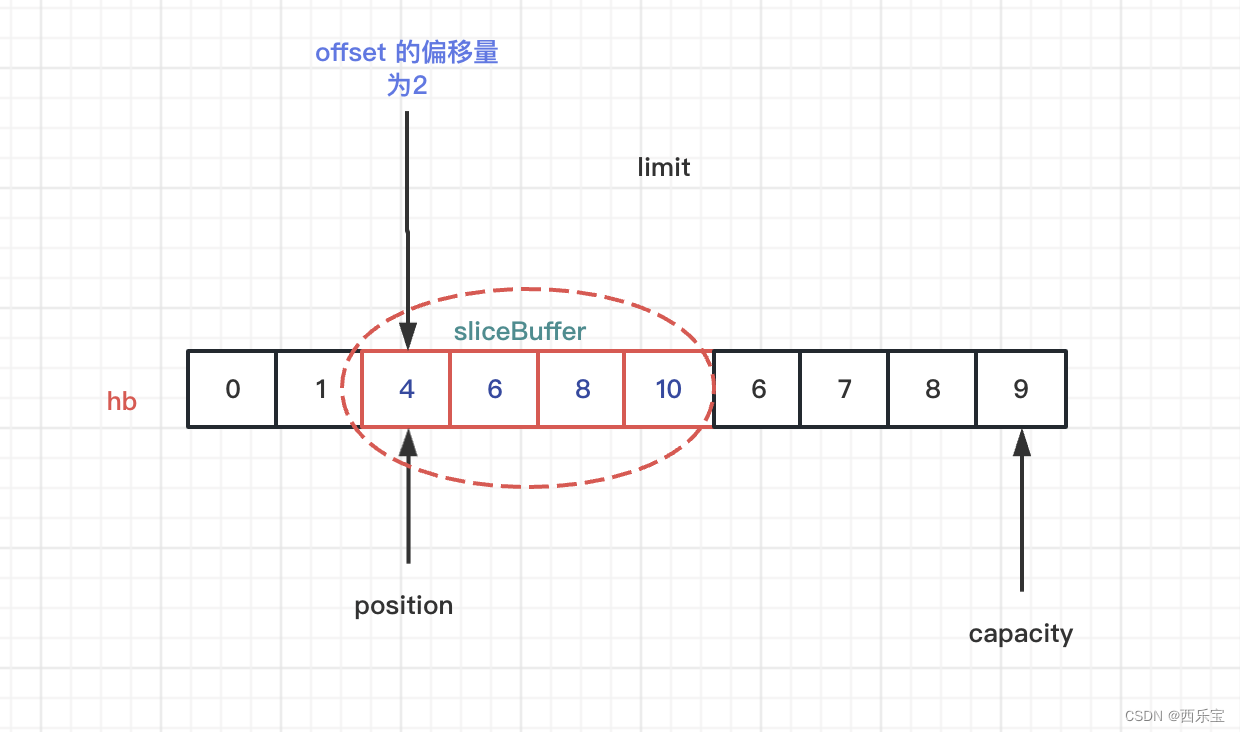
有了以上的理论基础,再来分析打印结果,就很简单了,打印结果请看下图。
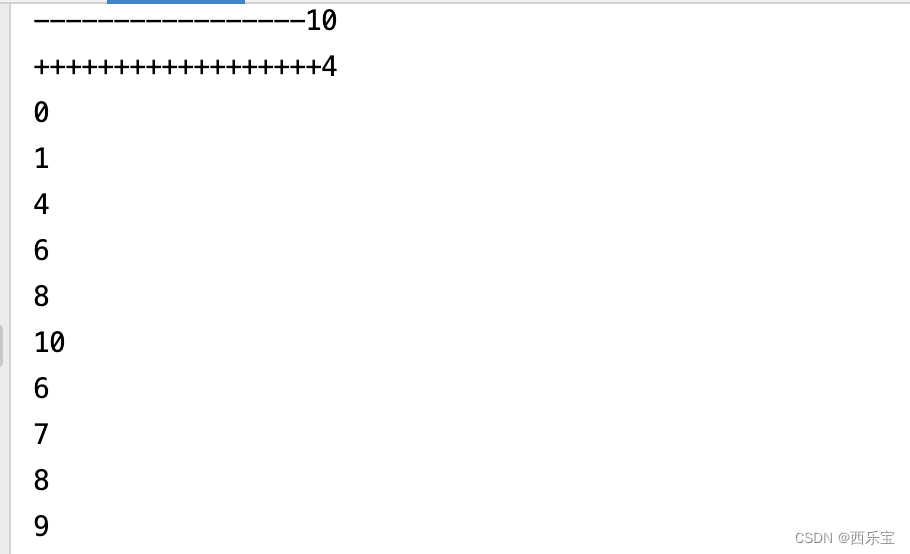
当然啦,ByteBuffer还有另外一个方法duplicate(),这个方法有什么含义呢?
public class BufferDuplicate {

    public static void main(String[] args) {
        ByteBuffer buffer = ByteBuffer.allocate(10);
        System.out.println("-----------------" + buffer.capacity());

        for (int i = 0; i < buffer.capacity(); ++i) {
            buffer.put((byte) i);
        }

        ByteBuffer newBuffer = buffer.duplicate();

        System.out.println("原来旧对象打印");
        buffer.flip();

        newBuffer.flip();
        for(int i = 0 ;i < 3 ;i ++){
            System.out.println(buffer.get());
            if(i == 2 ){
                buffer.put(2,(byte)(buffer.get() * 3 ));
            }
        }

        System.out.println("============复制对象打印===========");
        for(int j = 0 ;j < 3 ;j ++){
            System.out.println(newBuffer.get());
        }
    }
}
NIO ByteBuffer的duplicate()方法可以复制对象,复制后的对象与原对象共享缓冲区的内存,但其位置指针独立维护。有了这个理论基础,再来看结果输出就很轻松了。
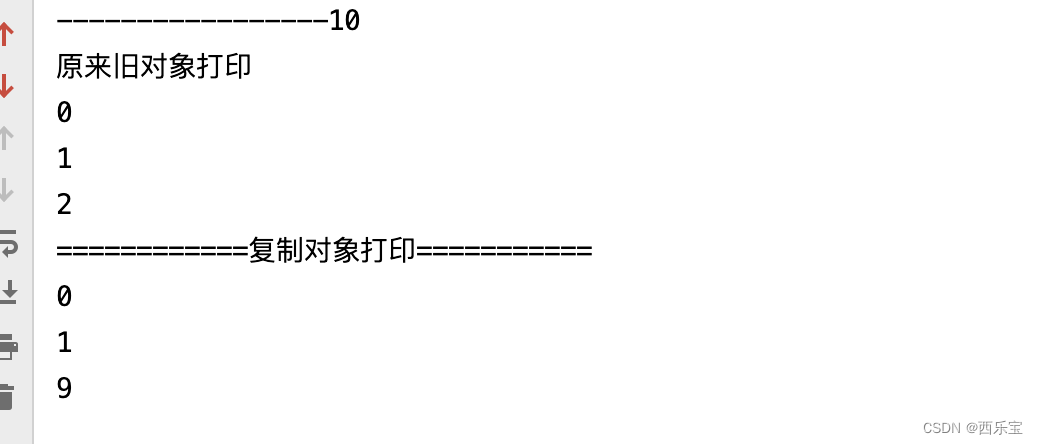
在旧的引用遍历时,对buffer[2]的值变为原来的两倍,因此在newBuffer打印时,值变为原来的两倍,但是他们维护了自己的一套指针,因此在操作底层buffer时,指针互不影响 。
clear()方法
接下来看buffer的clear()方法。
public final Buffer clear() {
    position = 0;
    limit = capacity;
    mark = -1;
    return this;
}
clear()方法主要将limit值设置为capacity,将position的值设置为0,mark为-1 。
接下来看clear()方法的应用场景 。
try {
    FileInputStream inputStream = new FileInputStream("/Users/quyixiao/git/netty-netty-4.1.38.Final/example/src/input.txt");
    FileOutputStream outputStream = new FileOutputStream("/Users/quyixiao/git/netty-netty-4.1.38.Final/example/src/output.txt");
    FileChannel inputChannel = inputStream.getChannel();
    FileChannel outputChannel = outputStream.getChannel();
    ByteBuffer buffer = ByteBuffer.allocate(10);
    while (true) {
        buffer.clear(); // 如果注释掉该行代码会发生什么情况?
        int read = inputChannel.read(buffer);
        System.out.println("read: " + read);
        try {
            Thread.sleep(1000);
        } catch (InterruptedException e) {
            throw new RuntimeException(e);
        }

        if (-1 == read) {

            break;
        }

        buffer.flip();
        outputChannel.write(buffer);
    }
    inputChannel.close();
    outputChannel.close();
} catch (IOException e) {
    e.printStackTrace();
}
在上述例子中, input.txt为输入文件,output.txt为输出文件,大家可以将clear()方法注释掉看看 。 这也许就是clear()方法的应用场景吧。
compact()
接下来看compact()方法,在看源码之前,请先看一个例子。
public static void main(String[] args) {


    ByteBuffer buffer = ByteBuffer.allocate(10);

    System.out.println("capacity: " + buffer.capacity());
    for(int i = 0; i < 10; ++i) {
        buffer.put((byte)i);
    }

    System.out.println("before flip limit: " + buffer.limit());

    buffer.flip();

    System.out.println(buffer.get());
    System.out.println(buffer.get());

    System.out.println("==========================");
    System.out.println("limit = " + buffer.limit());
    System.out.println("position = " + buffer.position());
    System.out.println("capacity = " + buffer.capacity());
    System.out.println("=======================");


    ByteBuffer byteBuffer = buffer.compact();

    System.out.println("==========================");
    System.out.println("limit = " + byteBuffer.limit());
    System.out.println("position = " + byteBuffer.position());
    System.out.println("capacity = " + byteBuffer.capacity());
    System.out.println("=======================");

    while (byteBuffer.hasRemaining()){
        System.out.println(byteBuffer.get());
    }
}
结果输出
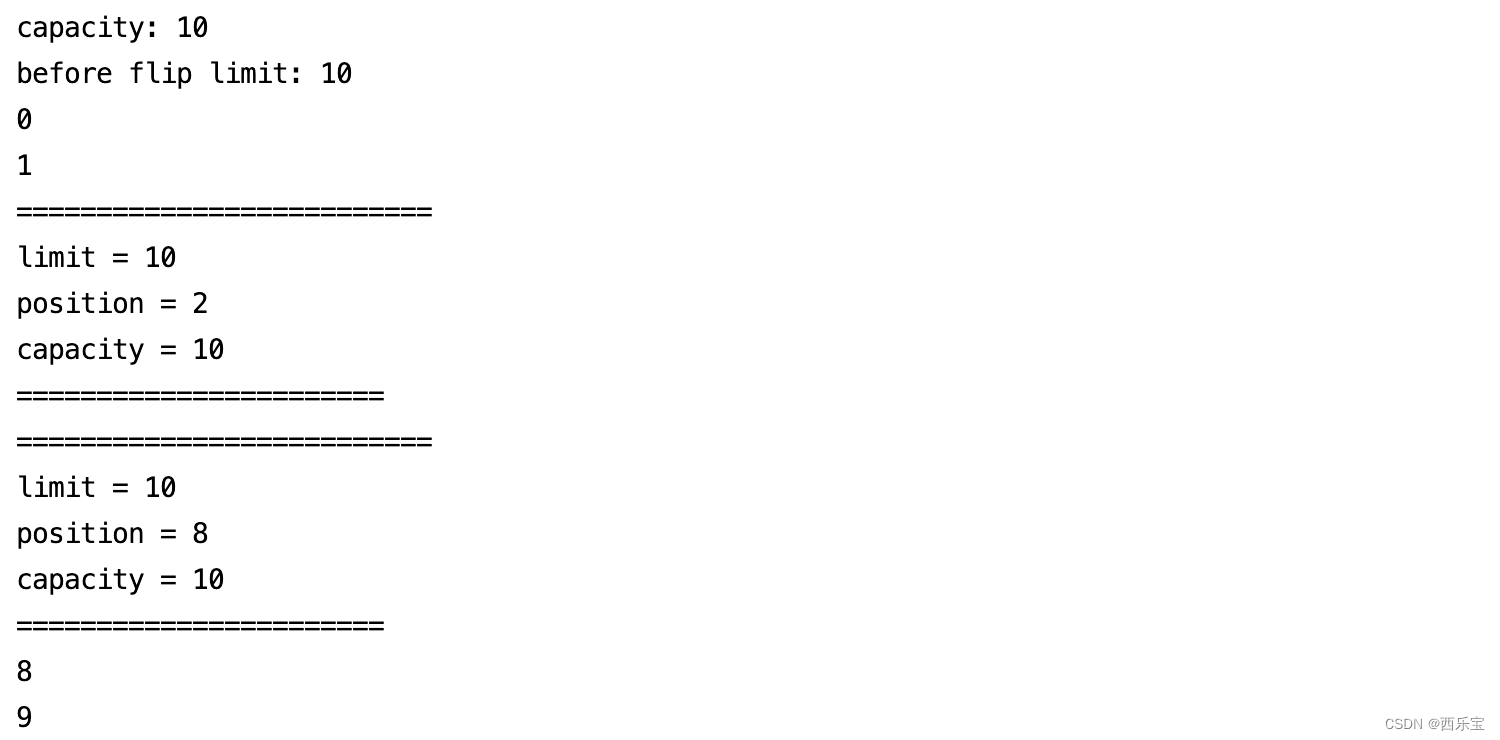
这个例子,先初始化数组buffer,初始化后buffer的hb值为[0, 1, 2, 3, 4, 5, 6, 7, 8, 9],接着翻转一下,再从buffer中获取两个值 。 此时limit和capacity()的值都不变,还是原来的10 ,但position已经移动到2这个位置,此时调用compact()方法,compact方法做了哪些事情呢?
- 将所有未读的数据复制到起始位置
- 将position设置为最后一个未读元素的后面。
- 将limit设置为capacity .
- 现在buffer就准备好了,但是不会覆盖未读取的数据 。
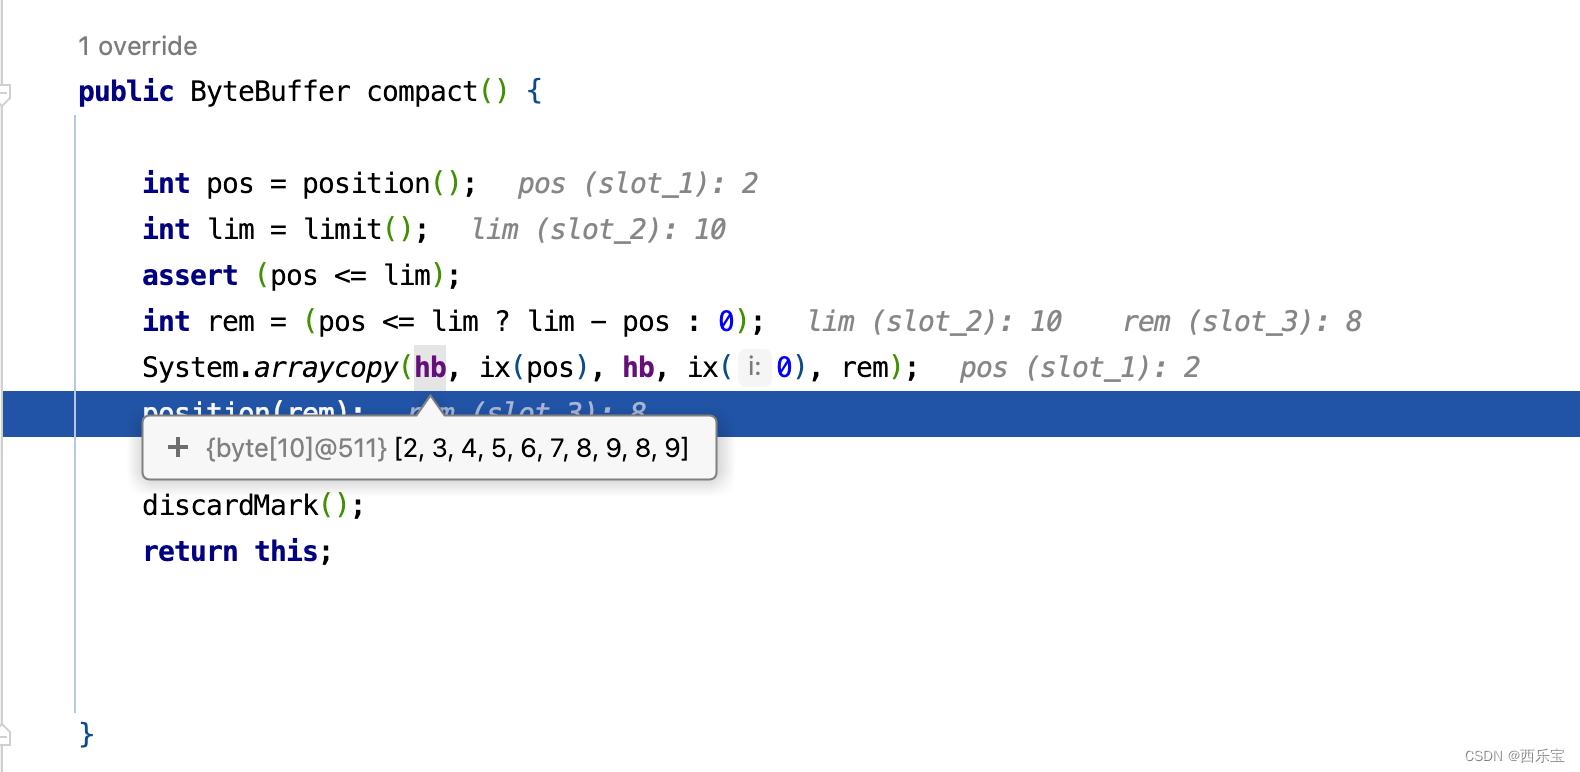
看到没有,此时之前读取过元素0,1 已经被后面未读的元素覆盖掉了。 懂了这些理论知识,再来看源码就很容易了。 请看compact()方法的源码 。
public ByteBuffer compact() {
    int pos = position();				// 2
    int lim = limit();						// 10
    assert (pos <= lim);
    int rem = (pos <= lim ? lim - pos : 0);		// 8
    System.arraycopy(hb, ix(pos), hb, ix(0), rem);
    position(rem);
    limit(capacity());
    discardMark();
    return this;
}
Netty的ByteBuf也采用了这个功能,并设计了内存池,内存池是由一定大小和数量的内存块的ByteBuf组成,这些内存块的大小默认为16MB ,当从Channel中读取数据时,无须每次都分配新的ByteBuf, 只需要从大的内存块中共享一份内存,并初始化其大小及独立维护读/写指针即可, Netty采用对象引用计数,需要手动回收,每复制一份ByteBuf或派生新的ByteBuf ,其引用值都需要增加。
AbstractByteBuf 源码解析
ByteBuf是Netty整个结构里面最为底层的模块,主要负责把数据从底层I/O读到ByteBuf,然后传递给应用程序,应用程序处理完之后,再把所有的数据封装成ByteBuf写回I/O,所以ByteBuf是直接与底层打交道的一层抽象,相对于Netty的其他模式来说,这部分是非常复杂的。
ByteBuf的基本结构
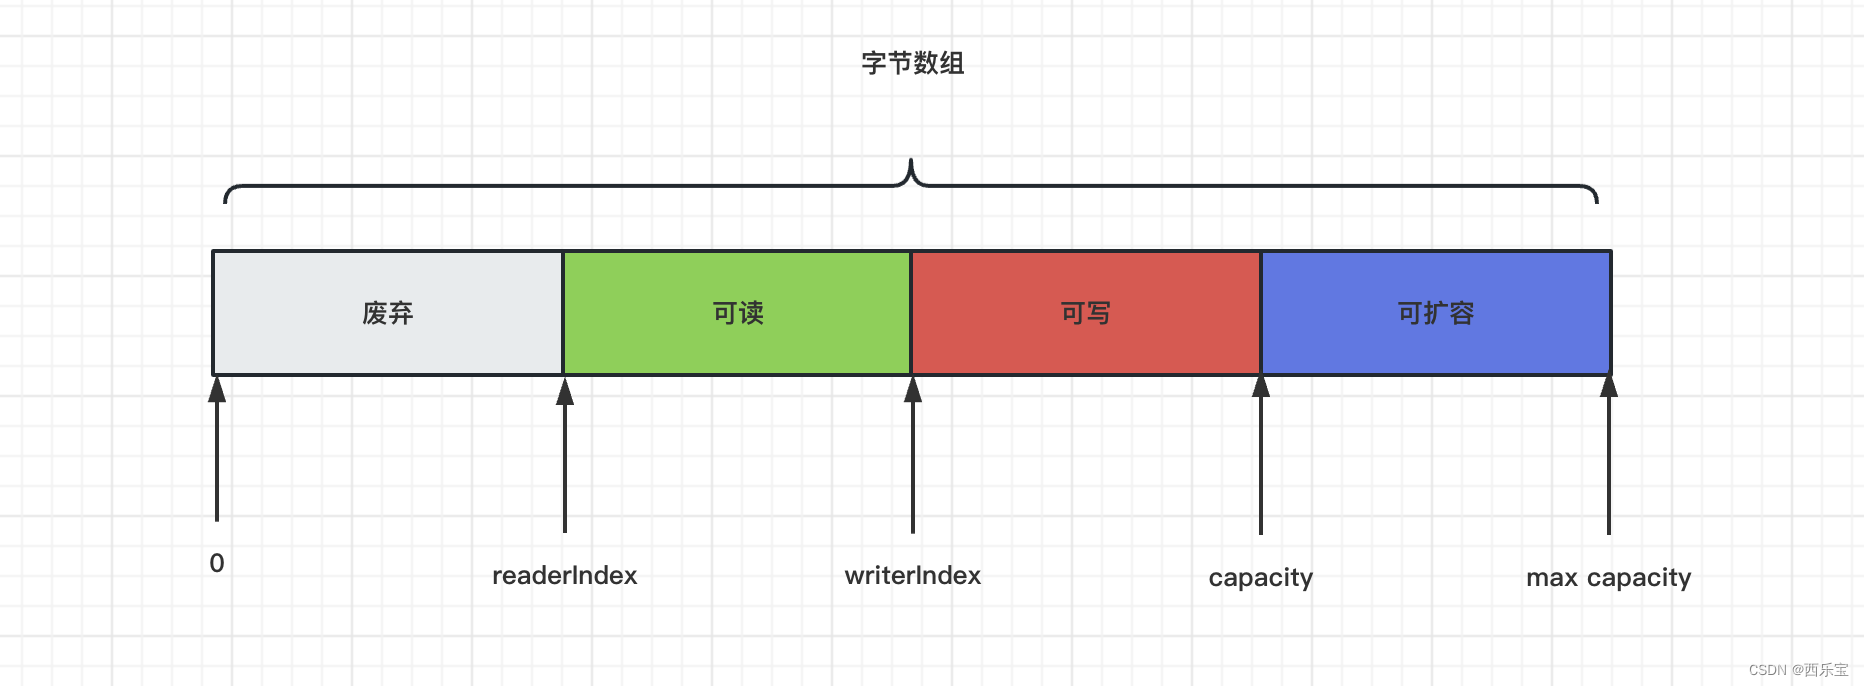
从上面的ByteBuf的结构来看,我们发现ByteBuf 有三个非常重要的指针,分别是readerIndex(记录读指针的开始位置 ),writerIndex(记录写指针的开始位置)和capacity(缓冲区的总长度 )。 三者的关系是reader<=writerIndex<=capacity。 从0到readerIndex为discardablebytes区域,表示无效的,从readerIndex 到writerIndex为readable bytes , 表示可读数据区,从writerIndex 到capacity 为writerable bytes ,表示这段区域空闲,可以往里写数据,除了这三个指针,ByteBuf里面其实还有一个指针maxCapacity ,它相当于ByteBuf 扩容的最大阈值,相应的代码如下 。
/**
 * Returns the maximum allowed capacity of this buffer. This value provides an upper
 * bound on {@link #capacity()}.
 * 表示ByteBuf 的最大能够容纳的最大字节数, 当向ByteBuf 中写数据的时候,如果发现容量不足,则进行扩容 , 直到扩容到maxCapacity设定的上限
 *
 * 最大容量限制(capacity的最大上限)
 */
public abstract int maxCapacity();
这个maxCapacity指针可以看作是指capacity之后的这段区间,当Netty发现writable bytes写数据超过空间大小时, ByteBuf 会提前自动扩容,扩容之后,就有了足够的空间来写数据,同时capacity也会同步更新,maxCapacity 就是扩容后capacity的最大值 。
ByteBuf的重要API
| 方法 | 解释 |
|---|---|
| readByte() | 从当前readerIndex指针开始往后读1 个字节的数据并移动readerIndex,将数据存储单位转化为Byte |
| readUnsignedByte() | 读取一个无符号的Byte数据 |
| readShort | 从当前readerIndex指针开始往后读2个字节数据并移动readerIndex,将数据类型转化为short |
| readInt | 从当前readerIndex指针开始往后读取4个字节的数据并移动readerIndex,将数据类型转化为int |
| readLong | 从当前readerIndex指针开始往后读取8个字节的数据并移动readerIndex,将数据类型转化为long |
| writeByte | 从当前writerIndex指针开始往后写1个字节的数据并移动writerIndex |
| setByte() | 将Byte数据写入到指定位置,不移动writerIndex |
| markReaderIndex() | 在读数据之前,将readerIndex的状态保存起来,方便在读完数据后将readerIndex复原 |
| resetReaderIndex() | 将readerIndex复原到调用markReaderIndex()之后的状态 |
| markWriterIndex() | 在写数据之前,将writerIndex的状态保存起来 , 方便在读完数据之后将writerIndex复原 |
| resetWriterIndex() | 将writerIndex复原到调用markWriterIndex()之后的状态 |
| readerableBytes() | 获取可读数据区的大小,相当于获取当前writerIndex减去readerIndex的值 |
| writableBytes() | 获取可写数据区的大小, 相当于获取当前capacity 关于writerIndex的值 |
| maxWritableBytes() | 获取最大可写数据区的大小, 相当于获取当前maxCapacity关于writerIndex的值 |
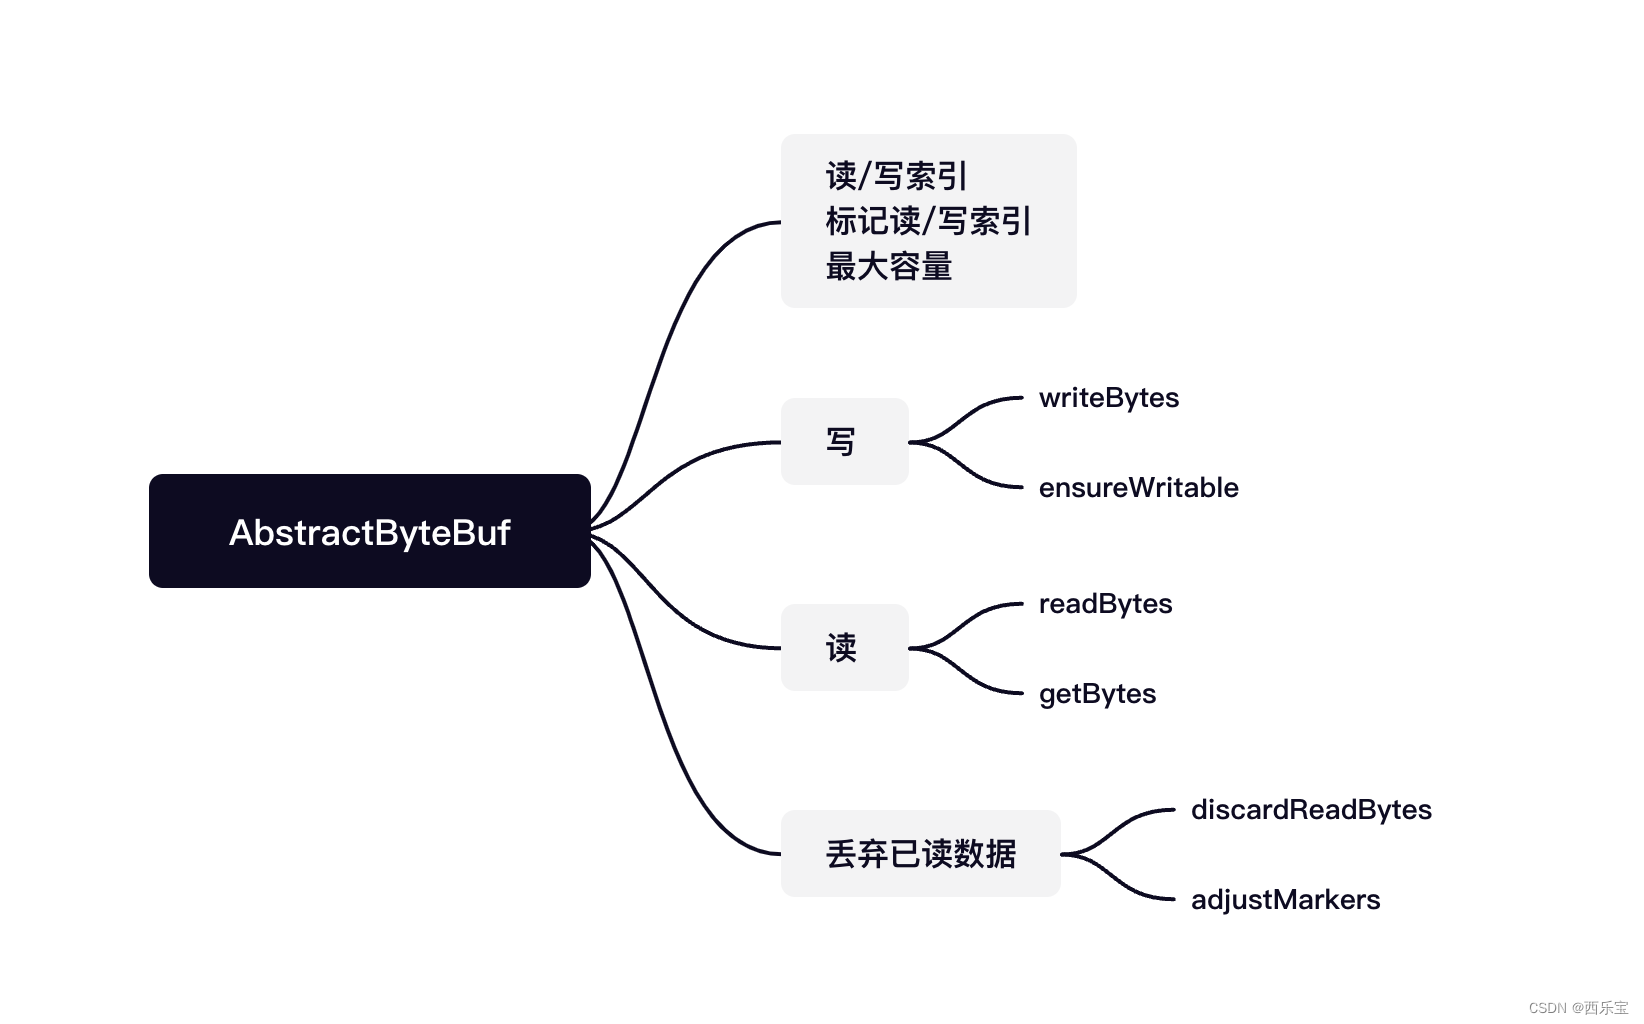
在Netty中,ByteBuf 的大部分功能都是在AbstractByteBuf中实现的。
AbstractByteBuf 是ByteBuf的子类, 它定义了一些公共的属性,如读索引,写索引,mark,最大容量等, AbstractByteBuf实现了一套读/写操作模板方法,其缓冲区真正的数据读/写由其子类完成,下图展示AbstractByteBuf的核心功能 。
int readerIndex;                //读索引
int writerIndex;                // 写索引
/**
 * 标记读索引
 * 解码时,由于消息不完整,无法处理
 * 需要将readerIndex复位
 * 此时需要先为索引做个标记
 */
private int markedReaderIndex;
// 标记写索引
private int markedWriterIndex;
// 最大容量
private int maxCapacity;
最重要的几个属性readerIndex,writerIndex, markedReaderIndex, markedWriterIndex, maxCapacity被定义在AbstractByteBuf抽象类中 。
public boolean isReadable() {
    return writerIndex > readerIndex;
}


public int writerIndex() {
    return writerIndex;
}


/**
 * 标记读索引
 * 解码时,由于消息不完整,无法处理
 * 需要将readerIndex复位
 * 此时需要先为索引做个标记
 *
 * 暂存的读指针
 */
private int markedReaderIndex;


public ByteBuf markWriterIndex() {
    markedWriterIndex = writerIndex;
    return this;
}


public int maxCapacity() {
    return maxCapacity;
}


public ByteBuf markReaderIndex() {
    markedReaderIndex = readerIndex;
    return this;
}


protected abstract void _setByte(int index, int value);

protected abstract byte _getByte(int index);
可以看到,上面的代码中readByte()和getByte()方法都调用了一个抽象的getByte()方法,这个方法在AbstractByteBuf的子类中实现, 在writeByte()方法中调用了一个抽象的setByte()方法,这个方法同样也在子类中实现。
Abstract有众多的子类 ,大到可以从三个维度来进行分类,分别如下 :
- Pooled:池化内存,就是预先从分配好的内存空间中提取一段连续的内存封装成一个ByteBuf,分给应用程序使用。
- Unsafe : 是JDK 底层的一个负责I/O操作的对象,可以直接获得对象的内存地址,基于内存地址进行读写操作。
- Direct : 堆外内存,直接调用JDK 的底层API 进行物理内存分配 , 不在JVM的堆内存中。需要手动释放 。
综上所示 , 其实ByteBuf 共会有六种组合 , Pooled(池化内存)和Unpooled(非池化内存),Unsafe和非Unsafe, Heap (堆内内存)和Direct(堆外内存),下图是ByteBuf最重要的继承关系类结构图, 通过命名就能一目了解 。
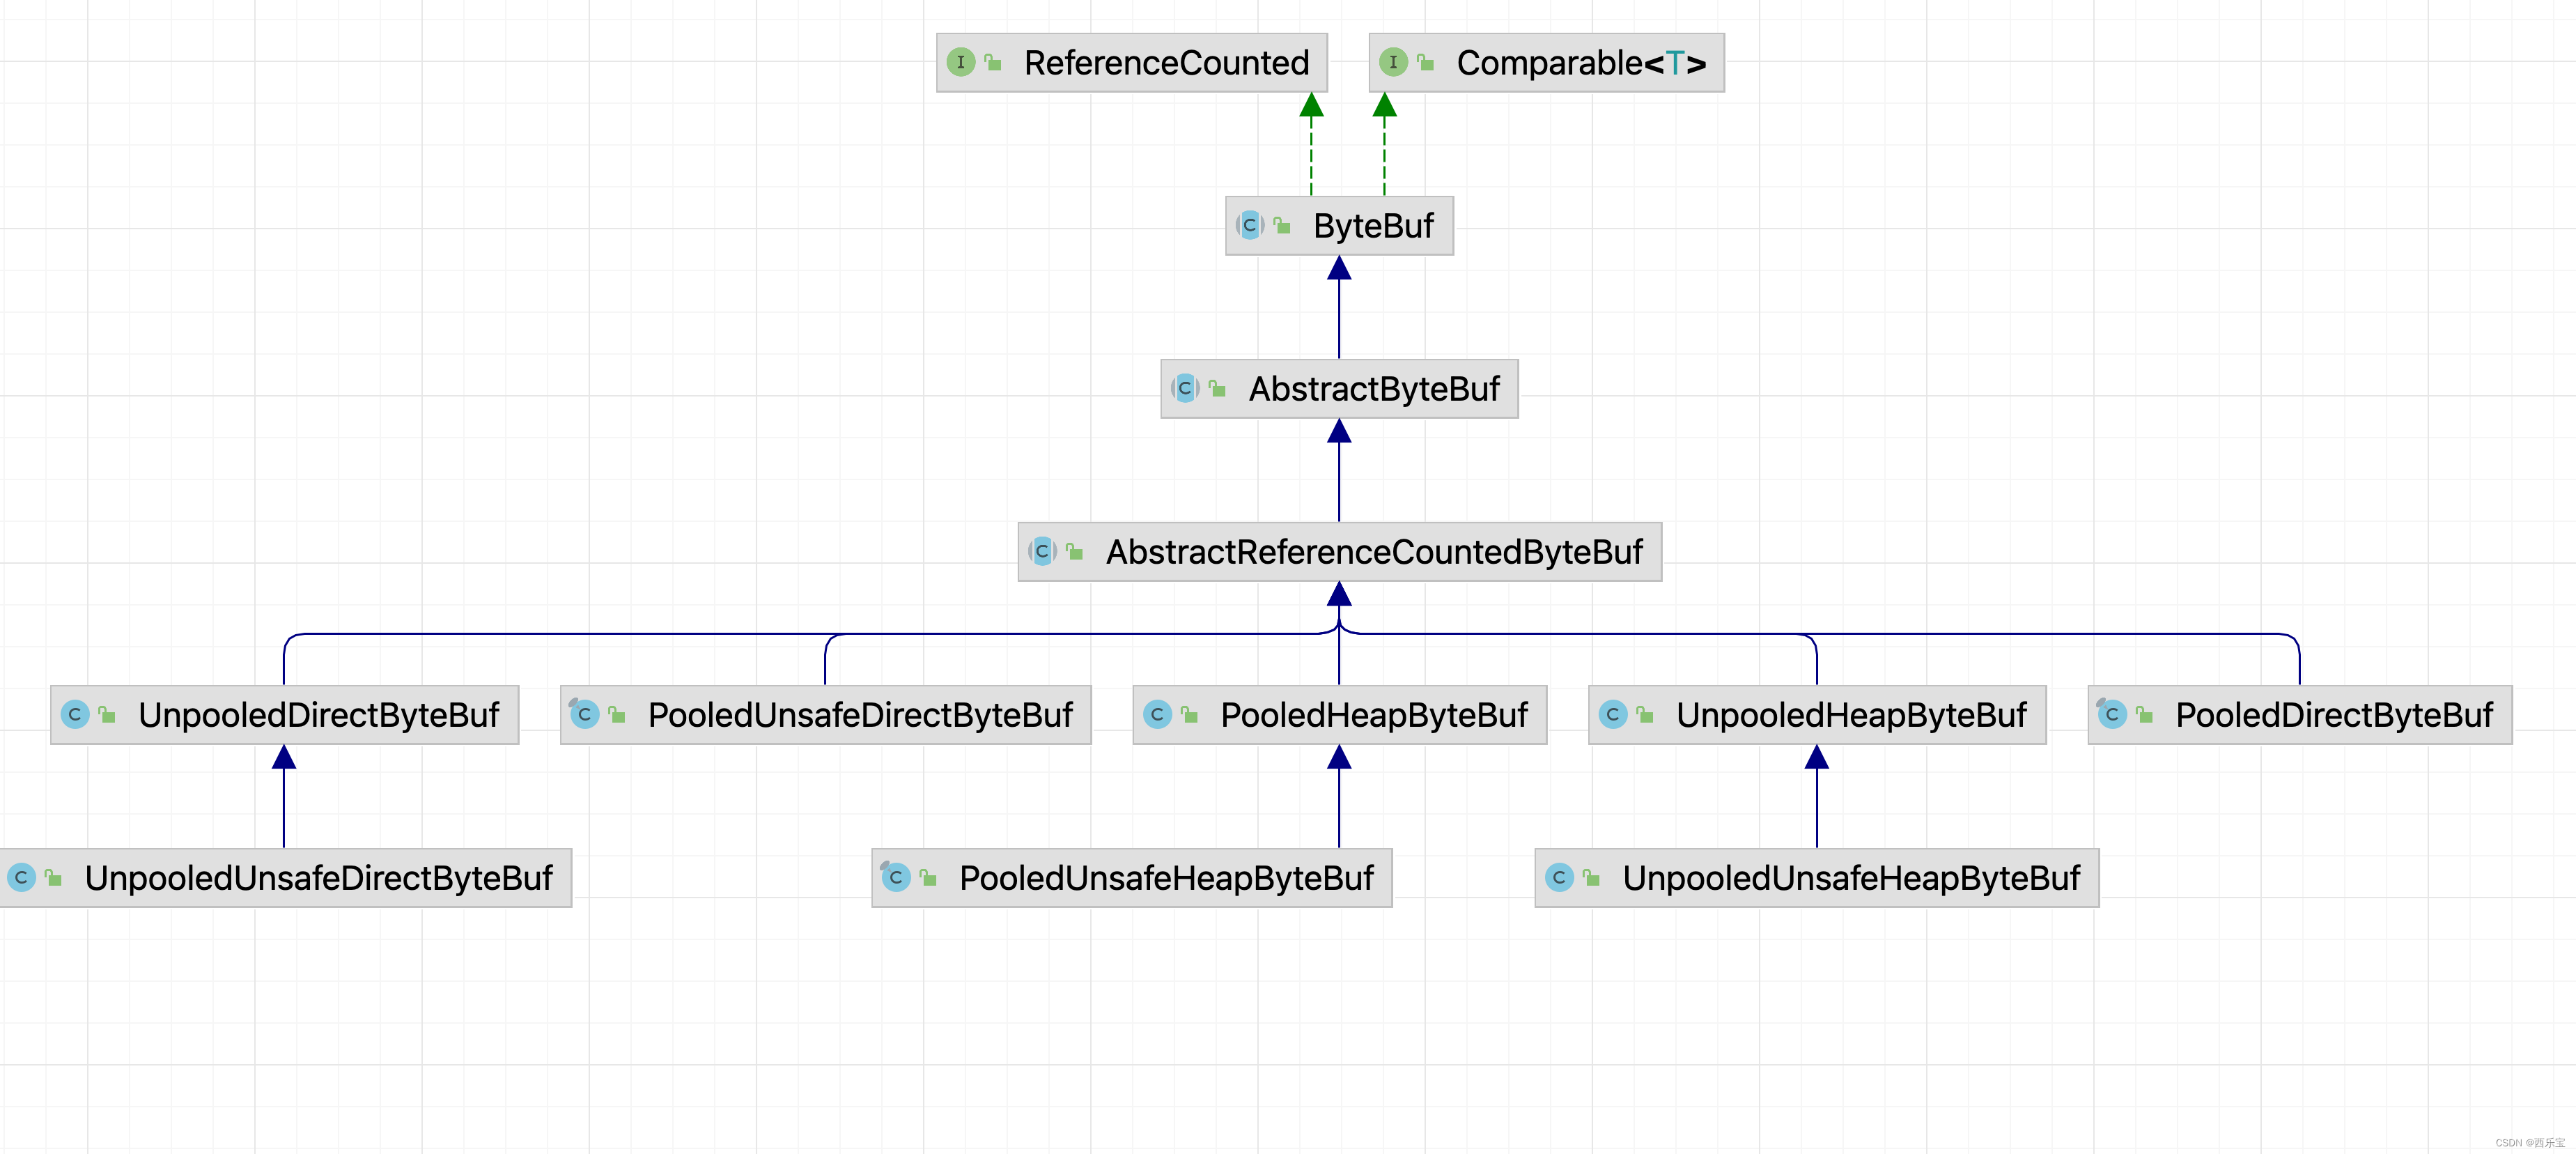
ByteBuf是最基本的读写API 操作在AbstractByteBuf中已经实现了,其众多的类采用不同的策略来分配内存空间,下表是对重要的几个例子的总结 。
| 类 | 解释 |
|---|---|
| PooledHeapByteBuf | 池化的堆内存缓冲区 |
| PooledUnsafeHeapByteBuf | 池化的Unsafe堆内缓冲区 |
| PooledDirectByteBuf | 池化的直接(堆外)缓冲区 |
| PooledUnsafeDirectByteBuf | 池化的Unsafe 直接 堆外缓冲区 |
| UnpooledHeapByteBuf | 非池化的堆内缓冲区 |
| UnpooledDirectByteBuf | 非池化的Unsafe堆内缓冲区 |
| UnpooledDirectByteBuf | 非池化的直接堆外缓冲区 |
| UnpooledUnsafeDirectByteBuf | 非池化的Unsafe直接堆外缓冲区 |
Netty中内存分配有一个顶层的抽象就是ByteBufAllocator,负责分配所有的ByteBuf类型的内存,功能其实不是很多, 主要有几个重要的API ,如下表所示 。
| 方法 | 解释 |
|---|---|
| buffer() | 分配一块内存,自动判断是否分配堆内内存或者堆外内存 |
| ioBuffer() | 尽可能地分配一块堆外直接内存, 如果系统不支持则分配堆内内存 |
| heapBuffer() | 分配一块堆内内存 |
| directBuffer() | 分配一块堆外内存 |
| compositeBuffer() | 组合分配,把多个ByteBuf 组合到一起变成一个整体 |
可能有小伙伴会疑问,以上的API 中为什么没有前面提到的8种类型的内存分配API , 下面来看看ByteBufAllocator的基本实现类AbstractByteBufAllocator ,重点分配主要的API的基本实现,比如Buffer()方法代码如下 :
public ByteBuf buffer() {
    if (directByDefault) {
        return directBuffer();
    }
    return heapBuffer();
}
我们发现buffer()方法中是否默认支持directBuffer做了判断,如果支持则分配directBuffer,否则分配heapBuffer。
有了这些理论知识之后,再来看一个例子,通过这个例子,来分析ByteBuf的源码,我觉得可能理解得更加深刻 。
public static void main(String[] args) {
    // 创建byteBuf 对象,该对象内部包含了一个字节数组byte[10]
    // 通过readerindex和writerIndex和capacity,将buffer分成三个区域
    // 已经读取的区域[0,readerindex]
    // 可读取的区域[readerindex,writerIndex]
    // 可写的区域[writerIndex, capacity)
    ByteBuf byteBuf = Unpooled.buffer(10);
    System.out.println("bytebuf = " + byteBuf);

    for(int i = 0 ;i < 8 ;i ++){
        byteBuf.writeByte(i);
    }

    System.out.println("bytebuf = " + byteBuf);


    for(int i = 0 ;i < 5 ;i ++){
        System.out.println(byteBuf.getByte(i));
    }
    System.out.println("bytebuf = " + byteBuf);

    for(int i = 0 ;i < 5 ;i ++){
        System.out.println(byteBuf.readByte());
    }
    System.out.println("bytebuf = " + byteBuf);

    // 用户 Unpooled工具类创建ByteBuf
    ByteBuf bytebuf2 = Unpooled.copiedBuffer("hello,zhsngsan", CharsetUtil.UTF_8);
    // 使用相关的方法
    if(bytebuf2.hasArray()){
        byte[] content = bytebuf2.array();
        // 将content 转成字符串
        System.out.println(new String(content, CharsetUtil.UTF_8));
        System.out.println("bytebuf = " + bytebuf2);
        System.out.println(bytebuf2.readerIndex());                     // 0
        System.out.println(bytebuf2.writerIndex());                     // 14
        System.out.println(bytebuf2.capacity());                            // 42

        System.out.println(bytebuf2.getByte(0)); // 获取数组0这个位置的字符h 的ascii码, h = 104
        int len = bytebuf2.readableBytes();             // 可读的字节数12
        System.out.println("len=" + len);


        // 使用for 取出各个字节
        for(int i = 0 ;i < len; i++){
            System.out.println((char)bytebuf2.getByte(i));
        }


        // 范围读取
        System.out.println(bytebuf2.getCharSequence(0,6,CharsetUtil.UTF_8));
        System.out.println(bytebuf2.getCharSequence(6,6,CharsetUtil.UTF_8));
    }
}
先来看buffer()方法 。
public static final UnpooledByteBufAllocator DEFAULT =
            new UnpooledByteBufAllocator(PlatformDependent.directBufferPreferred());
private static final ByteBufAllocator ALLOC = UnpooledByteBufAllocator.DEFAULT;

public static ByteBuf buffer(int initialCapacity) {
    return ALLOC.heapBuffer(initialCapacity);
}
因为ALLOC默认就是UnpooledByteBufAllocator,因此进入UnpooledByteBufAllocator的heapBuffer()方法 。
public ByteBuf heapBuffer(int initialCapacity) {
    return heapBuffer(initialCapacity, Integer.MAX_VALUE);
}

public ByteBuf heapBuffer(int initialCapacity, int maxCapacity) {
    if (initialCapacity == 0 && maxCapacity == 0) {
        return emptyBuf;
    }
    validate(initialCapacity, maxCapacity);
    return newHeapBuffer(initialCapacity, maxCapacity);
}

protected ByteBuf newHeapBuffer(int initialCapacity, int maxCapacity) {
    return PlatformDependent.hasUnsafe() ?
            new InstrumentedUnpooledUnsafeHeapByteBuf(this, initialCapacity, maxCapacity) :
            new InstrumentedUnpooledHeapByteBuf(this, initialCapacity, maxCapacity);
}
如果操作系统底层支持Unsafe那就采用Unsafe读写, 否则采用非Unsafe读写, 我们可以从UnpooledByteBufAllocator的源码中可以看出 。 因为我的是mac系统,肯定支持Unsafe,因此默认情况下会创建InstrumentedUnpooledUnsafeHeapByteBuf的Bytebuf 。
private static final class InstrumentedUnpooledUnsafeHeapByteBuf extends UnpooledUnsafeHeapByteBuf {
    InstrumentedUnpooledUnsafeHeapByteBuf(UnpooledByteBufAllocator alloc, int initialCapacity, int maxCapacity) {
        super(alloc, initialCapacity, maxCapacity);
    }

    @Override
    protected byte[] allocateArray(int initialCapacity) {
        byte[] bytes = super.allocateArray(initialCapacity);
        ((UnpooledByteBufAllocator) alloc()).incrementHeap(bytes.length);
        return bytes;
    }

    @Override
    protected void freeArray(byte[] array) {
        int length = array.length;
        super.freeArray(array);
        ((UnpooledByteBufAllocator) alloc()).decrementHeap(length);
    }
}
InstrumentedUnpooledUnsafeHeapByteBuf的构造方法中,也没有做其他事情,直接调用父类的构造方法 。
public UnpooledUnsafeHeapByteBuf(ByteBufAllocator alloc, int initialCapacity, int maxCapacity) {
    super(alloc, initialCapacity, maxCapacity);
}

public UnpooledHeapByteBuf(ByteBufAllocator alloc, int initialCapacity, int maxCapacity) {
	// 设置最大容量
    super(maxCapacity);
    checkNotNull(alloc, "alloc");
	// 如果初始化容量大于最大容量,抛出异常
    if (initialCapacity > maxCapacity) {
        throw new IllegalArgumentException(String.format(
                "initialCapacity(%d) > maxCapacity(%d)", initialCapacity, maxCapacity));
    }

    this.alloc = alloc;
    setArray(allocateArray(initialCapacity));
    // 设置读写索引为0
    setIndex(0, 0);
}

private void setArray(byte[] initialArray) {
	// 初始化数组
    array = initialArray;
    tmpNioBuf = null;
}

public ByteBuf setIndex(int readerIndex, int writerIndex) {
    if (checkBounds) {
    	// 检测 0 <= readerIndex <= writerIndex <=capacity
        checkIndexBounds(readerIndex, writerIndex, capacity());
    }
    setIndex0(readerIndex, writerIndex);
    return this;
}

final void setIndex0(int readerIndex, int writerIndex) {
    this.readerIndex = readerIndex;
    this.writerIndex = writerIndex;
}
InstrumentedUnpooledUnsafeHeapByteBuf最终调用了他的父类UnpooledUnsafeHeapByteBuf的allocateArray()方法 。
protected byte[] allocateArray(int initialCapacity) {
    return PlatformDependent.allocateUninitializedArray(initialCapacity);
}

int tryAllocateUninitializedArray =
                SystemPropertyUtil.getInt("io.netty.uninitializedArrayAllocationThreshold", 1024);
        UNINITIALIZED_ARRAY_ALLOCATION_THRESHOLD = javaVersion() >= 9 && PlatformDependent0.hasAllocateArrayMethod() ?
                tryAllocateUninitializedArray : -1;

public static byte[] allocateUninitializedArray(int size) {
    return UNINITIALIZED_ARRAY_ALLOCATION_THRESHOLD < 0 || UNINITIALIZED_ARRAY_ALLOCATION_THRESHOLD > size ?
    		// 如果JDK版本大于等于9时,并且hasAllocateArrayMethod()方法为true时,则使用allocateUninitializedArray()方法创建byte数组
    		// 否则直接new byte[size]数组
            new byte[size] : PlatformDependent0.allocateUninitializedArray(size);
}
从整个分析来看,创建InstrumentedUnpooledUnsafeHeapByteBuf对象,主要做了初始化byte[] 数组,读索引,写索引,设置了最大容量,接下来看其writeByte()方法源码 。
public ByteBuf writeByte(int value) {
	// 确保是可写的
    ensureWritable0(1);
    // _setByte()方法,由子类去具体实现
    _setByte(writerIndex++, value);
    return this;
}
final void ensureWritable0(int minWritableBytes) {
    // 获取ByteBuf对象的引用计数, 如果返回值为零,则说明该对象被销毁,会抛出异常
    ensureAccessible();
    // 若可写字节数大于 minWritableBytes,则无须扩容
    if (minWritableBytes <= writableBytes()) {
        return;
    }
    // 获取写索引
    final int writerIndex = writerIndex();
    /**
     *  checkBounds
     *  判断将要写入的字节数是否大于最大可写字节数(maxCapacity - writerIndex)
     *  如果大于则直接抛出异常, 否则继续执行
     */
    if (checkBounds) {
        if (minWritableBytes > maxCapacity - writerIndex) {
            throw new IndexOutOfBoundsException(String.format(
                    "writerIndex(%d) + minWritableBytes(%d) exceeds maxCapacity(%d): %s",
                    writerIndex, minWritableBytes, maxCapacity, this));
        }
    }

    // Normalize the current capacity to the power of 2.
    // 下面则是扩容的逻辑
    // 最小容量
    int minNewCapacity = writerIndex + minWritableBytes;
    // 计算自动扩容后的容量,需要满足最小容量,必须是2的幂数
    int newCapacity = alloc().calculateNewCapacity(minNewCapacity, maxCapacity);

    /**
     * maxFastWritableBytes 返回不用复制和重新分配内存的最快, 最大可写字节数,默认等于writeableBytes
     */
    int fastCapacity = writerIndex + maxFastWritableBytes();
    // 减少重新分配内存
    // Grow by a smaller amount if it will avoid reallocation
    if (newCapacity > fastCapacity && minNewCapacity <= fastCapacity) {
        newCapacity = fastCapacity;
    }
    // Adjust to the new capacity.
    // 由子类将容量调整到新容量值
    capacity(newCapacity);
}


protected final void ensureAccessible() {
    if (checkAccessible && !isAccessible()) {
        throw new IllegalReferenceCountException(0);
    }
}

boolean isAccessible() {
    // 引用是否大于 0
    return refCnt() != 0;
}

public int writableBytes() {
    return capacity() - writerIndex;
}
上述方法的逻辑还是很简单的,先看当前剩余容量是否能容纳新申请的容量,如果满足,则直接返回,如果不满足,则对数组进行扩容,那新数据的容量是多大呢? 请看calculateNewCapacity()方法,计算新数组容量 。
public int calculateNewCapacity(int minNewCapacity, int maxCapacity) {
// 检查minNewCapacity是否大于0
checkPositiveOrZero(minNewCapacity, "minNewCapacity");

if (minNewCapacity > maxCapacity) {
    throw new IllegalArgumentException(String.format(
            "minNewCapacity: %d (expected: not greater than maxCapacity(%d)",
            minNewCapacity, maxCapacity));
}
// 阀值为4MB ,CALCULATE_THRESHOLD的值默认为1048576 * 4
final int threshold = CALCULATE_THRESHOLD; // 4 MiB page

if (minNewCapacity == threshold) {
    return threshold;
}

// If over threshold, do not double but just increase by threshold.
// 当大于4MB时
if (minNewCapacity > threshold) {
    // 先获取离minNewCapacity最近的4MB 的整数倍值,且小于minNewCapacity
    int newCapacity = minNewCapacity / threshold * threshold;
    /**
     * 此处新的容量值不会倍增,因为4MB以上的内存比较大
     * 如果继续倍增,则可能带来额外的内存浪费
     * 只能在此基础上+4MB , 并判断是否大于maxCapacity
     * 若大于则返回maxCapacity
     * 否则返回newCapacity+threshold
     */
    if (newCapacity > maxCapacity - threshold) {
        newCapacity = maxCapacity;
    } else {
        newCapacity += threshold;
    }
    return newCapacity;
}
仔细看新内存大小的计算方法时,其实还是蛮简单的,如果计算内存的内存大小小于4MB时,每次以2的倍数递增,如果申请的内存大小大于4MB时,在每新的内存容量 = 旧的内存容量 + 4MB 。
关于capacity()的实现方法有很多。 我们以UnpooledHeapByteBuf为例对他的capacity()方法进行分析 。
public ByteBuf capacity(int newCapacity) {
    checkNewCapacity(newCapacity);

    int oldCapacity = array.length;
    byte[] oldArray = array;
    // 如果新数据的容量大于旧数据的容量
    if (newCapacity > oldCapacity) {
        byte[] newArray = allocateArray(newCapacity);
        // 直接进行数组拷贝即可
        System.arraycopy(oldArray, 0, newArray, 0, oldArray.length);
        // 替换数组
        setArray(newArray);
        // 释放旧数组的内存
        freeArray(oldArray);
    // 如果新数组的容量小于旧数组的容量
    } else if (newCapacity < oldCapacity) {
        byte[] newArray = allocateArray(newCapacity);
        int readerIndex = readerIndex();
        //  如果读索引小于新数组容量
        if (readerIndex < newCapacity) {
            int writerIndex = writerIndex();
            // 如果写索引大于新数组容量,则newCapacity ~  writerIndex 这一段的数据就会被丢弃掉
            if (writerIndex > newCapacity) {
                writerIndex(writerIndex = newCapacity);
            }
            System.arraycopy(oldArray, readerIndex, newArray, readerIndex, writerIndex - readerIndex);
        } else {
        	// 如果读索引大于新数组容量,则直接将读写索引设置为新数组容量大小即可
            setIndex(newCapacity, newCapacity);
        }
        setArray(newArray);
        freeArray(oldArray);
    }
    return this;
}
当然啦,接着看getByte()方法的内部实现。
public byte getByte(int index) {     // 获取此缓冲区中位于指定绝对索引处的字节
    checkIndex(index);
    return _getByte(index);
}

protected abstract byte _getByte(int index);
当然啦, _getByte()方法是一个抽象类,具体实现由子类决定,因此我们以UnpooledHeapByteBuf为例子,来看具体实现。
protected byte _getByte(int index) {
    return HeapByteBufUtil.getByte(array, index);
}
  而_getByte方法中,直接调用了工具类HeapByteBufUtil的getByte()方法,进入HeapByteBufUtil中来看具体的实现。

final class HeapByteBufUtil {

    static byte getByte(byte[] memory, int index) {
        return memory[index];
    }

    static short getShort(byte[] memory, int index) {
        return (short) (memory[index] << 8 | memory[index + 1] & 0xFF);
    }

    static short getShortLE(byte[] memory, int index) {
        return (short) (memory[index] & 0xff | memory[index + 1] << 8);
    }

    static int getUnsignedMedium(byte[] memory, int index) {
        return  (memory[index]     & 0xff) << 16 |
                (memory[index + 1] & 0xff) <<  8 |
                memory[index + 2] & 0xff;
    }

    static int getUnsignedMediumLE(byte[] memory, int index) {
        return  memory[index]     & 0xff         |
                (memory[index + 1] & 0xff) <<  8 |
                (memory[index + 2] & 0xff) << 16;
    }

    static int getInt(byte[] memory, int index) {
        return  (memory[index]     & 0xff) << 24 |
                (memory[index + 1] & 0xff) << 16 |
                (memory[index + 2] & 0xff) <<  8 |
                memory[index + 3] & 0xff;
    }

    static int getIntLE(byte[] memory, int index) {
        return  memory[index]      & 0xff        |
                (memory[index + 1] & 0xff) << 8  |
                (memory[index + 2] & 0xff) << 16 |
                (memory[index + 3] & 0xff) << 24;
    }

    static long getLong(byte[] memory, int index) {
        return  ((long) memory[index]     & 0xff) << 56 |
                ((long) memory[index + 1] & 0xff) << 48 |
                ((long) memory[index + 2] & 0xff) << 40 |
                ((long) memory[index + 3] & 0xff) << 32 |
                ((long) memory[index + 4] & 0xff) << 24 |
                ((long) memory[index + 5] & 0xff) << 16 |
                ((long) memory[index + 6] & 0xff) <<  8 |
                (long) memory[index + 7] & 0xff;
    }

    static long getLongLE(byte[] memory, int index) {
        return  (long) memory[index]      & 0xff        |
                ((long) memory[index + 1] & 0xff) <<  8 |
                ((long) memory[index + 2] & 0xff) << 16 |
                ((long) memory[index + 3] & 0xff) << 24 |
                ((long) memory[index + 4] & 0xff) << 32 |
                ((long) memory[index + 5] & 0xff) << 40 |
                ((long) memory[index + 6] & 0xff) << 48 |
                ((long) memory[index + 7] & 0xff) << 56;
    }

    static void setByte(byte[] memory, int index, int value) {
        memory[index] = (byte) value;
    }

    static void setShort(byte[] memory, int index, int value) {
        memory[index]     = (byte) (value >>> 8);
        memory[index + 1] = (byte) value;
    }

    static void setShortLE(byte[] memory, int index, int value) {
        memory[index]     = (byte) value;
        memory[index + 1] = (byte) (value >>> 8);
    }

    static void setMedium(byte[] memory, int index, int value) {
        memory[index]     = (byte) (value >>> 16);
        memory[index + 1] = (byte) (value >>> 8);
        memory[index + 2] = (byte) value;
    }

    static void setMediumLE(byte[] memory, int index, int value) {
        memory[index]     = (byte) value;
        memory[index + 1] = (byte) (value >>> 8);
        memory[index + 2] = (byte) (value >>> 16);
    }

    static void setInt(byte[] memory, int index, int value) {
        memory[index]     = (byte) (value >>> 24);
        memory[index + 1] = (byte) (value >>> 16);
        memory[index + 2] = (byte) (value >>> 8);
        memory[index + 3] = (byte) value;
    }

    static void setIntLE(byte[] memory, int index, int value) {
        memory[index]     = (byte) value;
        memory[index + 1] = (byte) (value >>> 8);
        memory[index + 2] = (byte) (value >>> 16);
        memory[index + 3] = (byte) (value >>> 24);
    }

    static void setLong(byte[] memory, int index, long value) {
        memory[index]     = (byte) (value >>> 56);
        memory[index + 1] = (byte) (value >>> 48);
        memory[index + 2] = (byte) (value >>> 40);
        memory[index + 3] = (byte) (value >>> 32);
        memory[index + 4] = (byte) (value >>> 24);
        memory[index + 5] = (byte) (value >>> 16);
        memory[index + 6] = (byte) (value >>> 8);
        memory[index + 7] = (byte) value;
    }

    static void setLongLE(byte[] memory, int index, long value) {
        memory[index]     = (byte) value;
        memory[index + 1] = (byte) (value >>> 8);
        memory[index + 2] = (byte) (value >>> 16);
        memory[index + 3] = (byte) (value >>> 24);
        memory[index + 4] = (byte) (value >>> 32);
        memory[index + 5] = (byte) (value >>> 40);
        memory[index + 6] = (byte) (value >>> 48);
        memory[index + 7] = (byte) (value >>> 56);
    }

    private HeapByteBufUtil() { }
}
在HeapByteBufUtil中还提供了很多的getShort(),getShortLE(),getInt(),getLong(),setByte(),setShort(),setInt(),setLong()等方法,看到源码后,是不是对此类方法已经有了清晰的认识了。
接着我们继续看上例中的readByte()方法具体实现。
public byte readByte() {
    checkReadableBytes0(1);
    int i = readerIndex;
    // 最终还是调用了之前分析的_getByte(i)方法
    byte b = _getByte(i);
    // 读索引加1
    readerIndex = i + 1;
    return b;
}
接下来看另一个方法readBytes()方法的源码解读如下 :
public ByteBuf readBytes(ByteBuf dst, int dstIndex, int length) {
    // 检测ByteBuf是否可读
    // 检测其可读长度是否小于length
    checkReadableBytes(length);
    // 数据的具体读取由子类实现 , readBytes()方法调用getBytes()方法从当前的读索引开始,将 length个字节复制到目标byte数组中。
    // 由于不同的子类对应不同的复 制操作,所以AbstractByteBuf类中的getBytes()方法是一个抽象方 法,留给子类来实现。
    getBytes(readerIndex, dst, dstIndex, length);
    // 修改读索引
    readerIndex += length;
    return this;
}


protected final void checkReadableBytes(int minimumReadableBytes) {
    checkPositiveOrZero(minimumReadableBytes, "minimumReadableBytes");
    checkReadableBytes0(minimumReadableBytes);
}
public static int checkPositiveOrZero(int i, String name) {
    if (i < 0) {
        throw new IllegalArgumentException(name + ": " + i + " (expected: >= 0)");
    }
    return i;
}
private void checkReadableBytes0(int minimumReadableBytes) {
	// 检查引用计数器是否为0 ,或者说是否被销毁
    ensureAccessible();
    if (checkBounds) {
        if (readerIndex > writerIndex - minimumReadableBytes) {
            throw new IndexOutOfBoundsException(String.format(
                    "readerIndex(%d) + length(%d) exceeds writerIndex(%d): %s",
                    readerIndex, minimumReadableBytes, writerIndex, this));
        }
    }
}
readBytes()方法调用getBytes()方法从当前的读索引开始,将length个字节复制到目标的byte数组中, 由于不同的子类对应的不同的复制操作,所以AbstractByteBuf类中的getBytes()方法是一个抽象方法,留给子类来实现,下面是一个具体的子类PooledHeapByteBuf对getBytes()方法的实现代码 。
public final ByteBuf getBytes(int index, byte[] dst, int dstIndex, int length) {
    // 先检查目标数组的存储空间是够用, 再检查byteBuf的可读内容是否足够
    checkDstIndex(index, length, dstIndex, dst.length);
    // 将ByteBuf中的内容读取到dst数组中
    System.arraycopy(memory, idx(index), dst, dstIndex, length);
    return this;
}
另一个子类PooledDirectByteBuf对getBytes()方法的实现代码如下 :
public ByteBuf getBytes(int index, byte[] dst, int dstIndex, int length) {
    // 检查
    checkDstIndex(index, length, dstIndex, dst.length);
    // 将NIO的ByteBuffer中的内容获取到dst数组中
    _internalNioBuffer(index, length, true).get(dst, dstIndex, length);
    return this;
}

final ByteBuffer _internalNioBuffer(int index, int length, boolean duplicate) {
    // 获取读索引
    index = idx(index);
    // 当duplicate为true时,在memory中创建共享此缓冲区内容的新的字节缓冲区
    // 当duplicate为false时,先从tmpNioBuf中获取,当tmpNioBuf 为空时
    // 再调用newInternalNioBuffer,此处与memory的类型有关,因此其具体实现由子类完成
    ByteBuffer buffer = duplicate ? newInternalNioBuffer(memory) : internalNioBuffer();
    // 设置新的缓冲区指针位置及limit
    buffer.limit(index + length).position(index);
    return buffer;
}

// 由具体的子类实现
protected abstract ByteBuffer newInternalNioBuffer(T memory);
在Netty中用得比较多的还是PooledByteBuf,那么PooledByteBuf的capacity()方法又是如何实现呢?
/**
 * 自动扩容
 * newCapacity : 新的容量值
 */
public final ByteBuf capacity(int newCapacity) {
    // 若新的容量值与长度相等,则无须扩容,直接返回即可
    if (newCapacity == length) {
        ensureAccessible();
        return this;
    }
    // 检查新的容量值是否大于最大允许容量
    checkNewCapacity(newCapacity);
    /**
     * 非内存池,在新容量值小于最大长度值的情况下,无须重新分配,只需要修改索引和数据长度即可
     */
    if (!chunk.unpooled) {
        // If the request capacity does not require reallocation, just update the length of the memory.
        /**
         * 新的容量值大于长度值
         * 在没有超过Buffer的最大可用长度值时,只需要把长度设为新的容量值即可,若超过了最大可用长度值,则只能重新分配
         */
        if (newCapacity > length) {
            if (newCapacity <= maxLength) {
                length = newCapacity;
                return this;
            }
            // 当新的容量值 小于 length
        } else if (newCapacity > maxLength >>> 1 &&
                (maxLength > 512 || newCapacity > maxLength - 16)) {
            // here newCapacity < length
            // 当新容量值小于最大可用长度值时,其读/写索引不能超过新容量值
            length = newCapacity;
            setIndex(Math.min(readerIndex(), newCapacity), Math.min(writerIndex(), newCapacity));
            return this;
        }
    }

    // Reallocation required.
    // 由Arena重新分配内存并释放旧的内存空间
    chunk.arena.reallocate(this, newCapacity, true);
    return this;
}
要看明白这个方法还是很难的,需要对之前的博客 Netty源码解析之内存管理-PooledByteBufAllocator-PoolArena 有一定理解才能看明白这个方法,但这里我可以将结论告诉你, 在Netty中PooledByteBuf,内存规格可以分为三个等级,tiny 为 16B 32B,48B,64B ~ 496B,他们之间相信的内存规格相差16B , small等级的内存规格为512B,1024B,2048B,4096B ,small的内存规格每一次扩容都是2的倍数,第三种 normal内存规格,为8K,16K,32K,也是2的倍数,则对于以上三种内存规格的chunk.unpooled 为false,那么Netty定义这些内存规格有什么用呢 ?假如用户申请了11B的内存空间,那么实际分配给用户的不是11B,而是16B,同理,如果用户申请了800B的内存,Netty分配给他的是1024B,如果想知道Netty为什么这么做,还是看之前的 Netty源码解析之内存管理-PooledByteBufAllocator-PoolArena 这篇博客,而在上述方法中有两个参数比较难, 一个是length,一个是maxLength,这两个值是什么含义呢?如果用户申请11B的内存,Netty分配给他的是16B 因此,length 的值就是11B,而maxLength的值为16B,此时再来看capacity()方法就简单了,我们反过来思考,什么情况下会导致 chunk.arena重新分配内存呢?
第一种情况,如果新分配的内存大于maxLength时,则需要重新分配内存,假如用户之前申请的是11B的内存,Netty分配给了它16B,此时用户需要20B的内存,这种情况,只能扩容。
第二种情况,假如用户之前申请了30B的内存,也就是length= 30 , 那么Netty的内存体系分配给了它32B,也就是maxLength为32B,如果此时调整新内存大小为15B,显然比 32>>>1 = 16还小,小了一个档次,此时依然会调用chunk.arena.reallocate(this, newCapacity, true);方法进行缩容处理。
有了上面的理论基础,再来看reallocate()方法,看其具体实现。
void reallocate(PooledByteBuf<T> buf, int newCapacity, boolean freeOldMemory) {
    if (newCapacity < 0 || newCapacity > buf.maxCapacity()) {
        throw new IllegalArgumentException("newCapacity: " + newCapacity);
    }

    int oldCapacity = buf.length;
    if (oldCapacity == newCapacity) {
        return;
    }

    PoolChunk<T> oldChunk = buf.chunk;
    ByteBuffer oldNioBuffer = buf.tmpNioBuf;
    long oldHandle = buf.handle;
    T oldMemory = buf.memory;
    int oldOffset = buf.offset;
    int oldMaxLength = buf.maxLength;
    int readerIndex = buf.readerIndex();
    int writerIndex = buf.writerIndex();

    allocate(parent.threadCache(), buf, newCapacity);
    if (newCapacity > oldCapacity) {
        memoryCopy(
                oldMemory, oldOffset,
                buf.memory, buf.offset, oldCapacity);
    } else if (newCapacity < oldCapacity) {
        if (readerIndex < newCapacity) {
            if (writerIndex > newCapacity) {
                writerIndex = newCapacity;
            }
            memoryCopy(
                    oldMemory, oldOffset + readerIndex,
                    buf.memory, buf.offset + readerIndex, writerIndex - readerIndex);
        } else {
            readerIndex = writerIndex = newCapacity;
        }
    }
    buf.setIndex(readerIndex, writerIndex);
    if (freeOldMemory) {
        free(oldChunk, oldNioBuffer, oldHandle, oldMaxLength, buf.cache);
    }
}
上述allocate(parent.threadCache(), buf, newCapacity);这一行代码,之前基本上用一整篇博客 Netty源码解析之内存管理-PooledByteBufAllocator-PoolArena 都是来分析这一行代码,这里就不再深入分析,但我们得出一个结论是什么呢? PooledByteBufAllocator- PoolArena他只是管理逻辑上的内存块,而物理存储还是PooledByteBuf,而之前在PoolArena的allocate()方法中传递了一个maxCapacity参数。
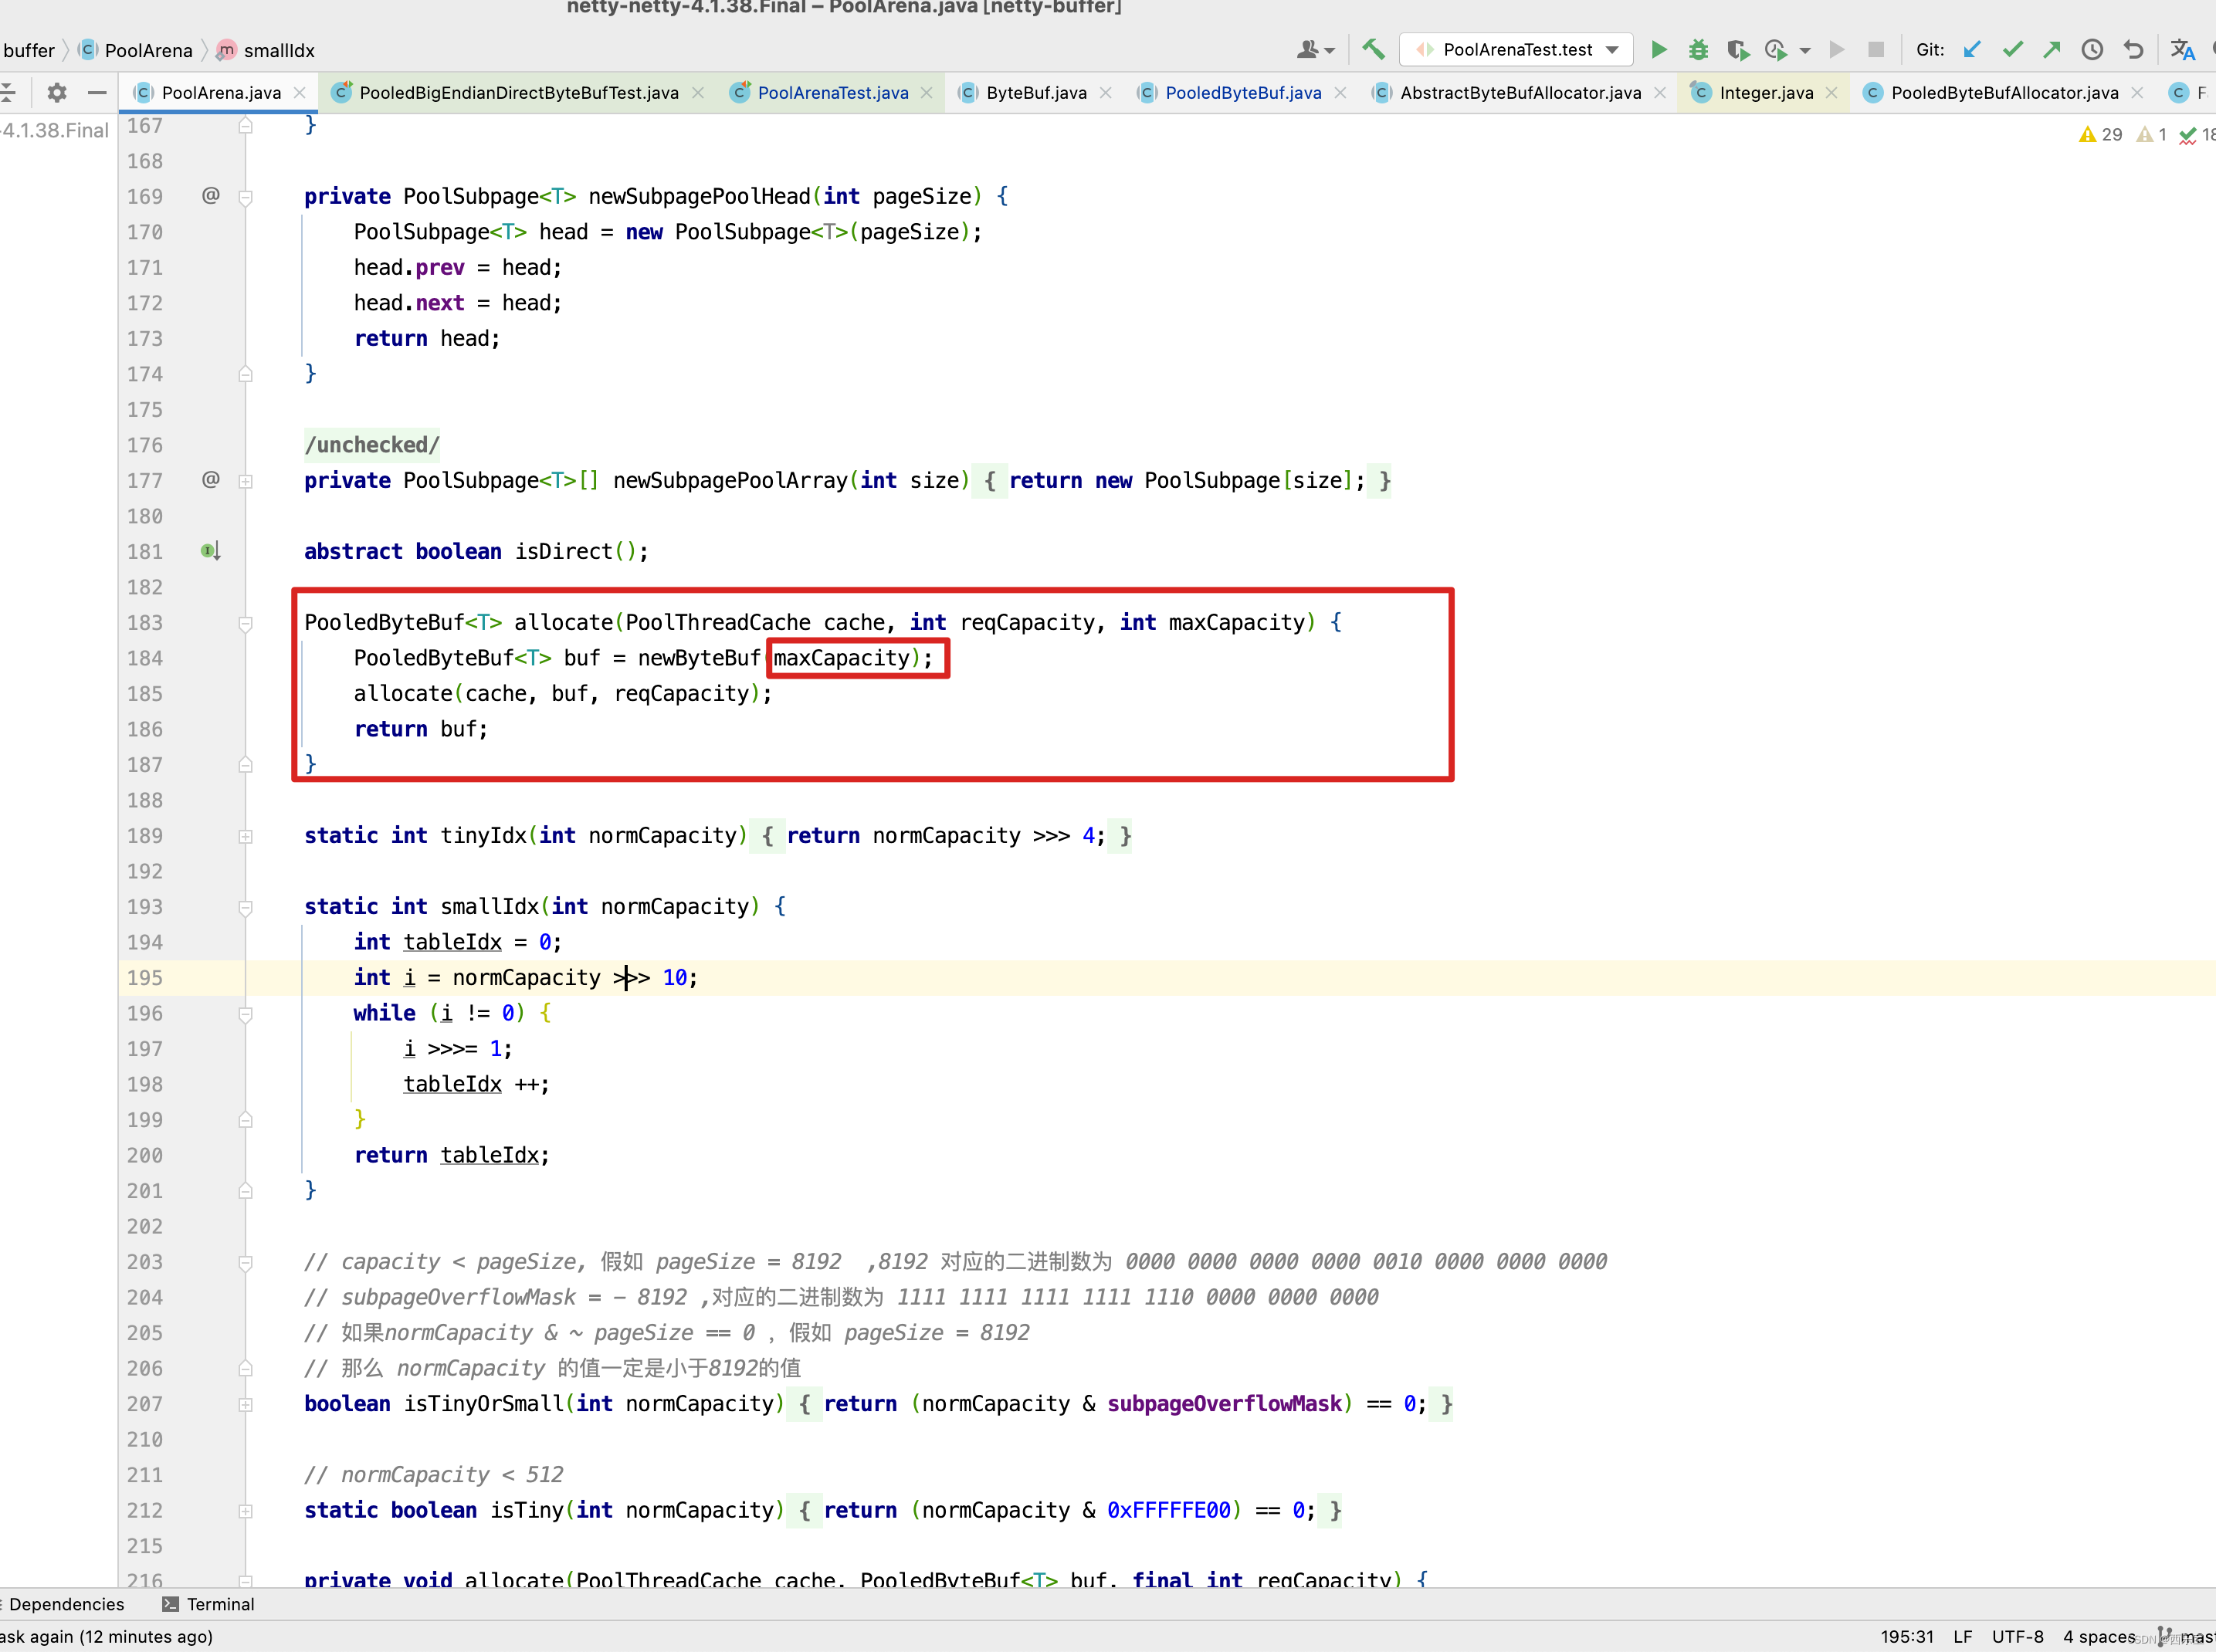
而这个参数的默认值为Integer.MAX_VALUE
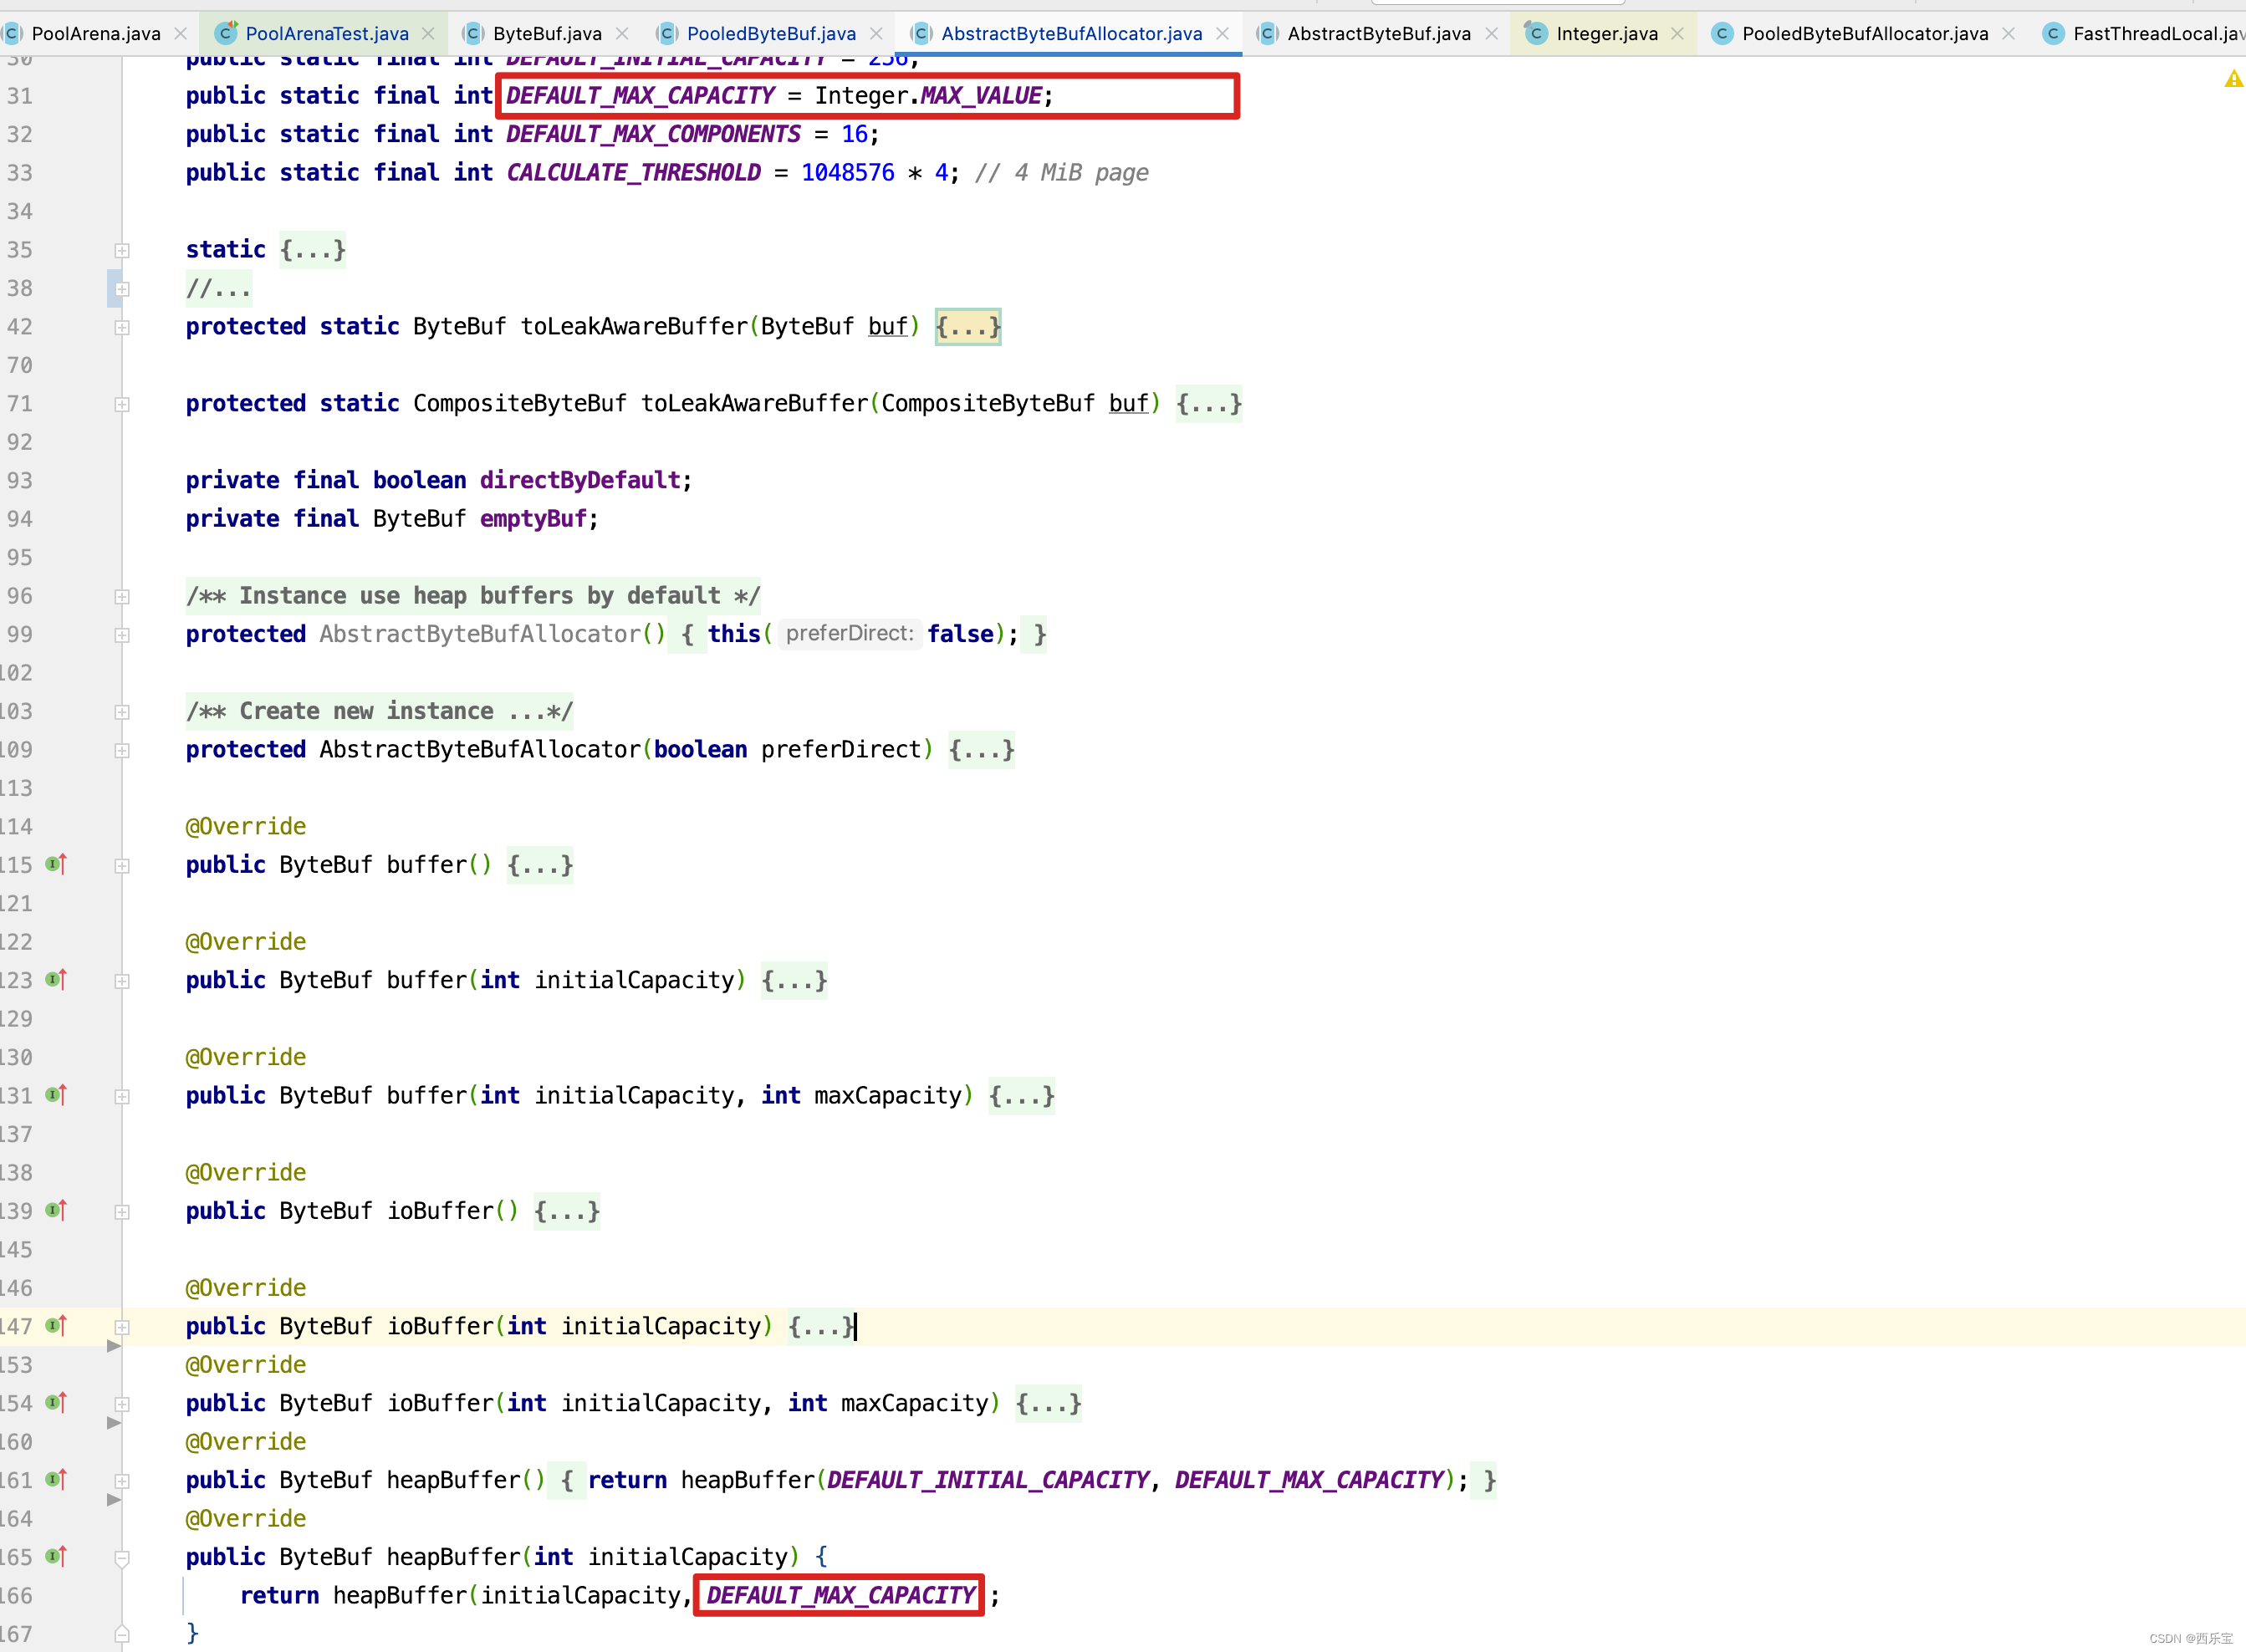
而DEFAULT_MAX_CAPACITY转化为Byte是2GB,也就是默认情况下PooledByteBuf可申请内存大小为2GB。而所有的内存分配,回收,扩容,缩容都是在PooledByteBuf上进行的。 以扩容为例,假如原来申请的内存是16B,此时需要扩容为32B,显然此时需要扩容,扩容就需要从PooledByteBuf中再申请得到一块内存块,此时会调用上面提到的allocate(parent.threadCache(), buf, newCapacity);方法,在allocate()方法中,申请得到内存块的方式有两种,第一种PoolThreadCache中的tinySubPageHeapCaches或tinySubPageDirectCaches的MemoryRegionCache队列中poll()方式得到,假如PoolThreadCache中内存规格为32B的MemoryRegionCache队列为空,此时需要向PoolArena的tinySubpagePools数组中找一个内存规格为32B的PoolSubpage,并从中找到一块并没有分配内存的内存块,如果依然没有找到,则需要创建一个PoolChunk,然后从这个PoolChunk中划分出一个PoolSubpage,而PoolSubpage的默认大小为8K,因此可以划分出256个32B的内存块,此时就可以从PoolSubpage中分配一个内存块来进行扩容,刚刚从PoolChunk中申请的PoolSubpage将被追加到PoolArena的tinySubpagePools 的内存规格为32B的PoolSubpage链表中。 而刚刚创建PoolChunk会被添加到qInit的链表中 。
这些知识都是在之前的博客 Netty源码解析之内存管理-PooledByteBufAllocator-PoolArena 分析过,这里只是作一个大概的分析,不管是如何得到新的内存块,最终效果图如下 。

从新从PooledByteBuf中得到了一块内存块,接下来的操作就简单了,无非将旧内存块中的数据复制到新申请的内存块中,并且将旧内存块给销毁掉即可。
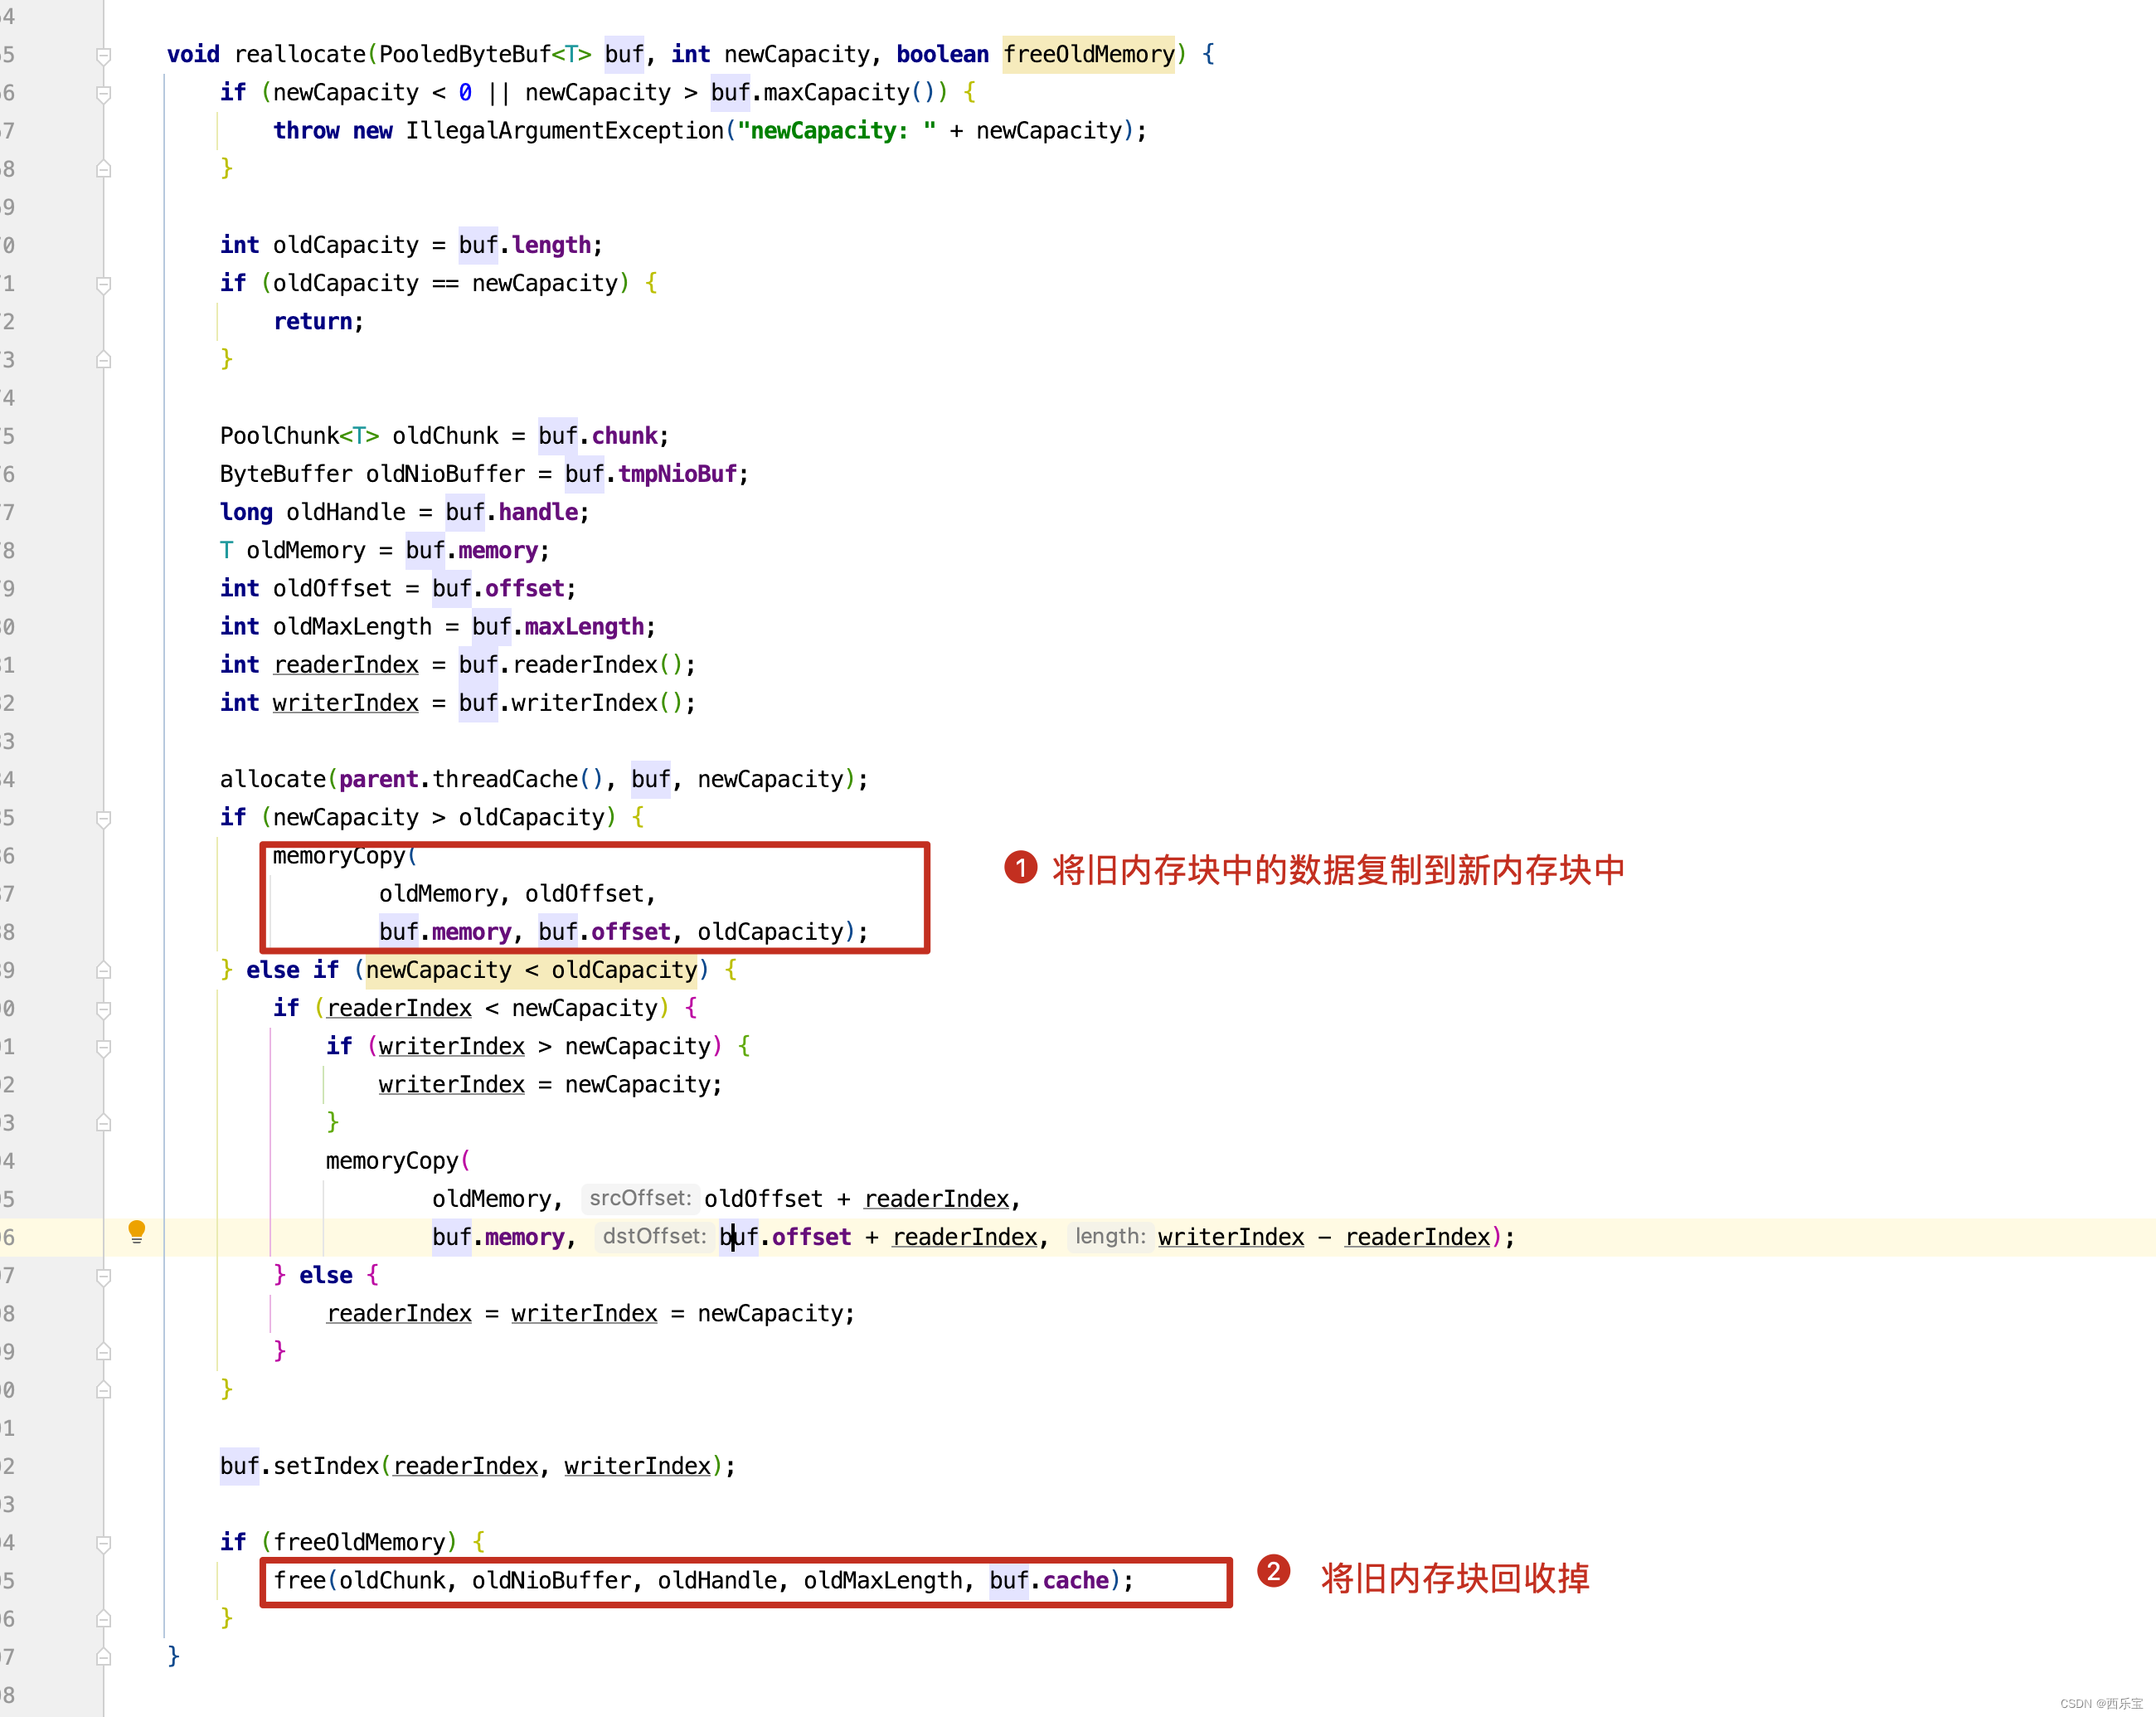
代码看到这里我们是不是就明白了PooledByteBufAllocator-PoolArena和ByteBuf的关系,PooledByteBufAllocator-PoolArena就像操作系统一样,帮我们管理,分配内存,而ByteBuf就像具体的内存块,实际存放数据的地方。因此再看ByteBuf提供的一系列方法就很明白了,像readerIndex(),writerIndex(),capacity(), alloc() 方法,无非就提供了操作内存块的api,而真正如何分配和释放内存由PooledByteBufAllocator-PoolArena决定,而ByteBuf又有众多的实现类,可以根据不同的操作系统,java版本,以及开发者的配置来决定使用哪种类型的ByteBuf,所以ByteBuf提供了对底层内存操作的抽象,PooledByteBufAllocator-PoolArena在操作底层内存时,不需要关心到底是Heap还是Direct,是Unsafe还是Safe的,只需要调用相应的reader(),writer()方法即可,读到这里,我觉得Netty的代码还是写得非常好的。 不知道大家感同深受没有。
接下来再来看一个有意思的方法discardReadBytes()
public ByteBuf discardReadBytes() {
    ensureAccessible();
    if (readerIndex == 0) {
        return this;
    }

    if (readerIndex != writerIndex) {
        setBytes(0, this, readerIndex, writerIndex - readerIndex);
        writerIndex -= readerIndex;
        adjustMarkers(readerIndex);
        readerIndex = 0;
    } else {
        adjustMarkers(readerIndex);
        writerIndex = readerIndex = 0;
    }
    return this;
}
setBytes()方法主要做什么事情呢? 如果ByteBuf是array,则会调用System.arraycopy(src, srcIndex, memory, idx(index), length);方法对数组进行复制。 看个例子。
public class NettyByteBuf2 {

    public static void main(String[] args) {
        ByteBuf byteBuf = Unpooled.buffer(10);
        System.out.println("bytebuf = " + byteBuf);

        for (int i = 0; i < 8; i++) {
            byteBuf.writeByte(i);
            if (i == 7 ) {
                byteBuf.markWriterIndex();
            }
        }
        for (int i = 0; i < 5; i++) {
            System.out.println(byteBuf.readByte());
            if( i == 2 ){
                byteBuf.markReaderIndex();
            }
        }
        System.out.println("readerIndex = " + byteBuf.readerIndex());
        System.out.println("writerIndex="+byteBuf.writerIndex());
        byteBuf.discardReadBytes();
        System.out.println("bytebuf = " + byteBuf);
    }
}
创建一个ByteBuf,先向数组中写入8个元素,此时ByteBuf数组数据为 [0, 1, 2, 3, 4, 5, 6, 7, 0, 0] ,再读取5个元素,此时readerIndex为5,writerIndex为8 。 再调用discardReadBytes()方法,discardReadBytes()方法会覆盖掉已经读取过的数据,此时ByteBuf中的数据为[5, 6, 7, 3, 4, 5, 6, 7, 0, 0],而readerIndex = 0 , writerIndex = 3,而array[3]之后的数据3,4,5,6,7随时可能被覆盖掉。
// 当对缓存进行读操作,由于某种原因,可能需要对之前的操作进行回滚。ByteBuf提供了:
// a,markReaderIndex:将当前的readerIndex备份到markedReaderIndex中;
// b,resetReaderIndex:将当前的readerIndex设置为markedReaderIndex;
// c,markWriterIndex:将当前的writerIndex备份到markedWriterIndex;
// d,resetWriterIndex:将当前的writerIndex设置为markedWriterIndex。
protected final void adjustMarkers(int decrement) {
    int markedReaderIndex = this.markedReaderIndex;
    if (markedReaderIndex <= decrement) {
        this.markedReaderIndex = 0;
        int markedWriterIndex = this.markedWriterIndex;
        if (markedWriterIndex <= decrement) {
            this.markedWriterIndex = 0;
        } else {
            this.markedWriterIndex = markedWriterIndex - decrement;
        }
    } else {
        this.markedReaderIndex = markedReaderIndex - decrement;
        markedWriterIndex -= decrement;
    }
}
从上述例子中,会发现,在reader()或writer()过程中, 可能有回滚的需求,因此会调用markWriterIndex()和markReaderIndex()方法,标记当前读写的位置,在后续读写过程中可能会回滚到之前读写的位置,但调用discardReadBytes()方法后,会抛弃掉已经读取的字节,这里就需要考虑之前markReaderIndex和markWriterIndex的位置,如果之前markReaderIndex和markWriterIndex的位置比此时readerIndex的位置小,因为调用discardReadBytes()方法后,已经读取过的字节将被覆盖掉,markReaderIndex和markWriterIndex的记录回滚的位置将无意义,因此直接将markReaderIndex和markWriterIndex设置为0即可,如果markReaderIndex和markWriterIndex 比当前readerIndex的位置大的话,因为discardReadBytes()方法不会覆盖未读取过的数据,因此markReaderIndex和markWriterIndex 是有意义的,只需要将markReaderIndex和markWriterIndex平移到指定位置即可。因此得出一个结论,只要markReaderIndex和markWriterIndex 记录的位置是未被读取的,markReaderIndex和markWriterIndex的记录是有效的,只需要将markReaderIndex和markWriterIndex平移readerIndex长度即可,如果markReaderIndex和markWriterIndex记录的位置已经被读取过了,调用discardReadBytes()方法后,markReaderIndex和markWriterIndex记录的位置将毫无意义,只需要将markReaderIndex和markWriterIndex清零即可。
AbstractReferenceCountedByteBuf源码解析
Netty在进行I/O读写时使用了堆外直接内存,实现了零拷贝,堆外直接内存Direct Buffer的分配与回收率要远远低于JVM堆内存上对象的创建与回收速率,Netty使用引用计数法来管理Buffer的引用与释放,Netty采用了内存池设计,先分配一块大内存,然后不断的重复利用这一块内存,例如,当从SocketChannel中读取数据时,先在大内存块中切一小部分来使用,由于与大内存块共享缓存区,所以需要增加大内存的引用值,当用完小内存块后,再将其放回到大内存块中,同时减少其引用值 。
运用到引用计数法的ByteBuf大部分都需要继承AbstractReferenceCountedByteBuf类,该类有个引用值属性refCnt,其功能大部分与此属性有关 。
由于ByteBuf的操作可能存在多线程并发使用的情况,其refCnt属性的操作必须是线程安全的,因此采用volatile来修饰,以保证其多线程可见,在Netty中,ByteBuf会被大量的创建,为了节省内存开销,通过AtomicIntegerFieldUpdater来更新refCnt的值,而没有采用AtomicInteger类型,因为AtomicInteger类型创建对象比int类型多占用16B的对象头,当有几十万或几百万ByteBuf对象时,节约的内存可能就是几十MB或几百MB 。
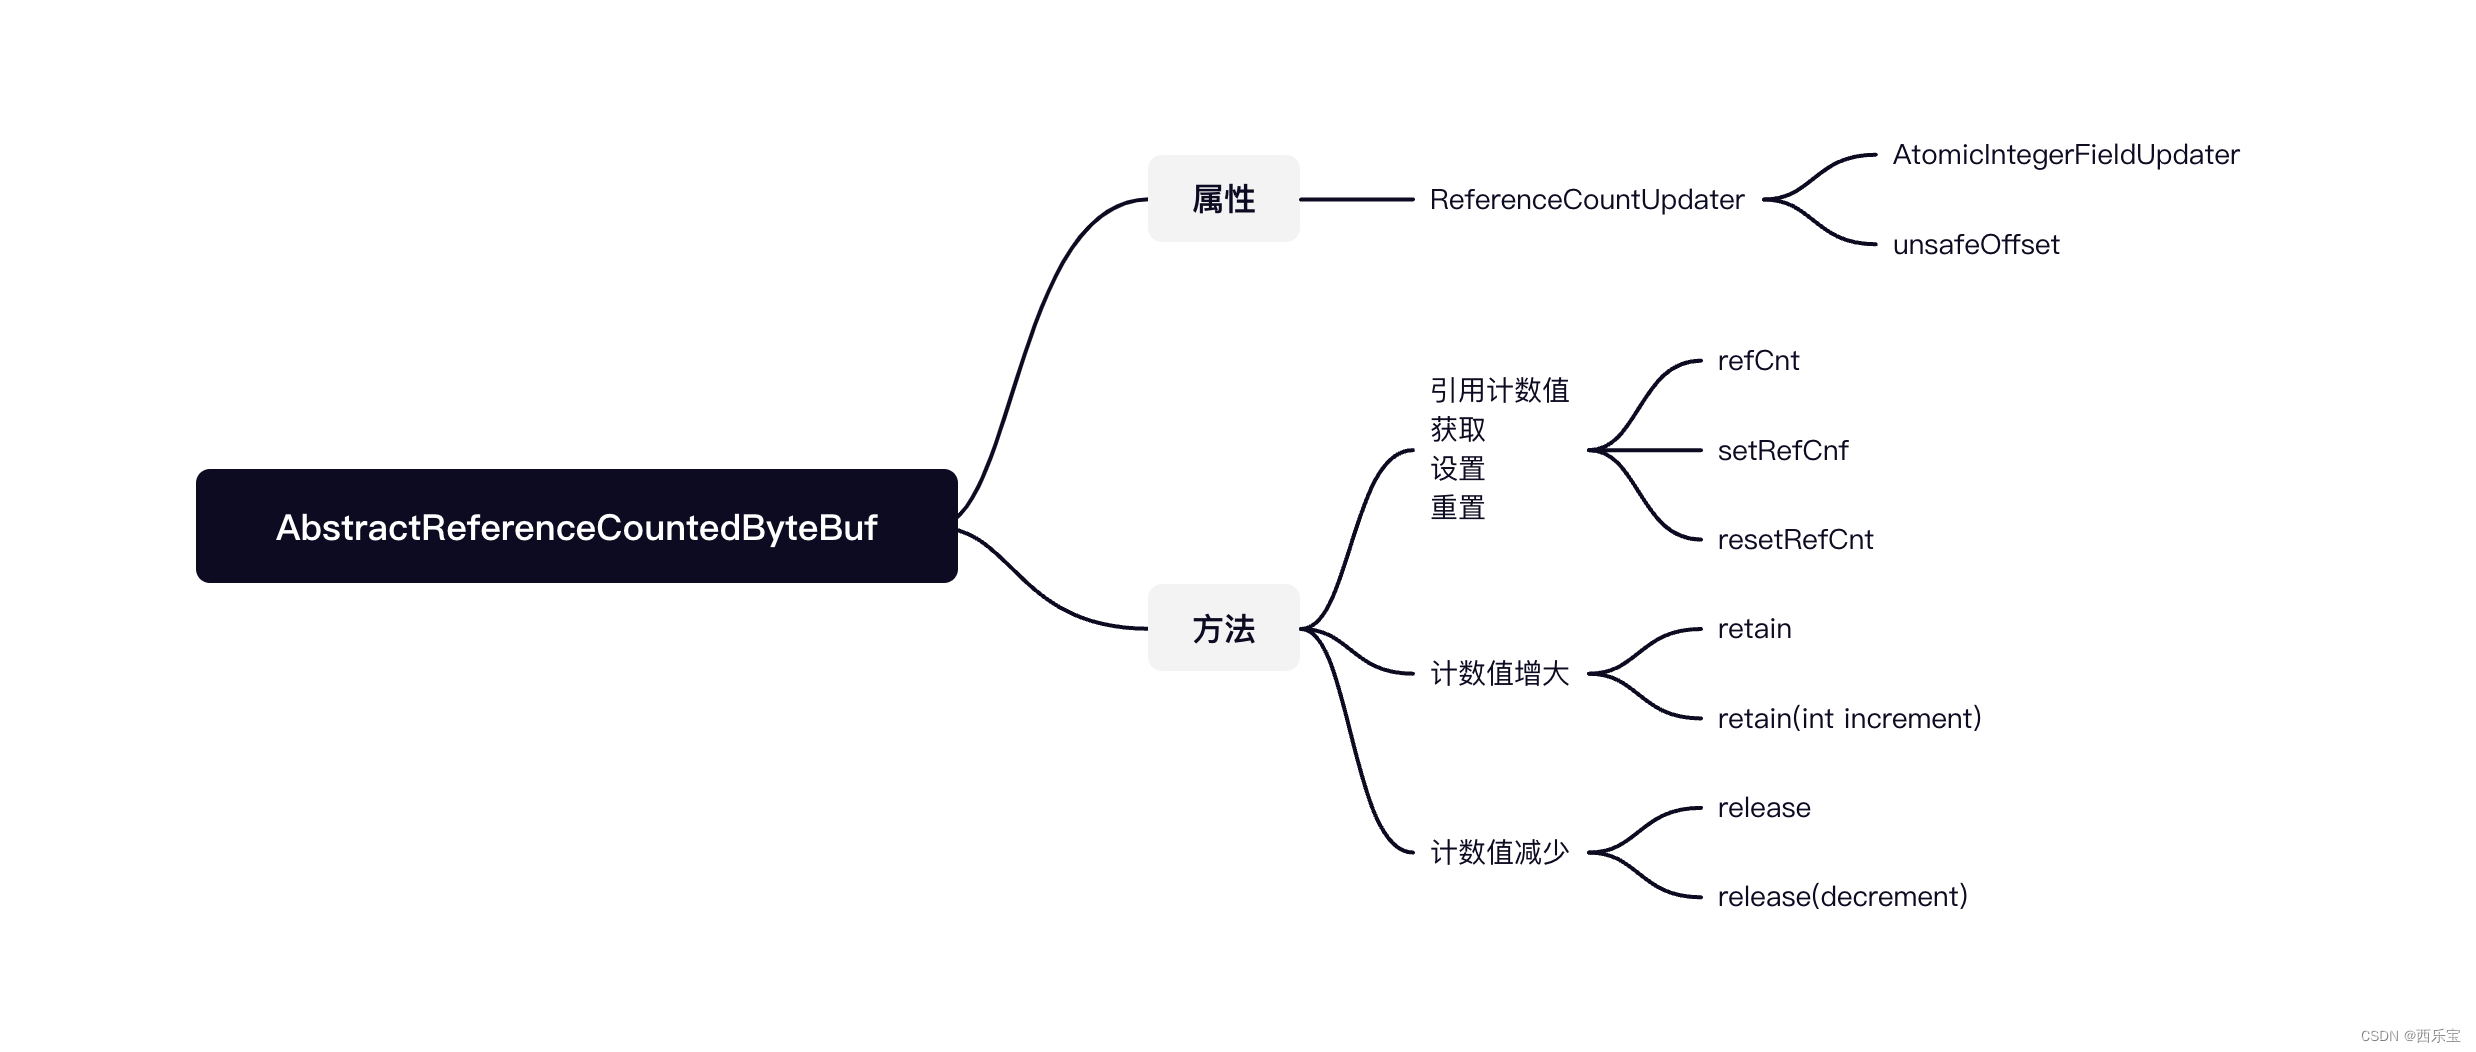
public abstract class AbstractReferenceCountedByteBuf extends AbstractByteBuf {
    /**
     * 调用Unsafe类的objectFieldOffset()方法
     * 以获取某个字段相对于Java对象的起始地址的偏移量
     * Netty为了提升性能,构建Unsafe 对象
     * 采用此偏移量访问ByteBuf 的refCnt字段
     * 并未直接使用AtomicIntegerFieldUpdater来操作
     *
     */
    private static final long REFCNT_FIELD_OFFSET =
            ReferenceCountUpdater.getUnsafeOffset(AbstractReferenceCountedByteBuf.class, "refCnt");

    /**
     *  AtomicIntegerFieldUpdater 属性委托给ReferenceCountUpdater来管理
     *  主要用于更新和获取efCnt的值
     */
    private static final AtomicIntegerFieldUpdater<AbstractReferenceCountedByteBuf> AIF_UPDATER =
            AtomicIntegerFieldUpdater.newUpdater(AbstractReferenceCountedByteBuf.class, "refCnt");


    // 引用计数值的实际管理者
    private static final ReferenceCountUpdater<AbstractReferenceCountedByteBuf> updater =
            new ReferenceCountUpdater<AbstractReferenceCountedByteBuf>() {
        @Override
        protected AtomicIntegerFieldUpdater<AbstractReferenceCountedByteBuf> updater() {
            return AIF_UPDATER;
        }
        @Override
        protected long unsafeOffset() {
            return REFCNT_FIELD_OFFSET;
        }
    };

    // Value might not equal "real" reference count, all access should be via the updater
    //运 用 到 引 用 计 数 法 的 ByteBuf 大 部 分 都 需 要 继 承 AbstractReferenceCountedByteBuf 类 。

    // refCntUpdater 是修改retCnt字段的原子更新器,而refCnt是存储引用计数的字段,注意,当ByteBuf 的引用数为refCnt/2
    // 因此当refCnt等于1时,引用数为0

    @SuppressWarnings("unused")
    private volatile int refCnt = updater.initialValue();

    protected AbstractReferenceCountedByteBuf(int maxCapacity) {
        super(maxCapacity);
    }

    @Override
    boolean isAccessible() {
        // Try to do non-volatile read for performance as the ensureAccessible() is racy anyway and only provide
        // a best-effort guard.
        return updater.isLiveNonVolatile(this);
    }

    @Override
    public int refCnt() {
        return updater.refCnt(this);
    }

    /**
     * An unsafe operation intended for use by a subclass that sets the reference count of the buffer directly
     */
    protected final void setRefCnt(int refCnt) {
        updater.setRefCnt(this, refCnt);
    }

    /**
     * An unsafe operation intended for use by a subclass that resets the reference count of the buffer to 1
     */
    protected final void resetRefCnt() {
        updater.resetRefCnt(this);
    }

    @Override
    public ByteBuf retain() {
        return updater.retain(this);
    }

    @Override
    public ByteBuf retain(int increment) {
        return updater.retain(this, increment);
    }

    @Override
    public ByteBuf touch() {
        return this;
    }

    @Override
    public ByteBuf touch(Object hint) {
        return this;
    }

    @Override
    public boolean release() {
        return handleRelease(updater.release(this));
    }

    @Override
    public boolean release(int decrement) {
        return handleRelease(updater.release(this, decrement));
    }

    private boolean handleRelease(boolean result) {
        if (result) {
            deallocate();
        }
        return result;
    }

    /**
     * Called once {@link #refCnt()} is equals 0.
     */
    protected abstract void deallocate();
}
ReferenceCountUpdater源码解析
ReferenceCountUpdater是AbstractReferenceCountedByteBuf的辅助类,用于完成对引用计数值的具体操作。 虽然它的功能基本上都与引用计数有关,但与Netty之前的版本相比有很大的改动,主要是Netty v4.1.38.Final版本采用了乐观锁的方式来修改refCnt,并在修改后进行较验,例如,retain()方法增加了refCnt后,如果出现了溢出,则回滚并抛出异常,在旧版本中,采用的是原子性的操作,不断的提前判断,并偿试调用compareAndSet,与之相比,新版本的吞吐量有所提高,但若还是采用refCnt的原有方式,从1开始每次加1或减1,则会引发一些问题,需要重新设计,这也是新版本改动较大的主要原因 。
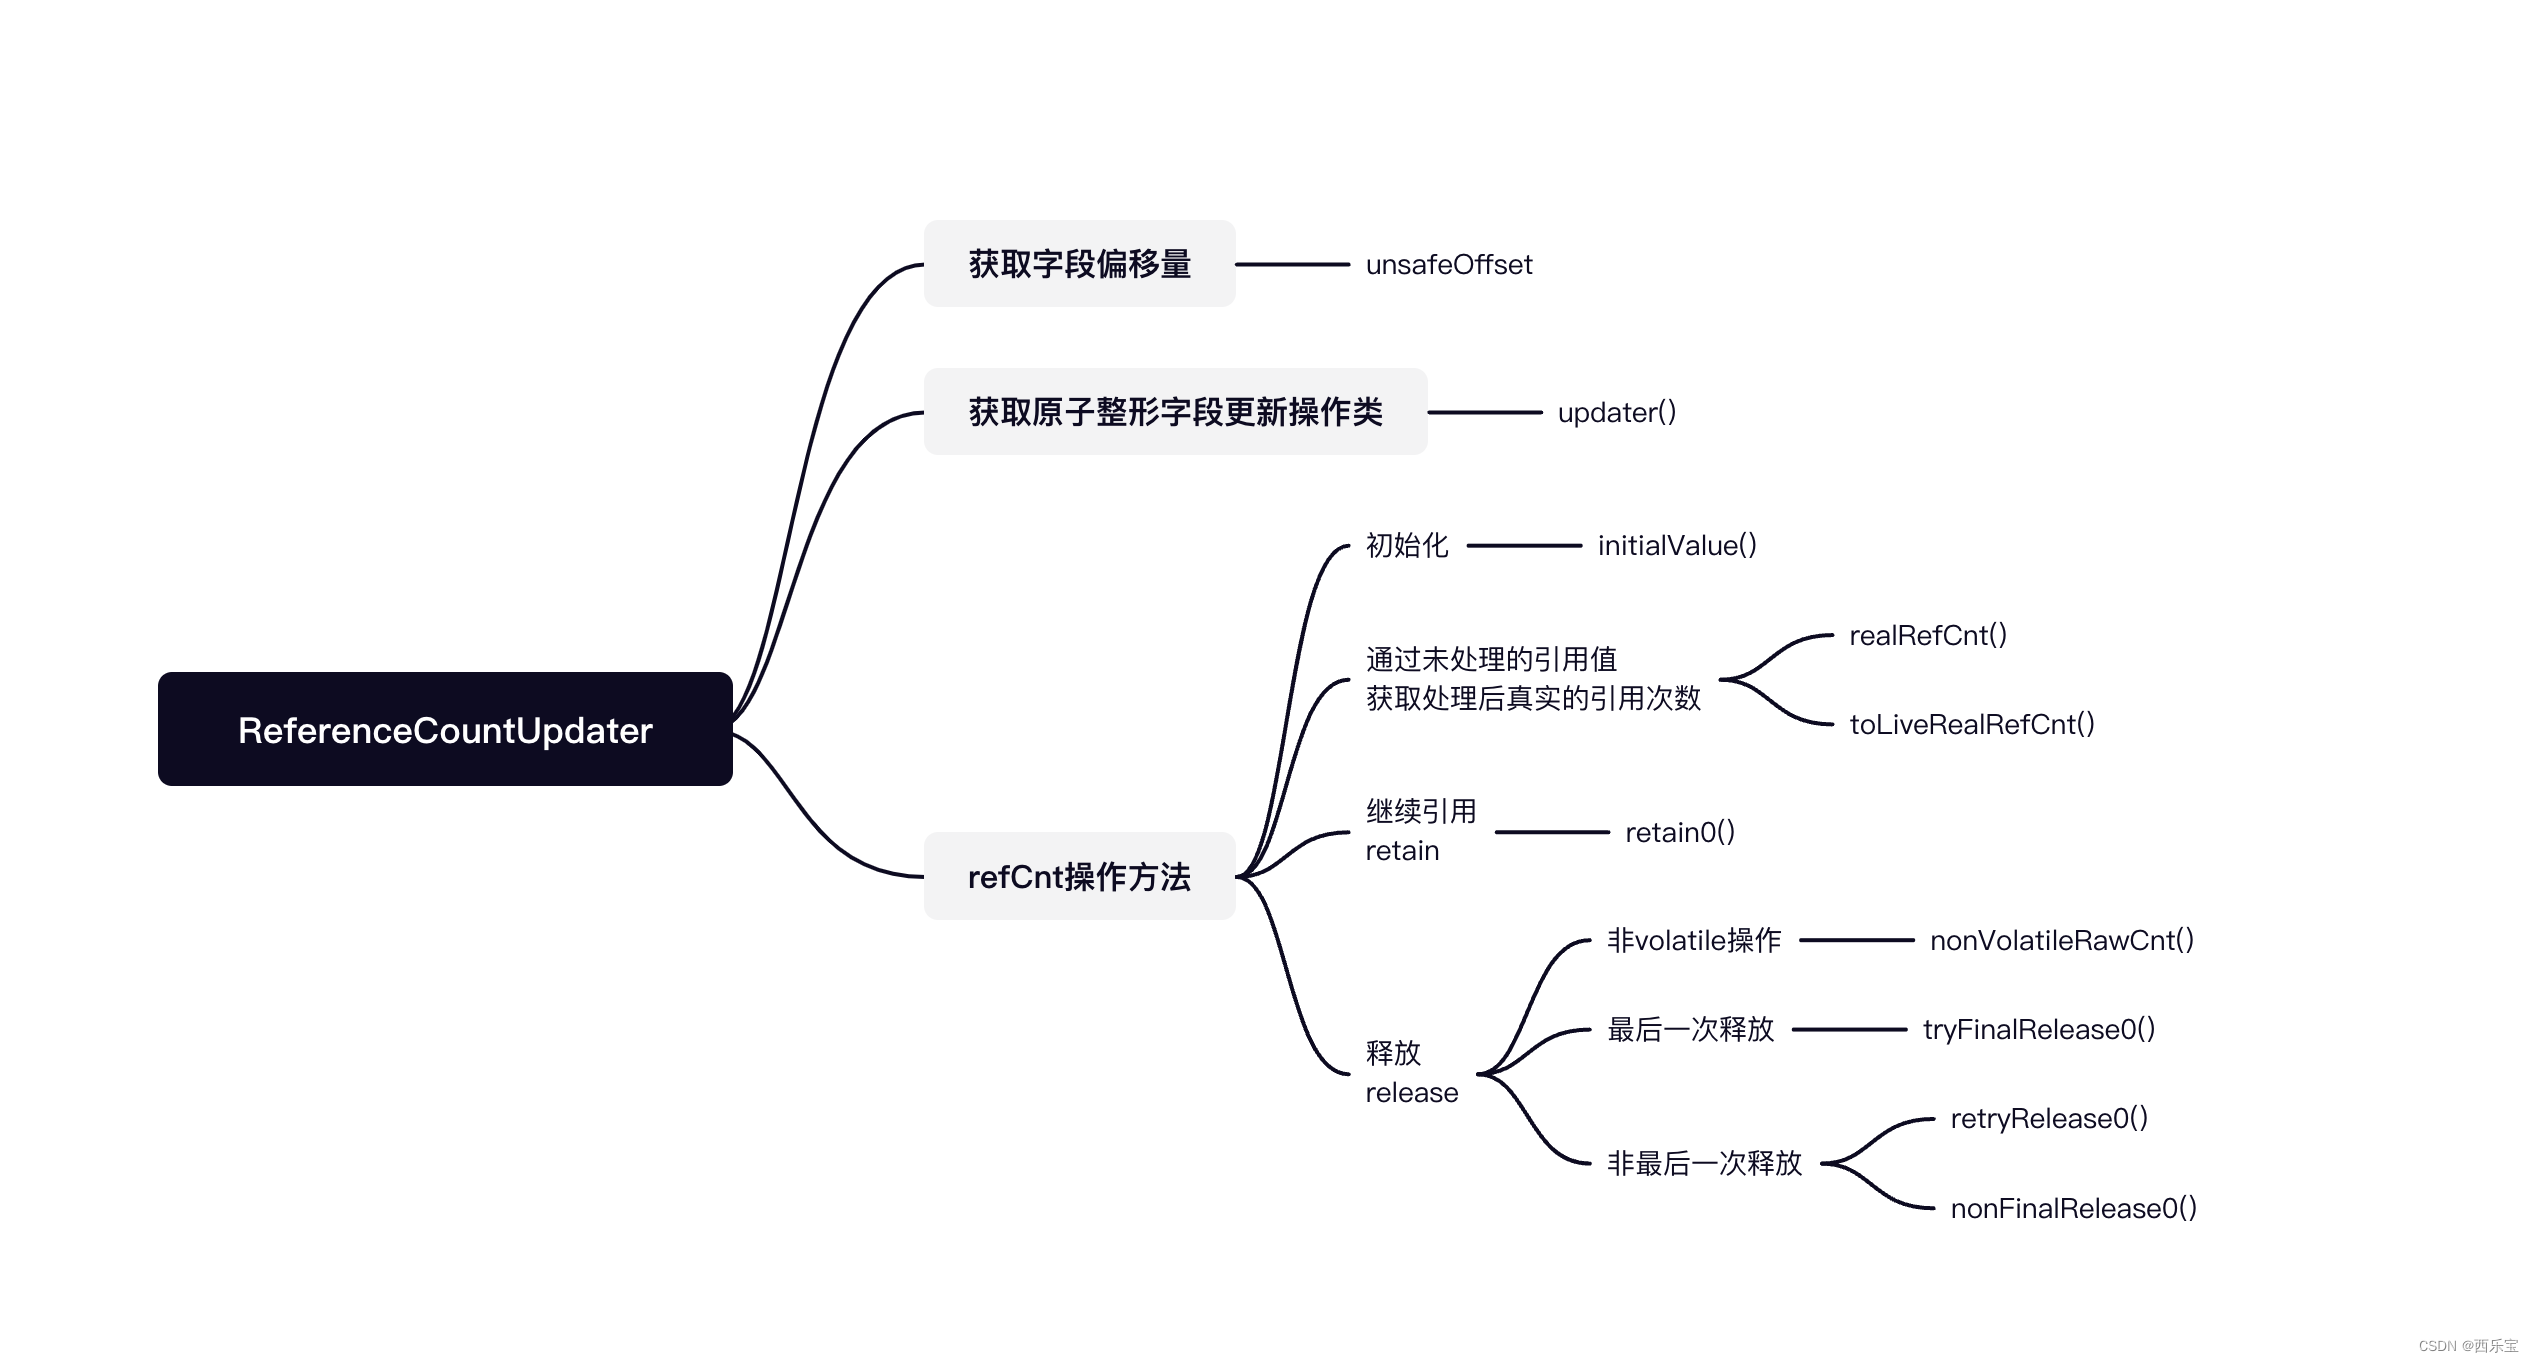
由duplicate(),slice()衍生的ByteBuf与原对象共享底层的Buffer,原对象的引用可能需要增加,引用增加的方式为retain0(),retain0()方法的具体实现,其代码解读如下:
// 注释已经讲得很明白了,这里再补充一下, 每次调用retain(),都会尝试给refCnt加2,所以确保了refCnt恒为偶数,也就是说当前的引用计数
// 为ref Cnt /2 ,这里为什么设计为2而不是递增1,估计是为了位运算更加高效吧,而且实际应用中Integer.MAX_VALU/2也是绰绰有余的。
private T retain0(T instance, final int increment, final int rawIncrement) {
    // 乐观锁,先获取原值,再增加
    // 将adjustedIncrements 更新到refCnt,因此refCnt初始化值为2 ,所以恒为偶数
    int oldRef = updater().getAndAdd(instance, rawIncrement);
    // 如果原值不为偶数,则表示ByteBuf 已经被释放了,无法继续引用,直接抛出异常
    if (oldRef != 2 && oldRef != 4 && (oldRef & 1) != 0) {
        throw new IllegalReferenceCountException(0, increment);
    }
    // don't pass 0!
    // 如果增加后出现溢出,如果oldRef 和 oldRef + rawIncrement 正负异号,则意味着已经溢出
    if ((oldRef <= 0 && oldRef + rawIncrement >= 0)
            || (oldRef >= 0 && oldRef + rawIncrement < oldRef)) {
        // overflow case
        // 则回滚并抛出异常 , 生性溢出则需要回滚adjustedIncrement
        updater().getAndAdd(instance, -rawIncrement);
        // 然后抛出异常
        throw new IllegalReferenceCountException(realRefCnt(oldRef), increment);
    }
    return instance;
}
旧版本代码如下 :
private ByteBuf retain0( int increment){
	// 一直循环
	for(;;){
			int refCnt = this.refCnt;
			final int nextCnt = refCnt + increment;
			// 先判断是否溢出
			 if(nextCnt <= increment){
						throw new IllegalReferenceCoiuntException(refCnt ,increment);
			 }
			 // 如果引用在for循环体中未被修改过, 则用新的引用值替换
			 if( refCntUpdater.copareAndSet(htis,refCnt,nextCnt)){
			 		break;
			 }
	}
}
在进行引用计数的修改时,并不会先判断是否会出现溢出,而是先执行,执行完之后再进行判断,如果溢出则进行回滚,在高并发的情况下, 与之前的版本相比,Netty v 4.1.38.Final的吞吐量会有所提升,但refCnt不是每次都进行加1或减1的操作,主要原因是修改前无法判断,若有多条线程同时操作,则线程1调用ByteBuf的release()方法,线程2调用retain()方法,线程3调用release()方法 。
线程1执行完后,refCnt的值为0 ,线程2 执行完retain()方法后,正好执行完增加操作,refCnt此时由0变成1 ,还未执行到判断回滚环节,此时线程3执行release()方法,能正常执行,导致ByteBuf出现多次销毁操作,若采用奇数表示销毁状态,偶数表示正常状态,则该问题就会得以解决,最终释放后会变成奇数 。
上面这段加粗代码需要注意,这是为什么Netty的开发者要以2为单元对updater() 进行加 减操作,问题出现在
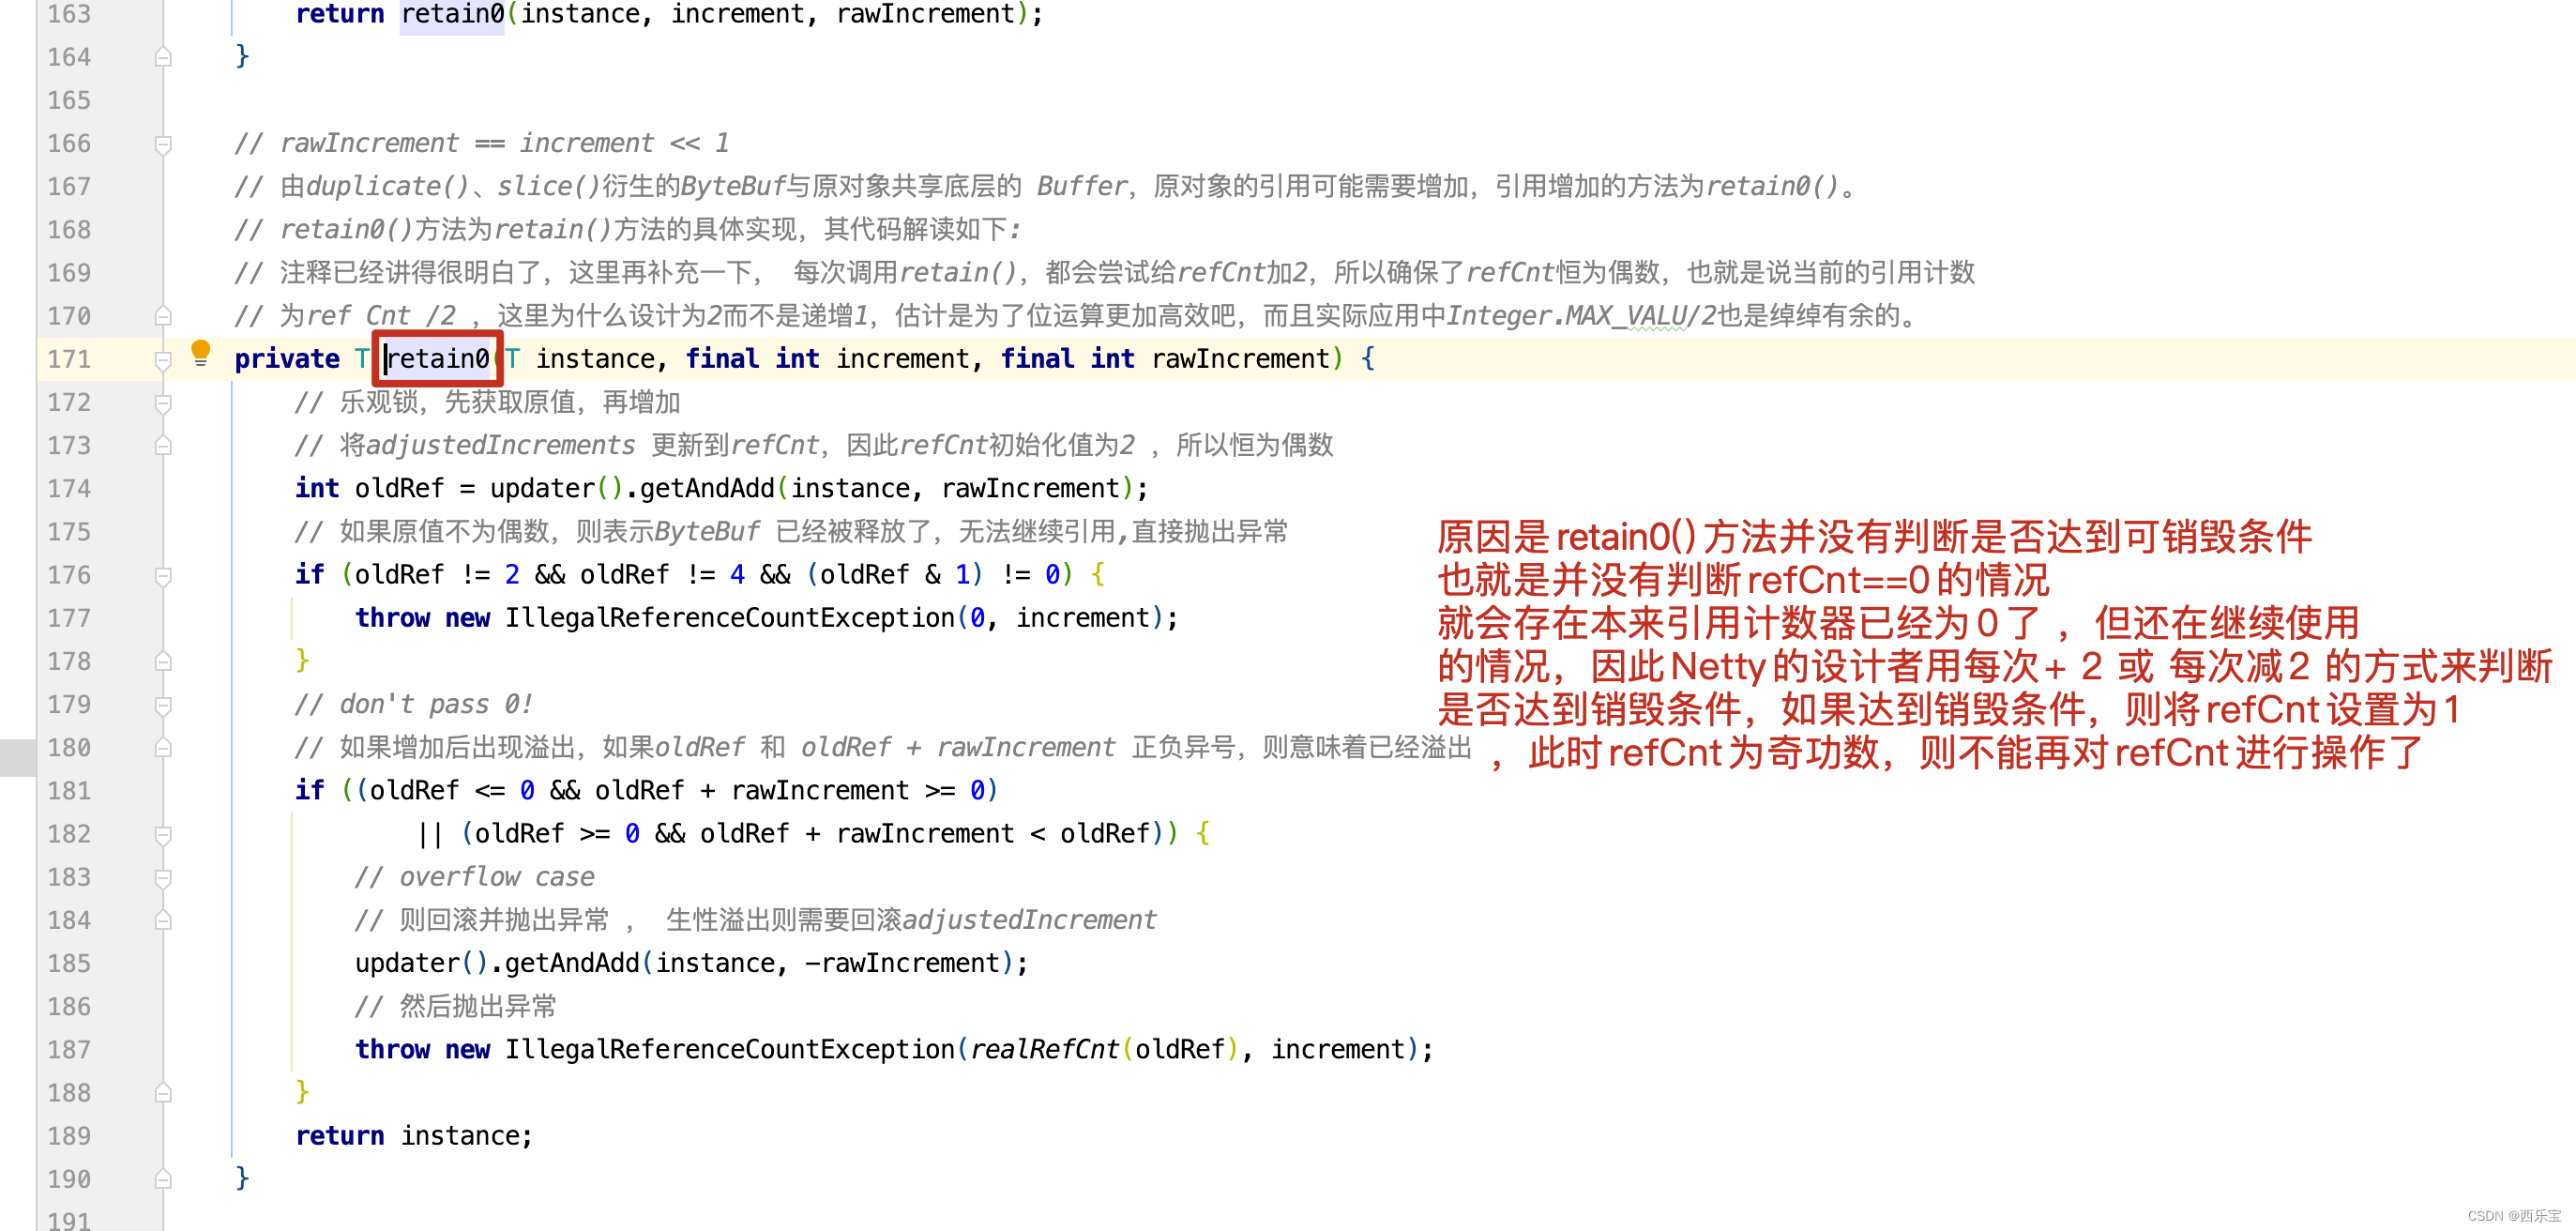
retain0()方法并没有判断refCnt是否为0,就直接设置 refCnt = refCnt + rawIncrement的操作了,导致refCnt 死而复活的情况出现,因此用refCnt 每次递增2或者递减2来实现引用计数,而 refCnt/2 就是具体的引用次数,当refCnt释放完时refCnt = 1 ,此时refCnt是奇数,如果再调用retain0()方法,则会抛出异常。
public final boolean release(T instance) {
    /**
     * 先采用普通方法获取refCnt的值,无须采用volatile获取
     * 因为tryFinalRelease0()方法会用CAS更新
     * 若更新失败了,则通过retryRelease0()方法进行不断的循环处理
     * 此处一开始并非调用retryRelease0()方法循环尝试来修改refCnt的值
     * 这样设计,吞吐量会有所提升
     * 当rawCnt不等于2时,说明还有其他地方引用了此对象
     * 调用nonFinalRelease0()方法,尝试采用CAS使refCnt的值减2
     */
    int rawCnt = nonVolatileRawCnt(instance);      // 非volatile操作
    return rawCnt == 2 ? tryFinalRelease0(instance, 2)       // 最后一次释放
            || retryRelease0(instance, 1)                       // 非最后一次释放
            : nonFinalRelease0(instance, 1, rawCnt, toLiveRealRefCnt(rawCnt, 1));       // 非最后一次释放
}

private int nonVolatileRawCnt(T instance) {
    // TODO: Once we compile against later versions of Java we can replace the Unsafe usage here by varhandles.
    // 获取偏移量
    final long offset = unsafeOffset();
    /**
     * 若偏移量正常,则选择Unsafe的普通get
     * 若偏移量获取异常,则选择Unsafe的volatile get
     */
    return offset != -1 ? PlatformDependent.getInt(instance, offset) : updater().get(instance);
}

// 采用CAS最终释放,将refCnt的设置为1
private boolean tryFinalRelease0(T instance, int expectRawCnt) {
    return updater().compareAndSet(instance, expectRawCnt, 1); // any odd number will work 设置为基数
}

private boolean retryRelease0(T instance, int decrement) {
    for (;;) {
        /***
         * volatile获取refCnt的原始值
         * 并通过toLiveRealRefCnt()方法将其转化成真正的引用次数
         * 原始值必须是2的倍数,否则状态为已释放,会抛出异常
         */
        int rawCnt = updater().get(instance);
        int realCnt = toLiveRealRefCnt(rawCnt, decrement);
        // 如果引用次数与当前释放次数相等 ,如果decrement == realCnt 意味着需要释放对象
        if (decrement == realCnt) {
            /**
             * 尝试最终释放,采用CAS更新refCnt的值为1,若更新成功则返回true
             * 如果更新失败,说明refCnt的值改变了, 则继续进行循环处理
             *
             *
             * 如果refCnt 为1 , 意味着实际的引用数为1/2= 0 ,所以需要释放掉
             */
            if (tryFinalRelease0(instance, rawCnt)) {
                return true;
            }
        } else if (decrement < realCnt) {
            // all changes to the raw count are 2x the "real" change
            /**
             * 引用次数大于当前释放的次数
             * CAS更新refCnt的值
             * 引用原始值- 2 * 当前释放的次数
             * 此处释放为非最后一次释放
             * 因此释放成功后会以返回false
             * 如果当前的引用数realCnt大于decrement,则可以正常更新
             */
            if (updater().compareAndSet(instance, rawCnt, rawCnt - (decrement << 1))) {
                return false;
            }
        } else {
            // 如果当前引用数 realCnt 小于decrement ,则抛出引用异常
            throw new IllegalReferenceCountException(realCnt, -decrement);
        }
        // Java线程中的Thread.yield( )方法,译为线程让步。顾名思义,就是说当一个线程使用了这个方法之后,它就会把自己CPU执行的时间让掉,让自己或者其它的线程运行,
        // 注意是让自己或者其他线程运行,并不是单纯的让给其他线程。
        // yield()的作用是让步。它能让当前线程由“运行状态”进入到“就绪状态”,从而让其它具有相同优先级的等待线程获取执行权;
        // 但是,并不能保
		// 证在当前线程调用yield()之后,其它具有相同优先级的线程就一定能获得执行权;也有可能是当前线程又进入到“运行状态”继续运行!
        Thread.yield(); // this benefits throughput under high contention
    }
}

/**
 * 非最后一次释放,realCnt > 1
 * @param instance
 * @param decrement
 * @param rawCnt
 * @param realCnt
 * @return
 */
private boolean nonFinalRelease0(T instance, int decrement, int rawCnt, int realCnt) {
    // 与retryRelease0()方法中的其中一个释放分支一样
    if (decrement < realCnt
            // all changes to the raw count are 2x the "real" change - overflow is OK
            && updater().compareAndSet(instance, rawCnt, rawCnt - (decrement << 1))) {
        return false;
    }
    //  若CAS更新失败,则进入retryRelease0
    return retryRelease0(instance, decrement);
}


private static int toLiveRealRefCnt(int rawCnt, int decrement) {
    // 当rawCnt的值为偶数时,真实引用的值需要右移1位
    if (rawCnt == 2 || rawCnt == 4 || (rawCnt & 1) == 0) {
        return rawCnt >>> 1;
    }
    // odd rawCnt => already deallocated
    // rawCnt为奇数表示已经释放,此时会抛出异常
    throw new IllegalReferenceCountException(0, -decrement);
}
在这个例子中,我们看到了什么,在retain0()方法中,首先对refCnt增加的时候,并没有判断refCnt是否为零,而是直接增加refCnt的值,在release()方法中,如果是最后一次释放refCnt的引用次数,则调用tryFinalRelease0()方法,如果非最后一次释放refCnt,则调用普通的retryRelease0()方法,在普通释放方法中,如果存在锁竞争,则会调用Thread.yield(); 让出CPU让其他线程先执行,在PooledByteBuf释放方法中,看到了作者构思的细致及巧妙,这些都是值得我们学习的。
CompositeByteBuf源码剖析
CompositeByteBuf的主要功能是组合多个ByteBuf,对外提供统一的readerIndex和writerIndex, 由于它只是将多个ByteBuf的实例组装到一起形成一个统一的视图,并没有对ByteBuf中的数据进行拷贝, 因此也属于Netty零拷贝的一种, 主要应用于编码和解码 。
例如,将消息头和消息体两个ByteBuf组合到一块进行编码,可能会觉得Netty有写缓冲区,其本身就会存储多个ByteBuf,此时只需要把两个ByteBuf分别写入缓冲区ChannelOutboundBuffer即可,没有必要使用组合的ByteBuf,但是在将ByteBuf写入缓冲区之前,需要对整个消息进行编码,如长度编码,此时需要把两个ByteBuf合并成一个,无须额外的处理就可以知道其整体长度,因此使用CompositeByteBuf是非常适合的。
在解码时,由于Socket通信传输数据会产生粘包和半包问题,因此需要一个读半包字节容器,这个容器采用了CompositeByteBuf比较合适,将每次从Socket中读到的数据直接放入到容器中,少了一次数据的拷贝,Netty在解码类ByteToMessageDecoder默认的读半包字节容器Cumulator未采用CompositeByteBuf,此时可在其子类中调用setCumulator进行修改,但需要注意的是,CompositeByteBuf使用了复杂的逻辑,所以其效率有可能比使用内存拷贝的低。
CompositeByteBuf内部定义了一个Component类型的集合,实际上,Component是ByteBuf的包装实现类,它聚合了ByteBuf对象并维护了ByteBuf对象在集合中的位置偏移量信息等 。
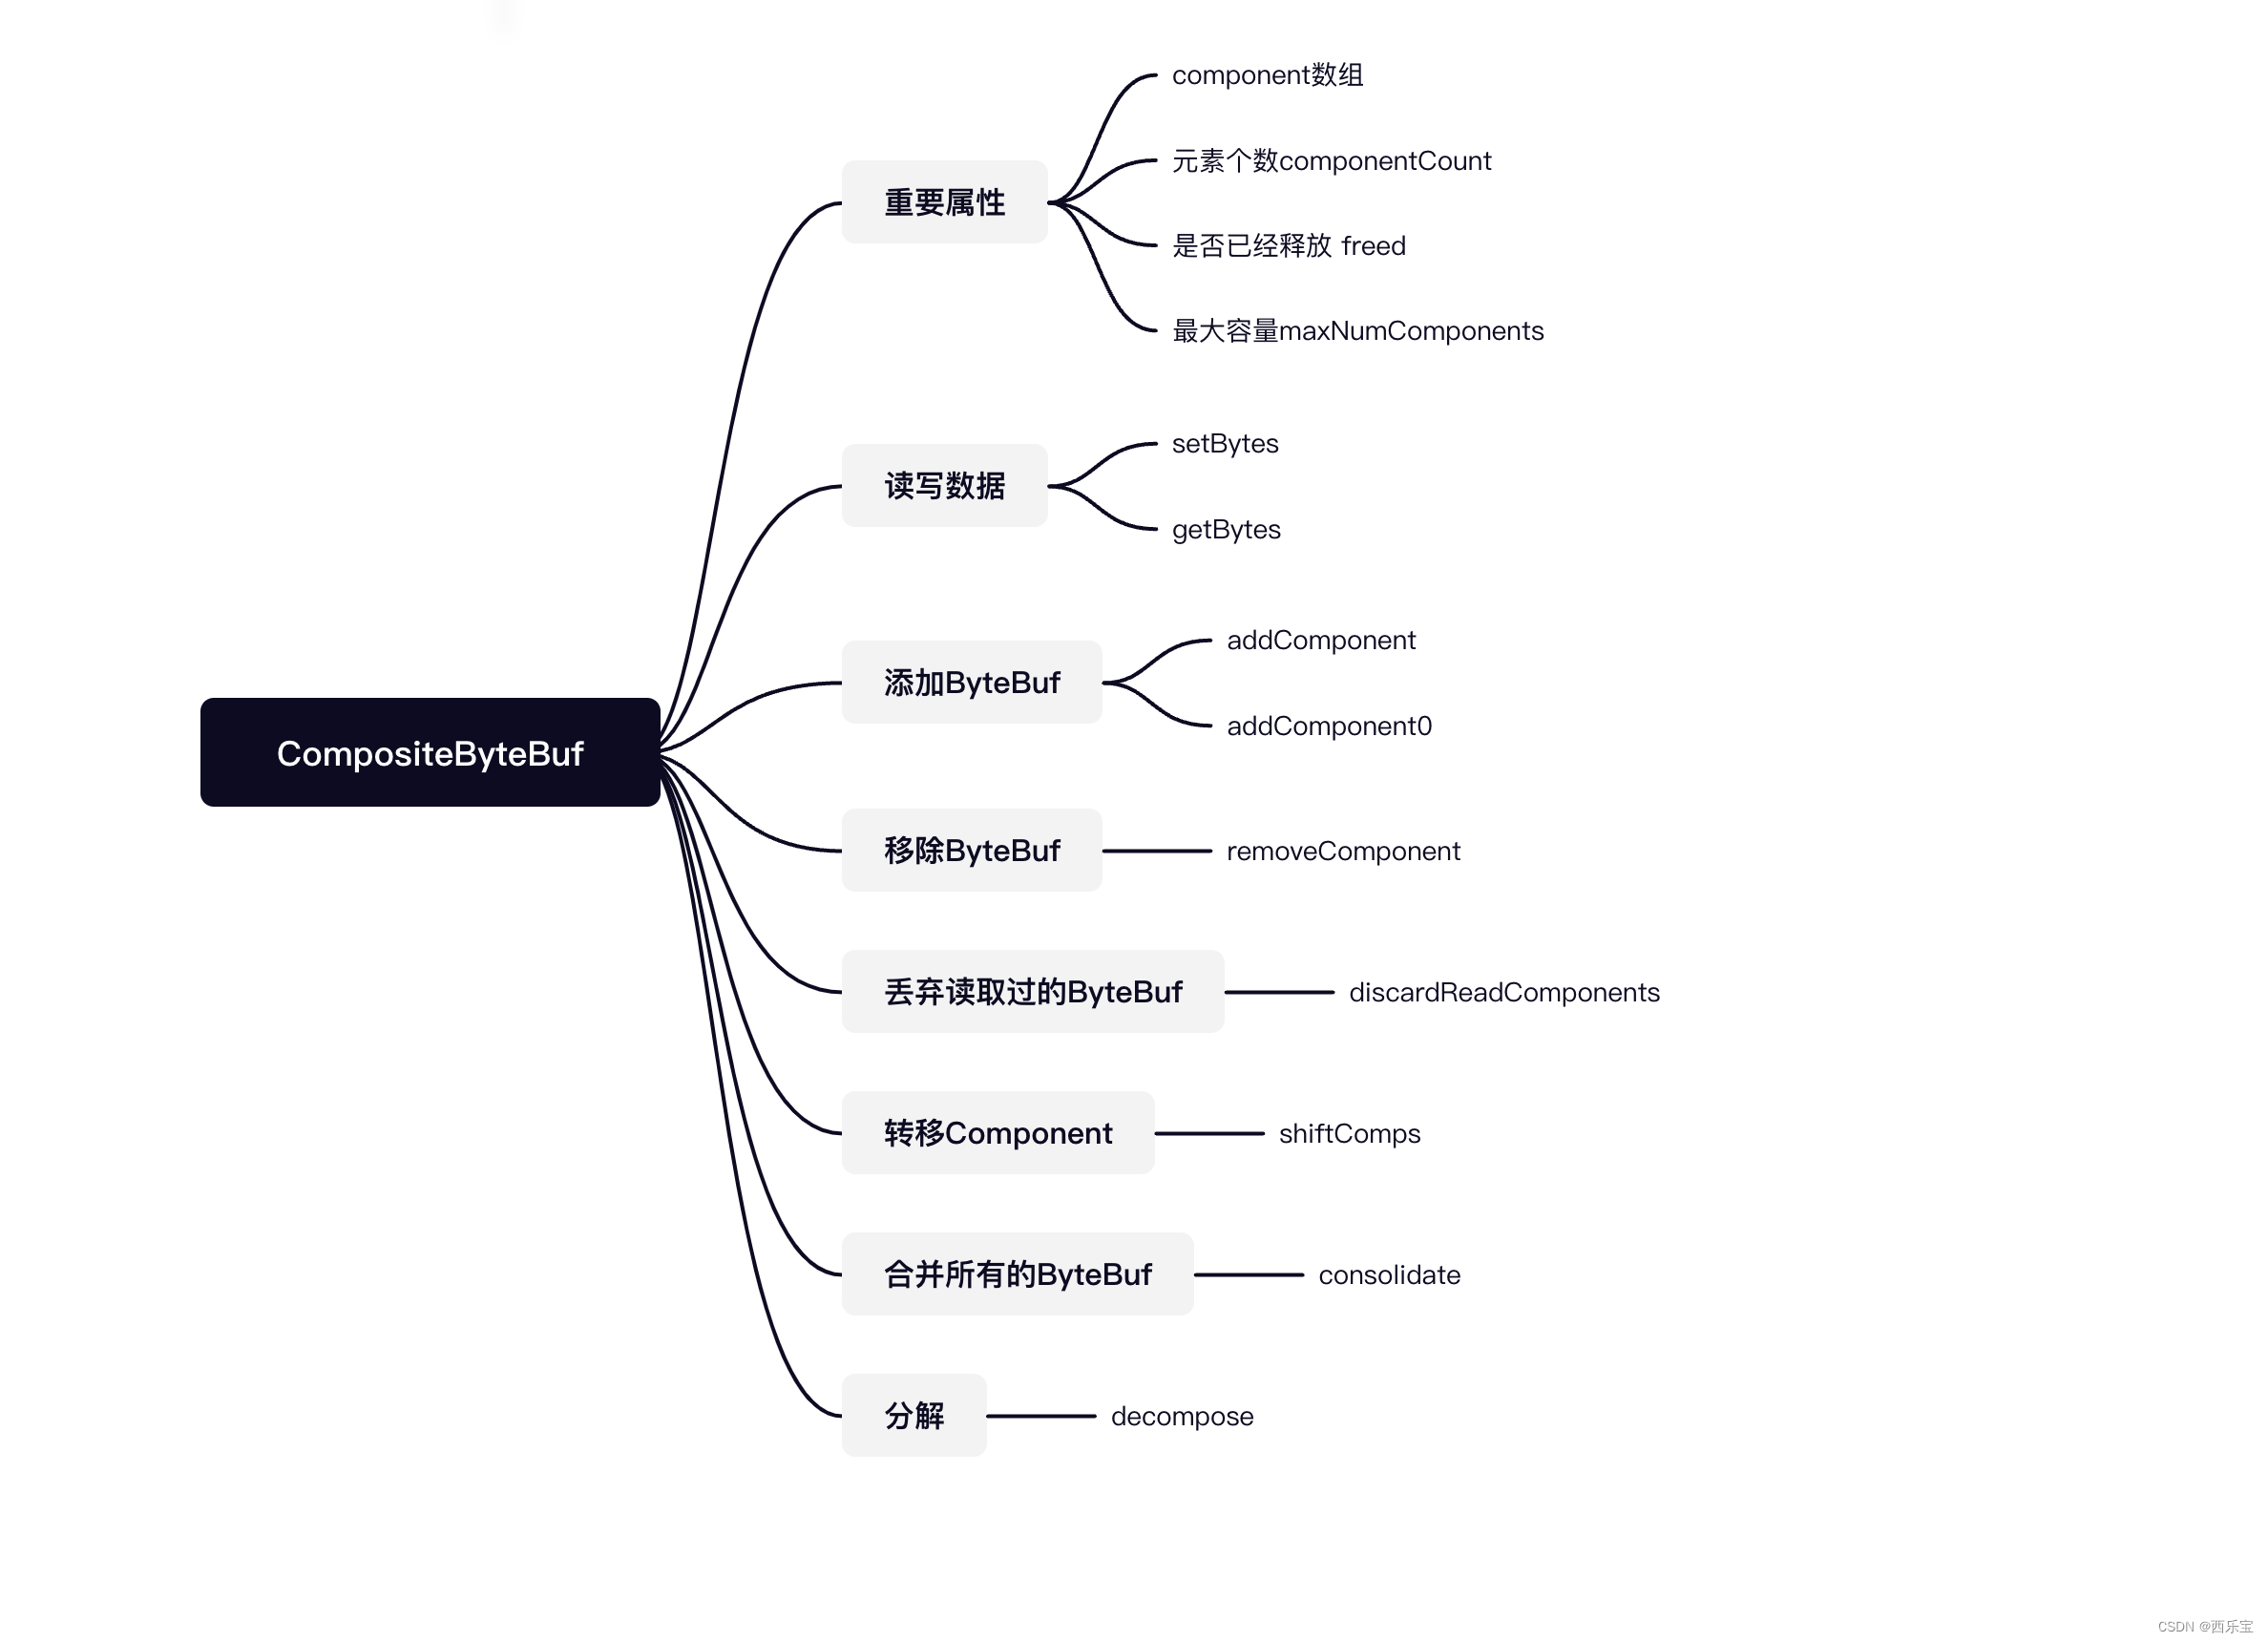
在分析源码之前,先来看一个例子,以这个例子为蓝本,分析后面的源码 。
public class ByteBufTest2 {

    public static void main(String[] args) {
        CompositeByteBuf compositeByteBuf = Unpooled.compositeBuffer();

        ByteBuf heapBuf1 = Unpooled.buffer(64).setIndex(0,64);
        ByteBuf heapBuf2 = Unpooled.buffer(64).setIndex(0,64);
        compositeByteBuf.addComponent(false, 0, heapBuf1);
        compositeByteBuf.addComponent(false, 1, heapBuf2);
		//        compositeByteBuf.removeComponent(0);
        System.out.println(compositeByteBuf.readableBytes());
        byte[] bytes = new byte[70];
        for(int i = 0 ;i < 70 ;i ++){
            bytes[i] = (byte)i;
        }

        compositeByteBuf.setBytes(0, bytes, 0, 70);
        ByteBuf buffer = Unpooled.buffer(128);
        compositeByteBuf.getBytes(0, buffer, 0, 70);

        System.out.println("capacity:" + buffer.capacity());

        if (buffer.hasArray()) {
            byte[] content = buffer.array();
            for (int i = 0; i < 10; i++) {
                System.out.println(content[i]);
            }
        }
    }
}
以此例作为基础对源码进行分析 。
/**
 * Add the given {@link ByteBuf} on the specific index and increase the {@code writerIndex}
 * if {@code increaseWriterIndex} is {@code true}.
 *
 * {@link ByteBuf#release()} ownership of {@code buffer} is transferred to this {@link CompositeByteBuf}.
 * @param cIndex the index on which the {@link ByteBuf} will be added.
 * @param buffer the {@link ByteBuf} to add. {@link ByteBuf#release()} ownership is transferred to this
 * {@link CompositeByteBuf}.
 * 添加到ByteBuf
 *
 */
public CompositeByteBuf addComponent(boolean increaseWriterIndex, int cIndex, ByteBuf buffer) {
    //
    checkNotNull(buffer, "buffer");
    // 把buffer加入Component数组中
    // 并对数组中的元素进行相应的挪动
    addComponent0(increaseWriterIndex, cIndex, buffer);
    // 是否需要合并成一个ByteBuf
    consolidateIfNeeded();
    return this;
}

/**
 * Precondition is that {@code buffer != null}.
 */
private int addComponent0(boolean increaseWriterIndex, int cIndex, ByteBuf buffer) {
    assert buffer != null;
    boolean wasAdded = false;
    try {
        // 检查下标是否正常
        checkComponentIndex(cIndex);
        // No need to consolidate - just add a component to the list.
        // 构建包装的component
        Component c = newComponent(buffer, 0);
        int readableBytes = c.length();
        // 把component追加到数组中,并移到其后面的元素
        addComp(cIndex, c);
        wasAdded = true;
        if (readableBytes > 0 && cIndex < componentCount - 1) {
            /***
             * 当插入的位置不在数组末尾时
             * 不仅需要设置插入元素的位置信息
             * 还需要更新其后面元素的位置信息
             */
            updateComponentOffsets(cIndex);
        } else if (cIndex > 0) {
            // 当插入的位置在数组末尾时, 只需要设置插入元素的位置信息即可
            c.reposition(components[cIndex - 1].endOffset);
        }
        // 是否修改写索引
        if (increaseWriterIndex) {
            writerIndex += readableBytes;
        }
        return cIndex;
    } finally {
        // 当出现异常增加失败时,释放buffer
        if (!wasAdded) {
            buffer.release();
        }
    }
}

@SuppressWarnings("deprecation")
private Component newComponent(ByteBuf buf, int offset) {
    if (checkAccessible && !buf.isAccessible()) {
        throw new IllegalReferenceCountException(0);
    }
    // 获取buf读索引及buf的长度
    int srcIndex = buf.readerIndex();
    int len = buf.readableBytes();
    ByteBuf slice = null;
    // 若是派生的ByteBuf ,则需要通过unwra得到原始的ByteBuf
    // 原始buf的读索引=派生buf读索引+偏移量adjustment
    // 由于是非可重复利用内存,所以其读索引应为0
    // unwrap if already sliced
    if (buf instanceof AbstractUnpooledSlicedByteBuf) {
        srcIndex += ((AbstractUnpooledSlicedByteBuf) buf).idx(0);
        slice = buf;
        buf = buf.unwrap();
    } else if (buf instanceof PooledSlicedByteBuf) {
        srcIndex += ((PooledSlicedByteBuf) buf).adjustment;
        slice = buf;
        buf = buf.unwrap();
    }
    // 包装成Component对象返回,并设置为大端模式(与网络传输模式一致)
    return new Component(buf.order(ByteOrder.BIG_ENDIAN), srcIndex, offset, len, slice);
}


private void addComp(int i, Component c) {
    shiftComps(i, 1);
    components[i] = c;
}

private void shiftComps(int i, int count) {
    final int size = componentCount, newSize = size + count;
    assert i >= 0 && i <= size && count > 0;
    if (newSize > components.length) {
        // grow the array
        int newArrSize = Math.max(size + (size >> 1), newSize);
        Component[] newArr;
        if (i == size) {
            newArr = Arrays.copyOf(components, newArrSize, Component[].class);
        } else {
            newArr = new Component[newArrSize];
            if (i > 0) {
                System.arraycopy(components, 0, newArr, 0, i);
            }
            if (i < size) {
                System.arraycopy(components, i, newArr, i + count, size - i);
            }
        }
        components = newArr;
    } else if (i < size) {
        System.arraycopy(components, i, components, i + count, size - i);
    }
    componentCount = newSize;
}
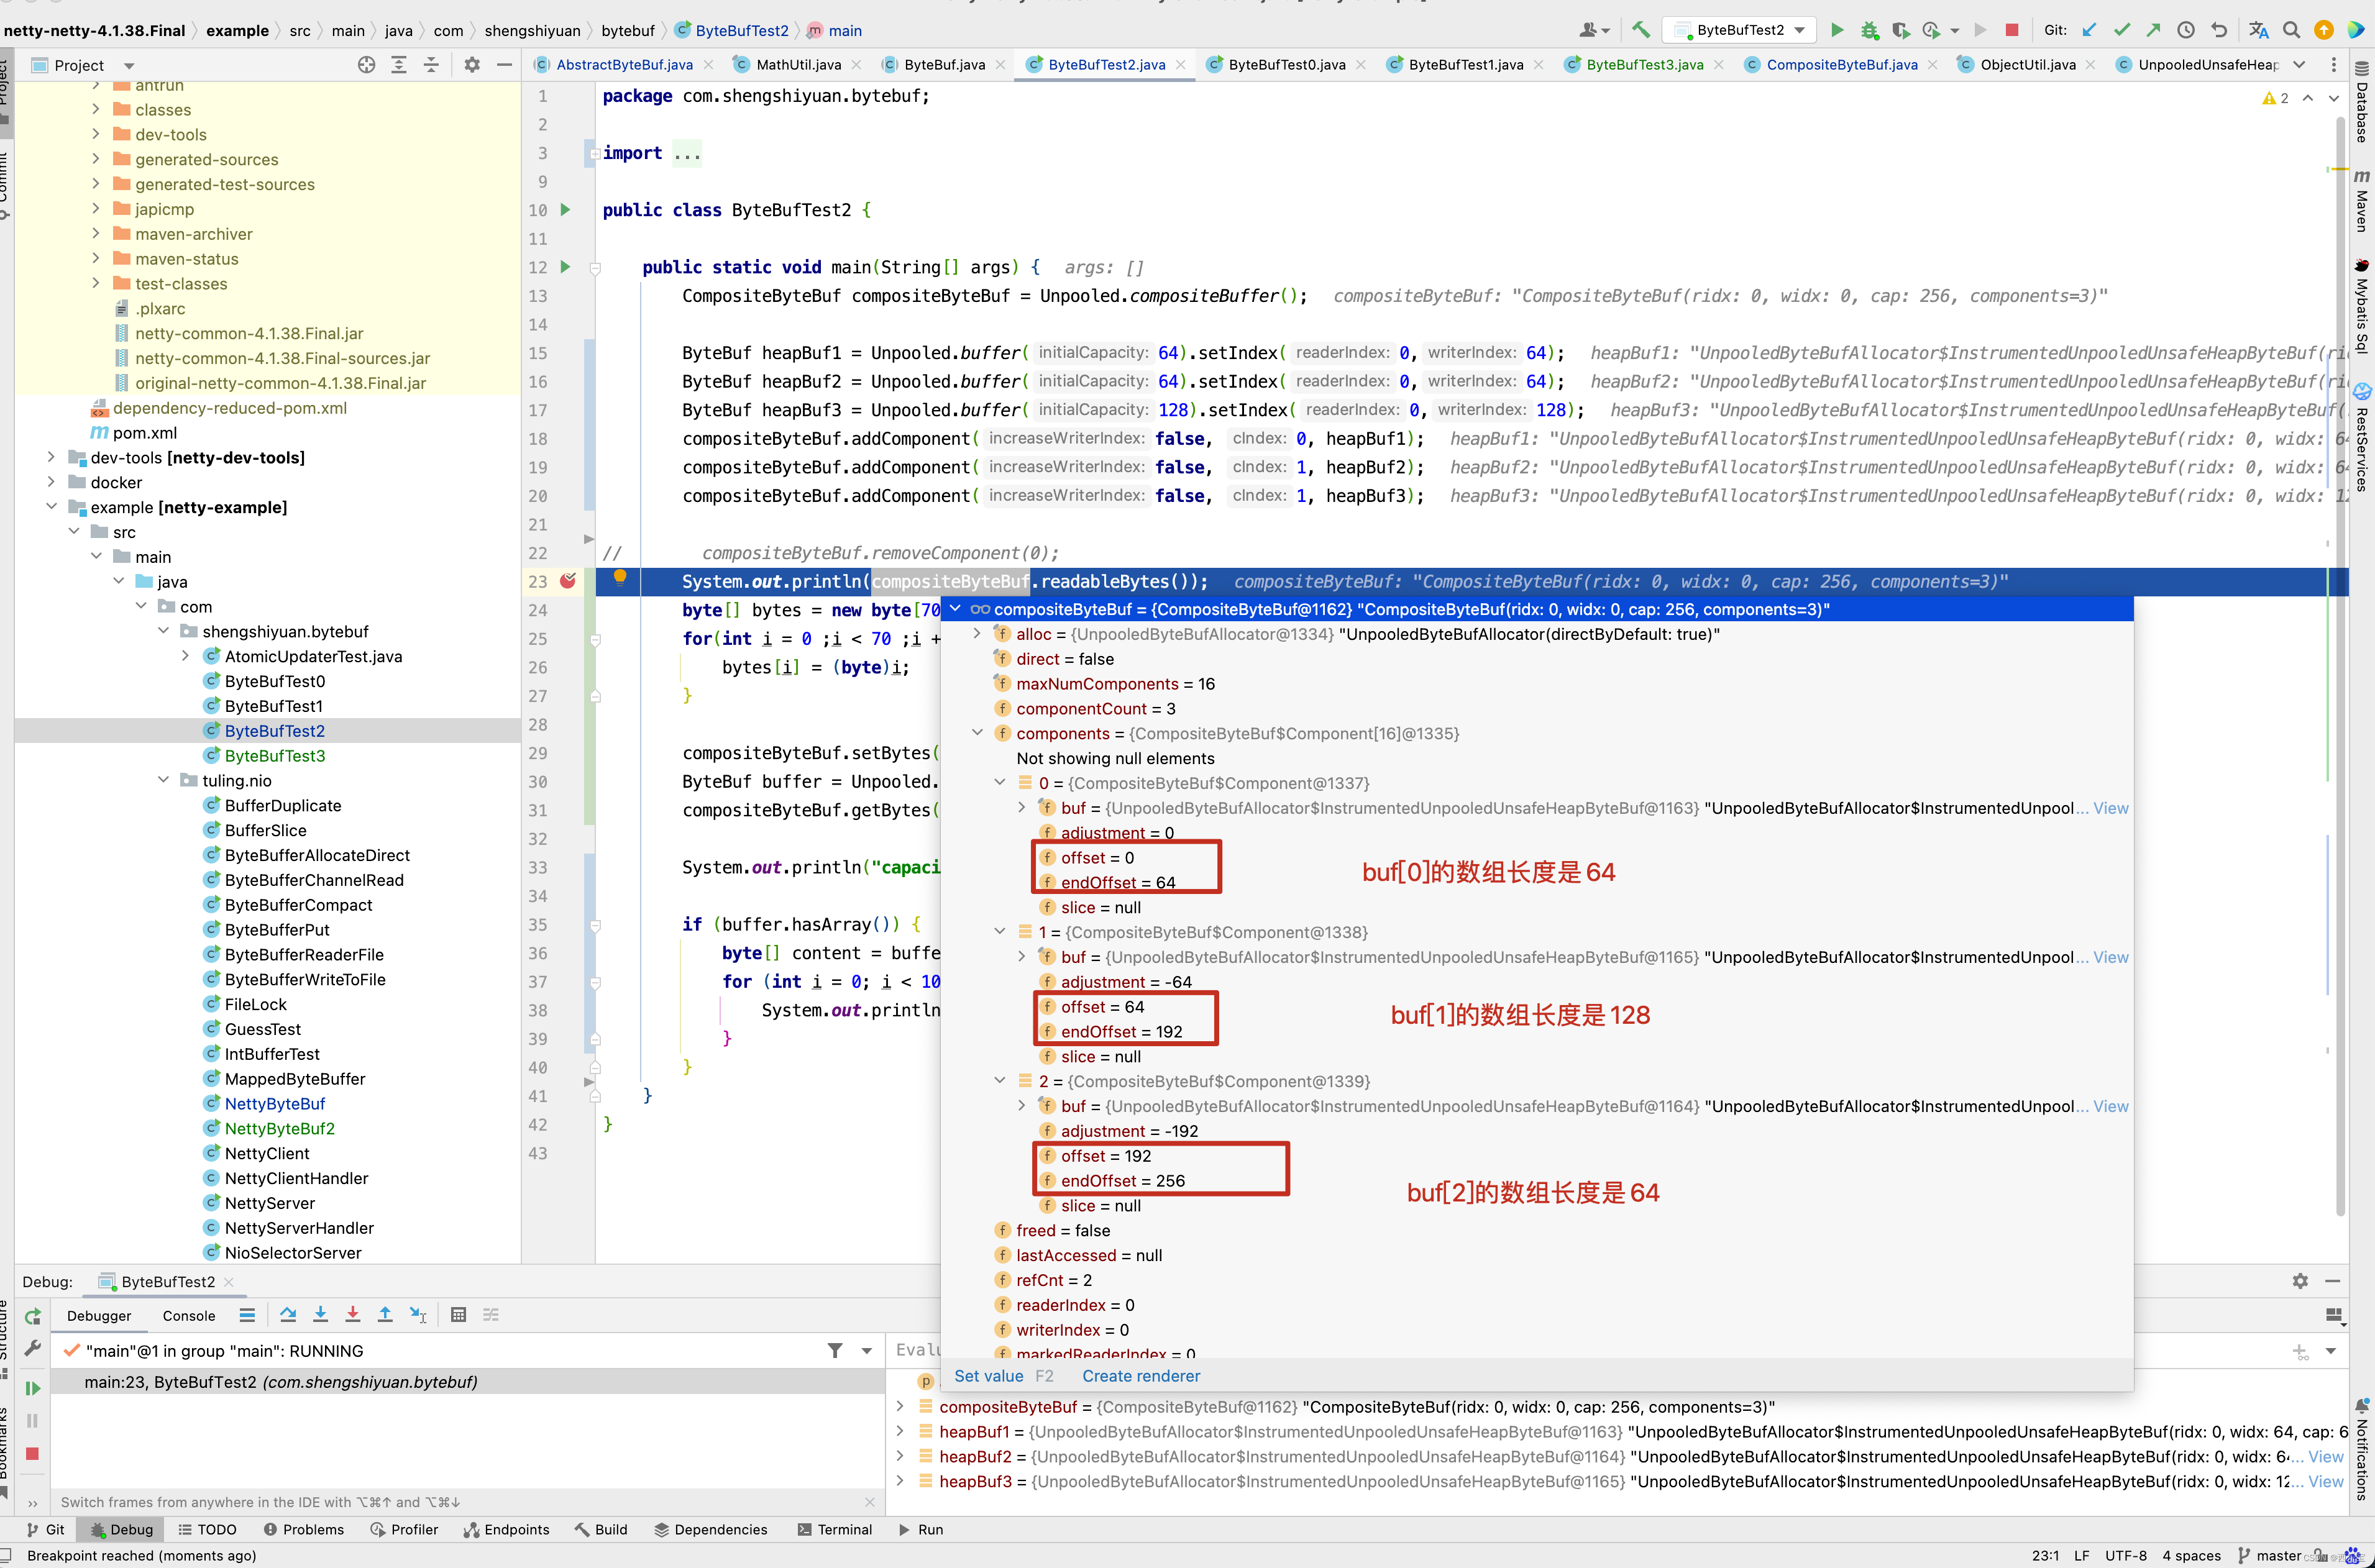
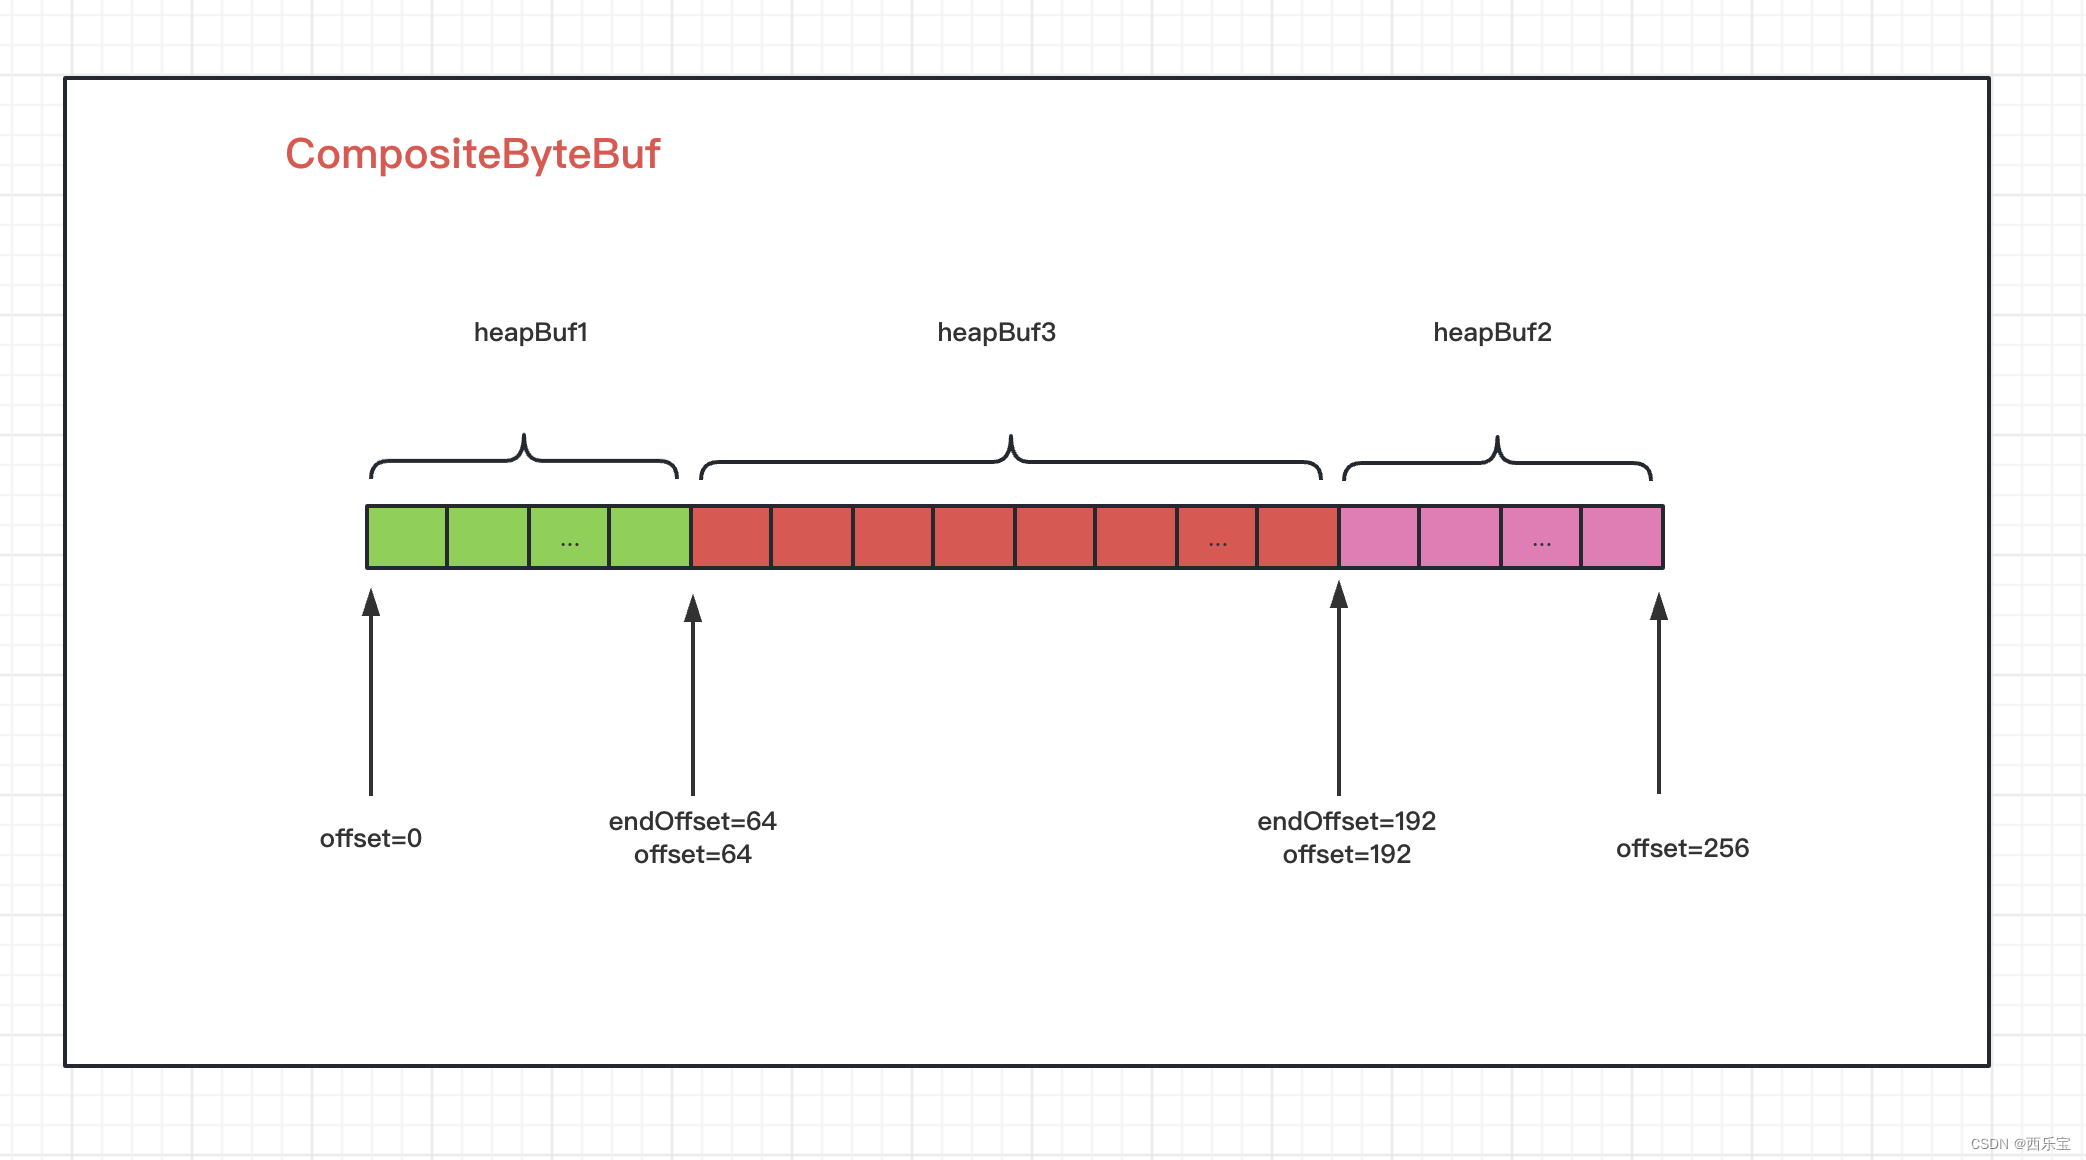
在上述一系列的方法中,其他方法还好理解,我们重点关注addComponent0()方法,对新插入的Component,会调整offset和endOffset的值,如果Component插入的位置是最后,则只需要调整Component的offset和endOffset的值即可,如果插入的位置不是最后,就需要调整新插入及之后的所有Component的offset和endOffset的值,请看下图 。
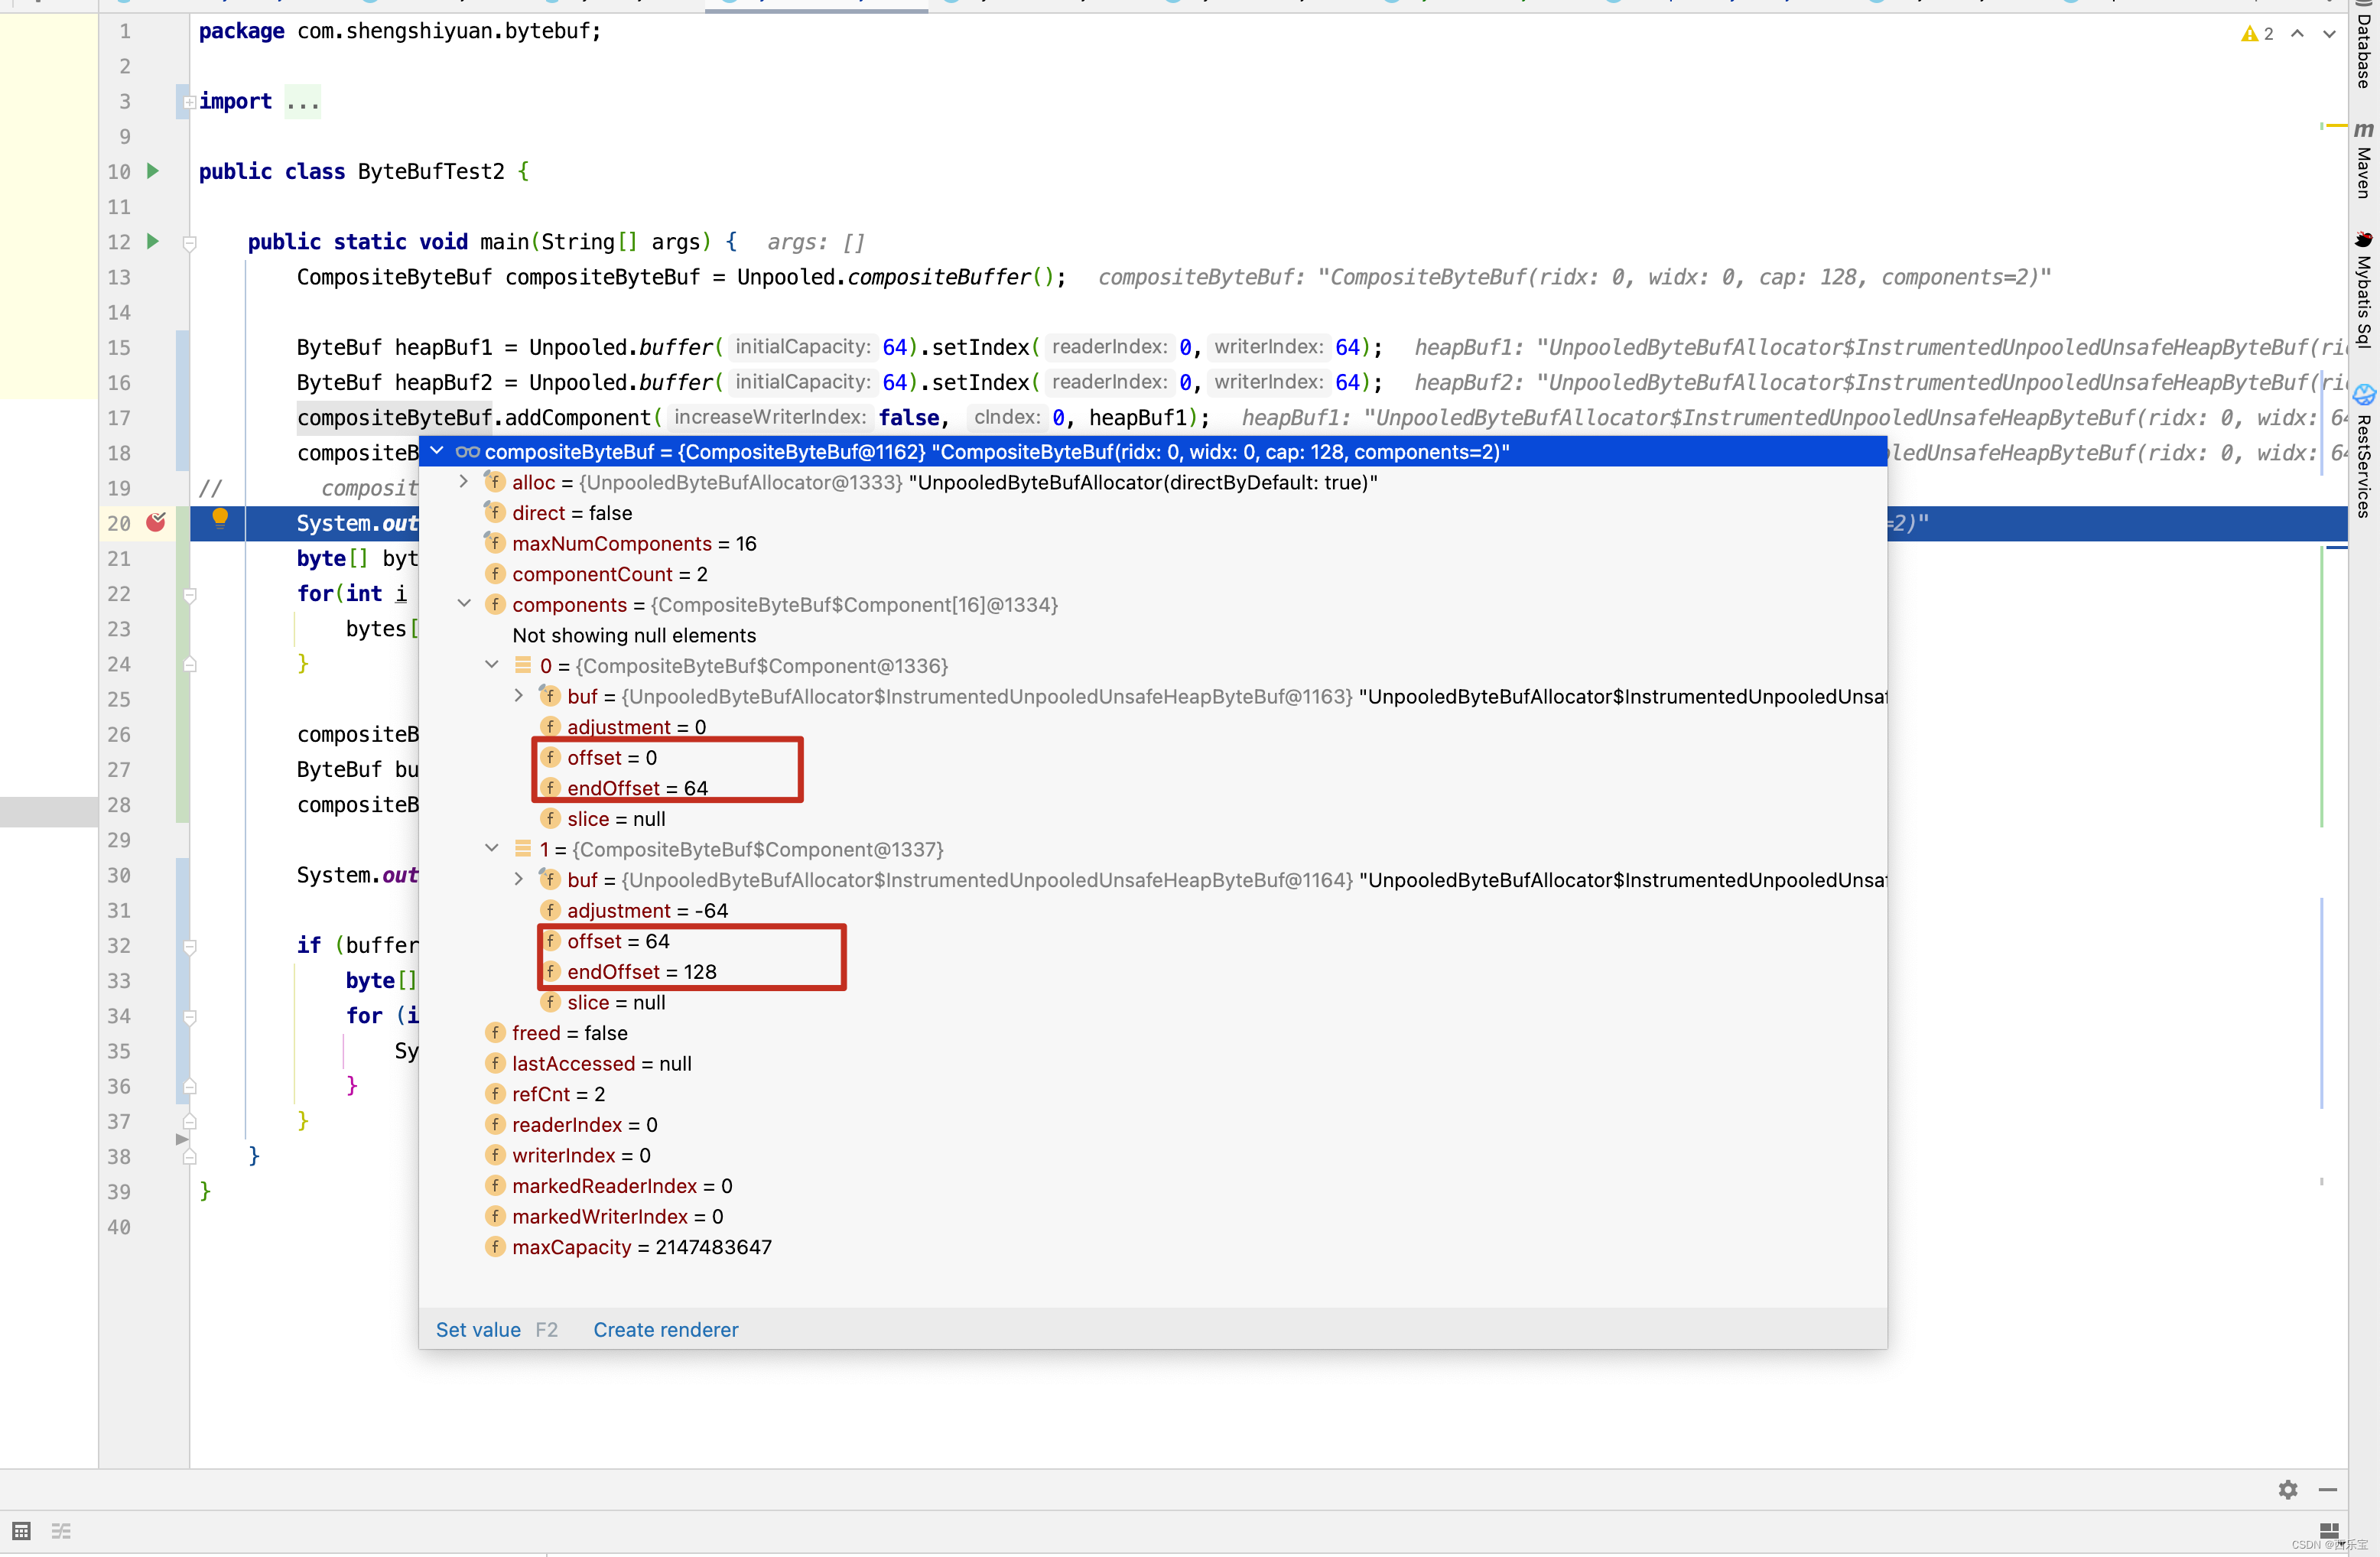
如果此时此刻,再在1位置插入一个长度为128的ByteBuf,那Component中的offset和endOffset又是怎样的呢?
接下来看读写数据解读 。
public CompositeByteBuf setBytes(int index, byte[] src, int srcIndex, int length) {
    // 检查
    checkSrcIndex(index, length, srcIndex, src.length);
    if (length == 0) {
        return this;
    }
    // 根据writerIndex获取components数组下标
    int i = toComponentIndex0(index);
    /**
     * 循环写入,逻辑与循环读取数据的逻辑类似,只是index从readerIndex换成了writerIndex
     */
    while (length > 0) {
        Component c = components[i];
        int localLength = Math.min(length, c.endOffset - index);
        c.buf.setBytes(c.idx(index), src, srcIndex, localLength);
        index += localLength;
        srcIndex += localLength;
        length -= localLength;
        i ++;
    }
    return this;
}

// 通过偏移量获取对应的下标
private int toComponentIndex0(int offset) {
    int size = componentCount;
    // 偏移量为0,快速获取第一个元素
    if (offset == 0) { // fast-path zero offset
        for (int i = 0; i < size; i++) {
            if (components[i].endOffset > 0) {
                return i;
            }
        }
    }
    // 当少于或等于两个元素时,没有必要使用二分查找算法,只需要快速判断并获取即可
    if (size <= 2) { // fast-path for 1 and 2 component count
        return size == 1 || offset < components[0].endOffset ? 0 : 1;
    }
    /***
     * 当components数组中的元素个数多于两个时,使用二分查找算法
     * 其分割规则主要根据偏移量来判断
     * 当偏移量大于或等于元素的 endOffset时,low=mid+1
     * 当偏移量小于遍历元素的offset时,high=mid-1
     * 当偏移量等于遍历元素的offset时,只需要返回其下标即可
     */
    for (int low = 0, high = size; low <= high;) {
        int mid = low + high >>> 1;
        Component c = components[mid];
        if (offset >= c.endOffset) {
            low = mid + 1;
        } else if (offset < c.offset) {
            high = mid - 1;
        } else {
            return mid;
        }
    }
    // 若没有找到,则抛出异常
    throw new Error("should not reach here");
}
接下来看getBytes()方法解读 。
public CompositeByteBuf getBytes(int index, ByteBuf dst, int dstIndex, int length) {
    // 检查index,length,dstIndex,dst.capacity()是否合法
    checkDstIndex(index, length, dstIndex, dst.capacity());
    if (length == 0) {
        return this;
    }
    // 根据readerIndex获取components数组的下标
    int i = toComponentIndex0(index);
    // 由于ByteBuf是逻辑组合
    // 在读的过程中,一个buf可能是不够的
    // 需要从多个buf中读取数据,因此需要while循环,直到写满
    while (length > 0) {
        Component c = components[i];
        // 在每次读数据时,只能读取当前buf的可读字节与length两者中的最小值
        int localLength = Math.min(length, c.endOffset - index);
        // 从buf中读取localLength字节到dst中
        c.buf.getBytes(c.idx(index), dst, dstIndex, localLength);
        // 其读取索引值需要增加localLength
        index += localLength;
        // 目标buf的写索引也需要进行相应的增加
        dstIndex += localLength;
        // 需要对字节进行相应的调整
        length -= localLength;
        // components数组的下标也要向上移一位
        i ++;
    }
    return this;
}
当然,意由未尽的读者可以继续看看下面的例子,分析一下原因 。
public class ByteBufTest3 {
    public static void main(String[] args) {
        CompositeByteBuf compositeByteBuf = Unpooled.compositeBuffer();

        ByteBuf heapBuf = Unpooled.buffer(10);
        ByteBuf directBuf = Unpooled.directBuffer(8);

        compositeByteBuf.addComponent(false,0 ,directBuf );
//        compositeByteBuf.removeComponent(0);
        System.out.println(compositeByteBuf.readableBytes());
        compositeByteBuf.writeByte(-1);
        for(int i = 0 ;i < 128;i ++){
            compositeByteBuf.writeByte(i);
            if(i == 0 ){
                System.out.println(compositeByteBuf.readerIndex());          // 读索引
                System.out.println(compositeByteBuf.writerIndex());          // 写索引
                System.out.println(compositeByteBuf.capacity());
                System.out.println("===============");
            }
        }

        System.out.println(compositeByteBuf.readerIndex());          // 读索引
        System.out.println(compositeByteBuf.writerIndex());          // 写索引
        System.out.println(compositeByteBuf.capacity());

        for(int i = 0 ;i < 65;i ++){
           compositeByteBuf.readByte();
        }

        compositeByteBuf.writeByte(10);
        compositeByteBuf.writeByte(11);
        compositeByteBuf.writeByte(12);

        compositeByteBuf.readByte();
        compositeByteBuf.writeByte(13);

    }
}
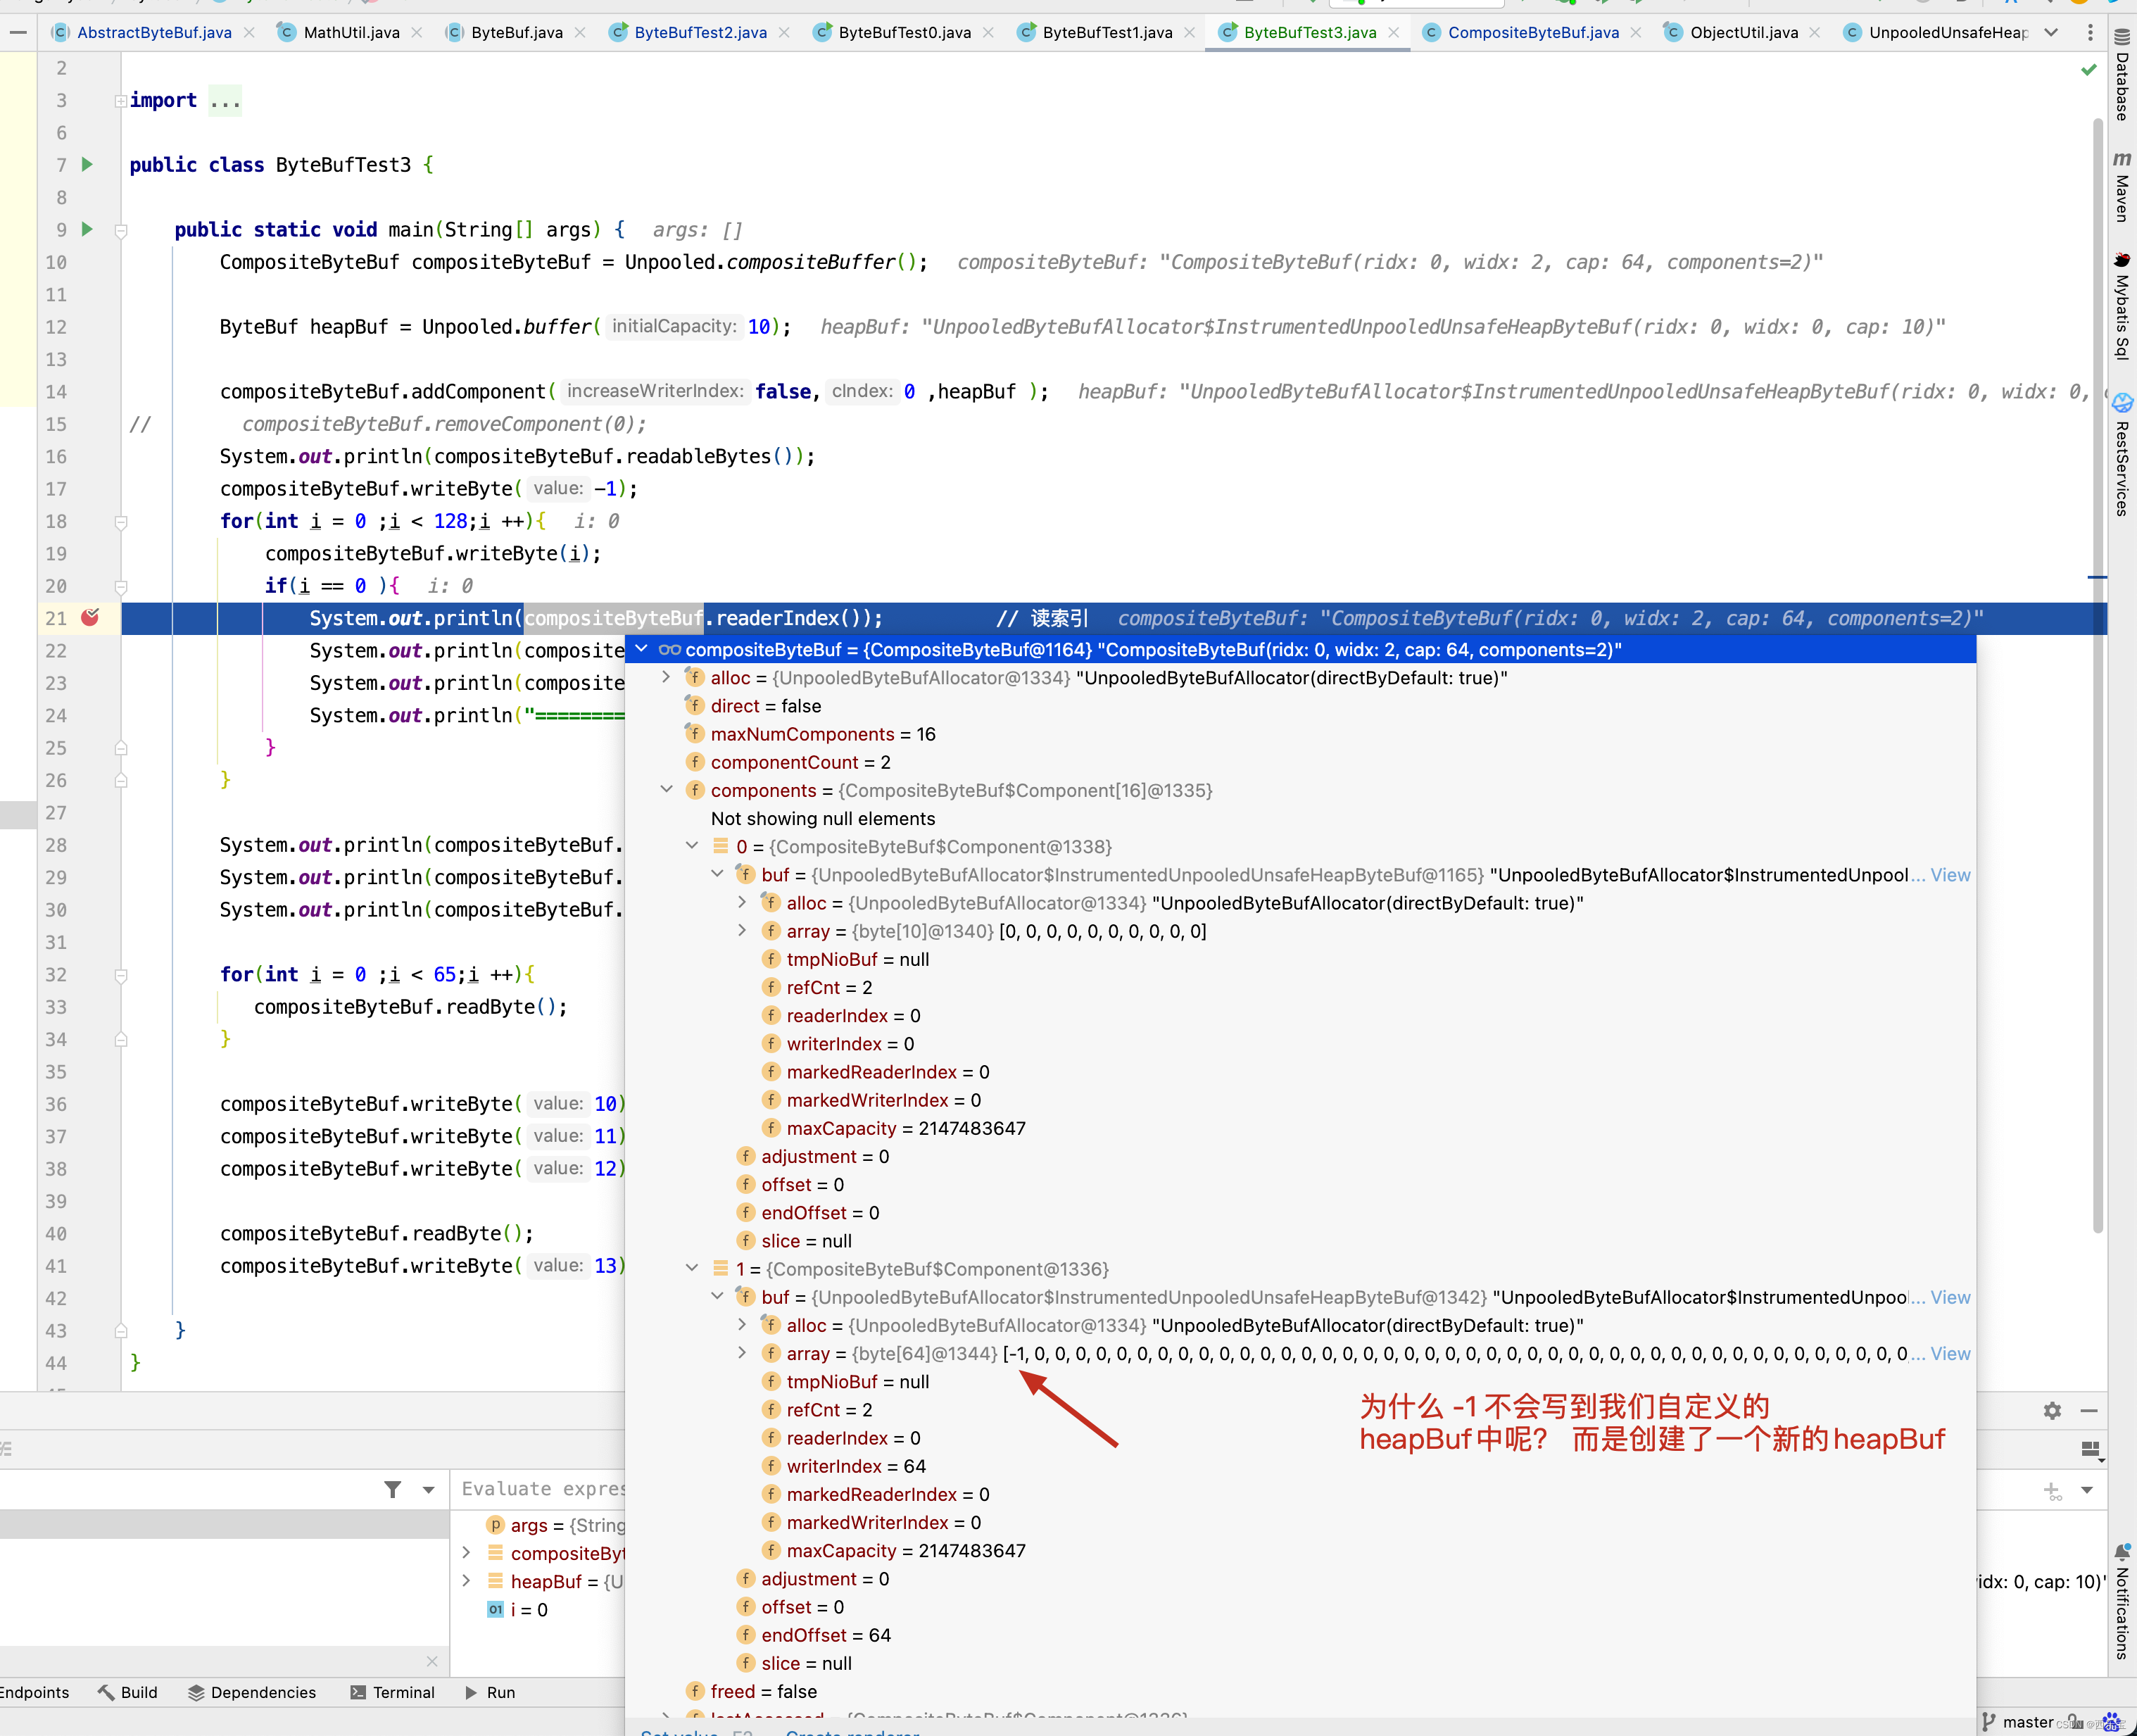
通过以上代码的剖析,对CompositeByteBuf的底层实现有了更进一步的了解,明白了它的内部是如何处理的数据的读/写的,如何添加新元素的,但细心的读者会发现,虽然Component是ByteBuf的包装对象,但它并没有像其他的派生类对象一样,调用retain0()方法,ByteBuf的引用计数器并没有任何改变,这个问题可以通过CompositeByteBuf在ByteToMessageDecoder解码器中的源码来找到答案 , 具体代码解读如下 。
 /**
 * Cumulate {@link ByteBuf}s by add them to a {@link CompositeByteBuf} and so do no memory copy whenever possible.
 * Be aware that {@link CompositeByteBuf} use a more complex indexing implementation so depending on your use-case
 * and the decoder implementation this may be slower then just use the {@link #MERGE_CUMULATOR}.
 * 复合缓冲区实现读半包字节容器
 */
public static final Cumulator COMPOSITE_CUMULATOR = new Cumulator() {
    @Override
    public ByteBuf cumulate(ByteBufAllocator alloc, ByteBuf cumulation, ByteBuf in) {
        ByteBuf buffer;
        try {
            /***
             * 引用大于1,说明用户使用了slice().retain()或duplicate().retain()
             * 命名refCnt增加且大于1
             * 此时扩容返回一个新的累积区ByteBuf
             * 以便对老的累积区ByteBuf进行后续的处理
             */
            if (cumulation.refCnt() > 1) {
                // Expand cumulation (by replace it) when the refCnt is greater then 1 which may happen when the
                // user use slice().retain() or duplicate().retain().
                //
                // See:
                // - https://github.com/netty/netty/issues/2327
                // - https://github.com/netty/netty/issues/1764
                buffer = expandCumulation(alloc, cumulation, in.readableBytes());
                buffer.writeBytes(in);
            } else {
                CompositeByteBuf composite;
                // 创建CompositeByteBuf ,如果已经创建过了,就不用重复创建了
                if (cumulation instanceof CompositeByteBuf) {
                    composite = (CompositeByteBuf) cumulation;
                } else {
                    // 创建CompositeByteBuf ,把cumulation包装成Component元素
                    // 并将其加入到复合缓冲区中
                    composite = alloc.compositeBuffer(Integer.MAX_VALUE);
                    composite.addComponent(true, cumulation);
                }
                // 把ByteBuf也加入到复合缓冲区中
                // 避免内存复制
                composite.addComponent(true, in);
                // 赋空值,由于ByteBuf 加入复合缓冲区后没有调用retain()方法,因此无须释放
                in = null;
                buffer = composite;
            }
            return buffer;
        } finally {
            // in 不为null,说明调用了buffer的writeBytes()方法,此时必须释放内存,以防止内存泄漏
            if (in != null) {
                // We must release if the ownership was not transferred as otherwise it may produce a leak if
                // writeBytes(...) throw for whatever release (for example because of OutOfMemoryError).
                in.release();
            }
        }
    }
};
最后,CompositeByteBuf还有一个重要的方法,即移除已经读字节,discardReadComponents(),其方法解读如下 。
/**
 * Discard all {@link ByteBuf}s which are read.
 * 移除缓冲区中已读字节
 */
public CompositeByteBuf discardReadComponents() {
    ensureAccessible();
    final int readerIndex = readerIndex();
    if (readerIndex == 0) {
        return this;
    }

    // Discard everything if (readerIndex = writerIndex = capacity).
    int writerIndex = writerIndex();
    // 若读/写索引等于容量,则说明容量已经使用完,全部释放即可
    if (readerIndex == writerIndex && writerIndex == capacity()) {
        for (int i = 0, size = componentCount; i < size; i++) {
            components[i].free();
        }
        lastAccessed = null;
        clearComps();
        setIndex(0, 0);
        adjustMarkers(readerIndex);
        return this;
    }

    // Remove read components.
    int firstComponentId = 0;
    Component c = null;
    // 从数组第一个元素开始遍历
    for (int size = componentCount; firstComponentId < size; firstComponentId++) {
        c = components[firstComponentId];
        // 如果结束位置大于读索引,则说明还有buf未读,无须再继续处理,否则需要释放
        if (c.endOffset > readerIndex) {
            break;
        }
        c.free();
    }
    // 一个都没有释放
    if (firstComponentId == 0) {
        return this; // Nothing to discard
    }
    // 最后一次访问时的子Buffer,若元素都被释放了,则置空它
    Component la = lastAccessed;
    if (la != null && la.endOffset <= readerIndex) {
        lastAccessed = null;
    }
    // 从数组中移除已经释放的元素
    removeCompRange(0, firstComponentId);

    // Update indexes and markers.
    // 更新读/写索引
    int offset = c.offset;
    // 从第一个元素开始更新元素的位置信息
    updateComponentOffsets(0);
    setIndex(readerIndex - offset, writerIndex - offset);
    // 更新标记索引
    adjustMarkers(offset);
    return this;
}


private void removeCompRange(int from, int to) {
    if (from >= to) {
        return;
    }
    final int size = componentCount;
    assert from >= 0 && to <= size;
    if (to < size) {
        // 若只移除中间元素,则需要把后面的元素向前移
        System.arraycopy(components, to, components, from, size - to);
    }
    // 处理后的元素个数
    int newSize = size - to + from;
    // 把移除的元素置空
    for (int i = newSize; i < size; i++) {
        components[i] = null;
    }
    // 更新元素个数
    componentCount = newSize;
}

private void updateComponentOffsets(int cIndex) {
    int size = componentCount;
    if (size <= cIndex) {
        return;
    }

    int nextIndex = cIndex > 0 ? components[cIndex - 1].endOffset : 0;
    for (; cIndex < size; cIndex++) {
        Component c = components[cIndex];
        c.reposition(nextIndex);
        nextIndex = c.endOffset;
    }
}
discardReadComponents()方法原理还是很简单的。
- 通过readerIndex定位到哪些components将被移除掉,需要被移除掉的components,调用其free()方法 。
- 设置最后一次访问的component
- 将未被读取的component从components数组向前平移
- 重置CompositeByteBuf的componentCount的值
- 重置每个component的offset和endOffset
- 重置CompositeByteBuf的readerIndex和writerIndex
- 调整CompositeByteBuf的markedReaderIndex和markedWriterIndex。
Netty ByteBuf所提供的3 种缓冲区的类型总结
- heap buffer
- direct buffer
- composite buffer
Heap Buffer (堆缓冲区)
这是最常用的类型, ByteBuf将数据存储到JVM的堆空间中, 并且将实际的数据存放到byte array中来实现。
优点:由于数据是存储在JVM的堆中,因此可以快速的创建与快速的释放,并且它提供了直接访问内部字节数组中的方法 。
缺点 : 每次读写数据时, 都需要将数据复制到直接缓冲区再进行网络传输。
Direct Buffer(直接缓冲区)
在堆之外直接分配内存空间, 直接缓冲区并不会占用堆的容量空间, 因为它是由操作系统在本地内存进行数据的分配 。
优点: 在使用Socket进行数据传递时, 性能非常的好,因为数据直接位于操作系统的本地内存中,所以不需要从JVM将数据复制到直接缓冲区中,性能很好。
缺点: 因为Direct Buffer是直接在操作系统的内存中, 所以内存空间的分配与释放要比堆空间更加复杂,而且速度更慢一些。
Netty 通过提高内存池来解决这个这个问题, 直接缓冲区并不支持通过字节数组的方式来访问数据 。
重点: 对于后端的业务消息来说,推荐使用HeapByteBuf,而对于 I/O通信线程在读写缓冲区时,推荐使用DirectByteBuf .
JDK的ByteBuffer与Netty的ByteBuf之间的差异 。
- Netty的ByteBuf采用了读写索引分离的策略(readerIndex 与 writerIndex) ,一个初始化(里面尚未有任何数据)的ByteBuf和readerIndex与writerIndex值都为0 。
- 当读索引与写索引处于同一个位置时,如果我们继续读取,那就会抛出常见的IndexOutBoundsException 。
- 对于ByteBuf的任何读写操作都会分别单独维护读索引与写索引,maxCapacity最大容量默认限制就是Integer.MAX_VALUE。
Netty内存泄漏检测机制源码剖析
Netty在默认情况下采用池化的PooledByteBuf,以提高程序的性能,但是PooledByteBuf在使用完毕后需要手动释放,否则会因PooledByteBuf申请的内存空间没有归还导致内存泄漏,最终使用内存溢出,一旦泄漏发生,在复杂的应用程序中找到未释放的ByteBuf并不是一件简单的事情,在没有工具辅助的情况下只检查所有的源码,效率很低。
为了解决这个问题,Netty运用了JDK的弱引用和引用队列设计一套专门的内存漏泄检测机制,用于实现对需要手动释放的ByteBuf对象的监控。
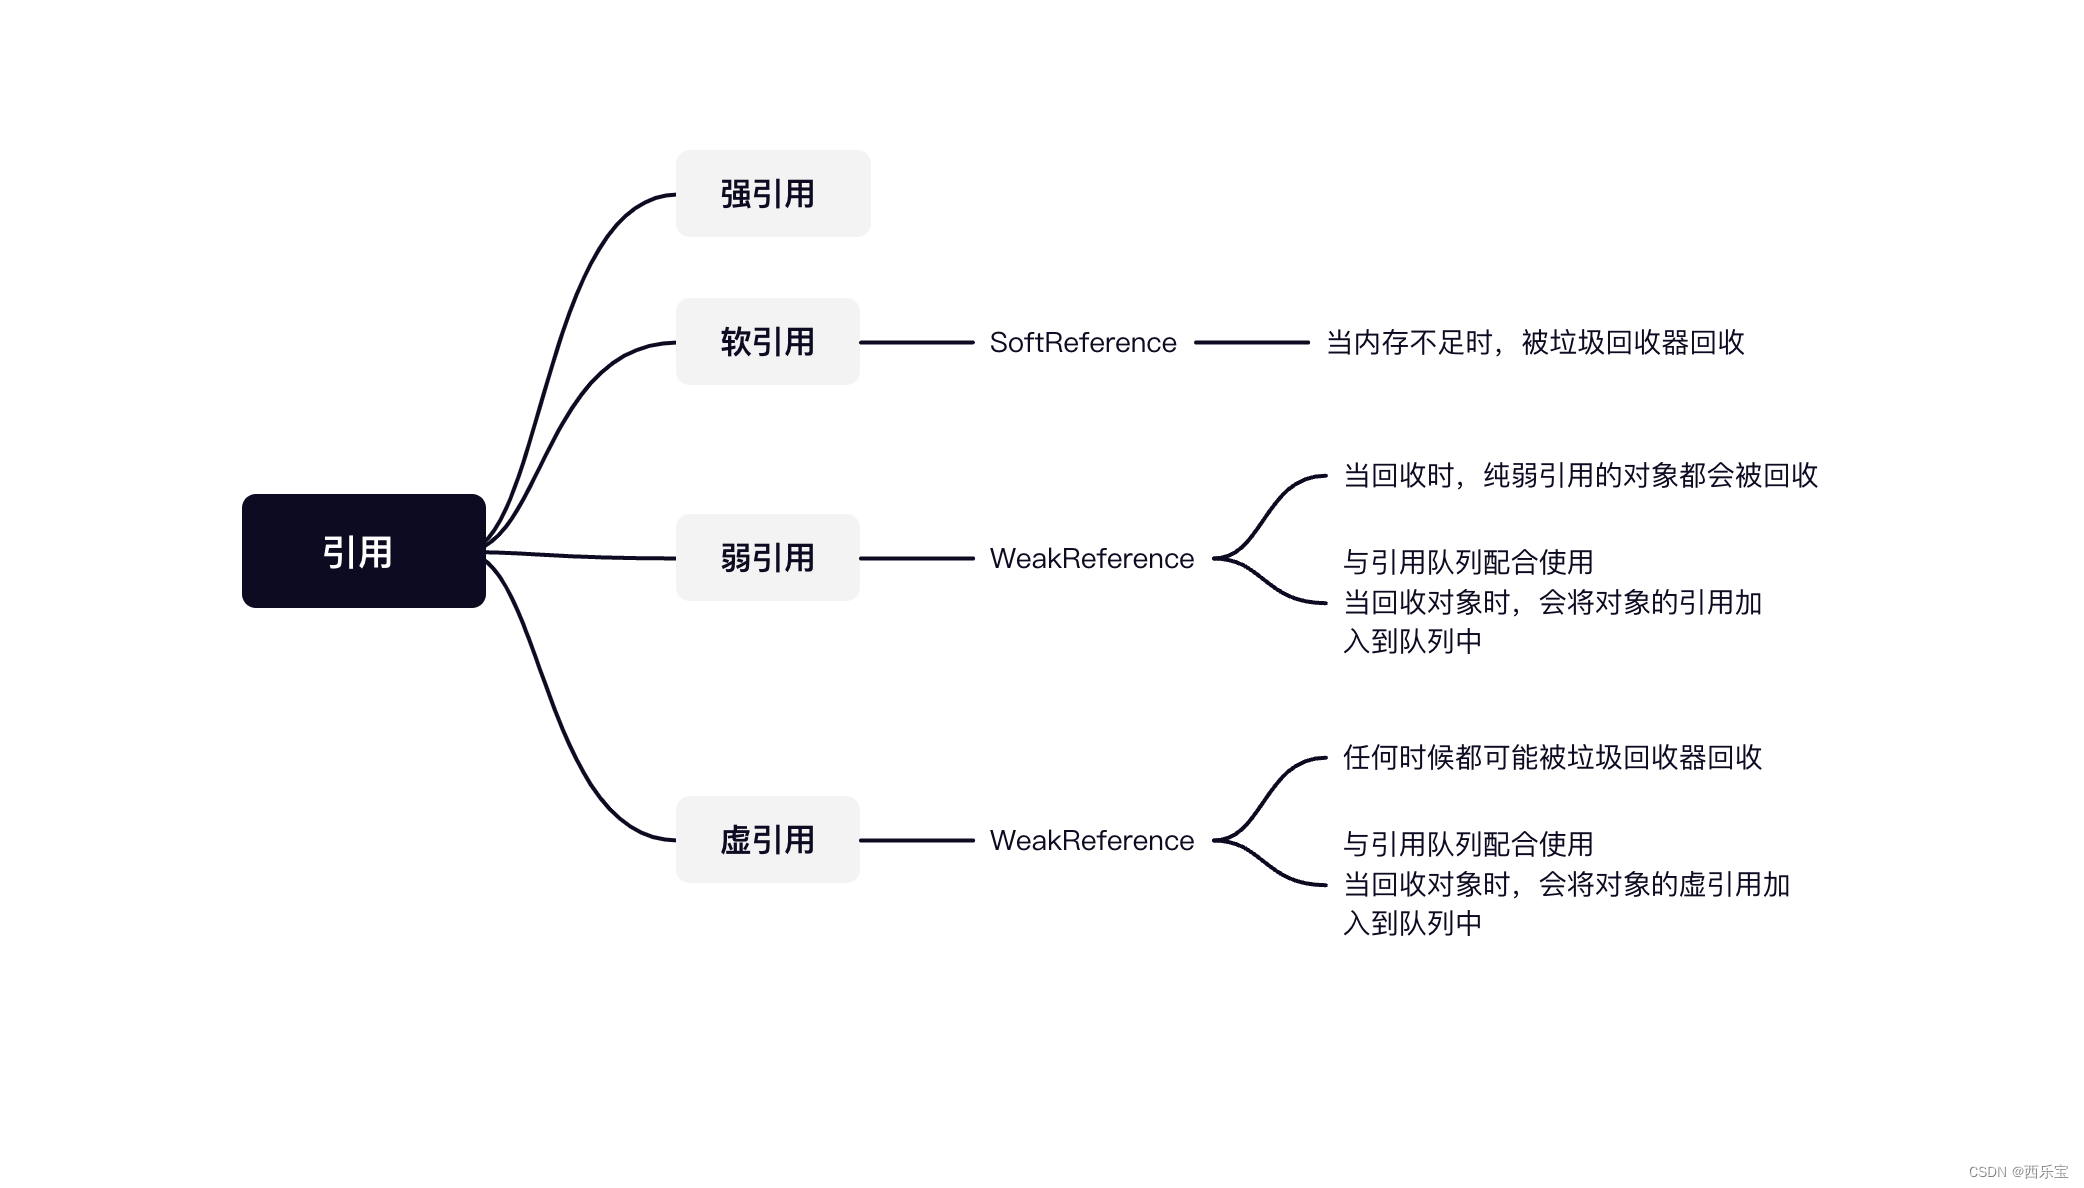
- 强引用:经常使用的编码方式,如果将一个对象赋值给一个变量 ,只要这个变量可用,那么这个对象的值就被该变量强引用了,否则垃圾回收器不会回收该对象 。
- 软引用,当内存不足时,被垃圾回收器回收,一般用于缓存
- 弱引用, 只要是发生回收的时候,纯弱引用的对象都会被回收,当对象未被回收时,弱引用可以获取引用的对象 。
- 虚引用,在任何时候都可能被垃圾回收器回收, 如果一个对象与虚引用关联 , 则该对象与没有引用与之关联时一样, 虚引用获取不到引用的对象 。
引用队列,与虚引用或弱引用配合使用, 当普通对象被垃圾回收器回收时, 会将对象的弱引用和虚引用加入到引用队列中,Netty运用这一特性来检测这些被回收的ByteBuf是否已经被释放了内存空间, 下面其实对其实现原理及源码进行剖析 。
内存泄漏检测原理
Netty内存泄漏检测机制主要是检测ByteBuf的内存是否正常释放,想要实现这种机制,就需要完成以下3步。
- 采集ByteBuf对象 。
- 记录ByteBuf的最新调用轨迹信息,方便溯源 。
- 检查是否有内存泄漏 , 并进行日志输出 。
第一,采集入口在内存分配器PooledByteAllocator的newDirectBuffer与newHeapBuffer方法中,对返回的ByteBuf对象做一层包装, 包装类分两种,SimpleLeakAwareByteBuf与AdvancedLeakAwardByteBuf。
AdvancedLeakAwardByteBuf是SimpleLeakAwareByteBuf的子类,它们的主要作用都是记录ByteBuf的调用轨迹,区别在于AdvancedLeakAwardByteBuf记录ByteBuf的所有操作,SimpleLeakAwardByteBuf只在ByteBuf被销毁时告诉内存泄漏检测工具把正常销毁的对象从检测缓存中移除,方便判断ByteBuf是否泄漏,不记录ByteBuf的操作 。
第二,每个ByteBuf的最新调用栈信息记录在其弱引用中,这个弱引用对象与ByteBuf都包装在SimpleLeakAwareByteBuf类中, 弱引用对象除了记录ByteBuf的调用轨迹 , 还要关闭检测的功能,因为当ByteBuf被销毁时需要关闭资源跟踪, 并清除对资源对象的引用,防止误报。 、
JDK的ByteBuffer的缺点:
- final byte[] hd 这是JDK的ByteBuffer对象中用于存储数据对象声明,可以看到,其字节数组是被声明为final的, 也就是长度是固定不变的,一旦分配好后就不能动态扩容和收缩 , 而且当待存储的数据字节很大时就可能出现IndexOutOfBoundException, 如果要预防这个异常, 那就需要存储之前完全确定好待存储字节大小,如果ByteBuf空间不足,我们只有一种解决文案,创建一个全新的ByteBuffer对象,然后再将之前的ByteBuffer中的数据复制过去,这一切的操作都需要由开发自己来手动完成 。
- ByteBuffer只使用了一个position指针来标识位置信息, 在进行读写切换时就需要调用flip方法或者是rewind()方法,使用起来不方便 。
Netty的ByteBuf的优点 :
- 存储字节数组是动态的,其最大值默认为Integer.MAX_VALUE,这里的动态性是体现在write方法中的, write方法在执行时会判断Buffer
内存泄漏器ResourceLeakDectector源码剖析
ResourceLeakDectector在整个内存泄漏检测机制中起核心作用,一种缓冲区资源会创建一个ResourceLeakDetector实例,并监控此缓冲区类型的池化资源(只介绍AbstractByteBuf类型的资源 ), ResourceLeakDetector和trace()方法是整个检测机制的入口 , 提供了资源采集的逻辑,运用全局的引用和引用缓存Set构建ByteBuf的弱引用对象,并检测当前监控资源是否出现了内存泄漏,若出现了内存泄漏,则输出泄漏报告及内存调用轨迹信息。
ResourceLeakDetector中有一个私有类-DefaultResourceLeak,实现了ResourceLeakTracker接口,主要负责跟踪资源的最近调用轨迹,同时继承了WeakReference弱引用,调用轨迹的记录被加入到DefaultResourceLeak的Record链表中, Record链表不会保存所有的记录,因为它的长度有一定限制 。
Netty的内存泄漏检测机制有以下的几种检测级别。
- DISABLED : 表示禁用,不开启检测 。
- SIMPLE: Netty的默认设置, 表示按一定的比例采集, 若采集的ByteBuf出现漏泄 , 则打印LEAK:XXX日志 。 但是没有ByteBuf的任何调用栈信息输出,因为它使用的包装类是SimpleLeakAwareByteBuf,不会进行记录。
- ADVANCED: 它的采集与SIMPLE级别的采集一样,但会输出ByteBuf的调用栈信息,因为它使用的包装类是AdvancedLeakAwareByteBuf .
- PARANOID:偏执级别,这种级别对ADVANCED的基础上按100% 的比例采集 。
当系统处于开发和功能测试阶段时, 一般会把级别设置为PARANOID,容易发现问题,在系统正式上线后,会把级别降到SIMPLE,若出现了泄漏日志的情况,则在重启服务后,可以把级别调到ADVANCED,查找内存泄漏的轨迹 ,方便定位 , 当系统上线很长的一段时间后,比较稳定了, 可以禁用内存泄漏检测机制,Netty 对这些级别的处理具体是怎样实现按一定比例采集的呢? 通过接下来的源码解读去寻找答案 。
回到DefaultResourceLeak,以PooledByteBufAllocator.newDirectBuffer()申请池化的直接内存为例,它创建完ByteBuf后不会立即返回,它需要在ByteBuf发生泄漏时感知到,因此需要对ByteBuf做一个包装。
public ByteBuf newDirectBuffer(int initialCapacity, int maxCapacity) {
	// 申请一个池化的,基于直接内存的ByteBuf,这里的细节先不管
    PoolThreadCache cache = threadCache.get();

    PoolArena<ByteBuffer> directArena = cache.directArena;

    final ByteBuf buf;
    if (directArena != null) {
        buf = directArena.allocate(cache, initialCapacity, maxCapacity);
    } else {
        buf = PlatformDependent.hasUnsafe() ?
                UnsafeByteBufUtil.newUnsafeDirectByteBuf(this, initialCapacity, maxCapacity) :
                new UnpooledDirectByteBuf(this, initialCapacity, maxCapacity);
    }
	// 尝试感知Buf的资源泄漏
    return toLeakAwareBuffer(buf);
}
源码解读先从入口 AbstractByteBufAllocator的toLeakAwareBuffer()方法开始 。 具体的代码解读如下 :
// Netty的内存泄漏检测机制有以下4种检测级别。
// 内存泄漏检测入口
// ByteBuf 在分配后需要次给内存泄漏检测处理
// 处理完后对ByteBuf 对象进行相应的包装并返回
protected static ByteBuf toLeakAwareBuffer(ByteBuf buf) {
    // 弱引用
    ResourceLeakTracker<ByteBuf> leak;
    switch (ResourceLeakDetector.getLevel()) {
        // 默认级别
        case SIMPLE:
            /**
             * 每种类型的资源都会创建一个内存泄漏检测器ResourceLeakDetector, 通过内存泄漏检测器获取弱引用
             */
            leak = AbstractByteBuf.leakDetector.track(buf);
            // 若弱引用不为空, 则说明此buf被采集了, buf 一旦被采集, 就需要返回对应级别的包装对象,否则会出现误报
            if (leak != null) {
                buf = new SimpleLeakAwareByteBuf(buf, leak);
            }
            break;
            // 高级和偏执级别,由于它们都需要被追踪buf的调用轨迹 , 因此返回的包装对象相同
        case ADVANCED:
        case PARANOID:
            leak = AbstractByteBuf.leakDetector.track(buf);
            if (leak != null) {
                buf = new AdvancedLeakAwareByteBuf(buf, leak);
            }
            break;
        default:
            break;
    }
    return buf;
}
AbstractByteBuf.leakDetector.track(buf)方法比较核心,它会返回一个buf的泄漏追踪器,当buf被正常释放时,包装类会自动关闭追踪器,反之资源泄漏时,追踪器可以感知到,并发出报告。
重点关注内存泄漏检测器的track()方法,此方法不仅采集了buf,还会在采集完后,检测是否有内存泄漏buf,并打印日志,具体代码解读如下 :
// 重点关注内存泄漏检测器的track()方法,此方法不仅采集buf, 还会在采集完后,检测是否有内存泄漏的buf,并打印日志。具体代码 解读如下:
public final ResourceLeakTracker<T> track(T obj) {
    return track0(obj);
}

private DefaultResourceLeak track0(T obj) {
    // 获取内存泄漏检测级别
    Level level = ResourceLeakDetector.level;
    // 不检测,也不采集
    if (level == Level.DISABLED) {
        return null;
    }

    // 当级别比偏执级别低时,获取一个128以内的随机数, 若得到的数不为0,则不采集,若为0,则检测是否有泄漏,并输出泄漏日志,同时创建一个弱引用
    if (level.ordinal() < Level.PARANOID.ordinal()) {
        if ((PlatformDependent.threadLocalRandom().nextInt(samplingInterval)) == 0) {
            reportLeak();
            return new DefaultResourceLeak(obj, refQueue, allLeaks);
        }
        return null;
    }
    // 偏执级别都采集
    reportLeak();
    return new DefaultResourceLeak(obj, refQueue, allLeaks);
}


private void reportLeak() {
    if (!logger.isErrorEnabled()) {
        clearRefQueue();
        return;
    }

    // Detect and report previous leaks.
    // 循环获取引用队列中的弱引用
    for (;;) {
        @SuppressWarnings("unchecked")
        DefaultResourceLeak ref = (DefaultResourceLeak) refQueue.poll();
        if (ref == null) {
            break;
        }

        // 检测是否泄漏 , 若未泄漏,则继续下一次循环
        if (!ref.dispose()) {
            continue;
        }

        // 获取buf的调用栈信息
        String records = ref.toString();
        // 不再输出曾经输出过的泄漏记录
        if (reportedLeaks.putIfAbsent(records, Boolean.TRUE) == null) {
            if (records.isEmpty()) {
                reportUntracedLeak(resourceType);
            } else {
                // 输出内存泄漏日志及其调用栈信息
                reportTracedLeak(resourceType, records);
            }
        }
    }
}

// 断是否泄漏
boolean dispose() {
	// 清理对资源对象的引用
	clear();
	// 若引用缓存还存在此引用,则说明buf未释放,内存泄漏了
	return allLeaks.remove(this);
}


弱引用重写了toString()方法, 需要注意,若采用IDE工具debug 调试代码则在处理对象时,IDE 会自动调用toString()方法
    public String toString() {
        // 获取记录列表的头部
        Record oldHead = headUpdater.getAndSet(this, null);
        // 若无记录,则返回空字符串
        if (oldHead == null) {
            // Already closed
            return EMPTY_STRING;
        }

        // 若记录太长,则会丢弃部分记录,获取丢弃了多少记录
        final int dropped = droppedRecordsUpdater.get(this);
        int duped = 0;

        // 由于每次在链表新增头部时,其pos=旧的pos + 1 , 因此最新的链表头部的pos就是链表的长度
        int present = oldHead.pos + 1;
        // Guess about 2 kilobytes per stack trace
        // 设置buf容量(大概为2KB栈信息 * 链表长度  ) ,并添加换行符
        StringBuilder buf = new StringBuilder(present * 2048).append(NEWLINE);
        buf.append("Recent access records: ").append(NEWLINE);

        int i = 1;
        Set<String> seen = new HashSet<String>(present);
        for (; oldHead != Record.BOTTOM; oldHead = oldHead.next) {
            // 获取调用栈信息
            String s = oldHead.toString();
            if (seen.add(s)) {
                // 遍历到最初的记录与其他节点输出有所不同
                if (oldHead.next == Record.BOTTOM) {
                    buf.append("Created at:").append(NEWLINE).append(s);
                } else {
                    buf.append('#').append(i++).append(':').append(NEWLINE).append(s);
                }
            } else {
                // 出现重复的记录
                duped++;
            }
        }
        // 当出现重复的记录时, 加上特殊的日志
        if (duped > 0) {
            buf.append(": ")
                    .append(duped)
                    .append(" leak records were discarded because they were duplicates")
                    .append(NEWLINE);
        }
        // 若出现记录数超过了TARGET_RECORDS(默认为4), 则输出丢弃了多少记录等额外信息,可以通过设置
        // io.netty.leakDetection.targetRecords来修改记录的长度
        if (dropped > 0) {
            buf.append(": ")
               .append(dropped)
               .append(" leak records were discarded because the leak record count is targeted to ")
               .append(TARGET_RECORDS)
               .append(". Use system property ")
               .append(PROP_TARGET_RECORDS)
               .append(" to increase the limit.")
               .append(NEWLINE);
        }

        buf.setLength(buf.length() - NEWLINE.length());
        return buf.toString();
    }
}


    /**
 * This method is called when an untraced leak is detected. It can be overridden for tracking how many times leaks
 * have been detected.
 */
protected void reportUntracedLeak(String resourceType) {
    logger.error("LEAK: {}.release() was not called before it's garbage-collected. " +
            "Enable advanced leak reporting to find out where the leak occurred. " +
            "To enable advanced leak reporting, " +
            "specify the JVM option '-D{}={}' or call {}.setLevel() " +
            "See https://netty.io/wiki/reference-counted-objects.html for more information.",
            resourceType, PROP_LEVEL, Level.ADVANCED.name().toLowerCase(), simpleClassName(this));
}


/**
 * This method is called when a traced leak is detected. It can be overridden for tracking how many times leaks
 * have been detected.
 */
protected void reportTracedLeak(String resourceType, String records) {
    logger.error(
            "LEAK: {}.release() was not called before it's garbage-collected. " +
            "See https://netty.io/wiki/reference-counted-objects.html for more information.{}",
            resourceType, records);
}
在ADVANCED之上的级别的操作中,ByteBuf的每项操作都涉及线程调用栈轨迹记录, 那么该如何获取线程调用栈的调用信息呢? 在记录某个点的调用栈信息时,Netty会创建一个Record对象,Record类继承Exception的父类Throwable,因此创建对象时,当前线程的调用栈信息就会保存起来 , 关于调用栈信息的保存及获取代码解读如下。
// ResourceLeakDetector中有个私有类——DefaultResourceLeak, 实现了ResourceLeakTracker接口,主要负责跟踪资源的最近调用轨 迹,
// 同时继承WeakReference弱引用。调用轨迹的记录被加入DefaultResourceLeak的Record链表中,Record链表不会保存所有记 录,因为它的长度有一定的限制。
private static final class DefaultResourceLeak<T>
        extends WeakReference<Object> implements ResourceLeakTracker<T>, ResourceLeak {

    @SuppressWarnings("unchecked") // generics and updaters do not mix.
    private static final AtomicReferenceFieldUpdater<DefaultResourceLeak<?>, Record> headUpdater =
            (AtomicReferenceFieldUpdater)
                    AtomicReferenceFieldUpdater.newUpdater(DefaultResourceLeak.class, Record.class, "head");

    @SuppressWarnings("unchecked") // generics and updaters do not mix.
    private static final AtomicIntegerFieldUpdater<DefaultResourceLeak<?>> droppedRecordsUpdater =
            (AtomicIntegerFieldUpdater)
                    AtomicIntegerFieldUpdater.newUpdater(DefaultResourceLeak.class, "droppedRecords");

    @SuppressWarnings("unused")
    private volatile Record head;
    @SuppressWarnings("unused")
    private volatile int droppedRecords;

    private final Set<DefaultResourceLeak<?>> allLeaks;
    private final int trackedHash;

    DefaultResourceLeak(
            Object referent,
            ReferenceQueue<Object> refQueue,
            Set<DefaultResourceLeak<?>> allLeaks) {
        super(referent, refQueue);

        assert referent != null;

        // Store the hash of the tracked object to later assert it in the close(...) method.
        // It's important that we not store a reference to the referent as this would disallow it from
        // be collected via the WeakReference.
        trackedHash = System.identityHashCode(referent);
        allLeaks.add(this);
        // Create a new Record so we always have the creation stacktrace included.
        headUpdater.set(this, new Record(Record.BOTTOM));
        this.allLeaks = allLeaks;
    }

    @Override
    public void record() {
        record0(null);
    }

    @Override
    public void record(Object hint) {
        record0(hint);
    }
/*
 *  记录调用轨迹
 */
private void record0(Object hint) {
    // Check TARGET_RECORDS > 0 here to avoid similar check before remove from and add to lastRecords
    // 如果 TARGET_RECORDS > 0 则记录
    if (TARGET_RECORDS > 0) {
        Record oldHead;
        Record prevHead;
        Record newHead;
        boolean dropped;
        do {
            // 判断记录链头是否为空,为空表示已经关闭,把之前的链头作为第二个元素赋值给新链表
            if ((prevHead = oldHead = headUpdater.get(this)) == null) {
                // already closed.
                return;
            }
            // 获取链表的长度
            final int numElements = oldHead.pos + 1;
            if (numElements >= TARGET_RECORDS) {
                // backOffFactor 是用来计算是否替换的因子 , 其最小值为numElements-TARGET_RECORDS ,元素越多,其值越大,最大值为30
                final int backOffFactor = Math.min(numElements - TARGET_RECORDS, 30);
                // 1/2^backOffFactor的概率不会执行此if 代码块, prevHead = oldHead.next 表示用之前的链头元素作为新链表的第二个元素
                // 丢弃原来的链头, 同时设置 drapped 为false
                if (dropped = PlatformDependent.threadLocalRandom().nextInt(1 << backOffFactor) != 0) {
                    prevHead = oldHead.next;
                }
            } else {
                dropped = false;
            }
            // 创建一个新的Record ,并将其添加到链表上, 作为链表的新的头部
            newHead = hint != null ? new Record(prevHead, hint) : new Record(prevHead);
        } while (!headUpdater.compareAndSet(this, oldHead, newHead));
        // 若有丢弃,则更新记录丢弃的数
        if (dropped) {
            droppedRecordsUpdater.incrementAndGet(this);
        }
    }
}

// Record 的toString() 方法获取Record创建时的调用栈信息
public String toString() {
    StringBuilder buf = new StringBuilder(2048);
    // 先添加提示信息
    if (hintString != null) {
        buf.append("\tHint: ").append(hintString).append(NEWLINE);
    }
    // Append the stack trace.
    // 再添加栈信息
    StackTraceElement[] array = getStackTrace();
    // Skip the first three elements.
    // 跳过前面的3个栈元素 , 因为他们是record()方法的栈信息,显示没有意义
    out: for (int i = 3; i < array.length; i++) {
        StackTraceElement element = array[i];
        // Strip the noisy stack trace elements.
        // 跳过一些不必要的方法信息
        String[] exclusions = excludedMethods.get();
        for (int k = 0; k < exclusions.length; k += 2) {
            if (exclusions[k].equals(element.getClassName())
                    && exclusions[k + 1].equals(element.getMethodName())) {
                continue out;
            }
        }
        // 格式化
        buf.append('\t');
        buf.append(element.toString());
        // 加上换行
        buf.append(NEWLINE);
    }
    return buf.toString();
}
关于内存泄漏这一块,看了这么多,可能还是会比较晕,我们将内存泄漏这一块抽取出来,模拟一个简单的例子,从而更加深刻的理解Netty内存泄漏这一块的原理 。
final class MyAdvancedLeakAwareByteBuf extends MyByteBuf {

    private MyByteBuf buf;

    private MyResourceLeakTracker leak;

    MyAdvancedLeakAwareByteBuf(MyByteBuf buf, MyResourceLeakTracker<MyByteBuf> leak) {
        this.buf = buf;
        this.leak = leak;
    }


    public int getInt() {
        recordLeakNonRefCountingOperation(leak);
        return buf.getInt();
    }

    public int setInt(int index) {
        recordLeakNonRefCountingOperation(leak);
        return buf.getInt();
    }


    static void recordLeakNonRefCountingOperation(MyResourceLeakTracker<MyByteBuf> leak) {
        leak.record();
    }
}

public class MyByteBuf {
    public int getInt() {
        return 1;
    }

    public int setInt(int index) {
        return 1;
    }
}

public interface MyResourceLeakTracker<T> {
    void record();
    void record(Object hint);
    boolean close(T trackedObject);
}


public class MyResourceLeakDetector<T> {

    public static final String EMPTY_STRING = "";
    public static final String NEWLINE = "\n";

    // 活跃的资源集合
    private final Set<MyDefaultResourceLeak<?>> allLeaks =
            Collections.newSetFromMap(new ConcurrentHashMap<MyDefaultResourceLeak<?>, Boolean>());

    private final ReferenceQueue<Object> refQueue = new ReferenceQueue<Object>();

    public final MyDefaultResourceLeak<T> track(T obj) {
        return track0(obj);
    }

    private MyDefaultResourceLeak track0(T obj) {
        // 偏执级别都采集
        reportLeak();
        return new MyDefaultResourceLeak(obj, refQueue, allLeaks);
    }

    private void reportLeak() {
        // Detect and report previous leaks.
        // 循环获取引用队列中的弱引用
        for (; ; ) {
            @SuppressWarnings("unchecked")
            MyDefaultResourceLeak ref = (MyDefaultResourceLeak) refQueue.poll();
            if (ref == null) {
                // 没有泄漏对象,则退出循环
                break;
            }
            // 获取buf的调用栈信息
            String records = ref.toString();
            System.out.println("=============recodes = " + records);
        }
    }

    private static final class MyDefaultResourceLeak<T> extends WeakReference<Object> implements MyResourceLeakTracker {

        @SuppressWarnings("unused")
        private volatile MyRecord head;
        @SuppressWarnings("unused")
        private volatile int droppedRecords;
        // 活跃的资源集合
        private final Set<MyDefaultResourceLeak<?>> allLeaks;
        // 追踪对象的一致性哈希码,确保关闭对象和追踪对象一致

        private static final AtomicReferenceFieldUpdater<MyDefaultResourceLeak<?>, MyRecord> headUpdater =
                (AtomicReferenceFieldUpdater)
                        AtomicReferenceFieldUpdater.newUpdater(MyDefaultResourceLeak.class, MyRecord.class, "head");


        public MyDefaultResourceLeak(
                Object referent,
                ReferenceQueue<Object> refQueue,
                Set<MyDefaultResourceLeak<?>> allLeaks) {
            super(referent, refQueue);
            assert referent != null;

            allLeaks.add(this);
            // Create a new Record so we always have the creation stacktrace included.
            // 记录追踪的堆栈信息,TraceRecord.BOTTOM代表链尾
            MyRecord myRecord = new MyRecord(MyRecord.BOTTOM);
            headUpdater.set(this,myRecord );
            this.allLeaks = allLeaks;
        }

        @Override
        public void record() {
            record0(null);
        }

        private void record0(Object hint) {
            MyRecord oldHead;
            MyRecord prevHead;
            MyRecord newHead;
            do {
                // 判断记录链头是否为空,为空表示已经关闭,把之前的链头作为第二个元素赋值给新链表
                if ((prevHead = oldHead = headUpdater.get(this)) == null) {
                    // already closed.
                    return;
                }
                // 创建一个新的Record ,并将其添加到链表上, 作为链表的新的头部
                newHead = new MyRecord(prevHead);
            } while (!headUpdater.compareAndSet(this, oldHead, newHead));
        }

        @Override
        public void record(Object hint) {

        }

        @Override
        public boolean close(Object trackedObject) {
            return false;
        }

        @Override
        // 弱引用重写了toString()方法, 需要注意,若采用IDE工具debug 调试代码则在处理对象时,IDE 会自动调用toString()方法
        public String toString() {
           // 获取记录列表的头部
            MyRecord oldHead = headUpdater.getAndSet(this, null);
            // 若无记录,则返回空字符串
            if (oldHead == null) {
                // Already closed
                return EMPTY_STRING;
            }

            for (; oldHead != MyRecord.BOTTOM; oldHead = oldHead.next) {
                // 获取调用栈信息
                String s = oldHead.toString();
                System.out.println(s);
            }

            return "";
        }
    }

    private static final class MyRecord extends Throwable {
        private static final long serialVersionUID = 6065153674892850720L;

        public static final MyRecord BOTTOM = new MyRecord();
        // 下一个节点
        public final MyRecord next;
        public final int pos;

        /**
         * @param next 下一个节点
         * @param hint 额外的提示信息
         */
        MyRecord(MyRecord next, Object hint) {
            // This needs to be generated even if toString() is never called as it may change later on.
            //hintString = hint instanceof ResourceLeakHint ? ((ResourceLeakHint) hint).toHintString() : hint.toString();
            this.next = next;
            this.pos = next.pos + 1;
        }

        MyRecord(MyRecord next) {
            this.next = next;
            this.pos = next.pos + 1;
        }

        // Used to terminate the stack
        private MyRecord() {
            next = null;
            pos = -1;
        }


        @Override
        // Record 的toString() 方法获取Record创建时的调用栈信息
        public String toString() {
            StringBuilder buf = new StringBuilder(2048);
            // Append the stack trace.
            // 再添加栈信息
            StackTraceElement[] array = getStackTrace();
            // Skip the first three elements.
            // 跳过前面的3个栈元素 , 因为他们是record()方法的栈信息,显示没有意义
            out:
            for (int i = 3; i < array.length; i++) {
                StackTraceElement element = array[i];
                // 格式化
                buf.append('\t');
                buf.append(element.toString());
                // 加上换行
                buf.append(NEWLINE);
            }
            return buf.toString();
        }
    }
}

public class LeakTest {
    public static void main(String[] args) {
        MyByteBuf buf = new MyByteBuf();

        MyResourceLeakDetector leakDetector = new MyResourceLeakDetector();

        MyResourceLeakTracker<MyByteBuf> leak = leakDetector.track(buf);

        MyAdvancedLeakAwareByteBuf wrapperBuf= new MyAdvancedLeakAwareByteBuf(buf, leak);

        wrapperBuf.getInt();

        wrapperBuf.setInt(1);

      leak.toString();
    }
}
如果出现内存泄漏,则从Record对象中获取调用堆栈信息 。
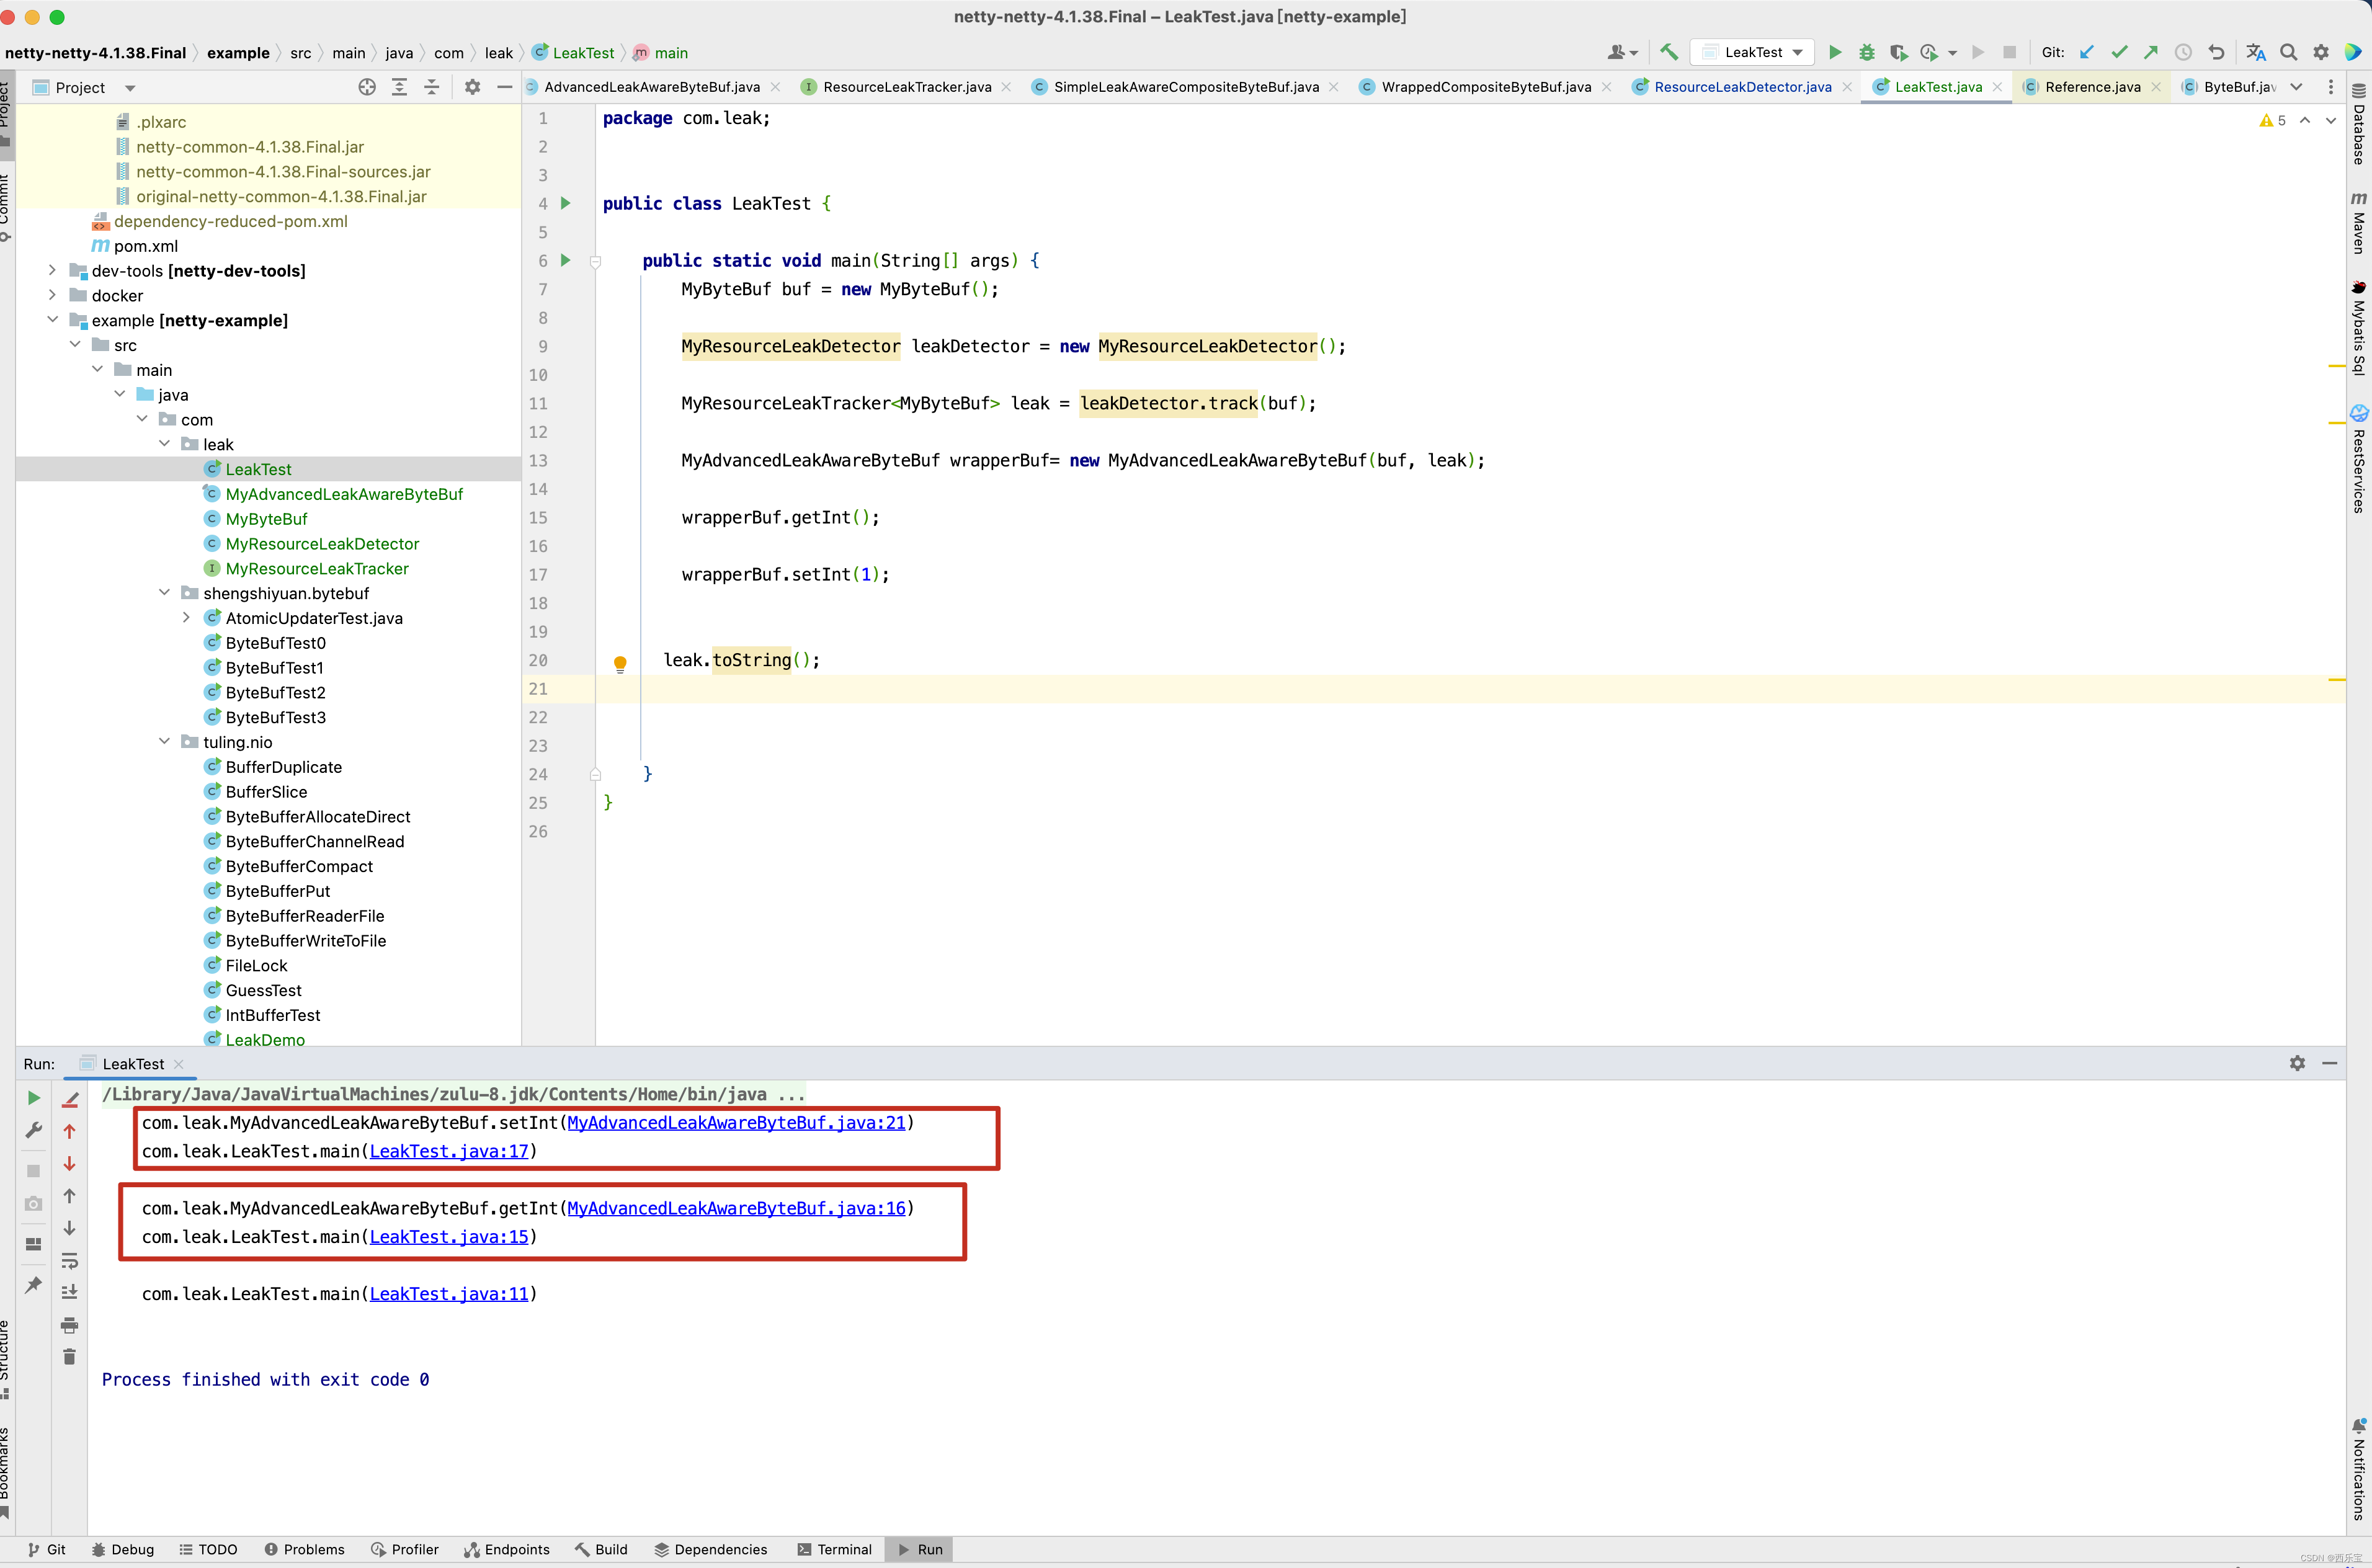
这个例子,基本上模拟出Netty的内存检测原理。 首先看leakDetector.track(buf);这一行代码,这一行代码的内部有一个非常重要的方法reportLeak(),这个方法有什么用呢? reportLeak()方法的内部会调用 refQueue.poll();这一行代码,如果能从refQueue.poll()中获得元素,并且没有从allLeaks中移除,则证明内存泄漏了。 因此需要调用DefaultResourceLeak的toString()方法打印ByteBuf的方法调用栈,以AdvancedLeakAwareCompositeByteBuf为例,AdvancedLeakAwareCompositeByteBuf类实际上是一个装饰器类, 对CompositeByteBuf的所有的方法都做了一层包装,每次调用CompositeByteBuf的具体方法前都会调用recordLeakNonRefCountingOperation()方法,实际上是调用了leak的record()方法,而record的方法主要目地是创建一个Record对象,Record对象中存储了CompositeByteBuf调用的堆栈信息,将创建的Record对象存储到DefaultResourceLeak的head链表中,而DefaultResourceLeak的toString()方法是遍历出所有的Record对象,并打印出其堆栈信息。
至此,整个内存泄漏的检测机制的源码已经解读完了,通过学习Netty的这套内存泄漏机制,不仅了解了如何检测内存泄漏还对栈信息的保存和弱引用,虚引用的应用有了一定的了解,在研究源码时,建议大家不太理解的地方,写一个测试用例进行调试。
public static void main(String[] args) {
    // 创建字符串对象
    String str = new String("内存泄漏检测 ");
    // 创建一个引用队列
    ReferenceQueue referenceQueue = new ReferenceQueue<>();
    // 创建一个弱引用,弱引用引用str字符串
    WeakReference weakReference = new WeakReference(str, referenceQueue);
    // 切断str 引用和内存泄漏检测,字符串之间的引用
    str = null;
    // 取出弱引用所引用的对象,若是虚引用,则虚引用无法获取被引用的对象
    System.out.println(weakReference.get());
    System.gc();
    // 强制垃圾回收
    System.runFinalization();
    // 垃圾回收后,弱引用将被放到引用队列,取出引用队列中的引用并与weakReference进行比较,应输出true
    System.out.println(referenceQueue.poll() == weakReference);
}
Netty根据WeakReference弱引用来判断对象是否发生内存泄漏,通过创建一个追踪对象的装饰类来进行增强,当追踪对象被release后,自动关闭追踪器,否则在发生泄漏时进行报告。
如果开启了资源泄漏检测,Netty会为追踪对象创建一个泄漏追踪器ResourceLeakTracker,ResourceLeakTracker包含一个单向链表,链表由一系列Record组成,它代表的是对象访问的堆栈记录,如果发生了资源泄漏,Netty会根据这个链表构建资源泄漏的位置信息并写入日志。
Netty提供了两种检测机制,分别是简单的和高级的,对于高级检测,Netty还会记录追踪对象的访问堆栈信息,在报告时可以快速定位到资源泄漏的具体位置,缺点是这会带来较大的额外开销,不建议在线上使用。
public boolean release() {
    // Call unwrap() before just in case that super.release() will change the ByteBuf instance that is returned
    // by unwrap().
    ByteBuf unwrapped = unwrap();
    if (super.release()) {
        closeLeak(unwrapped);
        return true;
    }
    return false;
}

private void closeLeak(ByteBuf trackedByteBuf) {
    // Close the ResourceLeakTracker with the tracked ByteBuf as argument. This must be the same that was used when
    // calling DefaultResourceLeak.track(...).
    boolean closed = leak.close(trackedByteBuf);
    assert closed;
}

@Override
public boolean close(T trackedObject) {
    // Ensure that the object that was tracked is the same as the one that was passed to close(...).
    assert trackedHash == System.identityHashCode(trackedObject);
    try {
        return close();
    } finally {
        // This method will do `synchronized(trackedObject)` and we should be sure this will not cause deadlock.
        // It should not, because somewhere up the callstack should be a (successful) `trackedObject.release`,
        // therefore it is unreasonable that anyone else, anywhere, is holding a lock on the trackedObject.
        // (Unreasonable but possible, unfortunately.)
        reachabilityFence0(trackedObject);
    }
}
public boolean close() {
    if (allLeaks.remove(this)) {
        // Call clear so the reference is not even enqueued.
        clear();
        headUpdater.set(this, null);
        return true;
    }
    return false;
}
在release()方法中, 可以看到,最终调用了allLeaks.remove(this)和 headUpdater.set(this, null) 方法,此时DefaultResourceLeak的head属性将变为空,而allLeaks中肯定没有DefaultResourceLeak对象了。 而 dispose()方法肯定返回false,只要调用了release()方法,肯定不会打印Record对象中的堆栈信息 ,证明没有发生内存泄漏 。
在内存泄漏检测代码中,用到了一个headUpdater变量,而关于AtomicReferenceFieldUpdater的使用,我们可以根据两个例子来举例说明 。 第一个例子,先看AtomicIntegerFieldUpdater的使用,在多线程下存在并发问题,通过AtomicIntegerFieldUpdater就能很好的解决锁的竞争 。
public class AtomicIntegerFieldUpdaterTest {

    public static void main(String[] args) throws Exception {
        //        Person person = new Person();
        //
        //        for (int i = 0; i < 10; ++i) {
        //            Thread thread = new Thread(() -> {
        //
        //                try {
        //                    Thread.sleep(20);
        //                } catch (InterruptedException e) {
        //                    e.printStackTrace();
        //                }
        //
        //                System.out.println(person.age++);
        //            });
        //
        //            thread.start();
        //        }
        User user = new User();
        // 如果更新器是AtomicIntegerFieldUpdater
        // 1. 更新器更新的必须是int类型的变量,不能是其包装类型。
        // 2. 更新器更新的必须是volatile变量 , volatile防止指令重排序 ,确保线程之间共享变量时的立即可见性
        // 3. 变量不能是static,必须要是实例变量,因为Unsafe.objectFieldOffset()方法不支持静态变量(CAS操作本质上是通过对象实例的偏移量来直接进行赋值的)
        // 4. 更新器只能修改它可见范围内的变量,因为更新器是通过反射来得到这个变量的,如果这个变量不可见,就报错
        // 如果要更新的变量是包装类型的变量,那么可以使用AtomicReferenceFieldUpdater来实现。
        AtomicIntegerFieldUpdater<User> atomicIntegerFieldUpdater = AtomicIntegerFieldUpdater.
                newUpdater(User.class, "age");

        for (int i = 0; i < 10; ++i) {
            Thread thread = new Thread(() -> {
                try {
                    Thread.sleep(20);
                } catch (InterruptedException e) {
                    e.printStackTrace();
                }
                atomicIntegerFieldUpdater.incrementAndGet(user);
            });
            thread.start();
        }
        Thread.sleep(2000);

        System.out.println(atomicIntegerFieldUpdater.get(user));

    }
}

class User {
    // Exception in thread "main" java.lang.IllegalArgumentException: Must be integer type
    //  at java.util.concurrent.atomic.AtomicIntegerFieldUpdater$AtomicIntegerFieldUpdaterImpl.<init>(AtomicIntegerFieldUpdater.java:409)
    //  at java.util.concurrent.atomic.AtomicIntegerFieldUpdater.newUpdater(AtomicIntegerFieldUpdater.java:88)
    // volatile Integer age = 0;
    volatile int age = 0;
}
如果要更新的变量是包装类型的变量,那么可以使用AtomicReferenceFieldUpdater来实现,接下来看AtomicReferenceFieldUpdater如何使用。
public class AtomicReferenceFieldUpdaterTest {
    public static void main(String[] args) throws Exception {

        Person person = new Person();
        // 如果要更新的变量是包装类型的变量,那么可以使用AtomicReferenceFieldUpdater来实现。
        AtomicReferenceFieldUpdater<Person, Integer> atomicIntegerFieldUpdater = AtomicReferenceFieldUpdater.
                newUpdater(Person.class, Integer.class, "age");

        for (int i = 0; i < 10; ++i) {
            Thread thread = new Thread(() -> {
                try {
                    Thread.sleep(20);
                } catch (InterruptedException e) {
                    e.printStackTrace();
                }
                while (true) {
                    Integer oldAge = atomicIntegerFieldUpdater.get(person);
                    Integer newAge = oldAge + 1;
                    if (atomicIntegerFieldUpdater.compareAndSet(person, oldAge, newAge)) {
                        break;
                    } else {
                        System.out.println(Thread.currentThread().getName() + "存在锁竞争");
                    }
                }
            });
            thread.start();
        }
        Thread.sleep(2000);

        System.out.println(atomicIntegerFieldUpdater.get(person));
    }
}

class Person {
    volatile Integer age = 0;
}
结果输出
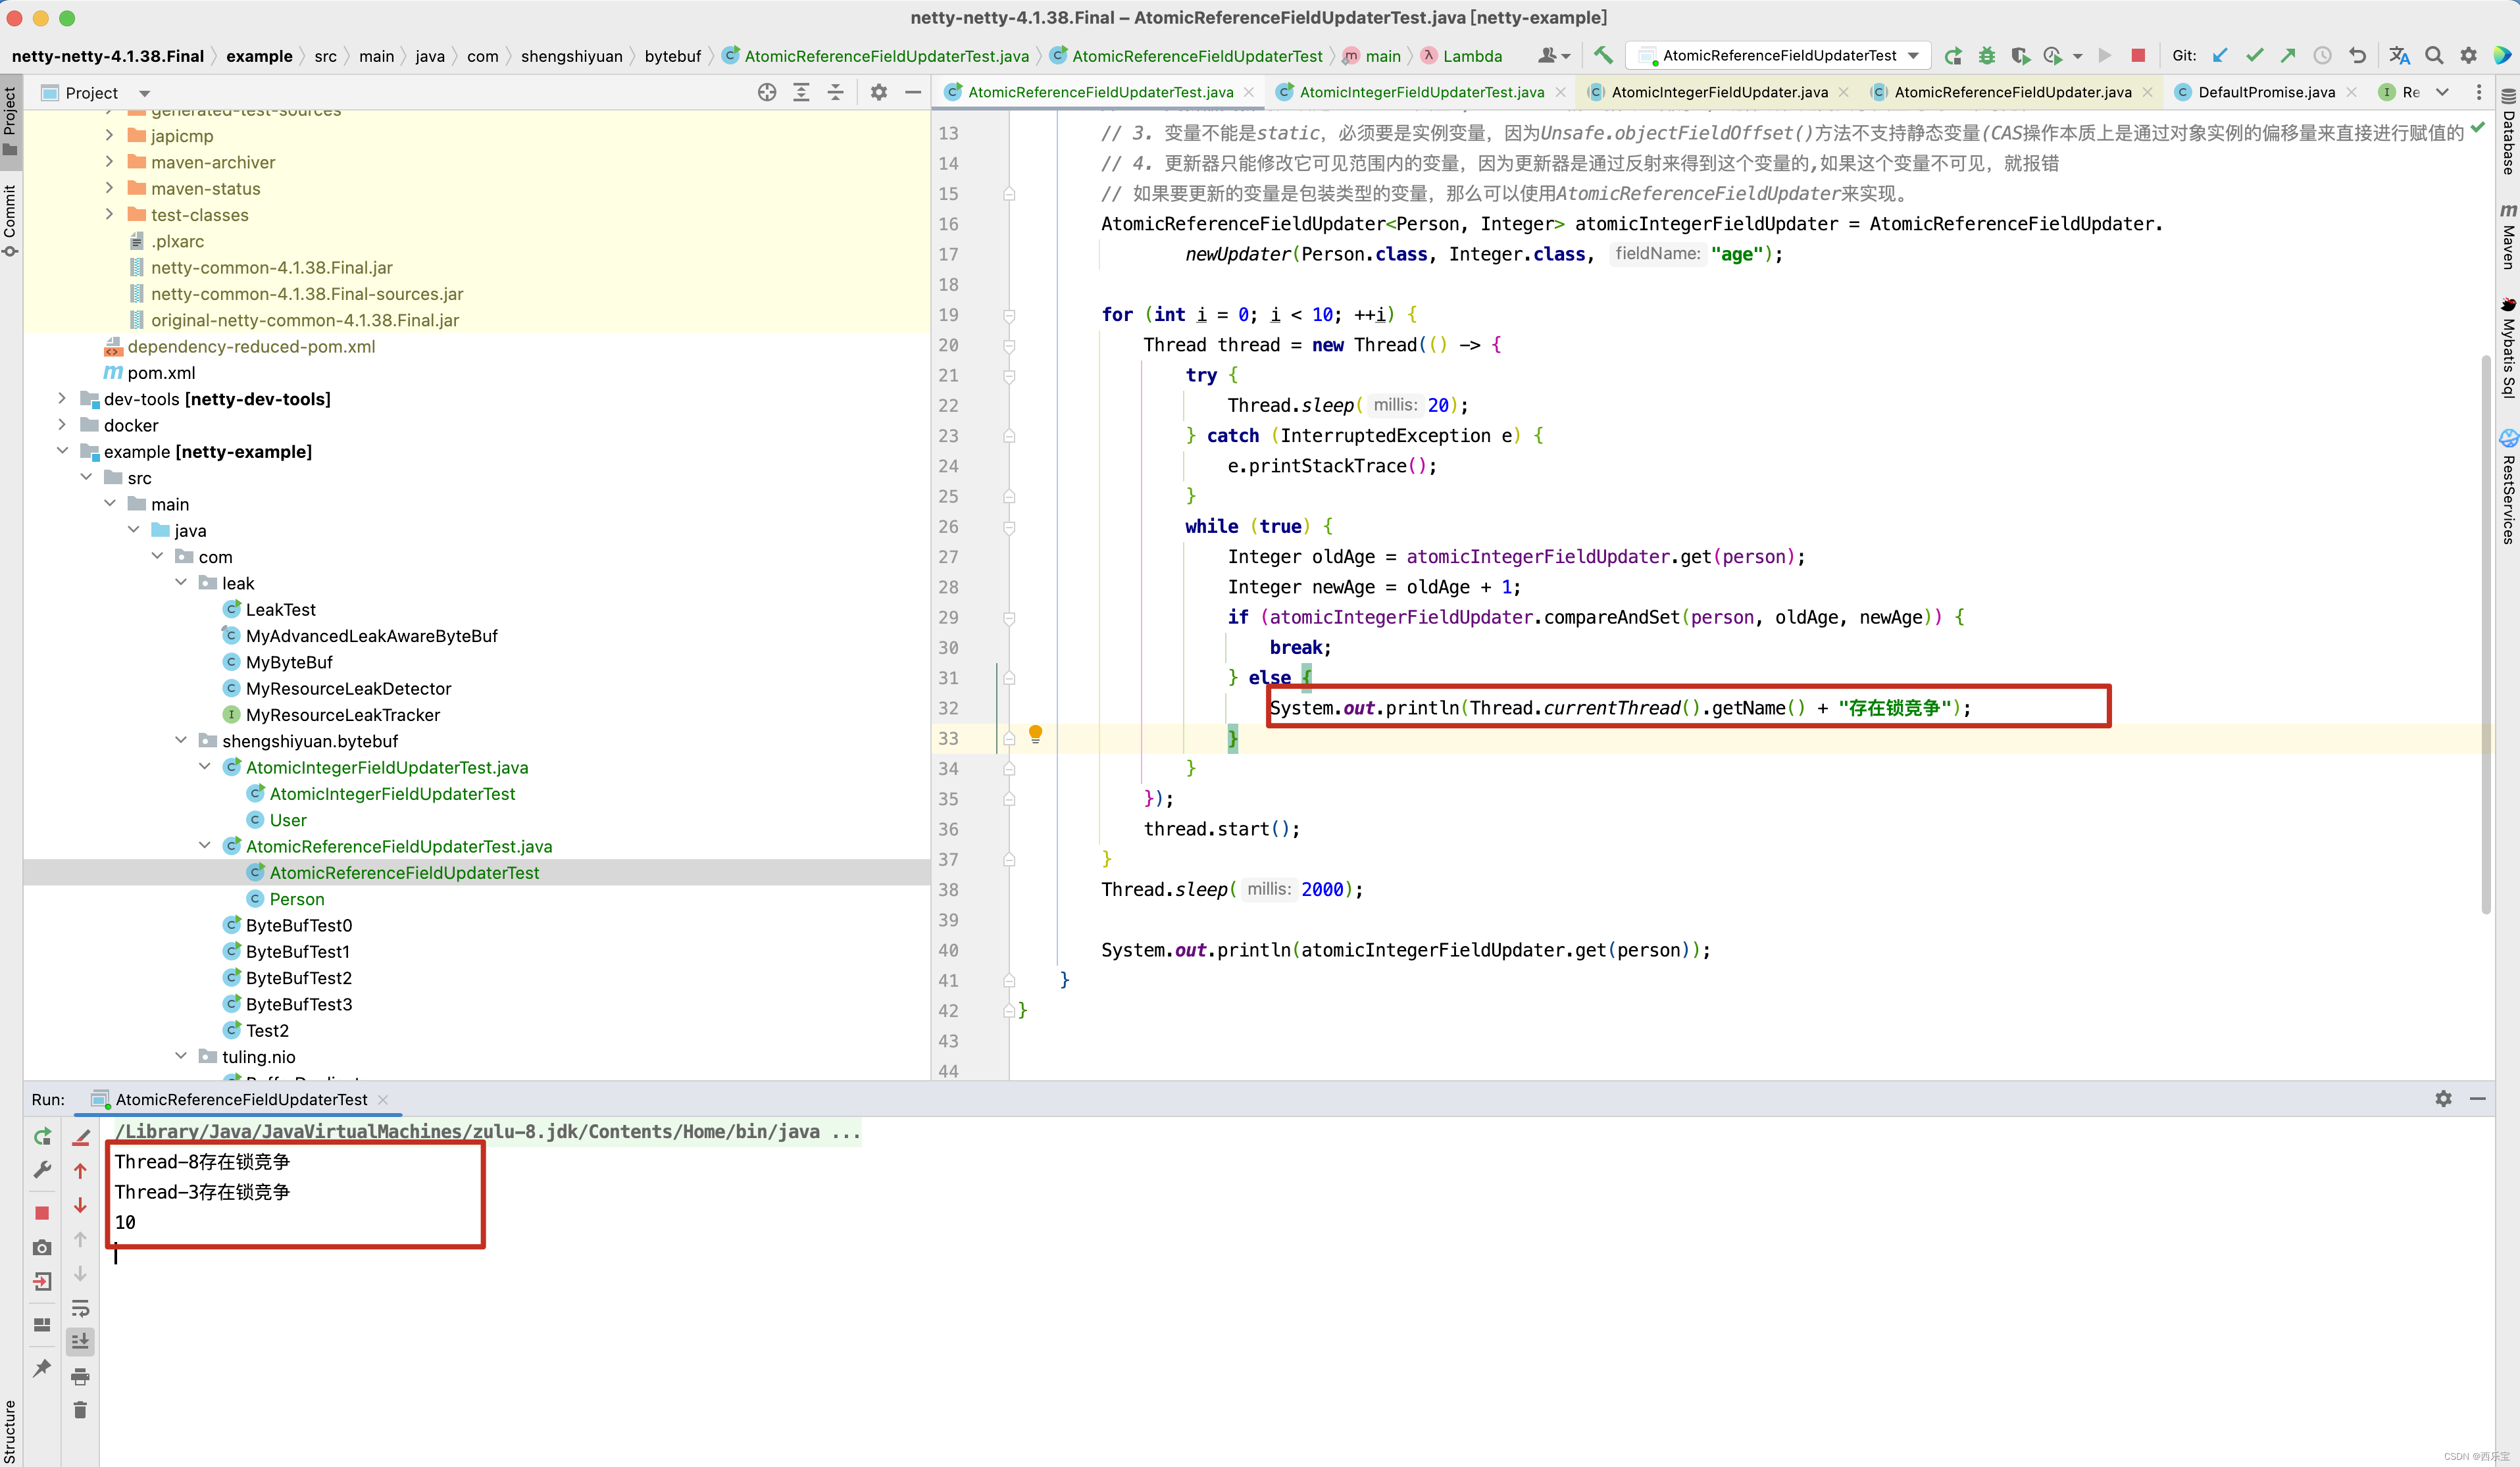
我相信通过这两个例子,就很好的明白在Netty中headUpdater的使用。
最终我们以一个例子,模拟Netty从ServerSocketChannel中读取字节到ByteBuf中,这里的Channel用FileChannel,用JDK的ByteBuffer代替ByteBuf,调用Channel的read()方法,将channel中的数据读取到ByteBuffer中。
public class ByteBufferAllocateDirect {
    public static void main(String[] args) throws Exception {
        FileInputStream inputStream = new FileInputStream("/Users/xxx/git/netty-netty-4.1.38.Final/example/src/input2.txt");
        FileOutputStream outputStream = new FileOutputStream("/Users/xxx/git/netty-netty-4.1.38.Final/example/src/output2.txt");
        FileChannel inputChannel = inputStream.getChannel();
        FileChannel outputChannel = outputStream.getChannel();

        ByteBuffer buffer = ByteBuffer.allocateDirect(512);
        while (true) {
            buffer.clear();
            int read = inputChannel.read(buffer);
            System.out.println("read: " + read);
            if (-1 == read) {
                break;
            }
            buffer.flip();
            outputChannel.write(buffer);
        }
        inputChannel.close();
        outputChannel.close();
    }
}
在Netty中,实际上也是通过read()方法,将Channel中的数据读取到ByteBuf中 。 请看下图 。
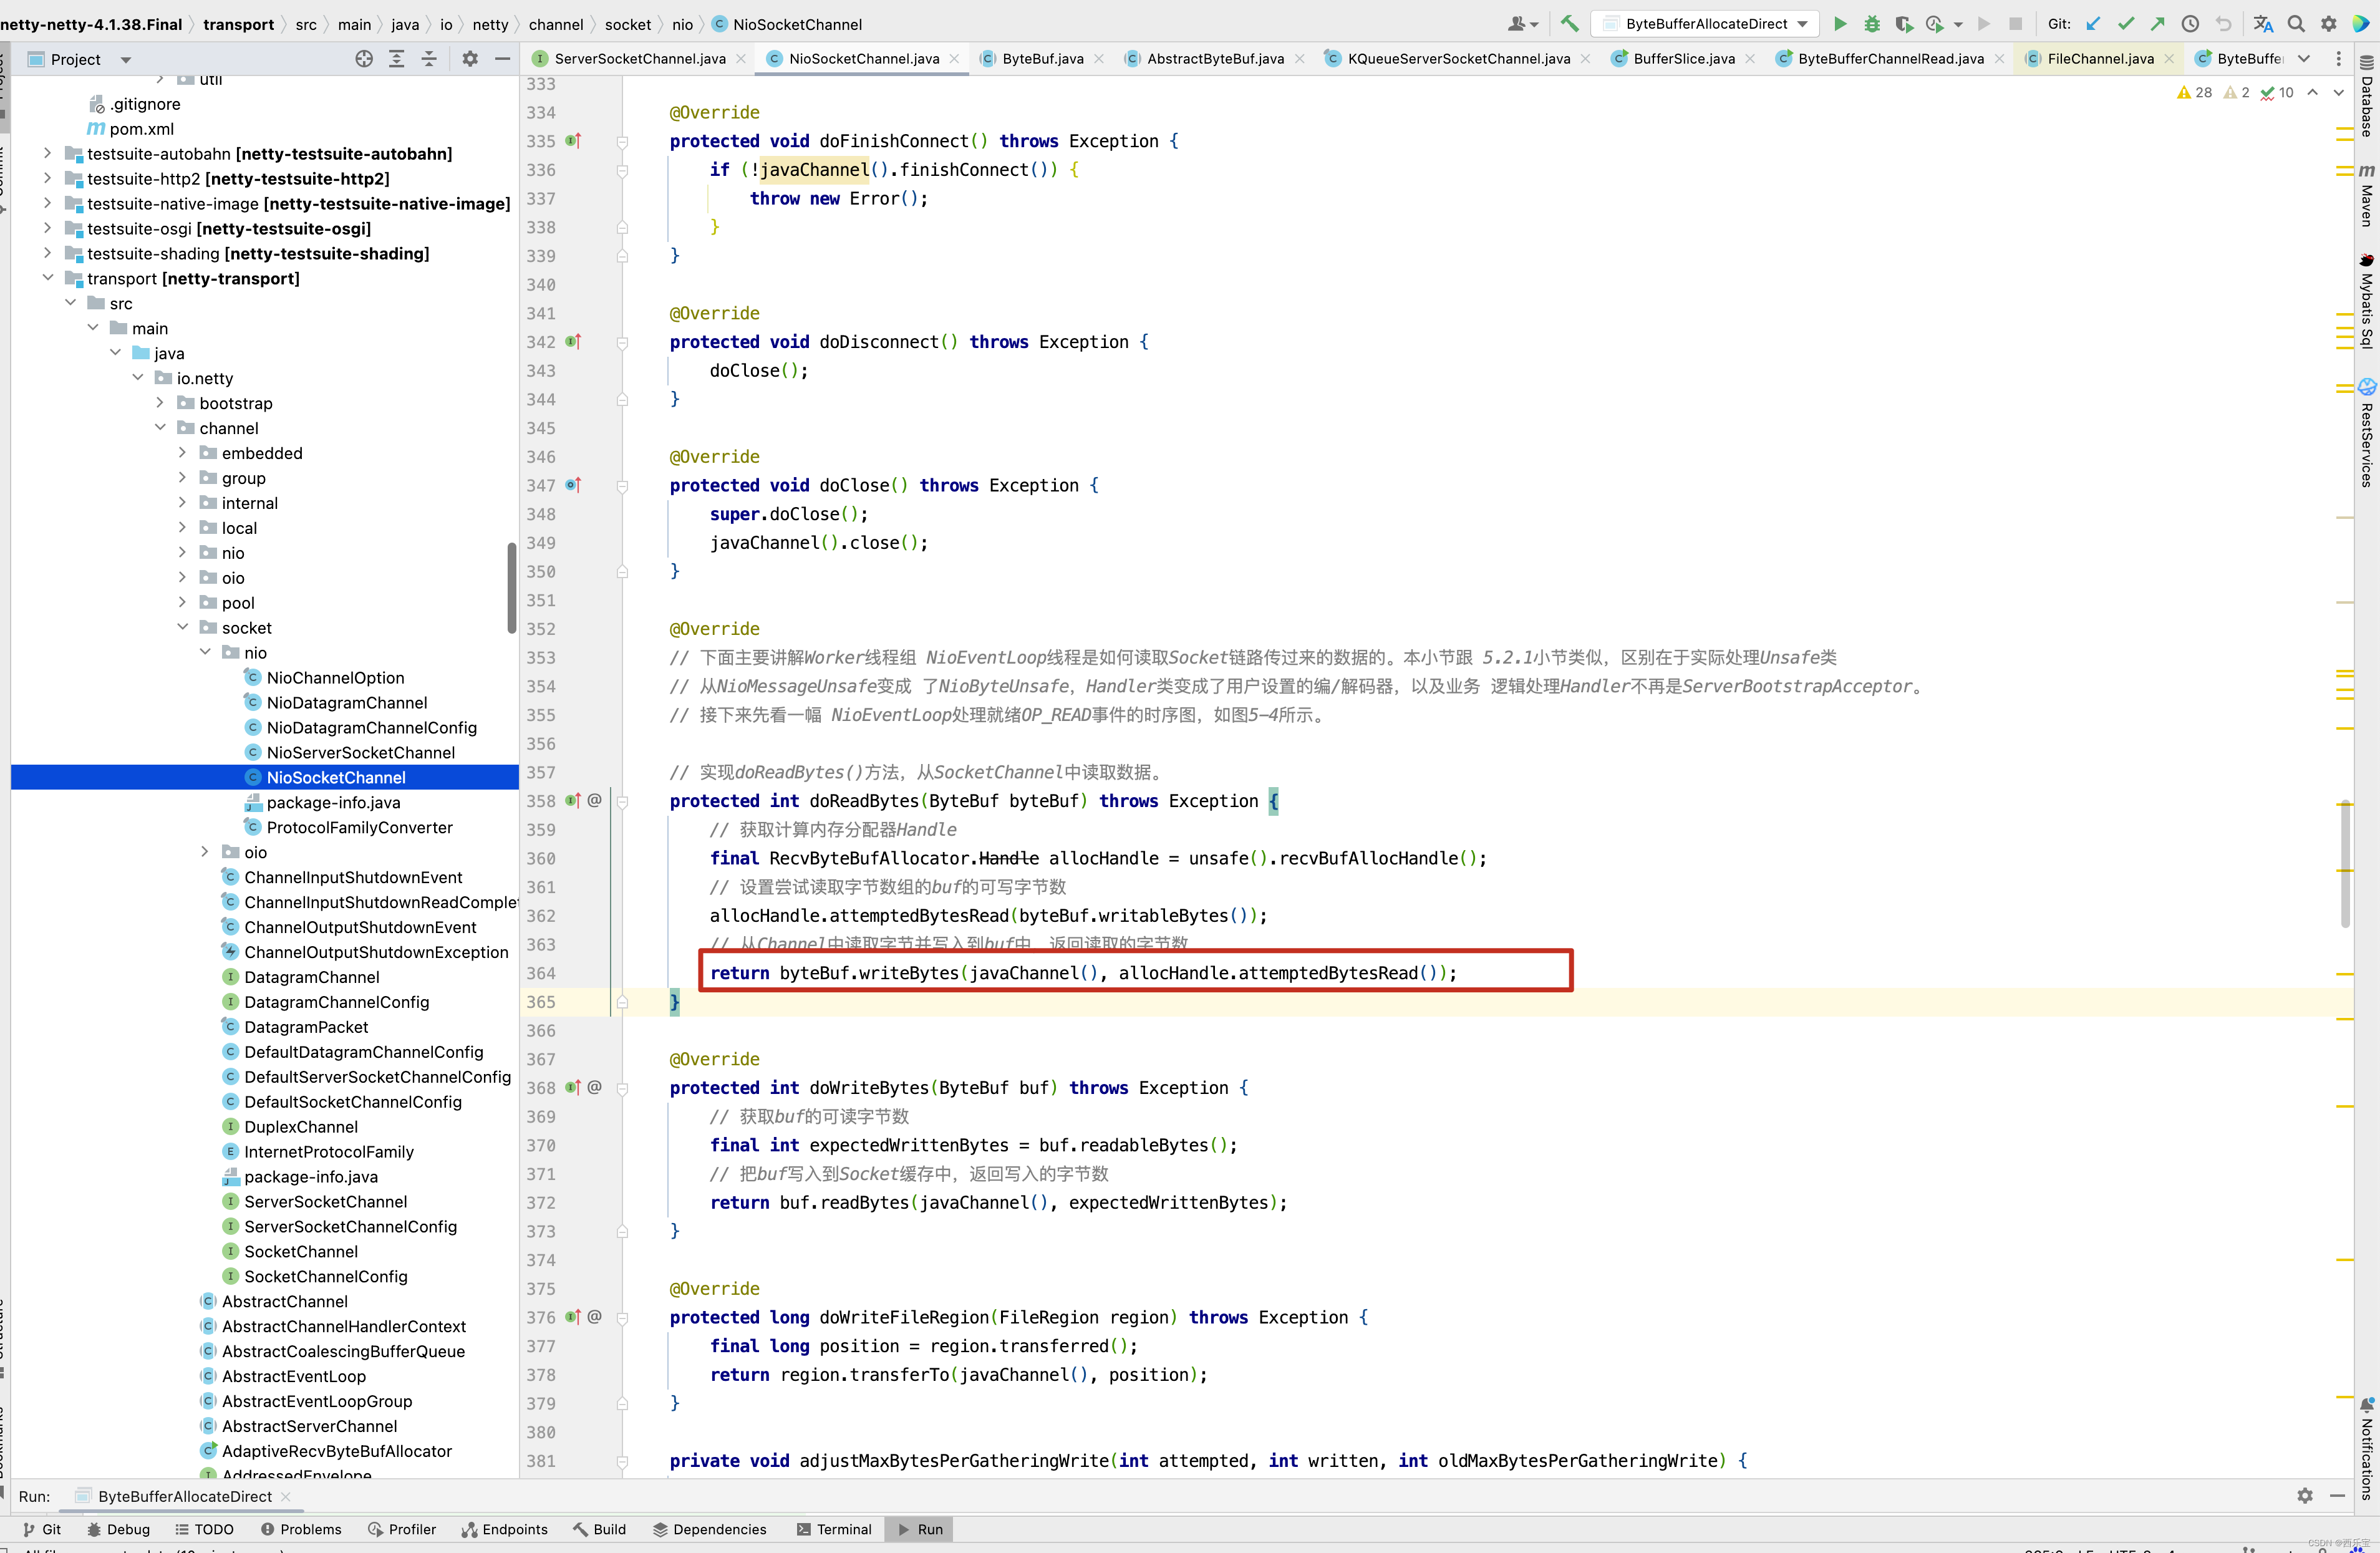
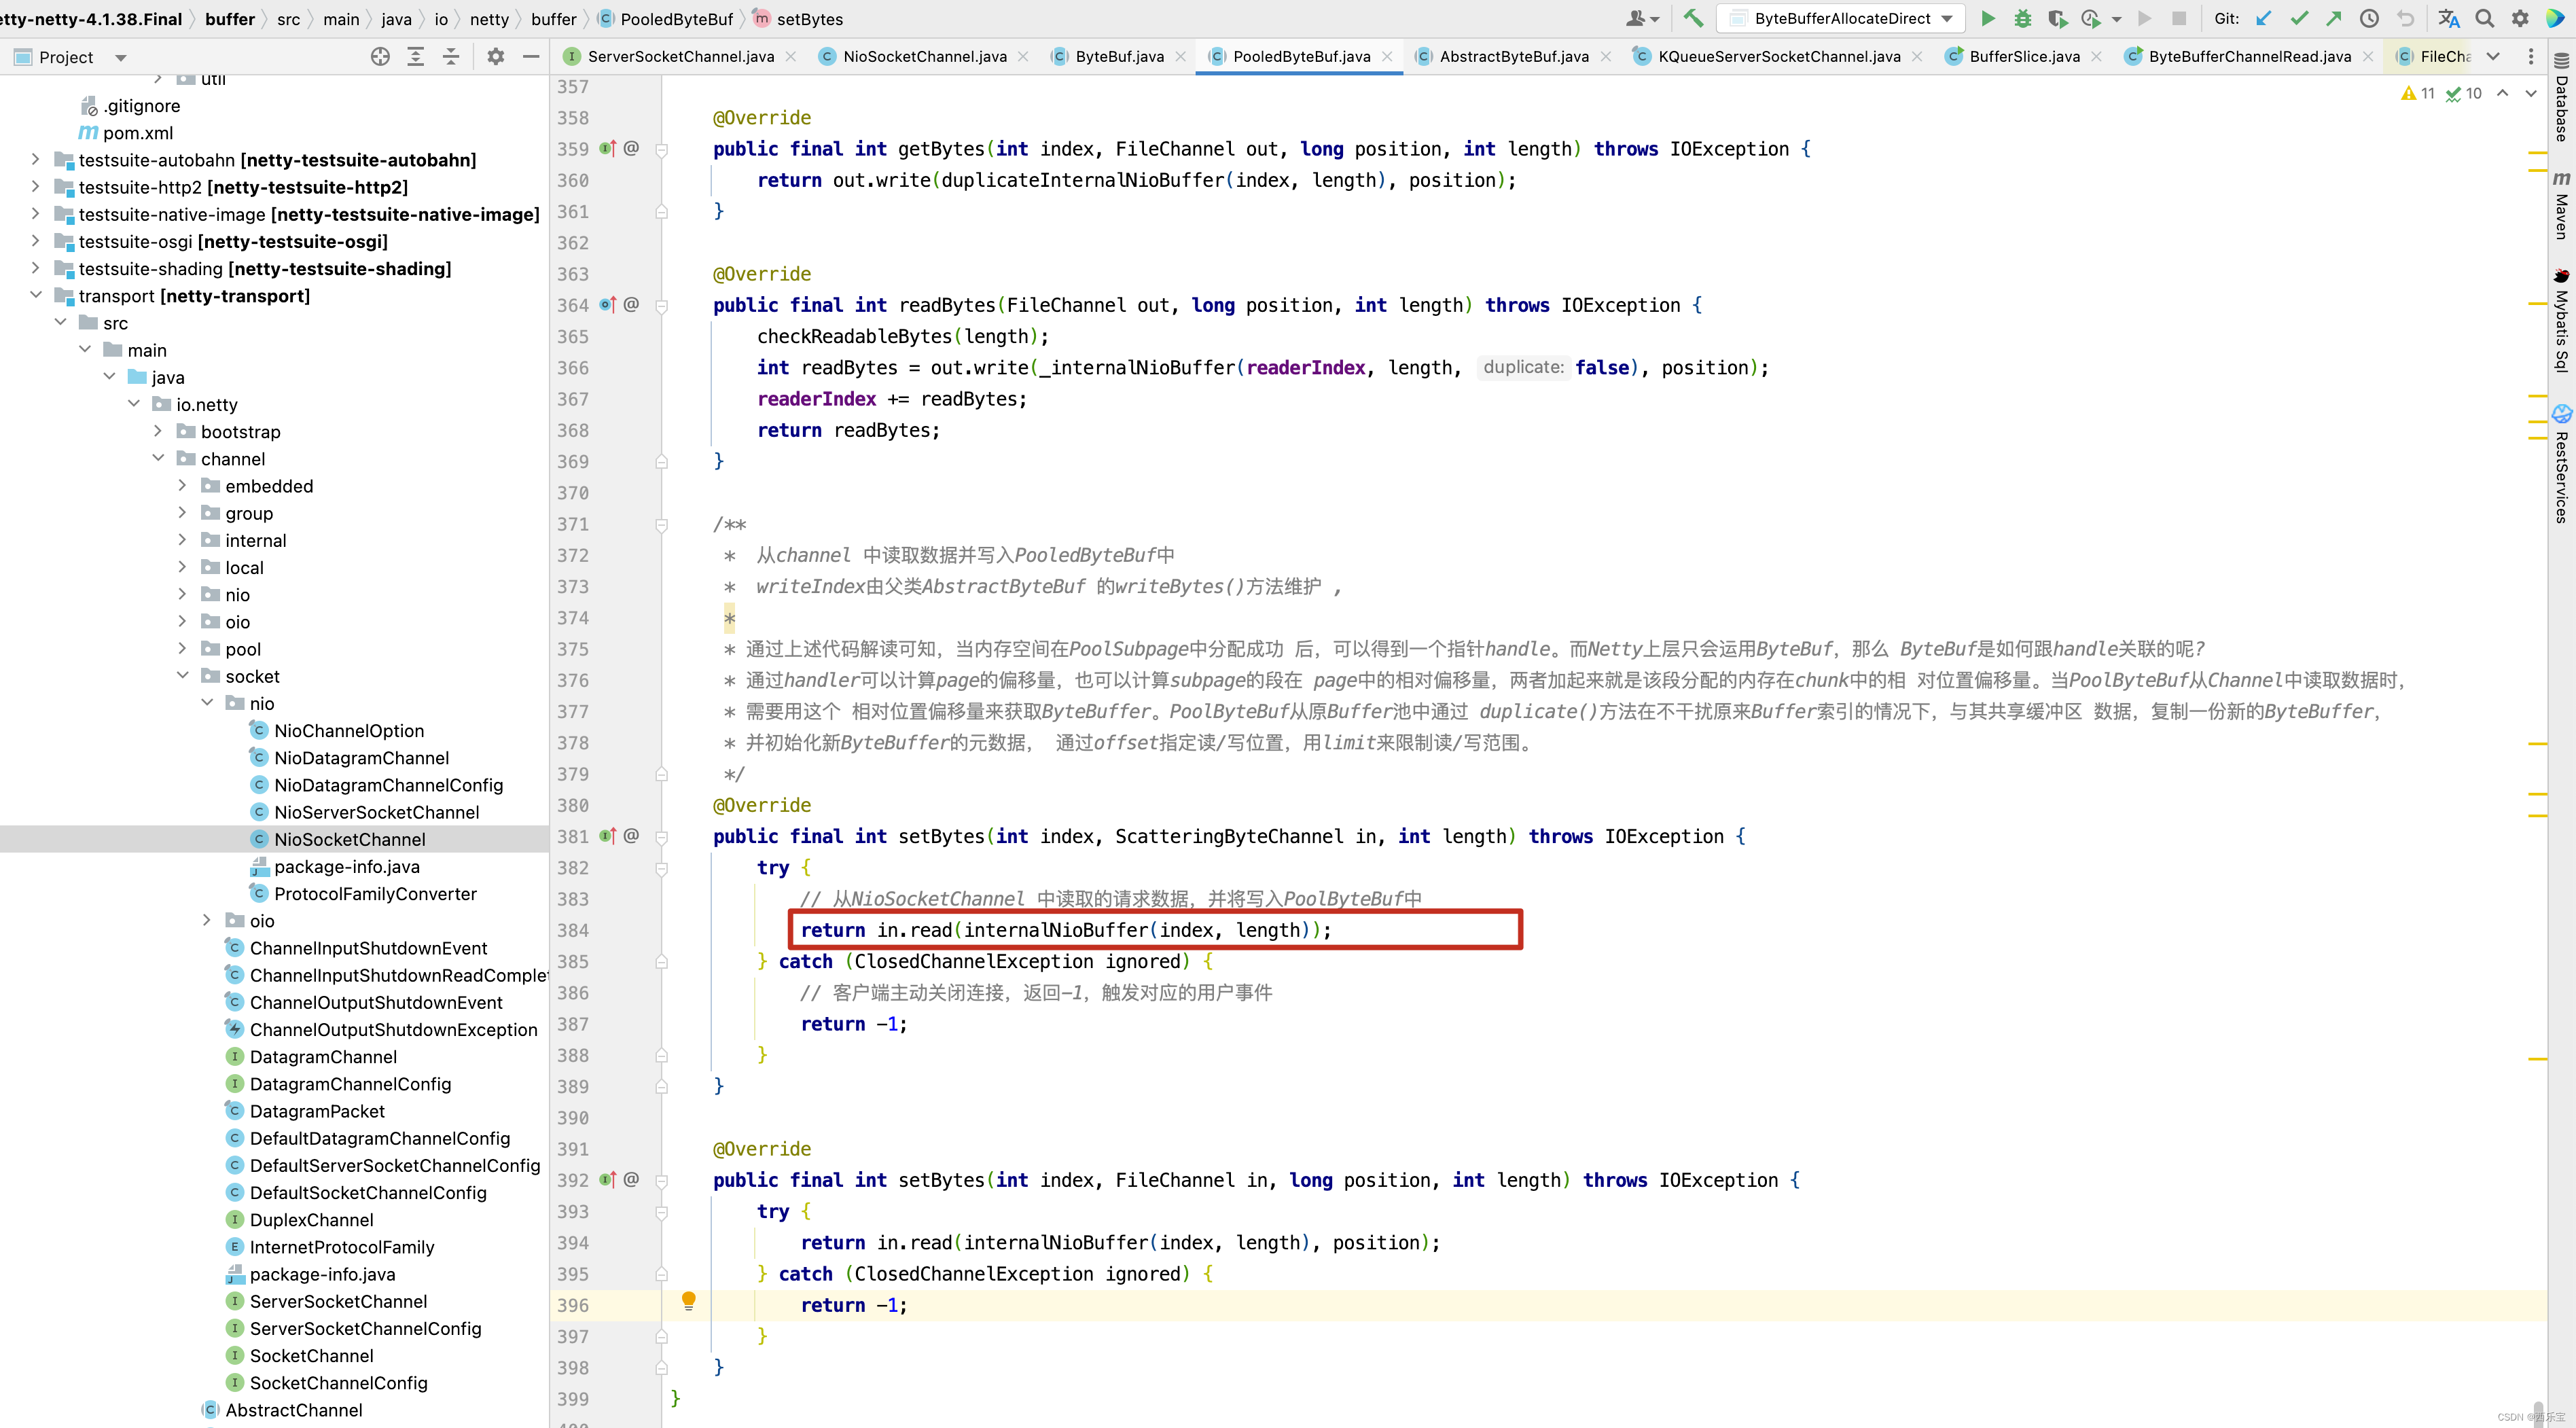
总结 :
我相信大家对JDK的ByteBuffer,Netty的ByteBuf的原理都有了一定的理解了,以及内存泄漏检测的原理都有了一定的理解,这对后面的Netty源码的阅读有着重要的作用,因此如果没有理解的小伙伴,可以多看几遍,再将Netty的源码抽取出来,写成例子,再进行测试,加深理解,只有这样步步为营,学习里面的技巧,学会里面的思想,最终才能学习到Netty的精粹。话不多说,下一篇博客见。
源码地址 :
https://gitee.com/quyixiao/netty-netty-4.1.38.Final.git


