前言
身是菩提树 心是明镜台 时时勤拂拭 模式染尘埃
这玩意不难,就是东西多。。。
1 看一下继承关系
class GridView extends BoxScrollView
abstract class BoxScrollView extends ScrollView
abstract class ScrollView extends StatelessWidget

2 下面是scroll_view.dart 中的代码
这个注释就是很清楚了 ,子类就是要重写buildSlivers这个方法,这是个抽象的方法。
  /// Build the list of widgets to place inside the viewport.
  ///
  /// Subclasses should override this method to build the slivers for the inside
  /// of the viewport.
  @protected
  List<Widget> buildSlivers(BuildContext context);
这是BoxScrollView 中 buildSlivers 的实现方法
  @override
  List<Widget> buildSlivers(BuildContext context) {
    Widget sliver = buildChildLayout(context);
    EdgeInsetsGeometry? effectivePadding = padding;
    if (padding == null) {
      final MediaQueryData? mediaQuery = MediaQuery.maybeOf(context);
      if (mediaQuery != null) {
        // Automatically pad sliver with padding from MediaQuery.
        final EdgeInsets mediaQueryHorizontalPadding =
            mediaQuery.padding.copyWith(top: 0.0, bottom: 0.0);
        final EdgeInsets mediaQueryVerticalPadding =
            mediaQuery.padding.copyWith(left: 0.0, right: 0.0);
        // Consume the main axis padding with SliverPadding.
        effectivePadding = scrollDirection == Axis.vertical
            ? mediaQueryVerticalPadding
            : mediaQueryHorizontalPadding;
        // Leave behind the cross axis padding.
        sliver = MediaQuery(
          data: mediaQuery.copyWith(
            padding: scrollDirection == Axis.vertical
                ? mediaQueryHorizontalPadding
                : mediaQueryVerticalPadding,
          ),
          child: sliver,
        );
      }
    }

    if (effectivePadding != null) {
      sliver = SliverPadding(padding: effectivePadding, sliver: sliver);
    }
    return <Widget>[sliver];
  }
从下面这行代码可以看出来,BoxScrollView 只有一个Sliver
Widget sliver = buildChildLayout(context);
而这个Sliver 来自调用 buildChildLayout,同时这个方法又是一个未实现的抽象方法,所以那么需要子类去实现这个方法,那么换言之1就是 Gridview 和 Listview 去实现这个方法
这个就是GridView 中实现的方法,返回的是一个SliverGrid 本质是也是一个
 @override
  Widget buildChildLayout(BuildContext context) {
    return SliverGrid(
      delegate: childrenDelegate,
      gridDelegate: gridDelegate,
    );
  }
这是 ListView 的实现的方法
Widget buildChildLayout(BuildContext context) {
    if (itemExtent != null) {
      return SliverFixedExtentList(
        delegate: childrenDelegate,
        itemExtent: itemExtent!,
      );
    } else if (prototypeItem != null) {
      return SliverPrototypeExtentList(
        delegate: childrenDelegate,
        prototypeItem: prototypeItem!,
      );
    }
    return SliverList(delegate: childrenDelegate);
  }
一 ListView
1 第一种构造方法
ListView()
 ListView(
      padding: EdgeInsets.all(10),
      itemExtent: 100,
      children: List.generate(100, (index) {
        return Text("data--${index}");
      }),
    );
2 第二种构造方法
ListView.builder
_demo2() {
    return ListView.builder(
      itemExtent: 100,
      itemBuilder: (context, index) {
        return Text("data");
      },
    );
  }
3 第三种构造方法
ListView.separated
 _demo3() {
    return ListView.separated(
        itemBuilder: (context, index) {
          return Text("data---${index}");
        },
        separatorBuilder: (context, index) {
          // 返回分割的区域 thickness 为线高
          return Divider(
            color: Colors.redAccent,
            height: 10,
            thickness: 10,
          );
        },
        itemCount: 100);
  }
二 GridView
网格布局
1 第一种构造方法
demo1() {
    return GridView(
        padding: EdgeInsets.only(left: 10, right: 10),
        gridDelegate: SliverGridDelegateWithFixedCrossAxisCount(
            // 交叉轴的间距
            crossAxisSpacing: 10,
            // 主轴的间距
            mainAxisSpacing: 10,
            // 宽高比
            childAspectRatio: 16 / 18,
            // 交叉轴的个数
            crossAxisCount: 3),
        children: List.generate(100, (index) {
          return Container(
            color: Color.fromARGB(255, Random().nextInt(256),
                Random().nextInt(256), Random().nextInt(256)),
          );
        }));
  }
2 第二种构造方法
 _demo2() {
    return GridView.builder(
      gridDelegate: SliverGridDelegateWithFixedCrossAxisCount(
        crossAxisCount: 3,
        childAspectRatio: 1 / 1,
        mainAxisSpacing: 10,
        crossAxisSpacing: 8,
      ),
      itemBuilder: (context, index) {
        return Container(
          color: Color.fromARGB(255, Random().nextInt(256),
              Random().nextInt(256), Random().nextInt(256)),
        );
      },
    );
  }
3 第三种构造方法
  _demo3() {
    return GridView.count(
        mainAxisSpacing: 10,
        crossAxisSpacing: 10,
        crossAxisCount: 3,
        children: List.generate(100, (index) {
          return Container(
            color: Color.fromARGB(255, Random().nextInt(256),
                Random().nextInt(256), Random().nextInt(256)),
          );
        }));
  }
三 Slivers
这个单词翻译成 碎片,可以将一个独立的滚动视图当做一个小裂片来使用。
这个主要是实现一些复杂的布局。
-
SliverList:类似于我们之前使用过的ListView;
-
SliverFixedExtentList:类似于SliverList只是可以设置滚动的高度;
-
SliverGrid:类似于我们之前使用过的GridView;
-
SliverPadding:设置Sliver的内边距,因为可能要单独给Sliver设置内边距;
-
SliverAppBar:添加一个AppBar,通常用来作为CustomScrollView的HeaderView;
-
SliverSafeArea:设置内容显示在安全区域(比如不让齐刘海挡住我们的内容)
示例一
放置多个滚动组件在里面。
_demo1() {
    return CustomScrollView(
      // 设置内边距
      slivers: [
        // // 第一个部分
        SliverPadding(
          padding: EdgeInsets.all(8),
          sliver: SliverSafeArea(
              // 这个安全区域可以设置上下左右
              bottom: false,
              sliver: SliverGrid(
                  gridDelegate: SliverGridDelegateWithFixedCrossAxisCount(
                      crossAxisCount: 3,
                      crossAxisSpacing: 8,
                      mainAxisSpacing: 8,
                      childAspectRatio: 16 / 18),
                  delegate: SliverChildBuilderDelegate(((context, index) {
                    return Container(
                      color: Color.fromARGB(255, Random().nextInt(256),
                          Random().nextInt(256), Random().nextInt(256)),
                    );
                  }), childCount: 6))),
        ),

        // 第二个部分
        SliverGrid(
            gridDelegate: SliverGridDelegateWithFixedCrossAxisCount(
                crossAxisCount: 2,
                crossAxisSpacing: 8,
                mainAxisSpacing: 8,
                childAspectRatio: 16 / 18),
            delegate: SliverChildBuilderDelegate(((context, index) {
              return Container(
                color: Color.fromARGB(255, Random().nextInt(256),
                    Random().nextInt(256), Random().nextInt(256)),
              );
            }),
                // 一共多少个item
                childCount: 2)),

        //  第三个部分
        SliverGrid(
            gridDelegate: SliverGridDelegateWithFixedCrossAxisCount(
                crossAxisCount: 4,
                crossAxisSpacing: 8,
                mainAxisSpacing: 8,
                childAspectRatio: 16 / 18),
            delegate: SliverChildBuilderDelegate(((context, index) {
              return Container(
                color: Color.fromARGB(255, Random().nextInt(256),
                    Random().nextInt(256), Random().nextInt(256)),
              );
            }),
                // 一共多少个item
                childCount: 40)),
      ],
    );
  }
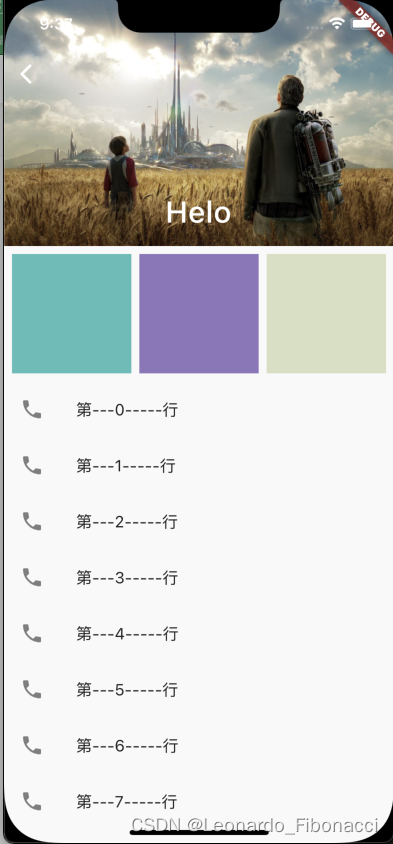
示例2
这里还可以设置一个SliverAppBar, 设置很多属性
 _demo2() {
    return CustomScrollView(
      slivers: [
        // 用这个导航 上面的导航就可以删掉 这个导航可以随着内容滚动而滚动
        SliverAppBar(
          // 扩展一个高度 设置一个图片
          expandedHeight: 200,
          flexibleSpace: FlexibleSpaceBar(
              title: Text("Helo"),
              background: Image.asset(
                "images/movie_1.png",
                fit: BoxFit.cover,
              )),

          // 是否随着内容滚动
          pinned: true,
        ),
        // 第一个是SliverGrid
        SliverPadding(
          padding: EdgeInsets.all(8),
          sliver: SliverGrid(
            delegate: SliverChildBuilderDelegate(((context, index) {
              return Container(
                color: Color.fromARGB(255, Random().nextInt(256),
                    Random().nextInt(256), Random().nextInt(256)),
              );
            }), childCount: 3),
            gridDelegate: SliverGridDelegateWithFixedCrossAxisCount(
                crossAxisCount: 3,
                mainAxisSpacing: 8,
                crossAxisSpacing: 8,
                childAspectRatio: 1 / 1),
          ),
        ),
        // 第二个使用SliverList
        SliverList(
            delegate: SliverChildBuilderDelegate((context, index) {
          return ListTile(
            leading: Icon(Icons.phone),
            title: Text("第---${index}-----行"),
          );
        }, childCount: 100))
      ],
    );
  }
四 滚动监听
1 使用controller 进行监听
不管我们用ListView 还是GridView 还是CustomScrollView,
都有一个controller 属性
class _SWListenDemoState extends State<SWListenDemo> {
  // 设置一个controller
  ScrollController _controller = ScrollController(initialScrollOffset: 100);

  @override
  void initState() {
    // TODO: implement initState
    super.initState();
    // 回到顶部可以 调用的方法
    // _controller.animateTo(0, duration: Duration(seconds: 2), curve: Curves.bounceIn);
    _controller.addListener(() {
      // 监听滚动的位置
      print("${_controller.offset}");
    });
  }
2 NotificationListener
如果我们希望监听什么时候开始滚动,什么时候结束滚动,这个时候我们可以通过NotificationListener。
class NotificationListener<T extends Notification> extends ProxyWidget
-
NotificationListener是一个Widget,模板参数T是想监听的通知类型,如果省略,则所有类型通知都会被监听,如果指定特定类型,则只有该类型的通知会被监听。
-
NotificationListener需要一个onNotification回调函数,用于实现监听处理逻辑。
-
该回调可以返回一个布尔值,代表是否阻止该事件继续向上冒泡,如果为
true时,则冒泡终止,事件停止向上传播,如果不返回或者返回值为false时,则冒泡继续。
Widget build(BuildContext context) {
    return NotificationListener(
        onNotification: (ScrollStartNotification notification) {
          // 当前滚动的位置 和 总长度
          final currentPixels = notification.metrics.pixels;
          final totalPixels = notification.metrics.maxScrollExtent;
          double progress = currentPixels / totalPixels;
          print("开始滚动了.....${progress} -- ${currentPixels}");

          return false;
        },
        child: ListView(
          // controller: _controller,
          children: List.generate(100, (index) {
            return ListTile(
              leading: Icon(Icons.time_to_leave),
              title: Text("---DiDi---"),
            );
          }),
        ));

  }