参考资料:
《Tomcat - Request请求处理: Container设计》
《Tomcat - Container容器之Engine:StandardEngine》
前文:
《Tomcat源码:启动类Bootstrap与Catalina的加载》
《Tomcat源码:容器的生命周期管理与事件监听》
《Tomcat源码:StandardServer与StandardService》
写在开头:本文为个人学习笔记,内容比较随意,夹杂个人理解,如有错误,欢迎指正。
前言
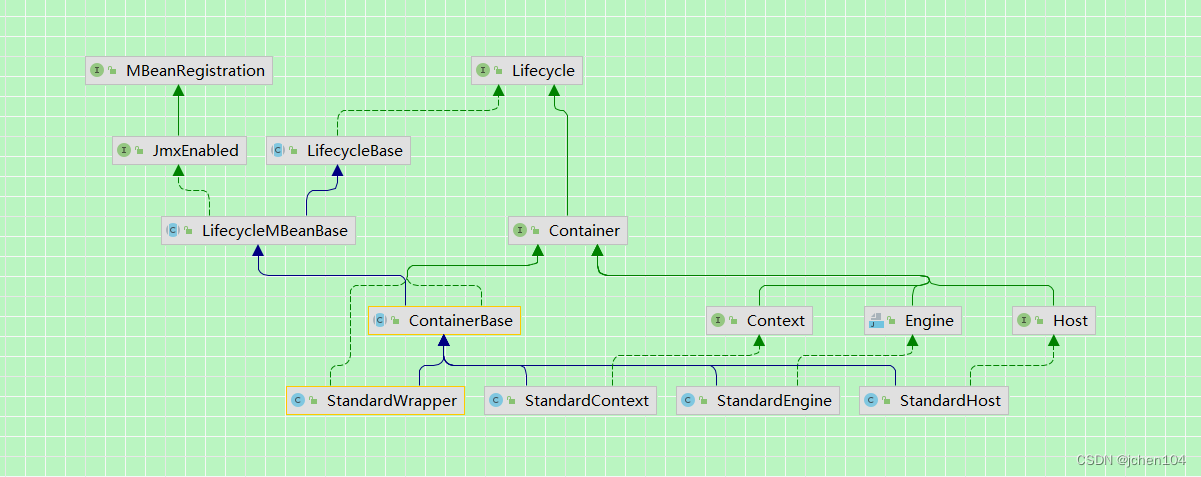
前文中我们介绍了StandServer与StandService的init与start方法,本文我们接着介绍以Engine为首的子容器。由下图可以看出Engine、Host、Context、Wrapper等容器组件都继承了Container接口,从而间接继承了Lifecycle接口,而其抽象实现类ContainerBase又继承了LifecycleMBeanBase类,本文我们就介绍下Container这个接口。
目录
前言
一、Container接口
1、父子容器交互
2、事件监听
二、抽象类ContainerBase
1、子容器相关方法实现
1.1、添加子容器
1.2、查找子容器
1.3、删除子容器
2、Lifecycle的模板方法
2.1、initInternal
2.2、getStartStopThreadsInternal
2.3、startInternal
2.4、threadStart
2.5、ContainerBackgroundProcessor#run
2.6、processChildren
2.7、backgroundProcess
一、Container接口
1、父子容器交互
Container的实现类Engine、Host、Context、Wrapper都具有父子关系(注意不是继承),因此Container自然要提供父节点的设置、查找以及子节点的添加、删除、查找。这里注意由于一个父节点可以有多个子节点因此返回的是数组。
public Container getParent();
public void setParent(Container container);
public void addChild(Container child);
public Container[] findChildren();
public void removeChild(Container child);
2、事件监听
这里不但有Container级别的监听器,还有属性相关的Listener以及触发方法。
public void addContainerListener(ContainerListener listener);
public ContainerListener[] findContainerListeners();
public void removeContainerListener(ContainerListener listener);

public void removePropertyChangeListener(PropertyChangeListener listener);
public void addPropertyChangeListener(PropertyChangeListener listener);

public void fireContainerEvent(String type, Object data);
二、抽象类ContainerBase
1、子容器相关方法实现
1.1、添加子容器
    public void addChild(Container child) {
        if (Globals.IS_SECURITY_ENABLED) {
            PrivilegedAction<Void> dp = new PrivilegedAddChild(child);
            AccessController.doPrivileged(dp);
        } else {
            addChildInternal(child);
        }
    }

    private void addChildInternal(Container child) {
        synchronized (children) {
            if (children.get(child.getName()) != null) {
                throw new IllegalArgumentException(sm.getString("containerBase.child.notUnique", child.getName()));
            }
            // 给子容器设置父容器并保存起来方便查找
            child.setParent(this);
            children.put(child.getName(), child);
        }
        // 没有将start方法放到synchronized的原因
        // 启动可能是一个缓慢的过程并且锁定子对象可能会导致其他地方出现问题
        try {
            // 判断状态决定是否要启动子容器
            if ((getState().isAvailable() || LifecycleState.STARTING_PREP.equals(getState())) && startChildren) {
                child.start();
            }
        } catch (LifecycleException e) {
            log.error("ContainerBase.addChild: start: ", e);
            throw new IllegalStateException(sm.getString("containerBase.child.start"), e);
        } finally {
            // 触发事件
            fireContainerEvent(ADD_CHILD_EVENT, child);
        }
    }
1.2、查找子容器
    protected final HashMap<String, Container> children = new HashMap<>();

    public Container findChild(String name) {
        if (name == null) {
            return null;
        }
        synchronized (children) {
            return children.get(name);
        }
    }

    public Container[] findChildren() {
        synchronized (children) {
            return children.values().toArray(new Container[0]);
        }
    }
1.3、删除子容器
因为容器都有生命周期,所以应该是先停止,然后销毁(distroy), 再触发删除事件,最后将children中子容器删除。
    public void removeChild(Container child) {
        if (child == null) {
            return;
        }
        try {
            if (child.getState().isAvailable()) {
                child.stop();
            }
        } catch (LifecycleException e) {
            log.error(sm.getString("containerBase.child.stop"), e);
        }
        try {
            if (!LifecycleState.DESTROYING.equals(child.getState())) {
                child.destroy();
            }
        } catch (LifecycleException e) {
            log.error(sm.getString("containerBase.child.destroy"), e);
        }
        synchronized (children) {
            if (children.get(child.getName()) == null) {
                return;
            }
            children.remove(child.getName());
        }

        fireContainerEvent(REMOVE_CHILD_EVENT, child);
    }
2、Lifecycle的模板方法
2.1、initInternal
initInternal主要创建了一个线程池,参数中的线程池大小由getStartStopThreadsInternal方法决定,这个线程池将会在下文用于启动子容器。
    protected ThreadPoolExecutor startStopExecutor;

    protected void initInternal() throws LifecycleException {
        // 创建线程安全的队列
        BlockingQueue<Runnable> startStopQueue = new LinkedBlockingQueue<>();
        // 创建线程池
        startStopExecutor = new ThreadPoolExecutor(getStartStopThreadsInternal(), getStartStopThreadsInternal(), 10,
                TimeUnit.SECONDS, startStopQueue, new StartStopThreadFactory(getName() + "-startStop-"));
        startStopExecutor.allowCoreThreadTimeOut(true);
        // 调用父类LifecycleMBeanBase的初始化方法
        super.initInternal();
    }
2.2、getStartStopThreadsInternal
该方法获取成员变量startStopThreads,如果值大于0则直接返回,如果小于等于0则进一步再处理,但可以确保返回值必然大于等于1。
    private int getStartStopThreadsInternal() {
        int result = getStartStopThreads();
        if (result > 0) {
            return result;
        }
        // availableProcessors返回可用处理器的Java虚拟机的数量
        result = Runtime.getRuntime().availableProcessors() + result;
        if (result < 1) {
            result = 1;
        }
        return result;
    }

    private int startStopThreads = 1;

    public int getStartStopThreads() {
        return startStopThreads;
    }
2.3、startInternal
startInternal负责启动子容器,这里findChildren()方法获取子容器并将子容器的启动封装在一个 StartChild 对象里,然后将这个 StartChild 对象加入到startStopExecutor线程池中,这个 startStopExecutor就是在文中上面介绍到的。
下方等待执行结果(Future的get方法可以获取执行结果,该方法会阻塞直到任务返回结果),如果执行中出现异常,则将收集到 MultiThrowable 对象了,并抛出 LifecycleException 异常。
    protected synchronized void startInternal() throws LifecycleException {
        logger = null;
        getLogger();
        Cluster cluster = getClusterInternal();
        if (cluster instanceof Lifecycle) {
            ((Lifecycle) cluster).start();
        }
        Realm realm = getRealmInternal();
        if (realm instanceof Lifecycle) {
            ((Lifecycle) realm).start();
        }
        // 将要启动的子容器加入到线程池中异步启动
        Container children[] = findChildren();
        List<Future<Void>> results = new ArrayList<>();
        for (Container child : children) {
            results.add(startStopExecutor.submit(new StartChild(child)));
        }
        MultiThrowable multiThrowable = null;
        // 获取子容器启动结果
        for (Future<Void> result : results) {
            try {
                result.get();
            } catch (Throwable e) {
                log.error(sm.getString("containerBase.threadedStartFailed"), e);
                if (multiThrowable == null) {
                    multiThrowable = new MultiThrowable();
                }
                multiThrowable.add(e);
            }

        }
        if (multiThrowable != null) {
            throw new LifecycleException(sm.getString("containerBase.threadedStartFailed"),
                    multiThrowable.getThrowable());
        }
        if (pipeline instanceof Lifecycle) {
            ((Lifecycle) pipeline).start();
        }
        // 设置状态
        setState(LifecycleState.STARTING);
        threadStart();
    }
可以看出StartChild类就只是简单执行Container 对象的 start 方法,再结合上文就可以明白子容器是如何启动的了。
    private static class StartChild implements Callable<Void> {
        private Container child;
        StartChild(Container child) {this.child = child;}
        @Override
        public Void call() throws LifecycleException {
            child.start();
            return null;
        }
    }
最后执行了pipeline的start方法,Pipeline是Container用来处理请求的,Container 处理请求实际上是交给Pipeline处理的,Pipeline串联了一个或多个 Valve组成了一个责任链,用 Value 去处理请求,这部分内容我们会在后续进行介绍。
2.4、threadStart
startInternal中最后一行调用了threadStart方法,backgroundProcessorDelay默认值-1可以看出来默认是不执行的,如果子容器中设置了大于0的值(如StandardEngine中设置了10),则会创建一个线程,异步执行ContainerBackgroundProcessor中的run方法。
   private Thread thread = null;
   protected int backgroundProcessorDelay = -1;

   protected void threadStart() {
        if (thread != null) {
            return;
        }
        if (backgroundProcessorDelay <= 0) {
            return;
        }
        threadDone = false;
        String threadName = "ContainerBackgroundProcessor[" + toString() + "]";
        thread = new Thread(new ContainerBackgroundProcessor(), threadName);
        thread.setDaemon(true);
        thread.start();
    }
2.5、ContainerBackgroundProcessor#run
ContainerBackgroundProcessor的run方法其实就是延迟调用Container的 backgroundProcess() 方法,然后递归处理调用 ContainerBackgroundProcessor#processChildren 来调用子容器的 backgroundProcess()。如果 Container 是 Context 的实现来的话,还会调用 Context#bind 方法。
    protected class ContainerBackgroundProcessor implements Runnable {

        @Override
        public void run() {
            Throwable t = null;
            String unexpectedDeathMessage = sm.getString("containerBase.backgroundProcess.unexpectedThreadDeath",
                    Thread.currentThread().getName());
            try {
                while (!threadDone) {
                    try {
                        // 延迟backgroundProcessorDelay秒
                        Thread.sleep(backgroundProcessorDelay * 1000L);
                    } catch (InterruptedException e) {
                        // Ignore
                    }
                    if (!threadDone) {
                        // 调用processChildren方法
                        processChildren(ContainerBase.this);
                    }
                }
            } catch (RuntimeException | Error e) {
                t = e;
                throw e;
            } finally {
                if (!threadDone) {
                    log.error(unexpectedDeathMessage, t);
                }
            }
        }

        protected void processChildren(Container container) {
            // ...
        }
    }
2.6、processChildren
processChildren方法调用当前容器的backgroundProcess方法,随后获取子容器并判断其是否需要延迟调用processChildren方法,最后达到的效果其实是递归调用子容器的backgroundProcess方法。
    protected class ContainerBackgroundProcessor implements Runnable {

        @Override
        public void run() {
            // ...
            processChildren(ContainerBase.this);
        }

        protected void processChildren(Container container) {
            ClassLoader originalClassLoader = null;
            try {
                if (container instanceof Context) {
                    Loader loader = ((Context) container).getLoader();
                    if (loader == null) {
                        return;
                    }
                    originalClassLoader = ((Context) container).bind(false, null);
                }
                // 调用当前容器的backgroundProcess方法
                container.backgroundProcess();
                Container[] children = container.findChildren();
                // 获取子容器并判断其是否需要延迟调用processChildren方法
                // 最后达到的效果其实是递归调用子容器的backgroundProcess方法
                for (Container child : children) {
                    if (child.getBackgroundProcessorDelay() <= 0) {
                        processChildren(child);
                    }
                }
            } catch (Throwable t) {
                ExceptionUtils.handleThrowable(t);
                log.error(sm.getString("containerBase.backgroundProcess.error"), t);
            } finally {
                if (container instanceof Context) {
                    ((Context) container).unbind(false, originalClassLoader);
                }
            }
        }
    }
backgroundProcess的具体操作由容器实现,这里暂且略过,我们会在介绍StandEngine时介绍。
StandardEngine 没有重写ContainerBase 的 backgroundProcess() 方法,而 StandardHost、StandardContext、StandardWrapper 都没有重新给 backgroundProcessorDelay 赋值,所以这些类的 getBackgroundProcessorDelay() 返回的值是 -1,因此都这些类的 backgroundProcess() 都将会执行。
结合上文,这里需要注意的是threadStart是在startInternal方法中执行的,虽然每个子容器都会调用startInternal方法,但是由于只有StandardEngine重新赋值了backgroundProcessorDelay,因此这一段只有在StandardEngine启动时调用,后续不会重复调用。
2.7、backgroundProcess
可以看出ContainerBase的backgroundProcess() 方法依次调用Cluster、Realm、Valve 的 backgroundProcess() 方法,然后触发一个 Lifecycle.PERIODIC_EVENT 事件。
这里有稍微介绍下Valve,在上文中的startInternal流程中启动了pipeline.start,pipeline是通过将多个value组成了责任链来完成对请求的处理,这里的pipeline.getFirst()便是获取责任链中的第一个Valve节点,调用其backgroundProcess方法,并通过current = current.getNext()不断获取责任链中的下一个Valve节点,以此实现所有Valve的调用。
    public void backgroundProcess() {

        if (!getState().isAvailable()) {
            return;
        }

        Cluster cluster = getClusterInternal();
        if (cluster != null) {
            try {
                cluster.backgroundProcess();
            } catch (Exception e) {
                log.warn(sm.getString("containerBase.backgroundProcess.cluster", cluster), e);
            }
        }
        Realm realm = getRealmInternal();
        if (realm != null) {
            try {
                realm.backgroundProcess();
            } catch (Exception e) {
                log.warn(sm.getString("containerBase.backgroundProcess.realm", realm), e);
            }
        }
        Valve current = pipeline.getFirst();
        while (current != null) {
            try {
                current.backgroundProcess();
            } catch (Exception e) {
                log.warn(sm.getString("containerBase.backgroundProcess.valve", current), e);
            }
            current = current.getNext();
        }
        fireLifecycleEvent(Lifecycle.PERIODIC_EVENT, null);
    }