init大体介绍
init是Android启动的第一个用户空间进程,它fork产生一些关键进程,如zygote、surfaceflinger进程。
init进程有很多功能:加载内核模块、挂载系统分区、加载sepolicy、支持属性服务、启动rc脚本、执行事件触发器和属性改变等等
init分析
init入口函数是main() system/core/init/main.cpp
main执行有三个阶段:
**FirstStage:**挂载一些基础文件系统、加载内核模
**selinux_setup:**执行selinux初始化
**SecondStage:**挂在其他文件系统,启动属性服务,执行boot流程,基本就是启动所有的其他进程和服务
main()
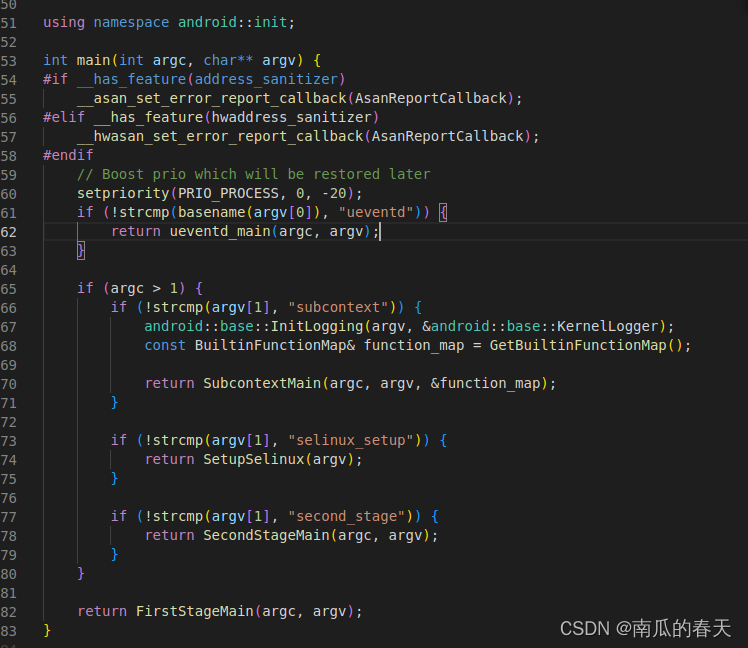
main函数中主要执行了三个函数FirstStageMain()、SetupSelinux()、SecondStageMain()对应三个阶段
//init的第一阶段      FirstStage 挂载一些基础文件系统和加载内核模块等
int FirstStageMain(int argc, char** argv) {
    if (REBOOT_BOOTLOADER_ON_PANIC) {  //设置panic处理器
    //InstallRebootSignalHandlers()函数是用来安装重启信号处理器的。
    //在Android系统中,当系统遇到严重错误时,会发送一个重启信号,以便系统可以重新启动。这个函数的作用是为这个信号安装一个处理器,以便在系统重启之前可以执行一些清理工作。
        InstallRebootSignalHandlers();
    }

    boot_clock::time_point start_time = boot_clock::now();  //获取当前时间

    std::vector<std::pair<std::string, int>> errors;
#define CHECKCALL(x) \
    if ((x) != 0) errors.emplace_back(#x " failed", errno);

    // Clear the umask.
    //umask(0)是用于设置进程的文件创建掩码。
    //文件创建掩码是一个8位的二进制数,用于控制新创建的文件的默认权限。在这个代码块中,umask(0)将文件创建掩码设置为0,这意味着新创建的文件将具有最大的权限。
    umask(0);


//clearenv()函数是用于清除当前进程的环境变量的。
//环境变量是一组键值对,用于存储进程的配置信息。在这个代码块中,clearenv()函数用于清除当前进程的环境变量,以确保进程的环境变量不会影响后续操作。

   CHECKCALL(clearenv());
    CHECKCALL(setenv("PATH", _PATH_DEFPATH, 1));
    // Get the basic filesystem setup we need put together in the initramdisk
    // on / and then we'll let the rc file figure out the rest.
    CHECKCALL(mount("tmpfs", "/dev", "tmpfs", MS_NOSUID, "mode=0755"));
    CHECKCALL(mkdir("/dev/pts", 0755));
    CHECKCALL(mkdir("/dev/socket", 0755));
    CHECKCALL(mkdir("/dev/dm-user", 0755));
    CHECKCALL(mount("devpts", "/dev/pts", "devpts", 0, NULL));
#define MAKE_STR(x) __STRING(x)
// /proc 伪文件系统,记录进程、线程相关实时状态
    CHECKCALL(mount("proc", "/proc", "proc", 0, "hidepid=2,gid=" MAKE_STR(AID_READPROC)));
#undef MAKE_STR
    // Don't expose the raw commandline to unprivileged processes.
    CHECKCALL(chmod("/proc/cmdline", 0440));
    std::string cmdline;
    android::base::ReadFileToString("/proc/cmdline", &cmdline);
    // Don't expose the raw bootconfig to unprivileged processes.
    chmod("/proc/bootconfig", 0440);
    std::string bootconfig;
    android::base::ReadFileToString("/proc/bootconfig", &bootconfig);
    gid_t groups[] = {AID_READPROC};
    CHECKCALL(setgroups(arraysize(groups), groups));
    CHECKCALL(mount("sysfs", "/sys", "sysfs", 0, NULL));
    CHECKCALL(mount("selinuxfs", "/sys/fs/selinux", "selinuxfs", 0, NULL));

    CHECKCALL(mknod("/dev/kmsg", S_IFCHR | 0600, makedev(1, 11)));

    if constexpr (WORLD_WRITABLE_KMSG) {
        CHECKCALL(mknod("/dev/kmsg_debug", S_IFCHR | 0622, makedev(1, 11)));
    }

    CHECKCALL(mknod("/dev/random", S_IFCHR | 0666, makedev(1, 8)));
    CHECKCALL(mknod("/dev/urandom", S_IFCHR | 0666, makedev(1, 9)));

    // This is needed for log wrapper, which gets called before ueventd runs.
    CHECKCALL(mknod("/dev/ptmx", S_IFCHR | 0666, makedev(5, 2)));
    CHECKCALL(mknod("/dev/null", S_IFCHR | 0666, makedev(1, 3)));

    // These below mounts are done in first stage init so that first stage mount can mount
    // subdirectories of /mnt/{vendor,product}/.  Other mounts, not required by first stage mount,
    // should be done in rc files.
    // Mount staging areas for devices managed by vold
    // See storage config details at http://source.android.com/devices/storage/

    CHECKCALL(mount("tmpfs", "/mnt", "tmpfs", MS_NOEXEC | MS_NOSUID | MS_NODEV,
                    "mode=0755,uid=0,gid=1000"));
    // /mnt/vendor is used to mount vendor-specific partitions that can not be
    // part of the vendor partition, e.g. because they are mounted read-write.
    CHECKCALL(mkdir("/mnt/vendor", 0755));
    // /mnt/product is used to mount product-specific partitions that can not be
    // part of the product partition, e.g. because they are mounted read-write.
    CHECKCALL(mkdir("/mnt/product", 0755));

    // /debug_ramdisk is used to preserve additional files from the debug ramdisk
    CHECKCALL(mount("tmpfs", "/debug_ramdisk", "tmpfs", MS_NOEXEC | MS_NOSUID | MS_NODEV,
                    "mode=0755,uid=0,gid=0"));

    // /second_stage_resources is used to preserve files from first to second
    // stage init
    CHECKCALL(mount("tmpfs", kSecondStageRes, "tmpfs", MS_NOEXEC | MS_NOSUID | MS_NODEV,
                    "mode=0755,uid=0,gid=0"))
#undef CHECKCALL

//SetStdioToDevNull()用于关闭这些现有的fds(如果它们存在),并将它们替换为/dev/null。
    SetStdioToDevNull(argv);
    // Now that tmpfs is mounted on /dev and we have /dev/kmsg, we can actually
    // talk to the outside world...
    InitKernelLogging(argv);

    if (!errors.empty()) {
        for (const auto& [error_string, error_errno] : errors) {
            LOG(ERROR) << error_string << " " << strerror(error_errno);
        }
        LOG(FATAL) << "Init encountered errors starting first stage, aborting";
    }

    LOG(INFO) << "init first stage started!";

    auto old_root_dir = std::unique_ptr<DIR, decltype(&closedir)>{opendir("/"), closedir};
    if (!old_root_dir) {
        PLOG(ERROR) << "Could not opendir(\"/\"), not freeing ramdisk";
    }

    struct stat old_root_info;
    if (stat("/", &old_root_info) != 0) {
        PLOG(ERROR) << "Could not stat(\"/\"), not freeing ramdisk";
        old_root_dir.reset();
    }

    auto want_console = ALLOW_FIRST_STAGE_CONSOLE ? FirstStageConsole(cmdline, bootconfig) : 0;

    //want_parallel的值是通过查找bootconfig中是否包含字符串androidboot.load_modules_parallel = "true"来确定的。
    auto want_parallel =
            bootconfig.find("androidboot.load_modules_parallel = \"true\"") != std::string::npos;

    boot_clock::time_point module_start_time = boot_clock::now();
    int module_count = 0;
    //这段代码348-357是在加载内核模块。它首先调用了IsRecoveryMode()和ForceNormalBoot()函数来判断是否在恢复模式下启动,
    //并且是否需要强制正常启动。然后它调用了LoadKernelModules()函数来加载内核模块,并且根据返回值来判断是否加载成功。
    //如果加载失败,它会根据want_console参数来决定是否启动控制台。如果want_console不等于FirstStageConsoleParam::DISABLED,
    //则会输出错误信息并启动控制台;否则会输出致命错误信息并退出。
    //IsRecoveryMode()和ForceNormalBoot()是用于判断设备是否处于恢复模式和是否需要强制正常启动的函数。
    if (!LoadKernelModules(IsRecoveryMode() && !ForceNormalBoot(cmdline, bootconfig), want_console,
                           want_parallel, module_count)) {
        if (want_console != FirstStageConsoleParam::DISABLED) {
            LOG(ERROR) << "Failed to load kernel modules, starting console";
        } else {
            LOG(FATAL) << "Failed to load kernel modules";
        }
    }
    //打印耗费的时间
    if (module_count > 0) {
        auto module_elapse_time = std::chrono::duration_cast<std::chrono::milliseconds>(
                boot_clock::now() - module_start_time);
        setenv(kEnvInitModuleDurationMs, std::to_string(module_elapse_time.count()).c_str(), 1);
        LOG(INFO) << "Loaded " << module_count << " kernel modules took "
                  << module_elapse_time.count() << " ms";
    }

    bool created_devices = false;
    if (want_console == FirstStageConsoleParam::CONSOLE_ON_FAILURE) {
        if (!IsRecoveryMode()) {
            created_devices = DoCreateDevices();
            if (!created_devices) {
                LOG(ERROR) << "Failed to create device nodes early";
            }
        }
        StartConsole(cmdline);
    }

    //检查是否存在名为kBootImageRamdiskProp的文件,如果存在,则将其复制到GetRamdiskPropForSecondStage()返回的路径中。
    //如果目标路径不存在,则会创建它。最后,会输出一条日志记录已将ramdisk prop复制到目标路径中。
    if (access(kBootImageRamdiskProp, F_OK) == 0) {
        std::string dest = GetRamdiskPropForSecondStage();
        std::string dir = android::base::Dirname(dest);
        std::error_code ec;
        if (!fs::create_directories(dir, ec) && !!ec) {
            LOG(FATAL) << "Can't mkdir " << dir << ": " << ec.message();
        }
        if (!fs::copy_file(kBootImageRamdiskProp, dest, ec)) {
            LOG(FATAL) << "Can't copy " << kBootImageRamdiskProp << " to " << dest << ": "
                       << ec.message();
        }
        LOG(INFO) << "Copied ramdisk prop to " << dest;
    }

    // If "/force_debuggable" is present, the second-stage init will use a userdebug
    // sepolicy and load adb_debug.prop to allow adb root, if the device is unlocked.
    //检查是否存在名为"/forcedebuggable"的文件,如果存在,则将"/adbdebug.prop"和"/userdebugplatsepolicy.cil"文件复制到"kDebugRamdiskProp"和"kDebugRamdiskSEPolicy"中,并设置环境变量"INITFORCEDEBUGGABLE"为"true",以便第二阶段的init进程读取上述文件。
    if (access("/force_debuggable", F_OK) == 0) {
        constexpr const char adb_debug_prop_src[] = "/adb_debug.prop";
        constexpr const char userdebug_plat_sepolicy_cil_src[] = "/userdebug_plat_sepolicy.cil";
        std::error_code ec;  // to invoke the overloaded copy_file() that won't throw.
        if (access(adb_debug_prop_src, F_OK) == 0 &&
            !fs::copy_file(adb_debug_prop_src, kDebugRamdiskProp, ec)) {
            LOG(WARNING) << "Can't copy " << adb_debug_prop_src << " to " << kDebugRamdiskProp
                         << ": " << ec.message();
        }
        if (access(userdebug_plat_sepolicy_cil_src, F_OK) == 0 &&
            !fs::copy_file(userdebug_plat_sepolicy_cil_src, kDebugRamdiskSEPolicy, ec)) {
            LOG(WARNING) << "Can't copy " << userdebug_plat_sepolicy_cil_src << " to "
                         << kDebugRamdiskSEPolicy << ": " << ec.message();
        }
        // setenv for second-stage init to read above kDebugRamdisk* files.
        setenv("INIT_FORCE_DEBUGGABLE", "true", 1);
    }
     //这段代码的作用是在强制正常启动后,创建一个名为"/firststageramdisk"的目录,
     //并将其绑定到自身。然后,使用SwitchRoot()函数将根目录切换到"/firststageramdisk"。
     //这个过程是为了在启动过程中切换根目录,以便在启动后可以卸载ramdisk。
    if (ForceNormalBoot(cmdline, bootconfig)) {
        mkdir("/first_stage_ramdisk", 0755);
        PrepareSwitchRoot();
        // SwitchRoot() must be called with a mount point as the target, so we bind mount the
        // target directory to itself here.
        if (mount("/first_stage_ramdisk", "/first_stage_ramdisk", nullptr, MS_BIND, nullptr) != 0) {
            PLOG(FATAL) << "Could not bind mount /first_stage_ramdisk to itself";
        }
        SwitchRoot("/first_stage_ramdisk");
    }

//这段代码是在判断是否成功挂载了必要的分区。
//如果没有成功挂载,则会记录一个致命错误日志并退出程序。其中,DoFirstStageMount 函数是用来挂载分区的,
//!created_devices 表示如果没有成功创建设备节点,则需要传入 true,表示需要重新创建设备节点。如果挂载失败,则会记录一个致命错误日志并退出程序。
    if (!DoFirstStageMount(!created_devices)) {
        LOG(FATAL) << "Failed to mount required partitions early ...";
    }
//这段代码的作用是获取根目录的状态信息,并将其存储在名为newrootinfo的结构体中。
//如果获取状态信息失败,则会记录错误并重置oldrootdir。这段代码的上下文表明,
//它是在初始化过程中被调用的,用于检查是否需要释放ramdisk。
    struct stat new_root_info;
    if (stat("/", &new_root_info) != 0) {
        PLOG(ERROR) << "Could not stat(\"/\"), not freeing ramdisk";
        old_root_dir.reset();
    }
//这段代码的作用是检查旧的根目录是否存在,并且新的根目录是否与旧的根目录不同。
//如果是,则调用 FreeRamdisk 函数释放旧的根目录。这段代码通常用于 Android 系统的启动过程中,
//用于释放旧的根目录以便切换到新的根目录。
    if (old_root_dir && old_root_info.st_dev != new_root_info.st_dev) {
        FreeRamdisk(old_root_dir.get(), old_root_info.st_dev);
    }
//在recovery模式下设置AVB版本。具体实现可以在"./system/core/init/firststage.cpp"中找到。
    SetInitAvbVersionInRecovery();
//设置一个名为kEnvFirstStageStartedAt的环境变量,它的值是start_time的时间戳,单位是秒。
//第三个参数1表示覆盖已有的同名环境变量。这个环境变量在后面的代码中可能会被使用。
    setenv(kEnvFirstStageStartedAt, std::to_string(start_time.time_since_epoch().count()).c_str(),
           1);

//启动 init 进程,并传递参数 "selinuxsetup"。具体来说,它使用 execv() 函数来执行 "/system/bin/init" 可执行文件,
//并将标准输出和标准错误输出重定向到 "/dev/kmsg" 设备文件。如果 execv() 函数返回,则会记录一个致命错误消息并退出程序。
    const char* path = "/system/bin/init";
    const char* args[] = {path, "selinux_setup", nullptr};
    auto fd = open("/dev/kmsg", O_WRONLY | O_CLOEXEC);
    dup2(fd, STDOUT_FILENO);
    dup2(fd, STDERR_FILENO);
    close(fd);
    execv(path, const_cast<char**>(args));

    // execv() only returns if an error happened, in which case we
    // panic and never fall through this conditional.
    PLOG(FATAL) << "execv(\"" << path << "\") failed";

    return 1;
}
可以看到在第一阶段基本就干了两件事挂载文件系统和启动内核,最后用execv来到selinux阶段。
SetupSelinux()
system/core/init/selinux
int SetupSelinux(char** argv) {
    SetStdioToDevNull(argv);
    InitKernelLogging(argv);

//检查是否需要在发生 panic 时重启 bootloader,如果需要,就调用 InstallRebootSignalHandlers() 来安装重启信号处理程序
//panic 是指操作系统遇到无法处理的错误或异常情况时的一种状态。在 Android 中,当系统遇到无法处理的错误时,会触发 panic 状态,此时系统会尝试重启以恢复正常运行。
//bootloader 是指启动加载程序,是在计算机系统启动时运行的程序。在 Android 设备中,bootloader 负责初始化硬件设备、加载操作系统内核并启动它
    if (REBOOT_BOOTLOADER_ON_PANIC) {
        InstallRebootSignalHandlers();
    }

    boot_clock::time_point start_time = boot_clock::now();

    //挂载缺失的系统分区
    MountMissingSystemPartitions();

    SelinuxSetupKernelLogging();

    LOG(INFO) << "Opening SELinux policy";

//准备APEX的SELinux策略。在该函数中,它首先读取策略,然后加载策略并设置强制执行。
//在这之前,它还会执行一些恢复上下文的操作,以确保文件系统中的文件具有正确的SELinux上下文。最后,它调用execv()函数来启动

//APEX是Android的一种软件包格式,它允许将应用程序和系统组件以模块化的方式交付和更新。每个APEX模块都有自己的文件系统命名空间和SELinux策略。

//SELinux是一种安全增强的Linux内核安全模块,它通过强制访问控制(MAC)机制来限制进程的权限,从而提高系统的安全性。
//在Android系统中,每个进程都有一个与之关联的SELinux安全上下文,该上下文定义了进程可以访问的资源和操作。
    PrepareApexSepolicy();

    //在杀死 snapuserd 之前读取策略并清理 Apex sepolicy。具体来说,它首先声明了一个名为 policy 的字符串变量,然后调用 ReadPolicy 函数将策略读入该变量中。
    //接下来,它调用 CleanupApexSepolicy 函数清理 Apex sepolicy。


//Apex sepolicy 是 Android 的一个安全机制,它是一种基于 SELinux 的安全策略,用于保护系统的关键部分免受恶意软件的攻击。
//Apex 是 Android 的一种新的软件分发格式,它将应用程序和系统组件打包到一个单独的文件中,以便更轻松地进行更新和管理。
//Apex sepolicy 是专门为 Apex 设计的一种安全机制,它可以确保 Apex 文件中的应用程序和系统组件只能访问它们被授权访问的资源和功能。
    // Read the policy before potentially killing snapuserd.
    std::string policy;
    ReadPolicy(&policy);
    CleanupApexSepolicy();


//启动 snapuserd 进程并开始转换。如果 snapuserdhelper 不为空,则会调用 StartTransition() 方法来杀死旧的 snapuserd 进程以避免审计消息。
//snapuserd 是一个用户空间进程,用于管理 Android 的 snapshot 功能。在这里,如果 snapuserd_helper 不为空,就会调用 StartTransition() 来杀死旧的 snapuserd 进程,以避免审计消息。在这之后,就不能从 /system(或其他动态分区)中读取数据,直到调用 FinishTransition()。
//在调用 FinishTransition() 方法之前,我们不能从 /system(或其他动态分区)中读取任何内容。
    auto snapuserd_helper = SnapuserdSelinuxHelper::CreateIfNeeded();
    if (snapuserd_helper) {
        // Kill the old snapused to avoid audit messages. After this we cannot
        // read from /system (or other dynamic partitions) until we call
        // FinishTransition().
        snapuserd_helper->StartTransition();
    }

//加载 SELinux 策略。具体来说,它调用了 LoadSelinuxPolicy 函数,该函数从字符串 policy 中读取 SELinux 策略
    LoadSelinuxPolicy(policy);

//用于完成 snapuserd 的转换并关闭它。在这之前,snapuserdhelper 会被创建并启动转换。
//完成转换后,snapuserdhelper 会被设置为 nullptr。这个函数的目的是为了确保在 SELinux 强制执行之前,snapuserd 转换已经完成并关闭了。
    if (snapuserd_helper) {
        // Before enforcing, finish the pending snapuserd transition.
        snapuserd_helper->FinishTransition();
        snapuserd_helper = nullptr;
    }

    // This restorecon is intentionally done before SelinuxSetEnforcement because the permissions
    // needed to transition files from tmpfs to *_contexts_file context should not be granted to
    // any process after selinux is set into enforcing mode.

    //selinux_android_restorecon函数用于恢复指定路径的SELinux上下文。如果恢复失败,将会记录一个致命错误并退出程序。
    if (selinux_android_restorecon("/dev/selinux/", SELINUX_ANDROID_RESTORECON_RECURSE) == -1) {
        PLOG(FATAL) << "restorecon failed of /dev/selinux failed";
    }
    //它调用了 SelinuxSetEnforcement() 函数,用于设置 SELinux 的执行模式。SELinux 是一种安全增强功能,它可以限制进程的权限,
    //从而提高系统的安全性。在 Android 系统中,SELinux 默认是开启的,而 SelinuxSetEnforcement() 函数用于设置 SELinux 的执行模式为强制模式,
    //这意味着所有进程都必须遵守 SELinux 的规则,否则将会被拒绝访问。
    SelinuxSetEnforcement();

    // We're in the kernel domain and want to transition to the init domain.  File systems that
    // store SELabels in their xattrs, such as ext4 do not need an explicit restorecon here,
    // but other file systems do.  In particular, this is needed for ramdisks such as the
    // recovery image for A/B devices.
    //调用了 selinux_android_restorecon 函数来恢复 /system/bin/init 的安全上下文。
    //如果恢复失败,它将记录一个致命错误并退出。这个函数的第二个参数是一个标志,用于指定恢复上下文时是否递归地恢复其子目录和文件。在这里,它被设置为 0,表示不递归恢复。
    if (selinux_android_restorecon("/system/bin/init", 0) == -1) {
        PLOG(FATAL) << "restorecon failed of /system/bin/init failed";
    }

//设置 SELinux 启动时间的环境变量。具体来说,它将当前时间戳转换为字符串并设置为名为 kEnvSelinuxStartedAt 的环境变量的值。
    setenv(kEnvSelinuxStartedAt, std::to_string(start_time.time_since_epoch().count()).c_str(), 1);


//启动第二阶段的 init 进程。
//具体来说,它使用 execv 函数执行了 /system/bin/init 可执行文件,并传递了 "second_stage" 参数。
//如果 execv 函数返回,那么会输出一条错误信息并进入死循环。这段代码位于 system/core/init/init.cpp 文件中的 Init::SecondStageMain 函数中。
    const char* path = "/system/bin/init";
    const char* args[] = {path, "second_stage", nullptr};
    execv(path, const_cast<char**>(args));

    // execv() only returns if an error happened, in which case we
    // panic and never return from this function.
    PLOG(FATAL) << "execv(\"" << path << "\") failed";

    return 1;
}
SecondStageMain()
int SecondStageMain(int argc, char** argv) {
    if (REBOOT_BOOTLOADER_ON_PANIC) {
        InstallRebootSignalHandlers();
    }

    // No threads should be spin up until signalfd
    // is registered. If the threads are indeed required,
    // each of these threads _should_ make sure SIGCHLD signal
    // is blocked. See b/223076262

    boot_clock::time_point start_time = boot_clock::now();

    //设置一个lambda函数,以便在需要时触发系统关机。具体来说,它将一个字符串命令作为参数传递给shutdown_state.TriggerShutdown()函数,该函数将触发系统关机。
    //这个lambda函数被赋值给trigger_shutdown变量
    trigger_shutdown = [](const std::string& command) { shutdown_state.TriggerShutdown(command); };

    SetStdioToDevNull(argv);
    InitKernelLogging(argv);
    LOG(INFO) << "init second stage started!";

    SelinuxSetupKernelLogging();

    // Update $PATH in the case the second stage init is newer than first stage init, where it is
    // first set.
    if (setenv("PATH", _PATH_DEFPATH, 1) != 0) {
        PLOG(FATAL) << "Could not set $PATH to '" << _PATH_DEFPATH << "' in second stage";
    }

    // Init should not crash because of a dependence on any other process, therefore we ignore
    // SIGPIPE and handle EPIPE at the call site directly.  Note that setting a signal to SIG_IGN
    // is inherited across exec, but custom signal handlers are not.  Since we do not want to
    // ignore SIGPIPE for child processes, we set a no-op function for the signal handler instead.

    //忽略SIGPIPE信号并在调用点直接处理EPIPE。注意,将信号设置为SIGIGN会在exec期间继承,但自定义信号处理程序不会。
    //由于我们不希望为子进程忽略SIGPIPE,因此我们将信号处理程序设置为无操作函数。
    //SIGPIPE信号是在进程向一个已经关闭了写端的管道或socket中写入数据时产生的信号。在这种情况下,内核会向进程发送SIGPIPE信号,以通知进程写入失败。
    //EPIPE是指在写入一个已经关闭了写端的管道或socket时产生的错误。在这种情况下,内核会向进程发送SIGPIPE信号,以通知进程写入失败。
    {
        struct sigaction action = {.sa_flags = SA_RESTART};
        action.sa_handler = [](int) {};
        sigaction(SIGPIPE, &action, nullptr);
    }

//将默认的OOM分数调整写入/proc/1/oomscoreadj文件中。如果写入失败,则记录错误日志。这个文件是一个特殊的文件,它包含了进程的OOM分数,这个分数越高,进程就越容易被杀死。
//这个代码块是在第二阶段初始化中被调用的,它确保了init进程的OOM分数被正确地设置。
//OOM分数是一个用于衡量进程优先级的指标,它代表了进程被杀死的可能性。当系统内存不足时,内核会根据进程的OOM分数来决定哪些进程应该被杀死以释放内存。
    // Set init and its forked children's oom_adj.
    if (auto result =
                WriteFile("/proc/1/oom_score_adj", StringPrintf("%d", DEFAULT_OOM_SCORE_ADJUST));
        !result.ok()) {
        LOG(ERROR) << "Unable to write " << DEFAULT_OOM_SCORE_ADJUST
                   << " to /proc/1/oom_score_adj: " << result.error();
    }

    // Set up a session keyring that all processes will have access to. It
    // will hold things like FBE encryption keys. No process should override
    // its session keyring.
    //用于获取指定类型的密钥环的ID。在这里,它获取了KEYSPECSESSIONKEYRING类型的密钥环的ID,该密钥环是会话密钥环,它保存了与当前会话相关的密钥。
    //这个函数的第二个参数是0或1,用于指定是否创建一个新的密钥环。在这里,它传递了1,表示如果指定类型的密钥环不存在,则创建一个新的密钥环。

    //会话密钥环是一个用于保存加密密钥等敏感信息的内核数据结构。在这个代码段中,keyctl_get_keyring_ID函数被用来获取会话密钥环的ID,
    //如果会话密钥环不存在,则创建一个新的会话密钥环。这个会话密钥环被设置为所有进程都可以访问,因此所有进程都可以使用其中保存的密钥。
    //没有进程应该覆盖会话密钥环,因为这可能会导致数据丢失或安全问题。
    keyctl_get_keyring_ID(KEY_SPEC_SESSION_KEYRING, 1);

    // Indicate that booting is in progress to background fw loaders, etc.

    //打开 /dev/.booting 设备文件,然后关闭它。这个文件是用来指示系统正在启动中的,
    //当它存在时,一些后台的固件加载程序等会知道系统正在启动中,从而避免在启动过程中进行一些不必要的操作。
    close(open("/dev/.booting", O_WRONLY | O_CREAT | O_CLOEXEC, 0000));

    // See if need to load debug props to allow adb root, when the device is unlocked.
    //检查是否需要加载调试属性以允许在设备解锁时使用adb root。
    //如果环境变量INITFORCEDEBUGGABLE存在且设备已解锁,则将loaddebugprop设置为true。最后,将INITFORCEDEBUGGABLE环境变量取消设置。
    const char* force_debuggable_env = getenv("INIT_FORCE_DEBUGGABLE");
    bool load_debug_prop = false;
    if (force_debuggable_env && AvbHandle::IsDeviceUnlocked()) {
        load_debug_prop = "true"s == force_debuggable_env;
    }
    unsetenv("INIT_FORCE_DEBUGGABLE");

    // Umount the debug ramdisk so property service doesn't read .prop files from there, when it
    // is not meant to.
    //在 load_debug_prop 为假时卸载调试 ramdisk。具体来说,如果不需要加载调试属性,就会卸载调试 ramdisk。
    if (!load_debug_prop) {
        UmountDebugRamdisk();
    }

//PropertyInit()函数的作用是初始化属性服务,该服务负责读取.prop文件并将其转换为系统属性。
//这些属性可以在系统中的其他进程和服务中使用,以便它们可以根据系统的状态进行调整。

//属性服务是一个系统级别的服务,它负责读取.prop文件并将其转换为系统属性。
//这些属性可以在系统中的其他进程和服务中使用,以便它们可以根据系统的状态进行调整。
//系统属性可以用于控制各种系统行为,例如调整屏幕亮度、设置默认语言、控制系统音量等。在Android系统中,属性服务是由init进程启动的,并在系统启动时初始化。
    PropertyInit();

    // Umount second stage resources after property service has read the .prop files.
    //用于卸载第一阶段初始化时挂载的一些文件系统,以便在第二阶段初始化时重新挂载这些文件系统。
    UmountSecondStageRes();

    // Umount the debug ramdisk after property service has read the .prop files when it means to.
    if (load_debug_prop) {
        UmountDebugRamdisk();
    }

    // Mount extra filesystems required during second stage init
    //挂载一些在第二阶段启动时需要的额外文件系统。
    MountExtraFilesystems();

    // Now set up SELinux for second stage.
    //初始化 SELinux 并恢复上下文
    SelabelInitialize();
    SelinuxRestoreContext();

//创建了一个名为epoll的Epoll对象,并尝试打开它。如果打开失败,它将记录一个致命错误并退出程序。
//Epoll是一个Linux系统调用,它允许进程监视多个文件描述符以查看它们是否已准备好进行I/O操作。
//在这里,它被用于监视一些文件描述符,以便在它们准备好时执行相应的操作。这个对象被用于监视子进程的退出,以便在它们退出时清理它们的资源。它还被用于处理信号和启动属性服务。
    Epoll epoll;
    if (auto result = epoll.Open(); !result.ok()) {
        PLOG(FATAL) << result.error();
    }

    // We always reap children before responding to the other pending functions. This is to
    // prevent a race where other daemons see that a service has exited and ask init to
    // start it again via ctl.start before init has reaped it.
    //设置了 epoll 的第一个回调函数为 ReapAnyOutstandingChildren。
    //这个函数的作用是在响应其他挂起的函数之前,始终回收子进程,以防止其他守护进程在服务退出后看到它并要求 init 通过 ctl.start 启动它。这是为了防止竞争条件。
    epoll.SetFirstCallback(ReapAnyOutstandingChildren);

//初始化系统的各种服务和资源
//InstallSignalFdHandler(&epoll):安装信号处理程序,用于处理进程收到的信号。
//InstallInitNotifier(&epoll):安装init进程的通知程序,用于通知其他进程init进程已经启动完成。
//StartPropertyService(&property_fd):启动属性服务,用于管理系统属性。
    InstallSignalFdHandler(&epoll);
    InstallInitNotifier(&epoll);
    StartPropertyService(&property_fd);

    // Make the time that init stages started available for bootstat to log.
    RecordStageBoottimes(start_time);

    // Set libavb version for Framework-only OTA match in Treble build.
    //检查环境变量 INIT_AVB_VERSION 是否存在,如果存在则将其设置为 ro.boot.avb_version 属性的值。
    //然后,它会使用 unsetenv 函数删除 INIT_AVB_VERSION 环境变量。
    //这段代码的作用是在启动时设置 Android Verified Boot (AVB) 版本。
    if (const char* avb_version = getenv("INIT_AVB_VERSION"); avb_version != nullptr) {
        SetProperty("ro.boot.avb_version", avb_version);
    }
    unsetenv("INIT_AVB_VERSION");

//在系统启动时进行一些初始化操作。
//fs_mgr_vendor_overlay_mount_all():挂载 vendor overlay 分区,该分区用于存储厂商定制的一些文件。
//export_oem_lock_status():导出 OEM lock 状态,该状态用于判断设备是否处于锁定状态。
//MountHandler mount_handler(&epoll):初始化 MountHandler 对象,用于处理文件系统挂载。
//SetUsbController():设置 USB 控制器,用于处理 USB 相关的事件
//SetKernelVersion():设置内核版本号,该版本号用于记录当前系统所使用的内核版本。
    fs_mgr_vendor_overlay_mount_all();
    export_oem_lock_status();
    MountHandler mount_handler(&epoll);
    SetUsbController();
    SetKernelVersion();

//首先获取内置函数映射表,然后将其设置为Action类的函数映射表。
//这个映射表包含了所有可用的内置函数,这些函数可以在init.rc脚本中使用。
//这些函数可以用于启动服务、挂载文件系统等等。这段代码的作用是确保Action类可以访问内置函数映射表,以便在init.rc脚本中使用这些函数。
    const BuiltinFunctionMap& function_map = GetBuiltinFunctionMap();
    Action::set_function_map(&function_map);

//用于设置mount namespace的。如果SetupMountNamespaces()函数返回false,那么会记录一个fatal级别的日志,表示设置mount namespace失败。
    if (!SetupMountNamespaces()) {
        PLOG(FATAL) << "SetupMountNamespaces failed";
    }

//初始化 SELinux 上下文
    InitializeSubcontext();

    //初始化系统启动时需要的各种资源和服务,包括但不限于:初始化 SELinux、初始化 property service、挂载文件系统、启动各种服务等等。
    //其中 ActionManager 和 ServiceList 的实例化是在初始化完成后,启动各种服务之前进行的。

    //ActionManager 和 ServiceList 是 Android 系统启动时的两个重要类。
    //ActionManager 负责管理系统启动时需要执行的所有操作,
    //而 ServiceList 则负责管理系统启动时需要启动的所有服务。这两个类的实例化都是通过 GetInstance() 函数来实现的。
    ActionManager& am = ActionManager::GetInstance();
    ServiceList& sm = ServiceList::GetInstance();

//加载启动脚本 会加载init.rc
    LoadBootScripts(am, sm);

    // Turning this on and letting the INFO logging be discarded adds 0.2s to
    // Nexus 9 boot time, so it's disabled by default.
    if (false) DumpState();

    // Make the GSI status available before scripts start running.
    //首先检查 GSI 是否正在运行,如果是,则将属性 gsi::kGsiBootedProp 设置为 "1",否则设置为 "0"。
    //然后它检查 GSI 是否已安装,如果是,则将属性 gsi::kGsiInstalledProp 设置为 "1",否则设置为 "0"。
    //GSI 是 Generic System Image 的缩写,是一种 Android 系统映像,可以在支持 Project Treble 的设备上运行。
    //它是一个通用的、不包含设备特定代码的 Android 系统映像,可以在多种设备上运行。
    auto is_running = android::gsi::IsGsiRunning() ? "1" : "0";
    SetProperty(gsi::kGsiBootedProp, is_running);
    auto is_installed = android::gsi::IsGsiInstalled() ? "1" : "0";
    SetProperty(gsi::kGsiInstalledProp, is_installed);


    am.QueueBuiltinAction(SetupCgroupsAction, "SetupCgroups");   //设置cgroups,以便在后续的进程管理中使用。
    am.QueueBuiltinAction(SetKptrRestrictAction, "SetKptrRestrict");  //限制内核指针的泄露,以提高系统的安全性。
    am.QueueBuiltinAction(TestPerfEventSelinuxAction, "TestPerfEventSelinux"); //测试SELinux是否正确地限制了性能事件的访问。
    am.QueueBuiltinAction(ConnectEarlyStageSnapuserdAction, "ConnectEarlyStageSnapuserd"); //连接snapuserd,以便在后续的Snapshots操作中使用。
    am.QueueEventTrigger("early-init"); //触发"early-init"事件,以便在后续的初始化过程中执行必要的操作。


//将两个内置的Action加入到ActionManager的队列中,以便在后续的初始化过程中执行。
//第一个Action是waitforcoldbootdoneaction,它会等待系统完成冷启动,以确保/dev目录下的所有设备都已经被创建。
//第二个Action是SetMmapRndBitsAction,它会设置系统的内存映射随机化位数。
//这两个Action的执行顺序是有先后之分的,因为SetMmapRndBitsAction需要/dev目录下的一些设备才能正常工作。
    // Queue an action that waits for coldboot done so we know ueventd has set up all of /dev...
    am.QueueBuiltinAction(wait_for_coldboot_done_action, "wait_for_coldboot_done");
    // ... so that we can start queuing up actions that require stuff from /dev.
    am.QueueBuiltinAction(SetMmapRndBitsAction, "SetMmapRndBits");

    //在初始化过程中注册按键组合的回调函数。
    //它使用了 am.QueueBuiltinAction() 函数来将一个 lambda 函数作为内置动作添加到 ActionManager 中。
    //这个 lambda 函数会遍历 ServiceList 中的所有服务,将它们的按键组合注册到 keychords 中。然后,它会使用 epoll 监听按键事件,并在按键组合被触发时调用 HandleKeychord 函数。
    //这个函数的作用是执行与按键组合相关的操作,例如重启设备或进入恢复模式。
    Keychords keychords;
    am.QueueBuiltinAction(
            [&epoll, &keychords](const BuiltinArguments& args) -> Result<void> {
                for (const auto& svc : ServiceList::GetInstance()) {
                    keychords.Register(svc->keycodes());
                }
                keychords.Start(&epoll, HandleKeychord);
                return {};
            },
            "KeychordInit");

    // Trigger all the boot actions to get us started.
    //触发所有启动操作以启动系统。
    am.QueueEventTrigger("init");

    // Don't mount filesystems or start core system services in charger mode.
    //检查设备是否处于充电器模式。如果是,则触发名为“charger”的事件,否则触发名为“late-init”的事件。在“charger”事件中,不会挂载文件系统或启动核心系统服务。
    //在init中会启动zygote
    std::string bootmode = GetProperty("ro.bootmode", "");
    if (bootmode == "charger") {
        am.QueueEventTrigger("charger");
    } else {
        am.QueueEventTrigger("late-init");
    }

    // Run all property triggers based on current state of the properties.
    //运行所有基于当前属性状态的属性触发器。
    //具体来说,它将一个名为queue_property_triggers_action的内置操作添加到ActionManager的队列中,该操作将运行所有基于当前属性状态的属性触发器。这个操作的名称是"queuepropertytriggers"。
    am.QueueBuiltinAction(queue_property_triggers_action, "queue_property_triggers");

    // Restore prio before main loop
    setpriority(PRIO_PROCESS, 0, 0);
    while (true) {
        // By default, sleep until something happens. Do not convert far_future into
        // std::chrono::milliseconds because that would trigger an overflow. The unit of boot_clock
        // is 1ns.
        const boot_clock::time_point far_future = boot_clock::time_point::max();
        boot_clock::time_point next_action_time = far_future;

        auto shutdown_command = shutdown_state.CheckShutdown();
        //检测是否有关机命令
        if (shutdown_command) {
            LOG(INFO) << "Got shutdown_command '" << *shutdown_command
                      << "' Calling HandlePowerctlMessage()";
            HandlePowerctlMessage(*shutdown_command);
        }
   //检查是否有等待的属性(property)或正在运行的服务(service),如果没有,则执行一个命令(command),并在有更多工作要做时立即唤醒。
   //这个 am 对象是 ActionManager 类的一个实例,它负责管理系统启动过程中的所有操作。
        if (!(prop_waiter_state.MightBeWaiting() || Service::is_exec_service_running())) {
            am.ExecuteOneCommand();
            // If there's more work to do, wake up again immediately.
            if (am.HasMoreCommands()) {
                next_action_time = boot_clock::now();
            }
        }


        // Since the above code examined pending actions, no new actions must be
        // queued by the code between this line and the Epoll::Wait() call below
        // without calling WakeMainInitThread().
        //HandleProcessActions()函数来处理进程操作。如果有需要重启的进程,就在适当的时间唤醒系统。
        if (!IsShuttingDown()) {
            auto next_process_action_time = HandleProcessActions();

            // If there's a process that needs restarting, wake up in time for that.
            if (next_process_action_time) {
                next_action_time = std::min(next_action_time, *next_process_action_time);
            }
        }

        std::optional<std::chrono::milliseconds> epoll_timeout;
        //计算下一次 epollwait 的超时时间。如果下一次有事件需要处理,那么就计算出下一次事件的时间,然后将其转换为毫秒并向上取整,作为 epollwait 的超时时间。
        //如果没有事件需要处理,那么就不需要等待,直接进入下一次循环。
        if (next_action_time != far_future) {
            epoll_timeout = std::chrono::ceil<std::chrono::milliseconds>(
                    std::max(next_action_time - boot_clock::now(), 0ns));
        }
        auto epoll_result = epoll.Wait(epoll_timeout);
        if (!epoll_result.ok()) {
            LOG(ERROR) << epoll_result.error();
        }
        if (!IsShuttingDown()) {
            HandleControlMessages();
            SetUsbController();
        }
    }

    return 0;
}
在late-init触发器中会执行zygote
在SecondSatge的最后会进入一个while死循环来循环等待处理事件


