1、前言
面试官:“看过Spring源码吧,简单说说Spring中Bean的生命周期”
大神仙:“基本生命周期会经历实例化 -> 属性赋值 -> 初始化 -> 销毁”。
面试官:“......”
2、Bean的生命周期
如果是普通Bean的生命周期,那么上述的回答是真正确的。确实会经历“实例化 -> 属性赋值 -> 初始化 -> 销毁”四个阶段。但是请时刻记住,Spring是个框架,框架的特性除了封装以外,还应当具备扩展性。因此,Spring Bean的生命周期除了上述常见的4个阶段外,还应该具体了解每个阶段的扩展能力,以及Spring提供的一些扩展机制。
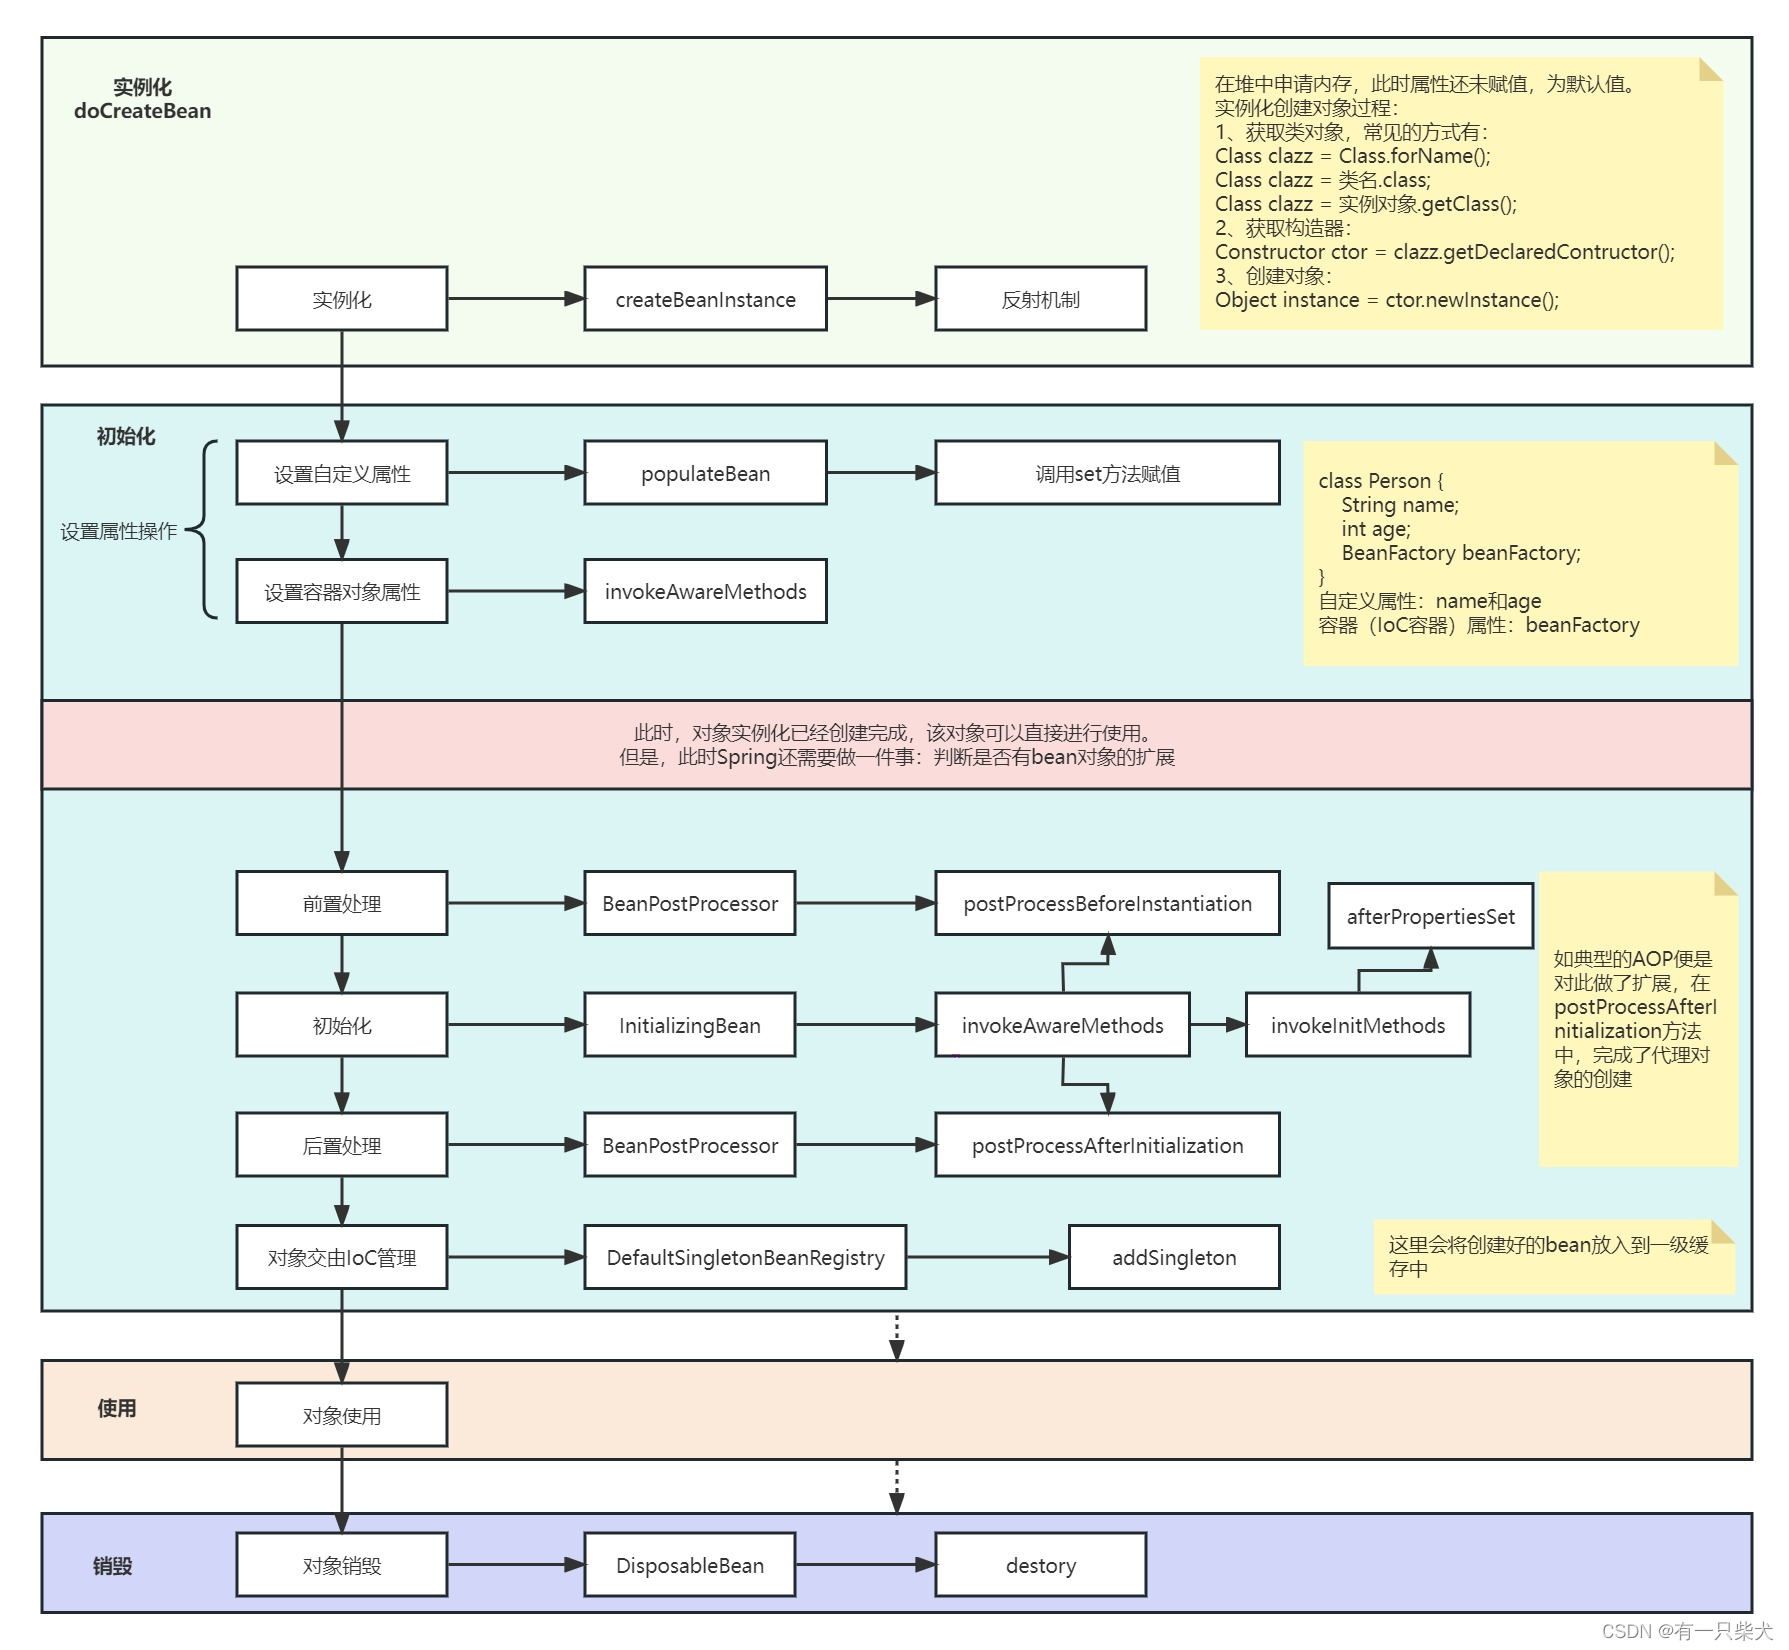
简单的说可以分为以下几步:
- 对象通过反射机制实例化;执行createBeanInstance方法;
- 通过populateBean设置属性,同时会检查aware接口,设置容器对象属性;
- 初始化,检查beanPostProcessor扩展前置处理操作;
- 如果有init-method方法,执行初始化操作;
- 执行beanPostProcessor扩展后置处理操作;
- 注册到IoC容器中,交由Spring管理;
- 对象使用;
- 对象销毁;
整个生命周期管理可以查看Spring源码:org.springframework.beans.factory.support.AbstractAutowireCapableBeanFactory#doCreateBean。
/**
 * Actually create the specified bean. Pre-creation processing has already happened
 * at this point, e.g. checking {@code postProcessBeforeInstantiation} callbacks.
 * <p>Differentiates between default bean instantiation, use of a
 * factory method, and autowiring a constructor.
 * @param beanName the name of the bean
 * @param mbd the merged bean definition for the bean
 * @param args explicit arguments to use for constructor or factory method invocation
 * @return a new instance of the bean
 * @throws BeanCreationException if the bean could not be created
 * @see #instantiateBean
 * @see #instantiateUsingFactoryMethod
 * @see #autowireConstructor
 */
protected Object doCreateBean(String beanName, RootBeanDefinition mbd, @Nullable Object[] args)
      throws BeanCreationException {

   // Instantiate the bean.
   BeanWrapper instanceWrapper = null;
   ...
   if (instanceWrapper == null) {
      //创建实例,使用工厂方法,构造函数主动注入、简单初始化
      instanceWrapper = createBeanInstance(beanName, mbd, args);
   }
   Object bean = instanceWrapper.getWrappedInstance();
   Class<?> beanType = instanceWrapper.getWrappedClass();
   if (beanType != NullBean.class) {
      mbd.resolvedTargetType = beanType;
   }

   ...
   // 中间还有一些循环依赖的检测

   // Initialize the bean instance.
   Object exposedObject = bean;
   try {
      // 属性赋值
      populateBean(beanName, mbd, instanceWrapper);
      // 初始化
      exposedObject = initializeBean(beanName, exposedObject, mbd);
   }
   catch (Throwable ex) {
      if (ex instanceof BeanCreationException && beanName.equals(((BeanCreationException) ex).getBeanName())) {
         throw (BeanCreationException) ex;
      }
      else {
         throw new BeanCreationException(
               mbd.getResourceDescription(), beanName, "Initialization of bean failed", ex);
      }
   }

   ...

   // Register bean as disposable.
    try {
        // 注册bean对象,方便后续在容器销毁的时候销毁对象
        registerDisposableBeanIfNecessary(beanName, bean, mbd);
    }
    catch (BeanDefinitionValidationException ex) {
        throw new BeanCreationException(
            mbd.getResourceDescription(), beanName, "Invalid destruction signature", ex);
    }

   return exposedObject;
}
2.1、图解生命周期
2.2、createBeanInstance()
对象实例化,我们从源码org.springframework.beans.factory.support.AbstractAutowireCapableBeanFactory#doCreateBean中,找到createBeanInstance方法:
protected BeanWrapper createBeanInstance(String beanName, RootBeanDefinition mbd, @Nullable Object[] args) {
   // Make sure bean class is actually resolved at this point.
   Class<?> beanClass = resolveBeanClass(mbd, beanName);

   if (beanClass != null && !Modifier.isPublic(beanClass.getModifiers()) && !mbd.isNonPublicAccessAllowed()) {
      throw new BeanCreationException(mbd.getResourceDescription(), beanName,
            "Bean class isn't public, and non-public access not allowed: " + beanClass.getName());
   }

   // 判断当前beanDefinition中是否包含扩展回调方法,这里是生成bean的第一个策略
   Supplier<?> instanceSupplier = mbd.getInstanceSupplier();
   if (instanceSupplier != null) {
      return obtainFromSupplier(instanceSupplier, beanName);
   }

   // 判断是否有工厂方法初始化策略
   if (mbd.getFactoryMethodName() != null) {
      return instantiateUsingFactoryMethod(beanName, mbd, args);
   }

   // Shortcut when re-creating the same bean...
   boolean resolved = false;
   boolean autowireNecessary = false;
   if (args == null) {
      // 因为一个类可能由多个构造函数,所以需要根据配置文件中配置的参数或传入的参数来确定最终调用的构造函数。
      // 因为判断过程会比较,所以spring会将解析、确定好的构造函数缓存到BeanDefinition中的resolvedConstructorOrFactoryMethod字段中。
      // 在下次创建相同时直接从RootBeanDefinition中的属性resolvedConstructorOrFactoryMethod缓存的值获取,避免再次解析
      synchronized (mbd.constructorArgumentLock) {
         if (mbd.resolvedConstructorOrFactoryMethod != null) {
            resolved = true;
            autowireNecessary = mbd.constructorArgumentsResolved;
         }
      }
   }
   if (resolved) {
      if (autowireNecessary) {
          // 使用有参构造
         return autowireConstructor(beanName, mbd, null, null);
      }
      else {
          // 使用默认构造函数
         return instantiateBean(beanName, mbd);
      }
   }

   // Candidate constructors for autowiring?
   Constructor<?>[] ctors = determineConstructorsFromBeanPostProcessors(beanClass, beanName);
   if (ctors != null || mbd.getResolvedAutowireMode() == AUTOWIRE_CONSTRUCTOR ||
         mbd.hasConstructorArgumentValues() || !ObjectUtils.isEmpty(args)) {
      return autowireConstructor(beanName, mbd, ctors, args);
   }

   // Preferred constructors for default construction?
   ctors = mbd.getPreferredConstructors();
   if (ctors != null) {
      return autowireConstructor(beanName, mbd, ctors, null);
   }

   // No special handling: simply use no-arg constructor.
   // 使用默认的无参构造函数创建对象,如果没有午餐构造,且存在多个有参构造且没有@Autowired注解构造,就会直接报错
   return instantiateBean(beanName, mbd);
}
该方法里面包含了几种创建bean的策略。如实现FactoryBean方式,supplier方式,反射等等。该阶段主要完成了bean对象的实例化操作,此时的bean只是在堆中申请了内存,并未进行真正的赋值。
2.3、populateBean()
该阶段,为具体的属性赋值操作。一个对象属性大致可以分为两类:
如一个类:
class Person {
    String name;   // 自定义属性
    BeanFactory beanFactory;  // 容器(IoC容器)属性
}
属性赋值的顺序为:自定义属性 -> 容器对象属性。而容器对象属性,为一系列实现Aware接口的处理逻辑。典型的如:BeanFactoryAware,ApplicationContextAware等
可以看下populateBean源码:
protected void populateBean(String beanName, RootBeanDefinition mbd, @Nullable BeanWrapper bw) {
   if (bw == null) {
      if (mbd.hasPropertyValues()) {
         throw new BeanCreationException(
               mbd.getResourceDescription(), beanName, "Cannot apply property values to null instance");
      }
      else {
         // Skip property population phase for null instance.
         return;
      }
   }

   // Give any InstantiationAwareBeanPostProcessors the opportunity to modify the
   // state of the bean before properties are set. This can be used, for example,
   // to support styles of field injection.
   // 这里会获取BeanPostProcessor的扩展处理器。用户属性填充的前置后置处理操作。
   if (!mbd.isSynthetic() && hasInstantiationAwareBeanPostProcessors()) {
      for (InstantiationAwareBeanPostProcessor bp : getBeanPostProcessorCache().instantiationAware) {
         if (!bp.postProcessAfterInstantiation(bw.getWrappedInstance(), beanName)) {
            return;
         }
      }
   }

   PropertyValues pvs = (mbd.hasPropertyValues() ? mbd.getPropertyValues() : null);

   int resolvedAutowireMode = mbd.getResolvedAutowireMode();
   // 根据bean的依赖注入方式:即是否标注有 @Autowired 注解或 autowire=“byType/byName” 的标签
   if (resolvedAutowireMode == AUTOWIRE_BY_NAME || resolvedAutowireMode == AUTOWIRE_BY_TYPE) {
      MutablePropertyValues newPvs = new MutablePropertyValues(pvs);
      // Add property values based on autowire by name if applicable.
      if (resolvedAutowireMode == AUTOWIRE_BY_NAME) {
          // 根据名称进行注入
         autowireByName(beanName, mbd, bw, newPvs);
      }
      // Add property values based on autowire by type if applicable.
      if (resolvedAutowireMode == AUTOWIRE_BY_TYPE) {
          // 根据类型进行注入
         autowireByType(beanName, mbd, bw, newPvs);
      }
      pvs = newPvs;
   }

   boolean hasInstAwareBpps = hasInstantiationAwareBeanPostProcessors();
   boolean needsDepCheck = (mbd.getDependencyCheck() != AbstractBeanDefinition.DEPENDENCY_CHECK_NONE);

   PropertyDescriptor[] filteredPds = null;
   if (hasInstAwareBpps) {
      if (pvs == null) {
         pvs = mbd.getPropertyValues();
      }
      for (InstantiationAwareBeanPostProcessor bp : getBeanPostProcessorCache().instantiationAware) {
         PropertyValues pvsToUse = bp.postProcessProperties(pvs, bw.getWrappedInstance(), beanName);
         if (pvsToUse == null) {
            if (filteredPds == null) {
               filteredPds = filterPropertyDescriptorsForDependencyCheck(bw, mbd.allowCaching);
            }
            pvsToUse = bp.postProcessPropertyValues(pvs, filteredPds, bw.getWrappedInstance(), beanName);
            if (pvsToUse == null) {
               return;
            }
         }
         pvs = pvsToUse;
      }
   }
   if (needsDepCheck) {
      if (filteredPds == null) {
         filteredPds = filterPropertyDescriptorsForDependencyCheck(bw, mbd.allowCaching);
      }
      checkDependencies(beanName, mbd, filteredPds, pvs);
   }

   if (pvs != null) {
       // 自定义属性填充
      applyPropertyValues(beanName, mbd, bw, pvs);
   }
}
整个的处理逻辑简单理解为:
- bean对象判空处理
- 通过BeanPostprocessor扩展,在属性注入前最后一次修改bean的属性值;
- 根据Bean的注入方式,byName或byType完成注入;
- 检测如果有实现Aware接口的bean,进行容器对象属性赋值;
- 将所有的propertyValues 属性填充到BeanWrapper;
2.4、initializeBean()
上面createBeanInstance() 完成了bean的实例化操作,populateBean()则完成了所有属性的填充操作。而initializeBean()则是完成最终的初始化操作。
看源码:
protected Object initializeBean(String beanName, Object bean, @Nullable RootBeanDefinition mbd) {
   if (System.getSecurityManager() != null) {
       // 如果bean实现了 Aware、BeanClassLoaderAware、BeanFactoryAware 的处理
      AccessController.doPrivileged((PrivilegedAction<Object>) () -> {
         invokeAwareMethods(beanName, bean);
         return null;
      }, getAccessControlContext());
   }
   else {
      invokeAwareMethods(beanName, bean);
   }

   Object wrappedBean = bean;
   if (mbd == null || !mbd.isSynthetic()) {
       // 调用bean的后置处理器
      wrappedBean = applyBeanPostProcessorsBeforeInitialization(wrappedBean, beanName);
   }

   try {
       // 调用init初始化方法
      invokeInitMethods(beanName, wrappedBean, mbd);
   }
   catch (Throwable ex) {
      throw new BeanCreationException(
            (mbd != null ? mbd.getResourceDescription() : null),
            beanName, "Invocation of init method failed", ex);
   }
   if (mbd == null || !mbd.isSynthetic()) {
      wrappedBean = applyBeanPostProcessorsAfterInitialization(wrappedBean, beanName);
   }

   return wrappedBean;
}
invokeAwareMethods:
private void invokeAwareMethods(String beanName, Object bean) {
   if (bean instanceof Aware) {
      if (bean instanceof BeanNameAware) {
         ((BeanNameAware) bean).setBeanName(beanName);
      }
      if (bean instanceof BeanClassLoaderAware) {
         ClassLoader bcl = getBeanClassLoader();
         if (bcl != null) {
            ((BeanClassLoaderAware) bean).setBeanClassLoader(bcl);
         }
      }
      if (bean instanceof BeanFactoryAware) {
         ((BeanFactoryAware) bean).setBeanFactory(AbstractAutowireCapableBeanFactory.this);
      }
   }
}
invokeInitMethods:这里便是我们常见的init-methods。
protected void invokeInitMethods(String beanName, Object bean, @Nullable RootBeanDefinition mbd)
      throws Throwable {

   boolean isInitializingBean = (bean instanceof InitializingBean);
   if (isInitializingBean && (mbd == null || !mbd.hasAnyExternallyManagedInitMethod("afterPropertiesSet"))) {
      if (logger.isTraceEnabled()) {
         logger.trace("Invoking afterPropertiesSet() on bean with name '" + beanName + "'");
      }
      if (System.getSecurityManager() != null) {
         try {
            AccessController.doPrivileged((PrivilegedExceptionAction<Object>) () -> {
               ((InitializingBean) bean).afterPropertiesSet();
               return null;
            }, getAccessControlContext());
         }
         catch (PrivilegedActionException pae) {
            throw pae.getException();
         }
      }
      else {
         ((InitializingBean) bean).afterPropertiesSet();
      }
   }

   if (mbd != null && bean.getClass() != NullBean.class) {
      String initMethodName = mbd.getInitMethodName();
      if (StringUtils.hasLength(initMethodName) &&
            !(isInitializingBean && "afterPropertiesSet".equals(initMethodName)) &&
            !mbd.hasAnyExternallyManagedInitMethod(initMethodName)) {
         invokeCustomInitMethod(beanName, bean, mbd);
      }
   }
}
之所以这里提供了Aware接口实现,是用于让bean拥有某些额外的感知能力。
比如我们自定义的bean里面要拥有BeanFactory或ApplicationContext能力,只需要实现BeanFactoryAware或者ApplicationContextAware即可。
2.5、addSingleton()
到这里,基本上整个Bean的创建,属性填充,初始化工作都已经完成,接下来就需要将该Bean交由IoC容器管理。
具体的实现逻辑,看源码org.springframework.beans.factory.support.DefaultSingletonBeanRegistry#addSingleton:
/**
 * Add the given singleton object to the singleton cache of this factory.
 * <p>To be called for eager registration of singletons.
 * @param beanName the name of the bean
 * @param singletonObject the singleton object
 */
protected void addSingleton(String beanName, Object singletonObject) {
   synchronized (this.singletonObjects) {
       // 将映射关系添加到单例对象缓存中
      this.singletonObjects.put(beanName, singletonObject);
      // 移除beanName在单例工厂缓存中的数据
      this.singletonFactories.remove(beanName);
      // 移除beanName在早期单例工厂缓存中的数据
      this.earlySingletonObjects.remove(beanName);
      // 将beanName添加到已注册的单例集合中
      this.registeredSingletons.add(beanName);
   }
}
这里便将我们上述创建好的bean交由IoC容器管理。随后便是程序对于bean的使用,以及最终销毁交由GC回收。
到此,整个bean的生命周期便完整结束。
3、BeanDefinition
整个Bean的生命周期流程虽然完整结束,但是从整个源码看下来,很经常看到实现逻辑里面会涉及到两个很重要的类。BeanDefinition和BeanPostProcessor。
先来说BeanDefinition。是定义Bean的配置元信息的接口,其中包含了一个bean的定义属性,如类名,作用域,是否懒加载,构造参数,是否单例等等定义信息。
4、BeanPostProcessor
BeanPostProcessor是Spring框架提供的扩展接口之一。Spring的扩展能力非常强大,其中一个扩展能力就是我们在整个Bean生命周期的实例化和初始化节点,可以自己定义一些扩展以实现自己的处理逻辑。比如很常见的AOP实现就是如此。
BeanPostProcessor作为bean处理器的顶级接口,定义了两个方法:
public interface BeanPostProcessor {

   // 前置初始化操作
   @Nullable
   default Object postProcessBeforeInitialization(Object bean, String beanName) throws BeansException {
      return bean;
   }

  // 后置初始化操作
   @Nullable
   default Object postProcessAfterInitialization(Object bean, String beanName) throws BeansException {
      return bean;
   }
由方法名字也可以看出,前者在实例化及依赖注入完成后、在任何初始化代码(比如配置文件中的init-method)调用之前调用;后者在初始化代码调用之后调用。此处需要注意的是:接口中的两个方法都要将传入的 bean 返回,而不能返回 null,如果返回的是 null 那么我们通过 getBean() 方法将得不到目标。
Spring有两个核心的功能:IOC和AOP。其中AOP便是依赖于此扩展实现。
我们知道AOP的实现逻辑为代理模式,我们可以观察一下AOP实现的部分代码:
org.springframework.aop.framework.autoproxy.AbstractAutoProxyCreator
public abstract class AbstractAutoProxyCreator extends ProxyProcessorSupport
      implements SmartInstantiationAwareBeanPostProcessor, BeanFactoryAware {

    // 前置处理器
    @Override
    public Object postProcessBeforeInstantiation(Class<?> beanClass, String beanName) {
       Object cacheKey = getCacheKey(beanClass, beanName);

       ...

       // Create proxy here if we have a custom TargetSource.
       // Suppresses unnecessary default instantiation of the target bean:
       // The TargetSource will handle target instances in a custom fashion.
       TargetSource targetSource = getCustomTargetSource(beanClass, beanName);
       if (targetSource != null) {
          if (StringUtils.hasLength(beanName)) {
             this.targetSourcedBeans.add(beanName);
          }
          Object[] specificInterceptors = getAdvicesAndAdvisorsForBean(beanClass, beanName, targetSource);
          // 创建代理类
          Object proxy = createProxy(beanClass, beanName, specificInterceptors, targetSource);
          this.proxyTypes.put(cacheKey, proxy.getClass());
          return proxy;
       }

       return null;
    }

    // 后置处理器
    @Override
    public Object postProcessAfterInitialization(@Nullable Object bean, String beanName) {
       if (bean != null) {
          Object cacheKey = getCacheKey(bean.getClass(), beanName);
          if (this.earlyProxyReferences.remove(cacheKey) != bean) {
             return wrapIfNecessary(bean, beanName, cacheKey);
          }
       }
       return bean;
    }
}
我们可以看到前置处理器中有createProxy()方法,基本可以断定整个的AOP代理类应该是在这里生成,继续往下看:
protected Object createProxy(Class<?> beanClass, @Nullable String beanName,
      @Nullable Object[] specificInterceptors, TargetSource targetSource) {

   if (this.beanFactory instanceof ConfigurableListableBeanFactory) {
      AutoProxyUtils.exposeTargetClass((ConfigurableListableBeanFactory) this.beanFactory, beanName, beanClass);
   }

   ProxyFactory proxyFactory = new ProxyFactory();
   proxyFactory.copyFrom(this);

   if (proxyFactory.isProxyTargetClass()) {
      // Explicit handling of JDK proxy targets and lambdas (for introduction advice scenarios)
      if (Proxy.isProxyClass(beanClass) || ClassUtils.isLambdaClass(beanClass)) {
         // Must allow for introductions; can't just set interfaces to the proxy's interfaces only.
         for (Class<?> ifc : beanClass.getInterfaces()) {
            proxyFactory.addInterface(ifc);
         }
      }
   }
   else {
      // No proxyTargetClass flag enforced, let's apply our default checks...
      if (shouldProxyTargetClass(beanClass, beanName)) {
         proxyFactory.setProxyTargetClass(true);
      }
      else {
         evaluateProxyInterfaces(beanClass, proxyFactory);
      }
   }

   Advisor[] advisors = buildAdvisors(beanName, specificInterceptors);
   proxyFactory.addAdvisors(advisors);
   proxyFactory.setTargetSource(targetSource);
   customizeProxyFactory(proxyFactory);

   proxyFactory.setFrozen(this.freezeProxy);
   if (advisorsPreFiltered()) {
      proxyFactory.setPreFiltered(true);
   }

   // Use original ClassLoader if bean class not locally loaded in overriding class loader
   ClassLoader classLoader = getProxyClassLoader();
   if (classLoader instanceof SmartClassLoader && classLoader != beanClass.getClassLoader()) {
      classLoader = ((SmartClassLoader) classLoader).getOriginalClassLoader();
   }
   return proxyFactory.getProxy(classLoader);
}
继续看proxyFactory.getProxy(classLoader):
/**
 * Create a new proxy according to the settings in this factory.
 * <p>Can be called repeatedly. Effect will vary if we've added
 * or removed interfaces. Can add and remove interceptors.
 * <p>Uses the given class loader (if necessary for proxy creation).
 * @param classLoader the class loader to create the proxy with
 * (or {@code null} for the low-level proxy facility's default)
 * @return the proxy object
 */
public Object getProxy(@Nullable ClassLoader classLoader) {
   return createAopProxy().getProxy(classLoader);
}
继续看createAopProxy().getProxy(classLoader):
/**
 * Subclasses should call this to get a new AOP proxy. They should <b>not</b>
 * create an AOP proxy with {@code this} as an argument.
 */
protected final synchronized AopProxy createAopProxy() {
   if (!this.active) {
      activate();
   }
   return getAopProxyFactory().createAopProxy(this);
}
我们可以看到这里创建了AOP代理对象,返回了AopProxy实例。我们来看下AopProxy发现是个接口,看一下他的实现:
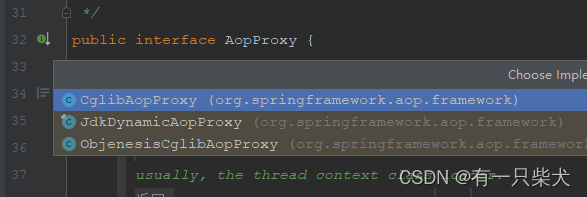
便是我们熟知的Cglib代理实现和Jdk代理实现方式。
所以到此我们借用AOP的实现,了解了BeanPostProcessor的作用,可以更好的帮我们理解和消化整个Bean的生命周期。
5、动手验证
5.1、创建一个BeanCycleEntity
该实体类实现了aware接口,以及init和destroybean。
package bean.cycle;

import org.springframework.beans.BeansException;
import org.springframework.beans.factory.BeanFactory;
import org.springframework.beans.factory.BeanFactoryAware;
import org.springframework.beans.factory.DisposableBean;
import org.springframework.beans.factory.InitializingBean;
import org.springframework.stereotype.Component;

/**
 * @author Shamee loop
 * @date 2023/4/1
 */
@Component
public class BeanCycleEntity implements BeanFactoryAware, InitializingBean, DisposableBean {

    private String name;
    private BeanFactory beanFactory;

    public BeanCycleEntity() {
        System.out.println("【构造器】加载BeanCycleEntity的构造器实例化");
    }

    public void setName(String name) {
        System.out.println("【属性注入】加载setName方法注入属性");
        this.name = name;
    }

    @Override
    public void setBeanFactory(BeanFactory beanFactory) throws BeansException {
        System.out.println("【BeanFactoryAware接口】调用BeanFactoryAware.setBeanFactory()");
        this.beanFactory = beanFactory;
    }

    @Override
    public void destroy() throws Exception {
        System.out.println("【DiposibleBean接口】调用DiposibleBean.destory()");
    }

    @Override
    public void afterPropertiesSet() throws Exception {
        System.out.println("【InitializingBean接口】调用InitializingBean.afterPropertiesSet()");
    }

    public void initMethod(){
        System.out.println("【init-method】调用<bean>的init-method属性指定的初始化方法");
    }

    public void destroyMethod() {
        System.out.println("【destroy-method】调用<bean>的destroy-method属性指定的初始化方法");
    }

    @Override
    public String toString() {
        System.out.println("【toString】,加载实体类tostring方法");
        return "bean.cycle.BeanCycleEntity{" +
                "name='" + name + '\'' +
                ", beanFactory=" + beanFactory +
                '}';
    }
}
5.2、定义BeanCyclePostProcessor
package bean.cycle;

import org.springframework.beans.BeansException;
import org.springframework.beans.factory.config.BeanPostProcessor;
import org.springframework.stereotype.Component;

/**
 * @author Shamee loop
 * @date 2023/4/1
 */
@Component
public class BeanCyclePostProcessor implements BeanPostProcessor {

    public BeanCyclePostProcessor() {
        super();
        System.out.println("【BeanPostProcessor接口】加载BeanCyclePostProcessor构造");
    }

    @Override
    public Object postProcessBeforeInitialization(Object bean, String beanName) throws BeansException {
        System.out.println("【BeanPostProcessor接口】调用postProcessBeforeInitialization");
        return bean;
    }

    @Override
    public Object postProcessAfterInitialization(Object bean, String beanName) throws BeansException {
        System.out.println("【BeanPostProcessor接口】调用postProcessAfterInitialization");
        return bean;
    }
}
5.3、定义Aware接口实现
package bean.cycle;

import org.springframework.beans.BeansException;
import org.springframework.beans.PropertyValues;
import org.springframework.beans.factory.config.SmartInstantiationAwareBeanPostProcessor;
import org.springframework.stereotype.Component;

/**
 * @author Shamee loop
 * @date 2023/4/1
 */
@Component
public class BeanCycleAwareBeanPostProcessor implements SmartInstantiationAwareBeanPostProcessor {
    public BeanCycleAwareBeanPostProcessor() {
        System.out.println("【SmartInstantiationAwareBeanPostProcessor接口】加载BeanCycleAwareBeanPostProcessor构造器");
    }

    @Override
    public Object postProcessBeforeInitialization(Object bean, String beanName) throws BeansException {
        System.out.println("【SmartInstantiationAwareBeanPostProcessor接口】加载postProcessBeforeInitialization");
        return bean;
    }

    @Override
    public Object postProcessAfterInitialization(Object bean, String beanName) throws BeansException {
        System.out.println("【SmartInstantiationAwareBeanPostProcessor接口】postProcessAfterInitialization");
        return bean;
    }

    @Override
    public PropertyValues postProcessProperties(PropertyValues pvs, Object bean, String beanName) throws BeansException {
        System.out.println("【SmartInstantiationAwareBeanPostProcessor接口】postProcessProperties");
        return pvs;
    }
}
5.4、配置xml
<?xml version="1.0" encoding="UTF-8"?>

<beans xmlns="http://www.springframework.org/schema/beans"
       xmlns:xsi="http://www.w3.org/2001/XMLSchema-instance" xmlns:p="http://www.springframework.org/schema/p"
       xsi:schemaLocation="
            http://www.springframework.org/schema/beans
            http://www.springframework.org/schema/beans/spring-beans-3.2.xsd">

    <bean id="BeanCycleEntity" class="bean.cycle.BeanCycleEntity" init-method="initMethod"
          destroy-method="destroyMethod" scope="singleton" p:name="张三" />

</beans>
5.5、测试类
package bean.cycle;

import org.springframework.context.ApplicationContext;
import org.springframework.context.support.ClassPathXmlApplicationContext;

/**
 * @author Shamee loop
 * @date 2023/4/1
 */
public class BeanCycleDemo {

    public static void main(String[] args) {
        ApplicationContext factory = new ClassPathXmlApplicationContext("bean.xml");
        System.out.println("容器初始化成功");
        BeanCycleEntity beanCycleEntity = factory.getBean(BeanCycleEntity.class);
        System.out.println(beanCycleEntity);

        System.out.println("现在开始关闭容器!");
        ((ClassPathXmlApplicationContext)factory).registerShutdownHook();
    }
}
5.6、执行结果
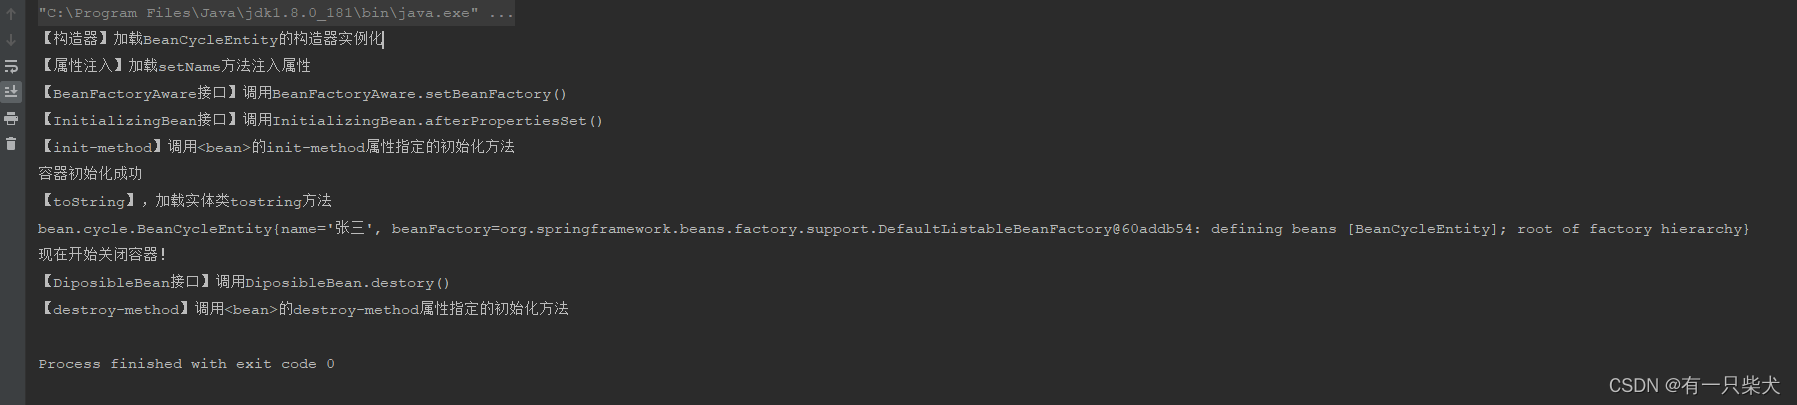
构造器实例化 -> 自定义属性填充 -> aware接口实现填充容器对象属性 -> 初始化afterPropertiesSet -> 调用init-method等初始化 -> 初始化成功 -> 销毁。
6、小结
整个Spring Bean对象的生命周期,其实说简单也简单,说复杂也复杂。简单是因为不论如何整个bean都逃不开JVM的生命周期,即”创建->初始化->使用->销毁“四个阶段。说复杂是因为Spring对每个节点都做了很多的逻辑处理,并提供了相当丰富的扩展。不过正是如此丰富的扩展能力,才让Spring框架如此的强大和灵活。学习Spring Bean生命周期,可以帮助我们更好的去分析当下bean的一个状态以及问题的定位。