全局状态管理
7-1:开篇
在上一章中我们完成了 “一半” 的文章搜索功能,并且留下了一些问题。那么这些历史残留的问题,我们将会在本章节中通过 全局状态管理工具 进行处理。
那么究竟什么是 全局状态管理工具,如何在 uniapp 中使用 全局状态管理工具,剩下的 文章搜索功能 搜索功能如何完成,我们是否还会再遇到其他的坑呢?
这些内容我们都会在本章节中为大家一一讲解。
7-2:状态管理 - 全局状态管理工具
场景
在上一章中,我们遇到了一个问题:search-blog 和 search-history、searchData 和 组件 之间 强耦合 。
如果想要解决这个问题,那么我们需要使用到一个叫做:全局状态管理工具 的东西。
学习过 vue 的同学应该知道,在 vue 中,存在一个 vuex 的库,这个库的作用就是:全局状态管理。
而在 uniapp 里,如果我们想要实现 全局状态管理,那么 vuex 也将是一个非常好的选择。
那么下面我们就来看一下,什么是 全局状态管理工具,以及什么是 vuex
问题
- 什么是全局状态管理模式 和 全局状态管理工具
- 什么是 vuex
内容
“单向数据流” 理念示意图
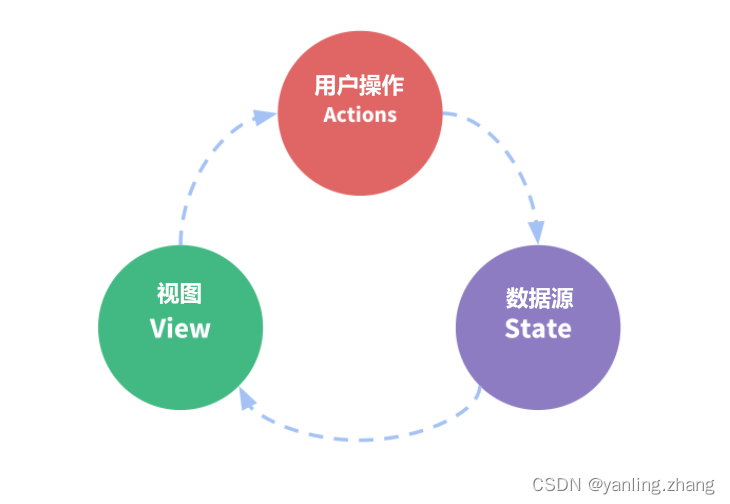
- state,驱动应用的数据源;
- view,以声明方式将 state 映射到视图;
- actions,响应在 view 上的用户输入导致的状态变化。
但是,当我们的应用遇到**多个组件共享状态(数据)**时,单向数据流的简洁性很容易被破坏(回忆 search-blog 和 search-history 的代码):
- 多个视图依赖于同一状态(数据)。
- 来自不同视图的行为需要变更同一状态(数据)。
所以我们不得不通过 父子组件传递数据 的方式,来频繁的修改状态(数据)。但是这种方式是 非常脆弱,通常会导致无法维护的代码。
什么是全局状态管理模式
所以我们就需要就想到了一种方案,我们把:
把多个组件之间共用的数据抽离出来,通过一个 单例模式 进行管理,而这种管理的方式就叫做【全局状态管理模式】。
具备 【全局状态管理模式】 的库,就是 【全局状态管理工具】
而在 vue 中存在一个专门的 【全局状态管理工具】,叫做 vuex。
因为 uniapp 追随 vue 和 微信小程序 的语法,所以我们可以在 uniapp 中使用 vuex 来进行 【全局状态管理】,并且这是一个 非常被推荐 的选择。
答案
- 什么是全局状态管理模式 和 全局状态管理工具
- 模式:把多个组件之间共用的数据抽离出来,通过一个 单例模式 进行管理。
- 工具:具备 【全局状态管理模式】 的库
- 什么是 vuex
- 对
vue应用程序进行全局状态管理的工具
7-3:状态管理 - 在项目中导入 vuex
**创建 store **
// 1. 导入 Vue 和 Vuex
import Vue from 'vue';
// uniapp 已默认安装,不需要重新下载
import Vuex from 'vuex';

// 2. 安装 Vuex 插件
Vue.use(Vuex);
// 3. 创建 store 实例
const store = new Vuex.Store({});
export default store;
在 main.js 中注册 vuex 插件
// 导入 vuex 实例
import store from './store';
...

const app = new Vue({
  ...App,
  store // 挂载实例对象
});
app.$mount();
7-4:状态管理 - 测试 vuex 是否导入成功
**创建 modules/search.js **
export default {
  // 独立命名空间
  namespaced: true,
  // 通过 state 声明数据
  state: () => {
    return {
      msg: 'hello vuex'
    };
  }
};
在 index.js 中注入模块
...
// 导入 search.js 暴露的对象
import search from './modules/search';

// 2. 安装 Vuex 插件
Vue.use(Vuex);
// 3. 创建 store 实例
const store = new Vuex.Store({
  modules: {
    search
  }
});
export default store;
search-blog 中使用 模块中的数据
<template>
  <view class="search-blog-container">
    <!-- 3. 使用导入的 vuex 模块中的数据 -->
    <div>{{ msg }}</div>
    ...
  </view>
</template>

<script>
// 1. 导入 mapState 函数
import { mapState } from 'vuex';
...
export default {
 ...
  computed: {
    // 2. 在 computed 中,通过 mapState 函数,注册 state 中的数据,导入之后的数据可直接使用(就像使用 data 中的数据一样)
    // mapState(模块名, ['字段名','字段名','字段名'])
    ...mapState('search', ['msg'])
  }
};
</script>
7-5:状态管理 - 构建 search 模块
search.js
export default {
  // 独立命名空间
  namespaced: true,
  // 通过 state 声明数据
  state: () => ({
    searchData: []
  }),
  // 更改 state 数据的唯一方式是:提交 mutations
  mutations: {
    /**
     * 添加数据
     */
    addSearchData(state, val) {
      if (!val) return;
      const index = state.searchData.findIndex((item) => item === val);
      if (index !== -1) {
        state.searchData.splice(index, 1);
      }
      state.searchData.unshift(val);
    },
    /**
     * 删除指定数据
     */
    removeSearchData(state, index) {
      state.searchData.splice(index, 1);
    },
    /**
     * 删除所有数据
     */
    removeAllSearchData(state) {
      state.searchData = [];
    }
  }
};
7-6:状态管理 - 使用 search 模块完成搜索历史管理
search-blog
<template>
  <view class="search-blog-container">
...
    <!-- 热搜列表 -->
    <view class="search-hot-list-box card" v-if="showType === HOT_LIST">
      <!-- 列表 -->
      <search-hot-list @onSearch="onSearchConfirm" />
    </view>
...
  </view>
</template>

<script>
// 导入 mapMutations 函数
import { mapMutations } from 'vuex';
...
export default {
  ...
  methods: {
    ...mapMutations('search', ['addSearchData']),
    /**
     * 搜索内容
     */
    onSearchConfirm(val) {
      ...
      // 保存搜索历史数据
      this.addSearchData(this.searchVal);
      ...
    },
    /**
     * @deprecated
     * 保存搜索历史数据
     */
    saveSearchData() {
      // 1. 如果数据已存在,则删除
      const index = this.searchData.findIndex((item) => item === this.searchVal);
      if (index !== -1) {
        this.searchData.splice(index, 1);
      }
      // 2. 新的搜索内容需要先于旧的搜索内容展示
      this.searchData.unshift(this.searchVal);
    },
    /**
     * @deprecated
     * 删除数据
     */
    onRemoveSearchData(index) {
      this.searchData.splice(index, 1);
    },

  }
};
</script>
search-history
<script>
// 1. 导入 mapState 函数
import { mapState, mapMutations } from 'vuex';

export default {
  name: 'search-history',
  props: {
    /**
     * @deprecated
     */
    // searchData: {
    //   type: Array,
    //   required: true
    // }
  },

  methods: {
    ...mapMutations('search', ['removeSearchData', 'removeAllSearchData']),
    onClearAll() {
      uni.showModal({
        title: '提示',
        content: '删除搜索历史记录?',
        showCancel: true,
        success: ({ confirm, cancel }) => {
          if (confirm) {
            // 删除 searchData
            this.removeAllSearchData();
            // 返回状态
            this.isShowClear = false;
          }
        }
      });
    },
    onHistoryItemClick(item, index) {
      if (this.isShowClear) {
        // 删除指定的 searchData
        this.removeSearchData(index);
      } else {
        this.$emit('onItemClick', item);
      }
    }
  },
  computed: {
    // 2. 在 computed 中,通过 mapState 函数,注册 state 中的数据,导入之后的数据可直接使用(就像使用 data 中的数据一样)
    // mapState(模块名, ['字段名','字段名','字段名'])
    ...mapState('search', ['searchData'])
  }
};
</script>
7-7:状态管理 - 数据持久化
已完成 数据和组件的分离,所以【数据持久化】不需要涉及到组件内的代码
store/search.js
const STORAGE_KEY = 'search-list';

export default {
  // 独立命名空间
  namespaced: true,
  // 通过 state 声明数据
  state: () => ({
    // 优先从 storage 中读取
    searchData: uni.getStorageSync(STORAGE_KEY) || []
  }),
  // 更改 state 数据的唯一方式是:提交 mutations
  mutations: {
    /**
     * 保存数据到 storage
     */
    saveToStorage(state) {
      uni.setStorage({
        key: STORAGE_KEY,
        data: state.searchData
      });
    },
    /**
     * 添加数据
     */
    addSearchData(state, val) {
      ...
      // 调用 saveToStorage
      this.commit('search/saveToStorage');
    },
    /**
     * 删除指定数据
     */
    removeSearchData(state, index) {
      ...
      // 调用 saveToStorage
      this.commit('search/saveToStorage');
    },
    /**
     * 删除所有数据
     */
    removeAllSearchData(state) {
      ...
      // 调用 saveToStorage
      this.commit('search/saveToStorage');
    }
  }
};
7-8:搜索结果 - 获取搜索结果数据
search.js
import request from '../utils/request';

/**
 * 搜索结果
 */
export function getSearchResult(data) {
  return request({
    url: '/search',
    data
  });
}
search-result-list.vue
<template>
  <view> 搜索结果 </view>
</template>

<script>
import { getSearchResult } from 'api/search';
export default {
  name: 'search-result-list',
  props: {
    // 搜索关键字
    queryStr: {
      type: String,
      required: true
    }
  },
  data() {
    return {
      // 数据源
      resultList: [],
      // 页数
      page: 1
    };
  },
  created() {
    this.loadSearchResult();
  },
  methods: {
    /**
     * 获取搜索数据
     */
    async loadSearchResult() {
      const { data: res } = await getSearchResult({
        q: this.queryStr,
        p: this.page
      });
      this.resultList = res.list;
      console.log(this.resultList);
    }
  }
};
</script>

<style lang="scss"></style>
search-blog
    <!-- 搜索结果 -->
    <view class="search-result-box" v-else>
      <search-result-list :queryStr="searchVal" />
    </view>
7-9:搜索结果 - 渲染搜索结果数据
创建三个组件,应该应对三种展示情况:
search-result-item-theme-1:无图片样式search-result-item-theme-2:一张图片样式search-result-item-theme-3:三张图片样式
search-result-item-theme-1
<template>
  <view class="search-result-item-box">
    <!-- 标题 -->
    <rich-text :nodes="data.title" class="item-title line-clamp-2"></rich-text>
    <!-- 内容区 - 样式 1 -->
    <rich-text :nodes="data.description" class="item-desc line-clamp-2"></rich-text>
    <!-- 底部 -->
    <view class="item-desc-bottom">
      <view class="item-author">{{ data.author }}</view>
      <view class="item-read-num">
        <uni-icons class="read-num-icon" color="#999999" type="compose" />
        <text>{{ data.updateTime }}</text>
      </view>
    </view>
  </view>
</template>

<script>
export default {
  props: {
    data: {
      type: Object,
      required: true
    }
  },
  data: () => ({})
};
</script>

<style lang="scss" scoped>
.search-result-item-box {
  margin-bottom: $uni-spacing-col-big;
  // 标题
  .item-title {
    font-size: $uni-font-size-base;
    font-weight: bold;
    color: $uni-text-color-title;
  }

  .item-desc {
    margin-top: $uni-spacing-col-base;
    font-size: $uni-font-size-base;
    color: $uni-color-subtitle;
  }

  // 底部作者 + 阅读量
  .item-desc-bottom {
    margin-top: $uni-spacing-col-base;
    display: flex;
    color: $uni-text-color-grey;
    font-size: $uni-font-size-sm;
    .item-author {
      margin-right: $uni-spacing-row-lg;
    }
    .item-read-num {
      .read-num-icon {
        color: $uni-text-color-grey;
        margin-right: $uni-spacing-row-sm;
      }
    }
  }
}
</style>
search-result-item-theme-2
<template>
  <view class="search-result-item-box">
    <!-- 标题 -->
    <rich-text :nodes="data.title" class="item-title line-clamp-2"></rich-text>
    <view class="item-info-box">
      <view class="item-desc-box">
        <rich-text :nodes="data.description" class="item-desc line-clamp-2"></rich-text>
        <view class="item-desc-bottom">
          <view class="item-author">{{ data.nickname }}</view>
          <view class="item-read-num">
            <uni-icons class="read-num-icon" color="#999999" type="compose" />
            <text>{{ data.updateTime }}</text>
          </view>
        </view>
      </view>
      <image class="item-img" :src="data.pic_list[0]" />
    </view>
  </view>
</template>

<script>
export default {
  props: {
    data: {
      type: Object,
      required: true
    }
  },
  data: () => ({})
};
</script>

<style lang="scss" scoped>
.search-result-item-box {
  margin-bottom: $uni-spacing-col-big;
  // 标题
  .item-title {
    font-size: $uni-font-size-base;
    font-weight: bold;
    color: $uni-text-color-title;
  }

  .item-info-box {
    display: flex;
    margin-top: $uni-spacing-col-base;
    .item-desc-box {
      width: 65%;
      font-size: $uni-font-size-base;
      color: $uni-color-subtitle;
      // 底部作者 + 阅读量
      .item-desc-bottom {
        margin-top: $uni-spacing-col-base;
        display: flex;
        color: $uni-text-color-grey;
        font-size: $uni-font-size-sm;
        .item-author {
          margin-right: $uni-spacing-row-lg;
        }
        .item-read-num {
          .read-num-icon {
            color: $uni-text-color-grey;
            margin-right: $uni-spacing-row-sm;
          }
        }
      }
    }

    .item-img {
      width: 33%;
      height: 70px;
    }
  }
}
</style>
search-result-item-theme-3
<template>
  <view class="search-result-item-box">
    <!-- 标题 -->
    <rich-text :nodes="data.title" class="item-title line-clamp-2"></rich-text>
    <!-- 内容区 - 样式 3 -->
    <view class="item-info-img-box">
      <image v-for="item in data.pic_list" :key="item" class="item-img" :src="item" />
    </view>
    <!-- 底部 -->
    <view class="item-desc-bottom">
      <view class="item-author">{{ data.nickname }}</view>
      <view class="item-read-num">
        <uni-icons class="read-num-icon" color="#999999" type="compose" />
        <text>{{ data.updateTime }}</text>
      </view>
    </view>
  </view>
</template>

<script>
export default {
  props: {
    data: {
      type: Object,
      required: true
    }
  },
  data: () => ({}),
  created() {
    if (this.data.pic_list.length > 3) {
      this.data.pic_list = this.data.pic_list.splice(0, 2);
    }
  }
};
</script>

<style lang="scss" scoped>
.search-result-item-box {
  margin-bottom: $uni-spacing-col-big;
  // 标题
  .item-title {
    font-size: $uni-font-size-base;
    font-weight: bold;
    color: $uni-text-color-title;
  }

  .item-info-img-box {
    display: flex;
    // 图片
    .item-img {
      width: 33%;
      height: 70px;
      box-sizing: border-box;
    }
    .item-img:nth-child(1n + 1) {
      margin-right: $uni-spacing-row-sm;
    }
  }

  // 底部作者 + 阅读量
  .item-desc-bottom {
    margin-top: $uni-spacing-col-base;
    display: flex;
    color: $uni-text-color-grey;
    font-size: $uni-font-size-sm;
    .item-author {
      margin-right: $uni-spacing-row-lg;
    }
    .item-read-num {
      .read-num-icon {
        color: $uni-text-color-grey;
        margin-right: $uni-spacing-row-sm;
      }
    }
  }
}
</style>
uni.scss
$uni-spacing-col-big: 24px;
search-result-list
<template>
  <view class="search-result-list-container">
    <!-- 循环渲染列表数据 -->
    <block v-for="(item, index) in resultList" :key="index">
      <view class="search-result-item-box">
        <!-- 内容区 - 样式 1 -->
        <search-result-item-theme-1
          v-if="!item.pic_list || item.pic_list.length === 0"
          :data="item"
        />

        <!-- 内容区 - 样式 2 -->
        <search-result-item-theme-2 v-else-if="item.pic_list.length === 1" :data="item" />

        <!-- 内容区 - 样式 3 -->
        <search-result-item-theme-3 v-else :data="item" />

        <!-- / -->
      </view>
    </block>
  </view>
</template>

<style lang="scss" scoped>
.search-result-list-container {
  padding: $uni-spacing-col-lg $uni-spacing-row-lg;
  .search-result-item-box {
    margin-bottom: $uni-spacing-col-big;
  }
}
</style>
7-10:搜索结果 - 处理相对时间
相对时间可以借助 dayjs 进行处理。想要在 uniapp 中使用 dayjs ,那么需要导入 npm 工具(以下内指令需要在项目路径的终端下进行):
-
需要在电脑中安装
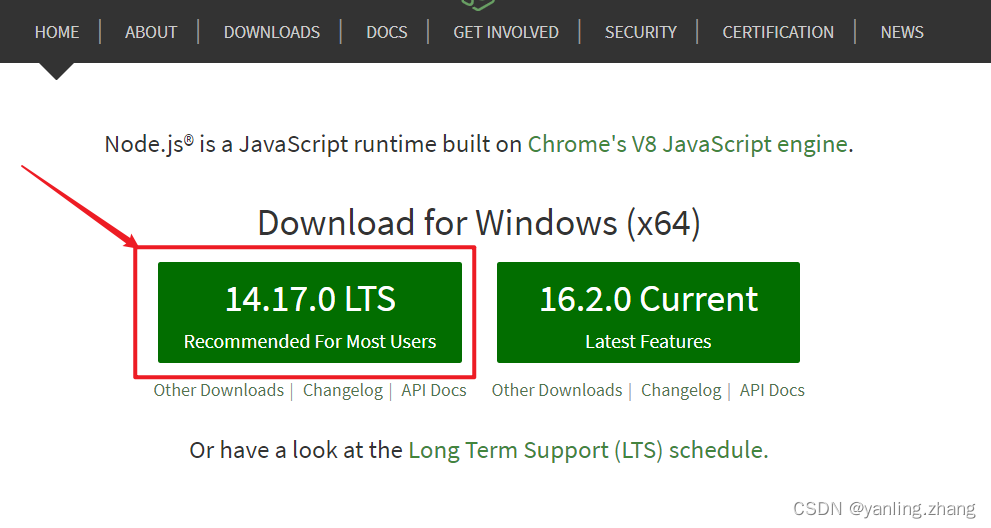
node环境,node 安装地址,推荐下载LTS版本
-
通过
npm init -y初始化npm包管理工具

-
通过
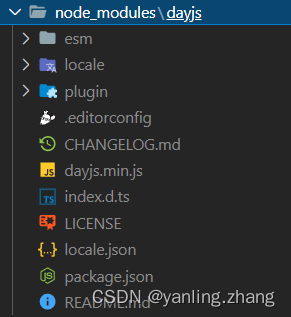
npm install dayjs@1.10.4 --save-dev安装,安装完成,项目中会多出node_modules文件夹
-
打开
filters/index.js,添加如下代码:// 1. 导入dayjs import dayjs from 'dayjs'; // 2. dayjs 默认语言是英文,我们这里配置为中文 import 'dayjs/locale/zh-cn'; // 3. 引入 relativeTime import rTime from 'dayjs/plugin/relativeTime'; // 4. 加载中文语言包 dayjs.locale('zh-cn'); // 5. 加载相对时间插件 dayjs.extend(rTime); /** * 6. 定义过滤器,通过 dayjs().to(dayjs(val)) 方法把【当前时间】处理为【相对时间】 */ export function relativeTime(val) { return dayjs().to(dayjs(val)); } -
分别在
search-result-item-theme-1、search-result-item-theme-2、search-result-item-theme-3中使用过滤器<text>{{ data.updateTime | relativeTime }}</text>
7-11:搜索结果 - 高亮搜索结果关键字
在 title 字段下,搜索关键字都通过 em 标签进行了标记,所以所谓的 搜索关键字高亮 就是 对 em 标签添加高亮样式
search-result-list
// 更改返回数据样式(行内样式)
      res.list.forEach((item) => {
        item.title = item.title.replace(/<em>/g, "<em style='color:#f94d2a; margin:0 2px'>");
        item.description = item.description.replace(
          /<em>/g,
          "<em style='color:#f94d2a; margin:0 2px'>"
        );
      });
7-12:搜索结果 - 介绍并使用 mescroll-uni 组件
mescroll-uni 是一个专门为 uni app 准备的 pullToRefresh 组件。可以帮助 uniapp 实现 下拉刷新、上拉加载的功能。
-
在 插件市场 点击 使用 HBuilderX 导入插件
-
导入成功,
uni-modules文件夹下会多出mescroll-ui文件夹

-
mescroll-uni的实现借助了 微信小程序 中的 onPullDownRefresh 和 onReachBottom 这两个 页面 事件。因为 微信小程序组件中没有这两个事件,所以mescroll-uni在 页面 和 组件 中的使用方式 不同 -
我们现在先来看
mescroll-uni在 组件 中的使用 -
mescroll-uni在 组件 中使用分为两大块:-
组件
<template> <view class="search-result-list-container"> <!-- 1. 通过 mescroll-body 包裹列表,指定 ref 为 mescrollRef ,监听@init、@down、@up 事件 --> <mescroll-body ref="mescrollRef" @init="mescrollInit" @down="downCallback" @up="upCallback"> <!-- 循环渲染列表数据 --> <block v-for="(item, index) in resultList" :key="index"> ... </block> </mescroll-body> </view> </template> <script> // 2. 导入对应的 mixins import MescrollMixin from '@/uni_modules/mescroll-uni/components/mescroll-uni/mescroll-mixins.js'; export default { // 3. 注册 mixins mixins: [MescrollMixin], methods: { // 4. 实现三个回调方法 /** * 首次加载 */ mescrollInit() { console.log('mescrollInit'); }, /** * 下拉刷新的回调 */ downCallback() { console.log('downCallback'); }, /** * 上拉加载的回调 */ upCallback() { console.log('upCallback'); }, } }; </script> -
组件所在的页面
<template>
  <view class="search-blog-container">
    <!-- 搜索结果 -->
    <view class="search-result-box" v-else>
      <!-- 1. 给mescroll-body的组件添加: ref="mescrollItem" (固定的,不可改,与mescroll-comp.js对应)-->
      <search-result-list ref="mescrollItem" :queryStr="searchVal" />
    </view>
  </view>
</template>

<script>
// 2. 引入mescroll-comp.js
import MescrollCompMixin from '@/uni_modules/mescroll-uni/components/mescroll-uni/mixins/mescroll-comp.js';

export default {
  // 3. 注册 mixins
  mixins: [MescrollCompMixin],
};
</script>
-
7-13:搜索结果 - 实现下拉刷新上拉加载功能
<script>
export default {
    ...
  data() {
    return {
      // 数据源
      resultList: [],
      // 页数
      page: 1,
      // 实例
      mescroll: null,
      // 处理渲染,会回调 down和up 方法,为了避免该问题,定义 init 变量,表示当前是否为首次请求
      isInit: true
    };
  },
  // created() {
  //   不需要主动调用
  //  this.loadSearchResult();
  // },
  // 页面渲染完成之后回调,想要获取组件实例,需要在该回调中进行
  mounted() {
    // 通过 $refs 获取组件实例
    this.mescroll = this.$refs.mescrollRef.mescroll;
  },
  methods: {
    // 4. 实现三个回调方法
    /**
     * List 组件的首次加载
     */
    async mescrollInit() {
      await this.loadSearchResult();
      this.isInit = false;
      // 结束 上拉加载 && 下拉刷新 动画
      this.mescroll.endSuccess();
    },
    /**
     * 下拉刷新的回调,永远都是从第一页开始加载的
     */
    async downCallback() {
      if (this.isInit) return;
      this.page = 1;
      await this.loadSearchResult();
      // 结束 上拉加载 && 下拉刷新
      this.mescroll.endSuccess();
    },
    /**
     * 上拉加载的回调,page开始递增
     */
    async upCallback() {
      if (this.isInit) return;
      this.page += 1;
      await this.loadSearchResult();
      // 结束 上拉加载 && 下拉刷新
      this.mescroll.endSuccess();
    },
    /**
     * 获取搜索数据
     */
    async loadSearchResult() {
      ...
      // 使用下拉刷新上拉加载的赋值策略
      // this.resultList = res.list;
      // 判断是否为第一页数据
      if (this.page === 1) {
        this.resultList = res.list;
      } else {
        this.resultList = [...this.resultList, ...res.list];
      }
    }
  }
};
</script>
7-14:搜索结果 - 处理空数据场景
创建空数据组件empty-data
<template>
  <view class="empty-data-cocntainer">
    <image src="/static/images/empty-data.png" class="img" />
    <view class="txt">暂无数据</view>
  </view>
</template>

<script>
export default {
  name: 'empty-data',
  data() {
    return {};
  }
};
</script>

<style lang="scss" scoped>
.empty-data-cocntainer {
  display: flex;
  flex-direction: column;
  align-items: center;
  padding-top: 35%;
  .img {
    width: 64px;
    height: 64px;
  }
  .txt {
    margin-top: $uni-spacing-col-sm;
    color: $uni-text-color-grey;
    font-size: $uni-font-size-base;
  }
}
</style>
在无数据时,进行渲染
search-result-list
<template>
  <view class="search-result-list-container">
    <empty-data v-if="isEmpty"></empty-data>

    <mescroll-body
      v-else
    ></mescroll-body>
  </view>
</template>

<script>
export default {
  ...
  methods: {
...
    /**
     * 获取搜索数据
     */
    async loadSearchResult() {
      ...
      // this.resultList = [];
      // 无数据,显示空数据组件
      if (this.resultList.length === 0) {
        this.isEmpty = true;
      }
    }
  }
};
</script>
7-15:文章搜索 - 细节修复
- 搜索历史数据量限制
store/modules/search.js
    /**
     * 添加数据
     */
    addSearchData(state, val) {
      if (!val) return;
      const index = state.searchData.findIndex((item) => item === val);
      if (index !== -1) {
        state.searchData.splice(index, 1);
      }
      // 判断是否超过了最大缓存数量,如果超过了,那么就把最后面的数据进行删除
      if (state.searchData.length > HISTORY_MAX) {
        state.searchData.splice(HISTORY_MAX - 1, state.searchData.length - HISTORY_MAX - 1);
      }

      state.searchData.unshift(val);
      // 调用 saveToStorage
      this.commit('search/saveToStorage');
    },
7-16:总结
在本章节中我们接触到了一个全新的知识点 **全局状态管理工具 vuex **, 我们利用它解决了 数据与组件深度耦合 的问题。
在正式的项目中(无论是 uniapp 项目还是 前端项目) ,**全局状态管理工具 ** 都是非常重要的一个内容。
在处理完了 “历史遗留” 问题之后,我们解决了文章搜索的最后一个模块 搜索结果,我们利用 三个组件分别应对了三种不同的渲染场景,并且通过 行内样式 的形式解决了 关键字高亮的问题。
其中为了处理 pullToRefresh 的场景,我们还接触到了一个新的库 mescroll-uni,利用它很好的解决了 下拉刷新,上拉加载的问题。
那么在下一章节,我们则会进入到 文章详情的功能开发。等待我们的又将会是什么样的难题呢?


