postman是一种测试工具
用postman直接在其上输入参数名和参数值就行,不用区分post和get请求方法,当然java代码要改变一点,在响应注解的方法里面添加和postman中输入的参数名一样的形参
get请求:
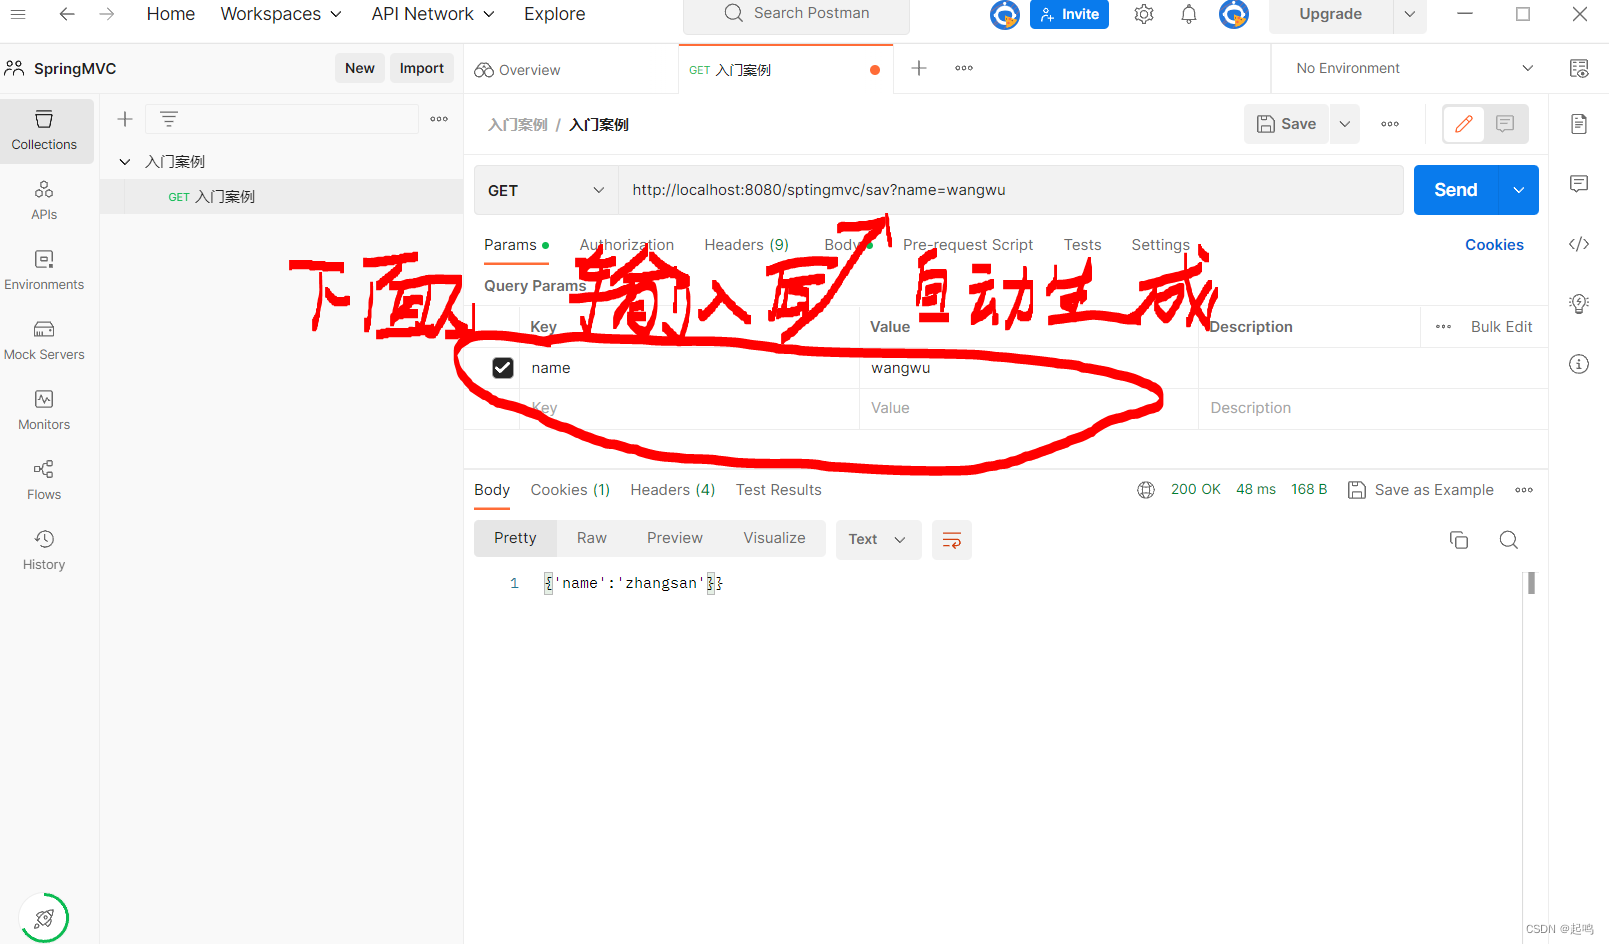
代码:注意在响应注解的方法里面新添加了形参,其就对应着上面图片中的参数名
package com.itjh.servletmvc;

import org.springframework.stereotype.Controller;
import org.springframework.web.bind.annotation.RequestMapping;
import org.springframework.web.bind.annotation.ResponseBody;

@Controller
//控制器
public class sermvc {
    //请求时的访问路径
    @RequestMapping("/sav")
    //返回给浏览器的响应数据
    @ResponseBody
    public String save(String name){
        System.out.println("spring.......mvc.."+name);
        return "{'name':'zhangsan'}}";
    }
}
测试类:
package com.itjh.Config.test;

import com.itjh.Config.SpringmvcConfig;
import org.springframework.web.context.WebApplicationContext;
import org.springframework.web.context.support.AnnotationConfigWebApplicationContext;
import org.springframework.web.servlet.support.AbstractDispatcherServletInitializer;

public class SpringmvcTest extends AbstractDispatcherServletInitializer {
    //加载springmvc容器
    @Override
    protected WebApplicationContext createServletApplicationContext() {
        AnnotationConfigWebApplicationContext context=new AnnotationConfigWebApplicationContext();
        //注册一下springmvc容器
        context.register(SpringmvcConfig.class);
        System.out.println("加载springmvc容器");
        return context;
    }
    //从前端过来的请求,被拦截,即设置哪些请求归springmvc管
    @Override
    protected String[] getServletMappings() {
        System.out.println("拦截。。。");
        return new String[]{"/"};
    }
    //加载spring容器
    @Override
    protected WebApplicationContext createRootApplicationContext() {
        return null;
    }
}
post请求:换一些地方:红圈
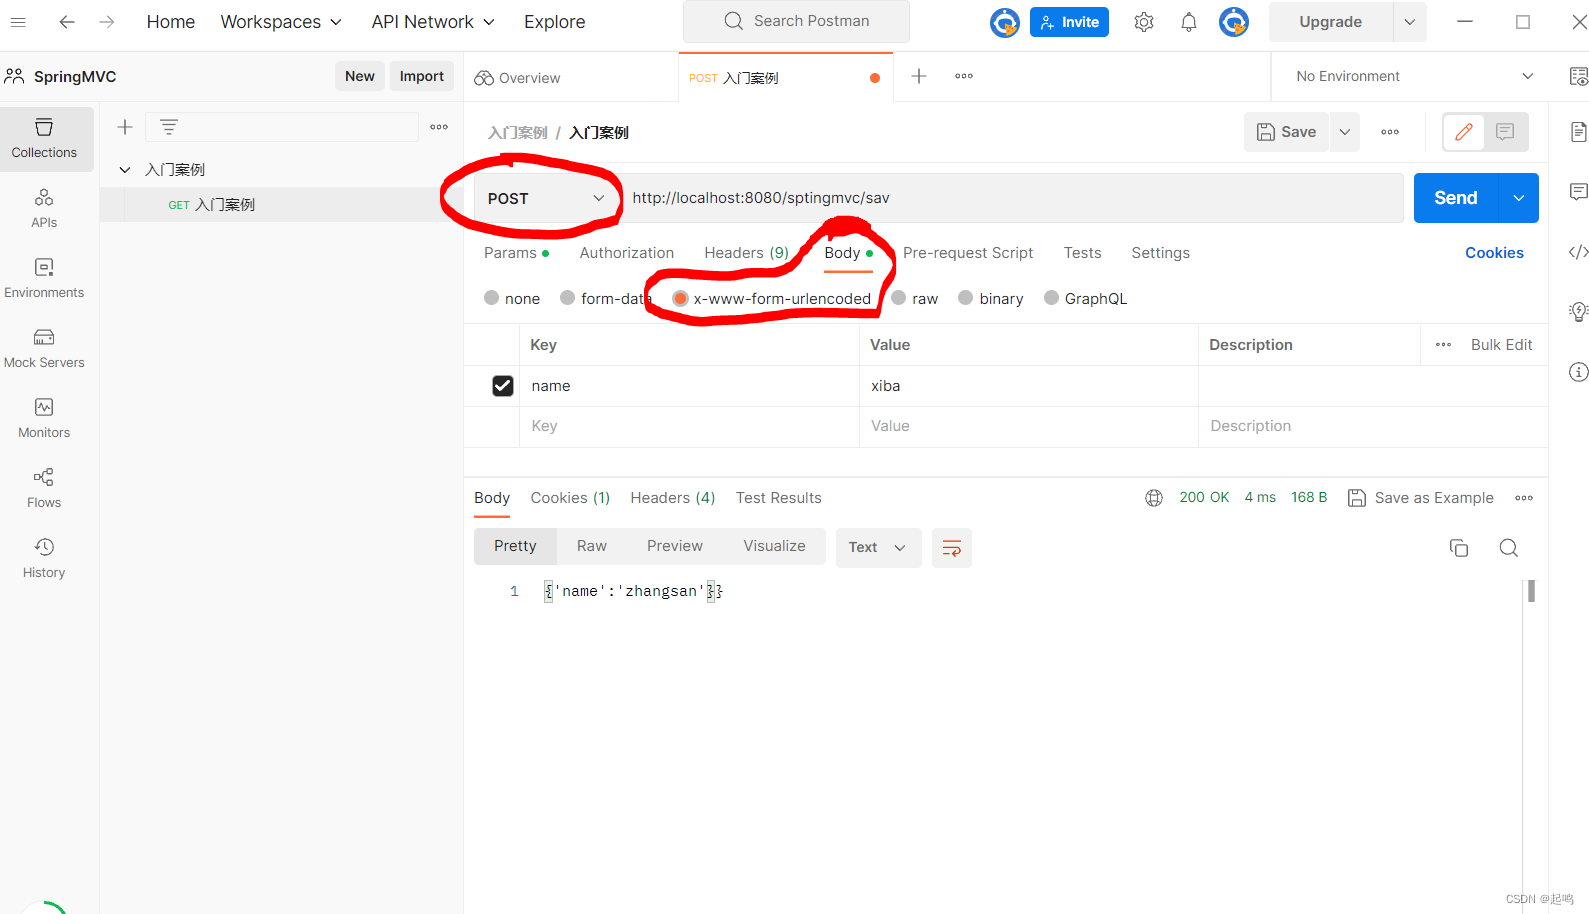
代码:和上面的get请求一样,不用变
总结:请求并且发送给服务器参数之后,这里的代码用封装好的request获得参数,然后再用手动创建的返回方法进行显示传进来的参数
中文乱码
post请求的解决方法:添加一个过滤器,再经过过滤器时进行手动重新编码,即解码,当然,这个只对post请求管用
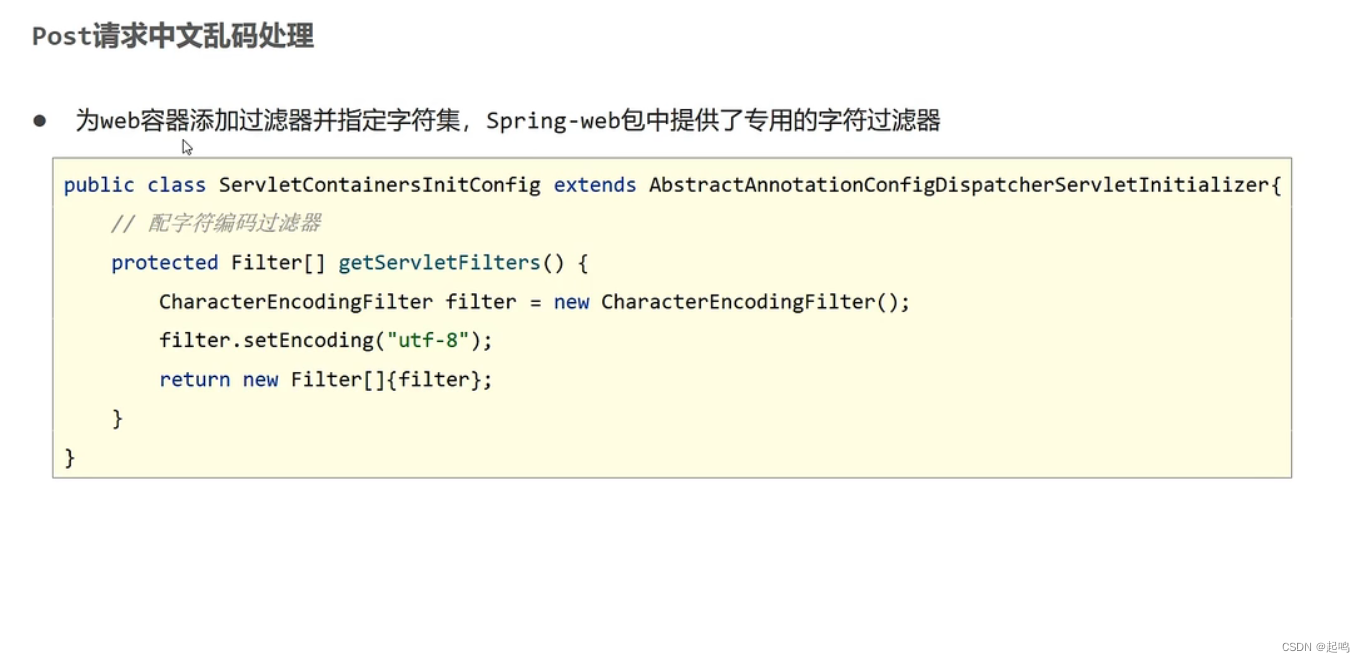
测试类:添加了一个方法,看注释
package com.itjh.test;

import com.itjh.Config.SpringConfig;
import com.itjh.Config.SpringmvcConfig;
import org.springframework.web.filter.CharacterEncodingFilter;
import org.springframework.web.servlet.support.AbstractAnnotationConfigDispatcherServletInitializer;
import javax.servlet.Filter;


public class SpringmvcTest extends AbstractAnnotationConfigDispatcherServletInitializer {
    @Override
    protected Class<?>[] getRootConfigClasses() {
        return new Class[]{SpringConfig.class};
    }

    @Override
    protected Class<?>[] getServletConfigClasses() {
        return new Class[]{SpringmvcConfig.class};
    }

    @Override
    protected String[] getServletMappings() {
        return new String[]{"/"};
    }

    @Override
    protected Filter[] getServletFilters() {
        //创建filter过滤器
        CharacterEncodingFilter filter=new CharacterEncodingFilter();
        //将传进来的经过TomCat编码后的东西,进行重新的UTF-8的编码,也就是解码
        //这样返回给页面的就不是乱码了,页面是UTF-8
        filter.setEncoding("UTF-8");
        return new Filter[]{filter};
    }
}
各类型参数传递
普通参数,pojo,嵌套pojo,数组,集合
代码实现:
第一种(save1):Java中的参数
name和请求参数username不一致时,就利用@RequestParam(“name”)
二:会根据Java中的参数创建其对象中的属性
三:
四:请求参数的参数名一致,值不同
五:按理会创建集合的属性,但是List是接口,自然没有属性,不像上面的pojo类,所以需要将传进来的参数转成数据,作为数据传给Java中的集合,要利用@RequestParam,他就有这个功能
package com.itjh.servletmvc;

import com.itjh.pojo.User;
import org.springframework.stereotype.Controller;
import org.springframework.web.bind.annotation.RequestMapping;
import org.springframework.web.bind.annotation.RequestParam;
import org.springframework.web.bind.annotation.ResponseBody;
import java.util.Arrays;
import java.util.List;


@Controller
//控制器
public class sermvc {
    //请求时的访问路径
    @RequestMapping("/sav")
    //返回给浏览器的响应数据
    @ResponseBody
    public String save(String name){
        System.out.println("spring.......mvc.."+name);
        return "{'name':'zhangsan'}}";
    }
    @RequestMapping("/save1" )
    @ResponseBody
    //请求参数作为数据与下面注解中的参数应当一致,
    //下面注解表示请求参数name和username关联起来
    //后面的age没有指定的话,应当是默认注解@。。。。。。。("age")
    public String save1(@RequestParam("name") String username, int age){
        System.out.println("save....1....."+username+"的年龄"+age);
        return "{'name':'lisi'}";
    }
    @RequestMapping("/save2" )
    @ResponseBody
    //请求参数名应当与实体类中的属性名一致
    public String save2(User user){
        System.out.println("save....2....."+user.toString());

        return "{'name':'wangwu'}";
    }
    @RequestMapping("/save3" )
    @ResponseBody
    //请求参数名应当与实体类中的属性名一致
    public String save3(User user){
        System.out.println("save....3....."+user.toString());
        return "{'name':'liuneng'}";
    }
    @RequestMapping("/save4" )
    @ResponseBody
    //数组名应当与参数请求名一致
    public String save4(String[] name){
        System.out.println("save....4....."+Arrays.toString(name));
        return "{'name':'liuneng'}";
    }
    @RequestMapping("/save5" )
    @ResponseBody
    //数组名应当与参数请求名一致
    public String save5(@RequestParam List<String> list){
        System.out.println("save....5....."+list.toString());
        return "{'name':'liuneng'}";
    }
}
json格式传参
都需要在方法里面的参数内加@RequesetBody
json格式传参需要进行转换,则需要jar包:
<dependency>
      <groupId>com.fasterxml.jackson.core</groupId>
      <artifactId>jackson-databind</artifactId>
      <version>2.9.0</version>
    </dependency>
完整pom.xml文件:加一个阿里云的镜像文件,免得可能下载不到jar包
<?xml version="1.0" encoding="UTF-8"?>

<project xmlns="http://maven.apache.org/POM/4.0.0" xmlns:xsi="http://www.w3.org/2001/XMLSchema-instance"
  xsi:schemaLocation="http://maven.apache.org/POM/4.0.0 http://maven.apache.org/xsd/maven-4.0.0.xsd">
  <modelVersion>4.0.0</modelVersion>

  <groupId>org.example</groupId>
  <artifactId>sptingmvc</artifactId>
  <version>1.0-SNAPSHOT</version>
  <packaging>war</packaging>

  <dependencies>
    <dependency>
      <groupId>javax.servlet</groupId>
      <artifactId>javax.servlet-api</artifactId>
      <version>4.0.1</version>
      <scope>provided</scope>
    </dependency>

    <dependency>
      <groupId>org.springframework</groupId>
      <artifactId>spring-webmvc</artifactId>
      <version>5.2.10.RELEASE</version>
    </dependency>
    <dependency>
      <groupId>com.fasterxml.jackson.core</groupId>
      <artifactId>jackson-databind</artifactId>
      <version>2.9.0</version>
    </dependency>
  </dependencies>
  <repositories>
    <repository>
      <id>nexus-aliyun</id>
      <name>nexus-aliyun</name>
      <url>http://maven.aliyun.com/nexus/content/groups/public/</url>
      <releases>
        <enabled>true</enabled>
      </releases>
      <snapshots>
        <enabled>false</enabled>
      </snapshots>
    </repository>
  </repositories>

  <build>
    <plugins>
      <!-- tomcat插件 -->
      <plugin>
        <groupId>org.apache.tomcat.maven</groupId>
        <artifactId>tomcat7-maven-plugin</artifactId>
        <version>2.2</version>
      </plugin>
    </plugins>
  </build>

  <properties>
    <project.build.sourceEncoding>UTF-8</project.build.sourceEncoding>
    <maven.compiler.source>1.7</maven.compiler.source>
    <maven.compiler.target>1.7</maven.compiler.target>
  </properties>


</project>
还需要在配置类中加入注解,这样才会开启转换json:@EnableWebMvc
package com.itjh.Config;

import org.springframework.context.annotation.ComponentScan;
import org.springframework.context.annotation.Configuration;
import org.springframework.web.servlet.config.annotation.EnableWebMvc;

@Configuration
@ComponentScan("com.itjh.servletmvc")
@EnableWebMvc
public class SpringmvcConfig {
}
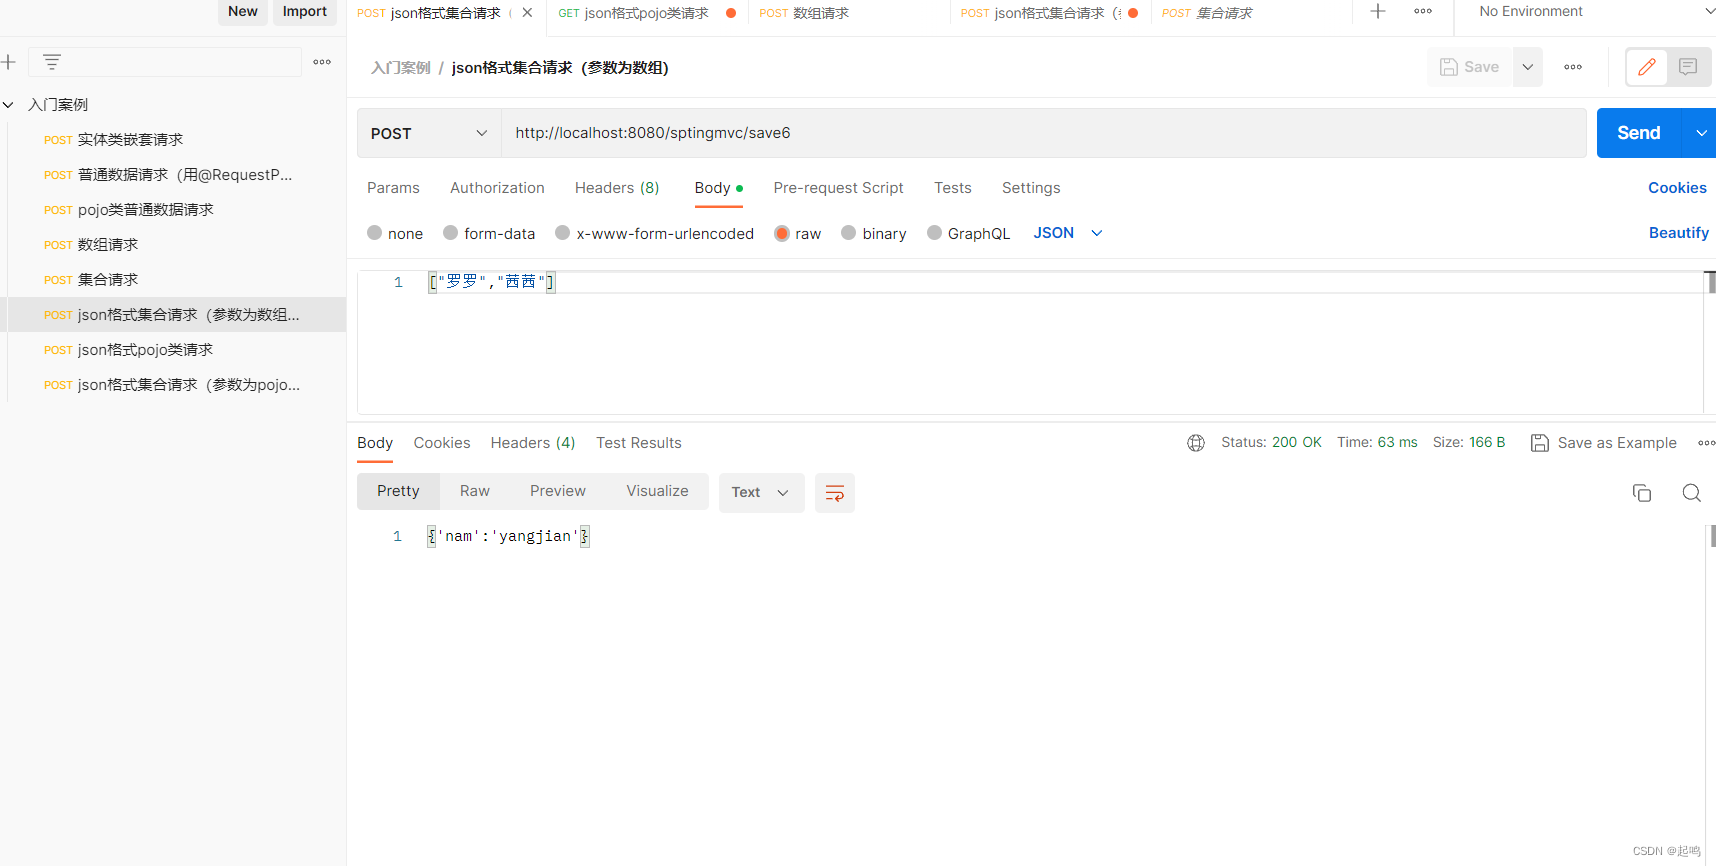
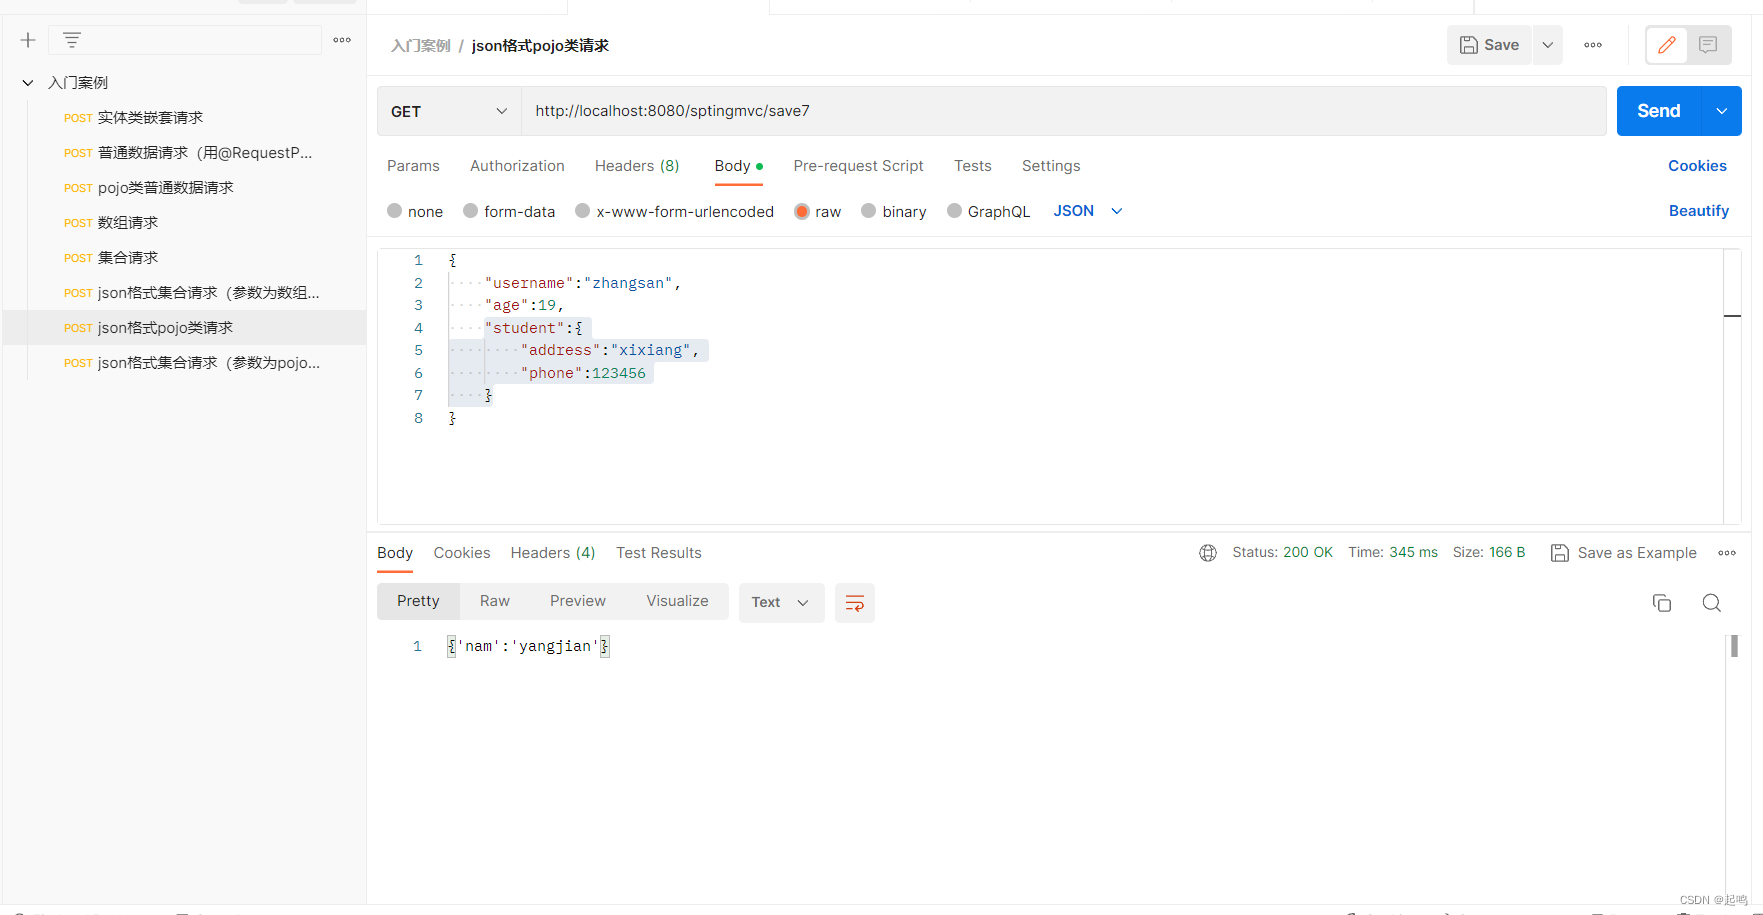
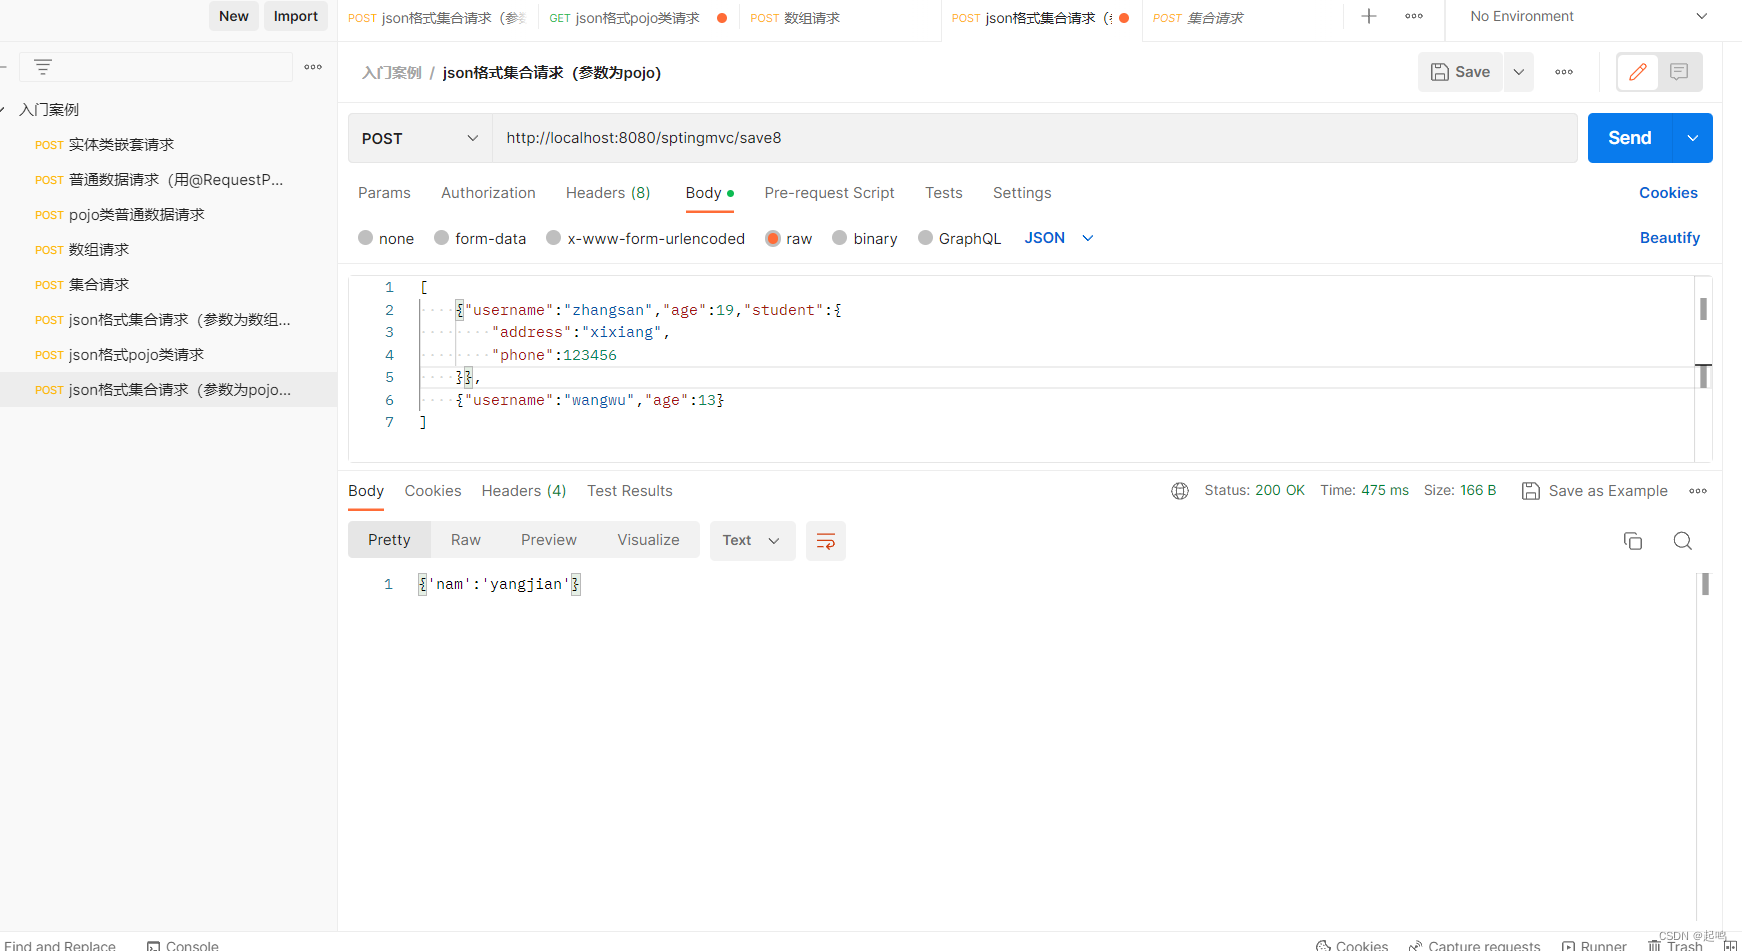
测试类:都需要加@RequesetBody,因为现在再postman中的body中传参
list底层是数组;
pojo型需要写成json格式;
list<实体类>需要数组里面加json格式;
代码:
@RequestMapping("/save6" )
    @ResponseBody
    //数组名应当与参数请求名一致
    public String JsonArraySave6(@RequestBody List<String> id){
        System.out.println("save....6....."+id.toString());
        return "{'nam':'yangjian'}";
    }
    @RequestMapping("/save7" )
    @ResponseBody
    //数组名应当与参数请求名一致
    public String JsonPojoSave7(@RequestBody User user){
        System.out.println("save7方法运行"+user);
        System.out.println("save....7.....");
        return "{'nam':'yangjian'}";
    }
    @RequestMapping("/save8" )
    @ResponseBody
    //数组名应当与参数请求名一致
    public String JsonPojoSave8(@RequestBody List<User> user){
        System.out.println("save8方法运行"+user.toString());
        System.out.println("save....8.....");
        return "{'nam':'yangjian'}";
    }
postman传参主要看保存的文件
postman:
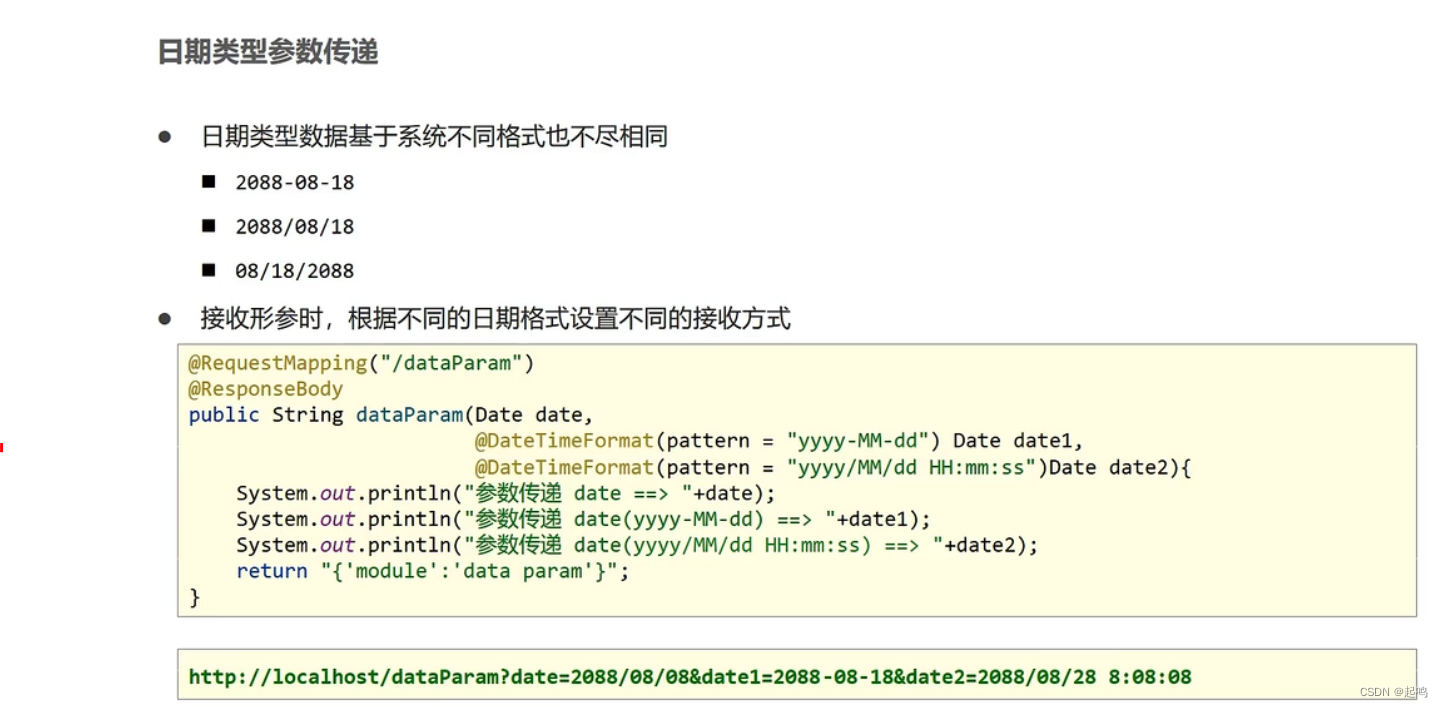
日期型参数传递
根据请求数据的日期格式设置相应参数的格式:其中的pattern后面的参数不要自己起名字,按照图片上的来呦
postman请求:
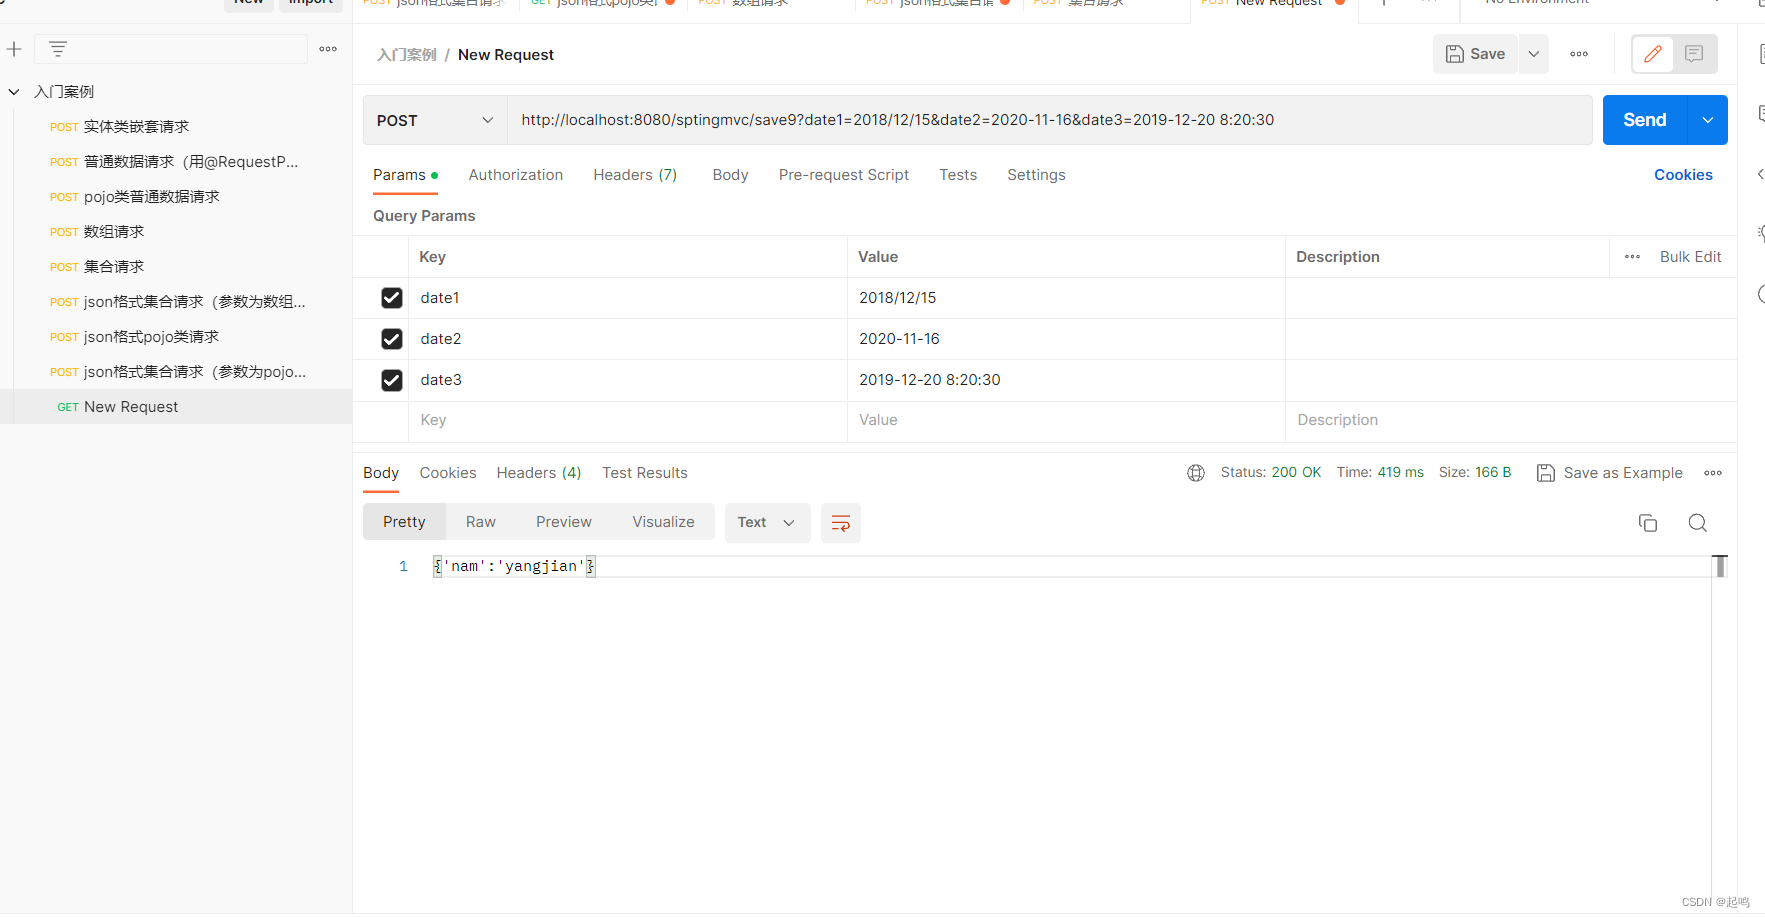
代码实现:
    @RequestMapping("/save9" )
    @ResponseBody
    //数组名应当与参数请求名一致
    public String JsondataSave9(Date date1,
    @DateTimeFormat(pattern = "yyyy-MM-dd") Date date2,
    @DateTimeFormat(pattern = "yyyy-MM-dd HH:mm:ss") Date date3){
        System.out.println("date:"+date1);
        System.out.println("date:"+date2);
        System.out.println("date:"+date3);
        return "{'nam':'yangjian'}";
    }
结果:
信息: 1 Spring WebApplicationInitializers detected on classpath
四月 13, 2023 4:55:49 下午 org.apache.catalina.core.ApplicationContext log
信息: Initializing Spring DispatcherServlet 'dispatcher'
[INFO] Initializing Servlet 'dispatcher'
[INFO] Completed initialization in 717 ms
四月 13, 2023 4:55:49 下午 org.apache.coyote.AbstractProtocol start
信息: Starting ProtocolHandler ["http-bio-8080"]
date:Sat Dec 15 00:00:00 CST 2018
date:Mon Nov 16 00:00:00 CST 2020
date:Fri Dec 20 08:20:30 CST 2019
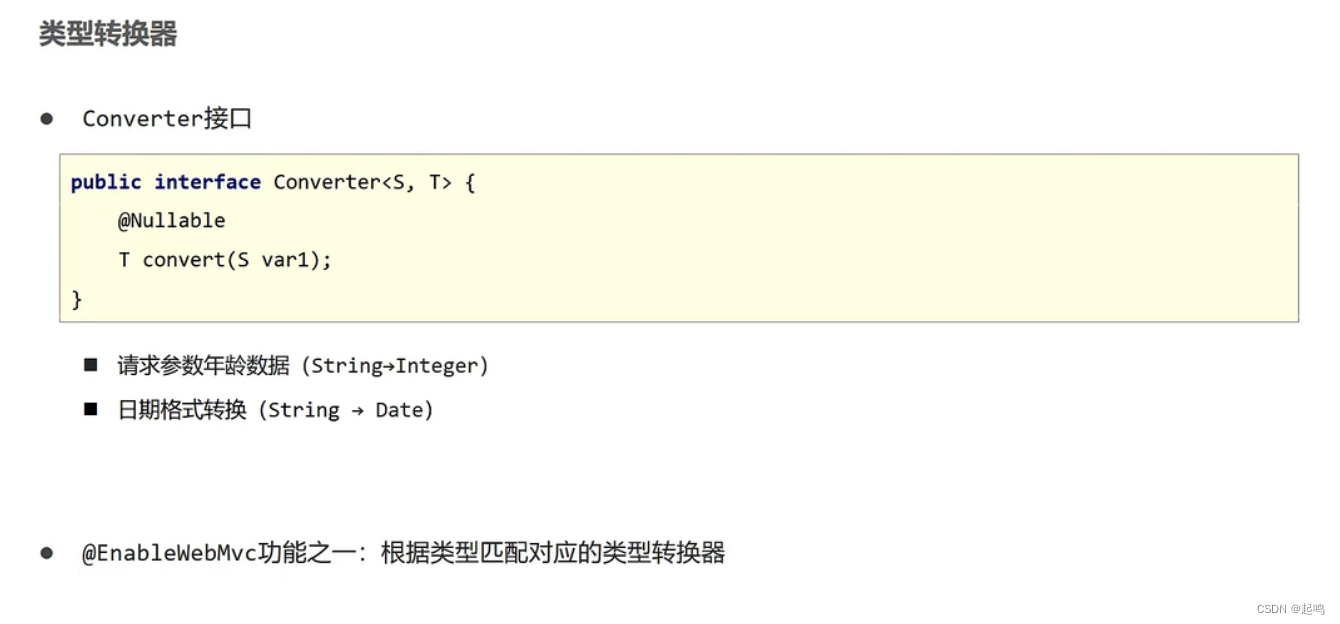
这个String类型传换成Date类型的底层是用了一个接口:刚才用的转换就是他的实现类做的事,他的实现类有很多,有些转化默认没有开启,就需要手动添加@EnableWebMvc
响应数据传回
上面返回值都是String类型,返回给postman页面的都是自定义的字符数据,而现在要真正学返回值,即返回值类型
返回类型可以是pojo类,集合等等
看代码:返回值直接写就行,加了注解@ResponseBody和导入了jar包jackson-databind之后,他会自动帮你将返回值类型转换成json类型数据返回
@RequestMapping("/save10")
    @ResponseBody
    public User jsonsave10(){
        User user=new User();
        user.setAge(12);
        user.setUsername("海皮");
        Student student=new Student();
        student.setAddress("中国");
        student.setPhone(123456);
        user.setStudent(student);
        return user;
    }
    @RequestMapping("/save11")
    @ResponseBody
    public List<User> save11(){
        List<User> list=new ArrayList<>();
        User user1=new User();
        user1.setAge(12);
        user1.setUsername("海皮");
        User user2=new User();
        user2.setAge(19);
        user2.setUsername("哈喽");
        Student student=new Student();
        student.setAddress("中国");
        student.setPhone(123456);
        user1.setStudent(student);
        user2.setStudent(student);
        list.add(user1);
        list.add(user2);
        return list;
    }
返回的数据:上面这个代码的第二个方法
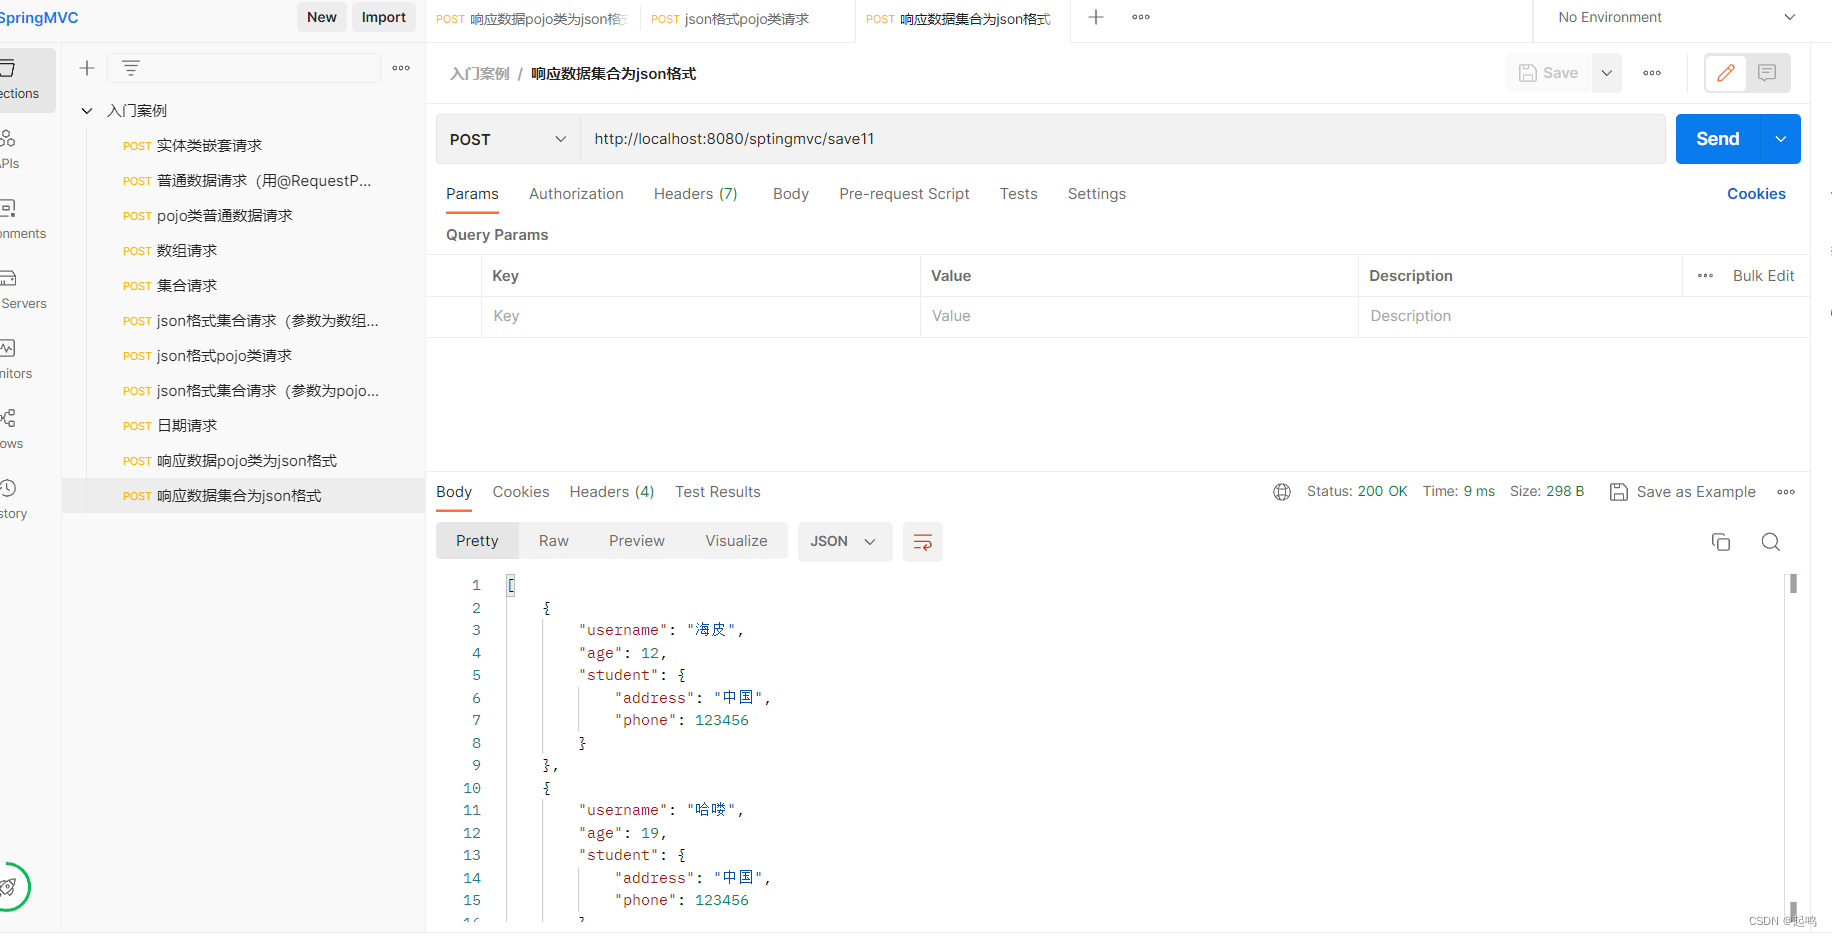
注解@ResponseBody对于数据的转换借助了一个接口(即类转换器,看下面的图)的实现类进行
