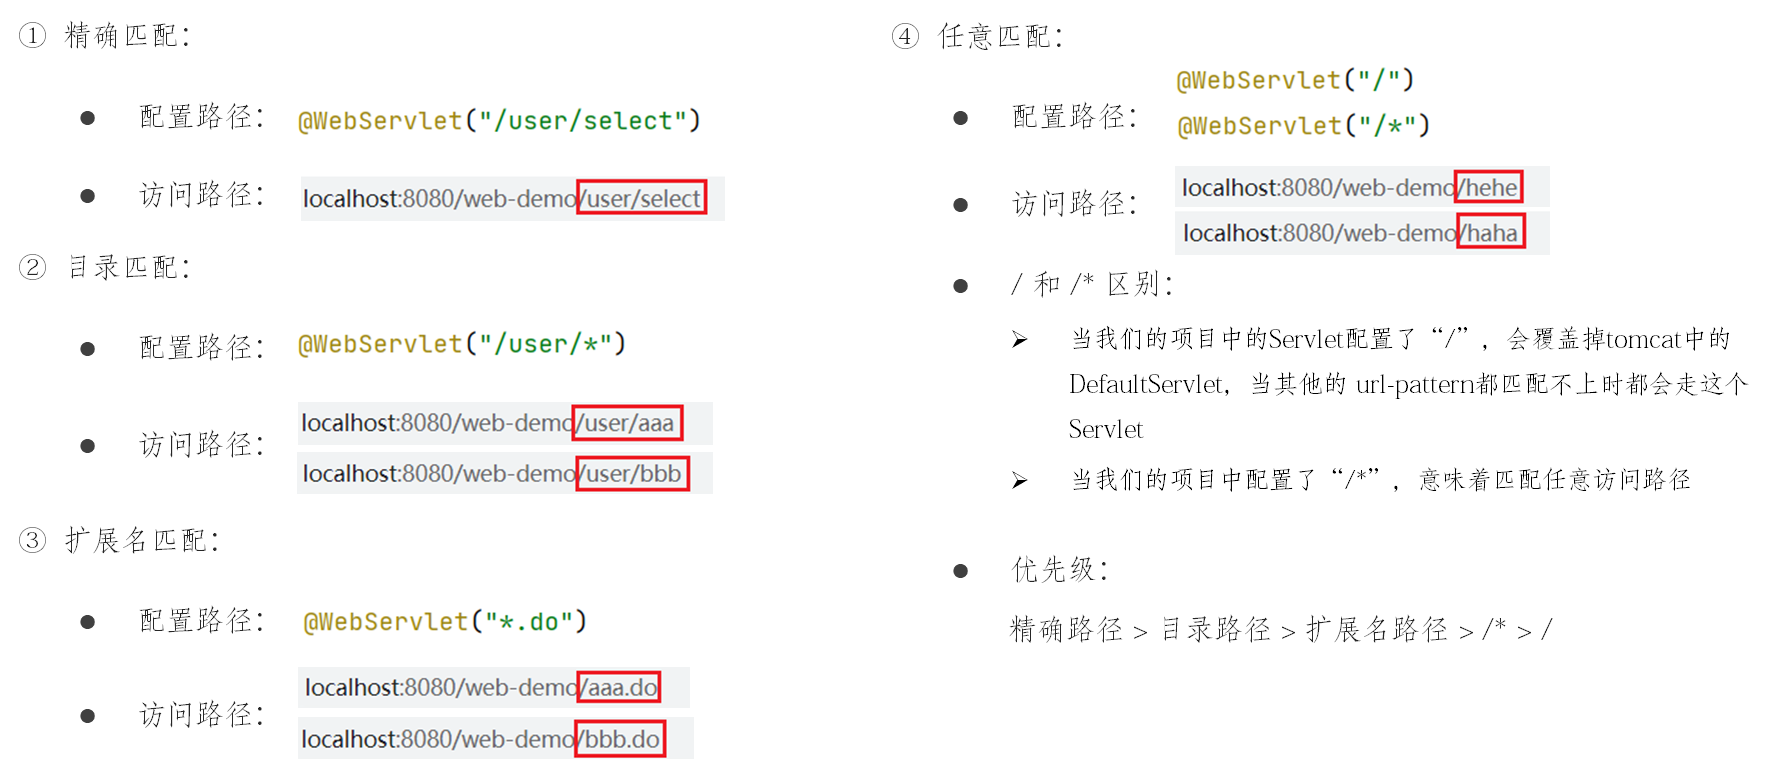
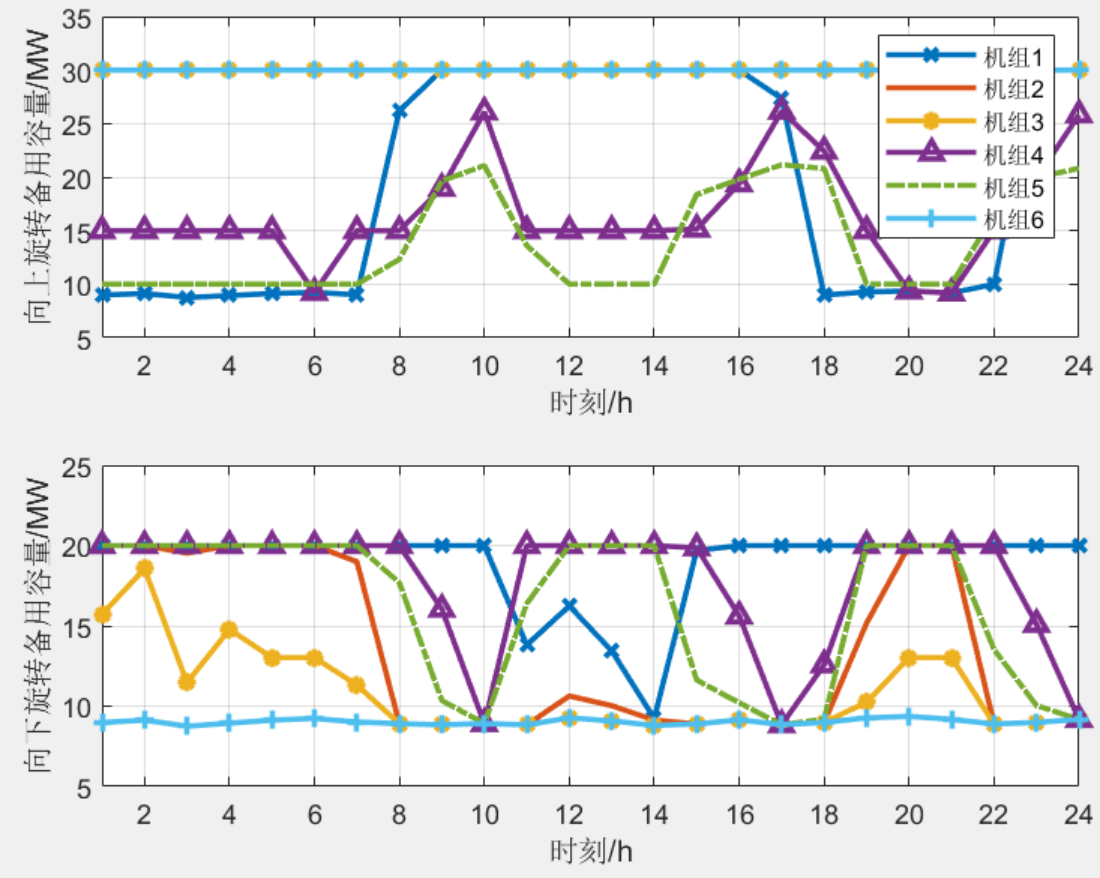
tomcat映射磁盘图片
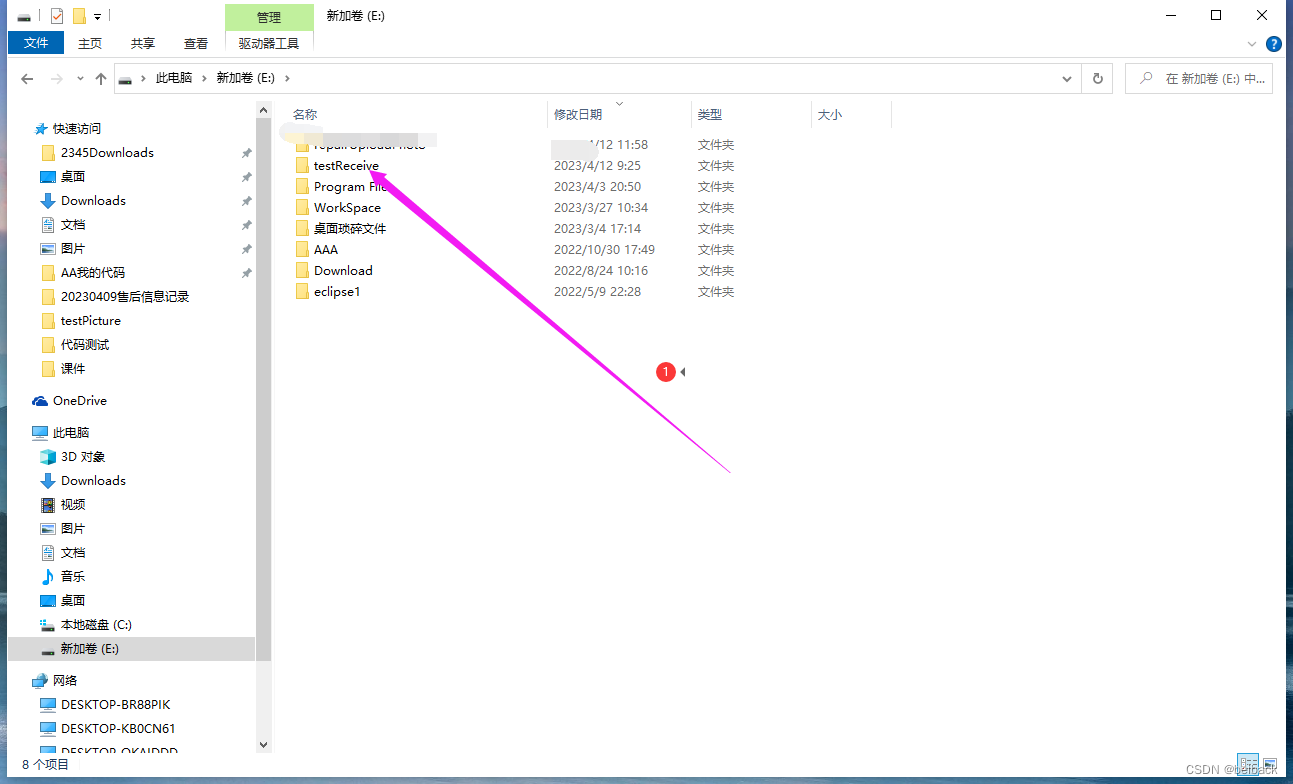
- 1.以E盘为例,在E盘创建目录testReceive
- 2.配置tomcat虚拟路径映射e盘本地文件
- 3.代码层面创建上传文件(此处为图片)工具类
- 3.1(校验图片格式、获取当前主机ip、上传图片至本机目的地,获取上传图片地址)
- 4.调用上传图片工具类接口serviceImp实现
- 4.1后台接口
- 4.2实现接口类
- 4.3mapper文件接口和sql语句
- 4.4 插入数据库图片上传的链接地址
- 5.前台上传form表单
- 5.1 form表单
- 5.2 表单函数
- 6.数据回显
- 6.1数据列表展示
- 6.2列表formatter每行函数
- 7.图片上传本地和列表回显和放大
- 8.其实用springboot两行代码就实现这个功能了
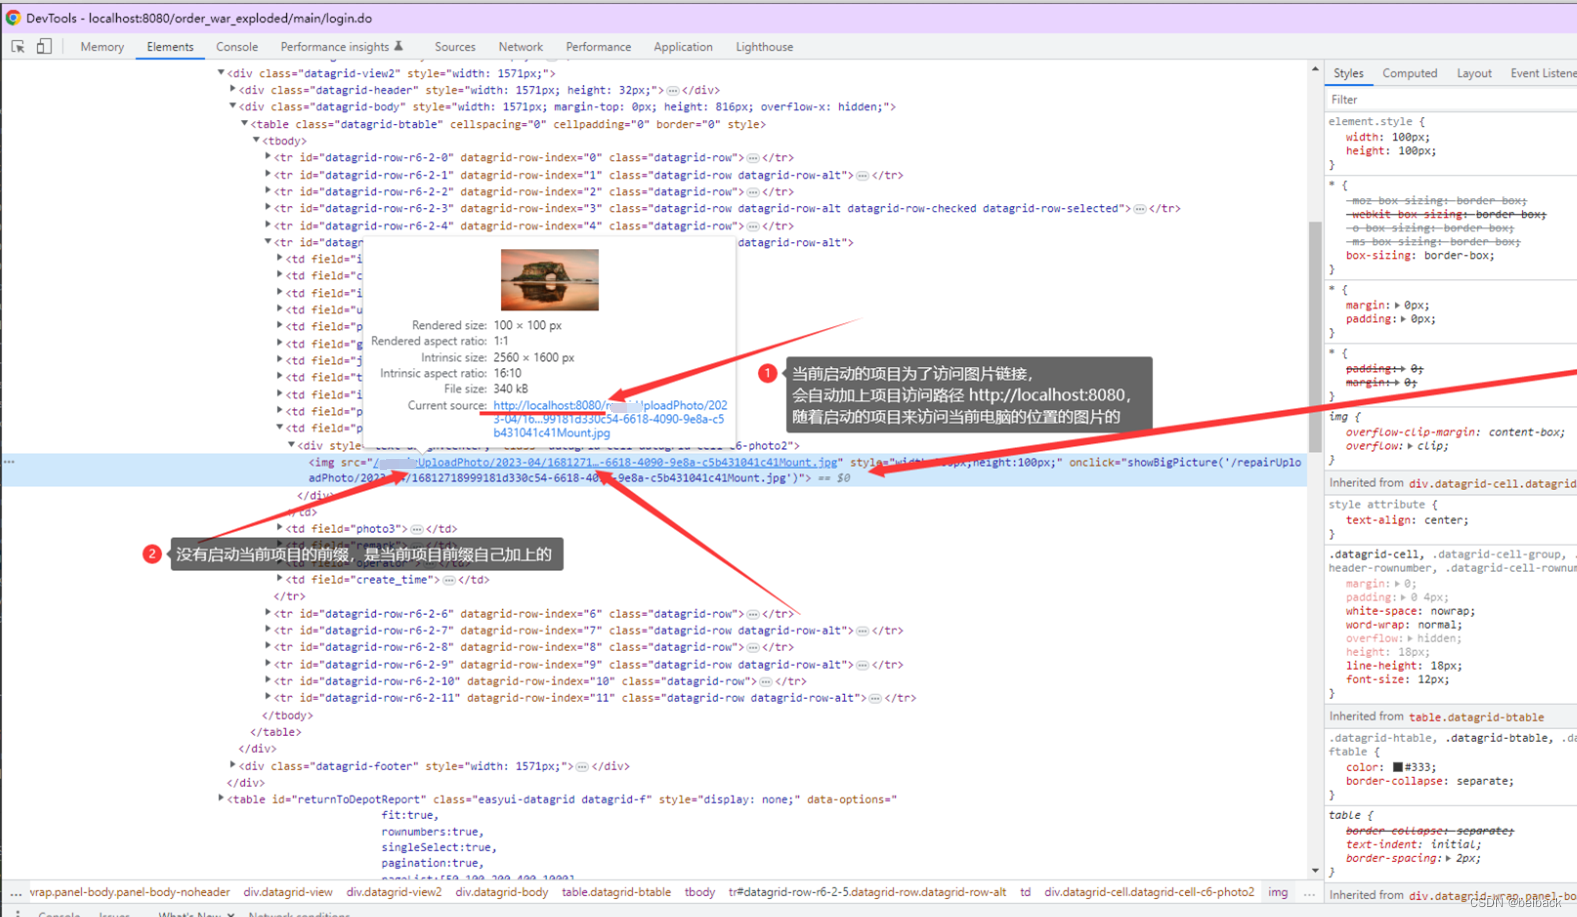
- 9.上传图片的命名和路径
1.以E盘为例,在E盘创建目录testReceive
2.配置tomcat虚拟路径映射e盘本地文件
找到tomcat服务器的conf目录下的server.xml文件,找到最下方左右位置
<Context docBase="E:\testReceive" path="/testReceive" reloadable="false"/>

3.代码层面创建上传文件(此处为图片)工具类
3.1(校验图片格式、获取当前主机ip、上传图片至本机目的地,获取上传图片地址)
import org.springframework.web.multipart.MultipartFile;
import javax.imageio.ImageIO;
import javax.servlet.http.HttpServletRequest;
import java.awt.*;
import java.io.File;
import java.io.IOException;
import java.net.Inet4Address;
import java.net.InetAddress;
import java.net.NetworkInterface;
import java.net.SocketException;
import java.text.SimpleDateFormat;
import java.util.*;
import java.util.List;

public class UploadUtil {
    /**
     * @description 检查是否是 bmp/gif/jpg/png图片
     * @param fileList
     * @return java.lang.Boolean
     */
    public static Boolean checkImg(List<MultipartFile> fileList){
        if(fileList.isEmpty()){
            return false;
        }else {
            for (MultipartFile file:fileList) {
                try {
                    //通过ImageIO检查是否是 bmp/gif/jpg/png图片,是则有东西返回(具体是啥,我也不清楚)
                    Image image = ImageIO.read(file.getInputStream());
                    return image!=null;
                } catch (IOException e) {
                    e.printStackTrace();
                    return false;
                }
            }
            return false;
        }
    }

    /**
     * @description 图片上传
     * @param fileList
     * @param request
     * @return java.lang.String
     */
    public static List<String> upload(List<MultipartFile> fileList, HttpServletRequest request, String dirPath){
        SimpleDateFormat simpleDateFormat = new SimpleDateFormat("yyyy-MM");
        String formatDate =simpleDateFormat.format(new Date(System.currentTimeMillis()));
        List<String> fileUploadList = new ArrayList<>();
        //获取当前主机ip
        String ip =UploadUtil.getRealIpv4();
        if (ip.indexOf("failUpload=>>>")>0){
            fileUploadList.add(ip);
            return fileUploadList;
        }
        for (MultipartFile file: fileList) {
            String fileName = file.getOriginalFilename();
            //将图片文件名进行重命名
            fileName = System.currentTimeMillis()+""+UUID.randomUUID() + fileName;
            //创建文件目录
            File dest = new File(new File(dirPath).getAbsolutePath()+"/"+formatDate+"/"+fileName);
            if(!dest.getParentFile().exists()){
                dest.getParentFile().mkdirs();
            }
            try {
            //将上传的图片写入本地创建的目录内部
                file.transferTo(dest);
                //获取当前图片上传的目录和目录图片位置
			 //地址格式如--》 /testReceive/当前年和月/时分秒的数字化+uuid.(jpg/png/gif)

            	fileUploadList.add("/"+dirPath.substring(dirPath.indexOf("E:\\")+3)+"/"+formatDate+"/"+fileName);
            } catch (IOException e) {
                e.printStackTrace();
                fileUploadList.add("failUpload=>>>上传失败异常:"+e.toString());
            }
        }
        return  fileUploadList;
    }

    /**
     * @description 删除文件
     * @return Boolean
     */
    public static Boolean deleteFile(String dirPath,String url){
        //截取第四个“/”后面的字符串
        int i1=url.indexOf('/');
        int i2=url.indexOf('/',i1+1);
        int i3=url.indexOf('/',i2+1);
        int i4=url.indexOf("/",i3+1);
        String substring=url.substring(i4+1,url.length());
        String relPath=dirPath+substring;
        Boolean flag = false;
        File file = new File(relPath);
        if (file.isFile() && file.exists()) {
            file.delete();
            flag = true;
        }
        return flag;
    }

//获取当前计算机IPv4地址
    public static String getRealIpv4() {
        try {
            Enumeration<NetworkInterface> allNetInterfaces = NetworkInterface.getNetworkInterfaces();
            while (allNetInterfaces.hasMoreElements()) {
                NetworkInterface netInterface = (NetworkInterface) allNetInterfaces.nextElement();
                // 去除回环接口,子接口,未运行和接口
                if (netInterface.isLoopback() || netInterface.isVirtual()
                        || !netInterface.isUp()) {
                    continue;
                }
                if (!netInterface.getDisplayName().contains("Intel")
                        && !netInterface.getDisplayName().contains("Realtek")) {
                    continue;
                }
                Enumeration<InetAddress> addresses = netInterface.getInetAddresses();
                while (addresses.hasMoreElements()) {
                    InetAddress ip = addresses.nextElement();
                    if (ip != null) {
                        // 描述为 Realtek PCIe GbE Family Controller的ipv4
                        if (ip instanceof Inet4Address) {
                            return ip.getHostAddress();
                        }
                    }
                }
                break;
            }
        } catch (SocketException e) {
            System.err.println("failUpload=>>>Error when getting host ip address"
                    + e.getMessage());
           return new String ("failUpload=>>>Error when getting host ip address"+e.getMessage());
        }
        return new String("failUpload=>>>getting host ip address IS NULL");
    }
}
4.调用上传图片工具类接口serviceImp实现
4.1后台接口
    @Controller
	@RequestMapping("/xxxControl")
    @RequestMapping("/insertUploadPhotoUrl.do")
    @ResponseBody
    String insertUploadPhotoUrl(HttpSession session, HttpServletRequest request,@RequestParam(value = "photoList", required = false) List<MultipartFile> photoList) {
        return xxxService.insertUploadPhotoUrl(session, request,photoList);
    }
4.2实现接口类
import com.alibaba.fastjson.JSONObject;
import org.springframework.web.multipart.MultipartFile;
..............

 public String insertUploadPhotoUrl(HttpSession session, HttpServletRequest request,List<MultipartFile> photoList) {
  JSONObject jObject = new JSONObject();
 xxxClass     xxxentity =new xxxClass();
 xxxentity.setUserName(request.getParameter("username"));
  xxxentity.setRemark(request.getParameter("remark"));
  try {
            if (!photoList.get(0).getOriginalFilename().isEmpty() && photoList.size() > 0 && photoList.size() < 4) {
            //图片将要保存e盘创建的位置
            String desktopDir ="E:\\testReceive";
            //校验上传的是否是图片格式
            Boolean img =UploadUtil.checkImg(photoList);
            if (img){//true的情况下
            //获取已经写入至本地目录的图片地址
                List<String> fileUploadList =UploadUtil.upload(photoList,request,desktopDir);
                //检验是否失败
                if (fileUploadList.toString().indexOf("failUpload=>>>")>0){
                    jObject.put("message", stringBuffer.append(fileUploadList.toString()));
                }else{
                //未失败的情况下依次获取上传的本地磁盘    链接字符串
                    if (fileUploadList.size() > 0 && fileUploadList.size() < 4) {
                        for (int i = 0; i < fileUploadList.size(); i++) {
                            if (i == 0) {
                                xxxentity .setPhoto1(fileUploadList.get(i));
                            } else if (i == 1) {
                                xxxentity .setPhoto2(fileUploadList.get(i));
                            } else if (i == 2) {
                                xxxentity .setPhoto3(fileUploadList.get(i));
                            }
                        }
                    }else{
                        jObject.put("message", "插入异常:"+stringBuffer.append("插入图片超过3张"));
                    }
                }
            }else {
                jObject.put("message", "图片后缀格式名不正确,请上传bmp/gif/jpg/png格式的图片;");
                return jObject.toString();
            }
        }
        } catch (Exception e) {
            jObject.put("message", "插入异常:"+stringBuffer.append(e.toString()));
            e.printStackTrace();
        }
        //插入数据数据库 表中至少创建三个字段 photo1、photo2、photo3
	int  count = xxxMapper.insertUploadPhotoUrl(xxxentity);
}
4.3mapper文件接口和sql语句
	Integer insertUploadPhotoUrl(xxxClass xxxentity);

	<insert id="insertUploadPhotoUrl">
        insert into xxxtable_name(user_name,remark,photo1,photo2,photo3,create_time)
         values
         (
         #{userName}, //这些都是 xxxClass对象的属性实例的值
        #{remark},
        #{photo1},
        #{photo2},
        #{photo3}),
		now()
		)
    </insert>
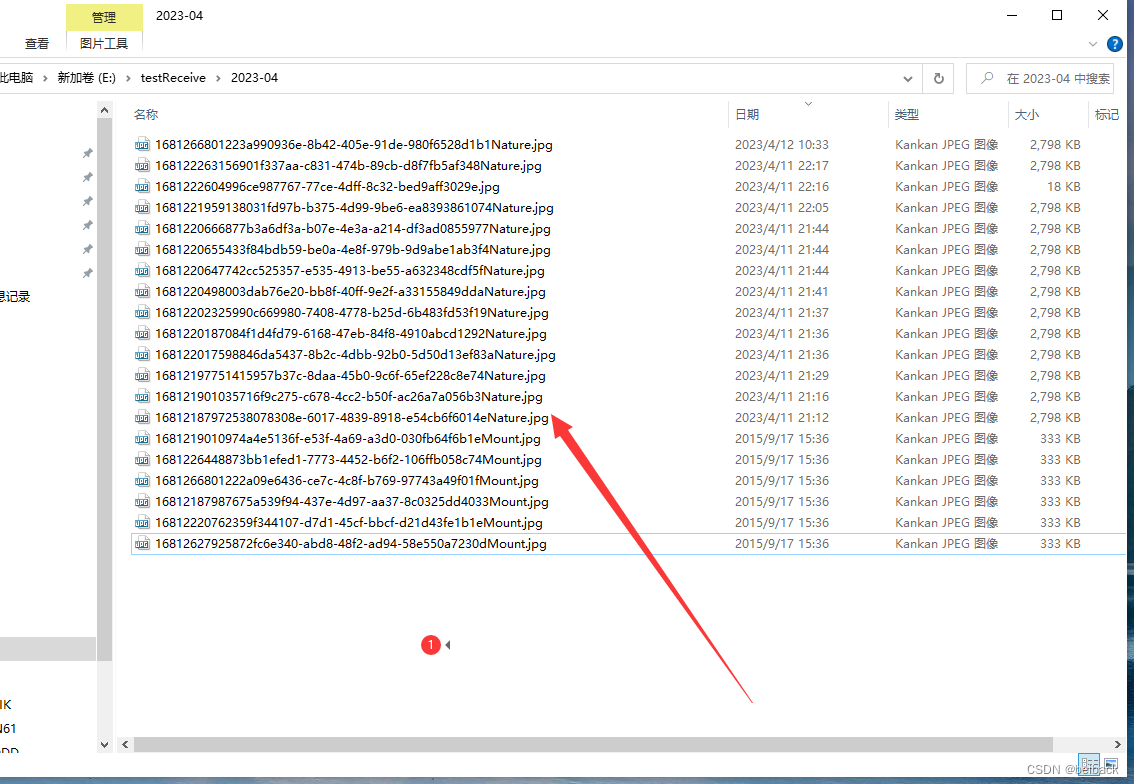
4.4 插入数据库图片上传的链接地址
字段photo1获得当前地址
/testReceive/2023-04/1681284642429a15d1c35-27bf-4391-a57e-d7612f4cfdadmount1.jpg
字段photo2获得当前地址
/testReceive/2023-04/1681284642430a15d1c35-27bf-4391-a57e-d7612f4cfdadmount2.jpg
字段photo3获得当前地址
/testReceive/2023-04/1681284642435a15d1c35-27bf-4391-a57e-d7612f4cfdadmount3.jpg
5.前台上传form表单
5.1 form表单
<div id="xxxwindowAdd" class="easyui-window"  closed="true" title="xxx记录添加" style="width:634px;height:700px;padding:10px;">
				<div  style="width:600px;padding:30px 125px">
					<form id="xxxFormAdd" class="easyui-form" enctype="multipart/form-data" method="post" data-options="novalidate:true" >
						<div style="margin-bottom:20px">
							<tr>
								<td>姓名:</td>
								<td><input class="easyui-textbox" style="width:100%;height:32px" type="text" name="userName"
							 data-options="required:false,prompt:'输入名字'"></input></td>
							</tr>
						</div>

						<div style="margin-bottom:20px">
							<tr>
								<td>备注:</td>
								<td><input class="easyui-textbox" style="width:100%;height:60px" name="remark" data-options="multiline:true,prompt:'备注选填'" ></input></td>
							</tr>
						</div>
						<div style="margin-bottom:20px">
							<tr>
								<td>图片上传:</td>
								<td><input class="easyui-filebox" style="width: 100%;height: 32px" name="photoList" value="no"
										   data-options="multiple:true,prompt:'最多添加3张图片',buttonText: '添加图片'"></input></td>
							</tr>
						</div>
						<div>
							<a href="#" class="easyui-linkbutton" iconCls="icon-ok" onclick="submitForm()" style="width:100%;height:32px">数据提交</a>
						</div>
				</form>

				</div>
				<div style="text-align:center;padding:39px;width: 600px">
					<a href="javascript:void(0)" class="easyui-linkbutton" style="margin-right: 100px;width: 75px" onclick="$('#xxxFormAdd').form('clear');">清空</a>
					<a href="javascript:void(0)" class="easyui-linkbutton"  style="margin-left: 100px;width: 75px" onclick="autoLoadDate()">自动加载数据</a>
				</div>
			</div>
5.2 表单函数
function submitForm(){
    $('#xxxFormAdd').form('submit',{
        url:ProjectPath + "/xxxControl/insertUploadPhotoUrl.do",
        onSubmit:function(){
            var isValid = $(this).form('validate');
            if (!isValid){
                $.messager.alert("空内容","必填项内容为空", "error");
                return false
            }
        },
        success:function (res) {
            res=JSON.parse(res)
            if (res.result=='success'){
                $('#xxxFormAdd').form('clear');
                $('#xxxwindowAdd').window('close'); // close a window
       			......
 				......
            }else {
                $.messager.alert("新增失败",res.message, "error");
            }
        }
    });
}


function autoLoadDate(){
    debugger
   $('#xxxFormAdd').form('load',{
		userName:'你想写的内容',
 });
}
6.数据回显
6.1数据列表展示
# 列表
<table id="returnToDepotReport" class="easyui-datagrid" style="width:100%;height: 100%"
				   data-options="
					   	fit:true,
 						rownumbers:true,
						singleSelect:true,
						pagination:true,
						pageList:[50,100,200,400,1000],
						pageNumber:1,
						pageSize:50,
						striped:true,
						autoRowHeight:false,
						idField:'id',
						fitColumns:true,
					   toolbar:'#returnToDepotToolBar'
						">
				<thead>
				<tr>
					<th data-options="field:'id',align:'center',width:10,hidden:true">主键id</th>
					<th data-options="field:'userName',align:'center',width:220">姓名</th>
					<th data-options="field:'photo1',width:80,height:80,align:'center',formatter:formatterPhoto" th:text="无" >图片1</th>
					<th data-options="field:'photo2',width:80,height:80,align:'center',formatter:formatterPhoto" th:text="无" >图片2</th>
					<th data-options="field:'photo3',width:80,height:80,align:'center',formatter:formatterPhoto" th:text="无" >图片3</th>
					<th data-options="field:'remark',align:'center',width:150">备注</th>
					<th data-options="field:'create_time',align:'center',width:150">创建时间</th>
				</tr>
				</thead>
			</table>
# 预览图片
<div class="easyui-window"  closed="true" id="show_anzhuang_pic" style="width:800px;height:675px;" title="预览图片">
				<img alt="" src="" id="img_show_anzhuang_pic" style="width:800px;">
			</div>
6.2列表formatter每行函数
function formatterPhoto(val) {
		if (val != undefined) {
			return '<img src="' +val + '"  style="width:100px;height:100px;" onclick="showBigPhoto(\'' + val + '\')">';
		}else{
			return '<img src="' +'' + '"   style="width:100px;height:100px;" onclick="showBigPhoto(undefined)">';
		}
	}

	function showBigPhoto(url){
		debugger
		if (url==undefined){
			$.messager.alert("空图片", "此处未上传图片", "error");
		}else{
			$('#show_anzhuang_pic').window('open');
			$('#img_show_anzhuang_pic').attr("src",url);
		}
	}
7.图片上传本地和列表回显和放大

8.其实用springboot两行代码就实现这个功能了
import org.springframework.context.annotation.Configuration;
import org.springframework.web.servlet.config.annotation.ResourceHandlerRegistry;
import org.springframework.web.servlet.config.annotation.WebMvcConfigurerAdapter;

@Configuration
public class WebMvcConfig extends WebMvcConfigurerAdapter {
    /*
     * 在配置文件中配置的文件保存路径
     */
    private String mapPath="file:/E:/testReceive/";
    @Override
    public void addResourceHandlers(ResourceHandlerRegistry registry) {
        registry.addResourceHandler("/testReceive/**").addResourceLocations(mapPath);
        // TODO Auto-generated method stub
        super.addResourceHandlers(registry);
    }

}
9.上传图片的命名和路径
Tomcat配置本地文件映射