一 Textview
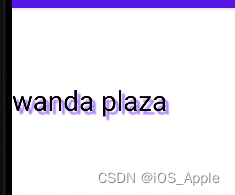
1 基本使用
<?xml version="1.0" encoding="utf-8"?>

<LinearLayout android:layout_height="match_parent"
    android:layout_width="match_parent"
    android:orientation="vertical"
    xmlns:android="http://schemas.android.com/apk/res/android">

    <TextView
        android:text = "@string/tv_one"
        android:textColor = "#FF000000"
        android:textSize="30sp"
        android:background = "#FFFFFFFF"
        android:shadowColor="@color/purple_200"
        android:shadowRadius="3.0"
        android:shadowDx="10.0"
        android:shadowDy="10.0"
        android:gravity = "center_vertical"
        android:id="@+id/tv_one" android:layout_width="200dp" android:layout_height="200dp"
        android:layout_gravity="center_vertical"
        />

</LinearLayout>
2 跑马灯效果
要实现跑马灯效果 文字一定要够长。
设置 重复次数 获取焦点
记得 放<requestFocus />标签,表示将当前控件设为焦点,然后跑马灯就起效果了
android:singleLine="true"
android:ellipsize="marquee"
android:marqueeRepeatLimit="marquee_forever"
android:focusable="true"
android:focusableInTouchMode="true"
    <TextView
        android:text = "@string/tv_one"
        android:textColor = "#FF000000"
        android:textSize="30sp"
        android:background = "#FFFFFFFF"
        android:shadowColor="@color/purple_200"
        android:shadowRadius="3.0"
        android:shadowDx="10.0"
        android:shadowDy="10.0"
        android:gravity = "center_vertical"
        android:id="@+id/tv_one"
        android:layout_width="200dp"
        android:layout_height="80dp"
        android:layout_gravity="center_vertical"
        android:singleLine="true"
        android:ellipsize="marquee"
        android:marqueeRepeatLimit="marquee_forever"
        android:focusable="true"
        android:focusableInTouchMode="true"
       >
        <requestFocus/>

    </TextView>
二 Button
1 使用
系统会对Button中所有的英文字母自动进行大写转换,可以配置属性禁用
设置按钮背景色无效的话 去themes.xml 文件修改style,加一个.Bridge
<style name="Theme.LeonardoDay1" parent="Theme.MaterialComponents.DayNight.DarkActionBar.Bridge">
    <Button
        android:id="@+id/btn"
        android:layout_width="100dp"
        android:layout_height="100dp"
        android:text="ClickMe"
        android:textAllCaps="false"
        android:background="@drawable/btn_selector"
        android:backgroundTint="@color/btn_color_selector"
        android:onClick="leoClick"
        >

    </Button>
Button btn = findViewById(R.id.btn);
btn.setText("ClickOK");
// 点击事件
btn.setOnClickListener(new View.OnClickListener() {
@Override
public void onClick(View view) {
// 收到点击效果
Log.e(TAG, "onClick: ");
}
});
// 长按事件
btn.setOnLongClickListener(new View.OnLongClickListener() {
@Override
public boolean onLongClick(View view) {
Log.e(TAG, "onLongClick: ");
return false;
}
});
// 触摸事件
btn.setOnTouchListener(new View.OnTouchListener() {
@Override
public boolean onTouch(View view, MotionEvent motionEvent) {
Log.e(TAG, "onTouch: ");
// 返回为True 的话 点击事件就会到此结束了
return false;
}
}); public void leoClick(View view) {
Log.e(TAG, "leoClick " );
}三 EditText
获取输入的文本
String s = et.getText().toString();
<EditText
        android:id="@+id/editText"
        android:layout_width="match_parent"
        android:layout_height="80dp"
        android:hint="please type something"
        android:textColorHint="#ffeeaaee"
        android:inputType="numberPassword"
        android:drawableLeft="@drawable/baseline_account_circle_24"
        android:drawableRight="@drawable/baseline_access_alarm_24"
        android:drawablePadding="20dp"
        android:paddingLeft="10dp"
        android:background="#ffffffff"
        />
四 ImageView
src 图片资源
scaleType 缩放类型
maxHeight 最大高度 maxWidth 最大宽度
        <ImageView
            android:id="@+id/img_view"
            android:layout_width="300dp"
            android:layout_height="150dp"
            android:src="@drawable/baseline_account_circle_24"
            />
imgView = findViewById(R.id.img_view);
imgView.setImageResource(R.drawable.demo2);
// 默认值 缩放后放置于中间
imgView.setScaleType(ImageView.ScaleType.FIT_CENTER);
// 最主要的目的是把图片显示在里面
imgView.setScaleType(ImageView.ScaleType.CENTER_INSIDE);
// 不改变 原图的大小 从左上角开始绘制 ,超过的部分做剪裁处理
imgView.setScaleType(ImageView.ScaleType.MATRIX);
五 ProgressBar
用于界面上显示一个进度条,表示我们的程序在加载一些数据。
有两种形式 progress_horizontal 和 progress_circular 形式
显示与隐藏的可以通过visiable invisiable 和 gone 进行设定
所有的安卓控件都有这个属性 Visiablity 这个属性


        <ProgressBar
            android:id="@+id/pb"
            android:layout_width="50dp"
            android:layout_height="50dp"
            android:max="80"
            />

        <ProgressBar
            android:id="@+id/pb_h"
            style="?android:progressBarStyleHorizontal"
            android:layout_width="200dp"
            android:layout_height="50dp"
            android:max="100"/>
if(pb.getVisibility() == View.GONE){
pb.setVisibility(View.VISIBLE);
}else {
pb.setVisibility(View.GONE);
}
int progress = pb2.getProgress();
progress += 10;
pb2.setProgress(progress);六 Notification
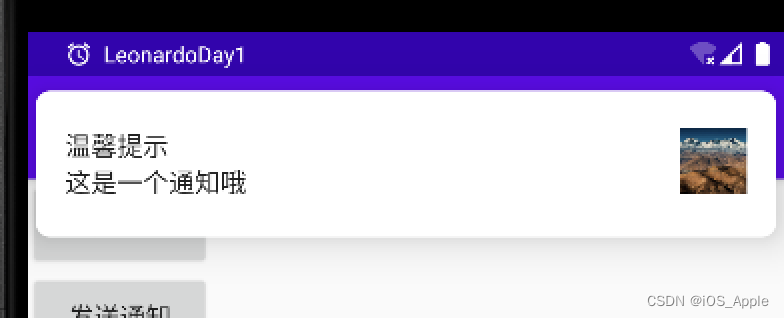
创建一个通知 并且发送·
    private NotificationManager manager;
    private Notification notification;


 // 1 创建通知管理
        manager = (NotificationManager) getSystemService(NOTIFICATION_SERVICE);

        //2 创建一个通知 channel
        if (Build.VERSION.SDK_INT >= Build.VERSION_CODES.O){
            NotificationChannel channel = new NotificationChannel("leo","测试下",NotificationManager.IMPORTANCE_HIGH);
            manager.createNotificationChannel(channel);
        }
        // 3 创建一个通知
        // 3.1 创建一个跳转的意图 点击通知进行跳转
        Intent intent = new Intent(this, NotificationActivity.class);
        PendingIntent p_intent  = PendingIntent.getActivity(this, 0, intent, PendingIntent.FLAG_UPDATE_CURRENT);
        // context
        notification = new NotificationCompat.Builder(this,"leo").setContentTitle("温馨提示")
                .setContentText("这是一个通知哦")
                .setSmallIcon(R.drawable.baseline_access_alarm_24)
                .setColor(Color.parseColor("#ff0000"))
                .setLargeIcon(BitmapFactory.decodeResource(getResources(),R.drawable.demo2))
                .setContentIntent(p_intent)
                .setAutoCancel(true)
                .build();

        Button sendBtn = findViewById(R.id.send_noti);
        sendBtn.setOnClickListener(new View.OnClickListener() {
            @Override
            public void onClick(View view) {
                // 发送通知
                manager.notify(1,notification);
            }
        });

        Button cancelBtn = findViewById(R.id.cancel_noti);
        cancelBtn.setOnClickListener(new View.OnClickListener() {
            @Override
            public void onClick(View view) {
                // 取消发送通知
                manager.cancel(1);
            }
        });
七 ToolBar
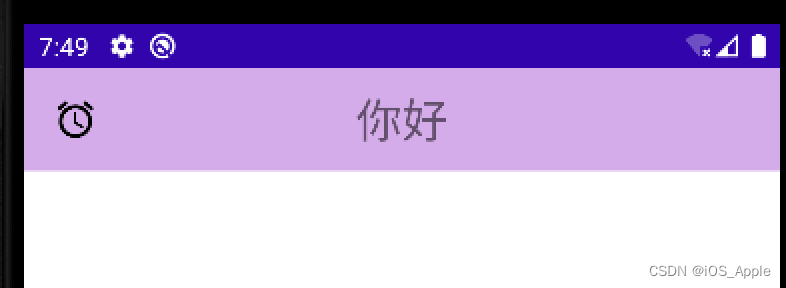
显示自己的ToolBar,在theme 中设置NoActionBar
<style name="Theme.LeonardoDay1" parent="Theme.MaterialComponents.DayNight.NoActionBar">
      <androidx.appcompat.widget.Toolbar
            android:id="@+id/tb"
            android:layout_width="match_parent"
            android:layout_height="?attr/actionBarSize"
            android:background="#ddaaee"

            app:navigationIcon="@drawable/baseline_access_alarm_24"
            app:titleTextColor="@color/btn_color_selector"
            >
            <TextView
                android:layout_width="wrap_content"
                android:layout_height="wrap_content"
                android:text="你好"
                android:textSize="25sp"
                android:layout_gravity="center"
                android:gravity="center"
                />
        </androidx.appcompat.widget.Toolbar>
Toolbar tb = findViewById(R.id.tb);
tb.setNavigationOnClickListener(new View.OnClickListener() {
@Override
public void onClick(View view) {
}
});
八 AlertDialog
在当前的界面演出一个对话框。
   // 弹出对话框
                // 1构造器
                AlertDialog.Builder  dialog = new AlertDialog.Builder(MainActivity.this);
                // 设置内容
                dialog.setTitle("This is My oscillator")
                        .setMessage("Something I know")
                        .setPositiveButton("OK", new DialogInterface.OnClickListener() {
                            @Override
                            public void onClick(DialogInterface dialogInterface, int i) {
                                // 确认的点击

                            }
                        })
                        .setNegativeButton("Cancel", new DialogInterface.OnClickListener() {
                            @Override
                            public void onClick(DialogInterface dialogInterface, int i) {

                            }
                        });

                // 显示
                dialog.show();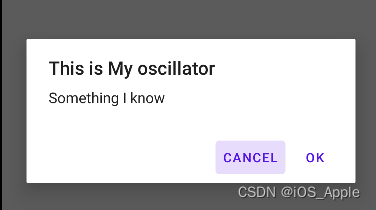
九 PopupWindow
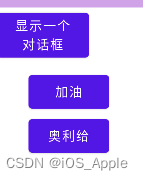
弹出框如下
<?xml version="1.0" encoding="utf-8"?>
<androidx.constraintlayout.widget.ConstraintLayout xmlns:android="http://schemas.android.com/apk/res/android"
    android:layout_width="match_parent"
    android:layout_height="match_parent">

   <LinearLayout
       android:layout_width="match_parent"
       android:layout_height="match_parent"
       android:orientation="vertical">

       <Button
           android:id="@+id/pop_btn_1"
           android:layout_width="wrap_content"
           android:layout_height="wrap_content"
           android:text="加油"
           />
       <Button
           android:id="@+id/pop_btn_2"
           android:layout_width="wrap_content"
           android:layout_height="wrap_content"
           android:text="奥利给"
           />


    </LinearLayout>
</androidx.constraintlayout.widget.ConstraintLayout>
void showPopWindow(View view){
// 在实际开发中LayoutInflater这个类还是非常有用的,它的作用类似于findViewById()。
// 不同点是LayoutInflater是用来找res/layout/下的xml布局文件,并且实例化;而findViewById()是找xml布局文件下的具体widget控件(如Button、TextView等)。
View popView = getLayoutInflater().inflate(R.layout.popup,null);
// focusable 最后的一个参数 点击空白处可以退出
PopupWindow popUpWindow = new PopupWindow(popView, ViewGroup.LayoutParams.WRAP_CONTENT,ViewGroup.LayoutParams.WRAP_CONTENT,true);
// 后面两个参数为宽高
//显示在view 的下方 后面两个参数为X Y 轴的偏移
popUpWindow.showAsDropDown(view,90,20);
// 按钮的监听
Button btn1 = popView.findViewById(R.id.pop_btn_1);
btn1.setOnClickListener(new View.OnClickListener() {
@Override
public void onClick(View view) {
// 消失
popUpWindow.dismiss();
}
});
Button btn2 = popView.findViewById(R.id.pop_btn_2);
btn2.setOnClickListener(new View.OnClickListener() {
@Override
public void onClick(View view) {
// 消失
popUpWindow.dismiss();
}
});
} 