目录
1、即时通信
1.1、什么是即时通信?编辑
1.2、功能说明
1.3、技术方案
2、环信
2.1、开发简介
2.2、环信Console
2.3、接口说明
3、抽取环信组件
3.1、编写HuanXinTemplate
3.2、编写Properties对象
3.3、配置
3.4、测试
4、用户体系集成
4.1、注册环信用户
4.2、查询环信用户信息
4.3、环信用户ID查询用户信息
4.4、发送消息给客户端
4.5、数据处理
5、联系人管理
5.1、查看用户详情
5.2、查看陌生人消息
5.3、回复陌生人消息
5.4、添加联系人
5.5、联系人列表
1、即时通信
1.1、什么是即时通信?
1.2、功能说明
在探花交友项目中也提供了类似微信的聊天功能,用户可以和好友或陌生人聊天。
如果是陌生人,通过《聊一下》功能进行打招呼,如果对方同意后,就成为了好友,可以进行聊天了。
陌生人之间如果相互喜欢,那么就会成为好友,也就可以聊天了。
在消息界面中也可以查看:点赞、评论、喜欢、公告等消息信息。


1.3、技术方案
对于高并发的即时通讯实现,还是很有挑战的,所需要考虑的点非常多,除了要实现功能,还要考虑并发、流量、负载、服务器、容灾等等。虽然有难度也并不是高不可攀。
对于现实即时通讯往往有两种方案:
-
方案一:
-
自主实现,从设计到架构,再到实现。
-
技术方面可以采用:Netty + WebSocket + RocketMQ + MongoDB + Redis + ZooKeeper + MySQL
-

-
方案二:
-
对接第三方服务完成。
-
这种方式简单,只需要按照第三方的api进行对接就可以了。
-
如:环信、网易、容联云通讯等。
-
-
如何选择呢?
如果是中大型企业做项目可以选择自主研发,如果是中小型企业研发中小型的项目,选择第二种方案即可。方案一需要有大量的人力、物力的支持,开发周期长,成本高,但可控性强。方案二,成本低,开发周期短,能够快速的集成起来进行功能的开发,只是在可控性方面来说就差了一些。
探花交友项目选择方案二进行实现。
2、环信
官网:环信 - 中国IM即时通讯云服务开创者! 稳定健壮,消息必达,亿级并发的即时通讯云

2.1、开发简介
平台架构:

集成:
环信和用户体系的集成主要发生在2个地方,服务器端集成和客户端集成。

探花集成:
-
探花前端使用AndroidSDK进行集成
-
文档:Android SDK 介绍及导入 [IM 开发文档]
-
-
后端集成用户体系
-
文档:用户体系集成 [IM 开发文档]
-
2.2、环信Console
需要使用环信平台,那么必须要进行注册,登录之后即可创建应用。环信100以内的用户免费使用,100以上就要注册企业版了。
企业版价格:
创建应用:

创建完成:

2.3、接口说明
2.3.1、Appkey 数据结构
当您申请了 AppKey 后,会得到一个 xxxx#xxxx 格式的字符串,字符串只能由小写字母数字组成,AppKey是环信应用的唯一标识。前半部分 org_name 是在多租户体系下的唯一租户标识,后半部分 app_name 是租户下的app唯一标识(在环信后台创建一个app时填写的应用 id 即是 app_name )。下述的 REST API 中,/{org_name}/{app_name}的请求,均是针对一个唯一的appkey进行的。目前环信注册的appkey暂不能由用户自己完成删除操作,如果对 APP 删除需要联系环信操作完成。
| Appkey | xxxx | 分隔符 | xxxx |
|---|---|---|---|
| 环信应用的唯一标识 | org_name | # | app_name |
2.3.2、环信 ID 数据结构
环信作为一个聊天通道,只需要提供环信 ID (也就是 IM 用户名)和密码就够了。
| 名称 | 字段名 | 数据类型 | 描述 |
|---|---|---|---|
| 环信 ID | username | String | 在 AppKey 的范围内唯一用户名。 |
| 用户密码 | password | String | 用户登录环信使用的密码。 |
2.3.4、获取管理员权限
环信提供的 REST API 需要权限才能访问,权限通过发送 HTTP 请求时携带 token 来体现,下面描述获取 token 的方式。说明:API 描述的时候使用到的 {APP 的 client_id} 之类的这种参数需要替换成具体的值。
重要提醒:获取 token 时服务器会返回 token 有效期,具体值参考接口返回的 expires_in 字段值。由于网络延迟等原因,系统不保证 token 在此值表示的有效期内绝对有效,如果发现 token 使用异常请重新获取新的 token,比如“http response code”返回 401。另外,请不要频繁向服务器发送获取 token 的请求,同一账号发送此请求超过一定频率会被服务器封号,切记,切记!!
client_id 和 client_secret 可以在环信管理后台的 APP 详情页面看到。
HTTP Request
| post | /{org_name}/{app_name}/token |
|---|---|
Request Headers
| 参数 | 说明 |
|---|---|
| Content-Type | application/json |
Request Body
| 参数 | 说明 |
|---|---|
| grant_type | client_credentials |
| client_id | App的client_id,可在app详情页找到 |
| client_secret | App的client_secret,可在app详情页找到 |
Response Body
| 参数 | 说明 |
|---|---|
| access_token | 有效的token字符串 |
| expires_in | token 有效时间,以秒为单位,在有效期内不需要重复获取 |
| application | 当前 App 的 UUID 值 |

3、抽取环信组件
抽取环信组件到tanhua-autoconfig工程中
3.1、编写HuanXinTemplate
@Slf4j
public class HuanXinTemplate {

    private EMService service;

    public HuanXinTemplate(HuanXinProperties properties) {
        EMProperties emProperties = EMProperties.builder()
                .setAppkey(properties.getAppkey())
                .setClientId(properties.getClientId())
                .setClientSecret(properties.getClientSecret())
                .build();
        service = new EMService(emProperties);
    }

    //创建环信用户
    public Boolean createUser(String username,String password) {
        try {
            //创建环信用户
            service.user().create(username.toLowerCase(), password)
                    .block();
            return true;
        }catch (Exception e) {
            e.printStackTrace();
            log.error("创建环信用户失败~");
        }
        return false;
    }

    //添加联系人
    public Boolean addContact(String username1,String username2) {
        try {
            //创建环信用户
            service.contact().add(username1,username2)
                    .block();
            return true;
        }catch (Exception e) {
            log.error("添加联系人失败~");
        }
        return false;
    }

    //删除联系人
    public Boolean deleteContact(String username1,String username2) {
        try {
            //创建环信用户
            service.contact().remove(username1,username2)
                    .block();
            return true;
        }catch (Exception e) {
            log.error("删除联系人失败~");
        }
        return false;
    }

    //发送消息
    public Boolean sendMsg(String username,String content) {
        try {
            //接收人用户列表
            Set<String> set = CollUtil.newHashSet(username);
            //文本消息
            EMTextMessage message = new EMTextMessage().text(content);
            //发送消息  from:admin是管理员发送
            service.message().send("admin","users",
                    set,message,null).block();
            return true;
        }catch (Exception e) {
            log.error("删除联系人失败~");
        }
        return false;
    }
}
3.2、编写Properties对象
@Configuration
@ConfigurationProperties(prefix = "tanhua.huanxin")
@Data
public class HuanXinProperties {

    private String appkey;
    private String clientId;
    private String clientSecret;

}
3.3、配置
tanhua-app-server工程的application.yml文件加入配置如下
tanhua:
  huanxin:
    appkey: 1110201018107234#tanhua
    clientId: YXA6nxJJ_pdEQ_eYUlqcRicS4w
    clientSecret: YXA6GMUxVEZhAvxlMn4OvHSXbWuEUTE
3.4、测试
@RunWith(SpringRunner.class)
@SpringBootTest
public class HuanXinTest {

    @Autowired
    private HuanXinTemplate template;

    @Test
    public void testRegister() {
        template.createUser("user01","123456");
    }
}
4、用户体系集成
将用户体系集成的逻辑写入到tanhua-server系统中。
-
探花用户注册时需要将用户信息注册到环信系统中
-
对于老数据:编写单元测试方法批量的注册到环信
-
对于新用户:改造代码(用户注册的时候,自动注册到环信)
-
-
APP从服务端获取当前用户的环信用户密码,自动登入环信系统
-
编写一个接口,获取当前用户在环信的用户名密码
-
-
APP自动获取环信服务器发送的信息数据
4.1、注册环信用户
在用户登录逻辑中,当第一次注册时,将用户信息注册到环信
/**
 * 验证登录
 * @param phone
 * @param code
 */
public Map loginVerification(String phone, String code) {
    //1、从redis中获取下发的验证码
    String redisCode = redisTemplate.opsForValue().get("CHECK_CODE_" + phone);
    //2、对验证码进行校验(验证码是否存在,是否和输入的验证码一致)
    if(StringUtils.isEmpty(redisCode) || !redisCode.equals(code)) {
        //验证码无效
        throw new BusinessException(ErrorResult.loginError());
    }
    //3、删除redis中的验证码
    redisTemplate.delete("CHECK_CODE_" + phone);
    //4、通过手机号码查询用户
    User user = userApi.findByMobile(phone);
    boolean isNew = false;
    //5、如果用户不存在,创建用户保存到数据库中
    if(user == null) {
        user = new User();
        user.setMobile(phone);
        user.setPassword(DigestUtils.md5Hex("123456"));
        Long userId = userApi.save(user);
        user.setId(userId);
        isNew = true;

        //注册环信用户
        String hxUser = "hx"+user.getId();
        Boolean create = huanXinTemplate.createUser(hxUser, Constants.INIT_PASSWORD);
        if(create) {
            user.setHxUser(hxUser);
            user.setHxPassword(Constants.INIT_PASSWORD);
            userApi.update(user);
        }
    }
    //6、通过JWT生成token(存入id和手机号码)
    Map tokenMap = new HashMap();
    tokenMap.put("id",user.getId());
    tokenMap.put("mobile",phone);
    String token = JwtUtils.getToken(tokenMap);
    //7、构造返回值
    Map retMap = new HashMap();
    retMap.put("token",token);
    retMap.put("isNew",isNew);

    return retMap;
}
4.2、查询环信用户信息
在app中,用户登录后需要根据用户名密码登录环信,由于用户名密码保存在后台,所以需要提供接口进行返回。
4.2.1 API接口
api地址:http://192.168.136.160:3000/project/19/interface/api/85

4.2.2 vo对象
import lombok.AllArgsConstructor;
import lombok.Data;
import lombok.NoArgsConstructor;

@Data
@NoArgsConstructor
@AllArgsConstructor
public class HuanXinUserVo {
    private String username;
    private String password;
}
4.2.3 代码实现
编写HuanXinController实现:
4.3、环信用户ID查询用户信息
在好友聊天时,完全基于环信服务器实现。为了更好的页面效果,需要展示出用户的基本信息,这是需要通过环信用户id查询用户。
MessagesController
@RestController
@RequestMapping("/messages")
public class MessagesController {

    @Autowired
    private MessagesService messagesService;

    @GetMapping("/userinfo")
    public ResponseEntity userinfo(String huanxinId) {
       UserInfoVo vo = messagesService.findUserInfoByHuanxin(huanxinId);
        return ResponseEntity.ok(vo);
    }
}
MessagesService
@Service
public class MessagesService {

    @DubboReference
    private UserApi userApi;

    @DubboReference
    private UserInfoApi userInfoApi;

    @DubboReference
    private FriendApi friendApi;

    @Autowired
    private HuanXinTemplate huanXinTemplate;

    /**
     * 根据环信id查询用户详情
     */
    public UserInfoVo findUserInfoByHuanxin(String huanxinId) {
        //1、根据环信id查询用户
        User user = userApi.findByHuanxin(huanxinId);
        //2、根据用户id查询用户详情
        UserInfo userInfo = userInfoApi.findById(user.getId());
        UserInfoVo vo = new UserInfoVo();
        BeanUtils.copyProperties(userInfo,vo); //copy同名同类型的属性
        if(userInfo.getAge() != null) {
            vo.setAge(userInfo.getAge().toString());
        }
        return vo;
    }
}
4.4、发送消息给客户端
目前已经完成了用户体系的对接,下面我们进行测试发送消息,场景是这样的:

点击“聊一下”,就会给对方发送一条陌生人信息,这个消息由系统发送完成。
我们暂时通过环信的控制台进行发送:
消息内容:
{"userId":106,"huanXinId":"hx106","nickname":"黑马小妹","strangerQuestion":"你喜欢去看蔚蓝的大海还是去爬巍峨的高山?","reply":"我喜欢秋天的落叶,夏天的泉水,冬天的雪地,只要有你一切皆可~"}


可以看到已经接收到了消息。
4.5、数据处理
针对新注册用户已经可以同步到环信服务器,而老数据需要程序员手动处理。
注意:使用测试账号最多支持100个用户
@Test
    public void register() {
        for (int i = 1; i < 106; i++) {
            User user = userApi.findById(Long.valueOf(i));
            if(user != null) {
                Boolean create = template.createUser("hx" + user.getId(), Constants.INIT_PASSWORD);
                if (create){
                    user.setHxUser("hx" + user.getId());
                    user.setHxPassword(Constants.INIT_PASSWORD);
                    userApi.update(user);
                }
            }
        }
    }
5、联系人管理
涵盖了系统业务:
-
查看感兴趣的用户,点击“聊一下”,查看陌生人问题
-
回答陌生人问题,会给感兴趣的用户发送一条消息(发送的添加好友的请求)
-
对方获取一条消息(服务端发送)
-
-
对方查看消息:如果两个投缘(点击聊一下,双方加为好友)
-
将好友关系记录到探花的MongoDB数据库中
-
将好友关系记录到环信
-
-
成为好友后,可以查看好友列表
-
对目标好友发送消息(和服务端无关)
5.1、查看用户详情
在首页可以查看感兴趣人的详细资料。点击“聊一下”,可以查看对方的问题
5.1.1、mock接口
地址:http://192.168.136.160:3000/project/19/interface/api/103

5.1.2、TanhuaController
/**
 * 查看佳人详情
 */
@GetMapping("/{id}/personalInfo")
public ResponseEntity personalInfo(@PathVariable("id") Long userId) {
    TodayBest best = tanhuaService.personalInfo(userId);
    return ResponseEntity.ok(best);
}
5.1.3、TanhuaService
//查看佳人详情
public TodayBest personalInfo(Long userId) {
    //1、根据用户id查询,用户详情
    UserInfo userInfo = userInfoApi.findById(userId);
    //2、根据操作人id和查看的用户id,查询两者的推荐数据
    RecommendUser user = recommendUserApi.queryByUserId(userId,UserHolder.getUserId());
    //3、构造返回值
    return TodayBest.init(userInfo,user);
}
5.1.4、API接口和实现类
RecommendUserApi和RecommendUserApiImpl编写查询用户缘分值方法
@Override
public RecommendUser queryByUserId(Long userId, Long toUserId) {
    Criteria criteria = Criteria.where("toUserId").is(toUserId).and("userId").is(userId);
    Query query = Query.query(criteria);
    RecommendUser user = mongoTemplate.findOne(query, RecommendUser.class);
    if(user == null) {
        user = new RecommendUser();
        user.setUserId(userId);
        user.setToUserId(toUserId);
        //构建缘分值
        user.setScore(95d);
    }
    return user;
}
5.2、查看陌生人消息
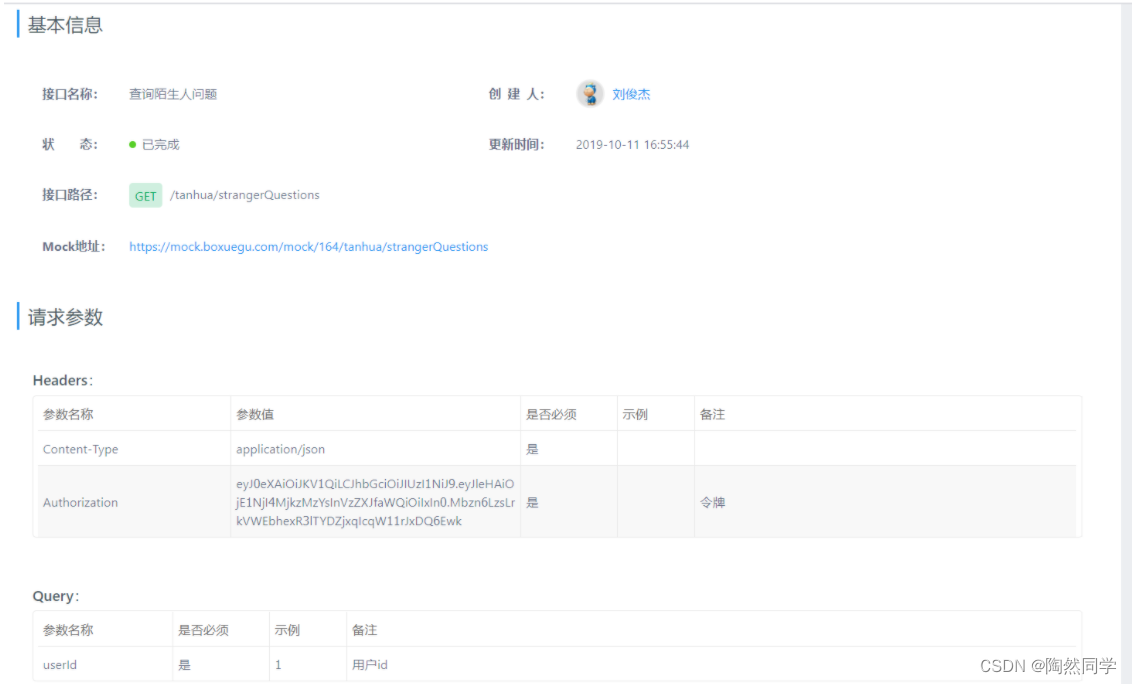
点击“聊一下”,可以查看对方的问题
5.2.1、mock接口
地址:http://192.168.136.160:3000/project/19/interface/api/124
5.2.2、TanhuaController
/**
 * 查看陌生人问题
 */
@GetMapping("/strangerQuestions")
public ResponseEntity strangerQuestions(Long userId) {
    String questions = tanhuaService.strangerQuestions(userId);
    return ResponseEntity.ok(questions);
}
5.2.3、TanhuaService
//查看陌生人问题
public String strangerQuestions(Long userId) {
    Question question = questionApi.findByUserId(userId);
    return question == null ? "你喜欢java编程吗?" : question.getTxt();
}
5.3、回复陌生人消息
需求:
-
通过服务器端,给目标用户发送一条陌生人消息
5.3.1、mock接口
地址:http://192.168.136.160:3000/project/19/interface/api/106

5.3.2、TanhuaController
/**
 * 回复陌生人问题
 */
@PostMapping("/strangerQuestions")
public ResponseEntity replyQuestions(@RequestBody Map map) {
    //前端传递的userId:是Integer类型的
    String obj = map.get("userId").toString();
    Long userId = Long.valueOf(obj);
    String reply = map.get("reply").toString();
    tanhuaService.replyQuestions(userId,reply);
    return ResponseEntity.ok(null);
}
5.3.3、TanhuaService
创建TanhuaService并编写方法,完成回复陌生人消息功能
{"userId":106,"huanXinId":"hx106","nickname":"黑马小妹","strangerQuestion":"你喜欢去看蔚蓝的大海还是去爬巍峨的高山?","reply":"我喜欢秋天的落叶,夏天的泉水,冬天的雪地,只要有你一切皆可~"}
//回复陌生人问题
public void replyQuestions(Long userId, String reply) {
    //1、构造消息数据
    Long currentUserId = UserHolder.getUserId();
    UserInfo userInfo = userInfoApi.findById(currentUserId);
    Map map = new HashMap();
    map.put("userId",currentUserId);
    map.put("huanXinId", Constants.HX_USER_PREFIX+currentUserId);
    map.put("nickname",userInfo.getNickname());
    map.put("strangerQuestion",strangerQuestions(userId));
    map.put("reply",reply);
    String message = JSON.toJSONString(map);
    //2、调用template对象,发送消息
    Boolean aBoolean = template.sendMsg(Constants.HX_USER_PREFIX + userId, message);//1、接受方的环信id,2、消息
    if(!aBoolean) {
        throw  new BusinessException(ErrorResult.error());
    }
}
5.4、添加联系人
用户获取陌生人消息后,点击“聊一下”,就会成为联系人(好友)。
实现:
-
将好友写入到MongoDB中
-
将好友关系注册到环信
5.4.1、mock接口
地址: http://192.168.136.160:3000/project/19/interface/api/205

5.4.2、定义MessagesController
/**
 * 添加好友
 */
@PostMapping("/contacts")
public ResponseEntity contacts(@RequestBody Map map) {
    Long friendId = Long.valueOf(map.get("userId").toString());
    messagesService.contacts(friendId);
    return ResponseEntity.ok(null);
}
5.4.3、编写Service方法
MessageService补充添加联系人方法
//添加好友关系
public void contacts(Long friendId) {
    //1、将好友关系注册到环信
    Boolean aBoolean = huanXinTemplate.addContact(Constants.HX_USER_PREFIX + UserHolder.getUserId(),
            Constants.HX_USER_PREFIX + friendId);
    if(!aBoolean) {
        throw new BusinessException(ErrorResult.error());
    }
    //2、如果注册成功,记录好友关系到mongodb
    friendApi.save(UserHolder.getUserId(),friendId);
}
5.4.4、dubbo服务
创建FriendApi和FriendApiImpl并编写添加好友的方法
FriendApiImpl实现类
@Override
public void save(Long userId, Long friendId) {
    //1、保存自己的好友数据
    Query query1 = Query.query(Criteria.where("userId").is(userId).and("frinedId").is(friendId));
    //1.1 判断好友关系是否存在
    if(!mongoTemplate.exists(query1, Friend.class)) {
        //1.2 如果不存在,保存
        Friend friend1 = new Friend();
        friend1.setUserId(userId);
        friend1.setFriendId(friendId);
        friend1.setCreated(System.currentTimeMillis());
        mongoTemplate.save(friend1);
    }
    //2、保存好友的数据
    Query query2 = Query.query(Criteria.where("userId").is(friendId).and("frinedId").is(userId));
    //2.1 判断好友关系是否存在
    if(!mongoTemplate.exists(query2, Friend.class)) {
        //2.2 如果不存在,保存
        Friend friend1 = new Friend();
        friend1.setUserId(friendId);
        friend1.setFriendId(userId);
        friend1.setCreated(System.currentTimeMillis());
        mongoTemplate.save(friend1);
    }
}
5.4.5、测试


可以看到好友已经添加成功。
5.5、联系人列表
联系人列表:分页查询好友列表数据 (tanhua-users:好友关系表)
5.5.1、mock接口
地址:http://192.168.136.160:3000/project/19/interface/api/202

响应数据结构:

5.5.2、定义ContactVo
package com.tanhua.domain.vo;

import lombok.AllArgsConstructor;
import lombok.Data;
import lombok.NoArgsConstructor;

import java.io.Serializable;

@Data
@NoArgsConstructor
@AllArgsConstructor
public class ContactVo implements Serializable {

    private Long id;
    private String userId;
    private String avatar;
    private String nickname;
    private String gender;
    private Integer age;
    private String city;

    public static ContactVo init(UserInfo userInfo) {
        ContactVo vo = new ContactVo();
        if(userInfo != null) {
        	BeanUtils.copyProperties(userInfo,vo);
        	vo.setUserId("hx"+userInfo.getId().toString());
        }
        return vo;
    }
}
5.5.3、编写MessagesController
在MessagesController中添加查询联系人列表方法
/**
 * 分页查询联系人列表
 */
@GetMapping("/contacts")
public ResponseEntity contacts(@RequestParam(defaultValue = "1") Integer page,
                               @RequestParam(defaultValue = "10") Integer pagesize,
                               String keyword) {
    PageResult pr = messagesService.findFriends(page,pagesize,keyword);
    return ResponseEntity.ok(pr);
}
5.5.4、编写Service
在MessageService中添加查询联系人方法
//分页查询联系人列表
public PageResult findFriends(Integer page, Integer pagesize, String keyword) {
    //1、调用API查询当前用户的好友数据 -- List<Friend>
    List<Friend> list = friendApi.findByUserId(UserHolder.getUserId(),page,pagesize);
    if(CollUtil.isEmpty(list)) {
        return new PageResult();
    }
    //2、提取数据列表中的好友id
    List<Long> userIds = CollUtil.getFieldValues(list, "friendId", Long.class);
    //3、调用UserInfoAPI查询好友的用户详情
    UserInfo info = new UserInfo();
    info.setNickname(keyword);
    Map<Long, UserInfo> map = userInfoApi.findByIds(userIds, info);
    //4、构造VO对象
    List<ContactVo> vos = new ArrayList<>();
    for (Friend friend : list) {
        UserInfo userInfo = map.get(friend.getFriendId());
        if(userInfo != null) {
            ContactVo vo = ContactVo.init(userInfo);
            vos.add(vo);
        }
    }
    return new PageResult(page,pagesize,0l,vos);
}
5.5.5、dubbo服务
在FriendApi和FriendApiImpl中添加分页查询方法
@Override
public List<Friend> findByUserId(Long userId, Integer page, Integer pagesize) {
    Criteria criteria = Criteria.where("userId").is(userId);
    Query query = Query.query(criteria).skip((page - 1) * pagesize).limit(pagesize)
            .with(Sort.by(Sort.Order.desc("created")));
    return mongoTemplate.find(query,Friend.class);
}