文章目录
- 前言
- 一、用户权限和菜单列表数据
- 二、pinia存储数据状态共享
- 1.创建存储用户详情的user.ts文件
- 2.创建存储用户菜单和权限的menus.ts文件
- 三、设置动态路由
- 1.在router文件夹下面创建routers.ts文件
- 2.设置前置路由守卫
- 3.左侧导航菜单
前言
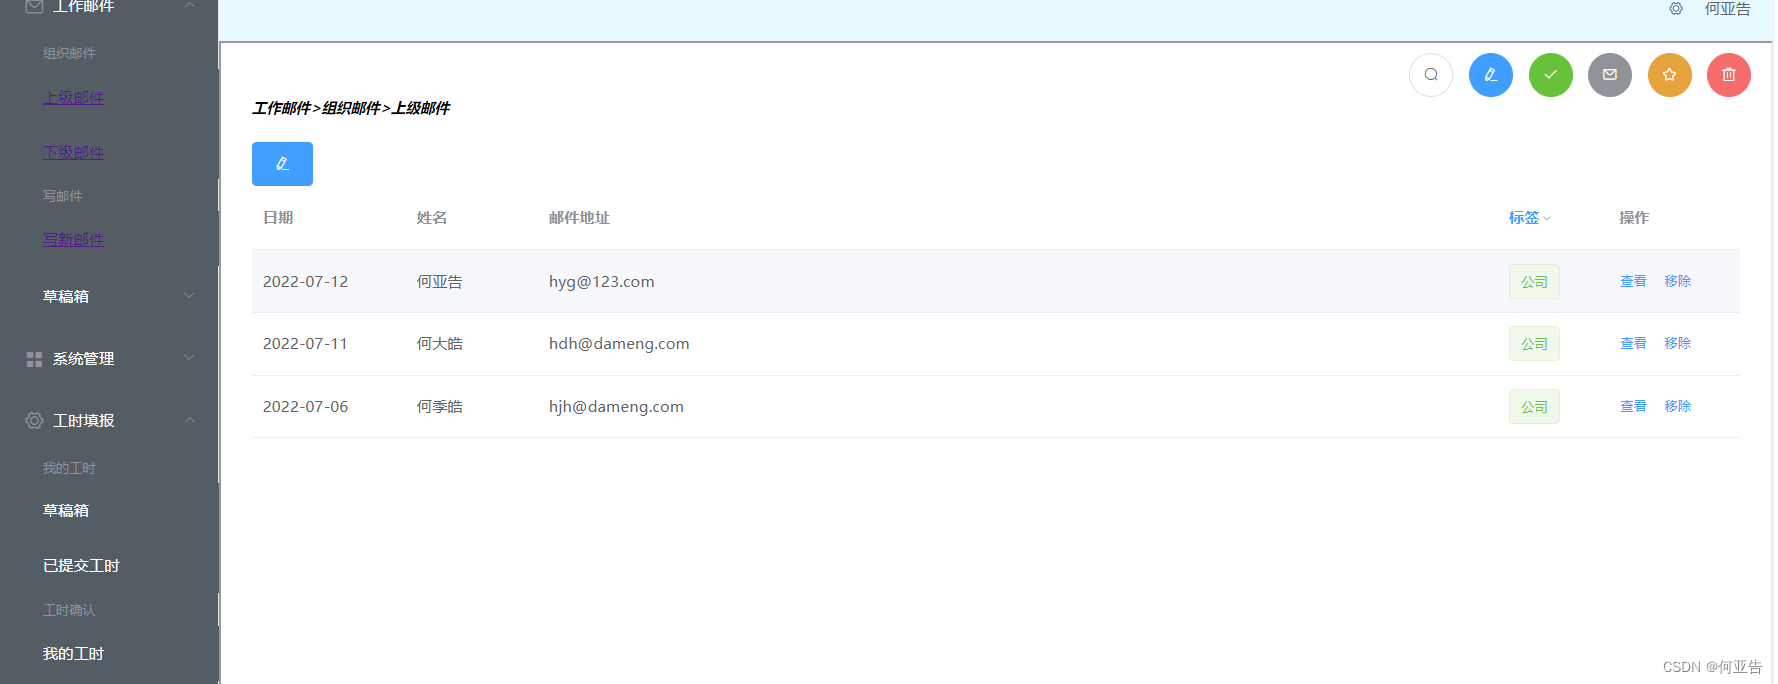
最近在做一个通用后台管理系统的框架,通过用户登录拿取用户的权限和菜单列表数据来动态添加路由,使不同用户的显示不同左侧菜单列表。这篇文章主要是讲述通过vue3+router+pinia技术栈设置动态路由菜单。
🚀效果

💥目录

一、用户权限和菜单列表数据
用户登录后拿取token,请求api/sysMenu/nav接口获取的数据。如果没有后端也可以使用mock去模拟数据,这里主要讲实现思路。
{
  "code": 200,
  "msg": "操作成功",
  "data": {
    "nav": [
      {
        "id": 1,
        "title": "系统管理",
        "icon": "el-icon-s-operation",
        "path": "",
        "name": "sys:manage",
        "component": "",
        "children": [
          {
            "id": 2,
            "title": "用户管理",
            "icon": "el-icon-s-custom",
            "path": "/sys/users",
            "name": "sys:user:list",
            "component": "sys/User",
            "children": [
              {
                "id": 9,
                "title": "添加用户",
                "icon": null,
                "path": null,
                "name": "sys:user:save",
                "component": null,
                "children": []
              },
              {
                "id": 10,
                "title": "修改用户",
                "icon": null,
                "path": null,
                "name": "sys:user:update",
                "component": null,
                "children": []
              },
              {
                "id": 11,
                "title": "删除用户",
                "icon": null,
                "path": null,
                "name": "sys:user:delete",
                "component": null,
                "children": []
              },
              {
                "id": 12,
                "title": "分配角色",
                "icon": null,
                "path": null,
                "name": "sys:user:role",
                "component": null,
                "children": []
              },
              {
                "id": 13,
                "title": "重置密码",
                "icon": null,
                "path": null,
                "name": "sys:user:repass",
                "component": null,
                "children": []
              }
            ]
          },
          {
            "id": 3,
            "title": "角色管理",
            "icon": "el-icon-rank",
            "path": "/sys/roles",
            "name": "sys:role:list",
            "component": "sys/Role",
            "children": [
              {
                "id": 7,
                "title": "添加角色",
                "icon": "",
                "path": "",
                "name": "sys:role:save",
                "component": "",
                "children": []
              },
              {
                "id": 14,
                "title": "修改角色",
                "icon": null,
                "path": null,
                "name": "sys:role:update",
                "component": null,
                "children": []
              },
              {
                "id": 15,
                "title": "删除角色",
                "icon": null,
                "path": null,
                "name": "sys:role:delete",
                "component": null,
                "children": []
              },
              {
                "id": 16,
                "title": "分配权限",
                "icon": null,
                "path": null,
                "name": "sys:role:perm",
                "component": null,
                "children": []
              }
            ]
          },
          {
            "id": 4,
            "title": "菜单管理",
            "icon": "el-icon-menu",
            "path": "/sys/menus",
            "name": "sys:menu:list",
            "component": "sys/Menu",
            "children": [
              {
                "id": 17,
                "title": "添加菜单",
                "icon": null,
                "path": null,
                "name": "sys:menu:save",
                "component": null,
                "children": []
              },
              {
                "id": 18,
                "title": "修改菜单",
                "icon": null,
                "path": null,
                "name": "sys:menu:update",
                "component": null,
                "children": []
              },
              {
                "id": 19,
                "title": "删除菜单",
                "icon": null,
                "path": null,
                "name": "sys:menu:delete",
                "component": null,
                "children": []
              }
            ]
          }
        ]
      },
      {
        "id": 5,
        "title": "系统工具",
        "icon": "el-icon-s-tools",
        "path": "",
        "name": "sys:tools",
        "component": null,
        "children": [
          {
            "id": 6,
            "title": "数字字典",
            "icon": "el-icon-s-order",
            "path": "/sys/dicts",
            "name": "sys:dict:list",
            "component": "sys/Dict",
            "children": []
          }
        ]
      },
      {
        "id": 20,
        "title": "管理员",
        "icon": null,
        "path": null,
        "name": "sys:user",
        "component": "sys/Normal",
        "children": []
      }
    ],
    "authoritys": [
      "ROLE_admin",
      "ROLE_normal",
      "sys:manage",
      "sys:user:list",
      "sys:role:list",
      "sys:menu:list",
      "sys:tools",
      "sys:dict:list",
      "sys:role:save",
      "sys:user:save",
      "sys:user:update",
      "sys:user:delete",
      "sys:user:role",
      "sys:user:repass",
      "sys:role:update",
      "sys:role:delete",
      "sys:role:perm",
      "sys:menu:save",
      "sys:menu:update",
      "sys:menu:delete",
      "sys:user"
    ]
  }
}
二、pinia存储数据状态共享
tips: pinia的引入去官网看看就能上手
1.创建存储用户详情的user.ts文件
// @src/store/user.ts
import { defineStore } from 'pinia'
import { logout } from '@/api/user'
import { ref } from 'vue';

export const useUserStore = defineStore('user', () => {
  const token = ref("")
  const userInfo = ref({} as UserInfo)
  function SET_TOKEN(name: string) {
    token.value = name
    localStorage.setItem("token", name)
  }
  function SET_INFO(user: UserInfo) {
    userInfo.value = user
  }
  async function remove() {
    await logout()
    localStorage.clear()
    sessionStorage.clear()
    SET_INFO({} as UserInfo)
  }

  return {
    persist: true,
    token,
    userInfo,
    remove,
    SET_TOKEN,
    SET_INFO
  }
})
2.创建存储用户菜单和权限的menus.ts文件
// @src/store/menus.ts
import { defineStore } from 'pinia'
import { ref } from 'vue';

export const useMeanStore =  defineStore('mean', () => {
  // 菜单数据
  const menuList = ref([])
  // 权限数据
  const permList = ref([])
  const hasRoute = ref(false)


  function changeRouteStatus(state: any) {
    hasRoute.value = state
    sessionStorage.setItem("hasRoute", state)
  }
  function setMenuList(menus: any) {
    menuList.value = menus
  }
 function setPermList(authoritys: any) {
    permList.value = authoritys
  }
  return {
    menuList,
    permList,
    hasRoute,
    changeRouteStatus,
    setMenuList,
    setPermList
  }
})
三、设置动态路由
1.在router文件夹下面创建routers.ts文件
提示:main.ts文件下导入 import router from '@/router/routers' 然后挂载实例app.use(router)
import { createRouter, createWebHistory, RouteRecordRaw } from 'vue-router';
import Index from '../views/Index.vue'
import Layout from '../layout/index.vue'
import { nav } from '@/api/system/menu'
import { useMeanStore } from '@/store/menus'

const routes: Array<RouteRecordRaw> = [
  {
    path: '/login',
    name: 'Login',
    meta: {
      title: '登录',
      keepAlive: true,
      requireAuth: false
    },
    component: () => import('@/views/login.vue')
  },
  {
    path: '/redirect',
    name: 'Redirect',
    component: Layout,
    children: [
      {
        path: '/index',
        name: 'Index',
        meta: {
          title: "首页"
        },
        component: Index
      },
    ]
  },
  {
    path: '/',
    component: Layout,
    redirect: '/dashboard',
    children: [
      {
        path: 'dashboard',
        component: Index,
        name: 'Dashboard',
        meta: { title: '首页', icon: 'index', affix: true, noCache: true }
      }
    ]
  }
]

const router = createRouter({
  history: createWebHistory(),
  routes
})

export default router
2.设置前置路由守卫
- beforeEach有三个参数
to: 即将要进入的目标、from: 当前导航正要离开的路由、可选的第三个参数 next:进入下一个目标,beforeEach个人理解是一个路由过滤器,在路由前进行判断的处理。
// @router/routers.ts 中添加前置路由守卫
router.beforeEach((to, from, next) => {
  let token = localStorage.getItem("token")
  // 注意:在beforeEach中调用pinia存储的菜单状态是为了避免` Did you forget to install pinia?`这个bug
  const useMean = useMeanStore()
  console.log('hasRoute', useMean.hasRoute)
  if (to.path == '/login') {
    console.log("login!!!!!!!!!!!")
    next()
  } else if (!token) {
    console.log("还没有token!!!")
    next({path: "/login"})
  } else if (to.path == '/' || to.path == '') {
    next({path: '/'})
  } else if (!useMean.hasRoute) {
    nav().then(res => {
      useMean.setMenuList(res.data.nav)
      useMean.setPermList(res.data.authoritys)
      res.data.nav.forEach((menu: { children: any[]; }) => {
        if (menu.children) {
          menu.children.forEach((e: any) => {
            if (!e.component) {
              return
            }
            let route:any = {
              name: e.name,
              path: e.path,
              meta: {
                icon: e.icon,
                title: e.title
              },
              component: () =>import('../views/' + e.component+'.vue')
            }
            router.addRoute("Redirect", route)
          })
        }
      })
    })
    useMean.changeRouteStatus(true)
    next({path: to.path})
  } else {
    console.log("已经有路由了------------")
    next()
  }
})
✨完整@router/routers.ts代码
import { createRouter, createWebHistory, RouteRecordRaw } from 'vue-router';
import Index from '../views/Index.vue'
import Layout from '../layout/index.vue'
import { nav } from '@/api/system/menu'
import { useMeanStore } from '@/store/menus'


const routes: Array<RouteRecordRaw> = [
  {
    path: '/login',
    name: 'Login',
    meta: {
      title: '登录',
      keepAlive: true,
      requireAuth: false
    },
    component: () => import('@/views/login.vue')
  },
  {
    path: '/redirect',
    name: 'Redirect',
    component: Layout,
    children: [
      {
        path: '/index',
        name: 'Index',
        meta: {
          title: "首页"
        },
        component: Index
      },
    ]
  },
  {
    path: '/',
    component: Layout,
    redirect: '/dashboard',
    children: [
      {
        path: 'dashboard',
        component: Index,
        name: 'Dashboard',
        meta: { title: '首页', icon: 'index', affix: true, noCache: true }
      }
    ]
  }

]

const router = createRouter({
  history: createWebHistory(),
  routes
})

router.beforeEach((to, from, next) => {
  let token = localStorage.getItem("token")
  const useMean = useMeanStore()
  console.log('hasRoute', useMean.hasRoute)
  if (to.path == '/login') {
    console.log("login!!!!!!!!!!!")
    next()
  } else if (!token) {
    console.log("还没有token!!!")
    next({path: "/login"})
  } else if (to.path == '/' || to.path == '') {
    next({path: '/'})
  } else if (!useMean.hasRoute) {
    nav().then(res => {
      useMean.setMenuList(res.data.nav)
      useMean.setPermList(res.data.authoritys)
      res.data.nav.forEach((menu: { children: any[]; }) => {
        if (menu.children) {
          menu.children.forEach((e: any) => {
            if (!e.component) {
              return
            }
            let route:any = {
              name: e.name,
              path: e.path,
              meta: {
                icon: e.icon,
                title: e.title
              },
              component: () =>import('../views/' + e.component +'.vue')
            }
            router.addRoute("Redirect", route)
          })
        }
      })
    })
    useMean.changeRouteStatus(true)
    next({path: to.path})
  } else {
    console.log("已经有路由了------------")
    next()
  }

})


export default router
描述:通过前置路由守卫拦截路由处理,在登录页判断是否有token,如果没有token继续去登陆,登录成功后拿取token使用pinia存储状态,再判断是否有路由hasRoute没有就请求api/sysMenu/nav接口获取的数据,添加路由并存储菜单数据和权限数据到pinia状态中共享数据。
3.左侧导航菜单
beforeEach中已经把用户菜单和权限存储到@src/store/menus.ts中,在Sidebar.vue中引用import { useMeanStore } from ‘@/store/menus’ 拿取菜单数据渲染菜单列表
<template>
    <div>
        <el-menu
            active-text-color="#ffd04b"
            background-color="#304156"
            class="el-menu-vertical-demo"
            default-active="2"
            text-color="#fff"
            @open="handleOpen"
            @close="handleClose"
        >
            <el-sub-menu default-active="Index" :index="menu.name" v-for="menu in menuList" :key="menu.name">
                <template #title>
                    <el-icon><location /></el-icon>
                    <span>{{menu.title}}</span>
                </template>
                <router-link :to="item.path" v-for="item in menu.children" :key="item.name">
                  <el-menu-item :index="item.name">
                    <template #title>
                      <i :class="item.icon"></i>
                      <span slot="title">{{item.title}}</span>
                    </template>
                  </el-menu-item>
                </router-link>
            </el-sub-menu>
        </el-menu>
    </div>
</template>

<script setup lang="ts">
import { reactive } from 'vue';
import { useMeanStore } from '@/store/menus';
import { storeToRefs } from "pinia";

const useMean = useMeanStore()
const { menuList, permList, hasRoute } = storeToRefs(useMean);
const setMenuList:any = localStorage.getItem("setMenuList")
console.log('setMenuList', menuList)

const handleOpen = (key: string, keyPath: string[]) => {
    console.log(key, keyPath);
};
const handleClose = (key: string, keyPath: string[]) => {
    console.log(key, keyPath);
};
</script>

<style lang="scss" scoped>
</style>
动态路由设置完成效果就会如上效果图
