这篇文章,主要介绍SpringBoot框架如何集成Redis数据库。
目录
一、SpringBoot集成Redis
1.1、引入依赖
1.2、配置redis连接信息
1.3、添加RedisTemplate配置类
1.4、编写测试类
1.5、运行测试
一、SpringBoot集成Redis
Redis是一个非关系型数据库,它是一个基于内存的数据,所有的操作都是在内存里面完成,所以它的执行效率非常的高,一般实际开发中,都会采用Redis数据库作为缓存组件,SpringBoot框架提供了Redis的starter启动器,下面介绍SpringBoot框架如何集成Redis。
1.1、引入依赖
- 集成Redis数据库,需要引入【spring-boot-starter-data-redis】依赖。
- 默认情况下,SpringBoot采用的lettuce客户端,所以如果想要使用jedis客户端,那就需要引入另外的依赖。
- 【jedis】客户端依赖和【commons-pool2】连接池依赖。
- 可以不写版本号,因为SpringBoot父工程里面已经定义了版本号。
<!-- 引入 父工程 依赖 -->
<parent>
    <groupId>org.springframework.boot</groupId>
    <artifactId>spring-boot-starter-parent</artifactId>
    <version>2.3.0.RELEASE</version>
</parent>

<!-- 引入 web 依赖 -->
<dependency>
    <groupId>org.springframework.boot</groupId>
    <artifactId>spring-boot-starter-web</artifactId>
</dependency>

<!-- 引入 redis 依赖 -->
<dependency>
    <groupId>org.springframework.boot</groupId>
    <artifactId>spring-boot-starter-data-redis</artifactId>
    <!-- 排除 lettuce 依赖 -->
    <exclusions>
        <exclusion>
            <groupId>io.lettuce</groupId>
            <artifactId>lettuce-core</artifactId>
        </exclusion>
    </exclusions>
</dependency>
<!-- 引入 jedis 客户端 -->
<dependency>
    <groupId>redis.clients</groupId>
    <artifactId>jedis</artifactId>
</dependency>
<!-- 连接池 -->
<dependency>
    <groupId>org.apache.commons</groupId>
    <artifactId>commons-pool2</artifactId>
</dependency>
查看【spring-boot-starter-data-redis】的依赖,可以看到默认采用的lettuce客户端依赖。

1.2、配置redis连接信息
引入redis依赖之后,这个时候SpringBoot还不知道具体连接哪个redis数据库,我们需要在【application.yml】配置文件里面,指定redis的连接地址相关信息,以及连接池信息。
# redis 配置信息
spring:
  redis:
    host: 127.0.0.1 # redis数据库主机地址
    port: 6379 # redis数据库端口,默认6379
    database: 0 # 选择哪个数据库,默认是0号数据库,redis右0-15个数据库可以选择
    password: root # 密码,没用密码可以不写
    jedis:
      pool: # 连接池信息
        max-active: 8 # 最大活跃连接数量
        max-idle: 8 # 最大空闲连接数量
        min-idle: 0 # 最小空闲连接数量
        max-wait: 60000 # 连接池中连接最大等待超时时间
        time-between-eviction-runs: 60000 # 空闲连接被剔除的时间间隔
1.3、添加RedisTemplate配置类
SpringBoot提供的启动器里面,给我们提供了一个RedisTemplate对象,使用这个对象可以实现Redis数据库的各种操作。一般我们在使用的时候,都会自定义Redis的序列化方式,这样写入redis数据库里面的时候,就可以看的更加直观,而不会是一些看不到的乱码。
package com.spring.boot.demo.config;

import com.fasterxml.jackson.annotation.JsonAutoDetect;
import com.fasterxml.jackson.annotation.JsonTypeInfo;
import com.fasterxml.jackson.annotation.PropertyAccessor;
import com.fasterxml.jackson.databind.ObjectMapper;
import com.fasterxml.jackson.databind.jsontype.impl.LaissezFaireSubTypeValidator;
import org.springframework.context.annotation.Bean;
import org.springframework.context.annotation.Configuration;
import org.springframework.data.redis.connection.RedisConnectionFactory;
import org.springframework.data.redis.core.RedisTemplate;
import org.springframework.data.redis.serializer.Jackson2JsonRedisSerializer;
import org.springframework.data.redis.serializer.StringRedisSerializer;

/**
 * @version 1.0.0
 * @Date: 2022/11/2 15:43
 * @Author ZhuYouBin
 * @Description RedisTemplate 配置类
 */
@Configuration
public class RedisConfig {

    @Bean
    public RedisTemplate<String, Object> redisTemplate(RedisConnectionFactory factory) {
        RedisTemplate<String, Object> redisTemplate = new RedisTemplate<>();
        redisTemplate.setConnectionFactory(factory);

        // 序列化设置
        StringRedisSerializer stringRedisSerializer = new StringRedisSerializer();
        // 设置 key 采用字符串序列化方式
        redisTemplate.setKeySerializer(stringRedisSerializer);
        redisTemplate.setHashKeySerializer(stringRedisSerializer);

        // 采用JSON序列化方式
        Jackson2JsonRedisSerializer<Object> jackson2JsonRedisSerializer = new Jackson2JsonRedisSerializer<Object>(Object.class);
        ObjectMapper objectMapper = new ObjectMapper();
        objectMapper.setVisibility(PropertyAccessor.ALL, JsonAutoDetect.Visibility.ANY);
        objectMapper.activateDefaultTyping(LaissezFaireSubTypeValidator.instance, ObjectMapper.DefaultTyping.NON_FINAL, JsonTypeInfo.As.PROPERTY);
        jackson2JsonRedisSerializer.setObjectMapper(objectMapper);

        // 设置value的序列化方式
        redisTemplate.setValueSerializer(jackson2JsonRedisSerializer);
        redisTemplate.setHashValueSerializer(jackson2JsonRedisSerializer);

        // 重新设置默认的序列化机制
        redisTemplate.afterPropertiesSet();
        return redisTemplate;
    }

}
1.4、编写测试类
- 下面这个测试类,是实现redis数据库的添加、删除、查询操作。
package com.spring.boot.demo.controller;

import org.springframework.beans.factory.annotation.Autowired;
import org.springframework.data.redis.core.RedisTemplate;
import org.springframework.data.redis.core.ValueOperations;
import org.springframework.web.bind.annotation.GetMapping;
import org.springframework.web.bind.annotation.RequestMapping;
import org.springframework.web.bind.annotation.RestController;

import java.util.Set;
import java.util.concurrent.TimeUnit;

/**
 * @version 1.0.0
 * @Date: 2022/11/3 11:04
 * @Author ZhuYouBin
 * @Description
 */
@RestController
@RequestMapping("/api/redis")
public class RedisController {

    @Autowired
    private RedisTemplate<String, Object> redisTemplate;

    @GetMapping("/set")
    public String set() {
        ValueOperations<String, Object> ops = redisTemplate.opsForValue();
        for (int i = 0; i < 6; i++) {
            ops.set("k" + i, "v" + i + "00");
        }
        ops.set("k22", "v2200", 10, TimeUnit.SECONDS);
        return "success.";
    }

    @GetMapping("/get")
    public String get() {
        Set<String> keys = redisTemplate.keys("*");
        if (keys == null || keys.size() == 0) {
            return null;
        }
        ValueOperations<String, Object> ops = redisTemplate.opsForValue();
        StringBuilder sb = new StringBuilder();
        for (String key : keys) {
            Object val = ops.get(key);
            sb.append(key)
                    .append("=")
                    .append(val)
                    .append(", ");
        }
        return sb.toString();
    }

    @GetMapping("/del")
    public String del() {
        Set<String> keys = redisTemplate.keys("*");
        if (keys == null || keys.size() == 0) {
            return null;
        }
        for (String key : keys) {
            Boolean ans = redisTemplate.delete(key);
            System.out.println(key + "删除是否成功: " + ans);
        }
        return "success.";
    }

}
1.5、运行测试
启动工程,浏览器依次访问上面三个接口地址,然后查看redis数据库。
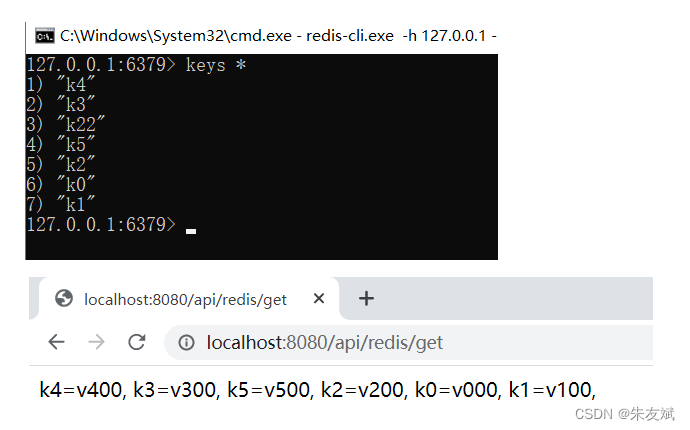
到此,SpringBoot框架集成Redis就成功啦。
综上,这篇文章结束了,主要介绍SpringBoot框架如何集成Redis数据库。





![[附源码]计算机毕业设计JAVA 宠物医院管理系统](https://img-blog.csdnimg.cn/94d247256cf14ca49790bc3a9f8c39dc.png)
