PyQt5创建打开图像及播放视频页面
上篇文章主要介绍了如何实现登录界面的账号密码注册及登录功能,还简单介绍了有关数据库的连接方法。这篇文章我们介绍一下如何在设计的页面中打开本地的图像,以及实现视频播放功能。
实现打开图像功能
为了便于记录实现细节,我们尽量一步步地来。之前的文章已经介绍过如何将新的页面与之前的页面建立连接了,这里就不再赘述,从建立新页面开始。
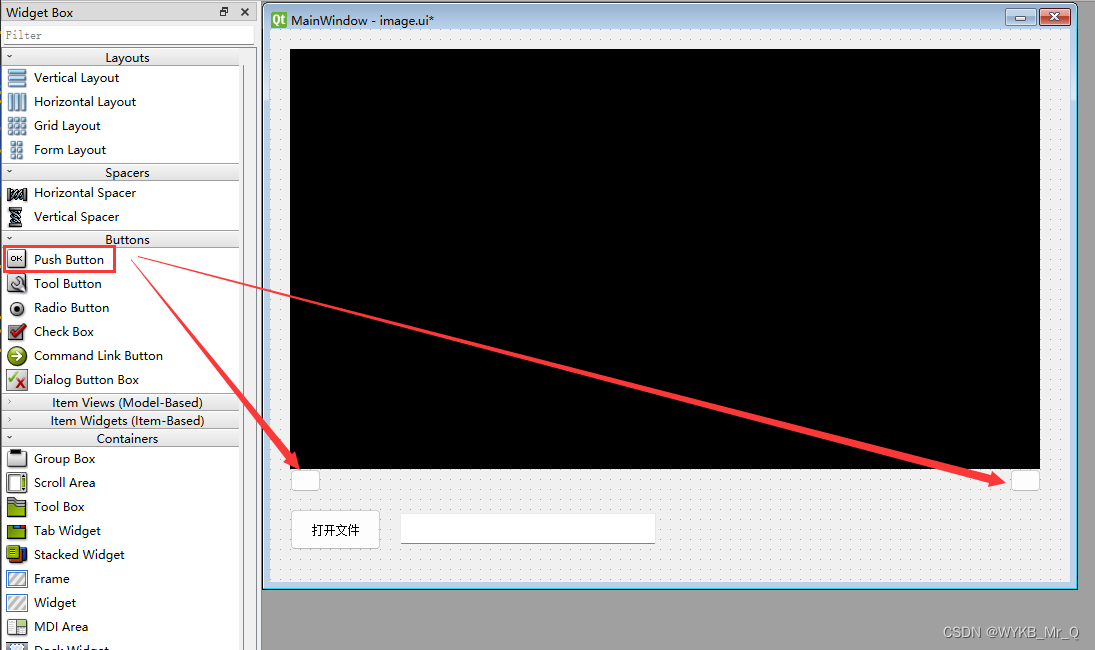
- 首先将label拖到屏幕中央,并在左侧设计成合适的宽和高,用于显示图像和视频。
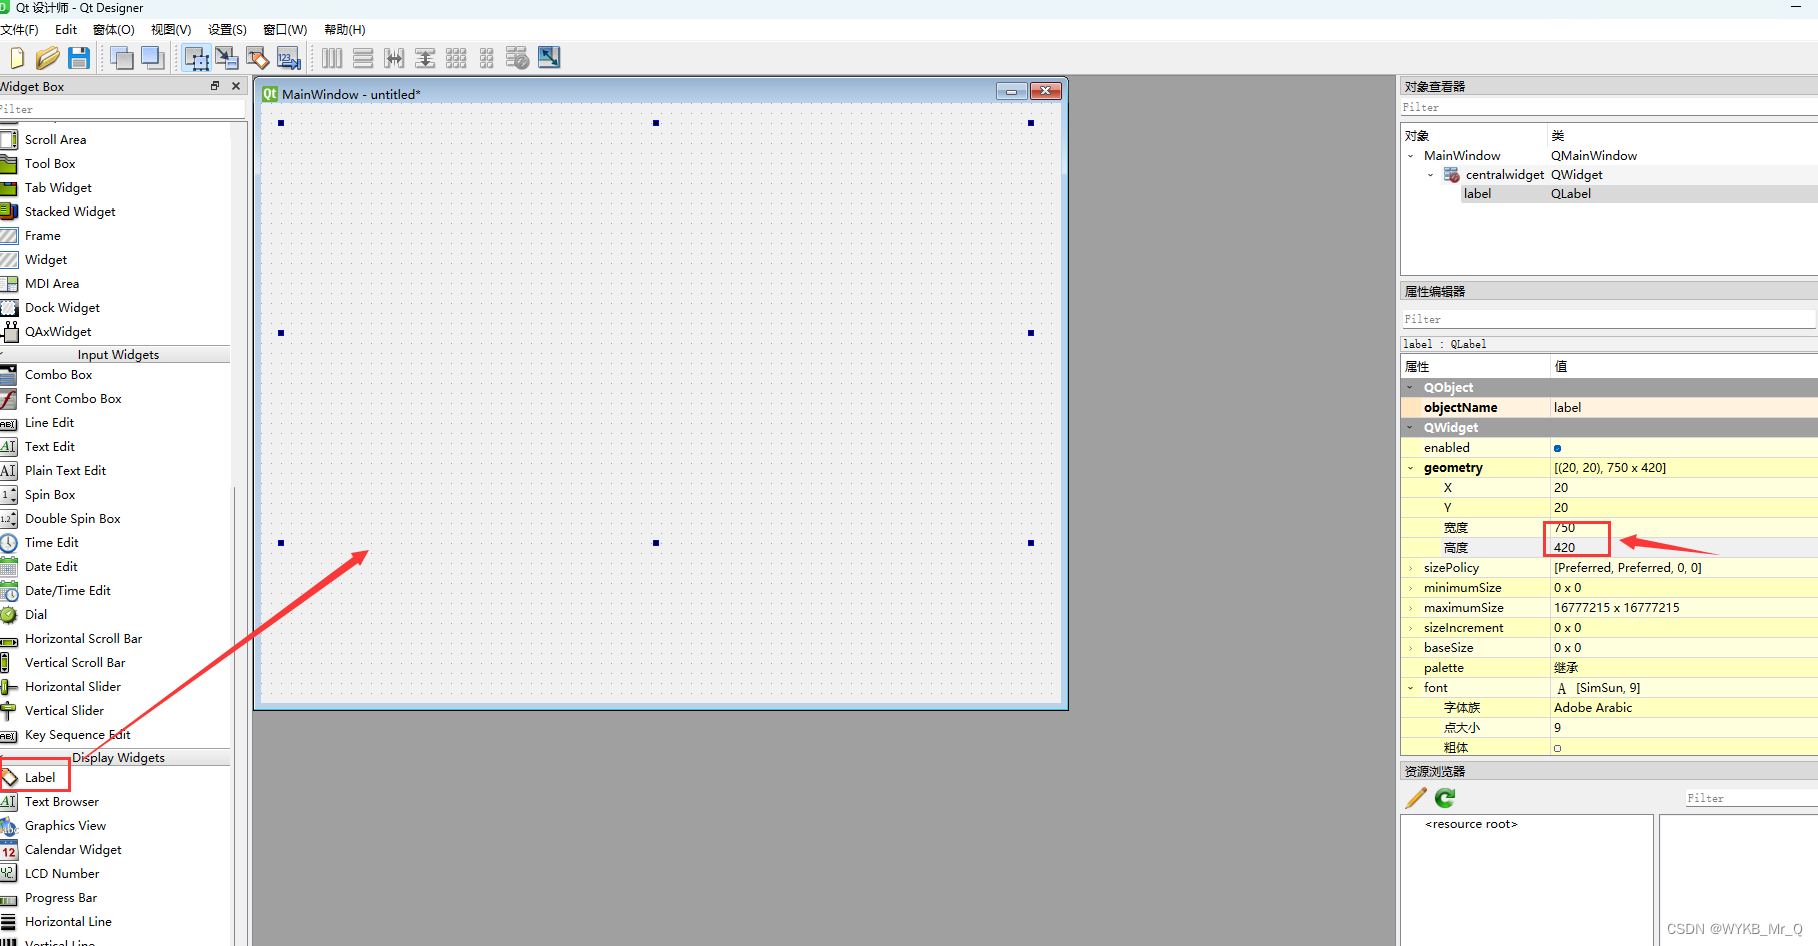
- 这个label是透明的,为了方便展示,我们为它填充个黑色,呈现出一种幕布的感觉。
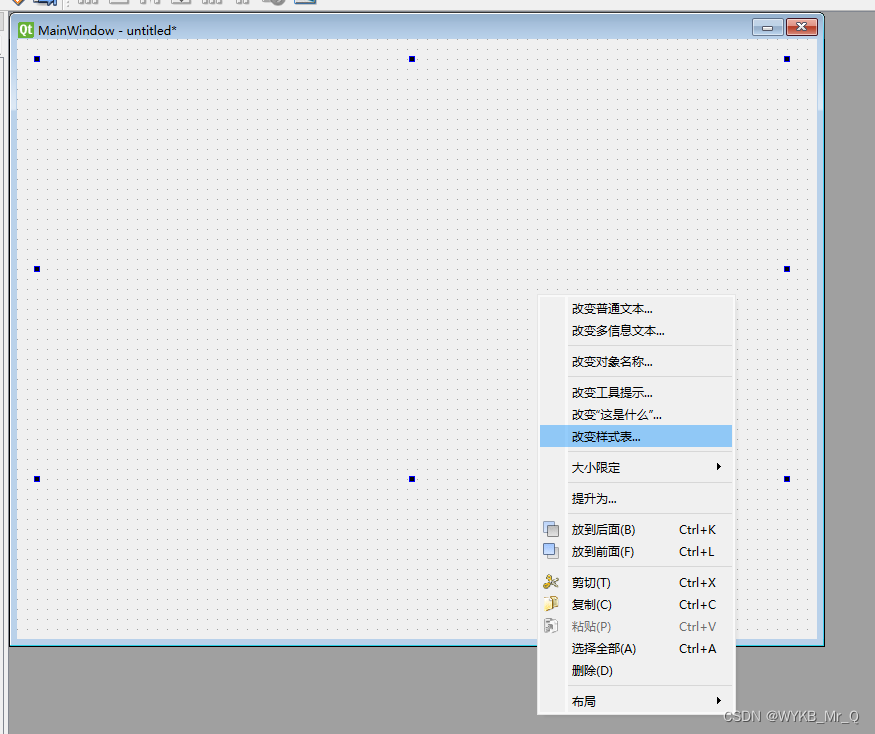
- 使用鼠标右击 label 中心,点击改变样式表;
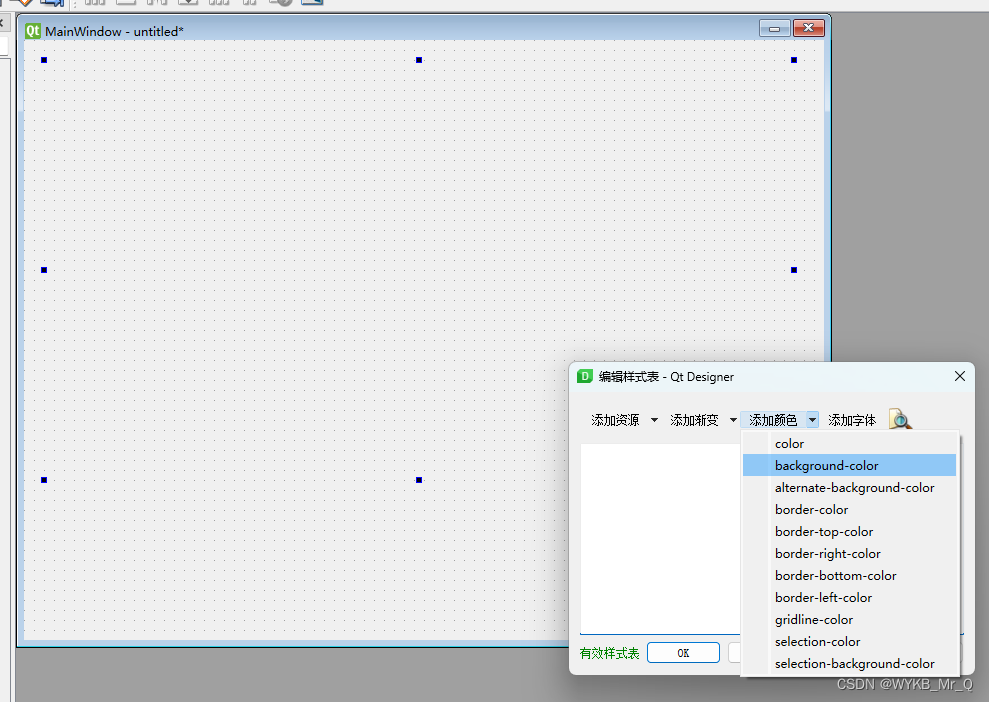
- 点击添加颜色,background-color;
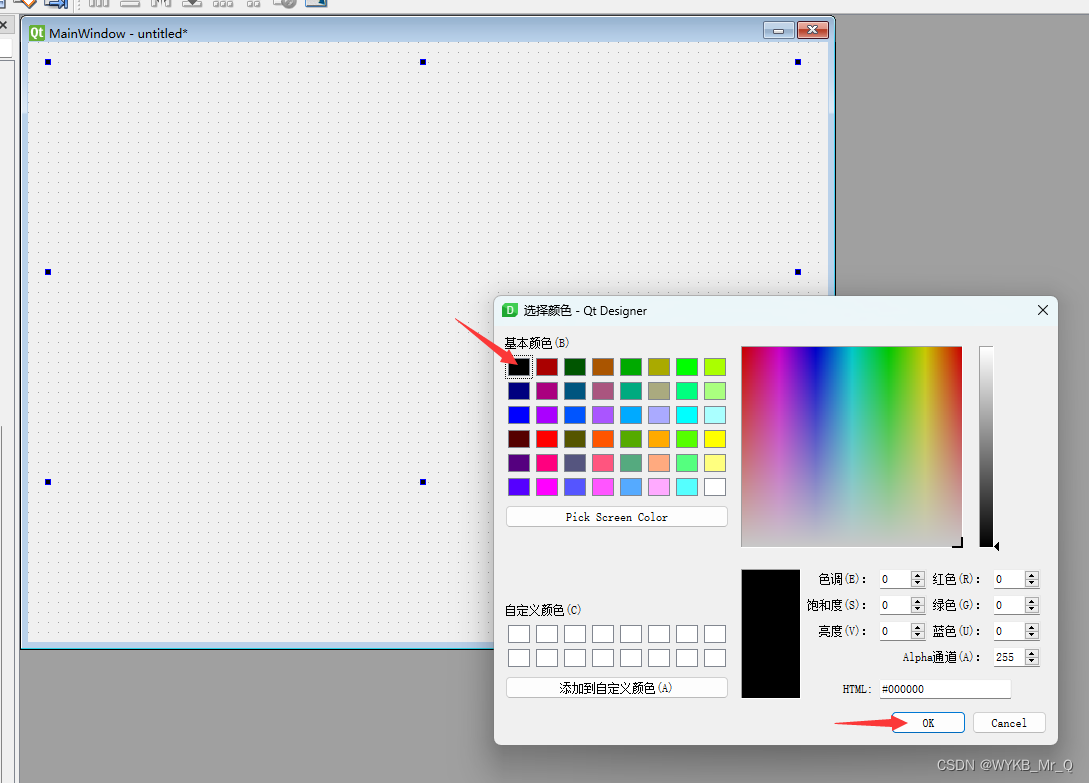
- 选择黑色,点击ok;
- 然后再点击Apply,最后点击ok。
- 之后,在下面拖入 Push Button 按钮和 Text Browser 按钮,分别用于打开本文文件,以及显示打开的路径。
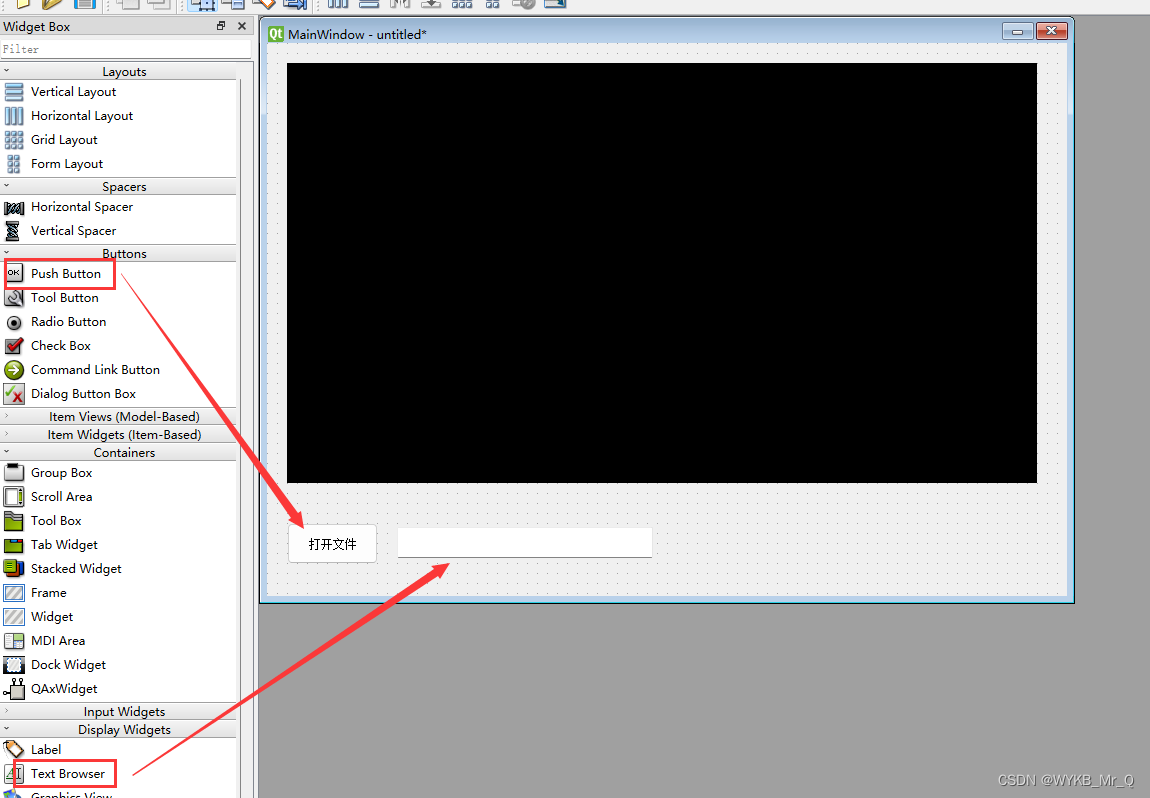
做到这里基础界面就算完成了,将其保存,并使用PyUIC工具转化为.py文件,剩下的部分就剩编写逻辑代码了。
在显示图像方面,我们主要的思想就是通过点击“打开文件”按钮,来选取本地库中的图像,并把路径显示到文本框中。self.image的取值用来判断选取的不是图像的情况。核心代码如下:
class Image_open(QMainWindow, image.Ui_MainWindow):
    def __init__(self, parent=None):
        super(Image_open, self).__init__(parent)
        # UI界面
        self.setupUi(self)
        self.pushButton.clicked.connect(self.open_image)

	def open_image(self):
		self.image = None
		# 获取图像的路径
        self.img_path = QFileDialog.getOpenFileName()[0]
        # 将路径存储到对话框中
        self.textBrowser.setText(self.img_path)
        # 可选的图像格式
        img_type = [".bmp", ".jpg", ".png", ".gif"]
        for ig in img_type:
            if ig not in self.img_path:
                continue
            else:
            	self.image = True
            	# 如果是图像文件名的话,读取图像
                img = QPixmap(self.img_path)
                # 获取图像的宽和高
                w = img.width()
                h = img.height()
                # 根据图像与label的比例,最大化图像在label中的显示
                ratio = max(w / self.label.width(), h / self.label.height())
                img.setDevicePixelRatio(ratio)
                # 图像在label中居中显示
                self.label.setAlignment(Qt.AlignCenter)
                self.label.setPixmap(img)
        if self.image is None:
            QMessageBox.information(self, "警告", "我们暂时不支持此格式的文件!", QMessageBox.Ok)
上面单独介绍了打开图像的代码,是为了方便阅读和理解。
而视频播放和打开图像的部分代码是可以共同使用的,因此下面的视频播放也会将打开图像的代码进行介绍。
实现视频播放功能
为了实现视频播放,暂停和关闭功能,我们额外增加了两个 Push Button 按钮,其中左边的那个按钮要实现本地视频的播放与暂停,右边的按钮用于实现视频的关闭。
接下来是逻辑代码部分。
可以发现我们的两个按钮上面并没有写汉字,这是为了我们在逻辑代码中给他加入标准图标。第一个按钮是播放的图标,第二个按钮是关闭的图标。
为了方便展示,我们把这些连接的设置都放在一个函数里。
 def background(self):
 		# 文件选择按钮
        self.pushButton.clicked.connect(self.open_image)
        # 视频播放图标
        self.pushButton_2.setIcon(self.style().standardIcon(QStyle.SP_MediaPlay))  # 播放图标
        self.pushButton_3.setIcon(self.style().standardIcon(QStyle.SP_MediaStop))  # 停止图标

        # 用于开始播放视频的按钮
        self.pushButton_2.clicked.connect(self.play_file) # 这是对应的函数
        # 用于关闭播放视频的按钮
        self.pushButton_3.clicked.connect(self.close_file) # 这是对应的函数

		# 当播放的为图像时,设计这两个按钮不能点击,只有当播放的是视频时,才能点击
        self.pushButton_2.setEnabled(False)
        self.pushButton_3.setEnabled(False)
重复上面的判断文件类型函数,这里我们考虑了视频及图像。
当所选文件为视频时,将播放按钮置为可使用。
def pre_judge(self):
   # 创建文件对话框,如果是视频,令self.video = True,如果是图像,令self.video = False,
   # 当self.video = None时,报错。
    self.video = None
    self.img_path = QFileDialog.getOpenFileName()[0]
    self.textBrowser.setText(self.img_path)
    video_type = [".mp4", ".mkv", ".MOV", "avi"]
    img_type = [".bmp", ".jpg", ".png", ".gif"]
    for vdi in video_type:
        if vdi not in self.img_path:
            continue
        else:
            self.video = True
            # 当是视频时,将开始按钮置为可点击状态
            self.pushButton_2.setEnabled(True)
    for ig in img_type:
        if ig not in self.img_path:
            continue
        else:
            self.video = False
            img = QPixmap(self.img_path)
            w = img.width()
            h = img.height()
            ratio = max(w / self.label.width(), h / self.label.height())
            img.setDevicePixelRatio(ratio)
            self.label.setAlignment(Qt.AlignCenter)
            self.label.setPixmap(img)
    if self.video is None:
        QMessageBox.information(self, "警告", "我们暂时不支持此格式的文件!", QMessageBox.Ok)
这里介绍如何播放视频,这里是整个的重点,也是难点。
播放视频,主要是使用其中的 QTimer 计时器,如果计时器被激活,就每隔一段时间读取一个视频帧,并显示。
我们根据计时器是否激活,将开始播放按钮置为暂停或播放,主要由 self.playing 参数控制。
import sys
from PyQt5.QtWidgets import QMessageBox, QFileDialog, QLineEdit
from PyQt5.QtGui import *
from PyQt5.QtWidgets import *
from PyQt5.QtCore import *
import mainwindow, image
import cv2
import sqlite3

### 主页面设计,略
class MainWindow(QMainWindow, mainwindow.Ui_MainWindow):
    def __init__(self, parent=None):
        super(MainWindow, self).__init__(parent)
        self.setupUi(self)
        self.image_open = Image_open()
        self.pushButton.clicked.connect(self.image_open.show)
### 未详细说明,请参考前三篇博客

class Image_open(QMainWindow, image.Ui_MainWindow):
    def __init__(self, parent=None):
        super(Image_open, self).__init__(parent)
        # UI界面
        self.setupUi(self)
        self.background()
        self.cap = cv2.VideoCapture()
        self.playing = False
        # 在label中播放视频
        self.init_timer()

	def background(self):
 		# 文件选择按钮
        self.pushButton.clicked.connect(self.pre_judge)
        # 视频播放图标
        self.pushButton_2.setIcon(self.style().standardIcon(QStyle.SP_MediaPlay))  # 播放图标
        self.pushButton_3.setIcon(self.style().standardIcon(QStyle.SP_MediaStop))  # 停止图标

        # 用于开始播放视频的按钮
        self.pushButton_2.clicked.connect(self.play_file) # 这是对应的函数
        # 用于关闭播放视频的按钮
        self.pushButton_3.clicked.connect(self.close_file) # 这是对应的函数

		# 当播放的为图像时,设计这两个按钮不能点击,只有当播放的是视频时,才能点击
        self.pushButton_2.setEnabled(False)
        self.pushButton_3.setEnabled(False)

    def pre_judge(self):
	   	# 创建文件对话框,如果是视频,令self.video = True,如果是图像,令self.video = False,
	  	# 当self.video = None时,报错。
	    self.video = None
	    self.img_path = QFileDialog.getOpenFileName()[0]
	    self.textBrowser.setText(self.img_path)
	    video_type = [".mp4", ".mkv", ".MOV", "avi"]
	    img_type = [".bmp", ".jpg", ".png", ".gif"]
	    for vdi in video_type:
	        if vdi not in self.img_path:
	            continue
	        else:
	            self.video = True
	            # 当是视频时,将开始按钮置为可点击状态
	            self.pushButton_2.setEnabled(True)
	    for ig in img_type:
	        if ig not in self.img_path:
	            continue
	        else:
	            self.video = False
	            img = QPixmap(self.img_path)
	            w = img.width()
	            h = img.height()
	            ratio = max(w / self.label.width(), h / self.label.height())
	            img.setDevicePixelRatio(ratio)
	            self.label.setAlignment(Qt.AlignCenter)
	            self.label.setPixmap(img)
	    if self.video is None:
	        QMessageBox.information(self, "警告", "我们暂时不支持此格式的文件!", QMessageBox.Ok)

 	# 打开本地视频文件
    def play_file(self):
        self.label.setEnabled(True)
        # 如果播放视频,则使得关闭视频按钮可用
        self.pushButton_3.setEnabled(True)
        # 如果计时器没激活,证明是暂停阶段,需要重新播放,并把self.playing = True。
        if self.timer.isActive() is False:
            self.cap.open(self.img_path)
            self.timer.start(30)
            self.playing = True
            # 更换播放按钮为暂停按钮
            self.set_state()
        # 如果计时器激活了,证明是开始阶段,需要暂停播放,并把self.playing = False。
        else:
            self.timer.stop()
            self.playing = False
            # 更换暂停按钮为播放按钮
            self.set_state()

    # 关闭本地视频
    def close_file(self):
        self.cap.release()
        self.pushButton_2.setEnabled(True)
        self.pushButton_3.setEnabled(False)
        self.timer.stop()
        self.playing = False
        # 关闭视频将按钮置为可以播放
        self.set_state()

    # 本地视频播放暂停转换图标按钮
    def set_state(self):
        if self.playing:
        	# 暂停图标
            self.pushButton_2.setIcon(self.style().standardIcon(QStyle.SP_MediaPause))

        else:
            self.pushButton_2.setIcon(self.style().standardIcon(QStyle.SP_MediaPlay))

    # 播放视频画面
    def init_timer(self):
        self.timer = QTimer(self)
        self.timer.timeout.connect(self.show_pic)

    # 显示视频图像
    def show_pic(self):
        ret, img = self.cap.read()
        if ret:
            cur_frame = cv2.cvtColor(img, cv2.COLOR_BGR2RGB)
            # 视频流的长和宽
            height, width = cur_frame.shape[:2]
            pixmap = QImage(cur_frame, width, height, QImage.Format_RGB888)
            pixmap = QPixmap.fromImage(pixmap)
            # 获取是视频流和label窗口的长宽比值的最大值,适应label窗口播放,不然显示不全
            ratio = max(width/self.label.width(), height/self.label.height())
            pixmap.setDevicePixelRatio(ratio)
            # 视频流置于label中间部分播放
            self.label.setAlignment(Qt.AlignCenter)
            self.label.setPixmap(pixmap)

if __name__ == '__main__':
    app = QApplication(sys.argv)
    main = MainWindow()
    main.show()
    sys.exit(app.exec_())
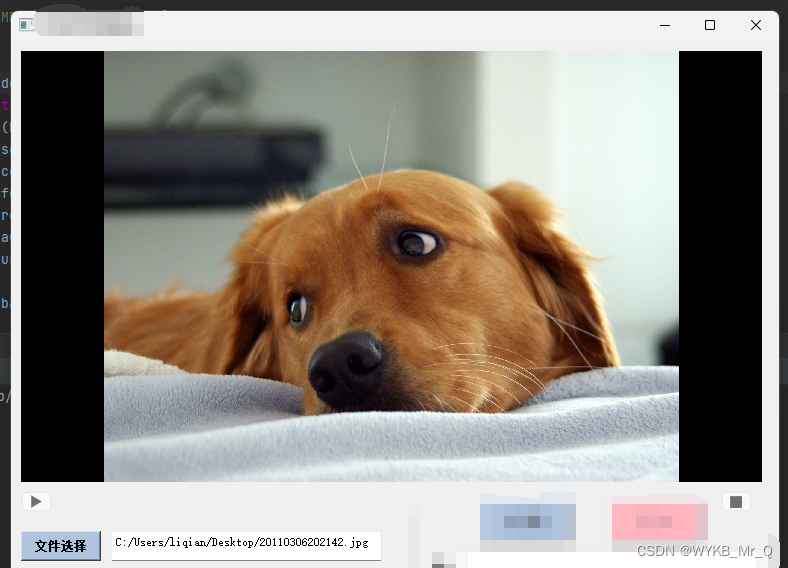
完成出来的结果大概就是这样的!
日常学习记录,一起交流讨论吧!侵权联系~
