文章目录
- 1.实现进程休眠:条件不够歇一歇,把CPU让给其他进程
- 2.内核表示时间和实现延时:linux中有一个时钟会周期性产生中断,linux将这中断作为时间基准
- 3.内核实现延缓操作:内核定时器,tasklet,workqueue
- 12.创建proc文件系统接口:之前调试内核时都是通过prink打印内核信息,通过dmesg查看输出的信息。新调试方法:利用proc文件系统在pro文件夹下创建接口,读写这个接口就可实现对内核的调试
- 13.内核内存分配函数:top,free,cat /pro/meminfo查看内存使用情况,cat /pro/slabinfo,cat /pro/buddyinfo,proc/sys/vm/下文件(虚拟内存更详细信息)
- 13.1 hello.c:和硬件有关,需要用到物理地址的,都不能使用vmalloc
- 14.内核基础数据类型,移植性,数据对齐:页大小为PAGE_SIZE,不要假设4K,保证可移植性
- 14.1 kdatasize.c:不同的架构(x86_64,arm),基础类型大小可能不同,主要区别在long和指针
- 14.2 kdataalign.c:数据存储时没有特殊指定会自然对齐:在数据项大小的整数倍的地址处存储数据项,字节对齐可以提高CPU的访问效率
- 15.内核中断的使用,顶半部和底半部:使用中断可实现内核和外设的异步处理,提高通讯效率,降低系统功耗
- 16.通过IO内存访问外设:有的外设将自己的寄存器映射到了物理内存某个区域,那这个区域叫做io内存区域,linux内核访问这个区域能实现对外设访问和读写
- 17.PCI设备驱动:pci是一种标准总线,基于它可以实现块设备,网络设备,字符设备
1.实现进程休眠:条件不够歇一歇,把CPU让给其他进程
有时候进程在读设备时,发现设备数据还没准备好,没办法正常读取设备。或在写设备时,发现设备缓冲区满,没办法正常写设备。在遇到这些情况时,进程该何去何从?进程在操作设备时,如果条件不满足,就让它进入休眠等待,直到条件满足,就可唤醒进程进行后面操作。
/*
初始化:
	DECLARE_WAIT_QUEUE_HEAD()   //初始化等待队列头,宏的静态方式
	或
	wait_queue_head_t wq;     //动态方式
	init_waitqueue_head(&wq);
休眠:
	wait_event()   //不可被打断,死等,直到满足条件为止
	wait_event_interruptible()  //可使用信号打断它,常用
唤醒:
	wake_up()   //对应wait_event()
	wake_up_interruptible()	 //对应上面可中断方式休眠的进程wait_event_interruptible()
*/
DECLARE_WAIT_QUEUE_HEAD(wq);  //等待队列头

hc_read函数中
{
	...
	printk(KERN_INFO "read hc_dev %p\n",hc_dev);
 // wait_event(wq,hc_dev->c!=NULL);  //第一个参数:等待队列头。第二个参数:等待条件: 如果设备字符串区为空就进入等待(唤醒方法在write函数中),不为空(即echo值进设备文件里)执行后面操作。
	wait_event_interruptible(wq,hc_dev->c!=NULL);
	...
}

hc_write函数中
{
	...
	printk(KERN_INFO"%s write done",current->comm);
//	wake_up(&wq);  // 当写入字符设备成功后(如上)就调用wakeup函数唤醒等待队列上的进程
	wake_up_interruptible(&wq);
	return count;
	...
}
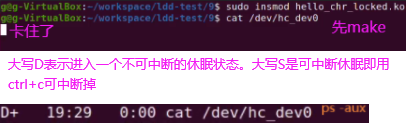
如下等待条件满足,如上卡住的即休眠的进程会正常退出(两个进程cat卡住休眠,执行如下一行,两个进程都不会卡住)。

2.内核表示时间和实现延时:linux中有一个时钟会周期性产生中断,linux将这中断作为时间基准
/*
【中断频率】会保存在HZ这个变量里。【中断次数】会保存在jiffies变量里,可通过jiffies值获得到系统从开机到现在的时钟中断次数。常使用HZ和jiffies这两个变量构造各种时间函数。
HZ:100-1000之间。 jiffies: 系统时钟中断计数器。
在比较jiffies时使用下面的宏,可以避免32位系统溢出的问题:
time_after(a,b) a>b? a>b返回1,否则返回0
time_before(a,b) a<b?
time_after_eq(a,b) a>=b?
time_before_eq(a,b) a<=b?
jiffies与常用时间之间的转换:
jiffies_to_msecs() //毫秒
jiffies_to_usecs() //微秒
msecs_to_jiffies()
usecs_to_jiffies()
jiffies_to_timespec64() //timespec结构里有两个成员:一个是秒,另一个是微妙
timespec64_to_jiffies()
延时:
wait_event_timeout() //除了关心条件是否成立外,还关心超时是否到时,如果超时时间一到,不管条件是否满足,这两函数都会返回退出,然后执行后面操作。
wait_event_interruptible_timeout()
set_current_state()
schedule_timeout() //单纯实现延时,不需要管条件,使用时需手动上行set_current_state()改变当前进程状态。
ndelay() 大于1000用下一个,均是忙等待即cpu死循环不休眠延时,一直占用cpu资源 //纳秒
udelay() 常用, 微秒
mdelay() 毫秒,时间长,如果用到了mdelay,那么你可能需要考虑使用msleep
休眠延时
usleep_range() 10us以上 20ms以下
msleep() 毫秒延时
msleep_interruptible() 可用信号打断延时
ssleep() 秒级延时
*/
#include<linux/module.h>
#include<linux/jiffies.h>
#include<linux/sched.h>
#include<linux/delay.h>
unsigned long j,t1,diff;
struct timespec64 ts64;
static int __init hello_init(void)
{
wait_queue_head_t wait;
init_waitqueue_head(&wait);
//1111111111111111111111111111111111111111111111111111111111111111111111111111111111111
printk(KERN_INFO "HELLO LINUX MODULE\n");
j=jiffies; //保存程序刚开始运行的jiffies值
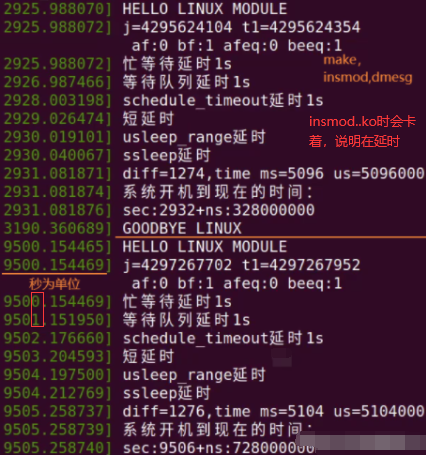
t1=j+msecs_to_jiffies(1000); //+1秒延时(1000毫秒)
printk(KERN_INFO "j=%ld t1=%ld\n af:%d bf:%d afeq:%d beeq:%d\n",j,t1,time_after(j,t1),time_before(j,t1),time_after_eq(j,t1),time_before_eq(j,t1));
//忙等待,不推荐使用,浪费系统性能,有可能让系统进入死循环出不来(比如禁止了中断)
printk(KERN_INFO "忙等待延时1s\n");
while(time_before(jiffies,t1)) //如果jiffies<t1,永远都是真,while一直循环
{ //当jiffies>t1,条件为假,退出循环,实现了延迟
}
//等待队列延时
printk(KERN_INFO "等待队列延时1s\n");
wait_event_interruptible_timeout(wait,0,msecs_to_jiffies(1000)); //休眠函数实现延迟,第二个参数为0是不需要条件,第三个参数是以jiffies表示的时间长度,所以用到时间转为jiffies函数msecs_to_jiffies,延迟1秒
//schedule_timeout延时
printk(KERN_INFO "schedule_timeout延时1s\n");
set_current_state(TASK_INTERRUPTIBLE); //将进程状态设置为可中断的休眠
schedule_timeout(msecs_to_jiffies(1000));
//短延时函数
printk(KERN_INFO "短延时\n");
mdelay(1000); //延迟1s
//休眠延时
printk(KERN_INFO "usleep_range延时\n");
usleep_range(10000,15000); //10毫秒到15毫秒
printk(KERN_INFO "ssleep延时\n");
ssleep(1); //延迟1s
//11111111111111111111111111111111111111111111111111111111111111111111111111111111111111
diff = jiffies - j; //获取如上中间一段几个延时差值,如下在将jiffies转时间就能获取上面代码运行时间
printk(KERN_INFO"diff=%ld,time ms=%d us=%d\n",diff,jiffies_to_msecs(diff),jiffies_to_usecs(diff)); //将jiffies差值转为毫秒和微妙值
printk(KERN_INFO "系统开机到现在的时间:\n");
jiffies_to_timespec64(jiffies-INITIAL_JIFFIES,&ts64); //INITIAL_JIFFIES: 这个宏的值是系统刚开始运行时系统赋给jiffies的初值
printk(KERN_INFO"sec:%lld+ns:%ld\n",ts64.tv_sec,ts64.tv_nsec);
return 0;
}
static void __exit hello_exit(void)
{
printk(KERN_INFO "GOODBYE LINUX\n");
}
module_init(hello_init);
module_exit(hello_exit);
MODULE_LICENSE("Dual BSD/GPL");//许可 GPL、GPL v2、Dual MPL/GPL、Proprietary(专有)等,没有内核会提示
MODULE_AUTHOR("KGZ"); //作者
MODULE_VERSION("V1.0"); //版本
3.内核实现延缓操作:内核定时器,tasklet,workqueue
有时希望一个事件在指定时间之后运行而不影响当前操作,或一个事件发生后,稍后去执行操作,不影响当前操作,这时需要内核为我们提供一些机制:1.如果想实现延迟指定时间之后执行指定操作,可使用内核定时器或workqueue工作队列。
2.如果想实现在一个事件发生之后再去执行其他操作,可使用tasklet或workqueue工作队列:这种情况多数发生在中断处理上,当一个中断发生后,在中断回调函数中希望尽可能短和尽可能快执行,所以把那些费时间的,不是很紧要的任务放稍后执行即放在中断回调函数后执行。
/*
1、内核定时器
struct timer_list
timer_setup() //初始化上面结构并绑定回调函数
mod_timer() //修改延时时间,调用mod_timer()后定时器开始定时,到达指定时间后调用绑定的回调函数
del_timer() //删除定时器
2、tasklet
struct tasklet_struct
tasklet_init() //绑定回调函数以及传入参数数据
tasklet_hi_schedule() //让tasklet执行,带hi的对应回调函数在高优先级执行
tasklet_schedule() //正常执行
tasklet_kill() //移除tasklet
3、workqueue
alloc_workqueue() //分配一个工作队列,内核自带的工作队列
destroy_workqueue()
struct work_struct //不需要延迟的操作,声明结构体
INIT_WORK() //初始化工作
queue_work() //将工作插入到工作队列中,内核自动调用对应工作
struct delayed_work //需要延时的工作,先声明结构
INIT_DELAYED_WORK() //初始化这结构
queue_delayed_work() //将对应工作插入到对应工作队列中,内核会在指定定时时间后调用对应工作
4、其他
in_interrupt() //指明当前上下文是不是在中断上下文,是在中断上下文则返回非0
smp_processor_id() //返回当前运行所在cpu的id号
构造下面的数据表,通过设备读取
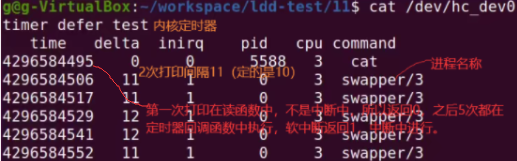
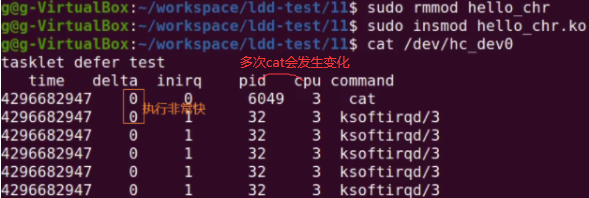
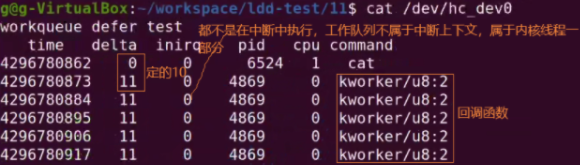
// 第一列是用jiffies表示的时间值。delta是两次获取之间的时间间隔。inirq是in_interrupt函数返回值,是否是在中断中。pid表明当前进程执行的pid。cpu是当前进程执行的cpu。command是当前进程的名称。
time delta inirq pid cpu command
4295601162 0 0 7559 0 cat
4295601162 0 1 10 0 ksoftirqd/0
4295601162 0 1 10 0 ksoftirqd/0
4295601162 0 1 10 0 ksoftirqd/0
4295601162 0 1 10 0 ksoftirqd/0
4295601162 0 1 10 0 ksoftirqd/0
./Documentation/core-api/workqueue.rst
*/
#include<linux/module.h>
#include<linux/fs.h>
#include<linux/cdev.h>
#include<linux/slab.h>
#include<linux/uaccess.h>
#include<linux/interrupt.h> //包括了tasklet、timer.h和workqueue.h
#include<linux/timer.h> //定时器
#include<linux/workqueue.h> //工作队列
#define DEFER_TEST 2 //(0:timer 1:tasklet 2:workqueue)
#define DELAY_WORK //workqueue通过定义这行宏决定延时还是不延时
#define HELLO_MAJOR 0
#define HELLO_NR_DEVS 2
int hello_major = HELLO_MAJOR;
int hello_minor = 0;
dev_t devt; //高12位是主设备号,低20位是次设备号
int hello_nr_devs = HELLO_NR_DEVS;
module_param(hello_major, int, S_IRUGO);
module_param(hello_minor, int, S_IRUGO);
module_param(hello_nr_devs, int, S_IRUGO);
struct hello_char_dev{ //实际的字符设备结构,类似于面向对象的继承
struct cdev cdev;
char * buff; //管理缓冲区
int loops; //限制循环次数
int tdelay; //两次打印时间间隔
unsigned long prej; //保存上一次jiffies时间值
#if (DEFER_TEST==0) //DEFER_TEST宏管理(在最前面定义)
struct timer_list t1; //使用定时器,声明定时器结构
#elif (DEFER_TEST==1)
struct tasklet_struct tsklt; //使用tasklet,声明tasklet结构
#else
#ifdef DELAY_WORK //通过这个宏决定延迟还是不延迟的工作队列
struct delayed_work work; //使用workqueue,声明workqueue结构
#else
struct work_struct work;
#endif
#endif
};
struct hello_char_dev *hc_devp;
struct class *hc_cls;
DECLARE_WAIT_QUEUE_HEAD(wq);
int hc_open(struct inode *inode, struct file *filp)
{
struct hello_char_dev *hc_dev;
printk(KERN_INFO "%s open \n",current->comm);
hc_dev = container_of(inode->i_cdev,struct hello_char_dev,cdev); //获取设备结构体的地址
filp->private_data = hc_dev;
return 0;
}
//11111111111111111111111111111111111111111111111111111111111111111111111定时器
#if (DEFER_TEST==0)
void timer_fn(struct timer_list *t) //回调函数,timer_list是放在字符设备的结构体中,所以要container_of通过结构体成员获得结构体指针
{
struct hello_char_dev *hc_dev = container_of(t,struct hello_char_dev,t1); //拿到字符设备指针
hc_dev->buff+=sprintf(hc_dev->buff,"%9ld %3ld %i %6i %i %s\n",
jiffies, jiffies-hc_dev->prej, in_interrupt()? 1 : 0,
current->pid, smp_processor_id(), current->comm);
if(--hc_dev->loops) //如果loops值不为0
{
mod_timer(t,jiffies+hc_dev->tdelay); //改变定时器定时时间,继续让定时器延时回调,循环5次
hc_dev->prej = jiffies;
}
else{
del_timer(t); //删除定时器
//del_timer_sync(t);
wake_up_interruptible(&wq); //唤醒读函数进程
}
}
ssize_t hc_read(struct file *filp, char __user *buf, size_t count,loff_t *f_pos)
{
ssize_t retval=0;
size_t cnt;
char *buf1;
struct hello_char_dev *hc_dev=filp->private_data; //拿到字符设备指针
printk(KERN_INFO "timer defer test\n");
if(*f_pos > 0)
goto out;
hc_dev->loops = 5;
hc_dev->tdelay = 10; //定时器每隔10
buf1 = kzalloc(400,GFP_KERNEL); //给缓冲区分配空间
hc_dev->buff = buf1; //下面几行是在缓冲里放数据
hc_dev->buff += sprintf(hc_dev->buff, "timer defer test\n");
hc_dev->buff += sprintf(hc_dev->buff, " time delta inirq pid cpu command\n");
hc_dev->buff += sprintf(hc_dev->buff, "%9li %3li %i %6i %i %s\n",
jiffies, 0L, in_interrupt() ? 1 : 0,
current->pid, smp_processor_id(), current->comm);
timer_setup(&hc_dev->t1,timer_fn,0); //初始化定时器,timer_fn对应回调函数
mod_timer(&hc_dev->t1,jiffies+hc_dev->tdelay); //修改delay时间,当前jiffies + 需延迟jiffies值
hc_dev->prej = jiffies; //当前jiffies值保存在字符设备prej变量中
wait_event_interruptible(wq, !hc_dev->loops); //让当前的read进行休眠
//如下是timer_fn回调函数将hc_read函数唤醒,继续执行
cnt =hc_dev->buff - buf1; //多少字节
if(copy_to_user(buf,buf1,cnt)) //将数据传给用户空间
{
retval = -EFAULT;
goto out;
}
*f_pos += cnt;
kfree(buf1);
return cnt;
out:
return retval;
} //如上整个操作完成了,实现了定时器每隔10个jiffies回调一次,打印一下当前信息,一共打印5次
//1111111111111111111111111111111111111111111111111111111111111111111tasklet
#elif (DEFER_TEST==1)
void tasklet_fn(unsigned long data) //回调函数
{
struct hello_char_dev *hc_dev =(struct hello_char_dev *) data;
hc_dev->buff+=sprintf(hc_dev->buff,"%9ld %3ld %i %6i %i %s\n",
jiffies, jiffies-hc_dev->prej, in_interrupt()? 1 : 0,
current->pid, smp_processor_id(), current->comm);
if (--hc_dev->loops) {
hc_dev->prej = jiffies;
tasklet_hi_schedule(&hc_dev->tsklt);
//tasklet_schedule(&hc_dev->tsklt);
} else {
wake_up_interruptible(&wq); //唤醒读进程
}
}
ssize_t hc_read(struct file *filp, char __user *buf, size_t count,loff_t *f_pos)
{
ssize_t retval=0;
int cnt;
char * buf1;
struct hello_char_dev *hc_dev=filp->private_data;
printk(KERN_INFO "tasklet defer test\n");
if(*f_pos > 0)
goto out;
hc_dev->loops = 5;
buf1 = kzalloc(400,GFP_KERNEL);
hc_dev->buff = buf1;
hc_dev->buff += sprintf(hc_dev->buff, "tasklet defer test\n");
hc_dev->buff += sprintf(hc_dev->buff, " time delta inirq pid cpu command\n");
hc_dev->buff += sprintf(hc_dev->buff, "%9li %3li %i %6i %i %s\n",
jiffies, 0L, in_interrupt() ? 1 : 0,
current->pid, smp_processor_id(), current->comm);
tasklet_init(&hc_dev->tsklt,tasklet_fn,(unsigned long)hc_dev); //第一个参数:tasklet结构体地址。第二个参数:回调函数。第三个参数:传入回调函数的数据参数,将字符设备地址强转为long传入。
hc_dev->prej = jiffies;
tasklet_hi_schedule(&hc_dev->tsklt);
//tasklet_schedule(&hc_dev->tsklt);
wait_event_interruptible(wq, !hc_dev->loops); //等待执行完成
tasklet_kill(&hc_dev->tsklt); //清除tasklet
cnt =hc_dev->buff - buf1; //获得到这个buf里有多少字节
if(copy_to_user(buf,buf1,cnt)) //将数据传给用户空间
{
retval = -EFAULT;
goto out;
}
*f_pos += cnt;
kfree(buf1); //释放存储空间返回
return cnt;
out:
return retval;
}
//1111111111111111111111111111111111111111111111111111111111111111111workqueue
#else
struct workqueue_struct *workq = NULL;
void workqueue_fn(struct work_struct *work)
{
#ifdef DELAY_WORK
struct delayed_work *dwork = container_of(work,struct delayed_work,work);
struct hello_char_dev *hc_dev = container_of(dwork,struct hello_char_dev,work);
#else
struct hello_char_dev *hc_dev = container_of(work,struct hello_char_dev,work);
#endif
hc_dev->buff+=sprintf(hc_dev->buff,"%9ld %3ld %i %6i %i %s\n",
jiffies, jiffies-hc_dev->prej, in_interrupt()? 1 : 0,
current->pid, smp_processor_id(), current->comm);
if (--hc_dev->loops) {
hc_dev->prej = jiffies;
#ifdef DELAY_WORK
queue_delayed_work(workq,dwork,hc_dev->tdelay);
#else
queue_work(workq,work);
#endif
} else {
wake_up_interruptible(&wq);
}
}
ssize_t hc_read(struct file *filp, char __user *buf, size_t count,loff_t *f_pos)
{
ssize_t retval=0;
int cnt;
char * buf1;
struct hello_char_dev *hc_dev=filp->private_data;
printk(KERN_INFO "workqueue defer test\n");
if(*f_pos > 0)
goto out;
workq = alloc_workqueue("workq",WQ_UNBOUND,0);
hc_dev->loops = 5;
#ifdef DELAY_WORK
hc_dev->tdelay = 10;
#endif
buf1 = kzalloc(400,GFP_KERNEL);
hc_dev->buff = buf1;
hc_dev->buff += sprintf(hc_dev->buff, "workqueue defer test\n");
hc_dev->buff += sprintf(hc_dev->buff, " time delta inirq pid cpu command\n");
hc_dev->buff += sprintf(hc_dev->buff, "%9li %3li %i %6i %i %s\n",
jiffies, 0L, in_interrupt() ? 1 : 0,
current->pid, smp_processor_id(), current->comm);
hc_dev->prej = jiffies;
#ifdef DELAY_WORK
INIT_DELAYED_WORK(&hc_dev->work,workqueue_fn);
queue_delayed_work(workq,&hc_dev->work,hc_dev->tdelay);
#else
INIT_WORK(&hc_dev->work,workqueue_fn);
queue_work(workq,&hc_dev->work);
#endif
wait_event_interruptible(wq, !hc_dev->loops);
destroy_workqueue(workq);
cnt =hc_dev->buff - buf1;
if(copy_to_user(buf,buf1,cnt))
{
retval = -EFAULT;
goto out;
}
*f_pos += cnt;
kfree(buf1);
return cnt;
out:
return retval;
}
#endif
ssize_t hc_write(struct file *filp, const char __user *buf, size_t count,loff_t *f_pos)
{
printk(KERN_INFO "write hc_dev\n");
return count; //不能返回0,否则会不停的写
}
int hc_release(struct inode *inode, struct file *filp)
{
printk(KERN_INFO "release hc_dev\n");
return 0;
}
struct file_operations hc_fops = { //字符设备的操作函数
.owner = THIS_MODULE,
.read = hc_read,
.write = hc_write,
.open = hc_open,
.release = hc_release,
};
//111111111111111111111111111111111111111111111111111111111111111111111111111111111111111
static int __init hello_init(void)
{
int ret,i;
printk(KERN_INFO "---BEGIN HELLO LINUX MODULE---\n");
if(hello_major){
devt=MKDEV(hello_major,hello_minor);
ret=register_chrdev_region(devt,hello_nr_devs,"hello_chr"); //使用指定的设备号分配
}
else{
ret = alloc_chrdev_region(&devt,hello_minor,hello_nr_devs,"hello_chr");//动态分配主设备号
hello_major = MAJOR(devt);
}
if (ret < 0) {
printk(KERN_WARNING "hello: can't get major %d\n", hello_major);
goto fail;
}
hc_devp = kzalloc(sizeof(struct hello_char_dev)*hello_nr_devs,GFP_KERNEL); //给字符设备分配空间,这里hello_nr_devs为2
if(!hc_devp)
{
printk(KERN_WARNING "alloc mem failed");
ret = -ENOMEM;
goto failure_kzalloc; //内核常用goto处理错误
}
for(i=0;i<hello_nr_devs;i++){
cdev_init(&hc_devp[i].cdev,&hc_fops); //初始化字符设备结构
hc_devp[i].cdev.owner = THIS_MODULE;
ret = cdev_add(&hc_devp[i].cdev,MKDEV(hello_major,hello_minor+i),1); //添加该字符设备到系统中
if(ret)
{
printk(KERN_WARNING"fail add hc_dev%d",i);
}
}
hc_cls = class_create(THIS_MODULE,"hc_dev");
if(!hc_cls)
{
printk(KERN_WARNING"fail create class");
ret = PTR_ERR(hc_cls);
goto failure_class;
}
for(i=0;i<hello_nr_devs;i++){
device_create(hc_cls,NULL,MKDEV(hello_major,hello_minor+i),NULL,"hc_dev%d",i);
}
printk(KERN_INFO "---END HELLO LINUX MODULE---\n");
return 0;
failure_class:
kfree(hc_devp);
failure_kzalloc:
unregister_chrdev_region(devt,hello_nr_devs);
fail:
return ret; //返回错误,模块无法正常加载
}
static void __exit hello_exit(void)
{
int i;
for(i=0;i<hello_nr_devs;i++)
{
device_destroy(hc_cls,MKDEV(hello_major,hello_minor+i));
}
class_destroy(hc_cls);
for(i=0;i<hello_nr_devs;i++)
cdev_del(&hc_devp[i].cdev);
kfree(hc_devp);
unregister_chrdev_region(devt,hello_nr_devs); //移除模块时释放设备号
printk(KERN_INFO "GOODBYE LINUX\n");
}
module_init(hello_init);
module_exit(hello_exit);
MODULE_LICENSE("Dual BSD/GPL");//许可 GPL、GPL v2、Dual MPL/GPL、Proprietary(专有)等,没有内核会提示
MODULE_AUTHOR("KGZ"); //作者
MODULE_VERSION("V1.0"); //版本
如下delta连1次jiffies值都没达到。
非延迟工作队列效果跟tasklet类似,把API换成没有delayed的即可。
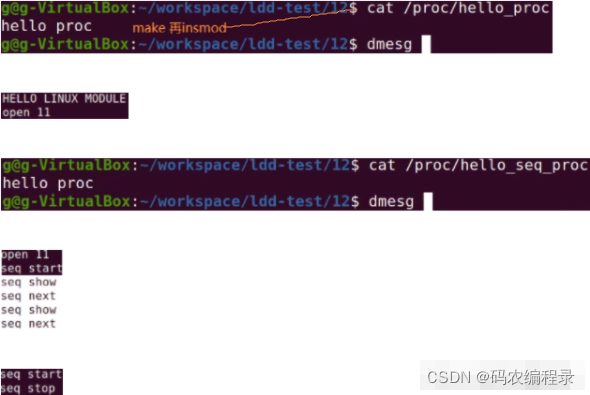
12.创建proc文件系统接口:之前调试内核时都是通过prink打印内核信息,通过dmesg查看输出的信息。新调试方法:利用proc文件系统在pro文件夹下创建接口,读写这个接口就可实现对内核的调试
/*
struct proc_ops    //pro文件夹下创建接口第一种方式
proc_create()

struct seq_operations   //第二种方式
proc_create_seq()

remove_proc_entry  //移除接口
*/
#include<linux/module.h>
#include<linux/uaccess.h>
#include<linux/string.h>
#define PROC_DEBUG
#ifdef PROC_DEBUG
#include<linux/proc_fs.h>  //传统第一种方式
#include<linux/seq_file.h>  //seq第二种方式
#endif

char * str = "hello proc\n";
#ifdef PROC_DEBUG    //由于proc一般用于调试,通常定义一个宏,将proc对应代码包起来,不需要这调试接口时,就可把这个宏注释掉,这样这个宏包含代码不会编译到内核中了。
int hp_open(struct inode * inode, struct file * filp)
{
	printk(KERN_INFO"open %ld\n",strlen(str));
	return 0;
}

ssize_t hp_read(struct file * filp, char __user * buff, size_t count, loff_t * f_pos)
{
	ssize_t retval=0;
	int n = strlen(str);
	if(*f_pos >= n)
		goto out;
	if(*f_pos + count > n)
		count = n - *f_pos;
	//如上是判断读的内容是否有效
	if(copy_to_user(buff,str,count))  //将字符串str赋值到buff用户空间
	{
		retval = -EFAULT;
		goto out;
	}
	*f_pos += count;
	return count;
out:
	return retval;
}

struct proc_ops hp_ops = {   //下面 __init函数中proc_create调用
	.proc_open = hp_open,
	.proc_read = hp_read,
};

//1111111111111111111111111111111111111111111111111111111111111111111111111111111111111
void * hp_seq_start (struct seq_file *m, loff_t *pos)  //pos表示当前读到哪个位置或写到哪个位置了,像索引
{
	printk(KERN_INFO"seq start\n");
	if(*pos >= strlen(str))
		return NULL;
	return &str[*pos];  //拿出字符串中字符,将地址返回,这返回值将来作为其他函数的v传入
}

void hp_seq_stop(struct seq_file *m, void *v)
{
	printk(KERN_INFO"seq stop\n");  //清除start函数一些工作,start里开辟一些空间或申请一些锁,这里清除
}

void * hp_seq_next (struct seq_file *m, void *v, loff_t *pos)
{
	printk(KERN_INFO"seq next\n");
	(*pos)++;
	if(*pos >= strlen(str))
		return NULL;
	return &str[*pos];
}

int hp_seq_show (struct seq_file *m, void *v)
{
	printk(KERN_INFO"seq show\n");
	seq_putc(m,*(char*)v);  //将获得到的字符一个一个打印出
	return 0;
}

const struct seq_operations seq_ops={  //构建这结构体
	.start = hp_seq_start,
	.stop = hp_seq_stop,
	.next = hp_seq_next,
	.show = hp_seq_show,
};
#endif

//11111111111111111111111111111111111111111111111111111111111111111111111111111111111
static int __init hello_init(void)
{
	printk(KERN_INFO "HELLO LINUX MODULE\n");
#ifdef PROC_DEBUG
	proc_create("hello_proc",0,NULL,&hp_ops);  //第一个参数即显示在pro目录下文件名称,
 //第二个参数默认0只读权限。第三个参数父节点,null默认pro目录。最后一个参数是操作的结构体地址。

	proc_create_seq("hello_seq_proc",0,NULL,&seq_ops); //就可在pro目录下创建对应节点
#endif
	return 0;
}

static void __exit hello_exit(void)
{
#ifdef PROC_DEBUG
	remove_proc_entry("hello_proc",NULL);  //第二个参数是父节点
	remove_proc_entry("hello_seq_proc",NULL);
#endif
	printk(KERN_INFO "GOODBYE LINUX\n");
}
module_init(hello_init);
module_exit(hello_exit);
MODULE_LICENSE("Dual BSD/GPL");//许可 GPL、GPL v2、Dual MPL/GPL、Proprietary(专有)等,没有内核会提示
MODULE_AUTHOR("KGZ");		//作者
MODULE_VERSION("V1.0");  	//版本
rmmod就没有/proc/下接口了。
13.内核内存分配函数:top,free,cat /pro/meminfo查看内存使用情况,cat /pro/slabinfo,cat /pro/buddyinfo,proc/sys/vm/下文件(虚拟内存更详细信息)
13.1 hello.c:和硬件有关,需要用到物理地址的,都不能使用vmalloc
/*
1.
如下两个一般千字节以下空间
kmalloc() 分配空间不清0
kzalloc() 分配空间并清0
kfree()
2.
如下对于某些应用需要频繁分配或释放固定大小空间,如下可提前创建一个高速缓冲区,从高速缓冲区中分配空间,这样运行速度会快,内存使用效率也会高
struct kmem_cache //slab分配器/专用高速缓存 速度快 利用率高
kmem_cache_create() //创建高速缓冲区,返回地址保存在上面一行的结构指针中,然后可调用kmem_cache_alloc函数分配空间,使用完后,free释放
kmem_cache_alloc()
kmem_cache_free()
kmem_cache_destroy() //清除高速缓冲区
3.
__get_free_page() //大块内存,按页分配,单独一页
__get_free_pages() //多页
get_zeroed_page() //清0
free_page()
free_pages()
4.
vmalloc() 虚拟地址连续,物理地址不连续,效率不高,
vfree() 用在分配大的连续的、只在软件中使用的、用于缓存的内存区域
*/
#include<linux/module.h>
#include<linux/slab.h>
#include<linux/gfp.h> //按页分配__get_free_page(),包含在slab.h中
#include<linux/vmalloc.h>
char * kmlcp;
struct kmem_cache *h_cache;
char * kmemcp;
char * frpgp;
char * vmlcp;
static int hello_init(void)
{
printk(KERN_INFO "HELLO LINUX MODULE\n");
//1111111111111111111111111111111111111
kmlcp = kmalloc(1024,GFP_KERNEL); //第一个参数:分配空间的大小,第二个参数:常用flag有GFP_KERNEL(kmalloc可休眠)和GFP_ATOMIC(kmalloc不可休眠)
if(!kmlcp)
{
return -ENOMEM;
}
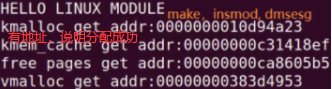
printk(KERN_INFO"kmalloc get addr:%p\n",kmlcp);
//1111111111111111111111111111111111112
h_cache = kmem_cache_create("h_cache",512,0,SLAB_HWCACHE_ALIGN|SLAB_POISON,NULL);
if(!h_cache)
{
kfree(kmlcp);
return -ENOMEM;
}
kmemcp = kmem_cache_alloc(h_cache,GFP_KERNEL);
if(!kmemcp)
{
//do something
return -ENOMEM;
}
printk(KERN_INFO"kmem_cache get addr:%p\n",kmemcp);
//1111111111111111111111111111111111113
frpgp =(void *) __get_free_pages(GFP_KERNEL,0); //第二个参数是页面数,以2为底的对数值,0:1 1:2 2:4 3:8 ,填的0分配一个页,填的1分配2个页,填的2分配4个页
if(!frpgp)
{
//do something
return -ENOMEM;
}
printk(KERN_INFO"free pages get addr:%p\n",frpgp);
//1111111111111111111111111111111111114
vmlcp = vmalloc(PAGE_SIZE<<4); //大空间,大于一个页,这里分配16个页空间
if(!vmlcp)
{
//do something
return -ENOMEM;
}
printk(KERN_INFO"vmalloc get addr:%p\n",vmlcp);
return 0;
}
static void __exit hello_exit(void)
{
printk(KERN_INFO "GOODBYE LINUX\n");
//1
kfree(kmlcp);
//2
kmem_cache_free(h_cache,kmemcp);
kmem_cache_destroy(h_cache);
//3
free_pages((unsigned long)frpgp,0);
//4
vfree(vmlcp);
}
module_init(hello_init);
module_exit(hello_exit);
MODULE_LICENSE("Dual BSD/GPL");//许可 GPL、GPL v2、Dual MPL/GPL、Proprietary(专有)等,没有内核会提示
MODULE_AUTHOR("KGZ"); //作者
MODULE_VERSION("V1.0"); //版本
14.内核基础数据类型,移植性,数据对齐:页大小为PAGE_SIZE,不要假设4K,保证可移植性

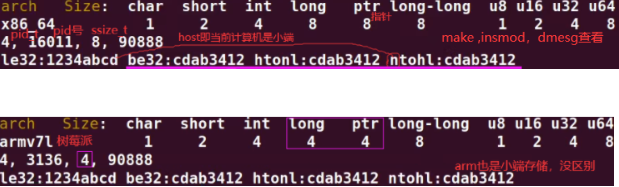
14.1 kdatasize.c:不同的架构(x86_64,arm),基础类型大小可能不同,主要区别在long和指针
/*
	linux内核基础数据类型分三大类:C标准(int,long,char等),linux内核特有大小确定(u32,u16等),特定内核对象(pid_t,ssize_t,size_t等)

	由于不同平台数据类型大小有区别,要考虑程序可移植性:-Wall(编译时使用这个标志会检查所有不兼容的问题),消除所有警告就可保证程序可移植性

	编译器支持uint32_t,则不使用u32,使用uint32_t等标准类型

	基础数据类型除了大小外还有存储方式不同,有的系统是大端存储方式,有的是小端,内核提供如下函数进行转换:
	大小端:cpu_to_le32()  le32_to_cpu() (小端32位转换为cpu存储类型)
			cpu_to_be32()  be32_to_cpu()
			......
			htonl() (host主机转换为network(网络存储都是大端)的long类型)    	ntohl()
			htons()	(.................short..)      			            ntohs()
*/
#include <linux/module.h>
#include <linux/kernel.h>
#include <linux/types.h>
#include <linux/utsname.h>
#include <linux/errno.h>

static void data_cleanup(void)
{
	/* never called */
}

int data_init(void)
{
	ssize_t n=90888;
	/* print information and return an error */
	printk("arch   Size:  char  short  int  long   ptr long-long "
		" u8 u16 u32 u64\n");
	printk("%-12s  %3i   %3i   %3i   %3i   %3i   %3i      "
		"%3i %3i %3i %3i\n",
		init_uts_ns.name.machine,
		(int)sizeof(char), (int)sizeof(short), (int)sizeof(int),
		(int)sizeof(long),
		(int)sizeof(void *), (int)sizeof(long long), (int)sizeof(__u8),
		(int)sizeof(__u16), (int)sizeof(__u32), (int)sizeof(__u64));
	printk("%i, %li, %i, %li\n",(int)sizeof(pid_t),(long)current->pid,(int)sizeof(ssize_t),(long)n);
	printk("le32:%x be32:%x htonl:%x ntohl:%x\n",	cpu_to_le32(0x1234abcd),
													cpu_to_be32(0x1234abcd),
													htonl(0x1234abcd),
													ntohl(0x1234abcd));
	return -ENODEV;
}

module_init(data_init);
module_exit(data_cleanup);
MODULE_LICENSE("Dual BSD/GPL");
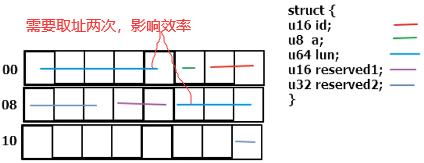
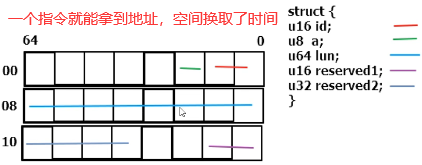
14.2 kdataalign.c:数据存储时没有特殊指定会自然对齐:在数据项大小的整数倍的地址处存储数据项,字节对齐可以提高CPU的访问效率
#include <linux/module.h>
#include <linux/kernel.h>
#include <linux/types.h>
#include <linux/utsname.h>
#include <linux/errno.h>

struct c   {char c;  char      t;} c;
struct s   {char c;  short     t;} s;
struct i   {char c;  int       t;} i;
struct l   {char c;  long      t;} l;
struct ll  {char c;  long long t;} ll;
struct p   {char c;  void *    t;} p;
struct u1b {char c;  __u8      t;} u1b;
struct u2b {char c;  __u16     t;} u2b;
struct u4b {char c;  __u32     t;} u4b;
struct u8b {char c;  __u64     t;} u8b;

struct {
	u16 id;
	u8  a;
	u64 lun;
	u16 reserved1;
	u32 reserved2;
}__attribute__((packed)) scsi;  // 属性:不用对齐,每个数据紧挨着

struct {
	u16 id;
	u8  a;
	u64 lun;
	u16 reserved1;
	u32 reserved2;
} scsi1;

static void data_cleanup(void)
{
	/* never called */
}

static int data_init(void)
{
	/* print information and return an error */
	printk("arch  Align:  char  short  int  long   ptr long-long "
		" u8 u16 u32 u64\n");
	printk("%-12s  %3i   %3i   %3i   %3i   %3i   %3i      "
		"%3i %3i %3i %3i\n",
		init_uts_ns.name.machine,
		/* note that gcc can subtract void * values, but it's not ansi */
		(int)((void *)(&c.t)   - (void *)&c),   //第二个成员地址 - 结构体地址 = 地址差即偏移的字节数
		(int)((void *)(&s.t)   - (void *)&s),
		(int)((void *)(&i.t)   - (void *)&i),
		(int)((void *)(&l.t)   - (void *)&l),
		(int)((void *)(&p.t)   - (void *)&p),
		(int)((void *)(&ll.t)  - (void *)&ll),
		(int)((void *)(&u1b.t) - (void *)&u1b),
		(int)((void *)(&u2b.t) - (void *)&u2b),
		(int)((void *)(&u4b.t) - (void *)&u4b),
		(int)((void *)(&u8b.t) - (void *)&u8b));
	//printk("%lx %lx %lx %lx %lx %lx %lx %lx %lx %lx \n",(unsigned long)&c,(unsigned long)&s,(unsigned long)&i,(unsigned long)&l,(unsigned long)&p,(unsigned long)&ll,(unsigned long)&u1b,(unsigned long)&u2b,(unsigned long)&u4b,(unsigned long)&u8b);
	printk("packed %i unpacked %i\n",(int)sizeof(scsi),(int)sizeof(scsi1));
	printk("      id		      a		       lun	        reserved1	 reserved2\n");
	printk("scsi  %lx %lx %lx %lx %lx",(unsigned long)&scsi.id,(unsigned long)&scsi.a,(unsigned long)&scsi.lun,(unsigned long)&scsi.reserved1,(unsigned long)&scsi.reserved2);
	printk("scsi1 %lx %lx %lx %lx %lx\n",(unsigned long)&scsi1.id,(unsigned long)&scsi1.a,(unsigned long)&scsi1.lun,(unsigned long)&scsi1.reserved1,(unsigned long)&scsi1.reserved2);

	return -ENODEV;
}

module_init(data_init);
module_exit(data_cleanup);
MODULE_LICENSE("Dual BSD/GPL");

15.内核中断的使用,顶半部和底半部:使用中断可实现内核和外设的异步处理,提高通讯效率,降低系统功耗
// hello.c
/*
request_irq() //申请中断,申请成功后就可以使用这个中断,中断触发就会调用注册的回调函数
free_irq()
typedef irqreturn_t (*irq_handler_t)(int, void *); //中断回调函数,第一个参数是中断号
enable_irq() //打开指定的中断
disable_irq()
//内核提供如下函数打开或关闭该处理器上所有中断,但是不起作用:可能内核不允许关闭所有中断,也可能这里关了中断,在其它地方被打开了
local_irq_enable()
local_irq_restore()
local_irq_disable()
local_irq_save()
*/
#include<linux/module.h>
#include<linux/gpio.h> //用到了树莓派的gpio
#include<linux/interrupt.h>
#include<linux/proc_fs.h> //用到了proc文件系统
#include<linux/uaccess.h> //用到了内核空间与用户空间数据交互对应函数
static struct work_struct work;
unsigned long flags;
void workqueue_fn(struct work_struct *work) //下半部/底半部 //工作队列回调函数,不紧急且耗时的在这执行
{
printk("hello workqueue\n");
}
static irqreturn_t irq_handler(int irq,void *dev) //上半部/顶半部 紧急工作 //中断回调函数,第一个参数中断号,第二个参数设备结构地址
{
static int n=0;
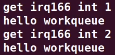
printk("get irq%d int %d\n",irq,++n); //中断号和中断次数
schedule_work(&work); //把工作放到默认的工作队列中运行
return IRQ_HANDLED; //中断回调函数irqreturn_t退出后,workqueue_fn就会运行
}
ssize_t hp_write(struct file * filp, const char __user * buff, size_t count, loff_t * f_pos)
{
char a;
get_user(a,buff);
if(a=='0') //给proc文件写入的是0,关闭中断
{
printk("disable irq\n");
disable_irq(gpio_to_irq(12));
//local_irq_disable();
//local_irq_save(flags);
}
else
{
printk("enable irq\n");
enable_irq(gpio_to_irq(12));
//local_irq_enable();
//local_irq_restore(flags);
}
return count;
}
struct file_operations hp_ops = { //proc_create接口,通过proc控制中断开闭
.write = hp_write,
};
//1111111111111111111111111111111111111111111111111111111111111111111111111111111111111111111111
static int __init hello_init(void)
{
int err;
printk(KERN_INFO "HELLO LINUX MODULE\n");
proc_create("hello_proc",0777,NULL,&hp_ops); //可读可写可执行,主要用到可写
//如下初始化工作,中断里涉及到顶半部和底半部问题, 底半部使用到的机制是工作队列,所以要初始化一个work,
//将底半部操作放在工作队列中去执行
INIT_WORK(&work,workqueue_fn);
err = request_irq(gpio_to_irq(12),irq_handler,IRQ_TYPE_EDGE_BOTH,"hello-int",NULL);
//上行第一个参数:通过gpio号12获取中断号。第二个参数:中断回调函数irq_handler。第三个参数:触发方式:上升沿下降沿都会触发中断
//第四个参数:hello-int名称会在proc文件系统中显示,第五个参数:指针参数,这个参数会在中断触发后通过irq_handler中一个参数传入
if(err<0)
{
printk("irq_request failed\n");
remove_proc_entry("hello_proc",NULL);
return err;
}
return 0;
}
static void __exit hello_exit(void)
{
printk(KERN_INFO "GOODBYE LINUX\n");
free_irq(gpio_to_irq(12),NULL); //释放request_irq申请的中断
remove_proc_entry("hello_proc",NULL);
}
module_init(hello_init);
module_exit(hello_exit);
MODULE_LICENSE("Dual BSD/GPL");//许可 GPL、GPL v2、Dual MPL/GPL、Proprietary(专有)等,没有内核会提示
MODULE_AUTHOR("KGZ"); //作者
MODULE_VERSION("V1.0"); //版本


// gpioout.c  // 测试中断运行状态
#include <bcm2835.h>
#include<unistd.h>

int main(int argc ,char* argv[])
{
	int n = atoi(argv[1]);
    bcm2835_init();
	bcm2835_gpio_fsel(21,BCM2835_GPIO_FSEL_OUTP);
	//树莓派21号引脚和之前12号引脚连在一起,这样可通过控制21号引脚高低电平触发12号引脚中断
	while(n--)
	{
		bcm2835_gpio_set(21);  //高电平
		sleep(1);
		bcm2835_gpio_clr(21);  //低电平
		sleep(1);
	}
	return 0;
}
如下循环一次(参数是1),触发两次中断,上升沿一次,下降沿一次。

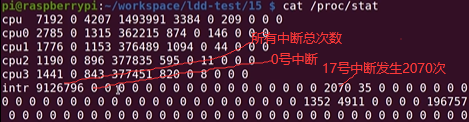
如下先是中断回调,再是工作队列。cat /proc/interrupts看出
如下关闭中断(非0是开中断),再次运行./gpioout 1,dmesg看没有信息更新。

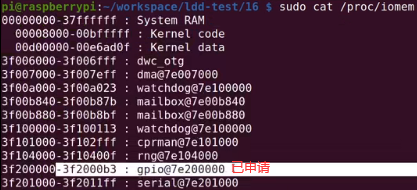
16.通过IO内存访问外设:有的外设将自己的寄存器映射到了物理内存某个区域,那这个区域叫做io内存区域,linux内核访问这个区域能实现对外设访问和读写
// hello.c
/*
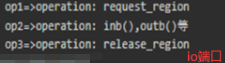
request_mem_region() //访问外设前需要先 申请 这片io内存区域
release_mem_region()
ioremap() //io内存(上行申请的)是物理地址,内核使用的是虚拟地址,ioremap将物理地址映射为虚拟地址
iounmap()
ioread32() ioread8()/ioread16() //读取io内存 //硬件是树莓派,四字节对齐地址读写的话都能读到正常值
iowrite32() iowrite8()/iowrite16()
*/
#include<linux/module.h>
#include<linux/io.h>
unsigned long gpio_base = 0x3f200000; //树莓派gpio基地址
int gpio_len =0xb3; //寄存器范围
struct timer_list t1; //内核定时器,1s开一次灯,1s关一次灯
int tdelay;
uint8_t flag=0;
void timer_fn(struct timer_list *t) //定时器回调函数
{
if(flag)
iowrite32(ioread32((void *)(gpio_base+0x1c))|(1<<4),(void*)(gpio_base+0x1c)); //1c寄存器将gpio置为高电平
else
iowrite32(ioread32((void *)(gpio_base+0x28))|1<<4,(void*)(gpio_base+0x28)); //28寄存器将gpio置为低电平
flag=!flag;
mod_timer(&t1,jiffies+msecs_to_jiffies(1000)); //gpio4接了一个led灯,以1s频率亮灭
}
//11111111111111111111111111111111111111111111111111111111111111111111111111111111111111111
static int __init hello_init(void)
{
printk(KERN_INFO "HELLO LINUX MODULE\n");
// if (! request_mem_region(gpio_base,gpio_len , "gpio")) { //理论上先申请这片区域,不过树莓派已经将这片区域申请好了,可通过cat /proc/iomem了解i/o内存分配情况
// printk(KERN_INFO " can't get I/O mem address 0x%lx\n",
// gpio_base);
// return -ENODEV;
// }
gpio_base = (unsigned long)ioremap(gpio_base,gpio_len);
//将基地址内容读出来或上要改变的值,再写回去。iowrite32第一个参数是写的值,第二个参数是写的地址
iowrite32(ioread32((void *)gpio_base)|(1<<12),(void*)gpio_base); //这一整行代码意思是将pin4设置为输出,具体寄存器含义下载树莓派芯片手册查看
printk(KERN_INFO"gpio remap base:0x%lx\n",gpio_base);
//如下gpio地址是4字节对齐的,可以用如下8 16 32读, 如果gpio_base+1,+2,+3就不对了
printk(KERN_INFO"read %x %x %x\n",ioread8((void *)(gpio_base)),ioread16((void *)(gpio_base)),ioread32((void *)(gpio_base)));
timer_setup(&t1,timer_fn,0); //初始化定时器
mod_timer(&t1,jiffies+msecs_to_jiffies(1000)); //设置溢出时间1s
return 0;
}
static void __exit hello_exit(void)
{
printk(KERN_INFO "GOODBYE LINUX\n");
//release_mem_region(gpio_base,gpio_len);
del_timer(&t1);
iounmap((void *)gpio_base);
}
module_init(hello_init);
module_exit(hello_exit);
MODULE_LICENSE("Dual BSD/GPL");//许可 GPL、GPL v2、Dual MPL/GPL、Proprietary(专有)等,没有内核会提示
MODULE_AUTHOR("KGZ"); //作者
MODULE_VERSION("V1.0"); //版本
如下make,insmod。

如下dmesg,8位读到的是0,16位读到的是1900,32位读到的是21201900。对其他寄存器或其他外设操作也是类似,只要这外设是按照io内存方式映射的,就可以用这种方式控制它。

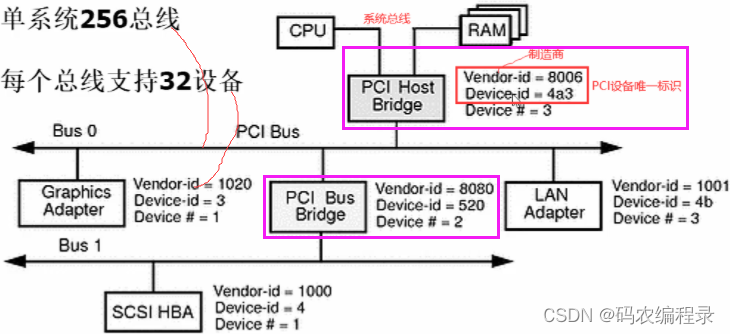
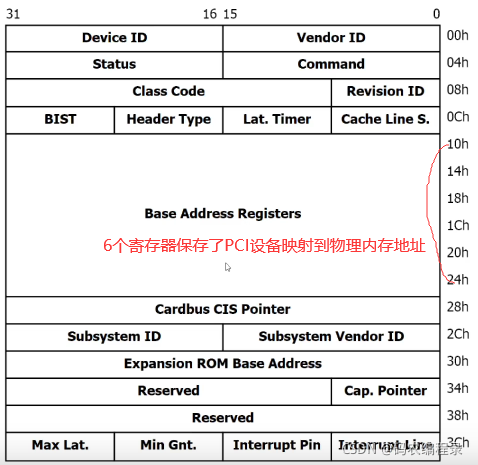
17.PCI设备驱动:pci是一种标准总线,基于它可以实现块设备,网络设备,字符设备
如下是pci总线树形结构示意图,两个id用来匹配pci设备和驱动。
如下是PCI设备的配置寄存器值:每个PCI设备中都有一个配置区域,这个区域保存了PCI设备信息,下图是前64字节内容(标准化的)。
// pci_skel.c
/*
struct pci_device_id 用这结构体构造一个数组,数组中包含驱动支持的所有设备
PCI_DEVICE() 这个宏通过vendor-id和device-id填充上面pci_device_id结构体内容
PCI_DEVICE_CLASS() 通过class类填充pci_device_id结构体内容
MODULE_DEVICE_TABLE() 上面填充好结构体构造的数组后,调用MODULE_DEVICE_TABLE()宏,导出pci_device_id结构体到用户空间,使热插拔和模块装载系统知道什么模块针对什么硬件设备
struct pci_driver 利用这结构体将驱动注册到内核中
pci_register_driver() 注册
pci_unregister_driver() 注销
在读取pci设备的配置寄存器或io空间,io地址时,需要如下调用:
pci_enable_device() 激活/初始化pci设备,比如唤醒设备、读写配置信息等
pci_disable_device() 关闭设备
如下内核提供一系列函数读取pci设备配置信息
pci_read_config_byte() 8位
pci_read_config_word() 16位
pci_read_config_dword() 32位
pci_resource_start() 获取区域信息(bar info) pci支持6个区域(io端口/io内存),获取io空间起始地址
pci_resource_end() 获取io空间结束地址
pci_resource_flags() 获取io空间标志信息
pci_request_regions() 获得io空间地址后,调用这行函数申请这片区域,跟request_mem_region()一样
pci_release_regions()
pci_ioremap_bar() 物理地址映射到虚拟地址空间,跟ioremap一样,作了必要的检查
pci_set_drvdata() 设置驱动私有数据
pci_get_drvdata() 获取驱动私有数据
*/
#include <linux/module.h>
#include <linux/pci.h>
struct pci_card //私有数据
{
//端口读写变量
resource_size_t io; //io空间起始地址
long range,flags; //空间大小,空间标志
void __iomem *ioaddr; //地址被映射后的虚拟地址
int irq; //pci设备中断号
};
static struct pci_device_id ids[] = { //pci_device_id里面包含这驱动支持的所有pci设备
{ PCI_DEVICE(PCI_VENDOR_ID_INTEL, 0x100e) }, //第一个参数:厂商号。第二个参数:设备id
{ PCI_DEVICE(PCI_VENDOR_ID_INTEL,PCI_DEVICE_ID_INTEL_80332_0) },
{ 0, } //最后一组是0,表示结束
};
MODULE_DEVICE_TABLE(pci, ids); //导出到用户空间:第一个参数:总线类型。第二个参数:上面数组名称。
void skel_get_configs(struct pci_dev *dev) //测试读写配置空间
{
uint8_t val1;
uint16_t val2;
uint32_t val4;
pci_read_config_word(dev,PCI_VENDOR_ID, &val2);
printk("vendorID:%x",val2);
pci_read_config_word(dev,PCI_DEVICE_ID, &val2);
printk("deviceID:%x",val2);
pci_read_config_byte(dev, PCI_REVISION_ID, &val1);
printk("revisionID:%x",val1);
pci_read_config_dword(dev,PCI_CLASS_REVISION, &val4);
printk("class:%x",val4);
}
/* 设备中断服务*/
static irqreturn_t mypci_interrupt(int irq, void *dev_id)
{
struct pci_card *mypci = (struct pci_card *)dev_id;
printk("irq = %d,mypci_irq = %d\n",irq,mypci->irq);
return IRQ_HANDLED;
}
static int probe(struct pci_dev *dev, const struct pci_device_id *id) //当我们插入模块时,内核发现驱动程序和设备是匹配的就会调用probe函数,第一个参数pci设备结构体,第二个参数数组
{
int retval = 0;
struct pci_card *mypci;
printk("probe func\n");
if(pci_enable_device(dev)) //激活pci设备
{
printk (KERN_ERR "IO Error.\n");
return -EIO;
}
mypci = kmalloc(sizeof(struct pci_card),GFP_KERNEL); //私有数据分配一空间
if(!mypci)
{
printk("In %s,kmalloc err!",__func__);
return -ENOMEM;
}
//如下是给私有数据的属性赋值
mypci->irq = dev->irq; //给私有数据中断号赋值,内核启动时扫描pci设备,给pci设备分配中断号获取基本信息
if(mypci->irq < 0)
{
printk("IRQ is %d, it's invalid!\n",mypci->irq);
goto out_mypci;
}
mypci->io = pci_resource_start(dev, 0); //获得区域0的开始地址
mypci->range = pci_resource_end(dev, 0) - mypci->io + 1; //结束地址 - 开始地址 + 1 就是空间大小
mypci->flags = pci_resource_flags(dev,0); //获取区域0标志,这标志会指示这区域是io内存还是io端口
printk("start %llx %lx %lx\n",mypci->io,mypci->range,mypci->flags);
printk("PCI base addr 0 is io%s.\n",(mypci->flags & IORESOURCE_MEM)? "mem":"port"); //判断是io内存还是io端口
//retval=request_mem_region(mypci->io,mypci->range, "pci_skel");
retval = pci_request_regions(dev,"pci_skel"); //要操作这内存区域,首先要分配这内存区,作用同上行
if(retval)
{
printk("PCI request regions err!\n");
goto out_mypci;
}
mypci->ioaddr = pci_ioremap_bar(dev,0); //分配成功,就将物理地址映射到内核的虚拟地址中,作用同下行,不过pci.h提供pci_ioremap_bar就用这个
//mypci->ioaddr = ioremap(mypci->io,mypci->range); 这里变量的类型与函数参数的类型必须一致,否则会出错
if(!mypci->ioaddr)
{
printk("ioremap err!\n");
retval = -ENOMEM;
goto out_regions;
}
//申请中断IRQ并给中断号绑定中断服务子函数pci_ioremap_bar
retval = request_irq(mypci->irq, mypci_interrupt, IRQF_SHARED, "pci_skel", mypci);
if(retval)
{
printk (KERN_ERR "Can't get assigned IRQ %d.\n",mypci->irq);
goto out_iounmap;
}
pci_set_drvdata(dev,mypci); //将私有数据保存到pci设备结构体中
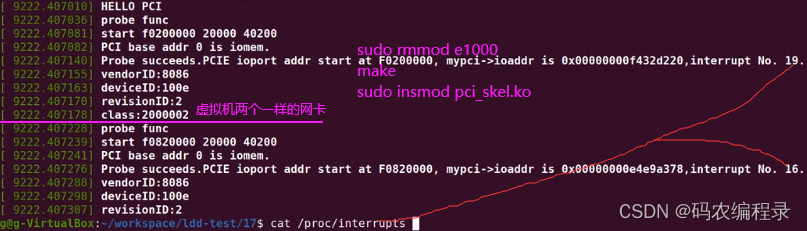
printk("Probe succeeds.PCIE ioport addr start at %llX, mypci->ioaddr is 0x%p,interrupt No. %d.\n",mypci->io,mypci->ioaddr,mypci->irq);
skel_get_configs(dev); //测试读写配置空间
return 0;
out_iounmap:
iounmap(mypci->ioaddr);
out_regions:
pci_release_regions(dev);
out_mypci:
kfree(mypci);
return retval;
}
//当probe函数结束后就拿到了pci设备io空间地址,之后业务逻辑代码操作这io地址进行
static void remove(struct pci_dev *dev) //移除PCI设备,清除在prob函数中做的工作
{
struct pci_card *mypci = pci_get_drvdata(dev); //获得私有数据
free_irq (mypci->irq, mypci); //释放中断号
iounmap(mypci->ioaddr); //取消地址映射
//release_mem_region(mypci->io,mypci->range);
pci_release_regions(dev); //释放申请的空间
kfree(mypci); //释放私有数据
pci_disable_device(dev); //关闭pci设备
printk("Device is removed successfully.\n");
}
static struct pci_driver pci_driver = {
.name = "pci_skel", //一般和模块名称一样即本文件名称
.id_table = ids, //支持的所有设备结构体数组的名称
.probe = probe, //当内核检测到和驱动匹配后会调用probe
.remove = remove,
};
//111111111111111111111111111111111111111111111111111111111111111111111111111111
static int __init pci_skel_init(void)
{
printk("HELLO PCI\n");
return pci_register_driver(&pci_driver); //上行结构体地址
}
static void __exit pci_skel_exit(void)
{
printk("GOODBYE PCI\n");
pci_unregister_driver(&pci_driver); //注销驱动程序
}
MODULE_LICENSE("GPL");
module_init(pci_skel_init);
module_exit(pci_skel_exit);
如下网卡驱动在设备启动时就加载了,需先将模块驱动移除rmmod。显示probe func说明调用了probe函数,发现了匹配的设备。mypci->ioaddr是映射后的虚拟地址。
lspci:列出系统中所有pci的简略信息,总线:设备.功能。

如下还有一个pci网卡信息。cat /pro/bus/pci/devices也会列出pci设备详细信息。

如下进入目录得到pci设备信息文件。