一:委托
所有的代码语言创造者母语都是英语,我们从英语翻译到中文的过程中难免会存在一些不太能还原本意的词,比如我之前一直不理解构造函数和析构函数,只知道这俩货作用相反,直到我看到了它的英文意思,Construstor/Distructor,我才彻底理解了他们的作用。
接下来我们来看委托,Delegate,来看两个例句,深入理解Delegate...
Can you delegate some tasks or projects? 你能够分配一些任务或者项目吗?
So why not delegate more work to your employees? 所以你为啥不给你的员工多分分配点任务?
从上面的句子中我们可以看到,他就是分配,也就是委托的意思(但是感觉可能有些人对委托的理解不如分配来的直接,至少对我来说是这样)
微软官方的解释是委托可以获取一个或多个方法,但是类型和返回值必须和方法相同,可以理解成委托是方法的抽象,也就是说定义一个方法的模板,至于这个方法具体是怎么样的,就由方法自己去实现。这点和函数指针很像...后续写单播委托时候再添加这部分内容。
我们可以说,委托就是一个方法的类型
话不多说,看代码...
一、单播委托——一次只能装进去一个方法
Public delegate 返回值 MyDelegate(参数1,参数2)就这么一步,我们就把委托定义出来了,接下来要做的就是把这玩意儿实例化出来,那我们怎么把我们的方法给委托呢?
第一点就是我们需要有和定义的委托类型一致的返回值和参数列表
其实委托就是起源于C语言的函数指针,不过在C#以委托的形式存在了
但是在Java中没有委托这么一说...
//使用Typedef将该函数指针声明为一种类型,它是指向两个参数为int,返回值为int的函数指针
typedef int (*Calculator)(int x , int y);

int Add(int a ,int b)
{
    return a+b;
}

int Multiply(int a ,int b)
{
    return a*b;
}

//函数指针的使用

Calculator Pointer1 = &Add;
Calculator Pointer2 = &Multiply;

//这样我们在调用函数的时候就不再写函数,而是采用函数指针的方法,间接的指向了该类型的函数
Pointer1(0,1);
Pointer2(1,2);
从上面的函数指针我们可以看出,我们在注册方法的时候,可以间接的声明一个和该方法类型和返回值都一致的指针类型,从而调用函数指针即可,那么我们的委托和它是类似的....
接下来看我们的委托的实例化和方法的插入,可以使用new,也可以直接引用方法:
//实例化委托
MyDelegate myDelegate = new MyDelegate(Function);

//简化写法
myDelegate = Telegate;


返回值类型 Function(参数1,参数2)
{
    方法体;
}
委托的调用,可以使用Invoke,也可以直接写委托名+()
可以通过Invoke进行调用委托
myDelegate.Invoke();

也可以直接myDelegate();
二、多播委托——一次装多个方法,但不安全
在上面的方法添加环节,我们只需要做小小的修改
myDelegate += ChangeColor;
myDelegate += Log;
但是其实我们没事儿也不会这么干,这样长期下来有可能会存在内存泄漏,如果顺序执行列表中方法有一个出错了,后面的就都不会执行了,所以我们还有其他更好的选择
三、Action委托和Func委托
大多数的情况下,我们不太需要自己去声明委托,而是使用现成的委托即可,Unity为我们内置了两种泛型委托
1)Action委托——返回值必须为空,参数可有可无
//声明无参数的Action委托
Action action;

//声明有参数的Action委托
Action<string,float> action1;

//Action的使用
action = new Action(同参数的方法1)
action1 = new Action<string ,float> (sayhello);

//sayhello方法
public void SayHello(string name,float num)
{
    Debug.log(sting.Fromat("{0} has {1} ChampionShips .",name,num));
}
2) Func委托——返回值必须有,但是参数可有可无
//声明Func委托,前面是参数,后面是返回值
Func<double,double,double> func1;

//使用
func1 = new Func<double,double,double>(Add);


//跟Func结构一样的方法
public double Add(doublea ,double b)
{
    return a+b;
}
二:事件
事件,使对象或类具备通知能力
事件,是委托字段的一个包装器,它对于委托字段的访问起了限制作用
对外界隐藏了委托实例的大部分功能,仅暴露添加/移除事件处理器的功能
日常开发中,自己声明事件的机会比较少,一般是用已有事件比较多...
java中没有委托,事件这么一说,只用Interface来实现
一、事件的五个重要因素
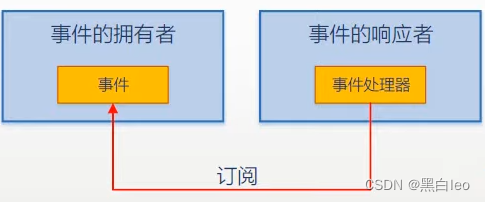
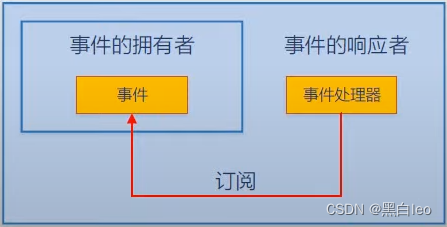
事件的拥有者
事件成员(Event)
事件的响应者(Event Subscriber)
事件处理器(Event handler,本质上是回调方法)
事件订阅(+=)
他们之间的关系可以如下几种:
1:事件的拥有者类和事件的响应者是不同的类
using System.Timers;
using UnityEngine;

public class EventTimothyLiu1 : MonoBehaviour
{
    private void Start()
    {
        //世间间隔,每过1s就触发Elesap事件
        Timer timer = new Timer();
        timer.Interval = 1000;

        Boy boy = new();
        Girl girl = new();

        timer.Elapsed += boy.OnAction;
        timer.Elapsed += girl.OnAction;

        timer.Start();
    }
}
public class Boy
{
    internal void OnAction(object sender, ElapsedEventArgs e)
    {
        Debug.Log("1");
    }
}
public class Girl
{
    internal void OnAction(object sender, ElapsedEventArgs e)
    {
        Debug.Log("2");
    }
}
在该示例中,事件的拥有者是Timer类,事件的响应者是自定义的Boy,Girl类
所以事件的响应者和拥有者是两个类
第二个例子:
using System;
using System.Windows.Forms;

namespace EventLiu
{
    class Program
    {
        static void Main(string[] args)
        {
            //事件的拥有者:Form
            Form form = new Form();
            //事件的响应者:Controller
            Controller controller = new Controller(form);
            form.ShowDialog();
        }
    }
    class Controller
    {
        private Form form;
        /// <summary>
        /// CTOR再加Tab即可编写出构造器
        /// 也叫构造函数,每个类都必须有
        /// 在构建类的引用时自动运行的方法!
        /// </summary>
        public Controller(Form form)
        {
            if (form!= null)
            {
                //this就是类的实例
                //this后是我们定义的字段,后面是参数form
                this.form = form;
                //Click是事件
                this.form.Click += this.FormClicked;
            }
        }
        /// <summary>
        /// 事件处理器
        /// </summary>
        /// <param name="sender"></param>
        /// <param name="e"></param>
        private void FormClicked(object sender, EventArgs e)
        {
            this.form.Text = DateTime.Now.ToString();
        }
    }
}
上述的代码段中,我们引入了Form名称空间
事件的拥有者是Form,事件的响应者是Controller
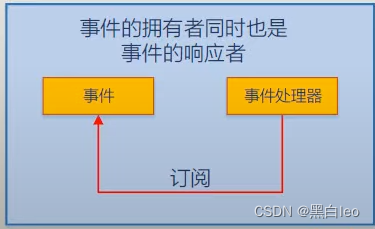
2:事件的拥有者同时也是事件的响应者
using System;
using System.Windows.Forms;

namespace EventLiu
{
    class Program1
    {
        static void Main(string[] args)
        {
            //事件的拥有者:myForm
            //事件的接受者:myForm
            MyForm myForm = new MyForm();
            //事件:Click
            myForm.Click += myForm.FormClicked;
        }
    }
    /// <summary>
    /// 继承Form
    /// </summary>
    class MyForm : Form
    {
        /// <summary>
        /// 事件的处理器
        /// </summary>
        /// <param name="sender"></param>
        /// <param name="e"></param>
        internal void FormClicked(object sender, EventArgs e)
        {
            this.Text = DateTime.Now.ToString();
        }
    }
}
事件的拥有者是Form
事件的响应者也是myForm的实例
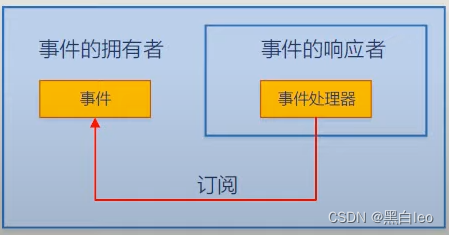
3:事件的拥有者是事件的响应者的成员(频率最高)
事件的响应者用自己的方法订阅者自己的字段成员的事件
using System;
using System.Windows.Forms;

namespace EventLiu
{
    class Program1
    {
        static void Main(string[] args)
        {
            MyForm myForm = new MyForm();
            myForm.ShowDIalog();
        }
    }
    class MyForm :Form
    {
        private TextBox textBox;
        //从订阅看事件拥有者就是button
        private Button button;

        public MyForm()
        {
            this.textBox = new TextBox();
            this.button = new Button();
            this.Controls.Add(this.button);
            this.Controls.Add(this.textBox);

            //Click是事件
            //事件的响应者是this,也就是MyForm的实例对象
            this.button.Click += this.ButtonClicked;
        }
        //事件处理器
        private void ButtonClicked(object sender, EventArgs e)
        {
            this.textBox.Text = "Hello";
        }
    }
}
在该段代码中,我们自己创建MyForm类,继承自Form
事件的拥有者是该类中的成员Button,事件的响应者是该类的实例化
也就是儿子有事件,爸爸订阅了。
4:事件的响应者是事件的拥有者的成员
二、事件的完整声明格式
用以下代码来看:
using System;
using System.Threading;
using UnityEngine;

public class EventTimothyLiu2 : MonoBehaviour
{
    private void Start()
    {
        Customer1 customer1 = new();
        Waiter1 waiter1 = new();

        customer1.Order += waiter1.Action;
        customer1.Action();
        customer1.PayTheBill();
    }
}
/// <summary>
/// 派生自EventArgs,习惯
/// </summary>
public class OrderEventArgs1:EventArgs
{
    public string DishName { get; set; }
    public string size { get; set; }
}

//把委托放置在类外
/// <summary>
/// 用EvenetHandler原因:
/// 1:别人看到这个后缀就知道这个委托是专门用来声明事件的
/// 2:EventHandle表明委托来约束事件处理器
/// 3:委托的实例是用来存储事件处理器
/// </summary>
/// <param name="customer"></param>
/// <param name="e"></param>
public delegate void OrderEventHandler1(Customer1 customer, OrderEventArgs1 e);


/// <summary>
/// Customer1是事件的拥有者,它拥有事件Order
/// </summary>
public class Customer1
{
    private OrderEventHandler1 OrderEventHandler1;
    public event OrderEventHandler1 Order
    {
        add { this.OrderEventHandler1 += value; }
        remove { this.OrderEventHandler1 -= value; }
    }

    public double Bill { get; set; }

    public void PayTheBill()
    {
        Debug.Log("I will pay $" + this.Bill);
    }

    public void WalkIn()
    {
        Debug.Log("Walk into the restaurant.");
    }
    public void SitDown()
    {
        Debug.Log("Sit down.");
    }
    public void Think()
    {
        for (int i = 0; i < 5; i++)
        {
            Debug.Log("Let me think...");
            Thread.Sleep(1000);
        }
        if(this.OrderEventHandler1 != null)
        {
            OrderEventArgs1 e = new OrderEventArgs1
            {
                DishName = "Kongpao Chicken",
                size = "large"
            };
            this.OrderEventHandler1.Invoke(this,e);
        }
    }
    public void Action()
    {
        this.WalkIn();
        this.SitDown();
        this.Think();
    }
}

/// <summary>
/// Waiter1是事件的接受者,它拥有事件的响应器Action
/// </summary>
public class Waiter1
{
    public void Action(Customer1 customer1, OrderEventArgs1 e)
    {
        Debug.Log("I will serve you  the dish -{0} "+ e.DishName);
        double price = 10;
        switch (e.size)
        {
            case "small":
            price = price * 0.5;
                break;
            case "large":
                price = price * 1.5;
                break;
            default:
                break;
        }
        customer1.Bill += price;
    }
}
从以上代码可以看出
Customer进入餐厅,走进,坐下,思考,然后触发点餐事件
Customer是点餐事件的拥有者
Waiter是点餐事件的接受者,它还得有点餐的响应事件,就是算出价格,并采取行动
在自定义点餐事件的时候,我们采用了EventHandler委托来给事件做支撑
创建了EventArgs类来承载事件,谁发起的事件,谁就是委托的第一个参数
但是这样写比较复杂,我们来看事件的简略声明格式
三、事件的简单声明格式
using System;
using System.Threading;
using UnityEngine;

public class EventTimothyLiu3 : MonoBehaviour
{
    private void Start()
    {
        Customer2 customer2 = new();
        Waiter2 waiter2 = new Waiter2();

        customer2.Order2 += waiter2.Action;

        customer2.Action();
        customer2.PayTheBill();
    }
}
/// <summary>
/// 先声明委托,委托两个参数分别是事件的拥有者和事件需要使用的参数
/// </summary>
/// <param name="customer2"></param>
/// <param name="e"></param>
public delegate void OrderEventHandler2(Customer2 customer2, OrderEventArgs2 e);

/// <summary>
/// 容纳事件参数
/// </summary>
public class OrderEventArgs2:EventArgs
{
    public string DishName { get; set; }
    public string size { get; set; }
}

/// <summary>
/// 事件的拥有者
/// </summary>
public class Customer2
{
    //原本需要先实例化委托,然后将委托赋予事件中进行使用
    //private OrderEventHandler1 OrderEventHandler1;
    //public event OrderEventHandler1 Order
    //{
    //    add { this.OrderEventHandler1 += value; }
    //    remove { this.OrderEventHandler1 -= value; }
    //}
    //现在进行简化
    /// <summary>
    /// 只需要事件+委托即可
    /// </summary>
    public event OrderEventHandler2 Order2;

    public double Bill { get; set; }
    public void PayTheBill()
    {
        Debug.Log("I will pay $ " + this.Bill);
    }
    public void WalkIn()
    {
        Debug.Log("I'm Coming");
    }
    public void SitDown()
    {
        Debug.Log("I'm sit down");
    }
    public void Think()
    {
        for (int i = 0; i < 5; i++)
        {
            Debug.Log("Let me think..");
            Thread.Sleep(1000);
        }
        if(Order2 != null)
        {
            OrderEventArgs2 e = new OrderEventArgs2();
            e.DishName = "Kongpao Chicken";
            e.size = "large";
            this.Order2.Invoke(this, e);
        }
    }
    public void Action()
    {
        this.WalkIn();
        this.SitDown();
        this.Think();
    }
}
/// <summary>
/// 事件的接收者和Action事件
/// </summary>
public class Waiter2
{
    public void Action(Customer2 customer2, OrderEventArgs2 e)
    {
        Debug.Log("I will serve you  the dish: " + e.DishName);
        double price = 10;
        switch (e.size)
        {
            case "small":
                price = price * 0.5;
                break;
            case "large":
                price = price * 1.5;
                break;
            default:
                break;
        }
        customer2.Bill += price;
    }
}
还是上述的代码,我们进行了简化
我们将如下代码:
private OrderEventHandler1 OrderEventHandler1;
    public event OrderEventHandler1 Order
    {
        add { this.OrderEventHandler1 += value; }
        remove { this.OrderEventHandler1 -= value; }
    }
简化成了:
public event OrderEventHandler2 Order2这样的简化是微软后台进行了,我们可以直接如此书写
其实并非不存在委托字段的声明,还是存在的,只是存在于后台中,微软后台声明了,我们不需要看到,所以可以进行简化
还可以进一步简化:
将声明委托的部分省略掉,即使用微软定义好的EventHandler的委托类型,代码如下:
using System;
using System.Threading;
using UnityEngine;

public class EventTimothyLiu4 : MonoBehaviour
{
    private void Start()
    {
        Customer3 customer3 = new Customer3();
        Waiter3 waiter3 = new Waiter3();

        customer3.Order3 += waiter3.Action;

        customer3.Action();
        customer3.PayTheBill();
    }
}
public class OrderEventArgs3:EventArgs
{
    public string DishName { get; set; }
    public string size { get; set; }
}
public class Customer3
{
    public event EventHandler Order3;
    public double Bill { get; set; }

    public void WalkIn()
    {
        Debug.Log("Im coming");
    }
    public void SitDown()
    {
        Debug.Log("Im Sitting");
    }
    public void Think()
    {
        for (int i = 0; i < 5; i++)
        {
            Debug.Log("Im thinking");
            Thread.Sleep(1000);
        }
        if(Order3 != null)
        {
            OrderEventArgs3 e = new OrderEventArgs3();
            e.DishName = "KongpaoChicken";
            e.size = "large";
            this.Order3.Invoke(this, e);
        }
    }
    internal void Action()
    {
        this.WalkIn();
        this.SitDown();
        this.Think();
    }

    internal void PayTheBill()
    {
        Debug.Log("I will Pay for $" + this.Bill);
    }
}
public class Waiter3
{
    public void Action(object sender,EventArgs e)
    {
        Customer3 customer3 = sender as Customer3;
        OrderEventArgs3 orderinfo = e as OrderEventArgs3;

        Debug.Log("i will serve  you the dish" + orderinfo.DishName);
        double price = 10;
        switch (orderinfo.size)
        {
            case "small":
                price = price * 0.5;
                break;
            case "large":
                price = price * 1.5;
                break;
            default:
                break;
        }
        customer3.Bill += price;
    }
}
注意在Waiter类中的实例化Cutsome3和OrderEventArgs3的实例化使用
采用实例化,参数 as 的方法,将参数转化为我们需要的
为什么有了委托字段/属性,还需要事件?
为了程序逻辑更加有道理,更加安全,谨防“借刀杀人”



![[学习笔记]黑马程序员Spark全套视频教程,4天spark3.2快速入门到精通,基于Python语言的spark教程](https://img-blog.csdnimg.cn/img_convert/803b59e25db6790514020005607041aa.png)


