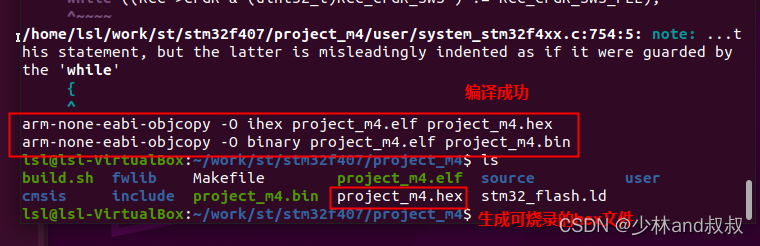
从OkHttp到Retrofit
- 主要流程
- dispatcher
- Interceptors
- RetryAndFollowUpInterceptor
- BridgeInterceptor
- CacheInterceptor
- ConnectInterceptor
- CallServerInterceptor
- 缓存
- 连接池
主要流程

okHttp的使用比较简单,通常需要首先初始化一个HttpClient,然后在每次发送请求的时候创建出一个request,并且将这个request包装成一个RealCall,RealCall就是真正执行请求的执行者,最后只需要调用call的execute方法同步执行或者异步执行就可以了。
示例代码如下:
class MainActivity : AppCompatActivity() {
    val client = OkHttpClient()
    override fun onCreate(savedInstanceState: Bundle?) {
        super.onCreate(savedInstanceState)
        setContentView(R.layout.activity_main)
        val url = "www.baidu.com"
        val request = Request.Builder().url(url).build()
        val call = client.newCall(request)
        //同步
        call.execute()
        //异步
        call.enqueue(object : Callback {
            override fun onFailure(call: Call, e: IOException) {
                TODO("Not yet implemented")
            }

            override fun onResponse(call: Call, response: Response) {
                TODO("Not yet implemented")
            }

        })
    }
}
看上去OkHttp只有call和client两个组成,但是实际上client还包含了两个非常重要的类——用于分发request的dispatcher和用于拦截修改请求的Interceptors。
dispatcher

client中的dispacher主要负责分发和处理异步的request请求,首先来看看当一个异步的Call调用enqueue方法之后到底发生了什么:
@Override public void enqueue(Callback responseCallback) {
    synchronized (this) {
    //判断是否重复执行
      if (executed) throw new IllegalStateException("Already Executed");
      executed = true;
    }
   	//transmitter发射器,看起来主要作用是监听一个call的发送生命周期
    transmitter.callStart();
    client.dispatcher().enqueue(new AsyncCall(responseCallback));
  }
//#Dispatcher.class
void enqueue(AsyncCall call) {
	//加了同步锁
    synchronized (this) {
    //加入到等待队列
      readyAsyncCalls.add(call);
      if (!call.get().forWebSocket) {
      	//判断是否存在相同的Host,如果存在相同的host则复用之前的host计数器,
      	//这里主要是因为okHttp限制了同一host默认最多只能有5个请求
      	//这里的计数器采用了AtomicInteger
        AsyncCall existingCall = findExistingCallWithHost(call.host());
        if (existingCall != null) call.reuseCallsPerHostFrom(existingCall);
      }
    }
    promoteAndExecute();
  }
private boolean promoteAndExecute() {
	... ...
    synchronized (this) {
      //遍历所有的准备队列,
      for (Iterator<AsyncCall> i = readyAsyncCalls.iterator(); i.hasNext(); ) {
        AsyncCall asyncCall = i.next();
		//判断是在运行的call是否达到了最大值
        if (runningAsyncCalls.size() >= maxRequests) break; // Max capacity.
        //判断同一host的call是否达到了最大值
        if (asyncCall.callsPerHost().get() >= maxRequestsPerHost) continue; // Host max capacity.
        i.remove();
        //满足可执行条件,把call移动出来,计数器++,并且加入到executableCalls和runningAsyncCalls中
        asyncCall.callsPerHost().incrementAndGet();
        //executableCalls是指这一次会执行的call,可以看到每次调用promoteAndExecute都会执行一批次call
        executableCalls.add(asyncCall);
        runningAsyncCalls.add(asyncCall);
      }
      isRunning = runningCallsCount() > 0;
    }

	//执行所有的executableCalls中的call
    for (int i = 0, size = executableCalls.size(); i < size; i++) {
      AsyncCall asyncCall = executableCalls.get(i);
      //executorService是一个懒汉式的单例线程池
      //核心线程数为0,空闲了60秒后,所有线程会被清空,
      //最大线程数无限制,由于运行队列有最大值,因此不需要限制线程数
      asyncCall.executeOn(executorService());
    }

    return isRunning;
  }
 //#AsyncCall.Class
 void executeOn(ExecutorService executorService) {
      assert (!Thread.holdsLock(client.dispatcher()));
      boolean success = false;
      try {
      	//开始执行
        executorService.execute(this);
        success = true;
      } catch (RejectedExecutionException e) {
        InterruptedIOException ioException = new InterruptedIOException("executor rejected");
        ioException.initCause(e);
        transmitter.noMoreExchanges(ioException);
        responseCallback.onFailure(RealCall.this, ioException);
      } finally {
        if (!success) {
        	//如果失败的则移除队列
          client.dispatcher().finished(this); // This call is no longer running!
        }
      }
    }
Interceptors

从上文可以看到,call最后执行了execute方法,那么call具体的execute是什么样子的呢?
@Override protected void execute() {
	  ... ...
      transmitter.timeoutEnter();
      try {
        Response response = getResponseWithInterceptorChain();
        signalledCallback = true;
        responseCallback.onResponse(RealCall.this, response);
      } catch (IOException e) {
      	... ...
      } finally {
        client.dispatcher().finished(this);
      }
    }
  }
可以看到call调用了getResponseWithInterceptorChain方法,并且将返回的结果回调给了callback。
getResponseWithInterceptorChain里面添加了client中保存的自定义拦截器以及5个默认拦截器(这里采用了一个责任链的设计模式),对于每一个request请求首先会按照顺序过一遍每个拦截器,最后到达CallServerInterceptor,CallServerInterceptor是真正和server发生请求的拦截器并且获取请求成功之后的response。获取到response之后,response又会倒序过一遍之前的所有拦截器。
Response getResponseWithInterceptorChain() throws IOException {
    // Build a full stack of interceptors.
    List<Interceptor> interceptors = new ArrayList<>();
    interceptors.addAll(client.interceptors());
    interceptors.add(new RetryAndFollowUpInterceptor(client));
    interceptors.add(new BridgeInterceptor(client.cookieJar()));
    interceptors.add(new CacheInterceptor(client.internalCache()));
    interceptors.add(new ConnectInterceptor(client));
    if (!forWebSocket) {
      interceptors.addAll(client.networkInterceptors());
    }
    interceptors.add(new CallServerInterceptor(forWebSocket));

    Interceptor.Chain chain = new RealInterceptorChain(interceptors, transmitter, null, 0,
        originalRequest, this, client.connectTimeoutMillis(),
        client.readTimeoutMillis(), client.writeTimeoutMillis());

    boolean calledNoMoreExchanges = false;
    try {
      Response response = chain.proceed(originalRequest);
      ... ...
     }
  }
这里不如来看看这5个原生的拦截器分别起了什么作用。
RetryAndFollowUpInterceptor
重试和
//最大重试次数
static final int MAX_FOLLOW_UPS = 20;

Response intercept(Chain chain) throws IOException {
    Request request = chain.request();
    RealInterceptorChain realChain = (RealInterceptorChain) chain;
    Transmitter transmitter = realChain.transmitter();
    int followUpCount = 0;
    while (true) {
        //从连接池中获取一个连接,如有可以相同请求可以复用连接则复用
        transmitter.prepareToConnect(request);
        //交给下一个拦截器
        Response response = realChain.proceed(request, transmitter, null);
        //判断是否需要重试或重定向,需要则返回新的Request
        Request followUp = followUpRequest(response, route);
        if (followUp == null) {
            return response;
        }
        RequestBody followUpBody = followUp.body();
        if (followUpBody != null && followUpBody.isOneShot()) {
            //如果RequestBody有值且只许被调用一次,直接返回response
            return response;
        }
        if (++followUpCount > MAX_FOLLOW_UPS) {
            //重试次数上限,结束
            throw new ProtocolException("Too many follow-up requests: " + followUpCount);
        }
        //将新的请求赋值给request,继续循环
        request = followUp;
    }
}
BridgeInterceptor
桥接拦截器,总之就是处理request和response中的body和header,gzip也是在这里完成的。
Response intercept(Chain chain) throws IOException {
    Request userRequest = chain.request();
    Request.Builder requestBuilder = userRequest.newBuilder();
    RequestBody body = userRequest.body();
    if (body != null) {
        requestBuilder.header("Content-Type", contentType.toString());
        //处理Content-Length、Transfer-Encoding
        //...
    }
    //处理Host、Connection、Accept-Encoding、Cookie、User-Agent、
    //...
    //放行,把处理好的新请求往下传递,得到Response
    Response networkResponse = chain.proceed(requestBuilder.build());
    Response.Builder responseBuilder = networkResponse.newBuilder()
        .request(userRequest);
	//处理新Response的Content-Encoding、Content-Length、Content-Type、gzip
    //返回新Response
    return responseBuilder.build();
}
CacheInterceptor
InternalCache cache;

Response intercept(Chain chain) throws IOException {
    //获取候选缓存
    Response cacheCandidate = cache != null
        ? cache.get(chain.request())
        : null;
    //创建缓存策略,根据策略返回需要发送的请求networkRequest,或者是缓存的cacheResponse
    CacheStrategy strategy =
        new CacheStrategy.Factory(now, chain.request(), cacheCandidate).get();
    Request networkRequest = strategy.networkRequest;
    Response cacheResponse = strategy.cacheResponse;
    if (networkRequest == null && cacheResponse == null) {
        return new Response.Builder().code(504).xxx.build();
    }
    //如果不需要发送网络请求,直接返回缓存
    if (networkRequest == null) {
        return cacheResponse.newBuilder()
            .cacheResponse(stripBody(cacheResponse)).build();
    }
    //如果需要发送则把网络请求交给后面的拦截器处理
    Response networkResponse = chain.proceed(networkRequest);
    //处理完了之后如果缓存的cacheResponse不为空,并且server返回304缓存可用则更新并返回
    if (cacheResponse != null) {
        if (networkResponse.code() == HTTP_NOT_MODIFIED) {
            Response response = cacheResponse.newBuilder().xxx.build();
            //更新缓存,返回
            cache.update(cacheResponse, response);
            return response;
        }
    }
    //否则将网络response写入缓存
    Response response = networkResponse.newBuilder().xxx.build();
    cache.put(response);
    return response;
}
ConnectInterceptor
创建连接的拦截器
Response intercept(Chain chain) throws IOException {
    RealInterceptorChain realChain = (RealInterceptorChain) chain;
    Request request = realChain.request();
    Transmitter transmitter = realChain.transmitter();
    boolean doExtensiveHealthChecks = !request.method().equals("GET");
    //创建一个交换器Exchange
    Exchange exchange = transmitter.newExchange(chain, doExtensiveHealthChecks);
    return realChain.proceed(request, transmitter, exchange);
}
CallServerInterceptor
Response intercept(Chain chain) throws IOException {
    RealInterceptorChain realChain = (RealInterceptorChain) chain;
    Exchange exchange = realChain.exchange();
    Request request = realChain.request();
    //写请求头
    exchange.writeRequestHeaders(request);
    Response.Builder responseBuilder = null;
    //处理请求体body...
    //读取响应头
    responseBuilder = exchange.readResponseHeaders(false);
    //构建响应
    Response response = responseBuilder
        .request(request)
        .handshake(exchange.connection().handshake())
        .sentRequestAtMillis(sentRequestMillis)
        .receivedResponseAtMillis(System.currentTimeMillis())
        .build();
    //读取响应体
    response = response.newBuilder()
        .body(exchange.openResponseBody(response))
        .build();
    return response;
}
缓存
上面提到了okHttp存在一个缓存拦截器,那么这个缓存拦截器是怎么实现的呢?
//CacheStrategy.java
//内部类工厂,生产CacheStrategy
static class Factory {
    //一些字段:servedDate、lastModified、expires、etag...
    Factory(long nowMillis, Request request, Response cacheResponse) {
        this.nowMillis = nowMillis;
        this.request = request;
        this.cacheResponse = cacheResponse;
        if (cacheResponse != null) {
            //解析cacheResponse,把参数赋值给自己的成员变量
            this.sentRequestMillis = cacheResponse.sentRequestAtMillis();
            //...
            Headers headers = cacheResponse.headers();
            for (int i = 0, size = headers.size(); i < size; i++) {
                String fieldName = headers.name(i);
                String value = headers.value(i);
                if ("Date".equalsIgnoreCase(fieldName)) {
                    servedDate = HttpDate.parse(value);
                    servedDateString = value;
                } else if (xxx){
                    //...
                }
            }
        }
    }

    CacheStrategy get() {
        CacheStrategy candidate = getCandidate();
        if (candidate.networkRequest != null && request.cacheControl().onlyIfCached()) {
            //返回策略,交给拦截器
            return new CacheStrategy(null, null);
        }
        return candidate;
    }

    CacheStrategy getCandidate() {
        //根据header字段,得到各种策略,交给拦截器...
        return new CacheStrategy(xxx);
    }
}
Cache类中实现了InternalCache接口,这个接口将缓存写入到了磁盘里面,okHttp使用LRU算法来管理缓存。
//Cache.java
InternalCache internalCache = new InternalCache() {
    @Override public Response get(Request request) throws IOException {
        return Cache.this.get(request);//读取
    }

    @Override public CacheRequest put(Response response) throws IOException {
        return Cache.this.put(response);//写入
    }

    //...
};

Response get(Request request) {
    String key = key(request.url()); //键
    DiskLruCache.Snapshot snapshot; //缓存快照
    Entry entry;
    snapshot = cache.get(key); //cache是okhttp的DiskLruCache
    if (snapshot == null) {
        return null; //没缓存,直接返回
    }
    //快照得到输入流,用于创建缓存条目
    entry = new Entry(snapshot.getSource(ENTRY_METADATA));
    //得到响应
    Response response = entry.response(snapshot);
    return response;
}

CacheRequest put(Response response) {
    String requestMethod = response.request().method();
    if (!requestMethod.equals("GET")) {
        //不是get请求,不缓存
        return null;
    }
    //封装成日志条目
    Entry entry = new Entry(response);
    DiskLruCache.Editor editor = null;
    editor = cache.edit(key(response.request().url()));
    //写入缓存
    entry.writeTo(editor);
    return new CacheRequestImpl(editor);
}
连接池
之前说过RetryAndFollowUpInterceptor中通过Transmitter获取了一个connection,之后又在ConnectInterceptor中创建了一个交换器Exchange。这两者之间有什么关系呢?
Exchange内部包含了两个类ExchangeFinder以及ExchangeCodec。
ExchangeFinder的职责是找到一个合适的连接和ExchangeCodec,而ExchangeCodec的职责是负责对请求和返回消息进行解码。
在RetryAndFollowUpInterceptor中,Transmitter创建了一个exchangeFinder,并且把连接池传入,之后在ConnectInterceptor中又根据这个exchangeFinder,创建了一个Exchange,并且调用find方法获取合适的connection和ExchangeCodec。
public void prepareToConnect(Request request) {
	//复用旧的
    if (this.request != null) {
      if (sameConnection(this.request.url(), request.url()) && exchangeFinder.hasRouteToTry()) {
        return; // Already ready.
      }
     ... ...
    //没有旧的就开始重新创建
    this.request = request;
    this.exchangeFinder = new ExchangeFinder(this, connectionPool, createAddress(request.url()),
        call, eventListener);
  }
#Transmitter.Class
//创建一个新的Exchange
Exchange newExchange(Interceptor.Chain chain, boolean doExtensiveHealthChecks) {
    synchronized (connectionPool) {
      if (noMoreExchanges) {
        throw new IllegalStateException("released");
      }
      if (exchange != null) {
        throw new IllegalStateException("cannot make a new request because the previous response "
            + "is still open: please call response.close()");
      }
    }
    //调用find方法找到合适链接和解码器
    ExchangeCodec codec = exchangeFinder.find(client, chain, doExtensiveHealthChecks);
    //创建新的Exchange
    Exchange result = new Exchange(this, call, eventListener, exchangeFinder, codec);

    synchronized (connectionPool) {
      this.exchange = result;
      this.exchangeRequestDone = false;
      this.exchangeResponseDone = false;
      return result;
    }
  }
#ExchangeFinder.Class
public ExchangeCodec find(
      OkHttpClient client, Interceptor.Chain chain, boolean doExtensiveHealthChecks) {
      ... ...
    try {
    //找到一个合适的连接,并且根据这个连接创建出ExchangeCodec,ExchangeCodec中持有了这个Connection
      RealConnection resultConnection = findHealthyConnection(connectTimeout, readTimeout,
          writeTimeout, pingIntervalMillis, connectionRetryEnabled, doExtensiveHealthChecks);
      return resultConnection.newCodec(client, chain);
    }
    ... ...
  }
到这里Connection、Exchange和Transmitter的关系就大致明白了。
那么OkHttp又是如何管理连接的呢?
之前说过ExchangeFinder中会尝试获取一个connection,这里最终会调用到RealConnectionPool#transmitterAcquirePooledConnection方法:
boolean transmitterAcquirePooledConnection(Address address, Transmitter transmitter,
      @Nullable List<Route> routes, boolean requireMultiplexed) {
    assert (Thread.holdsLock(this));
    for (RealConnection connection : connections) {
      //transmitter要求多路复用,当前连接不能多路复用跳过
      if (requireMultiplexed && !connection.isMultiplexed()) continue;
      //当前连接不能够携带流分配地址。。。看不懂
      if (!connection.isEligible(address, routes)) continue;
      //获取当前连接,并且返回true
      transmitter.acquireConnectionNoEvents(connection);
      return true;
    }
    //没获取到
    return false;
  }
可以看到RealConnectionPool中维护了一个连接池,以及一个单个线程的线程池用于定期清除长期不用的连接:
public final class RealConnectionPool {
//后台线程用于清理过期的连接。 每个连接池最多运行一个线程。 线程池执行器允许池本身被垃圾收集。
  private static final Executor executor = new ThreadPoolExecutor(0 /* corePoolSize */,
      Integer.MAX_VALUE /* maximumPoolSize */, 60L /* keepAliveTime */, TimeUnit.SECONDS,
      new SynchronousQueue<>(), Util.threadFactory("OkHttp ConnectionPool", true));

  /** The maximum number of idle connections for each address. */
  private final int maxIdleConnections;
  private final long keepAliveDurationNs;
  private final Runnable cleanupRunnable = () -> {
  	... ...//执行具体的清除操作
  };
  //连接池
  private final Deque<RealConnection> connections = new ArrayDeque<>();、
  //标志位,判断是否在清除
  boolean cleanupRunning;
  //put 操作,每次put的时候会去判断是否需要清除下连接
  //ExchangeFinder中获取connection的时候如果没有复用的就会新创建一个connection并且put到这里
  void put(RealConnection connection) {
    assert (Thread.holdsLock(this));
    if (!cleanupRunning) {
      cleanupRunning = true;
      executor.execute(cleanupRunnable);
    }
    connections.add(connection);
  }