使用VNC技术实现的局域网内windows远程桌面
- 项目用途
- 服务端的技术实现
- 1. 安装UItraVNC软件,只部署server端即可
- 2. 为UItraVNC设定自定义密码
- Python 环境的安装
- Websockify 的使用
- 使用nssm工具将run.bat注册为系统服务,并开机自启
- 结束,这里就是服务端全部程序
- 客户端的技术实现
- 列表页面
- 设备远程桌面
- 走过的坑
- 有需求,请留言联系
项目用途
该项目仅限于局域网内部使用的windows系统远程桌面显示和远程控制。主要用于展厅内的设备控制,包括小屏控制大屏,一屏多显,多屏同步功能。
该系统只关注远程界面和远程控制,其他部分均有信息发布系统实现。
控制主要分为服务端和客户端两部分。受控设备为服务端,控制设备为客户端。
下方连接均为官方网站,切勿在第三方平台下载安装来源不明的软件。本文作者遵循信息安全管理条例!!!
服务端的技术实现
1. 安装UItraVNC软件,只部署server端即可
官网下载地址:https://uvnc.com/downloads/ultravnc.html
官方介绍:
UltraVNC服务器和查看器是一个功能强大、易于使用的免费软件,可以将一台计算机(服务器)的屏幕显示在另一台计算机(查看器)的屏幕上。
一个计算机(服务器)的屏幕显示在另一个计算机(浏览器)的屏幕上。该程序允许浏览者使用他们的鼠标
和键盘来远程控制服务器计算机。
UltraVNC是一个为Windows PC量身定做的VNC应用程序,具有其他VNC产品所没有的一些功能。
使用:
如果想本地测试,可以将viewer和server都安装上进行连接调试,其他受控设备只安装server端即可。
作用:
遵循VNC协议架构,将设备的远程帧和控制指令,通过TCP默认5900端口进行双向通信。
2. 为UItraVNC设定自定义密码


Python 环境的安装
官网下载地址:https://www.python.org/downloads/
这里不讲解,主要是下个部分用
这里一定要试运行一下python指令,否则权限问题无法调用
Websockify 的使用
官网下载地址: https://github.com/novnc/websockify
官方介绍:
websockify的前身是wsproxy,是noVNC项目的一部分。
在最基本的层面上,websockify只是将WebSockets流量翻译成正常的套接字流量。Websockify接受WebSockets握手,对其进行解析,然后开始在客户端和目标端之间双向转发流量。
这里要说一下项目需求,目的是要多端实现对windows设备进行远程控制,能多端的也就当属Javascript了吧。所以用到了No-vnc的开源项目,而No-vnc的通信实现就是基于websockify的。
使用:
将websockify目录copy到系统目录中,如:C:\Users\Administrator\AppData\Local\websockify
先创建一个win环境下的运行脚本run.bat并存放至C:\Users\Administrator\AppData\Local\websockify\run.bat。
内容如下,上述参数如有变更,请自行调整
C:
cd "\Users\Administrator\AppData\Local\websockify"
"C:\Users\Administrator\AppData\Local\Programs\Python\Python310\python.exe" -m websockify 5901 127.0.0.1:5900
将受控设备的TCP:5900端口代理到WS:5901端口
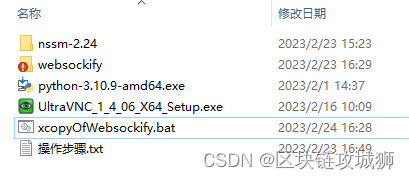
为了操作方便,写了一个copy指定目录的脚本xcopyOfWebsockify.bat
如果目录已经存放或不修改存放目录,可直接执行xcopyOfWebsockify.bat
echo off
chcp 65001
set ws_path="%~dp0websockify"
set targetFolder="C:\Users\Administrator\AppData\Local\websockify"
echo 检查当前目录websockify是否存在
if not exist %ws_path% (
	echo %ws_path% 不存在,请确认
	pause
	goto exitCode
 )
)
echo %ws_path% 存在,即将检查文件并复制
echo 复制websockify
xcopy /S /Y %ws_path% %targetFolder%
echo 复制websockify至windows系统用户目录完成


pause
使用nssm工具将run.bat注册为系统服务,并开机自启
官方网站:https://nssm.cc/download
具体如何使用可以自行查阅,这里提供了构建脚本,通过管理员身份运行即可。nssm.bat
echo off
chcp 65001
echo 即将开始采用nssm安装应用程序为windows服务,请确认以系统管理员身份运行
set servicename=HYwebsockify
REM %~dp0 为BAT脚本取当前系统目录命令,API_HOST.EXE为需要包装为服务的应用程序
set app_path="\Users\Administrator\AppData\Local\websockify\run.bat"
set nssm_path="%~dp0nssm.exe"
REM 将NSSM复制至系统盘目录,或者 添加 windows 环境变量亦可达到目的
set targetFolder="C:\windows\System32\nssm.exe"
REM 检查NSSM.exe文件是否存在
echo 检查当前目录nssm.exe文件是否存在
if not exist %nssm_path% (
	echo %nssm_path% 不存在,请确认
	pause
	goto exitCode
 )
)
echo %nssm_path% 存在,即将检查文件并复制
REM 复制nssm
if not exist %targetFolder% (
	copy /y %nssm_path% %targetFolder%
	echo 复制nssm至windows系统目录完成
)
echo 即将创建服务 %servicename%
echo  ****************************************

REM 判断service 是否存在,若存在,先停止,至删除
echo 检查服务是否存在,存在则停止服务后删除,再安装
sc query|find /i "%servicename%" >nul 2>nul
if not errorlevel 1 (
	echo 服务已存在,停止运行服务
	echo stop %servicename%
	REM NSSM停止服务命令:nssm stop <ServiceName>
	nssm stop %servicename%
	echo 开始移除服务 %servicename%
	echo remove service %servicename%
	REM NSSM删除服务命令:nssm remove <ServiceName> confirm
	REM 移除命令最后的 confirm 即表示无限弹窗确认,直接移除。
	nssm remove %servicename% confirm
	echo 移除服务完成
)

echo *********************************
echo 开始创建服务 %servicename%
REM NSSM命令:nssm install <服务名> <服务需要执行的程序>
nssm install %servicename% %app_path%
echo 开始设置服务信息
echo set service property
echo 设置服务显示名称
REM nssm set <ServiceName> DisplayName <ServiceName>
nssm set %servicename% 展厅商显远程控制服务 %servicename%
echo 设置服务描述
REM nssm set <ServiceName> Description <ServiceName>
nssm set %servicename% 主要用于win设备的远程监控及控制操作
echo 设置服务启动方式为:自动
nssm set %servicename% Start SERVICE_AUTO_START
echo *********************************
echo 启动服务 %servicename%
echo start service %servicename%
nssm start %servicename%
echo 服务创建并启动完成

:exitCode
pause
结束,这里就是服务端全部程序

客户端的技术实现
列表页面
<template>
	<view class="content">
		<view class="devices tn-flex tn-flex-direction-row tn-flex-wrap">
			<block v-for="(item, index) in devices" :key="index">
				<view class="device">
					<view class="device-img" @click="openScreen(item)">
						<text class="tn-text-xl-xxl tn-icon-computer" style="font-size: 100px;"></text>
					</view>
					<view class="device-text">
						<text>{{ item.title }}</text>
						<text @click="showInfo(item)" class="tn-float-right tn-text-xxl tn-icon-tips"></text>
					</view>
				</view>
			</block>
		</view>
<!-- 		<tn-fab
			:btnList="btnList"
		  :right="50"
		  :bottom="100"
		  :iconSize="64"
		  backgroundColor="#01BEFF"
		  fontColor="#FFFFFF"
		  icon="open"
		  animationType="up"
		  :showMask="true"
		  @click="clickFabItem"
		>
		</tn-fab> -->
		<!-- 添加设备 -->
		<tn-modal v-model="showModal" :custom="true" width="50%">
			<view class="custom-modal-title tn-text-center">
				<text v-if="isInfo"  class=" tn-text-bold tn-text-xl">添加设备</text>
				<text v-if="!isInfo" class=" tn-text-bold tn-text-xl">查看设备信息</text>
			</view>
			<view class="custom-modal-content">
				<tn-form :model="form" :labelWidth="200" labelAlign="right">
					<tn-form-item label="设备名称:" prop="title">
						<tn-input v-model="form.title" :disabled="isInfo" />
					</tn-form-item>
					<tn-form-item label="设备IP:" prop="ip">
						<tn-input v-model="form.ip" :disabled="isInfo"/>
					</tn-form-item>
					<tn-form-item label="通信端口:" prop="port">
						<tn-input v-model="form.port" placeholder="默认为5901,不修改可留空!!!" :disabled="isInfo" />
					</tn-form-item>
					<tn-form-item label="设备密钥:" prop="pwd">
						<tn-input typy="password" v-model="form.pwd" type="password" :disabled="isInfo"/>
					</tn-form-item>
				</tn-form>
				<view class="tn-padding" v-if="!isInfo">
					<tn-button backgroundColor="#01BEFF" fontColor="#FFFFFF" width="100%" @click="submit">提交</tn-button>
				</view>
			</view>
		</tn-modal>
		<view class="tn-padding-bottom-lg"></view>
	</view>
</template>

<script>
	export default {
		data() {
			return {
				title: 'HY商显设备控制系统',
				isInfo:false,
				showModal:false,
				form:{
					ip:'',
					port:'5901',
					pwd:'',
					title:'',
				},
				devices:devices,
				btnList:[
					{
					  icon: 'add',
					  text: '添加设备',
					  bgColor: '#E72F00'
					},
				],
				form:{}
			}
		},
		onLoad() {

		},
		methods: {
			click(event) {
        this[event.methods] && this[event.methods](event)
      },
			// 点击悬浮按钮的内容
			clickFabItem(e) {
			  // this.$tn.message.toast(`点击了第 ${e.index} 个选项`)
				if(e.index==0){
					this.showModal = true;
				}
			},
			openScreen(obj){
				uni.navigateTo({
					url:'/pages/vnc/index?ip='+obj.ip+'&port='+obj.port+'&pwd='+obj.pwd+'&title='+obj.title,
				})
			},
			showInfo(obj){
				this.form = obj
				this.showModal = true;
				this.isInfo = true;
			}
		}
	}
</script>

<style>
	.content {
		padding-top:44px;
		width:100vw;
		height:100vh;
		background-size:100% 100%;
		background-repeat: no-repeat;
		background-image: url('@/static/images/bg.jpg');
	}
	.devices{
		justify-content: space-evenly;
	}
	.device{
		display: flex;
		flex-direction: column;
		align-items: center;
		justify-content: center;
		background-color: aliceblue;
		width: 30%;
		height:300rpx;
		margin-bottom:60rpx;
		position: relative;
	}
	.device-img{
		width: 100%;
		text-align: center;
	}
	.device-text {
		font-size: 30rpx;
		color:#ffffff;
		background-color: #00000090;
		position: absolute;
		left: 0;
		bottom: 0;
		width: 100%;
		padding: 5px;
	}
</style>
设备远程桌面
<template>
  <div class="full" :style="'width:'+windowWidth+'px;height:'+windowHeight+'px;'">
		<navigation-bar :title="title"/>
    <div id="screen" class="full" :style="'width:'+windowWidth+'px;height:'+windowHeight+'px;'"></div>
  </div>
</template>

<script>
import RFB from '@novnc/novnc/core/rfb';

export default {
  name: 'Novnc',
  data() {
    return {
      url: '',
      rfb: null,
			windowWidth:1920,
			windowHeight:1080,
			title:'远程桌面',
			ip:'',
			port:'',
			pwd:'',

    }
  },
	onLoad(option) {
		uni.getSystemInfo({
			success: (res) => {
				this.windowWidth = res.windowWidth;
				this.windowHeight = res.windowHeight;
			},
		})
		this.title = '【'+option.title+'】的远程桌面';
		this.ip = option.ip;
		this.port = option.port;
		this.pwd = option.pwd;
	},
  mounted() {
    this.url = this.getUrl(this.$route.params.host);
    this.connectVnc();
  },
  methods: {
    getUrl(host) {
      let protocol = '';
      if (window.location.protocol === 'https:') {
        protocol = 'wss://';
      } else {
        protocol = 'ws://';
      }
      // 加window.location.host可以走vue.config.js的代理,ws://localhost:8081/vnc/192.168.18.57:5900
      // const wsUrl = `${protocol}${window.location.host}/vnc/${host}`;
      const wsUrl = `${protocol}${this.ip}:${this.port}/websockify`;
      console.log(wsUrl);
      return wsUrl;
    },
    // vnc连接断开的回调函数
    disconnectedFromServer(msg) {
      uni.showToast({
      	title:'连接断开',
      	icon:'none'
      })
      // clean是boolean指示终止是否干净。在发生意外终止或错误时 clean将设置为 false。
      if(msg.detail.clean){
        // 根据 断开信息的msg.detail.clean 来判断是否可以重新连接
				this.rfb = null;
				// this.connectVnc();
      } else {
        // 这里做不可重新连接的一些操作
        this.$tn.message.toast('连接不可用(可能需要密码)')
      }
    },
    // 连接成功的回调函数
    connectedToServer() {
			uni.hideLoading();
      uni.showToast({
      	title:'连接成功',
      	icon:'success'
      })
    },
    //连接vnc的函数
    connectVnc() {
			uni.showLoading({
				title:'正在连接服务'
			})
      const PASSWORD = '';
      let rfb = new RFB(document.getElementById('screen'), this.url, {
        // 向vnc 传递的一些参数,比如说虚拟机的开机密码等
        credentials: {password: this.pwd}
      });
      rfb.addEventListener('connect', this.connectedToServer);
      rfb.addEventListener('disconnect', this.disconnectedFromServer);
      // scaleViewport指示是否应在本地扩展远程会话以使其适合其容器。禁用时,如果远程会话小于其容器,则它将居中,或者根据clipViewport它是否更大来处理。默认情况下禁用。
      rfb.scaleViewport = true;
      // 是一个boolean指示是否每当容器改变尺寸应被发送到调整远程会话的请求。默认情况下禁用
      rfb.resizeSession = true;
      this.rfb = rfb;
    }
  },
  beforeDestroy() {
    this.rfb && this.rfb.disconnect();
  }
}
</script>
<style>
</style>
走过的坑
1.起初使用Python的OpenAI和Numpy做技术支撑,通过对屏幕截图,压缩,差异化比较,进行图像传输。前端采用vue-js-canvas做图像还原展示操作,奈何算法技术太差,图像传输量依然太大,图像显示会有2秒的延迟展示,实时性差。
2.第二个方案采用的rtmp直播流技术,搭建SRS全称为simple-rtmp-server开源流媒体服务器,将本地图像录屏为媒体流文件,上传到服务器进行分发同步,流畅性非常的好,但是对于屏幕实时远程控制来说,不同步让人无法接受。查看的官方文档,也确实验证了延时在0.8s-3s之间。这个方案可以用在别的项目了。
3.第三个方案尝试了NO-VNC的多端代理机制,后来发现,远程连接一台设备需要一分钟。后台转换思路,将websockify直接安装到被控设备上,实现了远程秒连。

