vector
- vector 容器
- vector 基本使用
- vector 定义
- 库中各类接口的使用
- 迭代器
- 容量相关接口
- 元素访问相关接口
- 元素修改相关接口
- 模拟实现 vector
- 前期准备
- 构造与析构
- 赋值运算符重载
- 迭代器相关
- 容量相关
- 元素访问相关
- 元素的修改相关
- 二维数组的创建
- 对于自定义类型数据的测试
vector 容器
C++ STL 中的 vector 就类似于 C 语言当中的数组,但是 vector 又拥有很多数组没有的接口,使用起来会更加的方便。
相比于 STL 中的 string ,vector 可以定义不同的数据类型
vector 基本使用
vector 定义
template < class T, class Alloc = allocator > class vector;
方式一:创建 vector 对象,不进行初始化
vector (const allocator_type& alloc = allocator_type());
方式二:创建 vector 对象,容量为 n,并赋值为 val
vector (size_type n, const value_type& val = value_type(),
const allocator_type& alloc = allocator_type());
方式三:创建 vector 对象,并采用区间赋值
vector (InputIterator first, InputIterator last,
const allocator_type& alloc = allocator_type());
方式四:拷贝构造
vector (const vector& x);
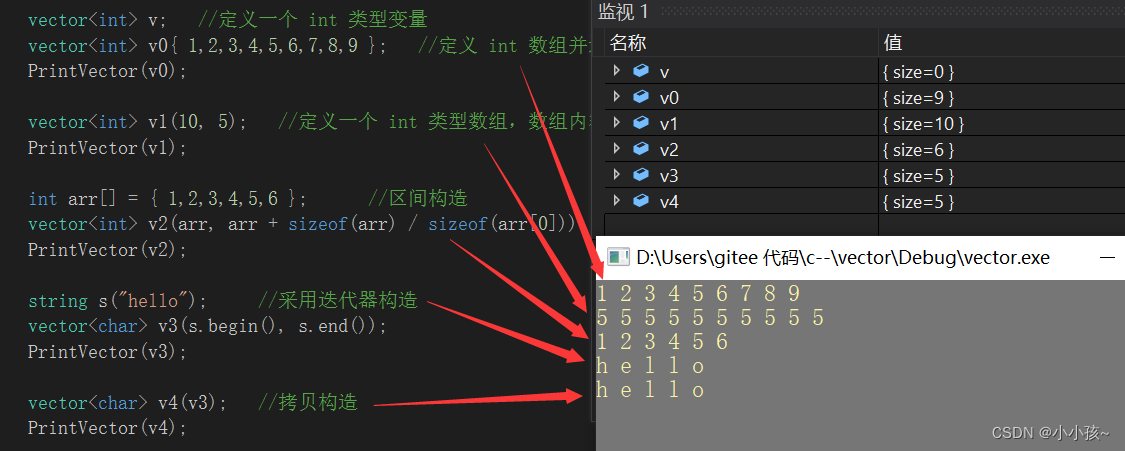
代码演示:
    vector<int> v;   //定义一个 int 类型变量
	vector<int> v0{ 1,2,3,4,5,6,7,8,9 };   //定义 int 数组并进行列表赋值
	PrintVector(v0);

	vector<int> v1(10, 5);   //定义一个 int 类型数组,数组内容为 10 个 5
	PrintVector(v1);

	int arr[] = { 1,2,3,4,5,6 };      //区间构造
	vector<int> v2(arr, arr + sizeof(arr) / sizeof(arr[0]));
	PrintVector(v2);

	string s("hello");     //采用迭代器构造
	vector<char> v3(s.begin(), s.end());
	PrintVector(v3);

	vector<char> v4(v3);   //拷贝构造
	PrintVector(v4);
定义一个打印函数可以很明显的观察到定义结果:
template<class T>
void PrintVector(const vector<T>& v)
{
	for (auto e : v)
		cout << e << " ";
	cout << endl;
}
库中各类接口的使用
迭代器
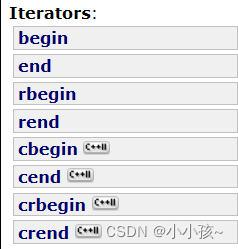
迭代器的本质是指针,其指针指向如下图:
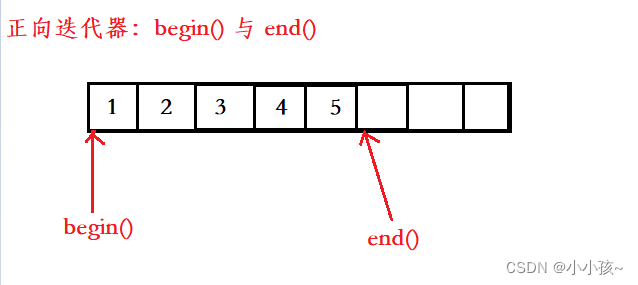
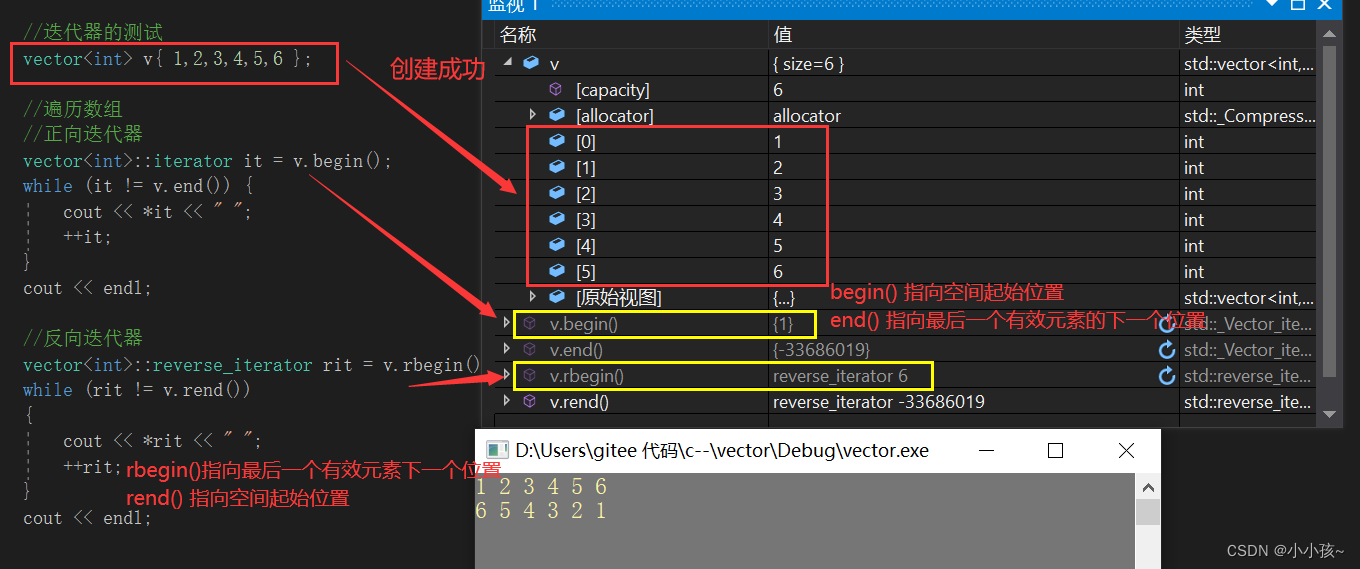
begin() 指向空间起始位置,end() 指向最后一个有效元素的下一个位置
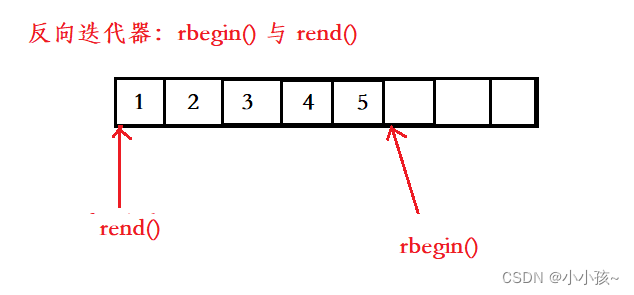
rbegin() 指向最后一个有效元素的下一个位置,rend() 指向空间的起始位置。
代码演示:
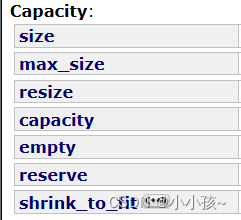
容量相关接口
代码演示:
(1)测试 size() 、capacity()、以及 resize()
vector<int> v{ 1,2,3,4,5,6 };
	PrintVector(v);
	cout << "v.size() = " << v.size() << endl;
	cout << "v.capacity() = " << v.capacity() << endl;
	cout << "----------------------------------------------------" << endl;


	//resize 修改有效元素个数
	v.resize(10, 0);   //将有效元素个数修改为 10,多余空间用 0 来进行填充
	PrintVector(v);
	cout << "v.size() = " << v.size() << endl;
	cout << "v.capacity() = " << v.capacity() << endl;
	cout << "----------------------------------------------------" << endl;

	v.resize(20);
	cout << "v.size() = " << v.size() << endl;
	cout << "v.capacity() = " << v.capacity() << endl;
	cout << "----------------------------------------------------" << endl;

	v.resize(4);        //有效元素个数缩小为 4
	PrintVector(v);
	cout << "v.size() = " << v.size() << endl;
	cout << "v.capacity() = " << v.capacity() << endl;
	cout << "----------------------------------------------------" << endl;
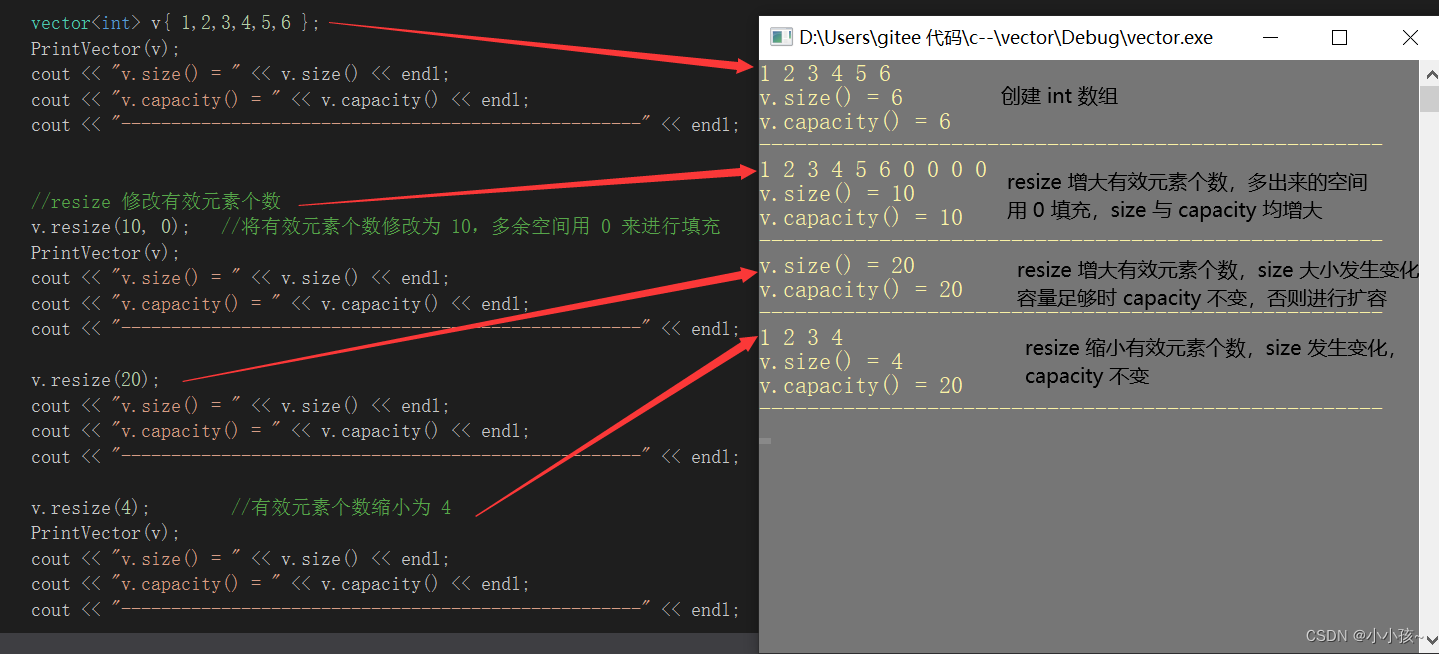
可以发现:
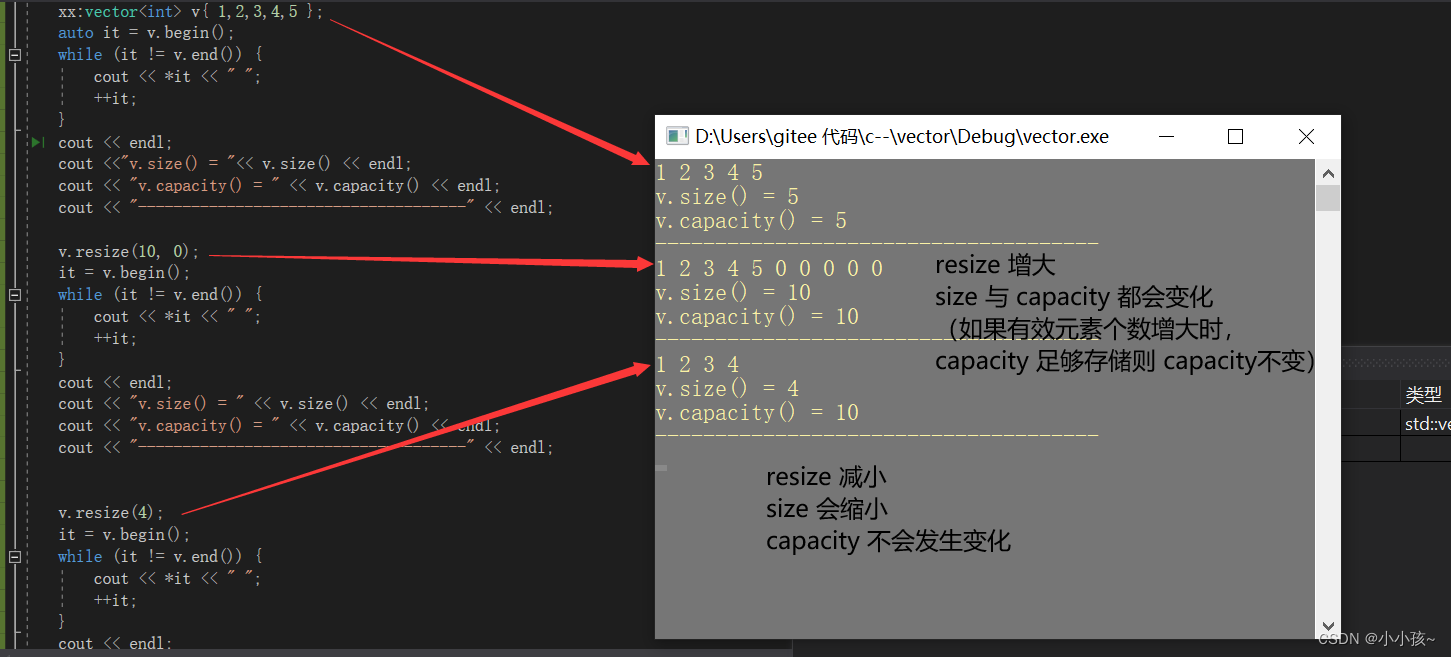
resize 修改有效元素个数时,size 会进行相应的扩大或缩小变化,capacity 不一定会变化(有效元素增多时,若容量足够则capacity不变,否则会扩容;有效元素减少时,capacity 不变)
(2)测试 reserve
vector<int> v{ 1,2,3,4,5,6 };
	PrintVector(v);
	cout << "v.size() = " << v.size() << endl;
	cout << "v.capacity() = " << v.capacity() << endl;
	cout << "----------------------------------------------------" << endl;

	//reserve 修改容量
	v.reserve(10);
	PrintVector(v);
	cout << "v.size() = " << v.size() << endl;
	cout << "v.capacity() = " << v.capacity() << endl;
	cout << "----------------------------------------------------" << endl;

	v.reserve(30);
	PrintVector(v);
	cout << "v.size() = " << v.size() << endl;
	cout << "v.capacity() = " << v.capacity() << endl;
	cout << "----------------------------------------------------" << endl;

	v.reserve(10);
	PrintVector(v);
	cout << "v.size() = " << v.size() << endl;
	cout << "v.capacity() = " << v.capacity() << endl;
	cout << "----------------------------------------------------" << endl;
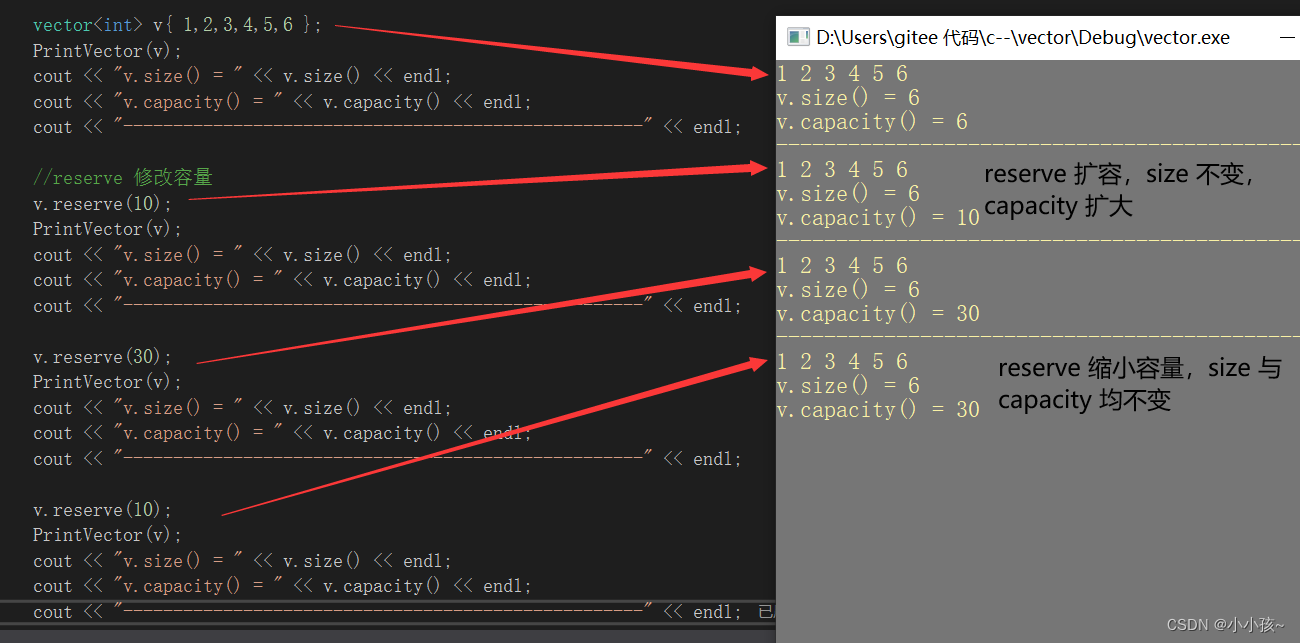
可以发现:
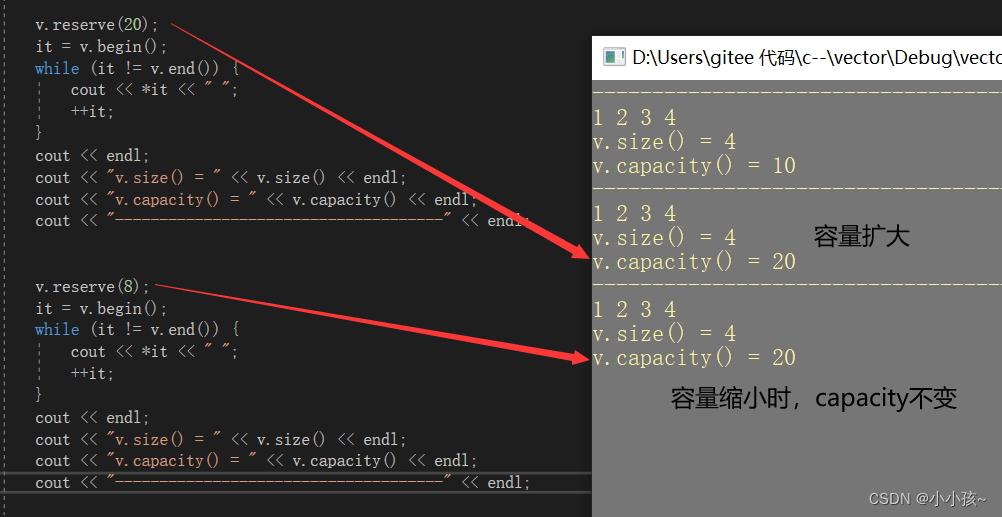
reserve 修改容量时,size 是不会发生变化的(因为有效元素个数不变),若空间容量扩大则 capacity 会相应的进行扩大,若空间容量缩小时 capacity 是不会发生变化的
(3)测试 empty
empty 是进行判空的接口

元素访问相关接口
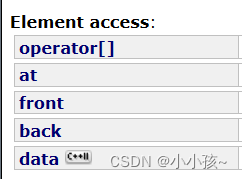
(1)下标运算符访问 operator[]

越界测试:越界触发 assert 异常

(2)at 访问

越界测试:越界抛出 out_of_range 异常
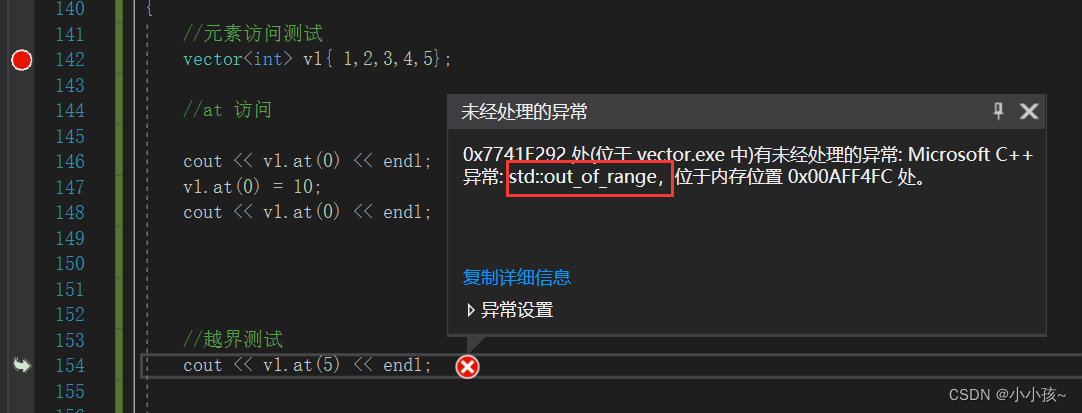
(3)获取首尾元素 front back

元素修改相关接口
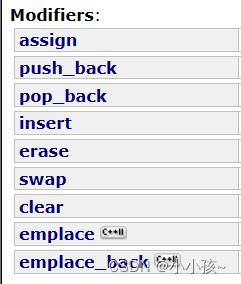
(1)尾插 push_back

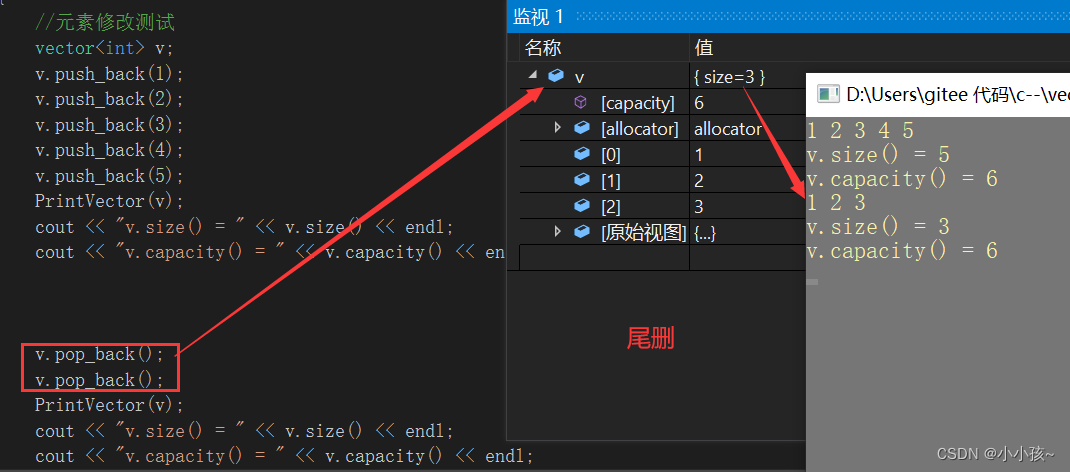
(2)尾删 pop_back
(3)任意位置插入 insert
vector<int> v{ 1,2,3 };
	cout << "v.size() = " << v.size() << endl;
	cout << "v.capacity() = " << v.capacity() << endl;
	cout << "-----------------------------------------" << endl;


	v.insert(v.begin(), 100);  //在起始位置插入 100
	PrintVector(v);
	cout << "v.size() = " << v.size() << endl;
	cout << "v.capacity() = " << v.capacity() << endl;
	cout << "-----------------------------------------" << endl;

	int arr[] = { 0,200,300,400 };
	v.insert(v.begin(), arr, arr + sizeof(arr) / sizeof(arr[0]));    //起始位置插入arr数组中元素
	PrintVector(v);
	cout << "v.size() = " << v.size() << endl;
	cout << "v.capacity() = " << v.capacity() << endl;
	cout << "-----------------------------------------" << endl;


	v.insert(v.end(), 9);   //尾部插入元素 9----------------同理也可以插入数组 arr
	PrintVector(v);
	cout << "v.size() = " << v.size() << endl;
	cout << "v.capacity() = " << v.capacity() << endl;
	cout << "-----------------------------------------" << endl;
	v.insert(v.end(), arr, arr + sizeof(arr) / sizeof(arr[0]));    //尾部插入arr数组中元素
	PrintVector(v);
	cout << "v.size() = " << v.size() << endl;
	cout << "v.capacity() = " << v.capacity() << endl;
	cout << "-----------------------------------------" << endl;

(4)任意位置删除 erase
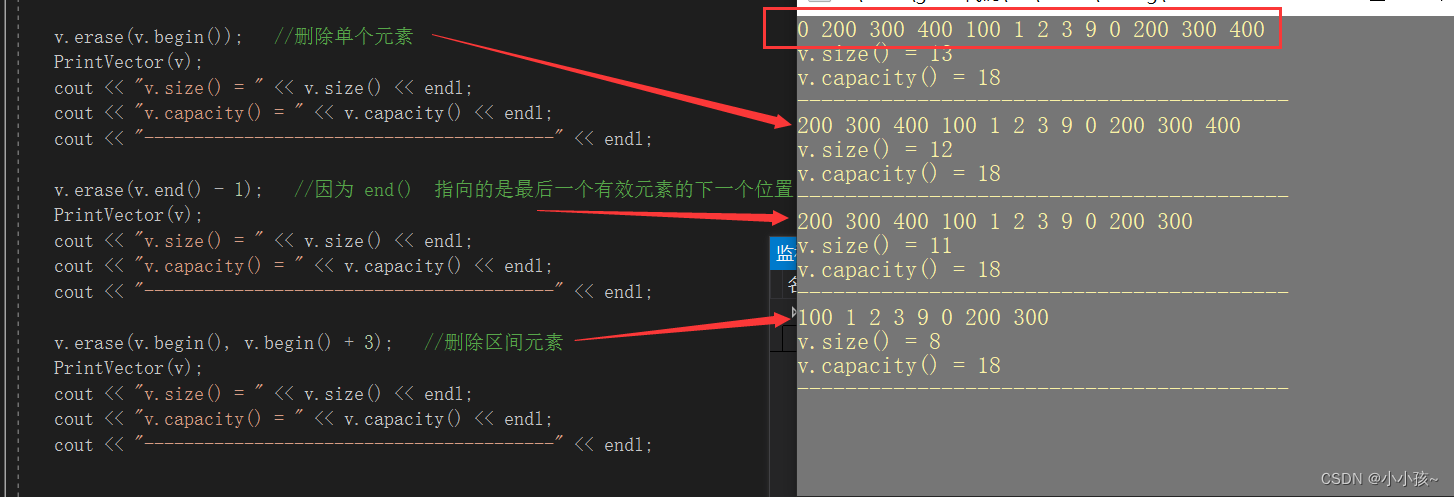
(5)清空 clear

模拟实现 vector
前期准备
迭代器的本质就是指针,模拟实现 vector 容器,我们需要定义三个指针 :指向起始位置 start,指向最后一个有效元素的下一个位置 finish ,指向容器最后一个位置 endofstorage:
namespace xx {  //自定义命名空间
	template<class T>     //定义模板类型
	class vector{
	public:
		typedef T* iterator;   //迭代器  等价于  T 类型指针
	private:
		iterator start;   //空间起始位置
		iterator finish;  //最后一个有效元素的下一个位置
		iterator endofstorage;  //最后一个容量空间位置
	};
}

构造与析构
构造函数
(1)默认无参构造
vector() :start(nullptr), finish(nullptr), endofstorage(nullptr)
		{}
(2)构造具有 n 个对象值为 val 的容器 (数据类型为模板类型 T)
vector(int n, const T& val = T())
		{
			start = new T[n];     //创建新空间
			for (size_t i = 0; i < n; ++i) {
				start[i] = val;     //对空间进行赋值操作
			}
			finish = start + n;      //修改 finish 指向---最后一个有效元素的下一个位置
			endofstorage = finish;   //修改容量指针
		}
注意:
第二个参数 val 是一个缺省参数,对于内置类型,T() 的值为 0;对于自定义类型, T() 调用的是该自定义类型的默认构造函数
因此,对于自定义类型一定要有默认的构造函数,否则会报错
(3)使用迭代器进行构造
		template<class Iterator>
		vector(Iterator first, Iterator last)  //区间构造
		{
			auto it = first;
			size_t n = 0;
			while (it != last) {
				++it;
				n++;  //统计区间中元素个数
			}

			start = new T[n];   //开辟空间
			finish = start;
			while (first != last) {    //进行赋值
				*finish = *first;
				++first; ++finish;
			}
			endofstorage = finish;    //修改容量指针
		}
(4)拷贝构造
vector(const vector<T>& v)
		{
			size_t n = v.size();     //记录 v 中元素个数
			start = new T[n];     //创建新空间
			for (size_t i = 0; i < n; ++i)
			{
				start[i] = v[i];      //进行赋值操作
			}
			finish = start + n;    //修改指向
			endofstorage = finish;
		}
新写法(参考上一篇博客深浅拷贝问题)
vector(const vector<T>& v)
		{
			vector<T> tmp(v.begin(),v.end());   //定义临时对象--调用迭代器构造方法
			this->swap(tmp);    //进行资源交换
		}
析构函数
~vector()
		{
			if (start) {
				delete[] start;
				start = finish = endofstorage = nullptr;
			}
		}
测试代码
void MyvectorTest0()
{
	xx::vector<int> v1;
	xx::vector<int> v2(10, 5);

	int arr[] = { 1,2,3,4,5 };  //区间构造
	xx::vector<int> v3(arr, arr + sizeof(arr) / sizeof(arr[0]));

	xx::vector<int> v4(v2);  //拷贝构造


	//遍历一:
	for (int i = 0; i < v2.size(); ++i) {
		cout << v2[i] << " ";
	}
	cout << endl;
	//遍历二:
	for (auto e : v3)
		cout << e << " ";
	cout << endl;
	//遍历三:
	auto it = v4.begin();
	while (it != v4.end()) {
		cout << *it << " ";
		++it;
	}
	cout << endl;

}
会发现在运行代码时候出现的问题:
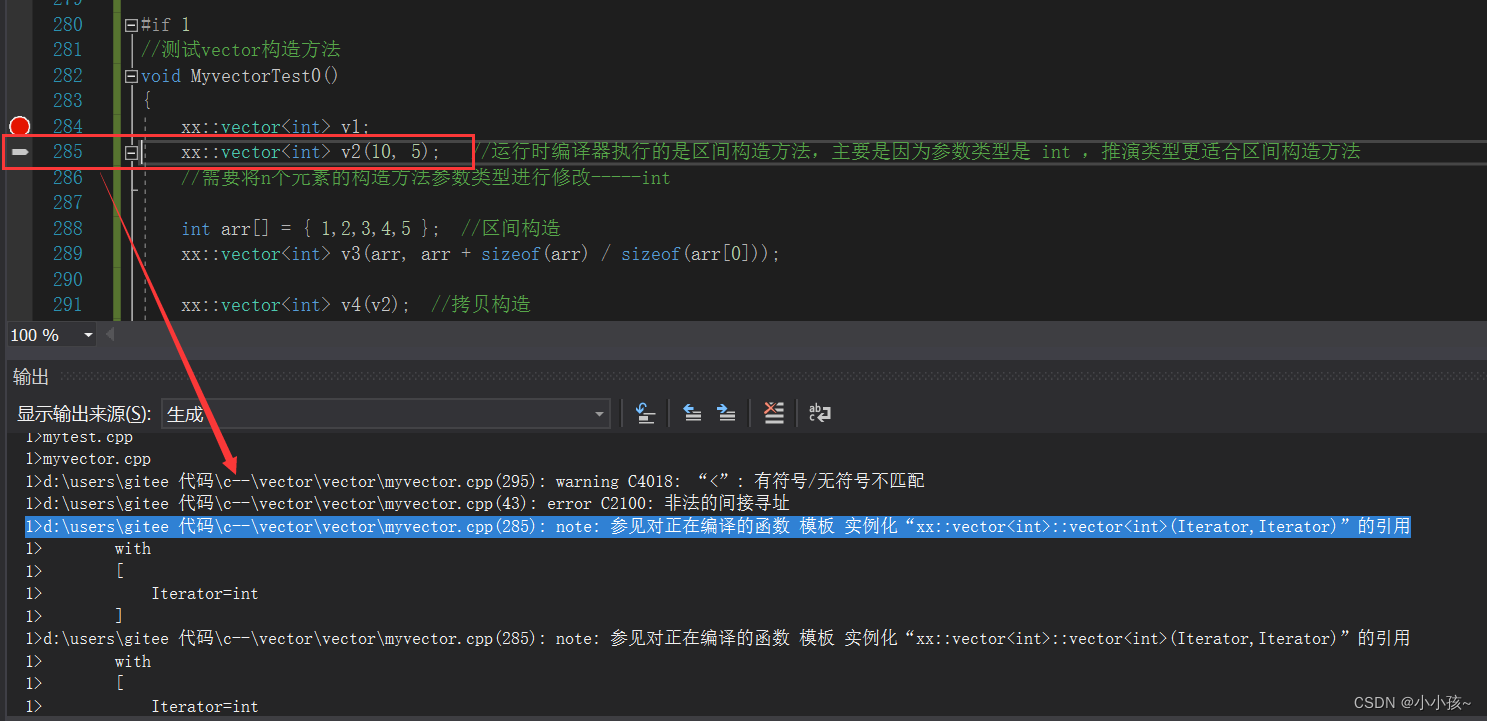
分析:
在构造 v2 时候,会调用区间构造方法,进行参数类型的推演,由于构造 v2 的两个参数都是 int 类型,故编译器会根据类型推演的结果来选择合适的构造方法,又因为构造 n 个值为 val 的构造方法中参数类型为 size_t , int,所以编译器认为类型不匹配,排除该构造方法,选用了迭代器区间的构造方法(参数类型实例化之后都为 int 类型),因此,为了实现构造 n 个值为 val 的空间构造,我们需要对构造函数进行一定的修改,使得其调用更准确:

赋值运算符重载
vector<T>& operator=(vector<T> v) {
 //因为参数是传值类型,故在传参过程中会进行一次拷贝构造的调用
			//赋值运算符重载
			this->swap(v);    //直接进行交换(可以参考上一篇博客中深浅拷贝内容)
			return *this;
		}
迭代器相关
//迭代器
		iterator begin()
		{
			return start;
		}
		iterator end()
		{
			return finish;
		}
容量相关
(1)size、capacity、empty 的实现
		size_t size()const {
			return finish - start;
		}
		size_t capacity()const {
			return endofstorage - start;
		}
		bool empty()const {
			return finish == start;
		}
(2)resize :修改有效元素个数
void resize(size_t newsize, const T&val = T())
		{
			size_t oldsize = size();
			if (newsize <= oldsize) { //缩小有效元素
				finish = start + newsize;    //容量不变
			}
			else {//有效元素增大
				//需要扩容
				size_t cap = capacity();
				if(newsize > cap)
					reserve(newsize);

				for (size_t i = oldsize; i < newsize; ++i) {
					//多出来的空间填充
					start[i] = val;
				}
				finish = start + newsize;
				//endofstorage = finish;
			}
		}
(3)reserve:修改容量
void reserve(size_t newcapacity)
		{
			size_t oldcapacity = capacity();
			if (newcapacity > oldcapacity) {
				//开辟新空间
				T* tmp = new T[newcapacity];
				if (start) {
					拷贝元素:memcpy(内存拷贝--------将一段空间中的内容原封不动的拷贝到新空间----浅拷贝) 按字节拷贝
					涉及到资源管理时,memcpy 属于浅拷贝
					//memcpy(tmp, start, sizeof(T)*size());

					for (size_t i = 0; i < size(); ++i) {
						tmp[i] = start[i];
					}

					//释放旧空间
					delete[] start;
				}
				size_t sz = size();
				start = tmp;
				finish = start + sz;   //**********
				endofstorage = start + newcapacity;
			}
		}
代码测试:
(1)测试 resize (含 size, capacity 的测试)
(2)测试 reserve
元素访问相关
(1)获取首尾元素 front back
T& front()
		{
			return *start;
		}
		const T& front()const
		{
			return *start;
		}
		T& back()
		{
			return *(finish - 1);
		}
		const T& back()const
		{
			return *(finish - 1);
		}
(2)下标访问
T& operator[](size_t index)
		{
			assert(index < size());     //注意区分异常处理方式
			return start[index];
		}
		const T& operator[](size_t index)const
		{
			assert(index < size());
			return start[index];
		}
(3)at 访问
T& at(size_t index)
		{
			if (index >= size())
				throw out_of_range("vector at method: index out_of_range"); //抛出异常
			return start[index];
		}
		const T& at(size_t index)const
		{
			if (index >= size())
				throw out_of_range("vector at method: index out_of_range");
			return start[index];
		}
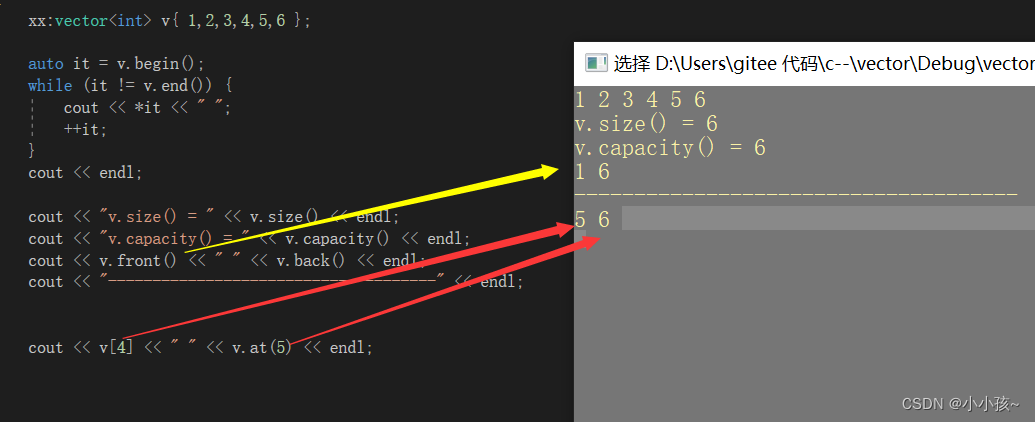
代码测试:
元素的修改相关
(1)尾插
void push_back(const T& val)
		{
			//进行尾插,判断容量是否足够
			if (finish == endofstorage) {
				reserve(capacity() * 2 + 3);  //按照2倍进行扩容
			}
			*finish = val;
			++finish;
		}
(2)尾删
void pop_back()
		{
			//进行尾删
			if (empty())
				return;
			--finish;       //直接修改尾指针
		}
(3)任意位置插入
//insert 插入元素的时间复杂度 O(n)
		iterator insert(iterator pos, const T&val)
		{
			//判断插入位置的合法性
			if (pos < begin() || pos > end())
				return end();
			//任意位置进行插入
			if (finish == endofstorage)
				reserve(capacity() * 2); //扩容
			auto it = finish - 1;
			while (it >= pos) {       //元素后移
				*(it + 1) = *it;
				--it;
			}
			*it = val;     //当前 it 指向的就是 pos 的位置
			++finish;
			return it;            //返回新插入的元素的位置
		}
(4)任意位置删除
删除单个元素:
iterator erase(iterator pos)
		{
			//删除任意位置元素
			if (empty())
				return end();
			if (pos < begin() || pos >= end())
				return  end();
			//位置合理
			auto it = pos;
			while (it != end() - 1)  //end() 表示最后一个有效元素的下一个位置
			{
				*it = *(it + 1);      //元素前移
				--it;
			}
			--finish;          //删除元素需要修改尾指针位置
			return pos;
		}
删除区间元素:
iterator erase(iterator start, iterator last)
		{
			if (empty())
				return end();
			if (start < begin() || start >= end())
				return end();
			//位置合法, 删除区间
			auto beg = start;
			auto en = last;

			int n = last - start;    //要删除的元素个数
			while (en != end()){
				*beg = *en;
				++beg; ++en;
				//--finish;
			}
			finish -= n;
			return start;   //返回删除的区间首元素位置
		}
(5)清空
void clear()
		{
			erase(begin(), end());
		}
(6)交换函数
void swap(vector<T>& v)
		{
			std::swap(start, v.start);
			std::swap(finish, v.finish);
			std::swap(endofstorage, v.endofstorage);
		}
测试代码:
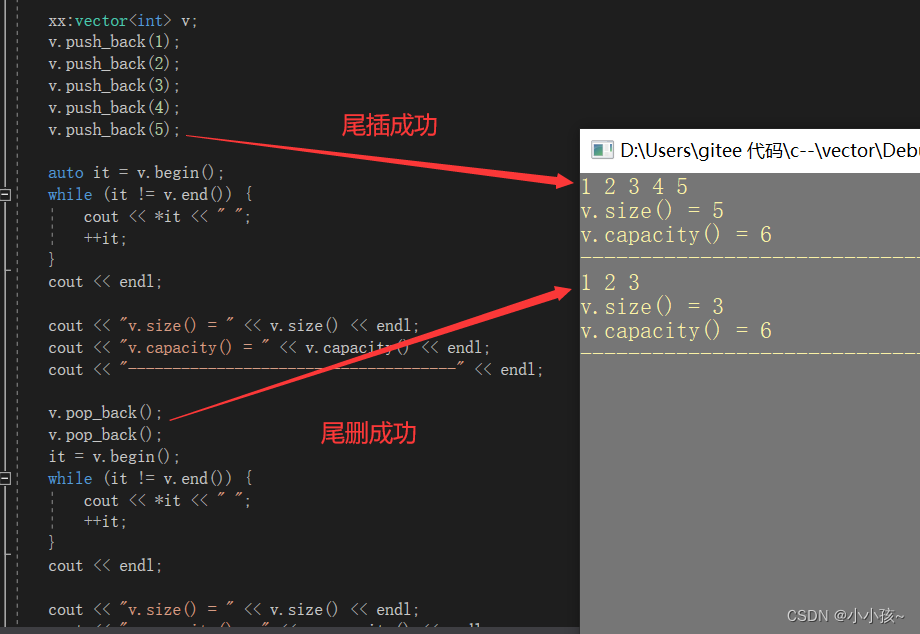
(1)测试尾插尾删:
(2)测试任意位置的插入删除:
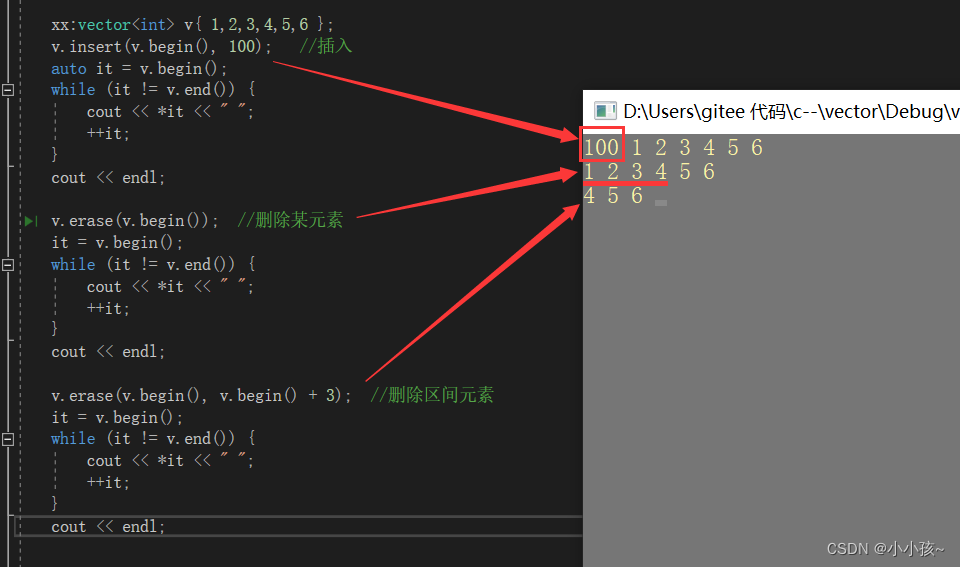
(3)清空:

二维数组的创建
创建一个五行六列数组,数组中元素值都为 8:
void MyvectorTest3()
{
	xx::vector<xx::vector<int>>  vv(5, xx::vector<int>(6, 8));
	  //创建有 5 个元素的数组,数组中元素用 vector<int>(6,8) 来进行填充
	for (size_t i = 0; i < vv.size(); ++i)
	{
		for (size_t j = 0; j < vv[i].size(); ++j)
			cout << vv[i][j] << " ";
		cout << endl;
	}
}

对于自定义类型数据的测试
上述的测试我们都是基于内置类型int数据的测试,发现代码可以正确运行没有报错,那针对于自定义类型数据是否正确呢?
(1)定义一个日期类:
class Date {
public:
	Date(int year = 1990, int month = 1, int day = 20)
	{
		_year = year;
		_month = month;
		_day = day;
	}
	Date(const Date& d)
	{//拷贝构造
		_year = d._year;
		_month = d._month;
		_day = d._day;
	}
	~Date() {}
private:
	int _year;
	int _month;
	int _day;
};

void MyvectorTest4()
{
	xx::vector<Date> d;      //定义 Date 类型数组
	d.push_back(Date(2023, 1, 1));     //插入元素--------Date 构造函数必须为带缺省值的构造方法
	d.push_back(Date(2023, 1, 2));
	d.push_back(Date(2023, 1, 3));
	d.push_back(Date(2023, 1, 4));
	d.push_back(Date(2023, 1, 5));

	cout << d.size() << endl;
}
运行改代码显式可以正确运行,因为 Date 类不存在资源的处理,那针对于 string 类是否正常?
我们来试试:
(2)定义 string 类:
class String {
public:
	String(const char* str=""):_str(nullptr)
	{
		//构造
		if (nullptr == str)
			 str = "";
		_str = new char[strlen(str) + 1];
		strcpy(_str, str);
	}
	String(const String& s):_str(new char[strlen(s._str)+1])
	{
		//拷贝构造
		strcpy(_str, s._str);
	}
	String& operator=(const String& s)
	{
		if (this != &s) {
			//不是给自己的赋值
			char* tmp = new char[strlen(s._str) + 1];
			strcpy(tmp, s._str);
			delete[] _str;
			_str = tmp;
		}
		return *this;
	}
	//String& operator=(const String s)
	//{
	//	if (this != &s) {
	//		//新写法
	//		this->swap(s._str);
	//	}
	//	return *this;
	//}
	~String()
	{
		if (_str) {
			delete[] _str;
			_str = nullptr;
		}
	}
private:
	char* _str;
};

void MyvectorTest5()
{
	xx::vector<String> s;
	s.push_back("hello");
	s.push_back("welcom");
	s.push_back("come on");

	cout << s.size() << endl;

	s.push_back("hahahha");    //此时需要进行扩容发生报错----------memcpy是属于浅拷贝

}
运行发现,在最后一次尾插时发生了错误,我们来看看是什么原因导致的:
因为在第四次尾插时候需要进行扩容,因此产生了错误
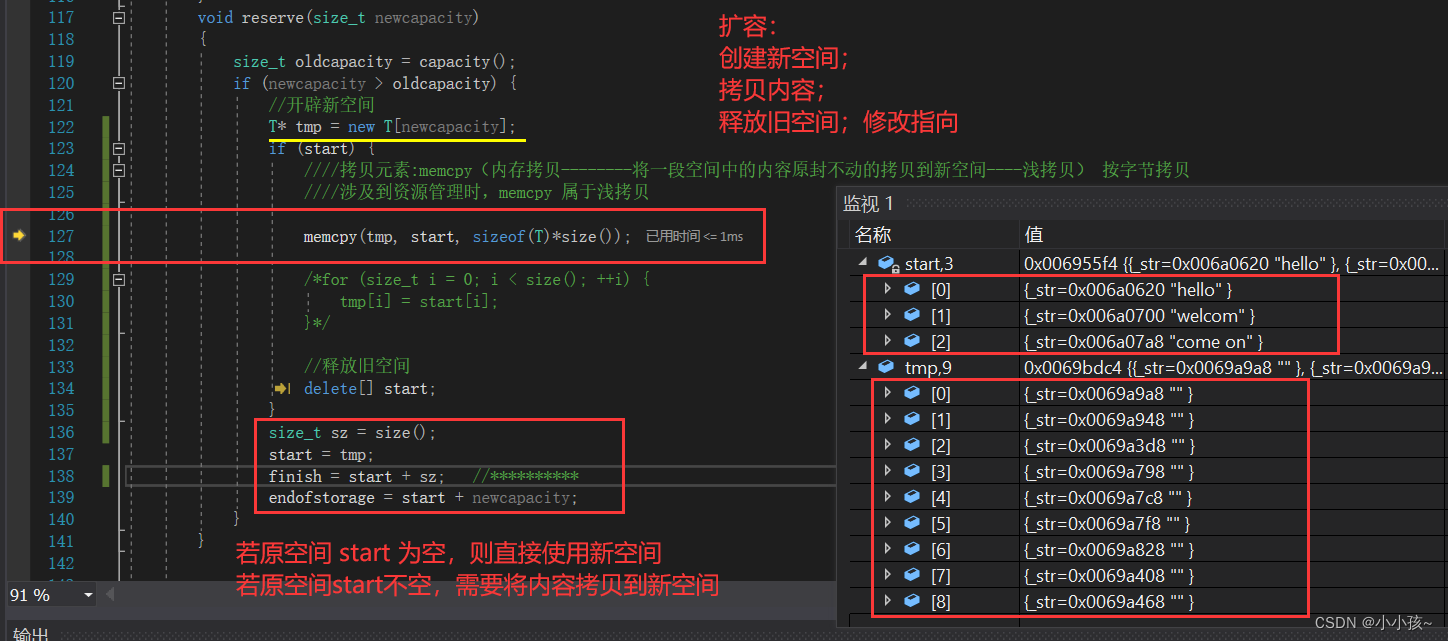
往下运行一步就会发现问题所在了:
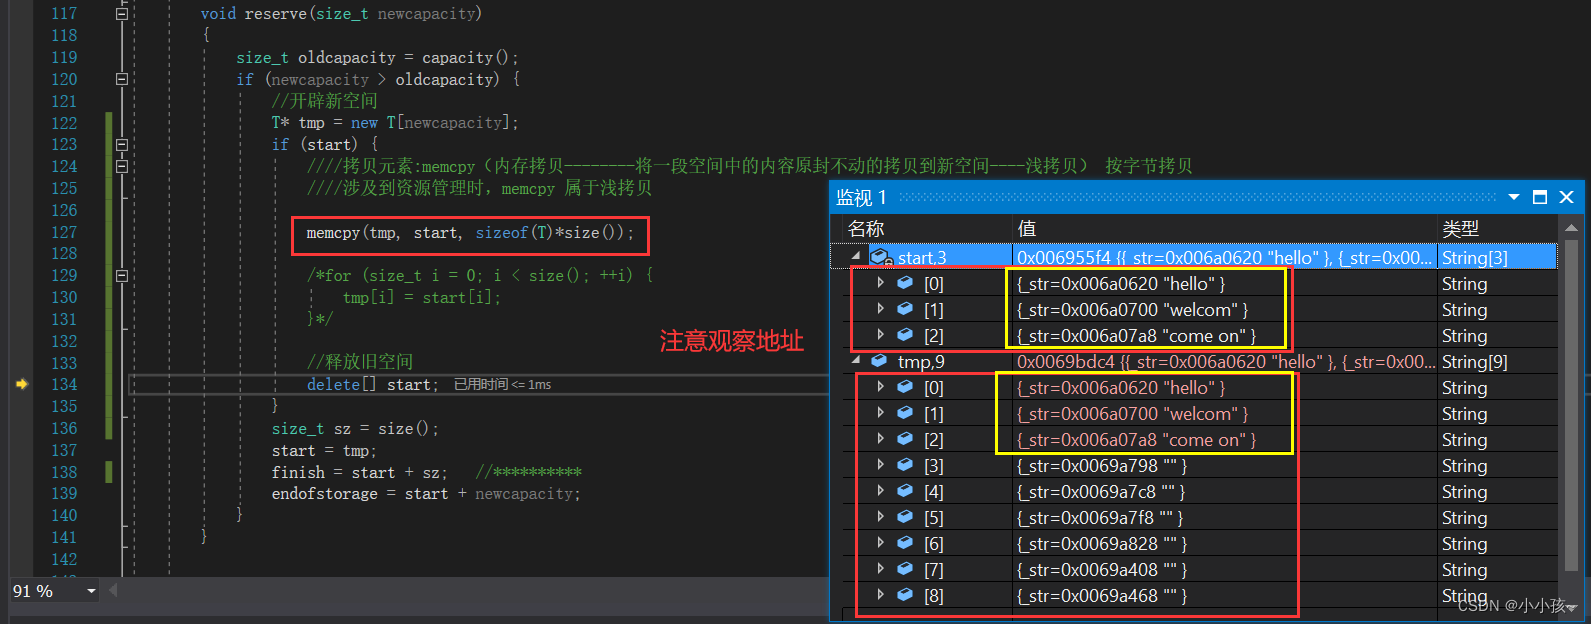
发现,在进行 memcpy 拷贝时候发生了浅拷贝,即将原空间内容原封不动的拷贝到新空间,这就导致了新空间共享旧空间的地址,会造成内存泄漏
因此,在扩容时候我们需要按元素将旧空间中元素交给新空间,而不是将地址空间也赋给新空间
进行修改:

修改之后程序可以正常运行。
_CrtDumpMemoryLeaks(); //检测内存泄漏
该章节完整代码:
添加链接描述
本篇内容就分享到这里啦!!!
学习编程的道路很长,要注重自我实践与验证,欢迎读者评论探讨~

![[qiankun]实战问题汇总](https://img-blog.csdnimg.cn/290e7d4aa9354eb88bff7a32e1327ac7.png)


