目录
- 一、登录需求分析
- 二、搭建service-user模块
- 三、登录接口实现
- 1、添加service接口与实现
- 2、添加Mapper接口
- 3、添加Controller方法
- 四、手机验证码登录(生成token)
- 1、使用JWT进行跨域身份验证
- 1.1 传统用户身份验证
- 1.2 解决方案
- 2、JWT介绍
- 3、整合JWT
- 4、单点登录总结
- 五、整合阿里云服务短信(云市场)
- 1、新建短信微服务
- 2、编写发送短信接口
- 3、完善登录接口
- 六、手机验证码登录前端
- 1、用户登录前端
一、登录需求分析
1,登录采取弹出层的形式
2,登录方式:
(1)手机号码+手机验证码
(2)微信扫描
3,无注册界面,第一次登录根据手机号判断系统是否存在,如果不存在则自动注册
4,微信扫描登录成功必须绑定手机号码,即:第一次扫描成功后绑定手机号,以后登录扫描直接登录成功
5,网关统一判断登录状态,如何需要登录,页面弹出登录层
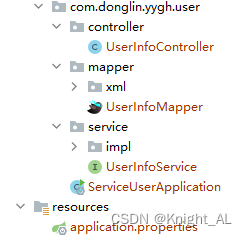
二、搭建service-user模块
1、在service下创建service_user模块
2、添加application.properties
# 服务端口
server.port=8203
# 服务名
spring.application.name=service-user

# 环境设置:dev、test、prod
spring.profiles.active=dev

# mysql数据库连接
spring.datasource.driver-class-name=com.mysql.jdbc.Driver
spring.datasource.url=jdbc:mysql://192.168.121.140:3306/yygh_user?characterEncoding=utf-8&useSSL=false
spring.datasource.username=root
spring.datasource.password=123456

#返回json的全局时间格式
spring.jackson.date-format=yyyy-MM-dd HH:mm:ss
spring.jackson.time-zone=GMT+8

# nacos服务地址
spring.cloud.nacos.discovery.server-addr=127.0.0.1:8848

#配置mapper xml文件的路径
mybatis-plus.mapper-locations=classpath:com/donglin/yygh/user/mapper/xml/*.xml
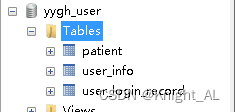
3、创建数据库和表
使用mybatis_plus代码生成器生成对应的controller…
4、创建启动类
@SpringBootApplication
@ComponentScan(basePackages = "com.donglin")
@EnableDiscoveryClient
@EnableFeignClients(basePackages = "com.donglin")
@MapperScan("com.donglin.yygh.user.mapper")
public class ServiceUserApplication {
    public static void main(String[] args) {
        SpringApplication.run(ServiceUserApplication.class, args);
    }
}
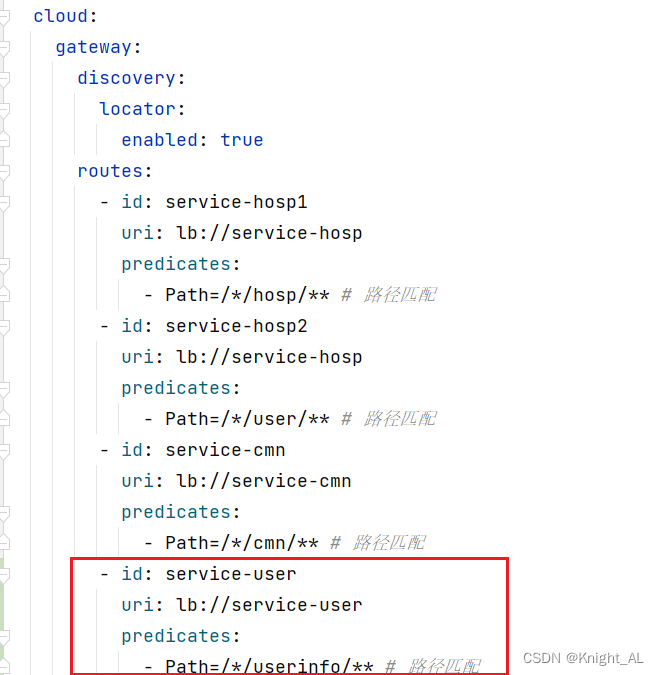
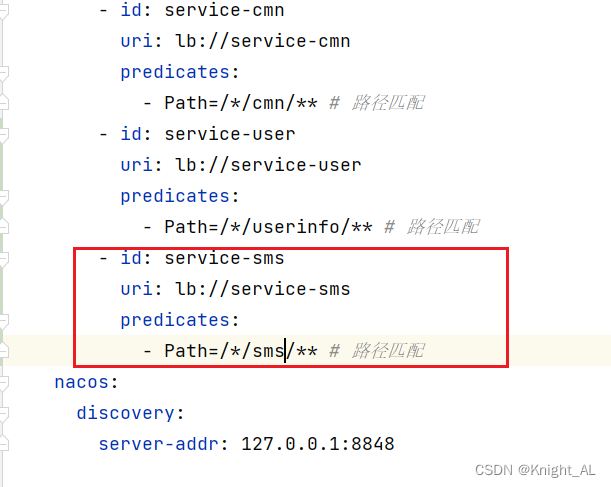
5、配置GateWay网关
properties
#设置路由id
spring.cloud.gateway.routes[3].id=service-user
#设置路由的uri
spring.cloud.gateway.routes[3].uri=lb://service-user
#设置路由断言,代理servicerId为auth-service的/auth/路径
spring.cloud.gateway.routes[3].predicates= Path=/*/userinfo/**
yml
三、登录接口实现
1、添加service接口与实现
1.1 创建UserInfoService定义方法
public interface UserInfoService extends IService<UserInfo> {

    Map<String, Object> login(LoginVo loginVo);

}
1.2 创建UserInfoServiceImpl实现方法
@Service
public class UserInfoServiceImpl extends ServiceImpl<UserInfoMapper, UserInfo> implements UserInfoService {

    @Override
    public Map<String, Object> login(LoginVo loginVo) {
        //1.首先获取用户输入的手机号和验证码信息
        String phone = loginVo.getPhone();
        String code = loginVo.getCode();
        //2.对接收的手机号和验证码做一个非空判断
        if (StringUtils.isEmpty(phone) || StringUtils.isEmpty(code)){
            throw  new YyghException(20001,"数据为空");
        }
        //TODO 对验证码做进一步确认

        //4.是否手机首次登陆,如果首次登陆,就先网表中注册一下当前用户信息
        QueryWrapper<UserInfo> wrapper = new QueryWrapper<>();
        wrapper.eq("phone",phone);
        UserInfo userInfo = baseMapper.selectOne(wrapper);
        if (userInfo == null){
            userInfo = new UserInfo();
            userInfo.setPhone(phone);
            userInfo.setCreateTime(new Date());
            userInfo.setStatus(1);
            baseMapper.insert(userInfo);
        }
        //5.验证用户的status
        if (userInfo.getStatus() == 0){
            throw new YyghException(20001,"用户已经禁用");
        }
        //6.返回信息
        HashMap<String, Object> map = new HashMap<>();
        String name = userInfo.getName();
        if (StringUtils.isEmpty(name)){
            name = userInfo.getNickName();
        }
        if (StringUtils.isEmpty(name)){
            name = userInfo.getPhone();
        }
        map.put("name",name);
        map.put("token","");
        return map;
    }
}
2、添加Mapper接口
public interface UserInfoMapper extends BaseMapper<UserInfo> {

}
3、添加Controller方法
创建UserInfoApiController添加方法
@RestController
@RequestMapping("/api/userinfo")
public class UserInfoApiController {

    @Autowired
    private UserInfoService userInfoService;

    @ApiOperation(value = "会员登录")
    @PostMapping("login")
    public R login(@RequestBody LoginVo loginVo) {
        Map<String, Object> info = userInfoService.login(loginVo);
        return R.ok().data(info);
    }
}
四、手机验证码登录(生成token)
1、使用JWT进行跨域身份验证
1.1 传统用户身份验证
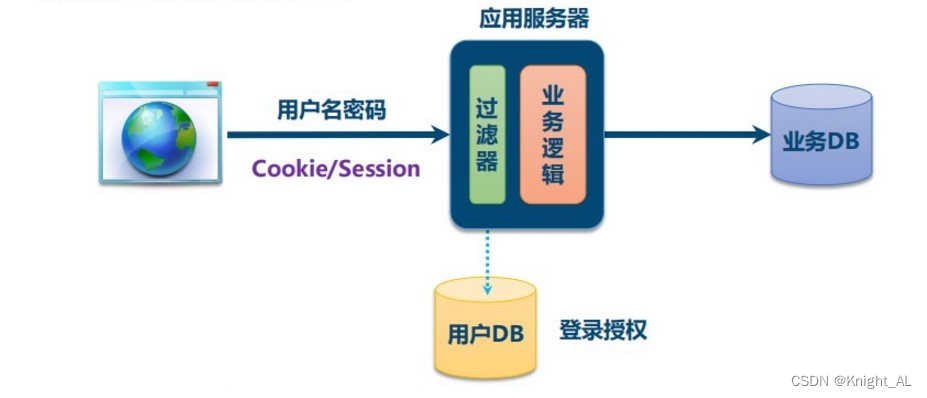
- Internet服务无法与用户身份验证分开。一般过程如下:
1.用户向服务器发送用户名和密码。
2.验证服务器后,相关数据(如用户角色,登录时间等)将保存在当前会话中。
3.服务器向用户返回session_id,session信息都会写入到用户的Cookie。
4.用户的每个后续请求都将通过在Cookie中取出session_id传给服务器。
5.服务器收到session_id并对比之前保存的数据,确认用户的身份。
这种模式最大的问题是,没有分布式架构,无法支持横向扩展。
1.2 解决方案
session广播
将透明令牌存入cookie,将用户身份信息存入redis
另外一种灵活的解决方案:
使用自包含令牌,通过客户端保存数据,而服务器不保存会话数据。 JWT是这种解决方案的代表
2、JWT介绍
JWT工具
JWT(Json Web Token)是为了在网络应用环境间传递声明而执行的一种基于JSON的开放标准。
JWT的声明一般被用来在身份提供者和服务提供者间传递被认证的用户身份信息,以便于从资源服务器获取资源。比如用在用户登录上
JWT最重要的作用就是对 token信息的防伪作用。
JWT的原理
一个JWT由三个部分组成:公共部分、私有部分、签名部分。最后由这三者组合进行base64编码得到JWT。
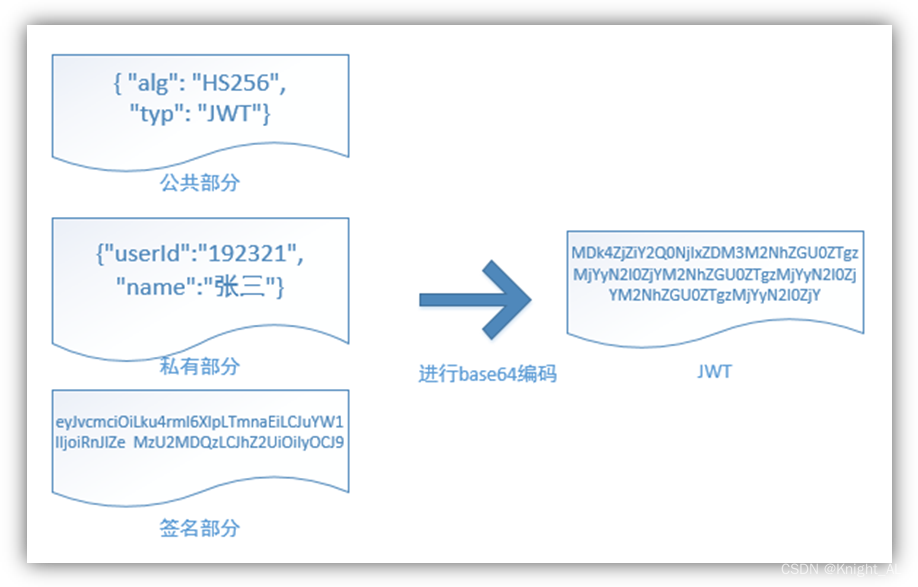
1、 公共部分
主要是该JWT的相关配置参数,比如签名的加密算法、格式类型、过期时间等等。
Key=ATGUIGU
2、 私有部分
用户自定义的内容,根据实际需要真正要封装的信息。
userInfo{用户的Id,用户的昵称nickName}
3、 签名部分
SaltiP: 当前服务器的Ip地址!{linux 中配置代理服务器的ip}
主要用户对JWT生成字符串的时候,进行加密{盐值}
最终组成 key+salt+userInfo -> token!
base64编码,并不是加密,只是把明文信息变成了不可见的字符串。但是其实只要用一些工具就可以把base64编码解成明文,所以不要在JWT中放入涉及私密的信息。
3、整合JWT
在service_utils模块添加依赖
<dependencies>
    <dependency>
        <groupId>io.jsonwebtoken</groupId>
        <artifactId>jjwt</artifactId>
    </dependency>
</dependencies>
添加JWT工具类
public class JwtHelper {
    private static long tokenExpiration = 24*60*60*1000;
    private static String tokenSignKey = "123456";

    public static String createToken(Long userId, String userName) {
        String token = Jwts.builder()
                .setSubject("YYGH-USER")
                .setExpiration(new Date(System.currentTimeMillis() + tokenExpiration))
                .claim("userId", userId)
                .claim("userName", userName)
                .signWith(SignatureAlgorithm.HS512, tokenSignKey)
                .compressWith(CompressionCodecs.GZIP)
                .compact();
        return token;
    }
    public static Long getUserId(String token) {
        if(StringUtils.isEmpty(token)) return null;
        Jws<Claims> claimsJws = Jwts.parser().setSigningKey(tokenSignKey).parseClaimsJws(token);
        Claims claims = claimsJws.getBody();
        Integer userId = (Integer)claims.get("userId");
        return userId.longValue();
    }
    public static String getUserName(String token) {
        if(StringUtils.isEmpty(token)) return "";
        Jws<Claims> claimsJws
                = Jwts.parser().setSigningKey(tokenSignKey).parseClaimsJws(token);
        Claims claims = claimsJws.getBody();
        return (String)claims.get("userName");
    }

    public static void main(String[] args) {
        String token = JwtHelper.createToken(1L, "55");
        System.out.println(token);
        System.out.println(JwtHelper.getUserId(token));
        System.out.println(JwtHelper.getUserName(token));
    }
}
完善UserInfoServiceImpl登录方法
@Override
public Map<String, Object> login(LoginVo loginVo) {
   .........

    //jwt生成token字符串
    String token = JwtHelper.createToken(userInfo.getId(), name);
    map.put("token",token);

    return map;
}
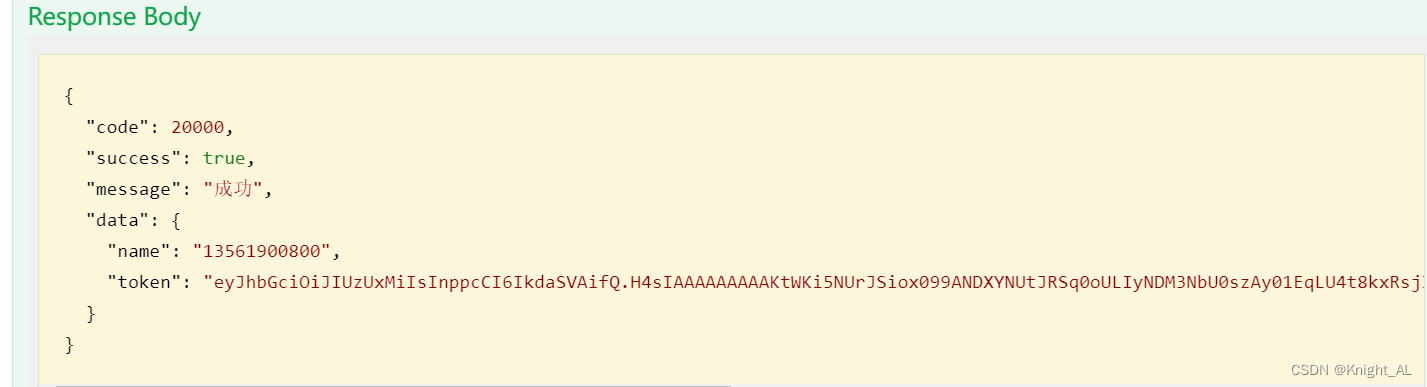
使用Swagger测试接口,测试多次,第一次注册,以后直接登录
4、单点登录总结
单点登录
1.session复制|广播的:缺点:比较消耗公司的网络带宽
2.redis统一保存各个微服务的session信息:缺点:单独redis服务
3.token方式:是服务器端根据一定规则[算法+盐值]生成的用户的唯一标识,token不在服务器保存,在浏览器端保存
五、整合阿里云服务短信(云市场)
可以参考下面这篇文章
https://donglin.blog.csdn.net/article/details/125699790
1、新建短信微服务
1、在service模块下创建子模块service_sms
2、创建controller和service代码
3、配置application.properties
# 服务端口
server.port=8206
# 服务名
spring.application.name=service-sms

spring.redis.host=127.0.0.1
spring.redis.port=6379
spring.redis.database= 0
spring.redis.timeout=1800000

spring.redis.lettuce.pool.max-active=20
spring.redis.lettuce.pool.max-wait=-1
#最大阻塞等待时间(负数表示没限制)
spring.redis.lettuce.pool.max-idle=5
spring.redis.lettuce.pool.min-idle=0
#最小空闲
# nacos服务地址
spring.cloud.nacos.discovery.server-addr=127.0.0.1:8848

#返回json的全局时间格式
spring.jackson.date-format=yyyy-MM-dd HH:mm:ss
spring.jackson.time-zone=GMT+8

#mybatis日志
mybatis-plus.configuration.log-impl=org.apache.ibatis.logging.stdout.StdOutImpl
4、创建启动类
创建ServiceMsmApplication.java
@ComponentScan({"com.donglin"})
@SpringBootApplication(exclude = DataSourceAutoConfiguration.class)//取消数据源自动配置
public class ServiceSmsApplication {
    public static void main(String[] args) {
        SpringApplication.run(ServiceSmsApplication.class, args);
    }
}
2、编写发送短信接口
1、在service-sms的pom中引入依赖
   <dependencies>
        <dependency>
            <groupId>com.alibaba</groupId>
            <artifactId>fastjson</artifactId>
        </dependency>
       <dependency>
            <groupId>org.apache.httpcomponents</groupId>
            <artifactId>httpclient</artifactId>
        </dependency>
    </dependencies>
2、编写controller,根据手机号发送短信
@RestController
@RequestMapping("/user/sms")
public class SmsController {

    @Autowired
    private SmsService smsService;

    @GetMapping("/send/{phone}")
    public R sendCode(@PathVariable String phone){
        boolean flag=smsService.sendCode(phone);
        if(flag){
            return R.ok();
        }else{
            return R.error();
        }
    }
}
3、编写service
import com.donglin.yygh.sms.service.SmsService;
import com.donglin.yygh.sms.uitls.HttpUtils;
import com.donglin.yygh.sms.uitls.RandomUtil;
import org.apache.http.HttpResponse;
import org.springframework.beans.factory.annotation.Autowired;
import org.springframework.data.redis.core.RedisTemplate;
import java.util.HashMap;
import java.util.Map;
import java.util.concurrent.TimeUnit;

@Service
public class SmsServiceImpl implements SmsService {

    @Autowired
    private RedisTemplate<String,String> redisTemplate;

    @Override
    public boolean sendCode(String phone) {
        String host = "http://dingxin.market.alicloudapi.com";
        String path = "/dx/sendSms";
        String method = "POST";
        String appcode = "f5e58dd4cd56493581466733a71b6c31";
        Map<String, String> headers = new HashMap<String, String>();
        //最后在header中的格式(中间是英文空格)为Authorization:APPCODE 83359fd73fe94948385f570e3c139105
        headers.put("Authorization", "APPCODE " + appcode);
        Map<String, String> querys = new HashMap<String, String>();
        querys.put("mobile", phone);
        String fourBitRandom = RandomUtil.getFourBitRandom();
        querys.put("param", "code:"+fourBitRandom);
        querys.put("tpl_id", "TP1711063");
        Map<String, String> bodys = new HashMap<String, String>();


        try {
            /**
             * 重要提示如下:
             * HttpUtils请从
             * https://github.com/aliyun/api-gateway-demo-sign-java/blob/master/src/main/java/com/aliyun/api/gateway/demo/util/HttpUtils.java
             * 下载
             *
             * 相应的依赖请参照
             * https://github.com/aliyun/api-gateway-demo-sign-java/blob/master/pom.xml
             */
            HttpResponse response = HttpUtils.doPost(host, path, method, headers, querys, bodys);
            System.out.println(response.toString());
            //获取response的body
            //System.out.println(EntityUtils.toString(response.getEntity()));

            //把验证码保存redis中一份
            redisTemplate.opsForValue().set(phone,fourBitRandom,10, TimeUnit.DAYS);
        } catch (Exception e) {
            e.printStackTrace();
        }
        return true;
    }


}
4.记得配置网关
3、完善登录接口
修改UserInfoServiceImpl
@Autowired
private RedisTemplate<String, String> redisTemplate;

//校验校验验证码
String mobleCode = redisTemplate.opsForValue().get(phone);
if(!code.equals(mobleCode)) {
    throw new YyghException(20001,"验证码失败");
}
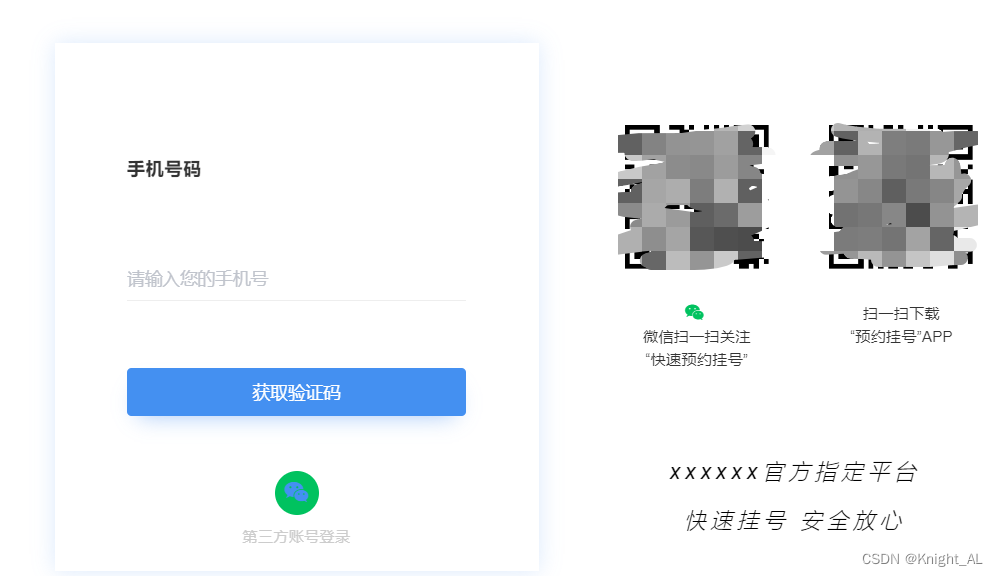
六、手机验证码登录前端
1、用户登录前端
1、封装api方法
(1)创建api/userInfo.js
import request from '@/utils/request'

const api_name = `/user/userinfo`

export default {
    login(userInfo) {
        return request({
            url: `${api_name}/login`,
            method: `post`,
            data: userInfo
        })
    }
}
(2)创建api/sms.js
import request from '@/utils/request'

const api_name = `/user/sms`

export default {
    sendCode(mobile) {
        return request({
            url: `${api_name}/send/${mobile}`,
            method: `get`
        })
    }
}
2、添加登录组件
登录层是一个公共层,因此我们把它放在头部组件里面
修改layouts/myheader.vue文件
<template>
<div class="header-container">
<div class="wrapper">
<!-- logo -->
<div class="left-wrapper v-link selected">
<img style="width: 50px" width="50" height="50" src="~assets/images/logo.png">
<span class="text">尚医通 预约挂号统一平台</span>
</div>
<!-- 右侧 -->
<div class="right-wrapper">
<span class="v-link clickable">帮助中心</span>
<span v-if="name == ''" class="v-link clickable" @click="showLogin()" id="loginDialog">登录/注册</span>
<el-dropdown v-if="name != ''" @command="loginMenu">
<span class="el-dropdown-link">
{{ name }}<i class="el-icon-arrow-down el-icon--right"></i>
</span>
<el-dropdown-menu class="user-name-wrapper" slot="dropdown">
<el-dropdown-item command="/user">实名认证</el-dropdown-item>
<el-dropdown-item command="/order">挂号订单</el-dropdown-item>
<el-dropdown-item command="/patient">就诊人管理</el-dropdown-item>
<el-dropdown-item command="/logout" divided>退出登录</el-dropdown-item>
</el-dropdown-menu>
</el-dropdown>
</div>
</div>
<!-- 登录弹出层 -->
<el-dialog :visible.sync="dialogUserFormVisible" style="text-align: left;" top="50px" :append-to-body="true" width="960px" @close="closeDialog()">
<div class="container">
<!-- 手机登录 #start -->
<div class="operate-view" v-if="dialogAtrr.showLoginType === 'phone'">
<div class="wrapper" style="width: 100%">
<div class="mobile-wrapper" style="position: static;width: 70%">
<span class="title">{{ dialogAtrr.labelTips }}</span>
<el-form>
<el-form-item>
<el-input v-model="dialogAtrr.inputValue" :placeholder="dialogAtrr.placeholder" :maxlength="dialogAtrr.maxlength" class="input v-input">
<span slot="suffix" class="sendText v-link" v-if="dialogAtrr.second > 0">{{ dialogAtrr.second }}s </span>
<span slot="suffix" class="sendText v-link highlight clickable selected" v-if="dialogAtrr.second == 0" @click="getCodeFun()">重新发送 </span>
</el-input>
</el-form-item>
</el-form>
<div class="send-button v-button" @click="btnClick()"> {{ dialogAtrr.loginBtn }}</div>
</div>
<div class="bottom">
<div class="wechat-wrapper" @click="weixinLogin()"><span
class="iconfont icon"></span></div>
<span class="third-text"> 第三方账号登录 </span></div>
</div>
</div>
<!-- 手机登录 #end -->
<!-- 微信登录 #start -->
<div class="operate-view" v-if="dialogAtrr.showLoginType === 'weixin'" >
<div class="wrapper wechat" style="height: 400px">
<div>
<div id="weixinLogin"></div>
</div>
<div class="bottom wechat" style="margin-top: -80px;">
<div class="phone-container">
<div class="phone-wrapper" @click="phoneLogin()"><span
class="iconfont icon"></span></div>
<span class="third-text"> 手机短信验证码登录 </span></div>
</div>
</div>
</div>
<!-- 微信登录 #end -->
<div class="info-wrapper">
<div class="code-wrapper">
<div><img src="//img.114yygh.com/static/web/code_login_wechat.png" class="code-img">
<div class="code-text"><span class="iconfont icon"></span>微信扫一扫关注
</div>
<div class="code-text"> “快速预约挂号”</div>
</div>
<div class="wechat-code-wrapper"><img
src="//img.114yygh.com/static/web/code_app.png"
class="code-img">
<div class="code-text"> 扫一扫下载</div>
<div class="code-text"> “预约挂号”APP</div>
</div>
</div>
<div class="slogan">
<div>xxxxxx官方指定平台</div>
<div>快速挂号 安全放心</div>
</div>
</div>
</div>
</el-dialog>
</div>
</template>
<script>
import cookie from 'js-cookie'
import Vue from 'vue'
import userInfoApi from '@/api/userInfo'
import smsApi from '@/api/sms'
const defaultDialogAtrr = {
showLoginType: 'phone', // 控制手机登录与微信登录切换
labelTips: '手机号码', // 输入框提示
inputValue: '', // 输入框绑定对象
placeholder: '请输入您的手机号', // 输入框placeholder
maxlength: 11, // 输入框长度控制
loginBtn: '获取验证码', // 登录按钮或获取验证码按钮文本
sending: true, // 是否可以发送验证码
second: -1, // 倒计时间 second>0 : 显示倒计时 second=0 :重新发送 second=-1 :什么都不显示
clearSmsTime: null // 倒计时定时任务引用 关闭登录层清除定时任务
}
export default {
data() {
return {
userInfo: {
phone: '',
code: '',
openid: ''
},
dialogUserFormVisible: false,
// 弹出层相关属性
dialogAtrr:defaultDialogAtrr,
name: '' // 用户登录显示的名称
}
},
created() {
this.showInfo()
},
mounted() {
// 注册全局登录事件对象
window.loginEvent = new Vue();
// 监听登录事件
loginEvent.$on('loginDialogEvent', function () {
document.getElementById("loginDialog").click();
})
// 触发事件,显示登录层:loginEvent.$emit('loginDialogEvent')
},
methods: {
// 绑定登录或获取验证码按钮
btnClick() {
// 判断是获取验证码还是登录
if(this.dialogAtrr.loginBtn == '获取验证码') {
this.userInfo.phone = this.dialogAtrr.inputValue
// 获取验证码
this.getCodeFun()
} else {
// 登录
this.login()
}
},
// 绑定登录,点击显示登录层
showLogin() {
this.dialogUserFormVisible = true
// 初始化登录层相关参数
this.dialogAtrr = { ...defaultDialogAtrr }
},
// 登录
login() {
this.userInfo.code = this.dialogAtrr.inputValue
if(this.dialogAtrr.loginBtn == '正在提交...') {
this.$message.error('重复提交')
return;
}
if (this.userInfo.code == '') {
this.$message.error('验证码必须输入')
return;
}
if (this.userInfo.code.length != 4) {
this.$message.error('验证码格式不正确')
return;
}
this.dialogAtrr.loginBtn = '正在提交...'
userInfoApi.login(this.userInfo).then(response => {
console.log(response.data)
// 登录成功 设置cookie
this.setCookies(response.data.name, response.data.token)
}).catch(e => {
this.dialogAtrr.loginBtn = '马上登录'
})
},
setCookies(name, token) {
cookie.set('token', token, { domain: 'localhost' })
cookie.set('name', name, { domain: 'localhost' })
window.location.reload()
},
// 获取验证码
getCodeFun() {
if (!(/^1[34578]\d{9}$/.test(this.userInfo.phone))) {
this.$message.error('手机号码不正确')
return;
}
// 初始化验证码相关属性
this.dialogAtrr.inputValue = ''
this.dialogAtrr.placeholder = '请输入验证码'
this.dialogAtrr.maxlength = 6
this.dialogAtrr.loginBtn = '马上登录'
// 控制重复发送
if (!this.dialogAtrr.sending) return;
// 发送短信验证码
this.timeDown();
this.dialogAtrr.sending = false;
smsApi.sendCode(this.userInfo.phone).then(response => {
this.timeDown();
}).catch(e => {
this.$message.error('发送失败,重新发送')
// 发送失败,回到重新获取验证码界面
//this.showLogin()
})
},
// 倒计时
timeDown() {
if(this.clearSmsTime) {
clearInterval(this.clearSmsTime);
}
this.dialogAtrr.second = 60;
this.dialogAtrr.labelTips = '验证码已发送至' + this.userInfo.phone
this.clearSmsTime = setInterval(() => {
--this.dialogAtrr.second;
if (this.dialogAtrr.second < 1) {
clearInterval(this.clearSmsTime);
this.dialogAtrr.sending = true;
this.dialogAtrr.second = 0;
}
}, 1000);
},
// 关闭登录层
closeDialog() {
if(this.clearSmsTime) {
clearInterval(this.clearSmsTime);
}
},
showInfo() {
let token = cookie.get('token')
if (token) {
this.name = cookie.get('name')
console.log(this.name)
}
},
loginMenu(command) {
if('/logout' == command) {
cookie.set('name', '', {domain: 'localhost'})
cookie.set('token', '', {domain: 'localhost'})
//跳转页面
window.location.href = '/'
} else {
window.location.href = command
}
},
handleSelect(item) {
window.location.href = '/hospital/' + item.hoscode
},
weixinLogin() {
this.dialogAtrr.showLoginType = 'weixin'
},
phoneLogin() {
this.dialogAtrr.showLoginType = 'phone'
this.showLogin()
}
}
}
</script>