[版权申明] 非商业目的注明出处可自由转载
出自:shusheng007
文章目录
- 概述
- 简介
- 原理
- 默认实现
- 使用Token认证方案
- JWT
- 认证流程
- 自定义Authentication Provider
- 自定义Provider
- 修改配置
- 认证失败与授权失败处理
- 认证失败处理
- 授权失败处理
- 支持方法级别的授权
- 总结
- 源码
概述
现如今Spring全家桶在Java web后端领域是寡头般的存在,其中安全相关的那员大奖就是Spring Security。我觉得它相对于其他竞争对手,例如 Apache Shiro显得过于复杂,对初学者很不友好,我第一次看见这玩意感觉这就是个垃圾,半天搞不懂,太tm复杂了。由于其是spring全家桶的一员,与spring生态集成时特别丝滑,所以用的人也不少,所以不管喜不喜欢你还是要懂他…
为什么要写这篇文章呢?因为我最近又用到了它,所以又去看了下相关的资料,在这里总结一下以便于自己和他人查阅,所以就有了这一篇全网最易懂的Spring Security入门教程,希望它可以名副其实,我也会尽量写的通俗易懂。下面跟着二狗哥开启对spring security的扫盲之旅吧…
简介
最近ChatGPT 很火,我们先让它给介绍一下Spring Security吧,下面是它的回答,不得不说这家伙很牛x。
Spring Security is a powerful and flexible security framework for Java-based applications. It is widely used to secure enterprise applications and web applications built on the Spring framework.
Spring Security provides a wide range of security features, including authentication, authorization, session management, and security for RESTful web services. It also provides support for a variety of authentication mechanisms, including form-based authentication, basic authentication, and Single Sign-On (SSO) solutions.
Some of the key features of Spring Security include:
-
Authentication: Spring Security provides a flexible authentication architecture that allows you to easily configure and integrate with various authentication mechanisms, such as LDAP, database-based authentication, and OAuth.
-
Authorization: Spring Security provides a powerful authorization model that allows you to control access to your application’s resources based on user roles and permissions.
-
Session Management: Spring Security provides built-in support for managing user sessions, including session timeout, session persistence, and session tracking.
-
RESTful Security: Spring Security provides security for RESTful web services through a variety of mechanisms, including basic authentication, token-based authentication, and OAuth.
-
Security Integration: Spring Security integrates seamlessly with other Spring framework components, making it easy to secure your application as it grows and evolves.
Overall, Spring Security is a great choice for anyone looking to build secure applications using the Spring framework. With its flexible and powerful security features, Spring Security makes it easy to secure your application and keep your users’ data safe.
总之我们只要知道这玩意是用在spring framwork 里保证程序安全的就行了。安全这个领域涵盖非常的广泛且深奥,二狗也没能力触碰太深。这里我们只涉及Authentication和Authorization两个概念
- 认证(Authentication)
解决你是谁的问题,具体表现为注册与登录
- 授权(Authorization)
解决你能干什么的问题,你登录后有哪些权限。
原理
如果现在让你写一个登录功能(Authentication)你怎么写?很自然的思路是不是把用户提交的信息和我们保存的信息做个比较,如果对上了就登录成功。其实spring security整体也是这样的,只是流程化后,兼顾扩展导致搞的很复杂。
Spring Security的整体原理为:
- 当http请求进来时,使用severlet的Filter来拦截。
- 提取http请求中的认证信息,例如username和password,或者Token。
- 从数据库(或者其他地方,例如Redis)中查询用户注册时的信息,然后进行比对,相同则认证成功,反之失败。
主体就是这么简单,然后只有抓住这个主体思路才不容易被Spring Security绕晕…
下图展示了Spring Security的一些Filter,其中UsernamePasswordAuthenticationFilter很重要,它是Authentication的开始。
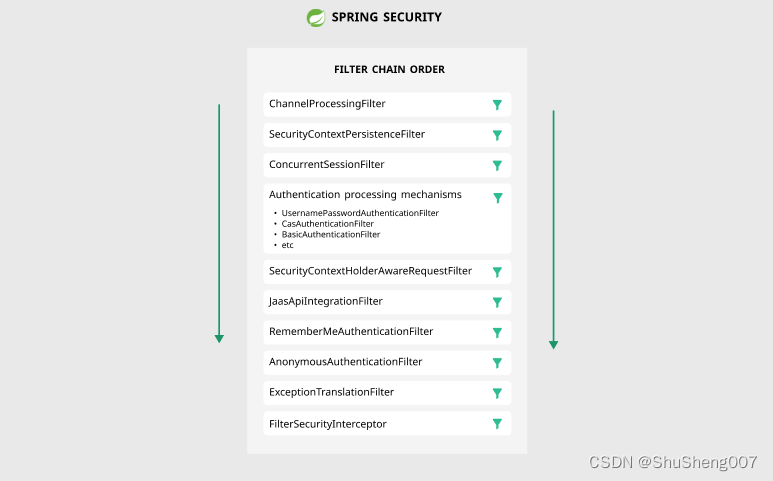
图片来源
默认实现
咱先从最简单的开始,使用Spring Security保护一个使用Spring Boot开发的web程序。
只要在pom.xml中引入依赖Spring Security的依赖即可。
<dependencies>
    <dependency>
        <groupId>org.springframework.boot</groupId>
        <artifactId>spring-boot-starter-web</artifactId>
    </dependency>
    <dependency>
        <groupId>org.springframework.boot</groupId>
        <artifactId>spring-boot-starter-security</artifactId>
    </dependency>
</dependencies>
然后我们写一个测试用的controller。
@RestController
@RequestMapping("/auth")
public class TestController {

    @GetMapping("/hello")
    public String sayHello(){
        return "hello security";
    }
}
使用浏览器访问localhost:8080/auth/hello,你就会发现弹出一个登录页面让你登录
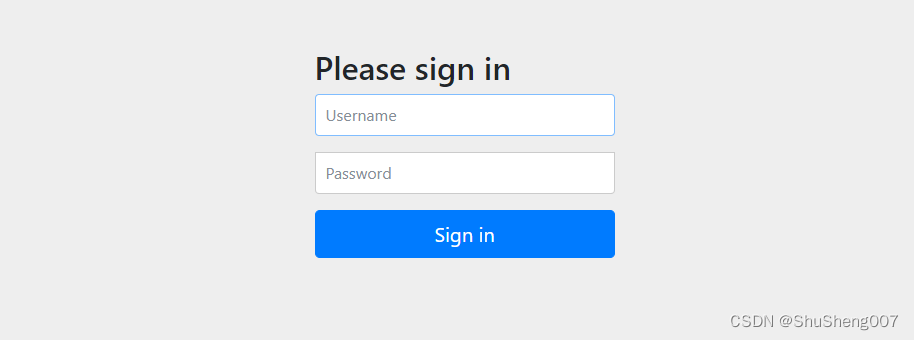
我们没有写一行代码就实现了一个登录功能,酷不酷?不过用户名和秘密是啥呢?别着急这个Spring Security已经给我们生成了。
username:user
password:随机生成,会打印在你的控制台日志上。
日志:
Using generated security password: 3f5acb10-1390-4474-8892-71e7562d47ce
当然了,我们可以在application.yml中配置用户名和秘密
spring:
  security:
    user:
      name: shusheng007
      password: ss007
那这一切都是怎么发生的呢?这才是我们要关注的重点。
一个请求过来Spring Security会按照下图的步骤处理:

- Filter
拦截Http请求,获取用户名和秘密等认证信息
关键方法:
public abstract Authentication attemptAuthentication(HttpServletRequest request, HttpServletResponse response)
		throws AuthenticationException, IOException, ServletException;
- AuthenticationManager
从filter中获取认证信息,然后查找合适的AuthenticationProvider来发起认证流程
关键方法:
Authentication authenticate(Authentication authentication) throws AuthenticationException;
- AuthenticationProvider
调用UserDetailsService来查询已经保存的用户信息并与从http请求中获取的认证信息比对。如果成功则返回,否则则抛出异常。
关键方法:
protected abstract UserDetails retrieveUser(String username, UsernamePasswordAuthenticationToken authentication)
			throws AuthenticationException;
- UserDetailsService
负责获取用户保存的认证信息,例如查询数据库。
关键方法:
UserDetails loadUserByUsername(String username) throws UsernameNotFoundException;
这些组件都是抽象的,每个都可以有不同的实现,换句话说都是可以定制,特别灵活,所以就特别复杂。具体到我们这个默认的例子中,使用的都是默认实现:
- Filter: UsernamePasswordAuthenticationFilter
- AuthenticationManager: ProviderManager
- AuthenticationProvider: DaoAuthenticationProvider
- UserDetailsService: InMemoryUserDetailsManager
业务流程是不是很清晰,之所以感觉复杂是因为经过框架的一顿设计,拉长了调用链。虽然设计上复杂了,但是如果理解了这套设计流程,终端用户使用就会简单很多,不理解的话,感觉特别复杂。
使用Token认证方案
上面那套默认实现几乎是不能用在生产环境的,我们日常也不这么用,生产环境中我们一般会结合Token来做认证。
JWT
比较流行的就是使用JWT(JSON Web Tokens),其是一个开放的工业标准。
JSON Web Tokens are an open, industry standard RFC 7519 method for representing claims securely between two parties.
有关于它的介绍可以直接点击上面的网站去查看,这里做个简单的介绍。其一共有三部分
- Header
- Payload
- Signature
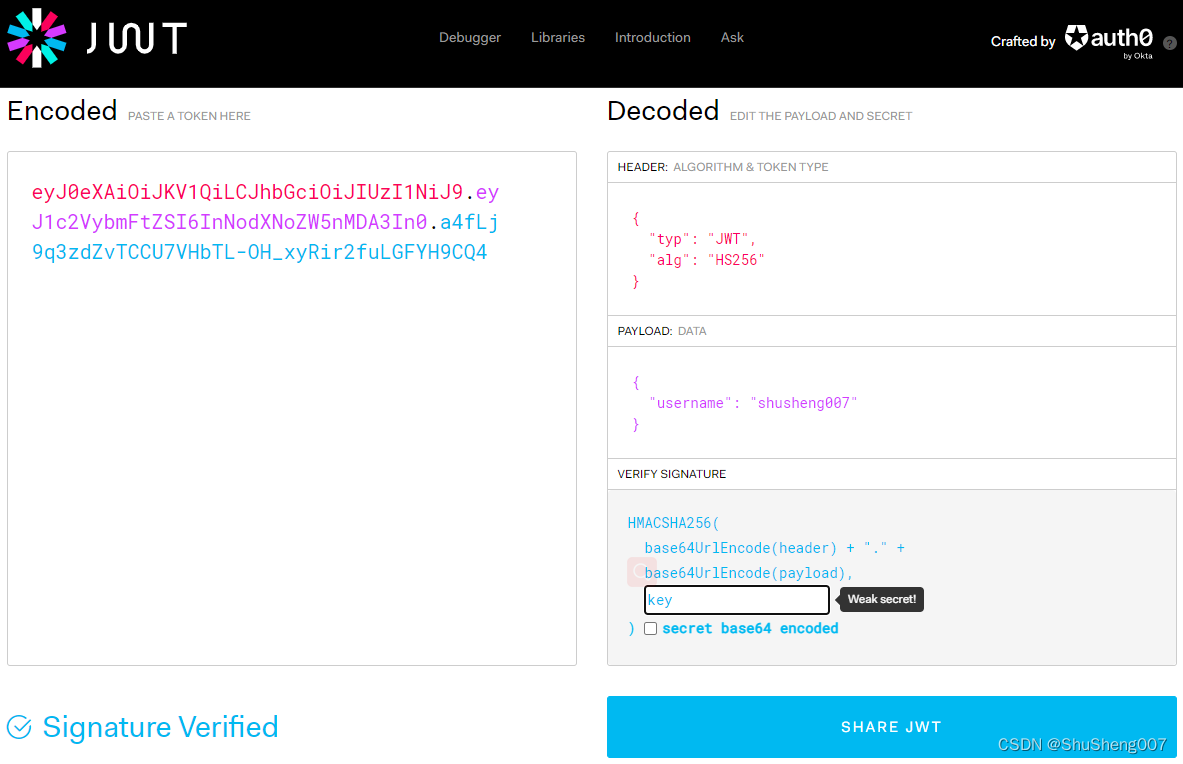
这三部分base64后采用.连接,例如下面就是我生成的一个jwt
eyJ0eXAiOiJKV1QiLCJhbGciOiJIUzI1NiJ9
.
eyJ1c2VybmFtZSI6InNodXNoZW5nMDA3In0
.
a4fLj9q3zdZvTCCU7VHbTL-OH_xyRir2fuLGFYH9CQ4
前两部分是base64,最后一部分是前面两部分使用SHA256的签名。你可以使用JWT(JSON Web Tokens)这个网站提供的工具来解码JWT。下图是上面那个jwt的解码结果。
操作JWT的库非常多,我们这里使用一个强悍的国产工具Hutool里的关于JWT的: hutool-jwt
认证流程
认证的底层逻辑仍然是一样的,就是将用户提交的凭证与我们保存的凭证对比。
- 登录
用户使用用户名与秘密登录我们的系统,登录成功后颁发JWT给用户
- 发起请求
用户发起请求时在Header中携带JWT,程序拦截并检查这个token是否合法,合法则放行,不合法则提示从新登录。
下面我们实现一下这个过程:
第一步: 引入依赖
 <dependencies>
     <dependency>
         <groupId>org.springframework.boot</groupId>
         <artifactId>spring-boot-starter-web</artifactId>
     </dependency>

     <dependency>
         <groupId>org.springframework.boot</groupId>
         <artifactId>spring-boot-starter-security</artifactId>
     </dependency>

     <dependency>
         <groupId>cn.hutool</groupId>
         <artifactId>hutool-jwt</artifactId>
         <version>${hutool-jwt.version}</version>
     </dependency>
 </dependencies>
第二步: 登录
@RestController
@RequestMapping("/user")
public class AuthController {

    @Autowired
    AuthenticationManager authenticationManager;

...

    @PostMapping("/login")
    public String login(@RequestBody SignInReq req) {

        UsernamePasswordAuthenticationToken authenticationToken =
                new UsernamePasswordAuthenticationToken(req.getUsername(), req.getPassword());
        authenticationManager.authenticate(authenticationToken);

         //上一步没有抛出异常说明认证成功,我们向用户颁发jwt令牌
        String token = JWT.create()
                .setPayload("username", req.getUsername())
                .setKey(MyConstant.JWT_SIGN_KEY.getBytes(StandardCharsets.UTF_8))
                .sign();

        return token;
    }
}
这里的AuthenticationManager 注入的是默认实现ProviderManager实例。UsernamePasswordAuthenticationToken 是一个Authentication,我们构建一个Authentication然后交给AuthenticationManager 去校验。一定要注意这里使用的是两个参数的构造方法,它将认证状态设置为了false,接着就需要让AuthenticationManager 去校验用户名和秘密。
    public UsernamePasswordAuthenticationToken(Object principal, Object credentials) {
		...
        this.setAuthenticated(false);
    }
第三步: 拦截请求,校验token
@Slf4j
public class JwtAuthenticationTokenFilter extends OncePerRequestFilter {
    private final static String AUTH_HEADER = "Authorization";
    private final static String AUTH_HEADER_TYPE = "Bearer";

    @Autowired
    private UserDetailsService userDetailsService;

    @Override
    protected void doFilterInternal(HttpServletRequest request, HttpServletResponse response, FilterChain filterChain) throws ServletException, IOException {
        // get token from header:  Authorization: Bearer <token>
        String authHeader = request.getHeader(AUTH_HEADER);
        if (Objects.isNull(authHeader) || !authHeader.startsWith(AUTH_HEADER_TYPE)){
            filterChain.doFilter(request,response);
            return;
        }

        String authToken = authHeader.split(" ")[1];
        log.info("authToken:{}" , authToken);
        //verify token
        if (!JWTUtil.verify(authToken, MyConstant.JWT_SIGN_KEY.getBytes(StandardCharsets.UTF_8))) {
            log.info("invalid token");
            filterChain.doFilter(request,response);
            return;
        }

        final String userName = (String) JWTUtil.parseToken(authToken).getPayload("username");
        UserDetails userDetails = userDetailsService.loadUserByUsername(userName);

        // 注意,这里使用的是3个参数的构造方法,此构造方法将认证状态设置为true
        UsernamePasswordAuthenticationToken authentication =
                new UsernamePasswordAuthenticationToken(userDetails.getUsername(), userDetails.getPassword(), userDetails.getAuthorities());
        authentication.setDetails(new WebAuthenticationDetailsSource().buildDetails(request));

        //将认证过了凭证保存到security的上下文中以便于在程序中使用
        SecurityContextHolder.getContext().setAuthentication(authentication);

        filterChain.doFilter(request, response);
    }
}
JwtAuthenticationTokenFilter继承 OncePerRequestFilter,其会拦截http请求,然后检查其header: Authorization携带的 jwt。如果通过了就从jwt中获取用户名,然后到数据库(或者redis)里查询用户信息,然后生成验证通过的UsernamePasswordAuthenticationToken 。一定要注意这次使用的是3个参数的构造函数,其将认证状态设置为了true。
	public UsernamePasswordAuthenticationToken(Object principal, Object credentials,
			Collection<? extends GrantedAuthority> authorities) {
          ...
		super.setAuthenticated(true); // must use super, as we override
	}
认证通过使用3个参数的构造函数,需要用它进行接下来的认证,则使用2个参数的构造函数。
第四步: 配置security
由于springboot 2.7.0以后弃用了WebSecurityConfigurerAdapter,所以我们直接采用最新的写法,网上教程很多都是老的写法。
@Configuration
@EnableWebSecurity
public class WebSecurityConfig {
    ...

    @Bean
    public AuthenticationManager authenticationManager(AuthenticationConfiguration authConfig) throws Exception {
        return authConfig.getAuthenticationManager();
    }

    //我们自定义的拦截器
    @Bean
    public JwtAuthenticationTokenFilter jwtAuthenticationTokenFilter() {
        return new JwtAuthenticationTokenFilter();
    }

...
    @Bean
    public SecurityFilterChain filterChain(HttpSecurity httpSecurity) throws Exception {
        //基于token,所以不需要csrf防护
        httpSecurity.csrf().disable()
                //基于token,所以不需要session
                .sessionManagement().sessionCreationPolicy(SessionCreationPolicy.STATELESS)
                .and()
                .authorizeRequests()
                //登录注册不需要认证
                .antMatchers("/user/login", "/user/register").permitAll()
                //除上面的所有请求全部需要鉴权认证
                .anyRequest()
                .authenticated();
        //禁用缓存
        httpSecurity.headers().cacheControl();
        //将我们的JWT filter添加到UsernamePasswordAuthenticationFilter前面,因为这个Filter是authentication开始的filter,我们要早于它
        httpSecurity.addFilterBefore(jwtAuthenticationTokenFilter(), UsernamePasswordAuthenticationFilter.class);

        ...

        return httpSecurity.build();
    }
}
完成以上4步就OK了,文中省略了很多细节代码,具体还是要查看源码,你可以在文末找到源码链接文末源码。
自定义Authentication Provider
还记得Authentication Provider是干什么的吗?具体的认证过程就发生在provider中,就是那个比较用户提交的凭证和程序保存凭证的过程。默认使用的是DaoAuthenticationProvider,一般情况都够用了。
自定义Provider
下面我们自定义一个provider,我们自己获取保存的用户凭证,自己比较。
public class JwtAuthenticationProvider implements AuthenticationProvider {

    @Autowired
    private  PasswordEncoder passwordEncoder;
    @Autowired
    private UserDetailsService userDetailsService;

    @Override
    public Authentication authenticate(Authentication authentication) throws AuthenticationException {
        String username = String.valueOf(authentication.getPrincipal());
        String password = String.valueOf(authentication.getCredentials());

        UserDetails userDetails = userDetailsService.loadUserByUsername(username);
        if(passwordEncoder.matches(password,userDetails.getPassword())){
           return new UsernamePasswordAuthenticationToken(username, password, userDetails.getAuthorities());
        }

        throw new BadCredentialsException("Error!!");
    }

    @Override
    public boolean supports(Class<?> authentication) {
        return UsernamePasswordAuthenticationToken.class.equals(authentication);
    }
}
值的注意的是我这里仍然使用了UserDetailsService 这个Spring Security提供的接口来获取程序保存的用户凭证。我们这里也可以不使用它,而直接使用我们自己定义的类,例如自己写个查询用户信息的service即可。
修改配置
@Configuration
@EnableWebSecurity
public class WebSecurityConfig {

    @Bean
    public AuthenticationManager authenticationManager(AuthenticationConfiguration authConfig) throws Exception {
        return authConfig.getAuthenticationManager();
    }

    @Bean
    public PasswordEncoder passwordEncoder() {
        return new BCryptPasswordEncoder();
    }

    @Bean
    public JwtAuthenticationTokenFilter jwtAuthenticationTokenFilter() {
        return new JwtAuthenticationTokenFilter();
    }

    @Bean
    public JwtAuthenticationProvider jwtAuthenticationProvider(){
        return new JwtAuthenticationProvider();
    }

    @Bean
    public SecurityFilterChain filterChain(HttpSecurity httpSecurity) throws Exception {
        //由于使用的是JWT,这里不需要csrf防护
        httpSecurity.csrf().disable()
                //基于token,所以不需要session
                .sessionManagement().sessionCreationPolicy(SessionCreationPolicy.STATELESS)
                .and()
                .authorizeRequests()
                //对登录注册允许匿名访问
                .antMatchers("/user/login", "/user/register").permitAll()
                .anyRequest()// 除上面外的所有请求全部需要鉴权认证
                .authenticated();
        //禁用缓存
        httpSecurity.headers().cacheControl();
        //使用自定义provider
        httpSecurity.authenticationProvider(jwtAuthenticationProvider());
        //添加JWT filter
        httpSecurity.addFilterBefore(jwtAuthenticationTokenFilter(), UsernamePasswordAuthenticationFilter.class);
        ...

        return httpSecurity.build();
    }
}
我们使用
httpSecurity.authenticationProvider(jwtAuthenticationProvider());
将自定义的provider交给AuthenticationManager使其生效。
认证失败与授权失败处理
当认证失败或者授权失败时我们怎么处理呢?
认证失败处理
首先我们提供一个AuthenticationEntryPoint接口的实现,response的内容根据你的需求修改
@Component
public class MyUnauthorizedHandler implements AuthenticationEntryPoint {
    @Override
    public void commence(HttpServletRequest request, HttpServletResponse response, AuthenticationException authException) throws IOException, ServletException {
        response.setCharacterEncoding("UTF-8");
        response.setContentType("application/json");
        response.getWriter().println("认证失败");
        response.getWriter().flush();
    }
}
将其配置到config中
...
public class WebSecurityConfig {

    @Autowired
    private MyUnauthorizedHandler unauthorizedHandler;
    ...

    @Bean
    public SecurityFilterChain filterChain(HttpSecurity httpSecurity) throws Exception {
        ...
        httpSecurity.exceptionHandling()
                .authenticationEntryPoint(unauthorizedHandler);

        return httpSecurity.build();
    }
}
授权失败处理
与认证失败处理方法类似。
首先我们提供一个AccessDeniedHandler 接口的实现,response的内容根据你的需求修改
@Component
public class MyAccessDeniedHandler implements AccessDeniedHandler {
    @Override
    public void handle(HttpServletRequest request, HttpServletResponse response, AccessDeniedException accessDeniedException) throws IOException, ServletException {
        response.setCharacterEncoding("UTF-8");
        response.setContentType("application/json");
        response.getWriter().println("禁止访问");
        response.getWriter().flush();
    }
}
将其配置到WebSecurityConfig 中
...
public class WebSecurityConfig {

    @Autowired
    private MyAccessDeniedHandler accessDeniedHandler;

    ...

    @Bean
    public SecurityFilterChain filterChain(HttpSecurity httpSecurity) throws Exception {
        ...
        httpSecurity.exceptionHandling()
                .accessDeniedHandler(accessDeniedHandler);

        return httpSecurity.build();
    }
}
支持方法级别的授权
Spring Security支持方法级别的授权。什么意思呢,例如你有一个API只能是admin调用,其他角色不允许。
我们在web配置类添加一个注解,如下所示。
@EnableGlobalMethodSecurity(prePostEnabled = true)
public class WebSecurityConfig {
    ...
}
然后在controller里使用@PreAuthorize注解,里面使用spring表达式(SpEL)来设置条件,例如下面的api只允许admin角色方法。
@PreAuthorize("hasRole('admin')")
@GetMapping("/users/{id}")
public String getUserDetail(@PathVariable String id){
    return "用户详情:" + id;
}
那怎么判断当前请求用户是什么角色呢?还记得我们在认证通过时传入UsernamePasswordAuthenticationToken 构造函数的第三个参数吗?它是一个Collection<? extends GrantedAuthority> authorities,里面保存的就是此用户的角色。
 UsernamePasswordAuthenticationToken authentication =
         new UsernamePasswordAuthenticationToken(userDetails.getUsername(), userDetails.getPassword(), userDetails.getAuthorities());
顺便在此强调一下:UsernamePasswordAuthenticationToken 仅仅是一个凭证,里面保存了用户的信息,例如username,password,权限等。
总结
Spring Security总的来说很难上手,初学者一定要抓大放小,抓住主要流程,其他的就比较容易理解了。
源码
一如既往,你可以从首发文章末尾找到源码地址:秒懂SpringBoot之全网最易懂的Spring Security教程