Vue基础13
- 浏览器本地存储
- localStorage 本地存储
- sessionStorage 会话存储
- 总结
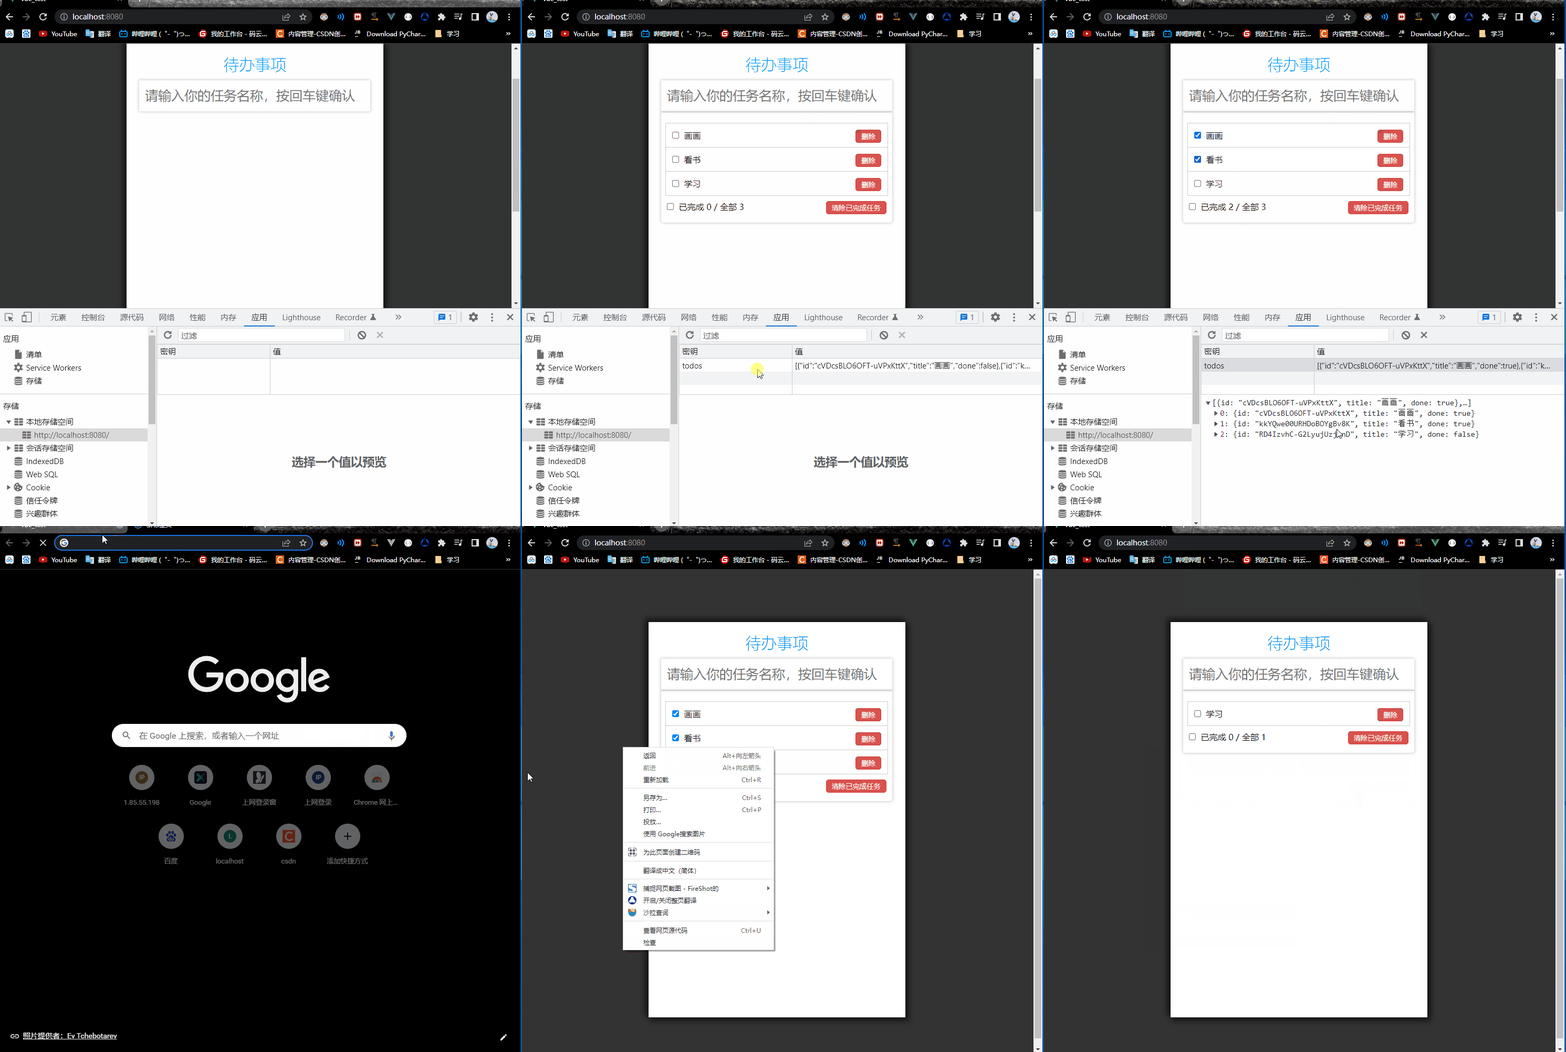
- TodoList本地存储
- App.vue
- 组件自定义事件
- 子组件给父组件传值使用props方法
- App.vue
- School.vue
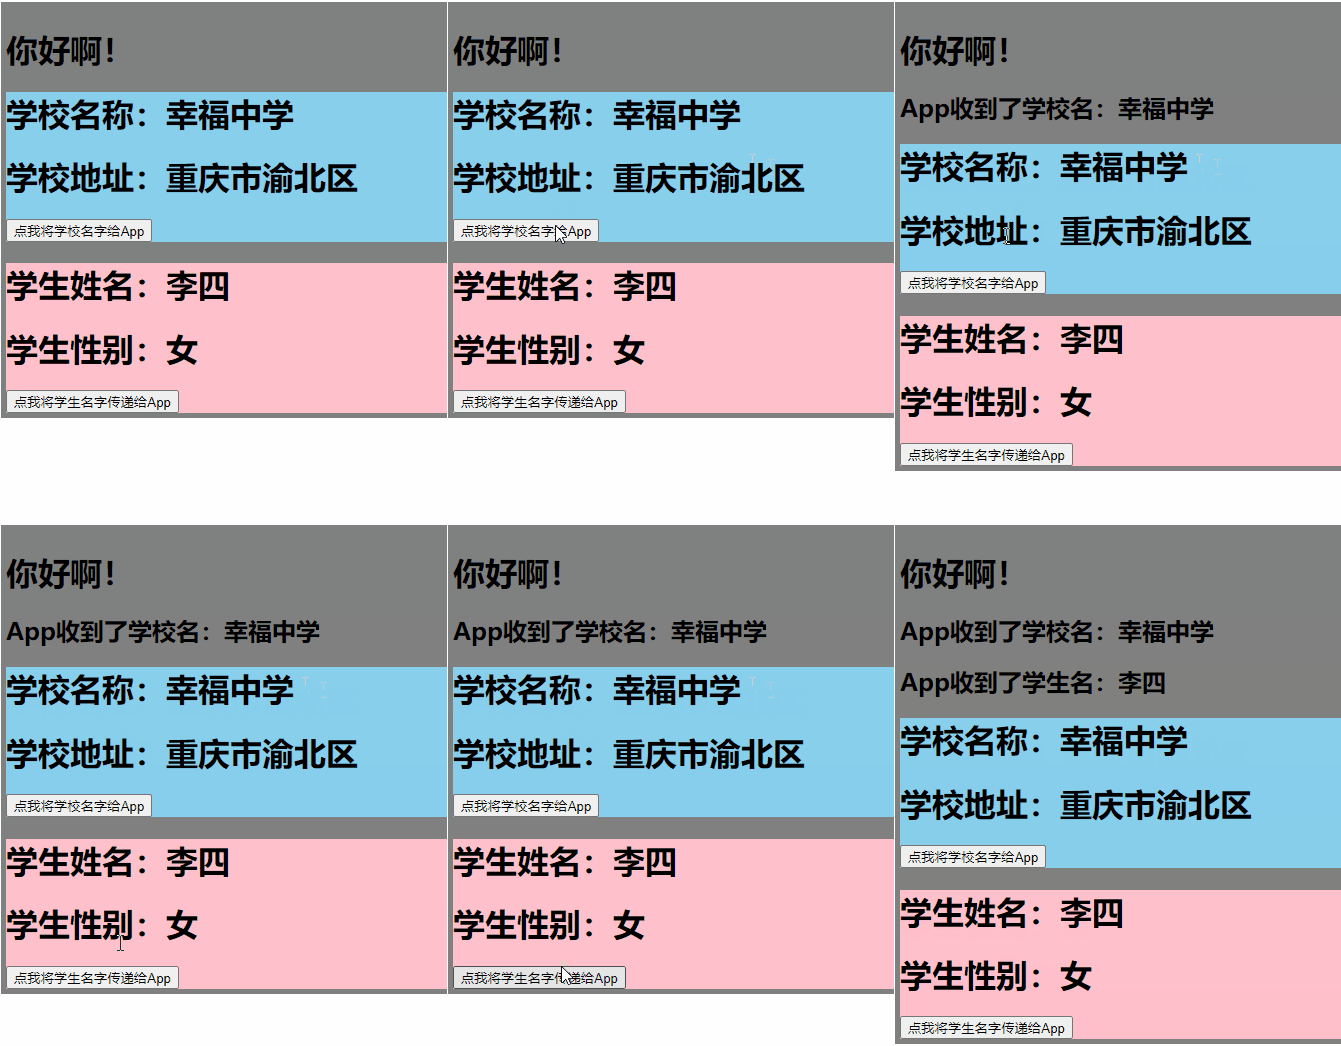
- 子组件给父组件传值使用组件自定义事件——绑定
- 第一种写法:使用v-on或@
- App.vue
- Student.vue
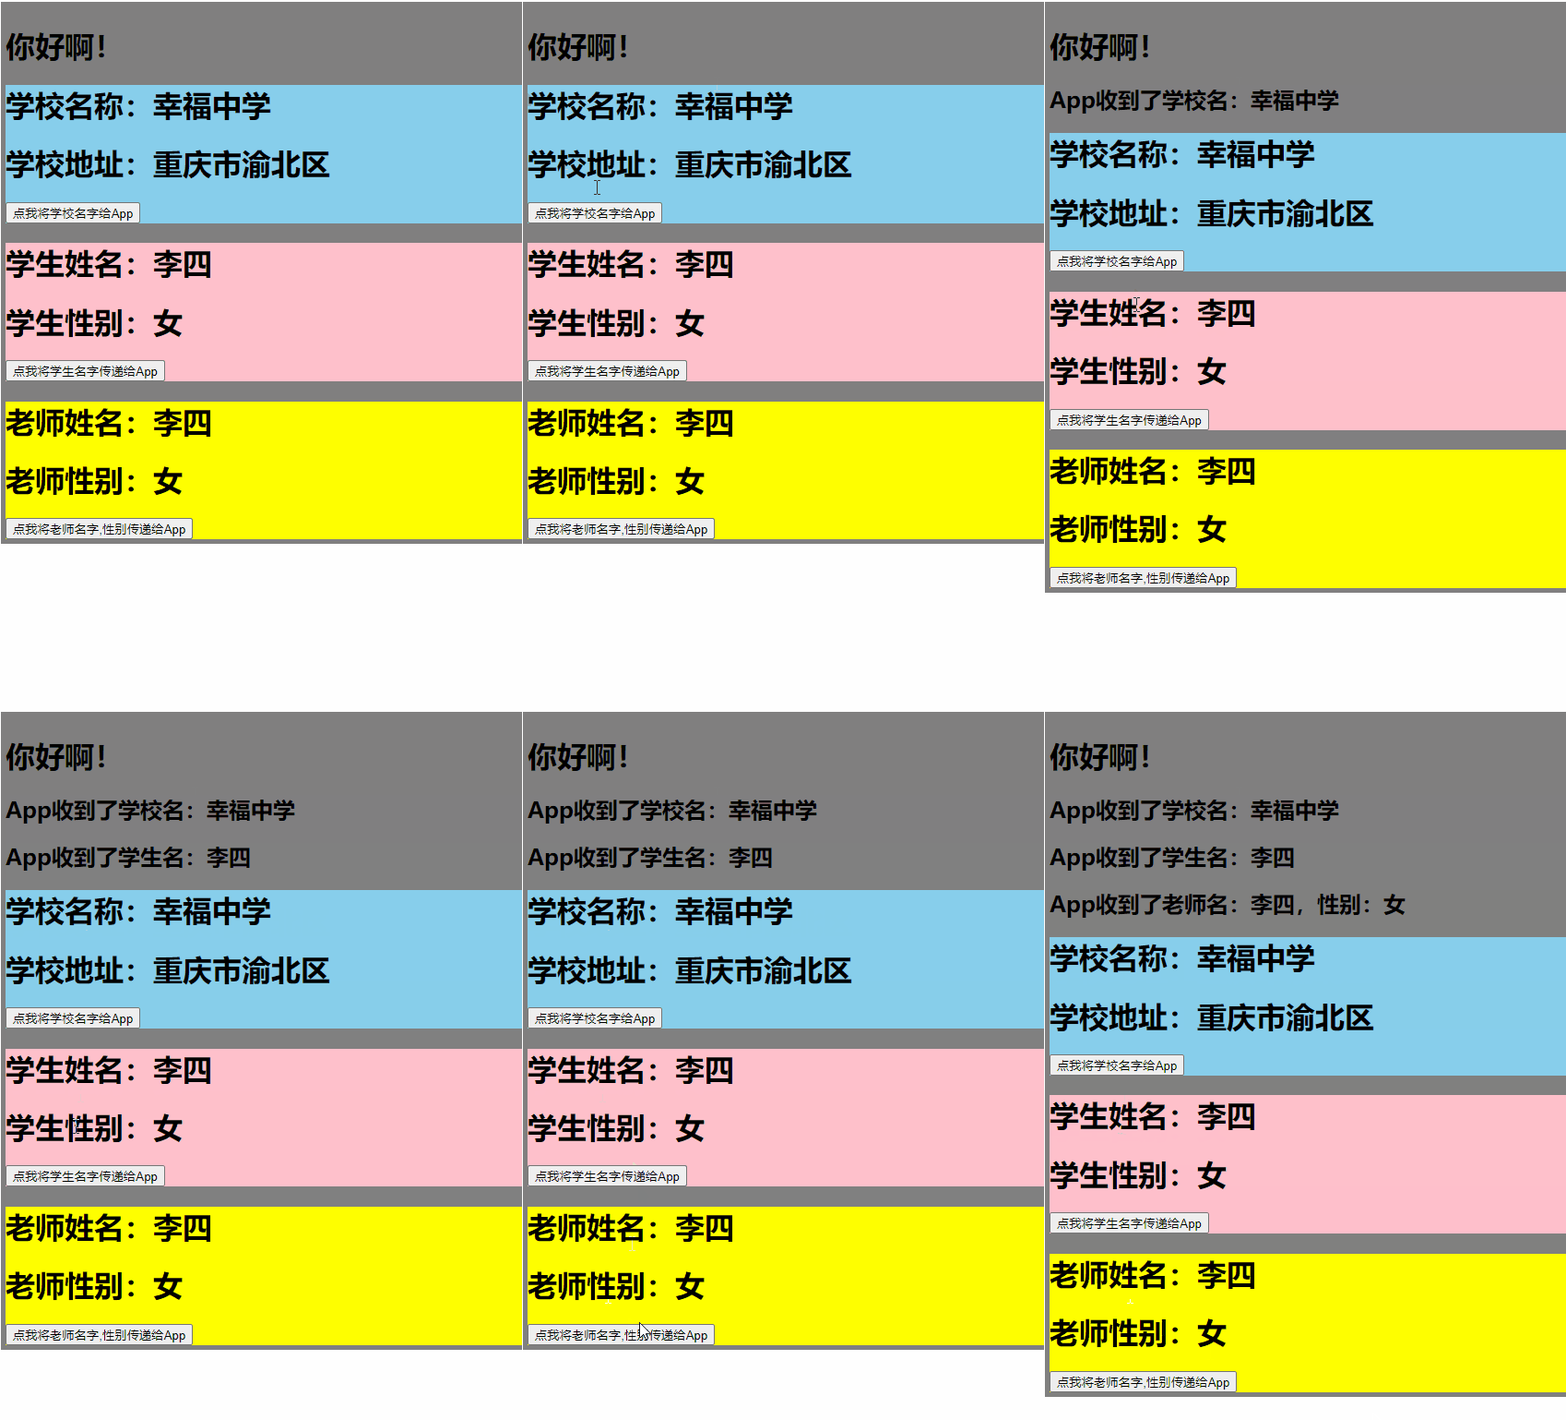
- 第二种写法
- App.vue
- Teacher.vue
- 解绑
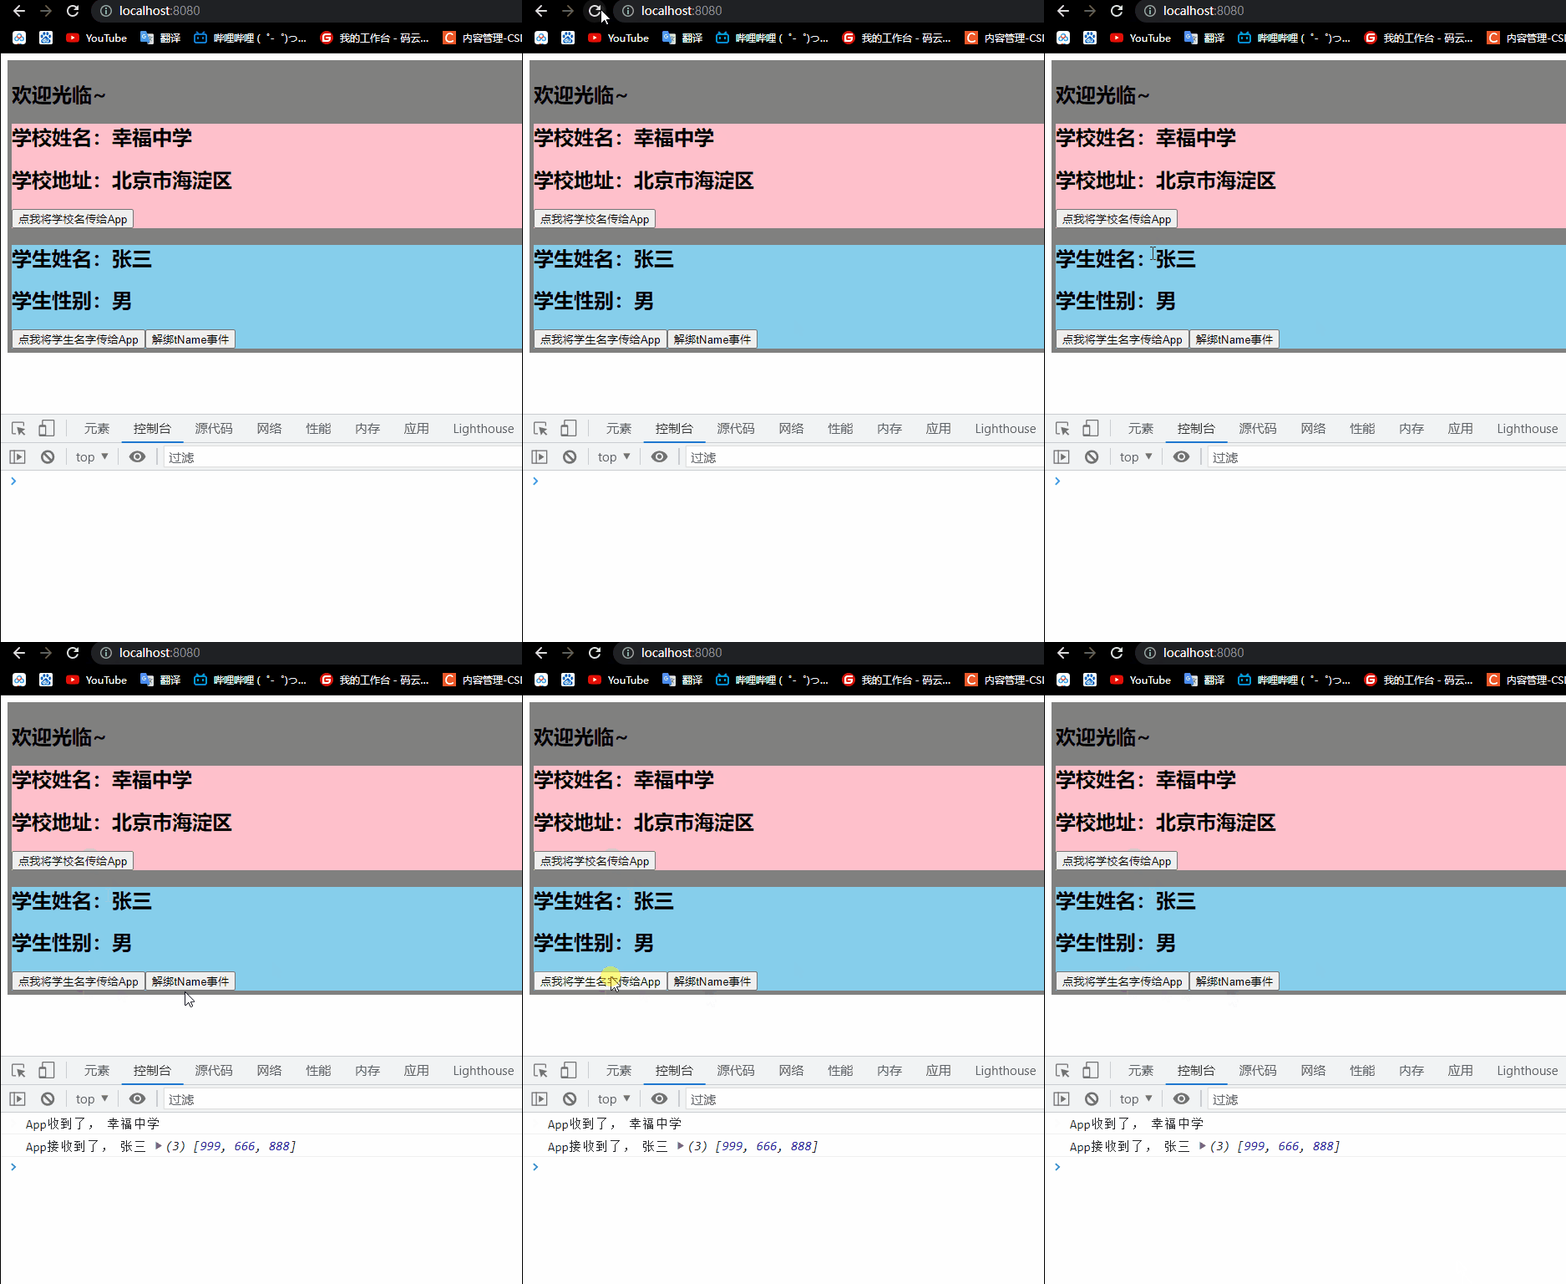
- 解绑一个自定义事件
- App.vue
- Student.vue
- School.vue
- 解绑多个自定义事件
- App.vue
- Student.vue
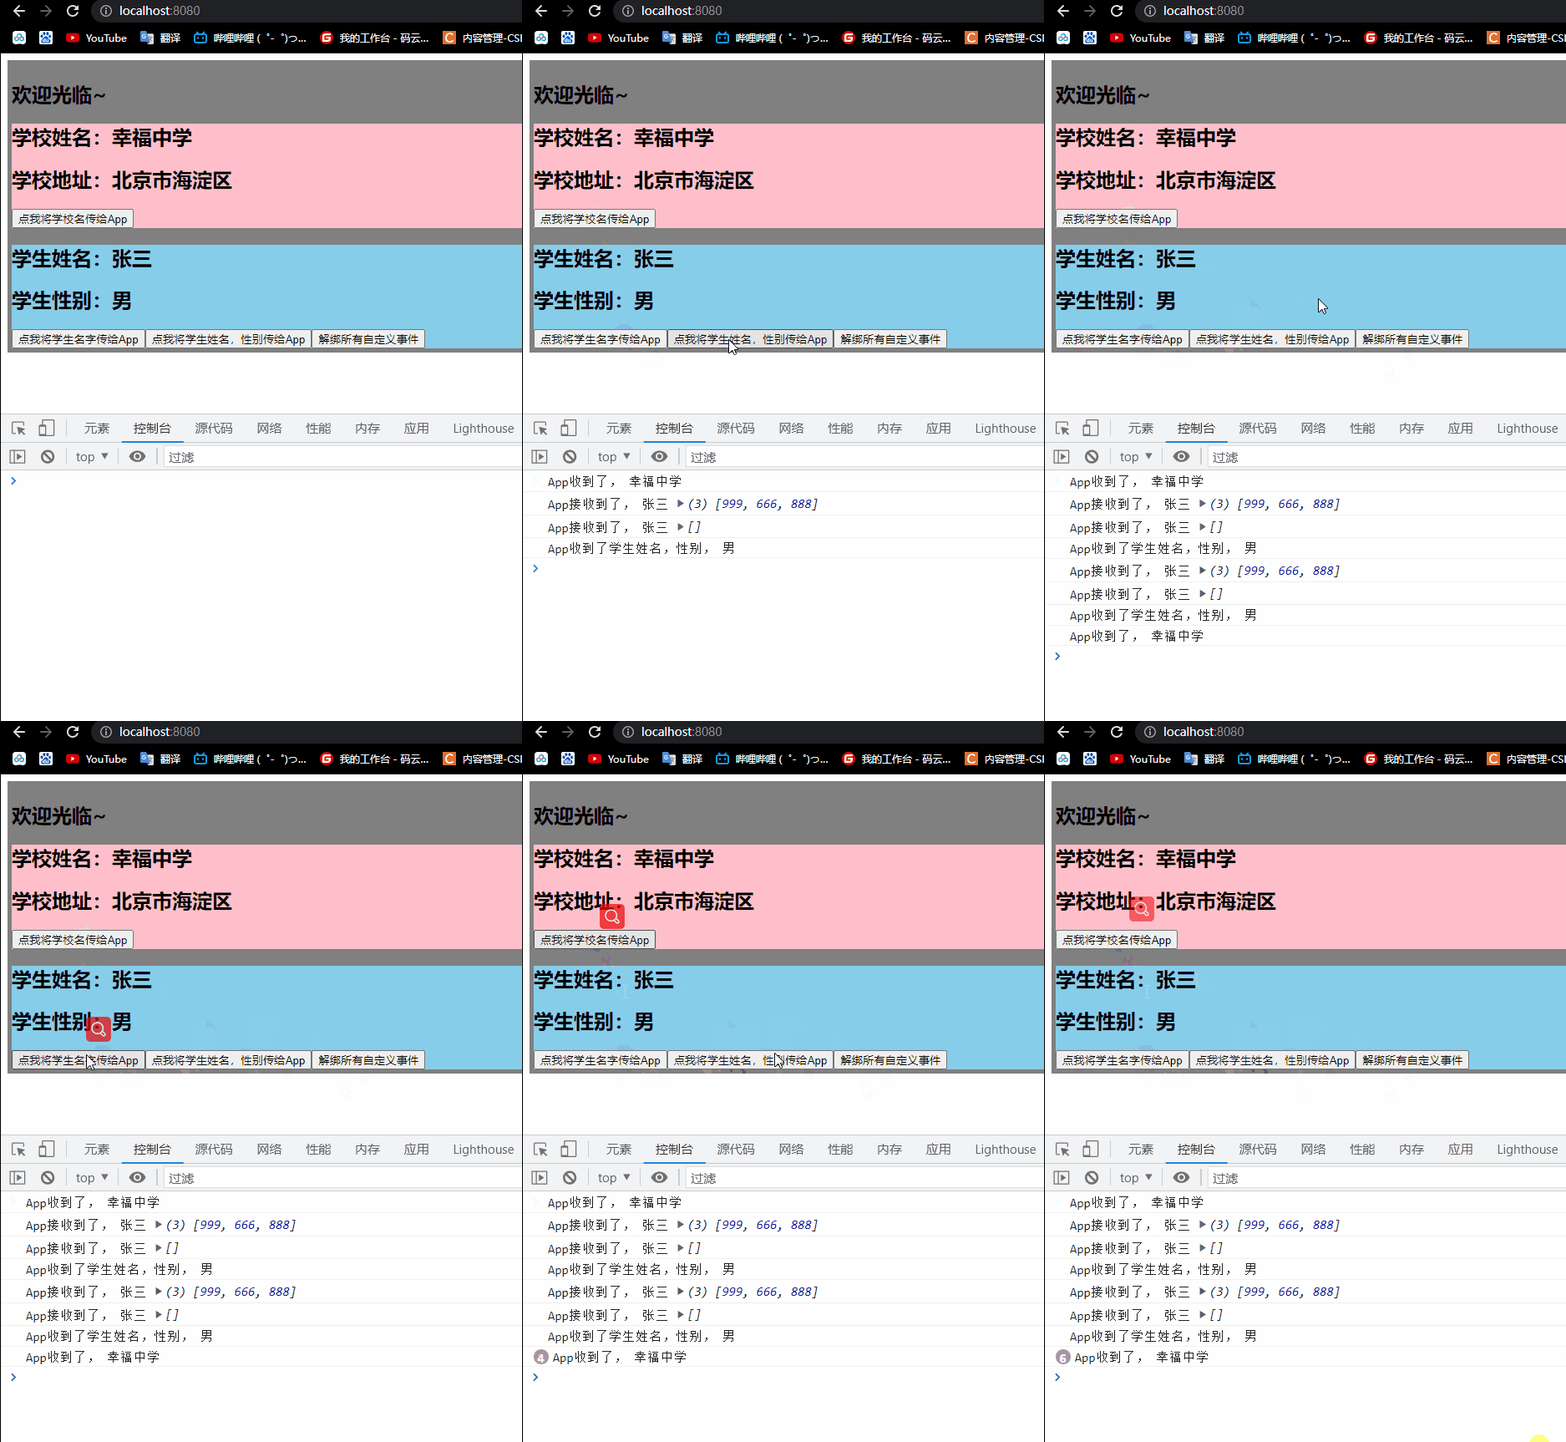
- 解绑所有事件
- 第一种方法
- App.vue
- Student.vue
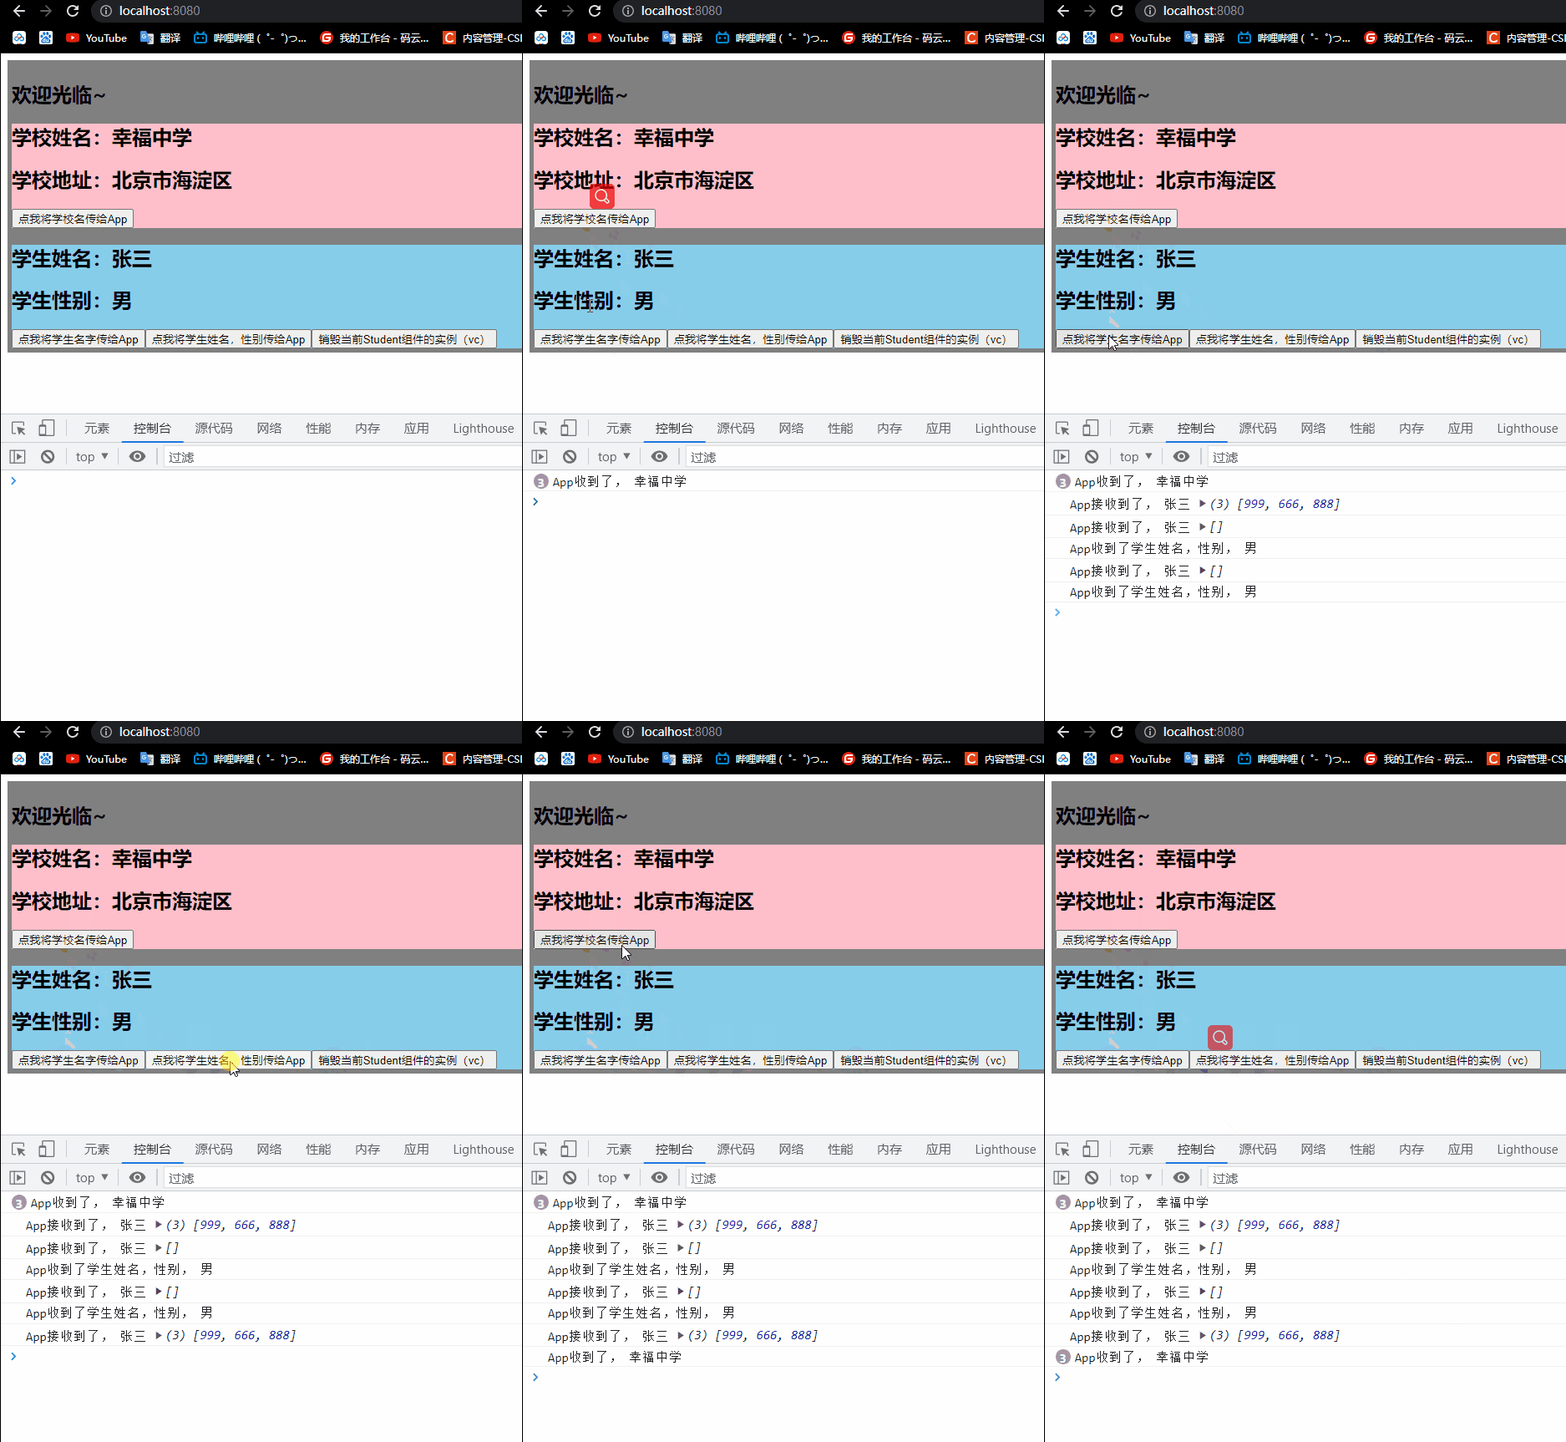
- 第二种方法(销毁)
- App.vue
- Student.vue
- App.vue
- Student.vue
- School.vue
- main.js
- 总结
- 两个点
- 子组件传值给父组件在页面上显示
- @sName场景,ref场景
- App.vue
- Student.vue
- School.vue
- 在ref中,使用内置函数传值有问题,因为this是Student的实例对象,不是App的实例对象
- App.vue
- Student.vue
- School.vue
- 所以,如果想在ref绑定时候就写函数,则使用箭头函数,因为箭头函数没有this对象,只会向外层找
- App.vue
- 给子组件绑定常规事件(click等)
- App.vue
- 总结组件自定义事件
浏览器本地存储
localStorage 本地存储
关闭浏览器之后重新打开,数据仍还在,除非自行清除内存数据
<!DOCTYPE html>
<html lang="en">
<head>
    <meta charset="UTF-8">
    <title>浏览器本地存储</title>
</head>
<body>
<h1>localStorage</h1>
<button onclick="saveData()">点我保存一个数据</button>
<button onclick="readData()">点我读取一个数据</button>
<button onclick="deleteData()">点我删除一个数据</button>
<button onclick="clearData()">点我清空所有</button>
<hr>
<script>
    function saveData(){
        localStorage.setItem('msg','hello~你好啊,你看到我了嘛?')
        localStorage.setItem('msg2',666)
        const p={name:'张三',age:20}
        localStorage.setItem('person',JSON.stringify(p))
    }
    function readData(){
        console.log(localStorage.getItem('msg'));
        console.log(localStorage.getItem('msg2'));
        const p=localStorage.getItem('person')
        console.log(JSON.parse(p));
        console.log("-------------------------------------------")
    }
    function deleteData(){
        localStorage.removeItem('msg2')
    }
    function clearData(){
        localStorage.clear()
    }

</script>
</body>
</html>

sessionStorage 会话存储
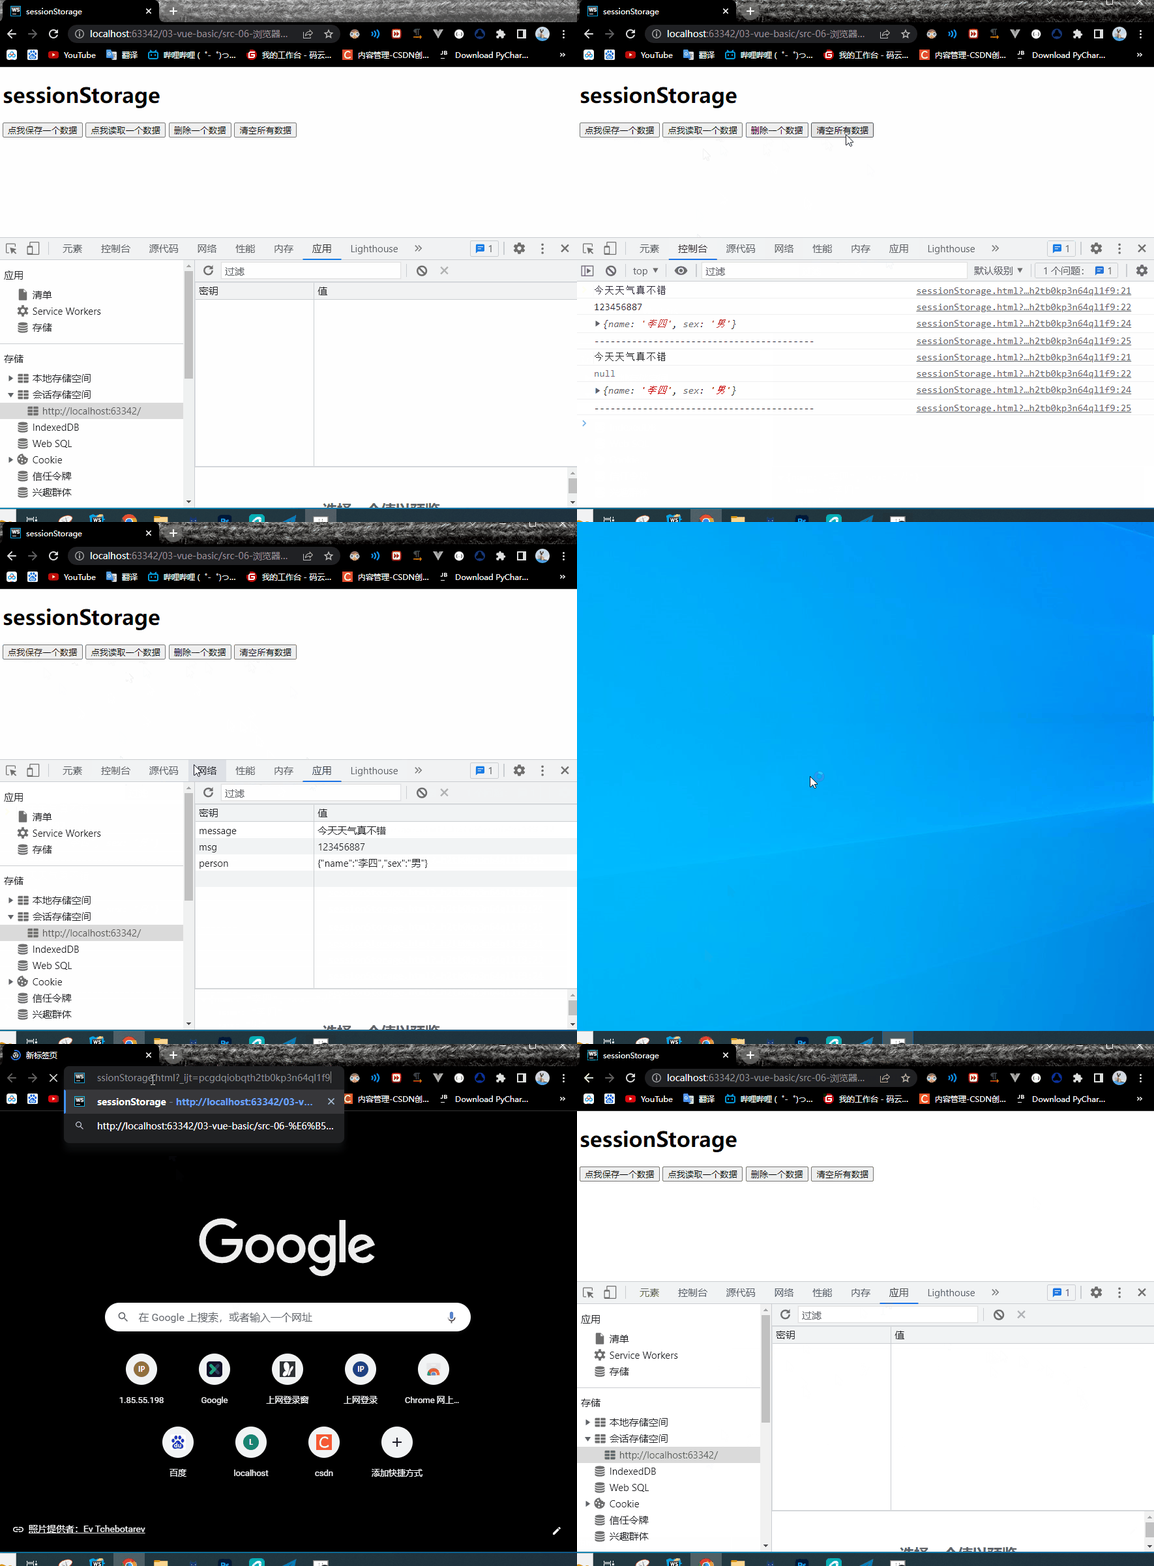
会话存储只能在一次会话中保存数据,浏览器关闭标志着一次会话的结束,所以,关闭浏览器后,保存的数据就不在了
<!DOCTYPE html>
<html lang="en">
<head>
    <meta charset="UTF-8">
    <title>sessionStorage</title>
</head>
<body>
<h1>sessionStorage</h1>
<button onclick="saveData()">点我保存一个数据</button>
<button onclick="readData()">点我读取一个数据</button>
<button onclick="deleteData()">删除一个数据</button>
<button onclick="clearData()">清空所有数据</button>
<script>
    function saveData(){
        sessionStorage.setItem('message','今天天气真不错')
        sessionStorage.setItem('msg',123456887)
        const person={name:'李四',sex:'男'}
        sessionStorage.setItem('person',JSON.stringify(person))
    }
    function readData(){
        console.log(sessionStorage.getItem('message'));
        console.log(sessionStorage.getItem('msg'));
        const p=sessionStorage.getItem('person')
        console.log(JSON.parse(p));
        console.log("-----------------------------------------")
    }
    function deleteData(){
        sessionStorage.removeItem('msg')
    }
    function clearData(){
        sessionStorage.clear()
    }
</script>
</body>
</html>
总结
- 存储内容大小一般支持5MB左右(不同浏览器可能还不一样)
- 浏览器端通过Window.sessionStorage和Window.localStorage属性来实现本地存储机制
- 相关API:
(1)xxxxStorage.setItem('key','value');
该方法接受一个键和值作为参数,会把键值对添加到存储中,如果键名存在,则更新其对应的值。
(2)xxxxStorage.getItem('person')
该方法接受一个键名作为参数,返回键名对应的值。
(3)xxxxxxStorage.removeItem('key')
该方法接受一个键名作为参数,并把该键名从存储中删除
(4)xxxxxxStorage.clear()
该方法会清空存储中的所有数据 - 备注:
(1)SessionStorage存储的内容会随着浏览器窗口关闭而消失
(2)LocalStorage存储的内容,需要手动清除才会消失
(3)xxxxStorage.getItem(xxx)如果xxx对应的value获取不到,那么getItem的返回值是null
(4)JSON.parse(null)的结果依然是null
TodoList本地存储
使用watch对todos进行监视,并将每次修改都存放在localStorage中
App.vue
<template>
  <div class="bg">
    <div class="todoList">
      <h2 class="title">待办事项</h2>
      <MyHeader :addTodo="addTodo"/>
      <div class="listItem" v-show="todos.length">
        <MyList :todos="todos" :deleteTodo="deleteTodo" :checkTodo="checkTodo"/>
        <MyFooter :todos="todos" :clearAllTodo="clearAllTodo" :checkAllTodo="checkAllTodo"/>
      </div>
    </div>
  </div>
</template>

<script>
import MyHeader from "@/components/MyHeader";
import MyList from '@/components/MyList';
import MyFooter from '@/components/MyFooter'
export default {
  name: "App",
  components:{MyHeader, MyList, MyFooter},
  data(){
    return{
      todos:JSON.parse(localStorage.getItem('todos'))||[]
    }
  },
  methods:{
    //添加一个todo
    addTodo(todoObj){
      this.todos.unshift(todoObj)
    },
    //删除一个todo
    deleteTodo(id){
      this.todos=this.todos.filter(todo=>todo.id!==id)
    },
    //勾选or取消勾选一个todo
    checkTodo(id){
      this.todos.forEach((todo)=>{
        if(todo.id===id){
          todo.done=!todo.done
        }
      })
    },
    //清除已完成任务
    clearAllTodo() {
      this.todos=this.todos.filter(todo=>!todo.done)
    },
    //全选or取消全选
    checkAllTodo(done){
      this.todos.forEach(todo=>todo.done=done)
    }
  },
  watch:{
    todos:{
      //开启深度监视
      deep:true,
      handler(value){
        localStorage.setItem('todos',JSON.stringify(value))
      }
    }
  }
}
</script>

<style lang="less">
*{
  padding: 0;
  margin: 0;
}
.bg{
  background-color: #333;
  height: 937px;
  padding-top: 100px;
  box-sizing: border-box;
  .todoList{
    background-color: #fff;
    width: 50%;
    height: 90%;
    margin: 0 auto;
    //box-shadow: 5px 5px 10px 3px rgba(147, 221, 255, 0.5),-5px -5px 10px 3px rgba(147, 221, 255, 0.5);  蓝色阴影
    box-shadow: 5px 5px 10px 3px rgba(0, 0, 0, 0.5),-5px -5px 10px 3px rgba(0, 0, 0, 0.5);
    padding-top: 20px;
    box-sizing: border-box;
    .title{
      text-align: center;
      font-size: 30px;
      font-weight: 300;
      color: #00a4ff;
    }
    .listItem{
      width: 90%;
      //height: 200px;
      margin: auto;
      /*background-color: pink;*/
      list-style: none;
      border-radius: 0 0 5px 5px;
      box-shadow: 1px 1px 5px 1px rgba(0,0,0,0.1),-1px -1px 5px 1px rgba(0,0,0,0.1);
      padding: 20px 0;
      box-sizing: border-box;
    }
  }
}
</style>
组件自定义事件
子组件给父组件传值使用props方法
App.vue
<template>
  <div class="main">
    <h1>{{msg}}</h1>
    <h2 v-show="schoolName">App收到了学校名:{{schoolName}}</h2>
    <!--   通过父组件给子组件传递函数类型的props实现:子给父传递数据-->
    <School :getSchoolName="getSchoolName"></School>
  </div>
</template>

<script>
import School from "@/components/School";
export default {
  name: "App",
  data(){
    return{
      msg:"你好啊!",
      schoolName:"",
    }
  },
  components:{School},
  methods:{
    getSchoolName(name){
      this.schoolName=name
    },
}
</script>

<style scoped>
.main{
  background-color: grey;
  padding: 5px;
}
</style>
School.vue
<template>
  <div class="school">
    <h1>学校名称:{{name}}</h1>
    <h1>学校地址:{{address}}</h1>
    <button @click="sendSchoolName">点我将学校名字给App</button>
  </div>
</template>

<script>
  export default {
      name: "School",
      data(){
        return{
          name:"幸福中学",
          address:"重庆市渝北区"
        }
      },
    props:['getSchoolName'],
    methods:{
      sendSchoolName(){
        this.getSchoolName(this.name)
      }
    }
  }
</script>

<style scoped>
.school{
  background-color: skyblue;
}
</style>

子组件给父组件传值使用组件自定义事件——绑定
第一种写法:使用v-on或@
App.vue
<template>
  <div class="main">
    <h1>{{msg}}</h1>
    <h2 v-show="schoolName">App收到了学校名:{{schoolName}}</h2>
    <h2 v-show="studentName">App收到了学生名:{{studentName}}</h2>
    <!--   通过父组件给子组件传递函数类型的props实现:子给父传递数据-->
    <School :getSchoolName="getSchoolName"></School>
    <!--        通过父组件给子组件绑定一个自定义事件实现:子给父传递数据(第一种写法:使用v-on或@)-->
    <Student v-on:showN="getStudentName"></Student>
  </div>
</template>

<script>
import School from "@/components/School";
import Student from "@/components/Student";
export default {
  name: "App",
  data(){
    return{
      msg:"你好啊!",
      schoolName:"",
      studentName:"",
    }
  },
  components:{School,Student},
  methods:{
    getSchoolName(name){
      this.schoolName=name
    },
    getStudentName(name){
      this.studentName=name
    },
  },
}
</script>

<style scoped>
.main{
  background-color: grey;
  padding: 5px;
}
</style>
Student.vue
<template>
  <div class="student">
    <h1>学生姓名:{{name}}</h1>
    <h1>学生性别:{{sex}}</h1>
    <button @click="sendStudentName">点我将学生名字传递给App</button>
  </div>
</template>

<script>
    export default {
        name: "Student",
        data(){
          return{
            name:'李四',
            sex:'女'
          }
        },
      methods:{
        sendStudentName(){
          //触发Student组件实例对象身上的showN事件
          this.$emit('showN',this.name)
        }
      }
    }
</script>

<style scoped>
.student{
  background-color: pink;
}
</style>
第二种写法
App.vue
<template>
  <div class="main">
    <h1>{{msg}}</h1>
    <h2 v-show="schoolName">App收到了学校名:{{schoolName}}</h2>
    <h2 v-show="studentName">App收到了学生名:{{studentName}}</h2>
    <h2 v-show="teacher.name&&teacher.sex">App收到了老师名:{{teacher.name}},性别:{{teacher.sex}}</h2>
    <!--   通过父组件给子组件传递函数类型的props实现:子给父传递数据-->
    <School :getSchoolName="getSchoolName"></School>
    <!--        通过父组件给子组件绑定一个自定义事件实现:子给父传递数据(第一种写法:使用v-on或@)-->
    <Student v-on:showN="getStudentName"></Student>
    <!--      通过父组件给子组件绑定一个自定义事件实现:子给父传递数据(第二种写法:使用ref)  -->
    <Teacher ref="teacher"/>
  </div>
</template>

<script>
import School from "@/components/School";
import Student from "@/components/Student";
import Teacher from "@/components/Teacher";
export default {
  name: "App",
  data(){
    return{
      msg:"你好啊!",
      schoolName:"",
      studentName:"",
      teacher:{
        name:"",
        sex:""
      }
    }
  },
  components:{School,Student,Teacher},
  methods:{
    getSchoolName(name){
      this.schoolName=name
    },
    getStudentName(name){
      this.studentName=name
    },
    getTeacherName(name,...params){
      this.teacher.name=name
      this.teacher.sex=params[0]
    }
  },
  mounted() {
    this.$refs.teacher.$on('tName',this.getTeacherName)
  }
}
</script>

<style scoped>
.main{
  background-color: grey;
  padding: 5px;
}
</style>
Teacher.vue
<template>
  <div class="teacher">
    <h1>老师姓名:{{name}}</h1>
    <h1>老师性别:{{sex}}</h1>
    <button @click="sendTeacherName">点我将老师名字,性别传递给App</button>
  </div>
</template>

<script>
    export default {
      name: "Teacher",
      data(){
        return{
          name:'李四',
          sex:'女'
        }
      },
      methods:{
        sendTeacherName(){
          this.$emit('tName',this.name,this.sex)
        }
      }
    }
</script>

<style scoped>
.teacher{
  background-color: yellow;
}
</style>
解绑
解绑一个自定义事件
App.vue
<template>
  <div class="main">
    <h2>{{msg}}</h2>
    <School @sName="getSchoolName"></School>
    <Student ref="student"></Student>
  </div>
</template>

<script>
import School from "@/components/School"
import Student from "@/components/Student"
export default {
  name: "App",
  components: {School,Student},
  data(){
    return{
      msg:"欢迎光临~"
    }
  },
  methods:{
    getSchoolName(name){
      console.log("App收到了,",name)
    },
    getStudentName(name,...params) {
      console.log("App接收到了,",name,params)
    },
  },
  mounted() {
    this.$refs.student.$on("tName",this.getStudentName)
  }
}
</script>

<style scoped>
.main{
  background-color: grey;
  padding: 5px;
}
</style>
Student.vue
<template>
  <div class="student">
    <h2>学生姓名:{{name}}</h2>
    <h2>学生性别:{{sex}}</h2>
    <button @click="sendStudentName">点我将学生名字传给App</button>
    <button @click="upbind">解绑tName事件</button>
    <br>
  </div>
</template>

<script>
export default {
  name: "Student",
  data(){
    return{
      name:"张三",
      sex:"男"
    }
  },
  methods:{
    sendStudentName(){
      this.$emit("tName",this.name,999,666,888)
    },
    sendStudentNameSex(){
      this.$emit("tName",this.name)
      this.$emit("tSex",this.sex)
    },
    upbind(){
      this.$off("tName")  //解绑一个自定义事件
    },
  }
}
</script>

<style scoped>
.student{
  background-color: skyblue;
}
</style>
School.vue
<template>
  <div class="school">
    <h2>学校姓名:{{name}}</h2>
    <h2>学校地址:{{address}}</h2>
    <button @click="sendSchoolName">点我将学校名传给App</button>
  </div>
</template>

<script>
    export default {
        name: "School",
      data(){
          return{
            name:"幸福中学",
            address:"北京市海淀区"
          }
      },
      methods:{
        sendSchoolName(){
          this.$emit("sName",this.name)
        }
      }
    }
</script>

<style scoped>
.school{
  background-color: pink;
}
</style>
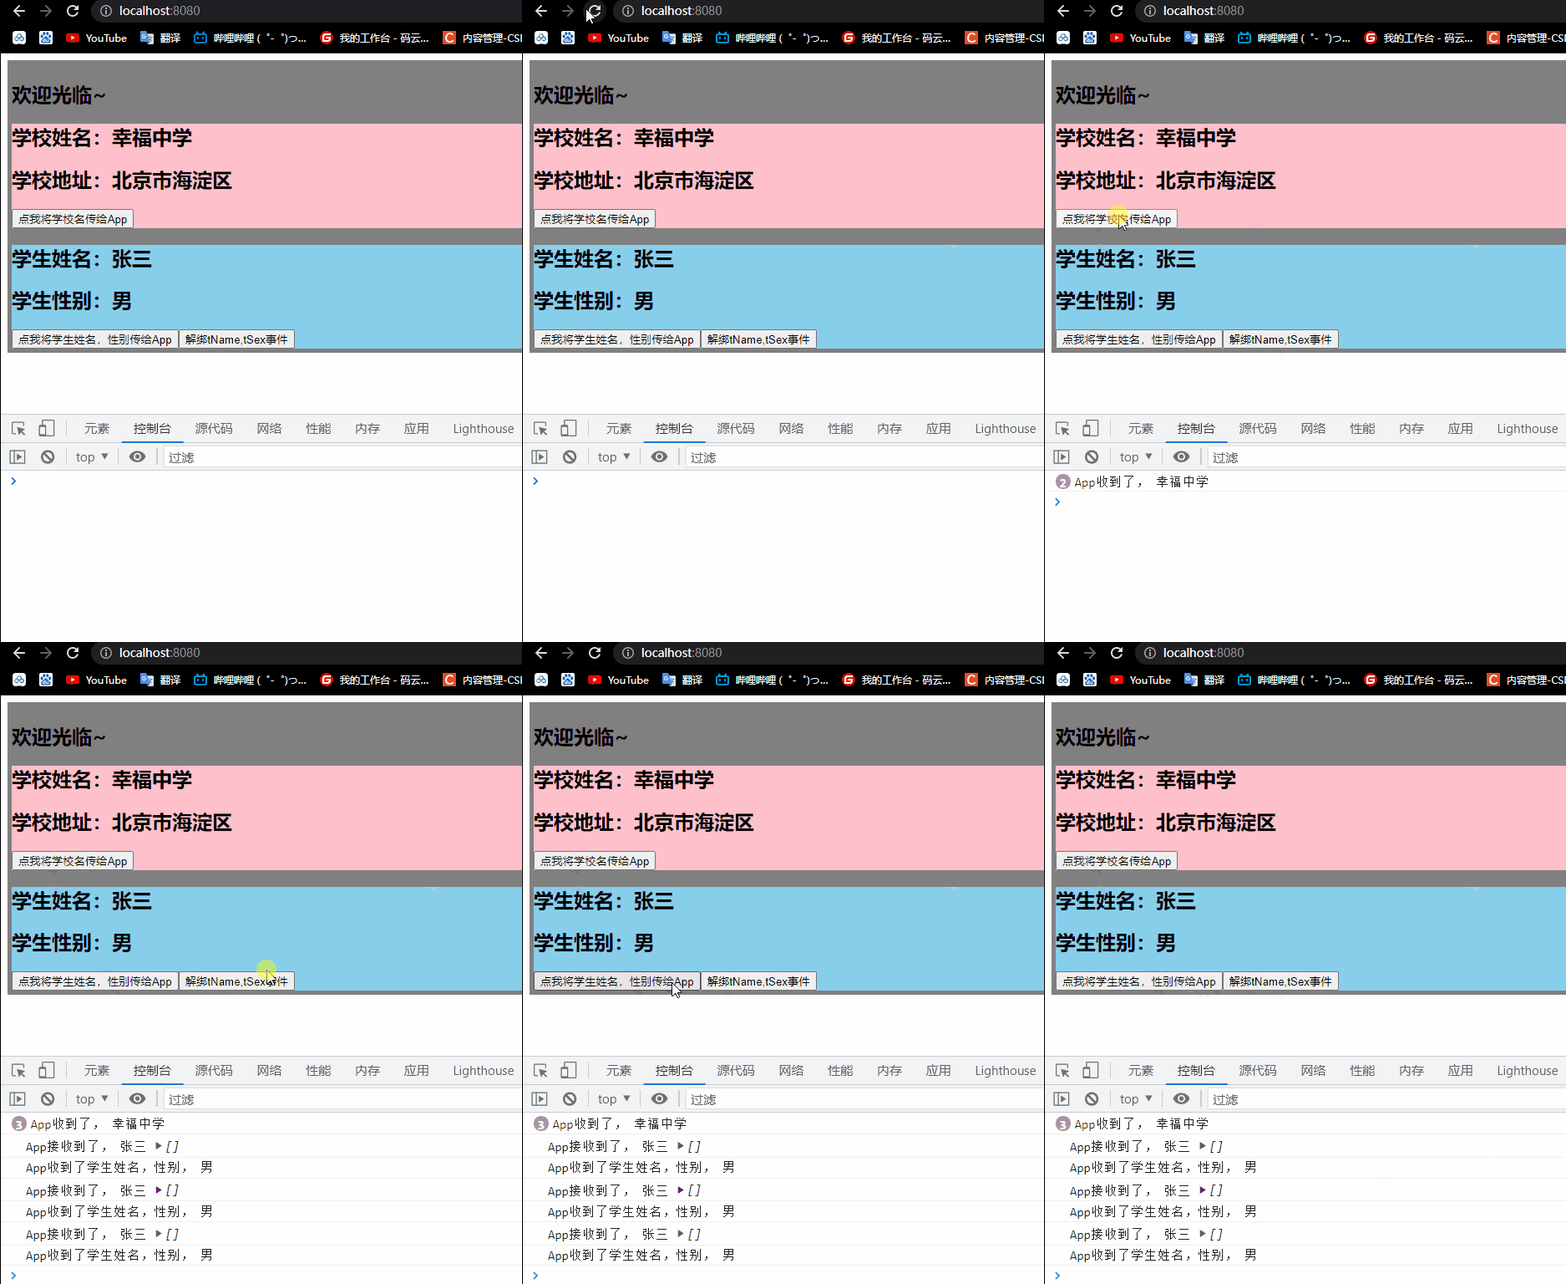
解绑多个自定义事件
App.vue
<template>
  <div class="main">
    <h2>{{msg}}</h2>
    <School @sName="getSchoolName"></School>
    <Student ref="student" @tSex="getStudentSex"></Student>
  </div>
</template>

<script>
import School from "@/components/School"
import Student from "@/components/Student"
export default {
  name: "App",
  components: {School,Student},
  data(){
    return{
      msg:"欢迎光临~"
    }
  },
  methods:{
    getSchoolName(name){
      console.log("App收到了,",name)
    },
    getStudentName(name,...params) {
      console.log("App接收到了,",name,params)
    },
    getStudentSex(sex){
      console.log("App收到了学生姓名,性别,",sex)
    }
  },
  mounted() {
    this.$refs.student.$on("tName",this.getStudentName)
  }
}
</script>

<style scoped>
.main{
  background-color: grey;
  padding: 5px;
}
</style>
Student.vue
<template>
  <div class="student">
    <h2>学生姓名:{{name}}</h2>
    <h2>学生性别:{{sex}}</h2>
    <button @click="sendStudentNameSex">点我将学生姓名,性别传给App</button>
    <button @click="upbind2">解绑tName,tSex事件</button>
  </div>
</template>

<script>
export default {
  name: "Student",
  data(){
    return{
      name:"张三",
      sex:"男"
    }
  },
  methods:{
    sendStudentNameSex(){
      this.$emit("tName",this.name)
      this.$emit("tSex",this.sex)
    },
    upbind2(){
      this.$off(["tName","tSex"])  //解绑多个自定义事件
    },
  }
}
</script>

<style scoped>
.student{
  background-color: skyblue;
}
</style>
解绑所有事件
第一种方法
App.vue
<template>
  <div class="main">
    <h2>{{msg}}</h2>
    <School @sName="getSchoolName"></School>
    <Student ref="student" @tSex="getStudentSex"></Student>
  </div>
</template>

<script>
import School from "@/components/School"
import Student from "@/components/Student"
export default {
  name: "App",
  components: {School,Student},
  data(){
    return{
      msg:"欢迎光临~"
    }
  },
  methods:{
    getSchoolName(name){
      console.log("App收到了,",name)
    },
    getStudentName(name,...params) {
      console.log("App接收到了,",name,params)
    },
    getStudentSex(sex){
      console.log("App收到了学生姓名,性别,",sex)
    }
  },
  mounted() {
    this.$refs.student.$on("tName",this.getStudentName)
  }
}
</script>

<style scoped>
.main{
  background-color: grey;
  padding: 5px;
}
</style>
Student.vue
<template>
  <div class="student">
    <h2>学生姓名:{{name}}</h2>
    <h2>学生性别:{{sex}}</h2>
    <button @click="sendStudentName">点我将学生名字传给App</button>
    <button @click="sendStudentNameSex">点我将学生姓名,性别传给App</button>
    <button @click="upbind3">解绑所有自定义事件</button>
  </div>
</template>

<script>
export default {
  name: "Student",
  data(){
    return{
      name:"张三",
      sex:"男"
    }
  },
  methods:{
    sendStudentName(){
      this.$emit("tName",this.name,999,666,888)
    },
    sendStudentNameSex(){
      this.$emit("tName",this.name)
      this.$emit("tSex",this.sex)
    },
    upbind3(){
      this.$off()  //解绑所有自定义事件
    },
  }
}
</script>

<style scoped>
.student{
  background-color: skyblue;
}
</style>
第二种方法(销毁)
在Student上销毁
App.vue
<template>
  <div class="main">
    <h2>{{msg}}</h2>
    <School @sName="getSchoolName"></School>
    <Student ref="student" @tSex="getStudentSex"></Student>
  </div>
</template>

<script>
import School from "@/components/School"
import Student from "@/components/Student"
export default {
  name: "App",
  components: {School,Student},
  data(){
    return{
      msg:"欢迎光临~"
    }
  },
  methods:{
    getSchoolName(name){
      console.log("App收到了,",name)
    },
    getStudentName(name,...params) {
      console.log("App接收到了,",name,params)
    },
    getStudentSex(sex){
      console.log("App收到了学生姓名,性别,",sex)
    }
  },
  mounted() {
    this.$refs.student.$on("tName",this.getStudentName)
  }
}
</script>

<style scoped>
.main{
  background-color: grey;
  padding: 5px;
}
</style>
Student.vue
<template>
  <div class="student">
    <h2>学生姓名:{{name}}</h2>
    <h2>学生性别:{{sex}}</h2>
    <button @click="sendStudentName">点我将学生名字传给App</button>
    <button @click="sendStudentNameSex">点我将学生姓名,性别传给App</button>
    <button @click="death">销毁当前Student组件的实例(vc)</button>
  </div>
</template>

<script>
export default {
  name: "Student",
  data(){
    return{
      name:"张三",
      sex:"男"
    }
  },
  methods:{
    sendStudentName(){
      this.$emit("tName",this.name,999,666,888)
    },
    sendStudentNameSex(){
      this.$emit("tName",this.name)
      this.$emit("tSex",this.sex)
    },
    death(){
      this.$destroy()  //销毁了当前Student组件的实例,销毁后所有Student的实例的自定义事件全都不奏效
    }
  }
}
</script>

<style scoped>
.student{
  background-color: skyblue;
}
</style>
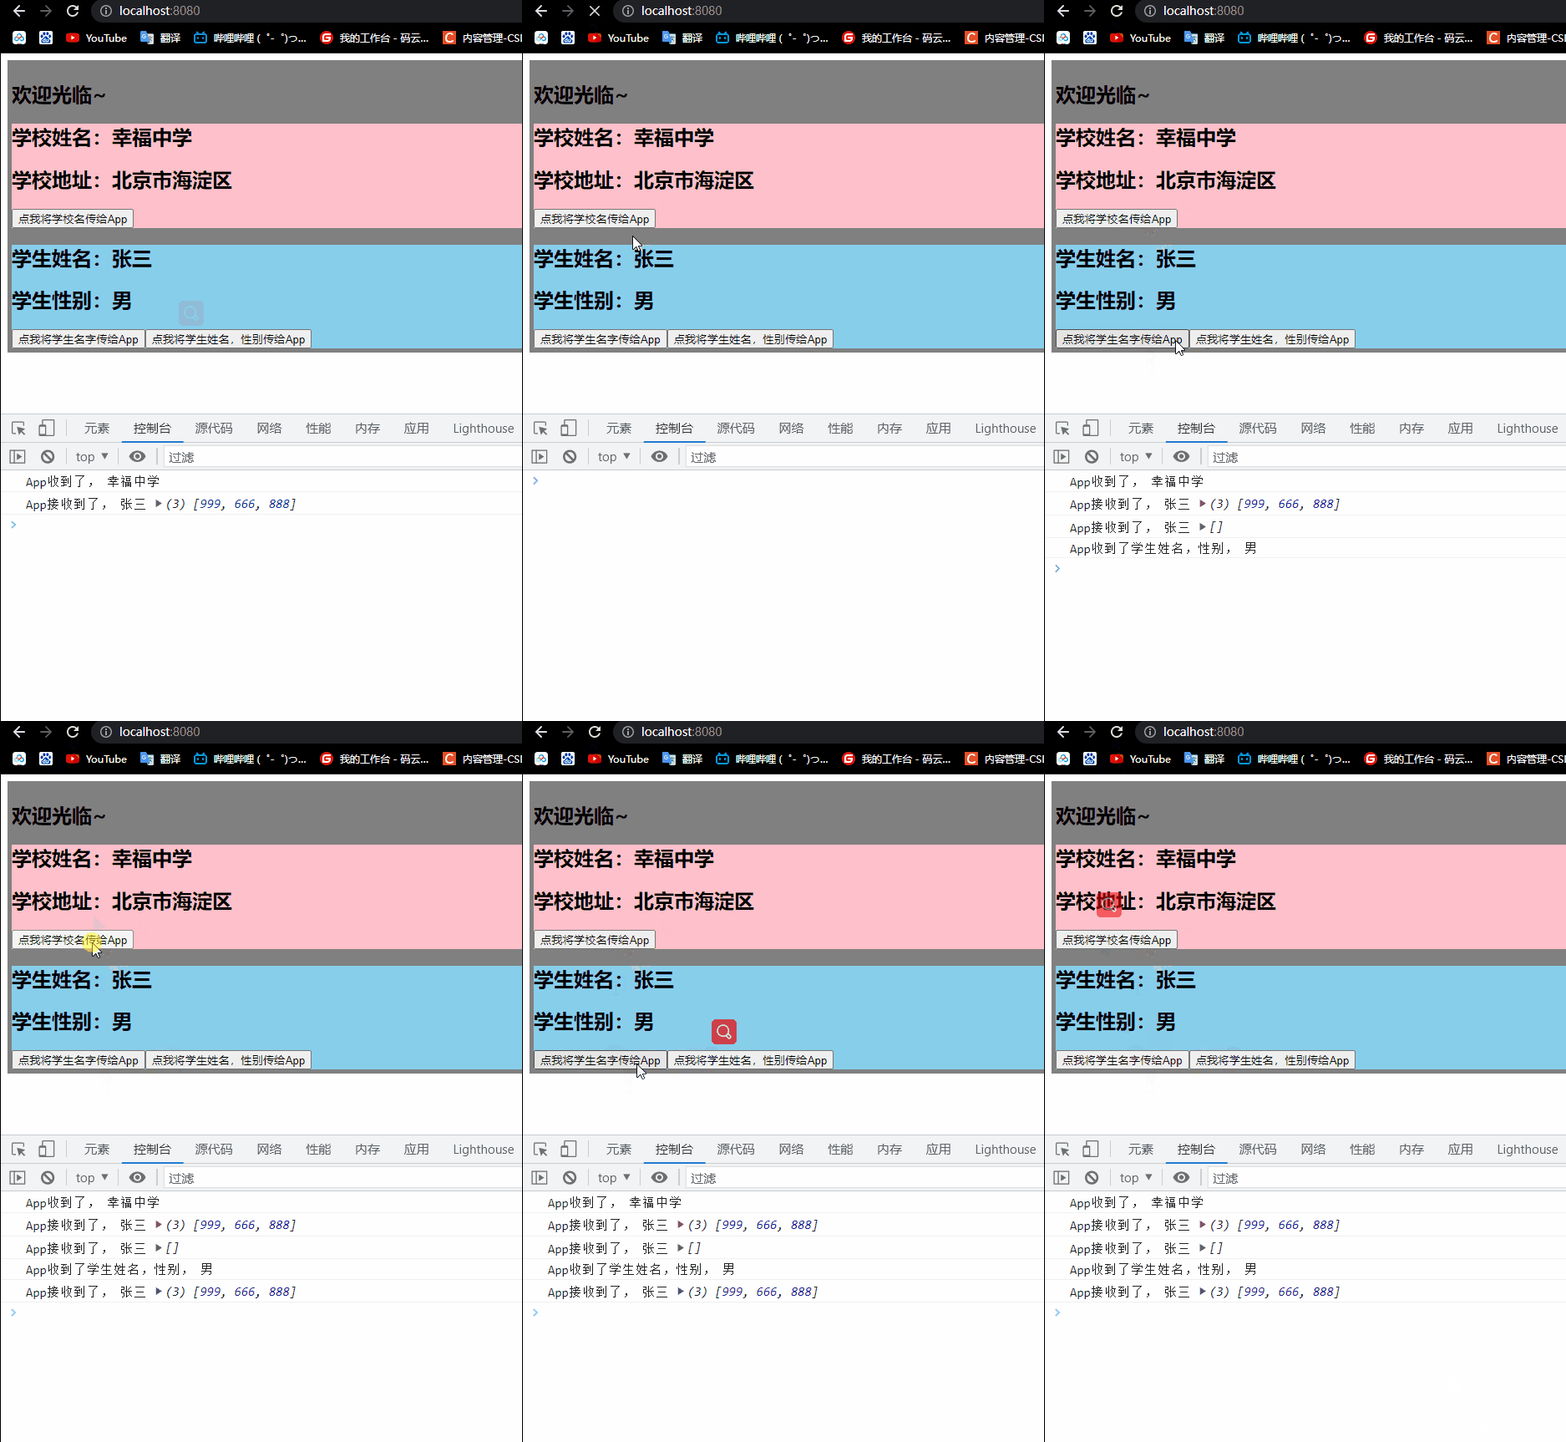
在App上可以绑定销毁,销毁了所有组件的实例,销毁后所有组件实例的自定义事件全都不奏效
在main.js里设置定时器,在3秒后自动销毁,之后所有组件的自定义事件不奏效了
App.vue
<template>
  <div class="main">
    <h2>{{msg}}</h2>
    <School @sName="getSchoolName"></School>
    <Student ref="student" @tSex="getStudentSex"></Student>
  </div>
</template>

<script>
import School from "@/components/School"
import Student from "@/components/Student"
export default {
  name: "App",
  components: {School,Student},
  data(){
    return{
      msg:"欢迎光临~"
    }
  },
  methods:{
    getSchoolName(name){
      console.log("App收到了,",name)
    },
    getStudentName(name,...params) {
      console.log("App接收到了,",name,params)
    },
    getStudentSex(sex){
      console.log("App收到了学生姓名,性别,",sex)
    }
  },
  mounted() {
    this.$refs.student.$on("tName",this.getStudentName)
  }
}
</script>

<style scoped>
.main{
  background-color: grey;
  padding: 5px;
}
</style>
Student.vue
<template>
  <div class="student">
    <h2>学生姓名:{{name}}</h2>
    <h2>学生性别:{{sex}}</h2>
    <button @click="sendStudentName">点我将学生名字传给App</button>
    <button @click="sendStudentNameSex">点我将学生姓名,性别传给App</button>
  </div>
</template>

<script>
export default {
  name: "Student",
  data(){
    return{
      name:"张三",
      sex:"男"
    }
  },
  methods:{
    sendStudentName(){
      this.$emit("tName",this.name,999,666,888)
    },
    sendStudentNameSex(){
      this.$emit("tName",this.name)
      this.$emit("tSex",this.sex)
    },
  }
}
</script>

<style scoped>
.student{
  background-color: skyblue;
}
</style>
School.vue
<template>
  <div class="school">
    <h2>学校姓名:{{name}}</h2>
    <h2>学校地址:{{address}}</h2>
    <button @click="sendSchoolName">点我将学校名传给App</button>
  </div>
</template>

<script>
    export default {
        name: "School",
      data(){
          return{
            name:"幸福中学",
            address:"北京市海淀区"
          }
      },
      methods:{
        sendSchoolName(){
          this.$emit("sName",this.name)
        }
      }
    }
</script>

<style scoped>
.school{
  background-color: pink;
}
</style>
main.js
import Vue from 'vue'

import App from './App'

Vue.config.productionTip=false

new Vue({
    el:"#app",
    render:h=>h(App),
    mounted() {
        setTimeout(()=>{
            this.$destroy()
        },3000)
    }
})
总结
两个点
子组件传值给父组件在页面上显示
@sName场景,ref场景
App.vue
<template>
  <div class="main">
    <h2>{{msg}},学校名称是:{{schoolName}},学生姓名是:{{studentName}}</h2>
    <School @sName="getSchoolName"></School>
    <Student ref="student"></Student>
  </div>
</template>

<script>
import School from "@/components/School"
import Student from "@/components/Student"
export default {
  name: "App",
  components: {School,Student},
  data(){
    return{
      msg:"欢迎光临~",
      schoolName:"",
      studentName:"",
    }
  },
  methods:{
    getSchoolName(name){
      console.log("App收到了,",name)
      this.schoolName=name
    },
    getStudentName(name,...params) {
      console.log("App接收到了,",name,params)
      this.studentName=name
    },
  },
  mounted() {
    this.$refs.student.$on("tName",this.getStudentName)
  }
}
</script>

<style scoped>
.main{
  background-color: grey;
  padding: 5px;
}
</style>
Student.vue
<template>
  <div class="student">
    <h2>学生姓名:{{name}}</h2>
    <h2>学生性别:{{sex}}</h2>
    <button @click="sendStudentName">点我将学生名字传给App</button>
  </div>
</template>

<script>
export default {
  name: "Student",
  data(){
    return{
      name:"张三",
      sex:"男"
    }
  },
  methods:{
    sendStudentName(){
      this.$emit("tName",this.name,999,666,888)
    },
  }
}
</script>

<style scoped>
.student{
  background-color: skyblue;
}
</style>
School.vue
<template>
  <div class="school">
    <h2>学校姓名:{{name}}</h2>
    <h2>学校地址:{{address}}</h2>
    <button @click="sendSchoolName">点我将学校名传给App</button>
  </div>
</template>

<script>
    export default {
        name: "School",
      data(){
          return{
            name:"幸福中学",
            address:"北京市海淀区"
          }
      },
      methods:{
        sendSchoolName(){
          this.$emit("sName",this.name)
        }
      }
    }
</script>

<style scoped>
.school{
  background-color: pink;
}
</style>

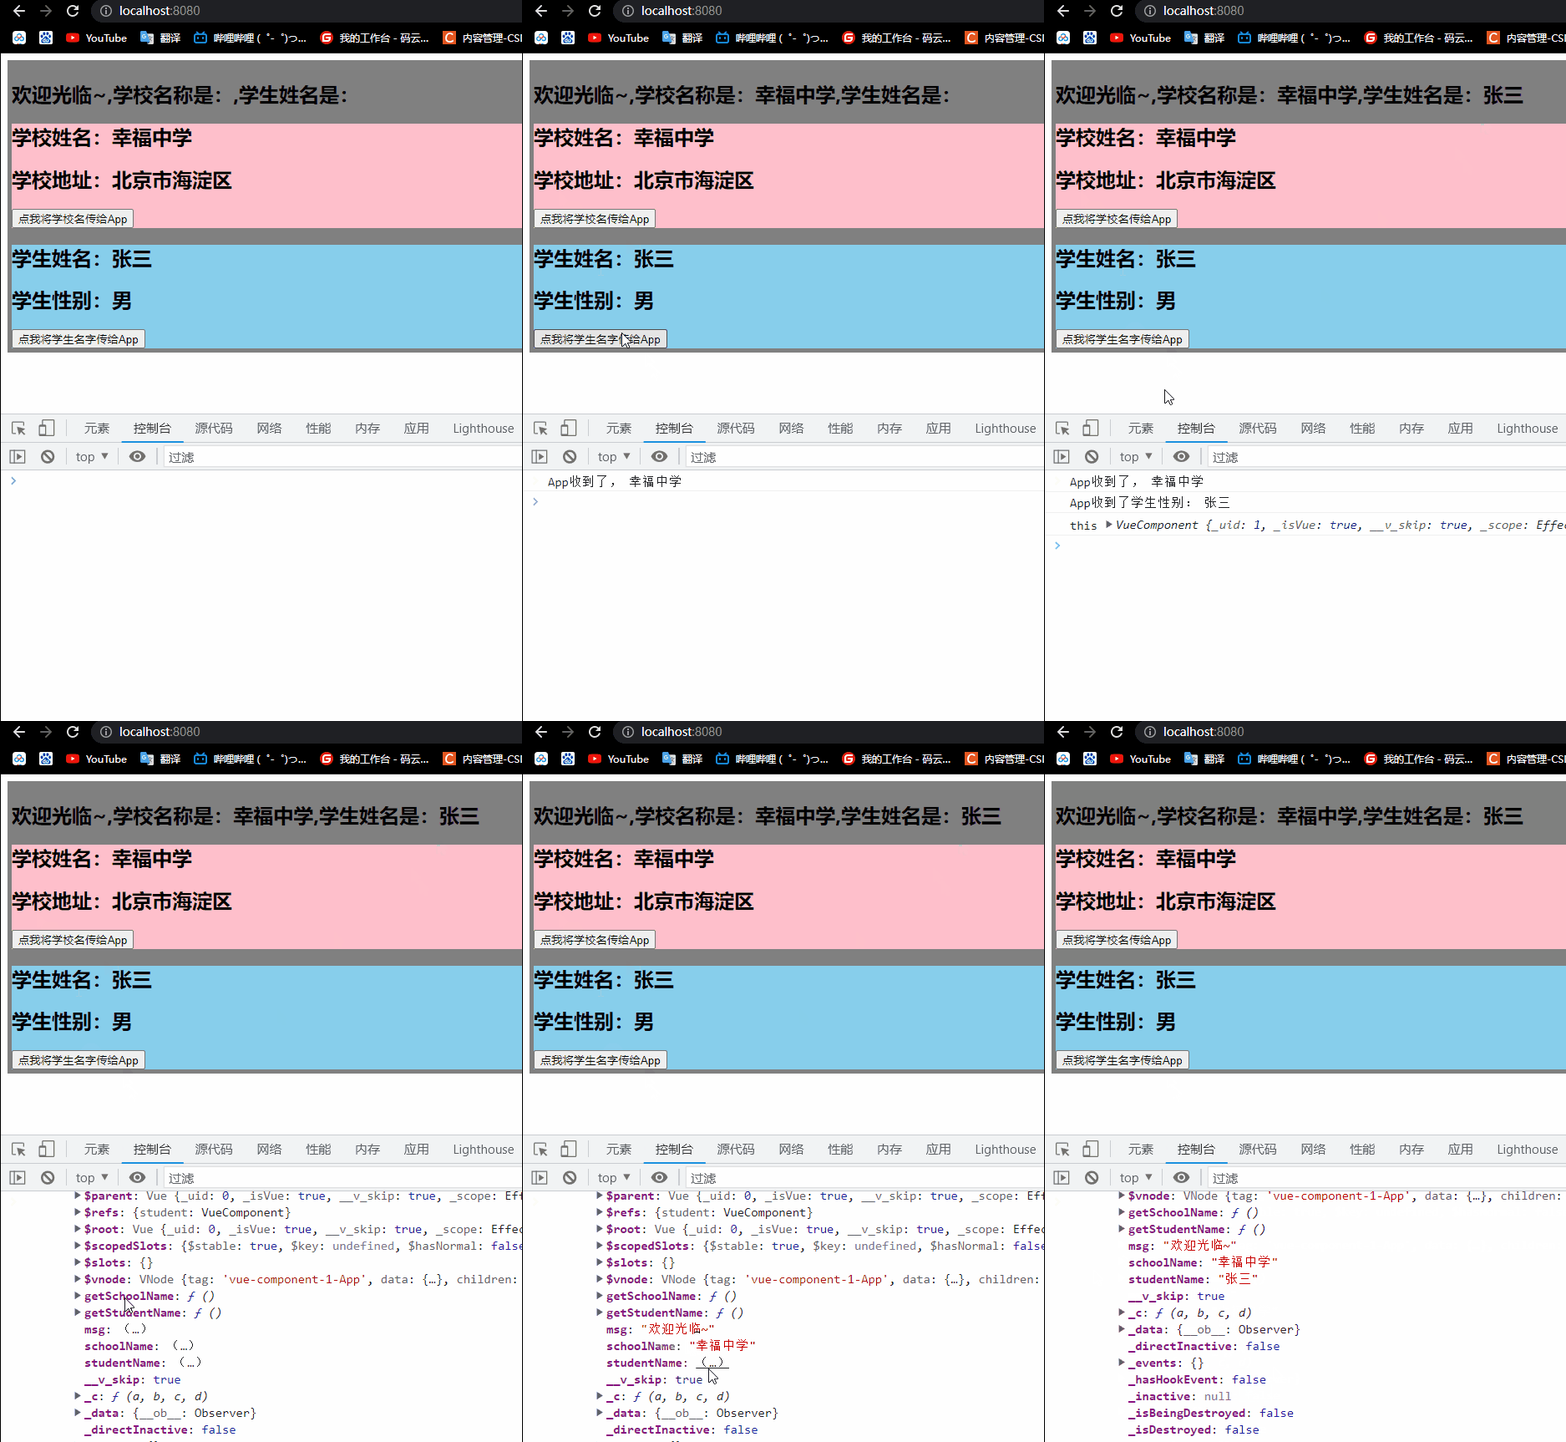
在ref中,使用内置函数传值有问题,因为this是Student的实例对象,不是App的实例对象
App.vue
<template>
  <div class="main">
    <h2>{{msg}},学校名称是:{{schoolName}},学生姓名是:{{studentName}}</h2>
    <School @sName="getSchoolName"></School>
    <Student ref="student"></Student>
  </div>
</template>

<script>
import School from "@/components/School"
import Student from "@/components/Student"
export default {
  name: "App",
  components: {School,Student},
  data(){
    return{
      msg:"欢迎光临~",
      schoolName:"",
      studentName:"",
    }
  },
  methods:{
    getSchoolName(name){
      console.log("App收到了,",name)
      this.schoolName=name
    },
    getStudentName(name,...params) {
      console.log("App接收到了,",name,params)
      this.studentName=name
    },
  },
  mounted() {
    this.$refs.student.$on("tName",function(name){
      console.log("App收到了学生性别:",name)
      console.log("this",this)
      this.studentName=name
    })
  }
}
</script>

<style scoped>
.main{
  background-color: grey;
  padding: 5px;
}
</style>
Student.vue
<template>
  <div class="student">
    <h2>学生姓名:{{name}}</h2>
    <h2>学生性别:{{sex}}</h2>
    <button @click="sendStudentName">点我将学生名字传给App</button>
  </div>
</template>

<script>
export default {
  name: "Student",
  data(){
    return{
      name:"张三",
      sex:"男"
    }
  },
  methods:{
    sendStudentName(){
      this.$emit("tName",this.name,999,666,888)
    },
  }
}
</script>

<style scoped>
.student{
  background-color: skyblue;
}
</style>
School.vue
<template>
  <div class="school">
    <h2>学校姓名:{{name}}</h2>
    <h2>学校地址:{{address}}</h2>
    <button @click="sendSchoolName">点我将学校名传给App</button>
  </div>
</template>

<script>
    export default {
        name: "School",
      data(){
          return{
            name:"幸福中学",
            address:"北京市海淀区"
          }
      },
      methods:{
        sendSchoolName(){
          this.$emit("sName",this.name)
        }
      }
    }
</script>

<style scoped>
.school{
  background-color: pink;
}
</style>

所以,如果想在ref绑定时候就写函数,则使用箭头函数,因为箭头函数没有this对象,只会向外层找
App.vue
<template>
  <div class="main">
    <h2>{{msg}},学校名称是:{{schoolName}},学生姓名是:{{studentName}}</h2>
    <School @sName="getSchoolName"></School>
    <Student ref="student"></Student>
  </div>
</template>

<script>
import School from "@/components/School"
import Student from "@/components/Student"
export default {
  name: "App",
  components: {School,Student},
  data(){
    return{
      msg:"欢迎光临~",
      schoolName:"",
      studentName:"",
    }
  },
  methods:{
    getSchoolName(name){
      console.log("App收到了,",name)
      this.schoolName=name
    },
    getStudentName(name,...params) {
      console.log("App接收到了,",name,params)
      this.studentName=name
    },
  },
  mounted() {
    this.$refs.student.$on("tName",(name)=>{
      console.log("App收到了学生性别:",name)
      console.log("this",this)
      this.studentName=name
    })
  }
}
</script>

<style scoped>
.main{
  background-color: grey;
  padding: 5px;
}
</style>
给子组件绑定常规事件(click等)
必须加native,否则会被认为自定义事件
App.vue
<template>
  <div class="main">
    <h2>{{msg}},学校名称是:{{schoolName}},学生姓名是:{{studentName}}</h2>
    <School @sName="getSchoolName"></School>
    <Student ref="student" @click.native="show"></Student>
  </div>
</template>

<script>
import School from "@/components/School"
import Student from "@/components/Student"
export default {
  name: "App",
  components: {School,Student},
  data(){
    return{
      msg:"欢迎光临~",
      schoolName:"",
      studentName:"",
    }
  },
  methods:{
    getSchoolName(name){
      console.log("App收到了,",name)
      this.schoolName=name
    },
    getStudentName(name,...params) {
      console.log("App接收到了,",name,params)
      this.studentName=name
    },
    show(){
      alert("hello~")
    }
  },
  mounted() {
    this.$refs.student.$on("tName",(name)=>{
      console.log("App收到了学生性别:",name)
      console.log("this",this)
      this.studentName=name
    })
  }
}
</script>

<style scoped>
.main{
  background-color: grey;
  padding: 5px;
}
</style>

总结组件自定义事件
- 一种组件间通信的方式,适用于:
子组件 ===> 父组件 - 使用场景:A是父组件,B是子组件,B想给A传数据,那么就要在A中给B绑定自定义事件
(事件的回调在A中) - 绑定自定义事件:
(1)第一种方式,在父组件中,<Demo @sName=“test”/> 或 <Demo v-on:sName=“test”/>
(2)第二种方式,在父组件中:
<Demo ref=“demo” />
…
mounted(){
this.$refs.xxx.$on(‘sName’,this.test)
}
(3)若想让自定义事件只能触发一次,可以使用once修饰符,或 $once方法
- 触发自定义事件:this.$emit(‘sName’,数据)
- 解绑自定义事件:this.$off(‘sName’)
- 组件上也可以绑定原生DOM事件,需要用native修饰符
- 注意:通过 this.$refs.xxx.$on(‘sName’,回调) 绑定自定义事件时,回调
要么配置在methods中,要么用箭头函数,否则this指向会出问题!

