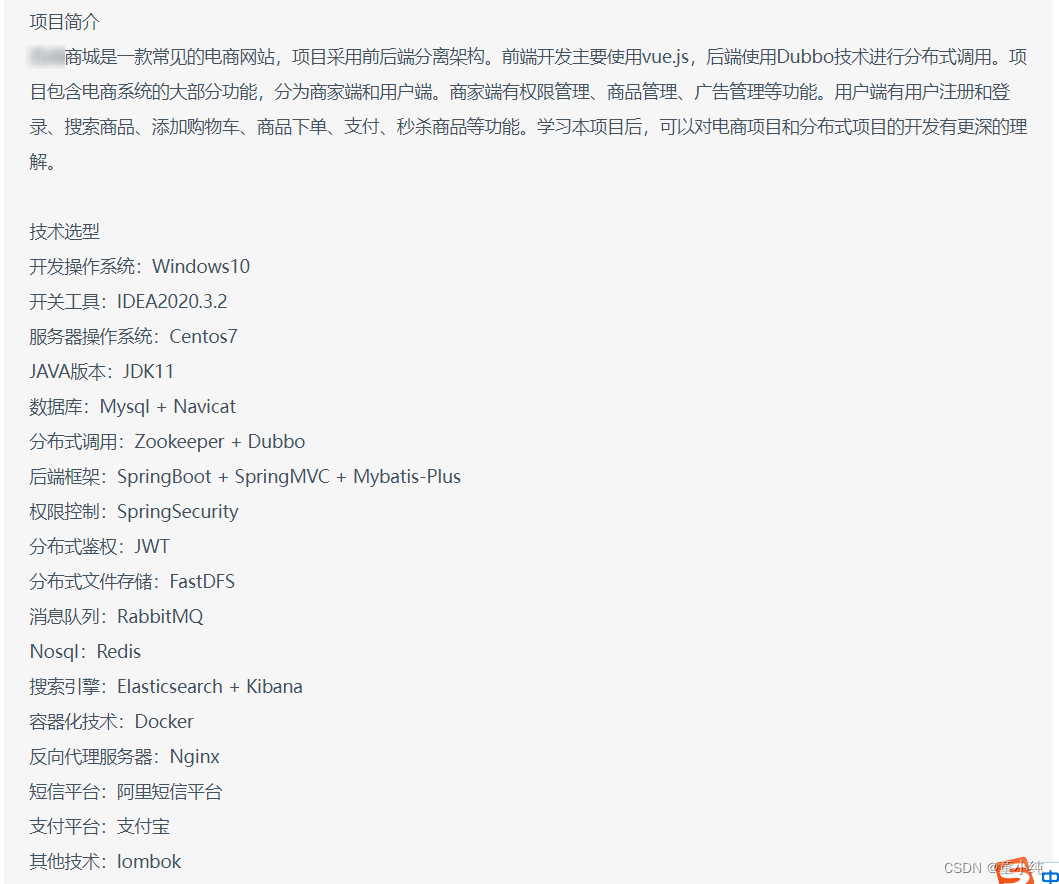


| 亿级高并发电商项目-- 实战篇 --万达商城项目搭建 一 (商家端与用户端功能介绍、项目技术架构、数据库表结构等设计) | 亿级高并发电商项目-- 实战篇 --万达商城项目搭建 一 (商家端与用户端功能介绍、项目技术架构、数据库表结构等设计)_童小纯的博客-CSDN博客 |
| 亿级高并发电商项目-- 实战篇 --万达商城项目 二(Zookeeper、Docker、Dubbo-Admin等搭建工作 | 亿级高并发电商项目-- 实战篇 --万达商城项目 二(Zookeeper、Docker、Dubbo-Admin等搭建工作_童小纯的博客-CSDN博客 |
| 亿级高并发电商项目-- 实战篇 --万达商城项目 三(通用模块、商品服务模块、后台API模块、IDEA忽略文件显示等开发工作 | 亿级高并发电商项目-- 实战篇 --万达商城项目 三(通用模块、商品服务模块、后台API模块、IDEA忽略文件显示等开发工作_童小纯的博客-CSDN博客 |
| 亿级高并发电商项目-- 实战篇 --万达商城项目 四(Dashboard服务、设置统一返回格式与异常处理、Postman测试接口 ) | 亿级高并发电商项目-- 实战篇 --万达商城项目 四(Dashboard服务、设置统一返回格式与异常处理、Postman测试接口 )_童小纯的博客-CSDN博客 |
| 亿级高并发电商项目-- 实战篇 --万达商城项目 五 (用户服务模块、管理员模块功能 增、删、改、查 、分页,前端工程) | 亿级高并发电商项目-- 实战篇 --万达商城项目 五 (用户服务模块、管理员模块功能 增、删、改、查 、分页,前端工程)_童小纯的博客-CSDN博客 |
| 亿级高并发电商项目-- 实战篇 --万达商城项目 六(编写角色管理、用户权限(Spring Security认证授权)、管理员管理等模块) | 亿级高并发电商项目-- 实战篇 --万达商城项目 六(编写角色管理、用户权限(Spring Security认证授权)、管理员管理等模块)_童小纯的博客-CSDN博客 |
| 亿级高并发电商项目-- 实战篇 --万达商城项目 七(品牌模块、商品类型模块等开发) | 亿级高并发电商项目-- 实战篇 --万达商城项目 七(品牌模块、商品类型模块等开发)_童小纯的博客-CSDN博客 |
| 亿级高并发电商项目-- 实战篇 --万达商城项目 八(安装FastDFS、安装Nginx、文件服务模块、文件上传功能、商品功能与秒杀商品等功能) | 亿级高并发电商项目-- 实战篇 --万达商城项目 八(安装FastDFS、安装Nginx、文件服务模块、文件上传功能、商品功能与秒杀商品等功能)_童小纯的博客-CSDN博客 |
| 亿级高并发电商项目-- 实战篇 --万达商城项目 九(广告服务、安装Redis优化用户缓存、广告服务实现类等开发) | 亿级高并发电商项目-- 实战篇 --万达商城项目 九(广告服务、安装Redis优化用户缓存、广告服务实现类等开发)_童小纯的博客-CSDN博客 |
部分开发截图

安装ES服务
前台用户需要进行商品搜索从而找到自己需要的商品,而数据库的 搜索性能远远比不上搜索引擎,所以我们要将数据库中的商品信息 同步到Elasticsearch中,用户在ES中进行商品搜索。
首先安装Elasticsearch和kibana:
1、修改系统最大可创建文件数
#打开系统文件:
vim /etc/sysctl.conf
#配置最大可创建文件数:
vm.max_map_count=655360
#配置生效:
sysctl -p
2、使用rz命令将ES压缩包上传至虚拟机
3、解压ES
#解压:
tar -zxvf elasticsearch-7.17.0-linux-x86_64.tar.gz
#重命名:
mv elasticsearch-7.17.0 elasticsearch
#移动文件夹:
mv elasticsearch /usr/local/
4、使用rz命令将IK分词器和拼音分词器上传至虚拟机
5、解压分词器到elasticsearch的plugins目录下
# 解压ik分词器
unzip elasticsearch-analysis-ik-7.17.0.zip -d /usr/local/elasticsearch/plugins/analysis-ik
# 解压拼音分词器
unzip elasticsearch-analysis-pinyin-7.17.0.zip -d /usr/local/elasticsearch/plugins/analysis-pinyin
6、启动ES服务
#创建一个非root用户
useradd es
#es用户取得ES文件夹权限:
chown -R es:es /usr/local/elasticsearch
#切换为es用户:
su es
#启动ES服务:
ES_JAVA_OPTS="-Xms512m -Xmx512m" /usr/local/elasticsearch/bin/elasticsearch -d
#查询ES服务是否启动成功
curl 127.0.0.1:9200
安装kibana
1、使用rz命令将Kibana压缩文件上传到Linux虚拟机
2、解压
tar -zxvf kibana-7.17.0-linux-x86_64.tar.gz -C /usr/local3、修改配置
# 修改配置文件
vim /usr/local/kibana-7.17.0-linux-x86_64/config/kibana.yml
# 加入以下内容
# kibana主机IP
server.host: "虚拟机IP"
# Elasticsearch路径
elasticsearch.hosts: ["http://127.0.0.1:9200"]
4、启动kibana
# 给es用户设置kibana目录权限
chown -R es:es /usr/local/kibana-7.17.0-linux-x86_64/
# 切换为es用户
su es
# 启动kibana
/usr/local/kibana-7.17.0-linux-x86_64/bin/kibana
5、访问kibana:http://虚拟机IP:5601
编写搜索相关的实体类
在ES中存储的商品实体类与数据库中的商品实体类不同,且商品的搜索条件和搜索结果都有相关的实体类。我们先编写这三个实体类:
1、在通用模块引入 spring-data-elasticsearch 起步依赖
<!-- elasticsearch -->
<dependency>
    <groupId>org.springframework.boot</groupId>
    <artifactId>spring-boot-starter-dataelasticsearch</artifactId>
</dependency>
2、编写在ES中存储的商品实体类
/**
* 在ES中存储的商品实体类
*/
@Document(indexName = "goods",createIndex = false)
@Data
public class GoodsES implements Serializable {
    @Field
    private Long id; // 商品id
    @Field
    private String goodsName; // 商品名称
    @Field
    private String caption; // 副标题
    @Field
    private BigDecimal price; // 价格
    @Field
    private String headerPic; // 头图
    @Field
    private String brand; // 品牌名称
    @CompletionField
    private List<String> tags; // 关键字
    @Field
    private List<String> productType; //类目名
    @Field
    private Map<String,List<String>> specification; // 规格,键为规格项,值为规格值
}
3、编写商品搜索条件实体类
/**
* 商品搜索条件
*/
@Data
public class GoodsSearchParam implements Serializable {
    @TableId
    private String keyword; // 关键字
    private String brand; // 品牌名
    private Double highPrice; //最高价
    private Double lowPrice; //最低价
    private Map<String,String> specificationOption; // 规格map, 键:规格名,值:规格值
    private String sortFiled; //排序字段 NEW:新品 PRICE:价格
    private String sort; //排序方式 ASC:升序 DESC:降序
    private Integer page; //页码
    private Integer size; //每页条数
}
4、编写商品搜索结果实体类
/**
* 商品搜索结果
*/
@Data
public class GoodsSearchResult implements Serializable {
    private Page<GoodsES> goodsPage; // 页面商品信息
    private GoodsSearchParam goodsSearchParam; // 搜索条件回显
    private Set<String> brands; // 和商品有关的品牌列表
    private Set<String> productType; // 和商品有关的类别列表
    // 和商品有关的规格列表,键:规格名,值:规格集合
    private Map<String, Set<String>> specifications;
}
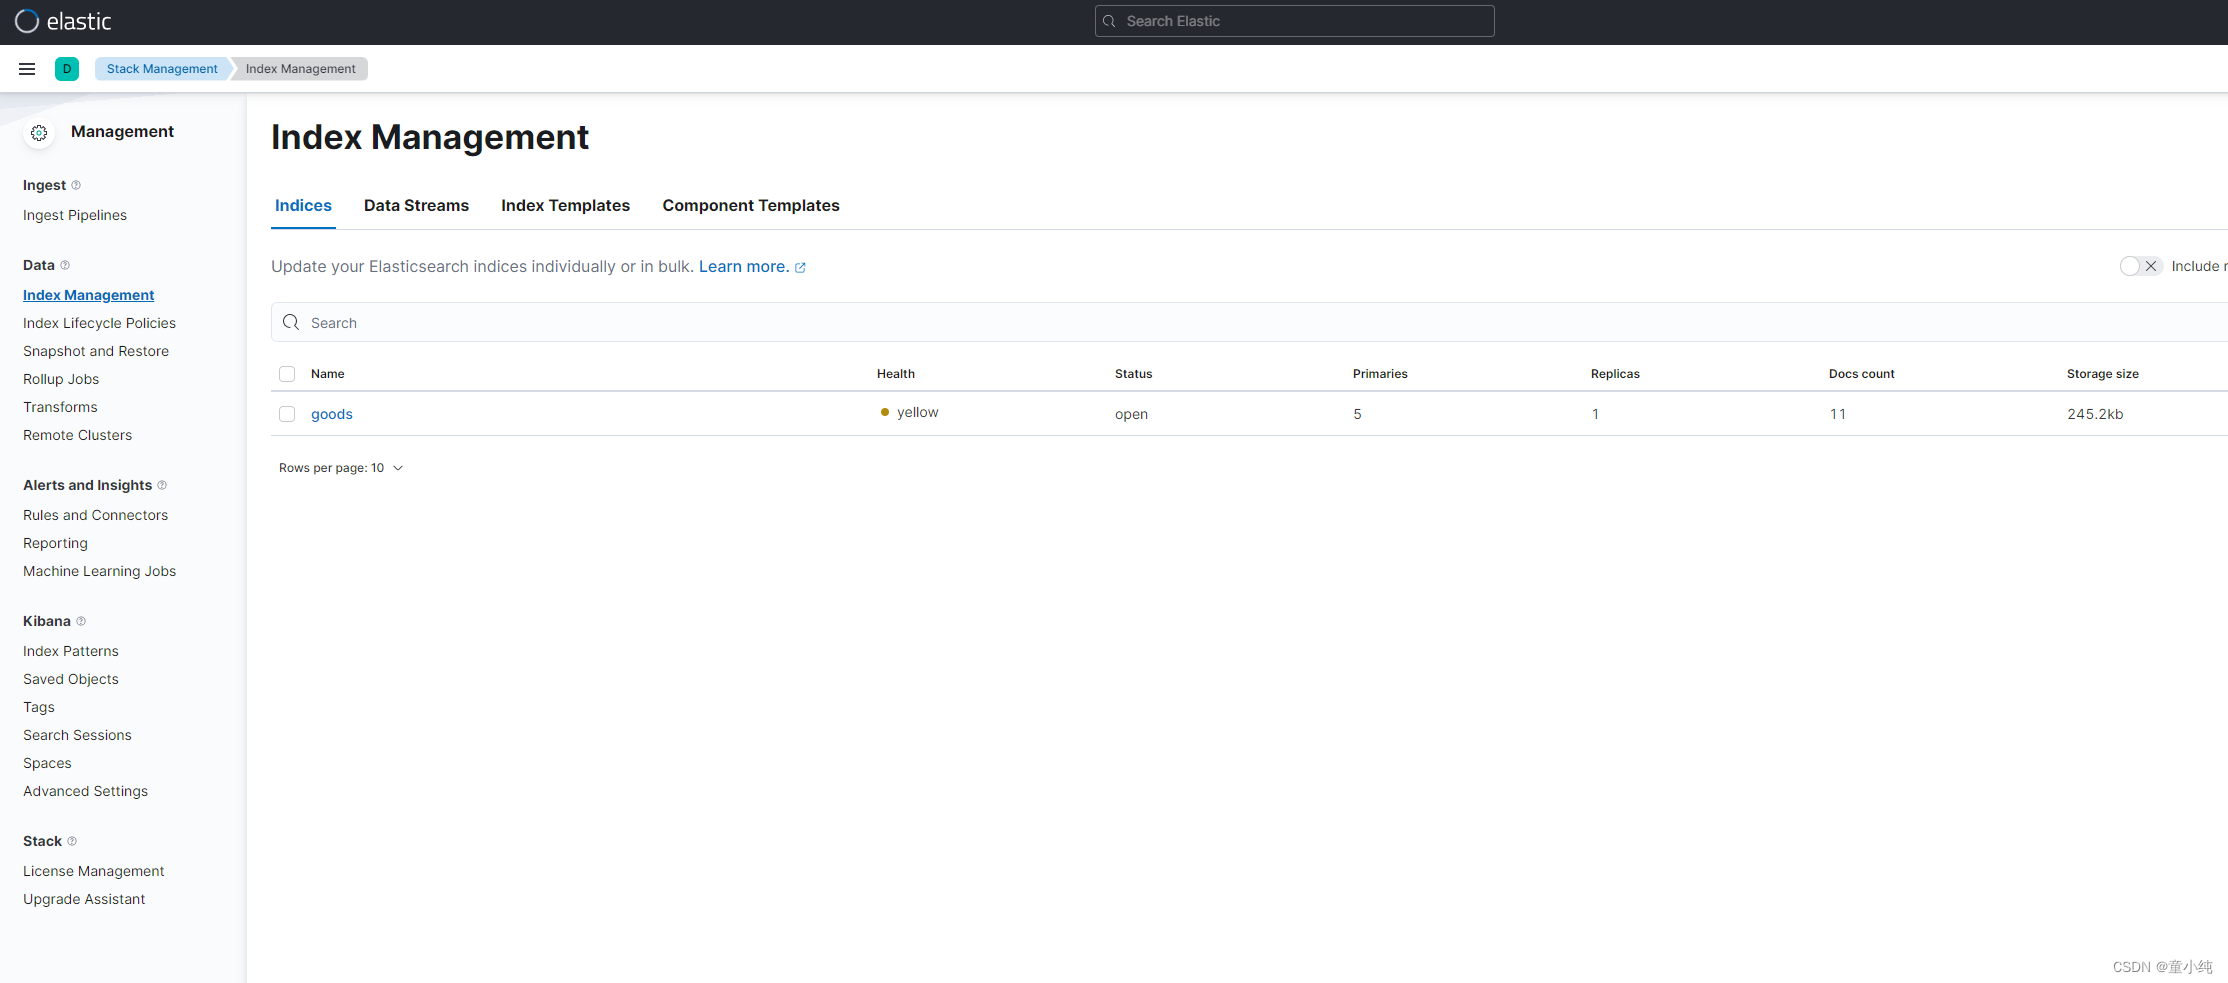
创建商品索引
在kibana中创建商品索引:
PUT /goods
{
    "settings": {
        "number_of_shards": 5,
        "number_of_replicas": 1,
        "analysis": {
            "analyzer": {
                "ik_pinyin": {
                    "tokenizer": "ik_smart",
                    "filter": "pinyin_filter"
               },
                "tag_pinyin": {
                    "tokenizer": "keyword",
                    "filter": "pinyin_filter"
               }
           },
            "filter": {
                "pinyin_filter": {
                    "type": "pinyin",
                    "keep_joined_full_pinyin": true,
                    "keep_original": true,
                    "remove_duplicated_term": true
               }
           }
       }
   },
    "mappings": {
        "properties": {
            "id": {
                "type": "long",
                "index": true
           },
           "goodsName": {
                "type": "text",
                "index": true,
                "analyzer": "ik_pinyin",
                "search_analyzer": "ik_smart"
           },
            "caption": {
                "type": "text",
                "index": true,
                "analyzer": "ik_pinyin",
                "search_analyzer": "ik_smart"
           },
            "tags": {
                "type": "completion",
                "analyzer": "tag_pinyin",
                "search_analyzer": "tag_pinyin"
           },
            "price": {
                "type": "double",
                "index": true
           },
            "headerPic": {
                "type": "keyword",
                "index": true
           },
            "brand": {
                "type": "keyword",
                "index": true
           },
           "productType": {
                "type": "keyword",
                "index": true
           },
            "specification":{
                "properties": {
                  "specificationName":{
                    "type": "keyword",
                    "index": true
                 },
                  "specificationOption":{
                    "type": "keyword",
                    "index": true
                 }
               }
           }
       }
   }
}
创建搜索服务模块
1、创建名为 shopping_search_service 的SpringBoot工程,添加相关依赖。
<dependencies>
    <dependency>
        <groupId>org.springframework.boot</groupId>
        <artifactId>spring-boot-starter</artifactId>
    </dependency>
    <dependency>
        <groupId>com.itbaizhan</groupId>
        <artifactId>shopping_common</artifactId>
        <version>0.0.1-SNAPSHOT</version>
    </dependency>
    <!-- dubbo -->
    <dependency>
        <groupId>org.apache.dubbo</groupId>
        <artifactId>dubbo-spring-boot-starter</artifactId>
        <version>2.7.8</version>
    </dependency>
    <!-- 操作zookeeper -->
    <dependency>
        <groupId>org.apache.curator</groupId>
        <artifactId>curator-recipes</artifactId>
        <version>4.2.0</version>
    </dependency>
    <dependency>
        <groupId>org.springframework.boot</groupId>
        <artifactId>spring-boot-starter-test</artifactId>
        <scope>test</scope>
    </dependency>
</dependencies>
2、设置该工程的父工程为 shopping 。
<parent>
    <groupId>com.ittxc</groupId>
    <artifactId>shopping</artifactId>
    <version>1.0-SNAPSHOT</version>
</parent>
3、给 shopping 工程设置子模块
<!-- 子模块 -->
<modules>
    <!-- 搜索服务 -->
   <module>shopping_search_service</module>
</modules>
4、编写配置文件 application.yml
# 端口号
server:
 port: 9008
# 日志格式
logging:
 pattern:
   console: '%d{HH:mm:ss.SSS} %clr(%-5level) --- [%-15thread] %cyan(%-50logger{50}):%msg%n'
spring:
  # elasticsearch
 elasticsearch:
   uris: http://192.168.100.131:9200

dubbo:
   application:
   name: shopping_search_service # 项目名
 registry:
   address: zookeeper://192.168.100.131 #注册中心地址
   port: 2181       # 注册中心的端口
   timeout: 10000 # 注册到zk上超时时间,ms
 protocol:
   name: dubbo # dubbo使用的协议
   port: -1 # dubbo自动分配端口
 scan:
   base-packages: com.itbaizhan.shopping_search_service.service # 包扫描
5、启动类忽略数据源自动配置
@SpringBootApplication(exclude= {DataSourceAutoConfiguration.class})
public class ShoppingSearchServiceApplication {
    public static void main(String[] args)
{
      SpringApplication.run(ShoppingSearchServiceApplication.class, args);
   }

    // 分页插件
    @Bean
    public MybatisPlusInterceptor mybatisPlusInterceptor() {
        MybatisPlusInterceptor interceptor = new MybatisPlusInterceptor();
        interceptor.addInnerInterceptor(new PaginationInnerInterceptor(DbType.MYSQL));
        return interceptor;
   }
}
创建搜索Api模块
1、创建名为 shopping_search_customer_api 的SpringBoot工程,添加相关依赖。
<dependencies>
    <dependency>
        <groupId>org.springframework.boot</groupId>
        <artifactId>spring-boot-starter</artifactId>
    </dependency>
    <dependency>
        <groupId>org.springframework.boot</groupId>
        <artifactId>spring-boot-starter-web</artifactId>
    </dependency>
    <!-- dubbo -->
    <dependency>
      <groupId>org.apache.dubbo</groupId>
        <artifactId>dubbo-spring-boot-starter</artifactId>
        <version>2.7.8</version>
    </dependency>
    <!-- 操作zookeeper -->
    <dependency>
        <groupId>org.apache.curator</groupId>
        <artifactId>curator-recipes</artifactId>
        <version>4.2.0</version>
    </dependency>
    <dependency>
        <groupId>com.ittxc</groupId>
        <artifactId>shopping_common</artifactId>
        <version>0.0.1-SNAPSHOT</version>
    </dependency>
    <dependency>
        <groupId>org.springframework.boot</groupId>
        <artifactId>spring-boot-starter-test</artifactId>
        <scope>test</scope>
    </dependency>
</dependencies>
2、设置该工程的父工程为 shopping 。
<parent>
    <groupId>com.ittxc</groupId>
    <artifactId>shopping</artifactId>
    <version>1.0-SNAPSHOT</version>
</parent>
3、给 shopping 工程设置子模块
<!-- 子模块 -->
<modules>
    <!-- 用户搜索暴露的api -->
    <module>shopping_search_customer_api</module>
</modules>
4 编写配置文件 application.yml
# 端口号
server:
 port: 8004
# 日志格式
logging:
 pattern:
   console: '%d{HH:mm:ss.SSS} %clr(%-5level) --- [%-15thread] %cyan(%-50logger{50}):%msg%n'
dubbo:
 application:
   name: shopping_search_customer_api #
项目名
 registry:
   address: zookeeper://192.168.100.131 #注册中心地址
   port: 2181       # 注册中心的端口
   timeout: 10000 # 注册到zk上超时时间,ms
 protocol:
   name: dubbo # dubbo使用的协议
   port: -1 # dubbo自动分配端口
5、启动类忽略数据源自动配置
@SpringBootApplication(exclude= {DataSourceAutoConfiguration.class})
public class ShoppingSearchCustomerApiApplication {
    public static void main(String[] args)
    {
       SpringApplication.run(ShoppingSearchCustomerApiApplication.class, args);
   }
}
编写搜索服务接口
在通用模块编写搜索服务接口:
// 搜索服务
public interface SearchService {
    /**
     * 自动补齐关键字
     * @param keyword 被补齐的词
     * @return 补齐的关键词集合
     */
    List<String> autoSuggest(String keyword);
    /**
     * 搜索商品
     * @param goodsSearchParam 搜索条件
     * @return 搜索结果
     */
    GoodsSearchResult search(GoodsSearchParam goodsSearchParam);

    /**
     * 向ES同步商品数据
     * @param goodsDesc 商品详情
     */
    void syncGoodsToES(GoodsDesc goodsDesc);
    /**
     * 删除ES中的商品数据
     * @param id 商品id
     */
    void delete(Long id);
}
向ES同步数据库商品数据
我们要将数据库的商品数据同步到ES中才能进行搜索。之前编写 Goods 实体类没有品牌名,商品类目名等数据,所以我们需要再编写 一个商品详情实体类 GoodsDesc ,并编写查询所有商品详情方法。
查询所有商品详情
1、在通用模块编写商品详情实体类 GoodsDesc
/**
* 商品详情
*/
@Data
public class GoodsDesc implements Serializable {
    private Long id; // 商品id
    private String goodsName; // 商品名称
    private String caption; // 副标题
    private BigDecimal price; // 价格
    private String headerPic; // 头图
    private Boolean isMarketable; // 是否上架
    private String introduction; // 商品介绍
    private Brand brand; // 品牌
    private ProductType productType1; //一级类目
    private ProductType productType2;  //二级类目id
    private ProductType productType3;  //三级类目id
    private List<GoodsImage> images; // 商品图片
    private List<Specification> specifications; // 商品规格
}2、在商品服务模块的Mapper中添加查询所有商品详情方法
// 查询所有商品详情
List<GoodsDesc> findAll();
3、编写Mapper映射文件
<resultMap id="goodsDescMapper" type="com.itbaizhan.shopping_common.pojo.GoodsDesc">
    <id property="id" column="bid"></id>
    <result property="goodsName" column="goodsName"></result>
    <result property="caption" column="caption"></result>
    <result property="price" column="price"></result>
    <result property="headerPic" column="headerPic"></result>
    <result property="isMarketable" column="isMarketable"></result>
    <result property="introduction" column="introduction"></result>
    <association property="brand" column="brandId" javaType="com.itbaizhan.shopping_common.pojo.Brand">
        <id property="id" column="brandId"></id>
        <result property="name" column="brandName"></result>
    </association>
     <association property="productType1" column="type1Id" javaType="com.itbaizhan.shopping_common.pojo.ProductType">
        <id property="id" column="type1Id"></id>
        <result property="name" column="type1Name"></result>
        <result property="level" column="type1Level"></result>
        <result property="parentId" column="type1ParentId"></result>
    </association>
    <association property="productType2" column="type2Id" javaType="com.itbaizhan.shopping_common.pojo.ProductType">
        <id property="id" column="type2Id"></id>
        <result property="name" column="type2Name"></result>
        <result property="level" column="type2Level"></result>
        <result property="parentId" column="type2ParentId"></result>
    </association>
    <association property="productType3" column="type3Id" javaType="com.itbaizhan.shopping_common.pojo.ProductType">
        <id property="id" column="type3Id"></id>
        <result property="name" column="type3Name"></result>
        <result property="level" column="type3Level"></result>
        <result property="parentId" column="type3ParentId"></result>
    </association>
    <collection property="images" column="bid" ofType="com.itbaizhan.shopping_common.pojo.GoodsImage">
        <id property="id" column="imageId"></id>
        <result property="imageTitle" column="imageTitle"></result>
        <result property="imageUrl" column="imageUrl"></result>
    </collection>
    <collection property="specifications" column="bid" ofType="com.itbaizhan.shopping_common.pojo.Specification">
        <id property="id" column="specificationId"></id>
        <result property="specName" column="specName"></result>
        <result property="productTypeId" column="productTypeId"></result>
   <collection property="specificationOptions" column="specificationId" ofType="com.itbaizhan.shopping_common.pojo.SpecificationOption">
            <id property="id" column="optionId"></id>
            <result property="optionName" column="optionName"></result>
        </collection>
    </collection>
</resultMap>
<select id="findAll" resultMap="goodsDescMapper">
   SELECT
   bz_goods.id bid,
   bz_goods.goodsName goodsName,
   bz_goods.caption caption,
   bz_goods.price price,
   bz_goods.headerPic headerPic,
   bz_goods.introduction introduction,
   bz_goods.isMarketable isMarketable,
   bz_goods.brandId brandId,
   bz_brand.`name` brandName,
   type1.id type1Id,
   type1.`name` type1Name,
   type1.`level` type1Level,
   type1.parentId type1ParentId,
   type2.id type2Id,
   type2.`name` type2Name,
   type2.`level` type2Level,
   type2.parentId type2ParentId,
   type3.id type3Id,
   type3.`name` type3Name,
   type3.`level` type3Level,
   type3.parentId type3ParentId,
   bz_goods_image.id imageId,
   bz_goods_image.imageTitle imageTitle,
   bz_goods_image.imageUrl imageUrl,
   bz_specification.id specificationId,
   bz_specification.specName specName,
   bz_specification.productTypeId productTypeId,
   bz_specification_option.id optionId,
   bz_specification_option.optionName optionName
   FROM
   bz_goods,
   bz_goods_image,
   bz_brand,
   bz_specification,
   bz_specification_option,
   bz_goods_specification_option,
   bz_product_type AS type1,
   bz_product_type AS type2,
   bz_product_type AS type3
   WHERE bz_goods.id = bz_goods_specification_option.gid
   AND bz_goods_specification_option.optionId = bz_specification_option.id
   AND bz_specification.id = bz_specification_option.specId
   AND bz_goods.brandId = bz_brand.id
   AND bz_goods.id = bz_goods_image.goodsId
   AND bz_goods.productType1Id = type1.id
   AND bz_goods.productType2Id = type2.id
   AND bz_goods.productType3Id = type3.id
</select>
4、修改商品服务接口和实现类
public interface GoodsService {
    // 查询所有商品详情
    List<GoodsDesc> findAll();
}
public class GoodsServiceImpl implements GoodsService {
    @Override
    public List<GoodsDesc> findAll() {
        return goodsMapper.findAll();
   }
}
编写分词方法
在向ES添加数据时,我们需要将数据库的一些字段进行分词作为商 品的关键词,方便编写补齐关键词功能,在搜索服务接口实现类编写分词方法:
@DubboService
public class GoodsESServiceImpl implements GoodsESService {
    @Autowired
      private GoodsESRepository goodsESRepository;
    @Autowired
    private ElasticsearchRestTemplate template;
    @Autowired
    private RestHighLevelClient restHighLevelClient;
    /**
     * 分词
     * @param text 被分词的文本
     * @param analyzer 分词器
     * @return 分词结果
     */
    @SneakyThrows // 抛出已检查异常
    public List<String> analyze(String text, String analyzer){
        // 分词请求
        AnalyzeRequest request = AnalyzeRequest.withIndexAnalyzer("goods",analyzer, text);
        // 分词响应
        AnalyzeResponse response = restHighLevelClient.indices().analyze(request, RequestOptions.DEFAULT);
        // 分词结果集合
        List<String> words = new ArrayList<>();
        // 处理响应
        List<AnalyzeResponse.AnalyzeToken>
        tokens = response.getTokens();
          for (AnalyzeResponse.AnalyzeToken token : tokens) {
            String term = token.getTerm(); // 分出的词
            words.add(term);
       }
        return words;
   }
}
在测试时,发现JAVA项目无法连接ES,这是由于ES默认不允许 远程访问。kibana由于和ES在同一台服务器下所以可以访问, JAVA程序在开发电脑中所以无法访问。我们修改es的配置文件,开启远程访问功能:
1、打开ES配置文件
vim /usr/local/elasticsearch/config/elasticsearch.yml
2、添加如下内容
# 单体ES环境
discovery.type: single-node
# 允许所有路径访问
network.host: 0.0.0.0
3、重启ES和kibana。
编写向ES同步商品数据方法
1、在搜索服务模块编写商品Repository
@Repository
public interface GoodsESRepository extends ElasticsearchRepository<GoodsES,Long> {
}
2、在搜索服务接口实现类编写向ES同步商品数据方法
// 向ES同步商品数据
@Override
public void syncGoodsToES(GoodsDesc goodsDesc) {
    // 将商品详情对象转为GoodsES对象
    GoodsES goodsES = new GoodsES();
    goodsES.setId(goodsDesc.getId());
    goodsES.setGoodsName(goodsDesc.getGoodsName());
    goodsES.setCaption(goodsDesc.getCaption());
    goodsES.setPrice(goodsDesc.getPrice());
    goodsES.setHeaderPic(goodsDesc.getHeaderPic());
    goodsES.setBrand(goodsDesc.getBrand().getName());
    // 类型集合
    List<String> productType = new ArrayList();
    productType.add(goodsDesc.getProductType1().getName());
    productType.add(goodsDesc.getProductType2().getName());
    productType.add(goodsDesc.getProductType3().getName());
    goodsES.setProductType(productType);
    // 规格集合
    Map<String,List<String>> map = new HashMap();
    List<Specification> specifications = goodsDesc.getSpecifications();
    // 遍历规格
    for (Specification specification : specifications) {
        // 规格项集合
        List<SpecificationOption> options = specification.getSpecificationOptions();
        // 规格项名集合
        List<String> optionStrList = new ArrayList();
        for (SpecificationOption option : options) {
             optionStrList.add(option.getOptionName());
       }
    map.put(specification.getSpecName(),optio nStrList);
   }
    goodsES.setSpecification(map);
    // 关键字
    List<String> tags = new ArrayList();
    tags.add(goodsDesc.getBrand().getName()); //品牌名是关键字
    tags.addAll(analyze(goodsDesc.getGoodsName(),"ik_smart"));//商品名分词后为关键词
    tags.addAll(analyze(goodsDesc.getCaption(),"ik_smart"));//副标题分词后为关键词
    goodsESRepository.save(goodsES);
}
同步所有商品数据到ES
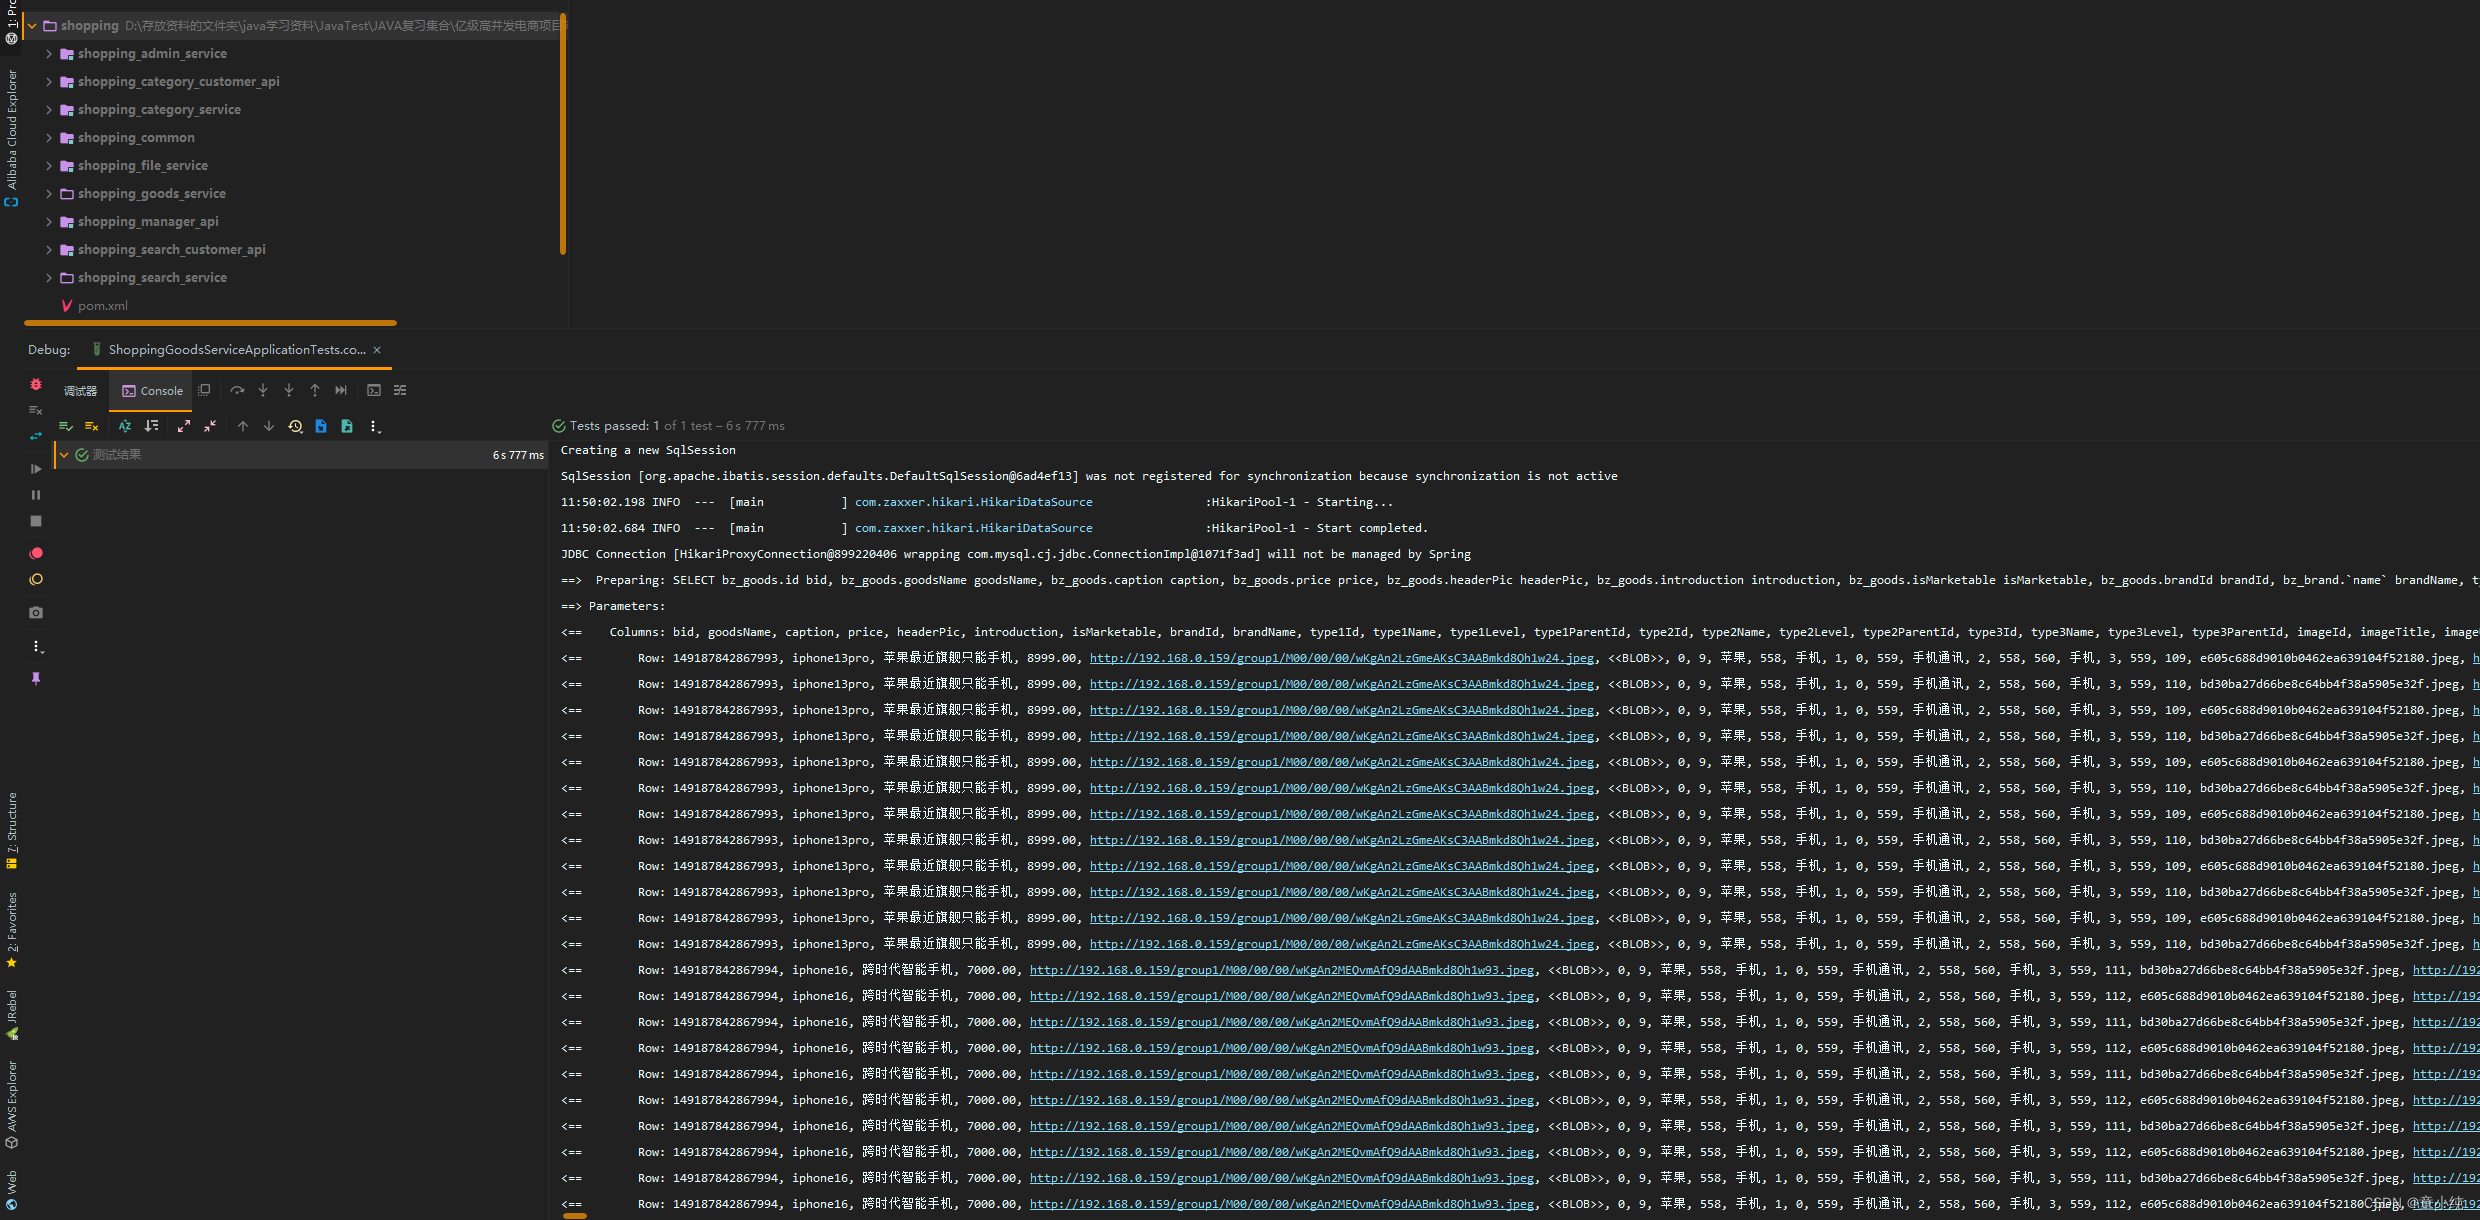
在搜索服务模块编写测试类,查询所有商品数据,同步到ES中:
@SpringBootTest
class ShoppingSearchServiceApplicationTests
{
    @DubboReference
    private GoodsESServiceImpl goodsESService;
    @DubboReference
    private GoodsService goodsService;
      @Test
    void testSyncGoodsToES(){
        List<GoodsDesc> goods = goodsService.findAll();
        for (GoodsDesc goodsDesc : goods) {
            // 如果商品是上架状态
            if (goodsDesc.getIsMarketable())
                 {
                    goodsESService.syncGoodsToES(goodsDesc);
           }
       }
   }
}
先启动商品服务,再执行测试类,同步所有商品。
注:同步成功后可以注释测试类,否则启动搜索服务前必须启动商品服务。