监控全网服务器
- 4.1 需求说明
- 4.2 规划方案
- 4.2.1 api接口使用(curl)
- 4.3 具体实施规划
- 4.3.1 硬件、系统、网络监控
- 4.3.2 应用服务监控
- 4.3.3 监控服务通用方法
- 4.4 实施全网监控
- 4.4.1 使用自动发现规则
- 4.4.2 监控备份服务器
- 1. 添加模板
- 2. 添加应用集
- 3. 添加监控项
- 4. 添加触发器
- 5. 添加图形
- 6. 添加触发器动作
- 7. 添加报警媒介
- 4.4.3 监控NFS服务器
- 4.4.4 监控MySQL服务器
- 4.4.5 监控web服务器
- 4.4.6 监控URL地址
- 4.4.7 监控反向代理服务器
- 4.4.8 监控Nginx的7种连接状态
zabbix监控配置流程
1.添加主机或主机组
2.添加监控项
a. 使用模板添加
b. 自定义模板
c. 手动加监控项
3.添加触发器
4.添加媒介
5.为用户选择要使用的媒介
6.添加动作
7.手动触发并验证
zabbix 监控指标
| 分类 | 详细 |
|---|---|
| 系统 | CPU,内存,硬盘 |
| 网络 | 网卡,网口 |
| 业务 | 进程,端口号,日志 |
| 硬件 | 电源个数,CPU温度,硬盘温度 |
4.1 需求说明
实际需求:公司已经有了100台服务器,现在需要使用zabbix全部监控起来
4.2 规划方案
常规监控:cpu,内存,磁盘,网卡 问题:怎样快速添加100台机器
- 方法1:使用克隆的方式
- 方法2:自动注册和自动发现
- 方法3:调用zabbix api接口 curl 、python开发自己的运维平台兼容zabbix的通道
服务监控,url监控等特殊监控:自定义监控
4.2.1 api接口使用(curl)
[root@dbc-server-554 grafana]# curl -i -X POST -H 'Content-Type:application/json' -d'{"jsonrpc": "2.0","method":"user.login","params":{"user":"Admin","password":"zabbix"},"auth": null,"id":0}' "http://192.168.5.54/api_jsonrpc.php"
HTTP/1.1 200 OK
Server: nginx/1.16.1
Date: Wed, 15 Feb 2023 06:48:52 GMT
Content-Type: application/json
Transfer-Encoding: chunked
Connection: keep-alive
X-Powered-By: PHP/7.2.24
Access-Control-Allow-Origin: *
Access-Control-Allow-Headers: Content-Type
Access-Control-Allow-Methods: POST
Access-Control-Max-Age: 1000
[root@dbc-server-554 grafana]# curl -i -X POST -H 'Content-Type:application/json' -d'
>     {
>         "jsonrpc": "2.0",
>         "method": "host.get",
>         "params": {
>             "output": [
>                 "hostid",
>                 "host"
>             ],
>             "selectInterfaces": [
>                 "interfaceid",
>                 "ip"
>             ]
>         },
>         "id": 0,
>         "auth":null
>
>     }' "http://192.168.5.54/api_jsonrpc.php"
HTTP/1.1 200 OK
Server: nginx/1.16.1
Date: Wed, 15 Feb 2023 06:58:16 GMT
Content-Type: application/json
Transfer-Encoding: chunked
Connection: keep-alive
X-Powered-By: PHP/7.2.24
Access-Control-Allow-Origin: *
Access-Control-Allow-Headers: Content-Type
Access-Control-Allow-Methods: POST
Access-Control-Max-Age: 1000
4.3 具体实施规划
4.3.1 硬件、系统、网络监控
所有集群节点(所有虚拟机)都监控上
交换机,路由器监控(简单方法:换成端口对应服务器网卡流量监控;标准方法:监控交换机的网卡)
snmp监控
4.3.2 应用服务监控
-
监控备份服务器,简单方法是监控rsync端口,如果有其他更佳方案可以说明;
方法1:监控873端口net.tcp.port[,873]
方法2:模拟推送拉取文件 -
监控NFS服务器,使用监控NFS进程来判断NFS服务器正常,如果有其他更佳方案可以说明;
方法1:端口(通过111的rpc端口获取nfs端口) net.tcp.port[,111]
方法2:showmount -e ip|wc -l -
监控MySQL服务器,简单方法监控mysql的3306端口,或者使用zabbix提供的Mysql模板,如果有其他更佳方案可以说明;
方法1:端口(通过3306的mysql端口) net.tcp.port[,3306]
方法2:mysql远程登录
方法3:使用zabbix agent自带的模板及key -
监控2台web服务器,简单方法监控80端口,如果有其他更佳方案可以说明;
方法1:端口(通过80的web端口) net.tcp.port[,80]
方法2:看网页状态码、返回内容==zabbix 自带WEB检测 -
监控URL地址来更精确的监控我们的网站运行正常;
使用zabbix自带的监控Web监测进行监控
-
监控反向代理服务器,PPTP服务器等你在期中架构部署的服务。
nginx,pptp
ntp 端口udp 123 -
监控Nginx的7种连接状态。
自定义监控
4.3.3 监控服务通用方法
- 监控端口 netstat ss lsof ==》 wc -l
- 监控进程 ps -ef|grep 进程|wc -l
- 模拟客户端的使用方式监控服务端
web ==》 curl
mysql ==》 select insert
memcache ==》 set再get
4.4 实施全网监控
安装客户端脚本,for centos6
#!/bin/bash

#设置解析
# echo '10.0.0.1 mirrors.aliyuncs.com mirrors.aliyun.com repo.zabbix.com' >> /etc/hosts

#安装zabbix源、aliyu nYUM源
curl -o /etc/yum.repos.d/CentOS-Base.repo http://mirrors.aliyun.com/repo/Centos-6.repo
curl -o /etc/yum.repos.d/epel.repo http://mirrors.aliyun.com/repo/epel-6.repo
rpm -ivh http://repo.zabbix.com/zabbix/3.0/rhel/6/x86_64/zabbix-release-3.0-1.el6.noarch.rpm

yum clean all
yum clean all
#安装zabbix客户端
yum install zabbix-agent -y
sed -i.ori 's#Server=127.0.0.1#Server=172.16.1.61#' /etc/zabbix/zabbix_agentd.conf
/etc/init.d/zabbix-agent start

#写入开机自启动
chmod +x /etc/rc.d/rc.local
cat >>/etc/rc.d/rc.local<<EOF
/etc/init.d/zabbix-agent start
EOF
安装客户端脚本,for centos7
[root@k8s-node-02 zabbix]# cat run.bat
#!/bin/bash

rpm -Uvh https://repo.zabbix.com/zabbix/5.0/rhel/7/x86_64/zabbix-release-5.0-1.el7.noarch.rpm
yum install zabbix-agent -y
systemctl stop firewalld
systemctl disable firewalld
setenforce 0
sed -i "s!SELINUX=enforcing!SELINUX=disabled!g" /etc/sysconfig/selinux
sed -i "s!Server=127.0.0.1!Server=192.168.5.54!g" /etc/zabbix/zabbix_agentd.conf
sed -i "s!# ListenPort=10050!ListenPort=10050!g" /etc/zabbix/zabbix_agentd.conf
systemctl start zabbix-agent
systemctl enable zabbix-agent
可以把以上命令保存到脚本后,配合ansible执行
4.4.1 使用自动发现规则
添加自动发现规则,配置–>自动发现—>创建发现规则
其中”检查”添加“自动发现检查”,端口范围和键值
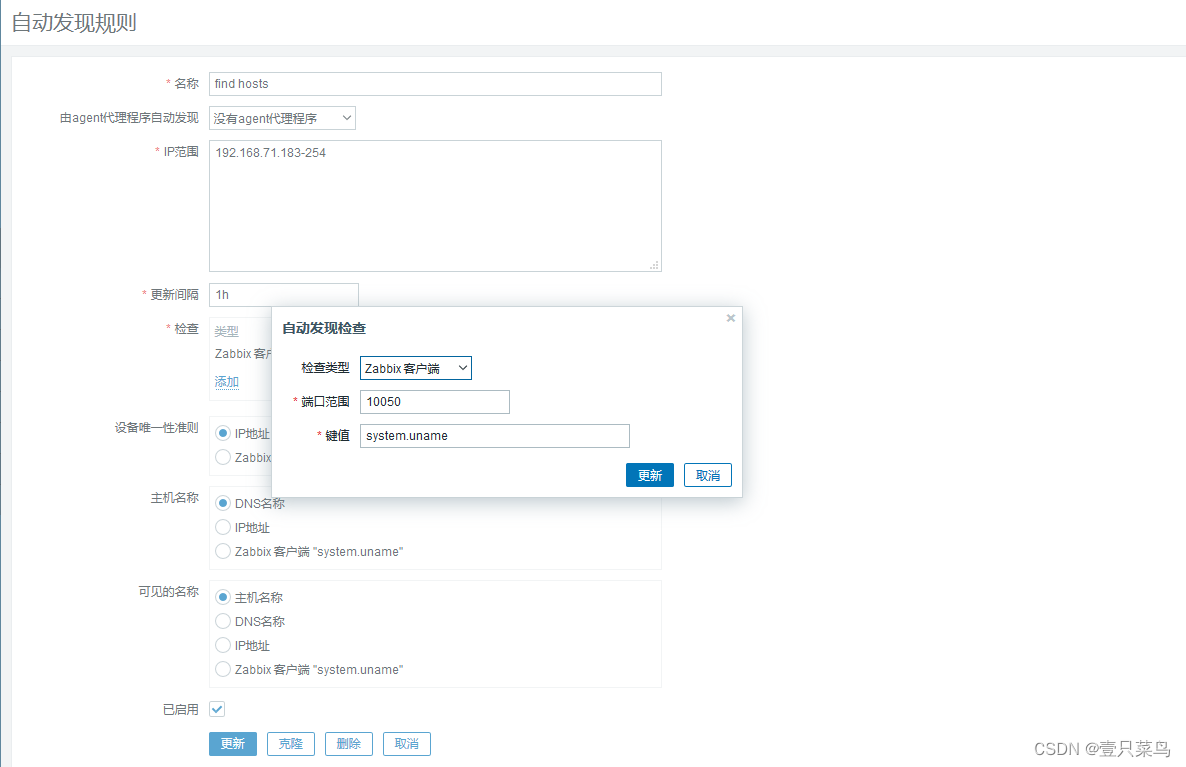
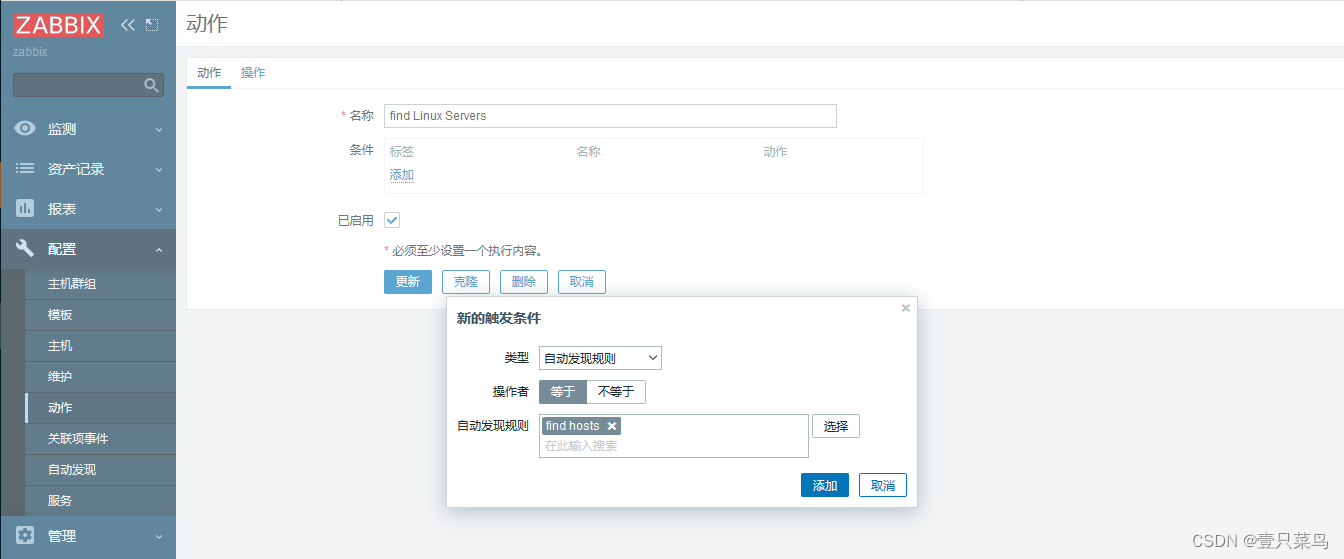
创建发现动作,配置->动作
其中“条件”添加类型:自动发现规则find hosts
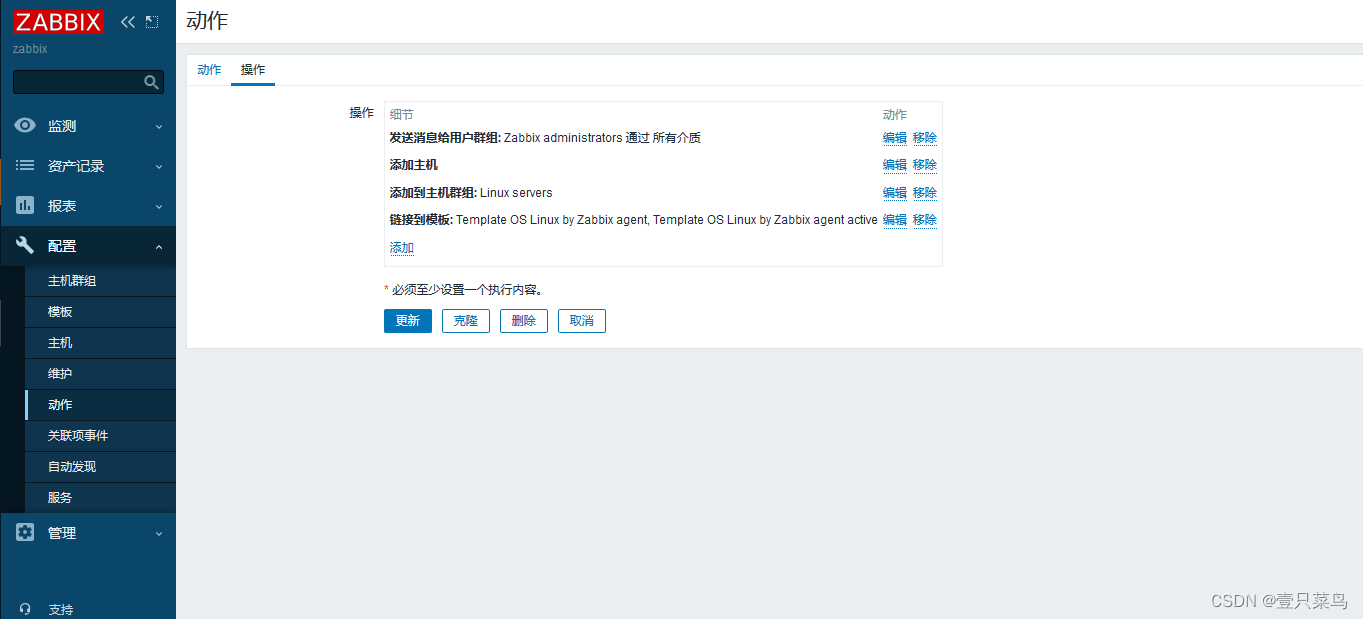
“操作”中添加“添加主机”,“添加到主机群组:Linux servers”,“链接到模板:Template OS linux by Zabbix agent”
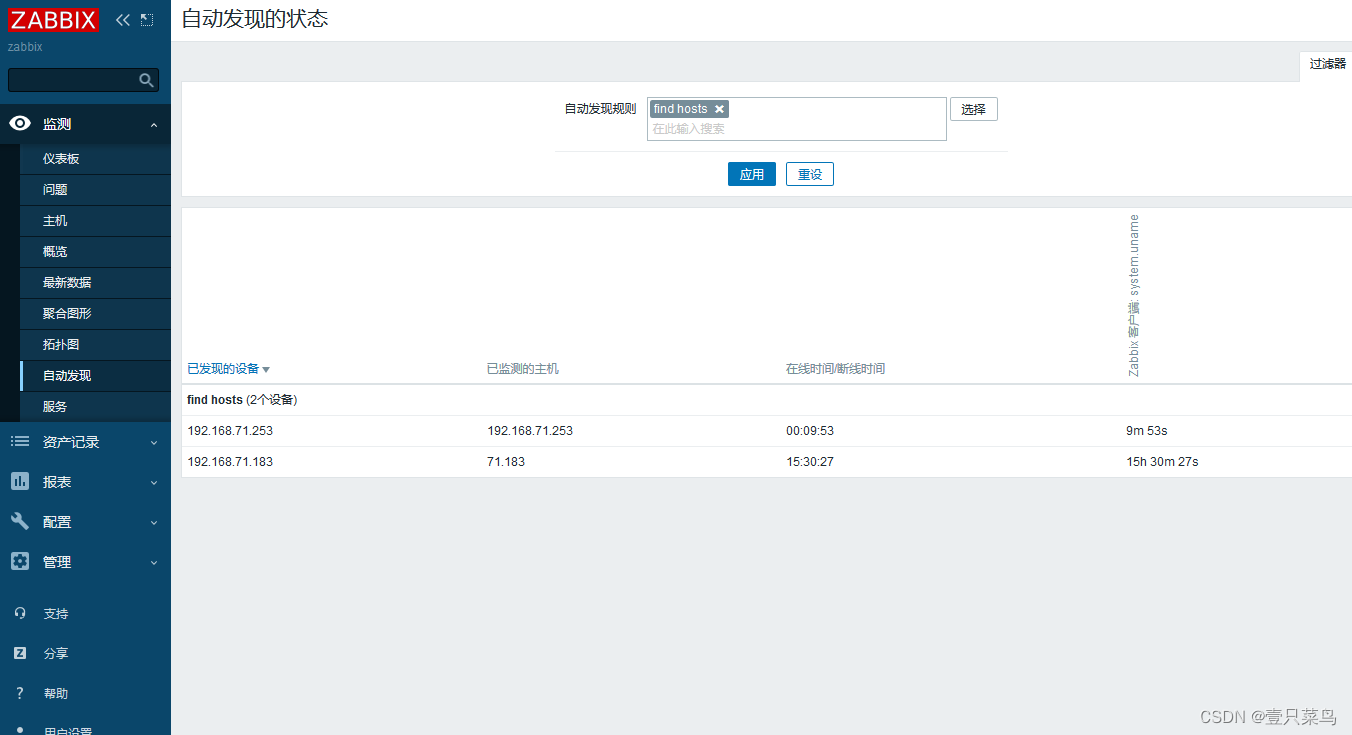
在“检测”中自动发现的主机
4.4.2 监控备份服务器
如何搭建备份服务器
利用系统自带键值进行监控net.tcp.listen[port] 创建新监控
在服务端进行测试
[root@dbc-server-554 new]# zabbix_get -s 192.168.71.253 -p 10050 -k "net.tcp.listen[873]"
1
添加监控流程:
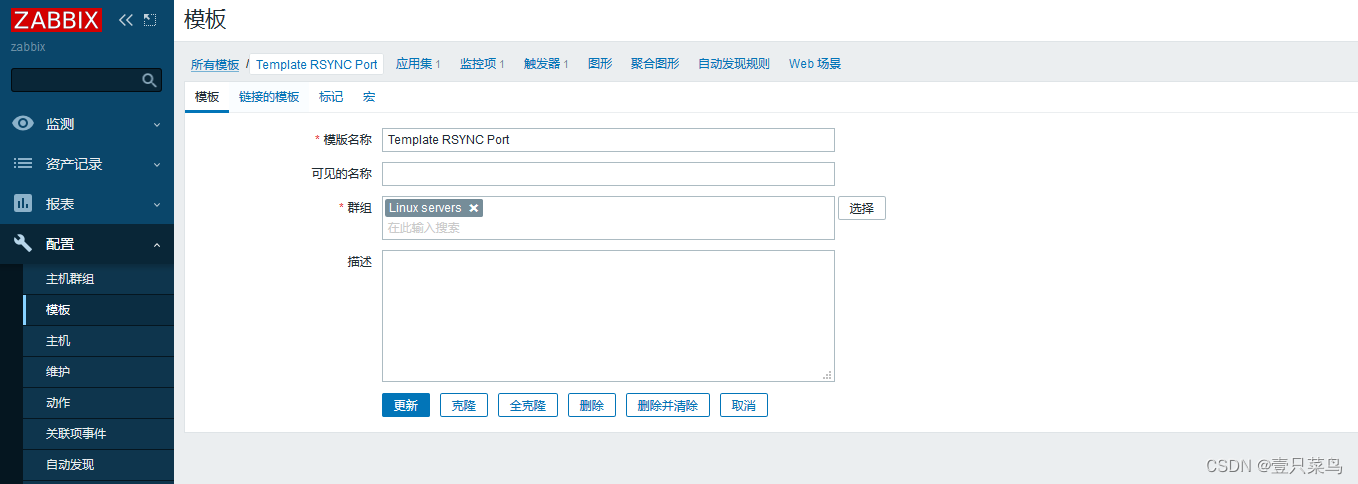
1. 添加模板
2. 添加应用集

3. 添加监控项
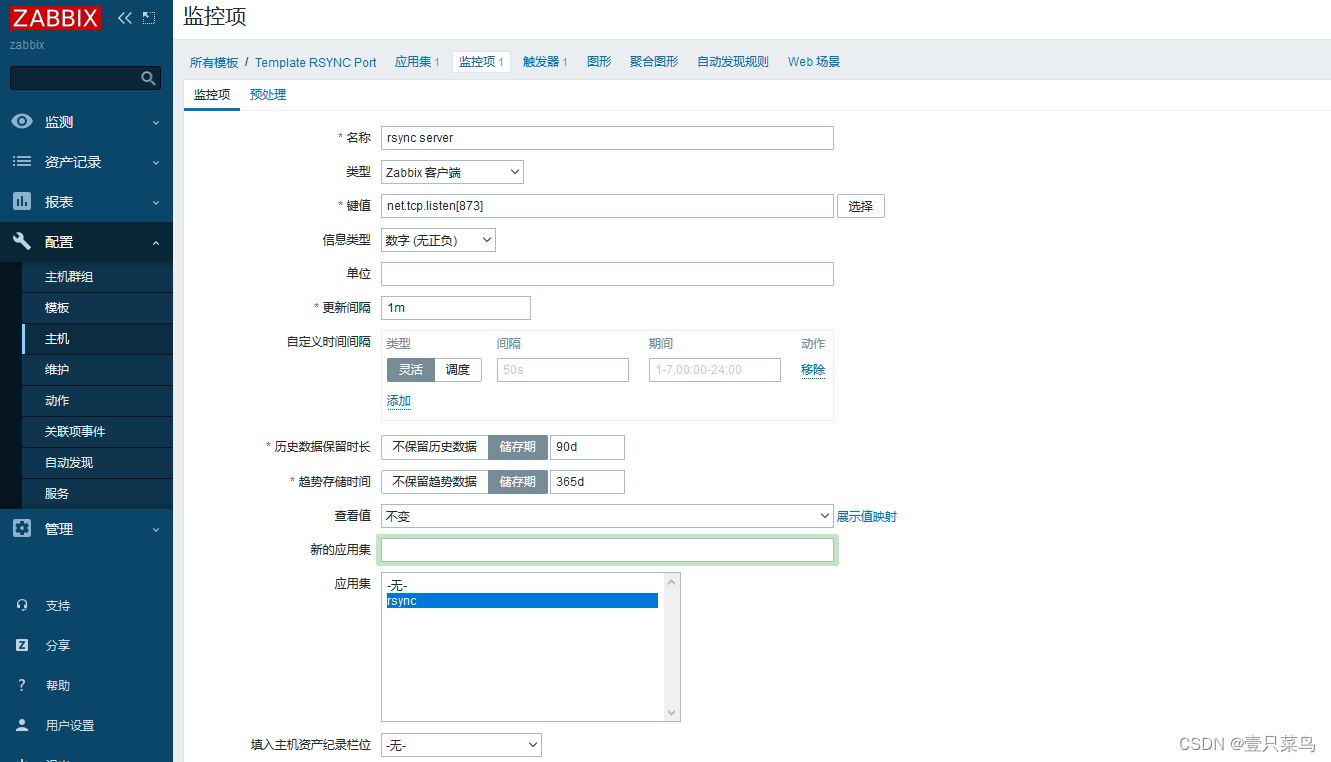
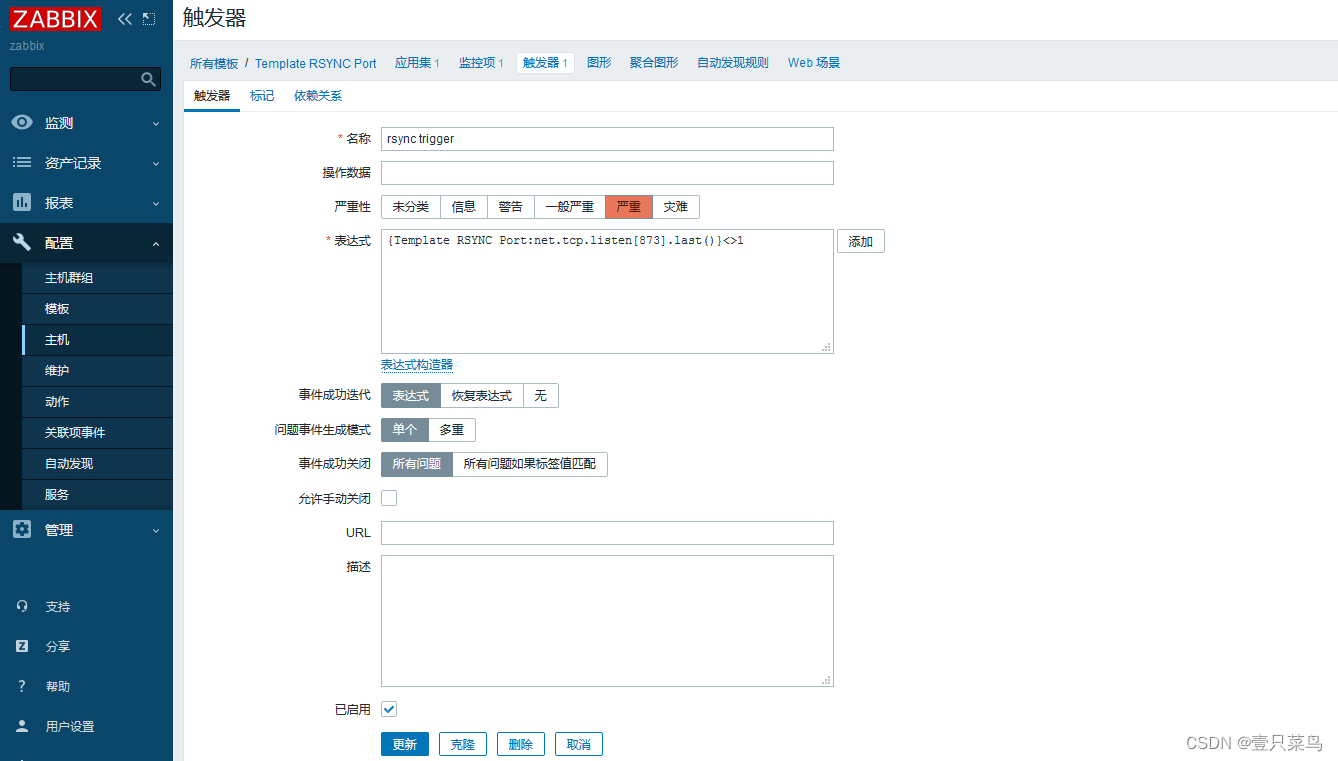
4. 添加触发器
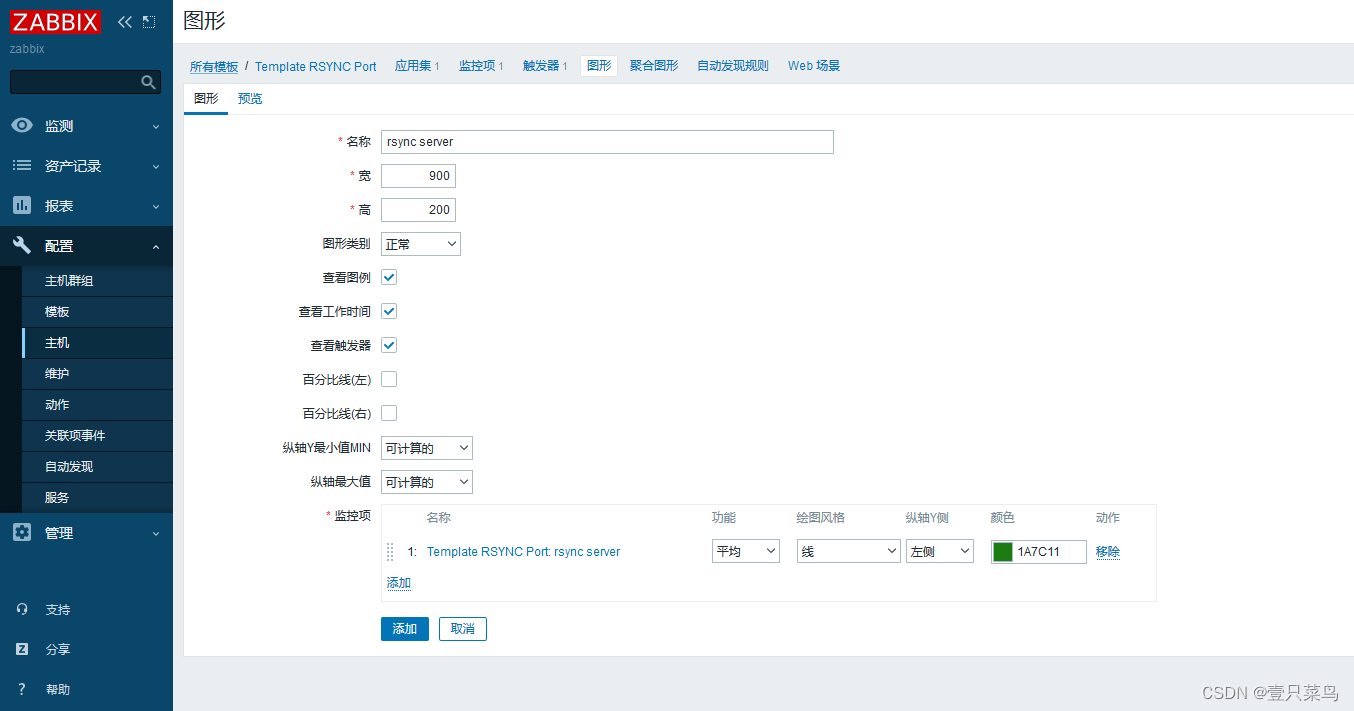
5. 添加图形
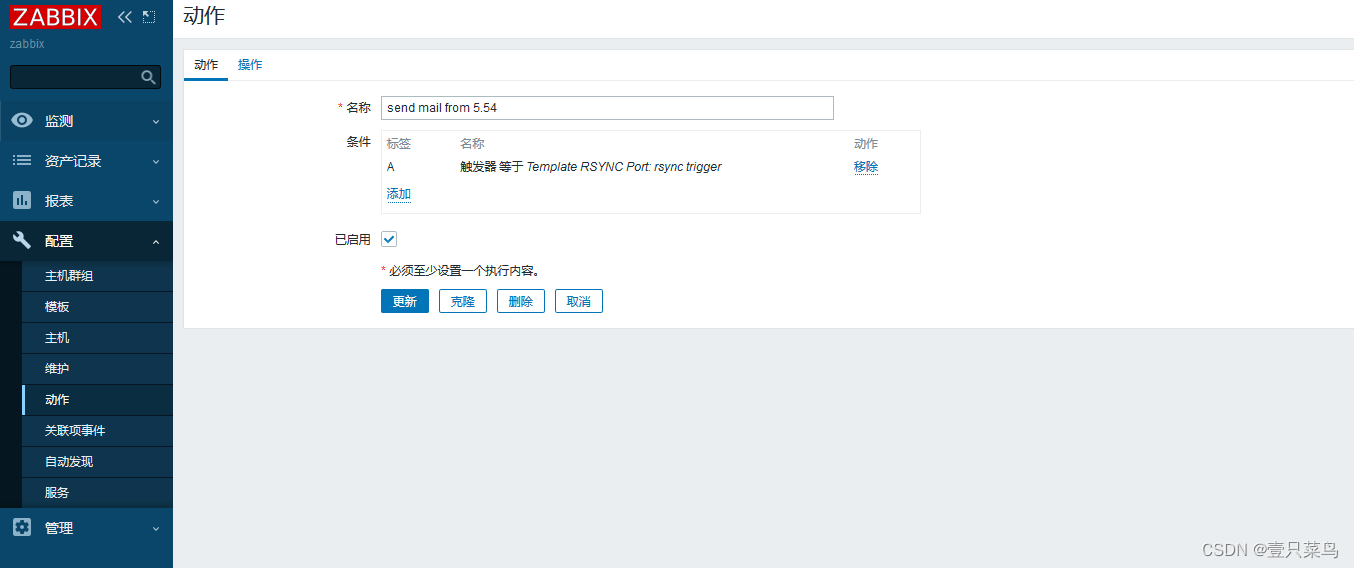
6. 添加触发器动作

7. 添加报警媒介
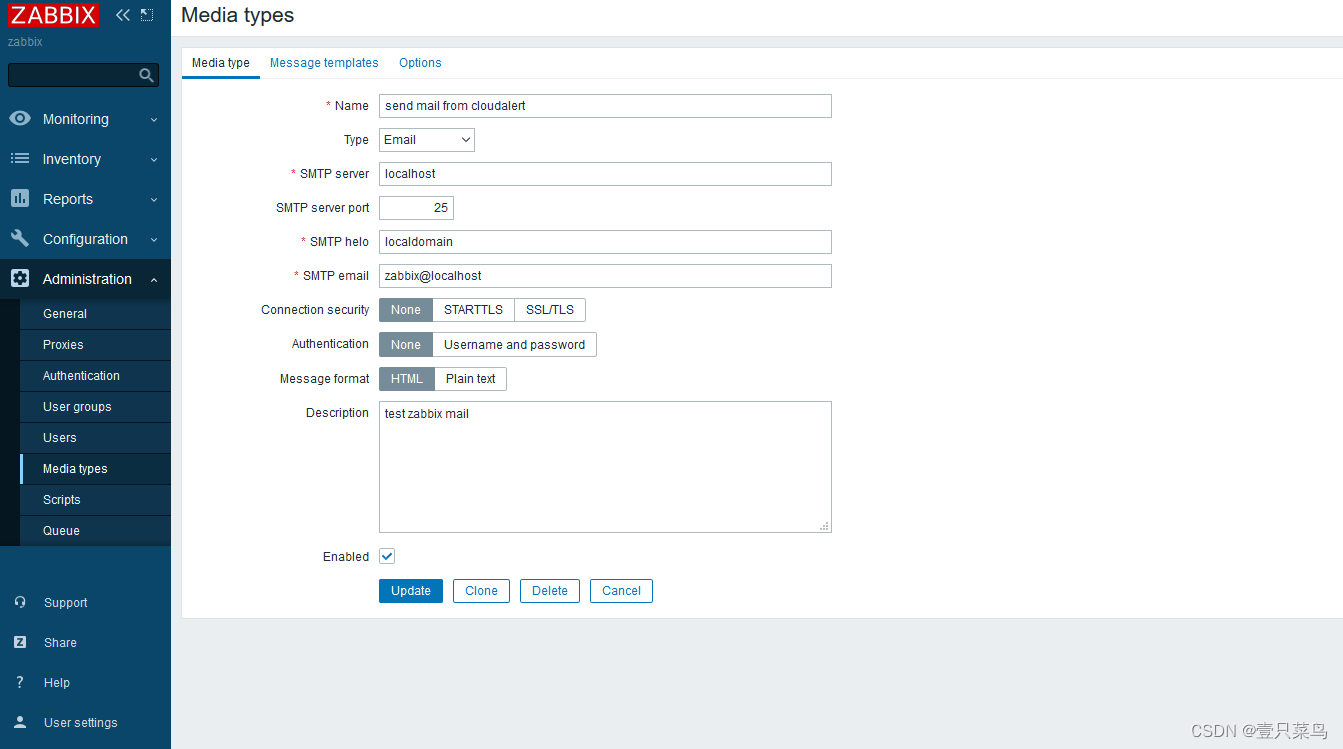
① Media type设置

	Name:报警媒介名称,自定义
	SMTP server:邮箱服务器IP或域名
	SMTP server port:邮箱非加密监听端口
	SMTP helo:邮箱服务器域名
	SMTP email:发件账号
② Message templates设置
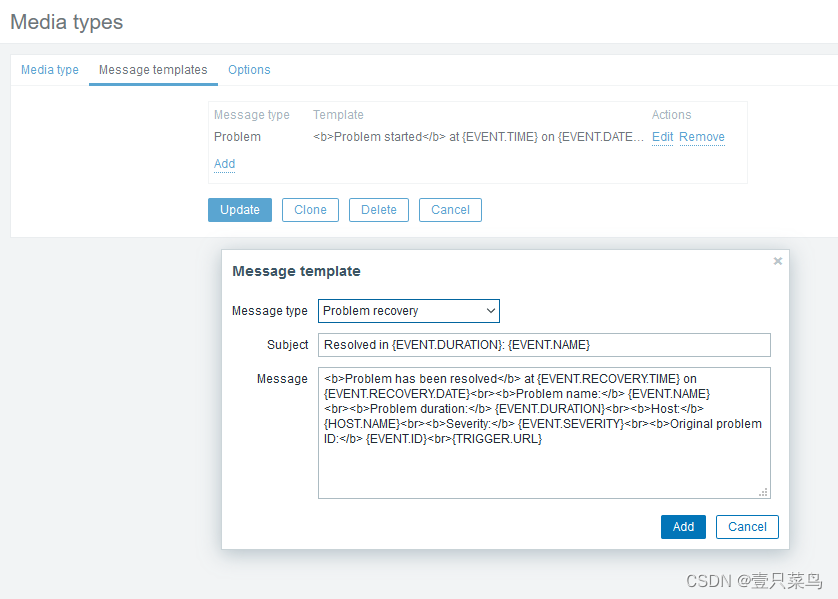
添加Message type:Problem和Problem recovery
使用默认配置
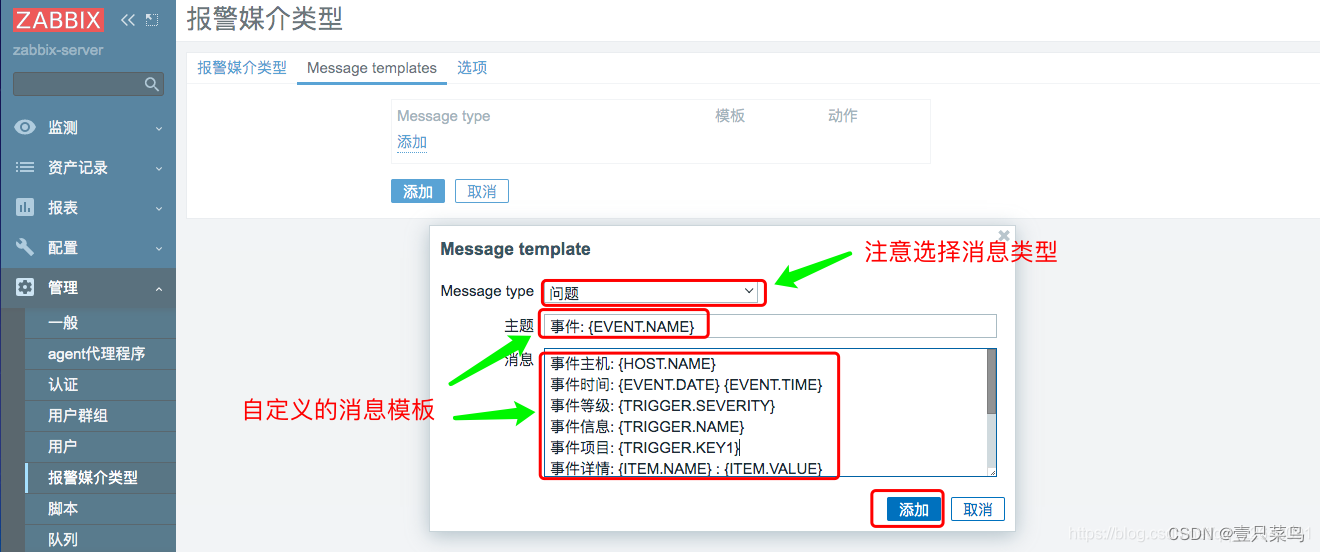
也可以自定义:
事件: {EVENT.NAME}

事件主机: {HOST.NAME}
事件时间: {EVENT.DATE} {EVENT.TIME}
事件等级: {TRIGGER.SEVERITY}
事件信息: {TRIGGER.NAME}
事件项目: {TRIGGER.KEY1}
事件详情: {ITEM.NAME} : {ITEM.VALUE}
当前状态: {TRIGGER.STATUS} : {ITEM.VALUE1}
事件ID:  {EVENT.ID}
操作数据: {EVENT.OPDATA}
{TRIGGER.URL}
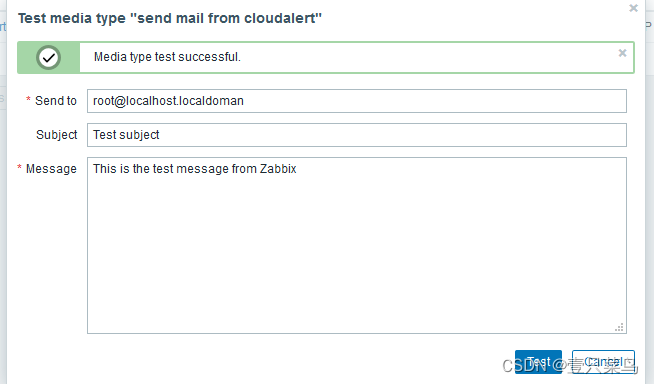
③ 创建完成,进行测试
点Test

④ 查看邮件
[root@dbc-server-554 bin]# mail
Heirloom Mail version 12.5 7/5/10.  Type ? for help.
"/var/spool/mail/root": 8 messages 8 new
...
 N  8 zabbix@localhost.loc  Wed Feb 15 09:23  19/833   "Test subject"
& 8
Message  8:
From zabbix@localhost.localdomain  Wed Feb 15 09:23:04 2023
Return-Path: <zabbix@localhost.localdomain>
X-Original-To: root@localhost.localdomain
Delivered-To: root@localhost.localdomain
From: <zabbix@localhost.localdomain>
To: <root@localhost.localdomain>
Date: Wed, 15 Feb 2023 09:23:04 +0800
Subject: Test subject
Content-Type: text/html; charset="UTF-8"
Status: R

This is the test message from Zabbix&
& q
Held 8 messages in /var/spool/mail/root
You have mail in /var/spool/mail/root
备份服务器监控创建完成,本节再次详细的介绍创建过程,后续的监控则会简要介绍创建流程
4.4.3 监控NFS服务器
使用 proc.num[<name>,<user>,<state>,<cmdline>] 键值,检测nfs进程的数量
在服务端进行测试
[root@dbc-server-554 new]# zabbix_get -s 192.168.71.253 -p 10050 -k "proc.num[,,,rpc]"
4
[root@dbc-server-554 new]# zabbix_get -s 192.168.71.253 -p 10050 -k "proc.num[nfsd,,,]"
8
创建nfs监控模板
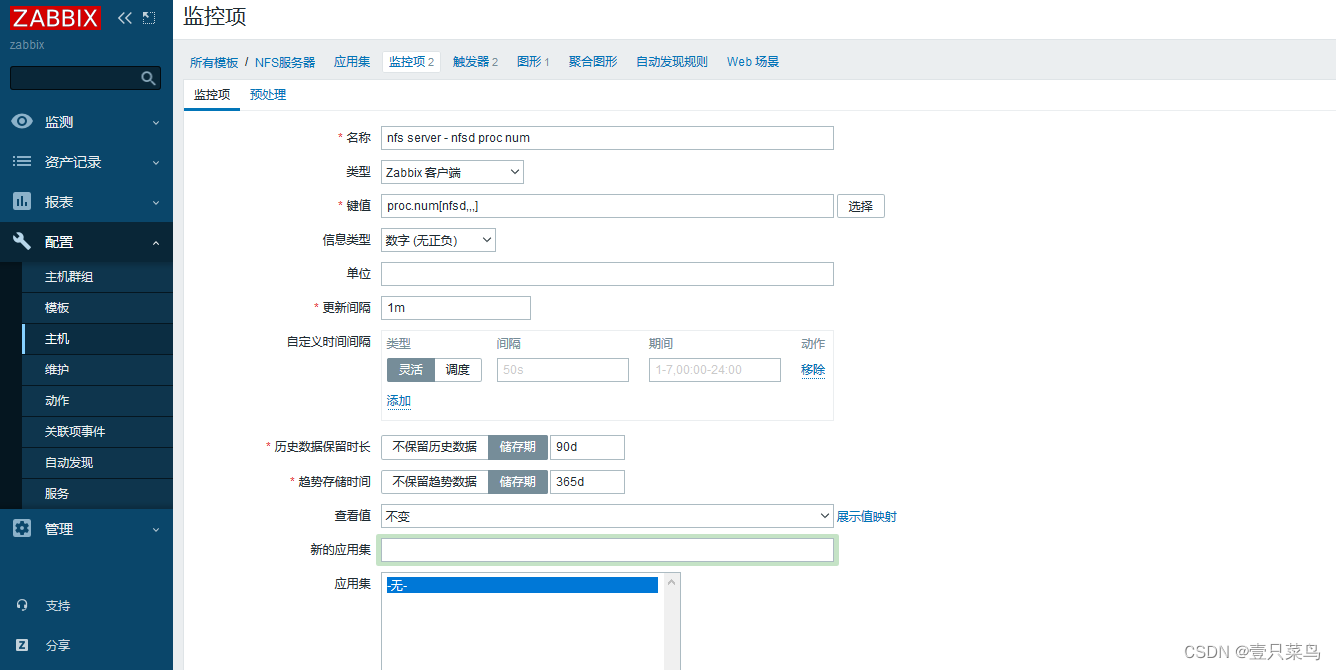
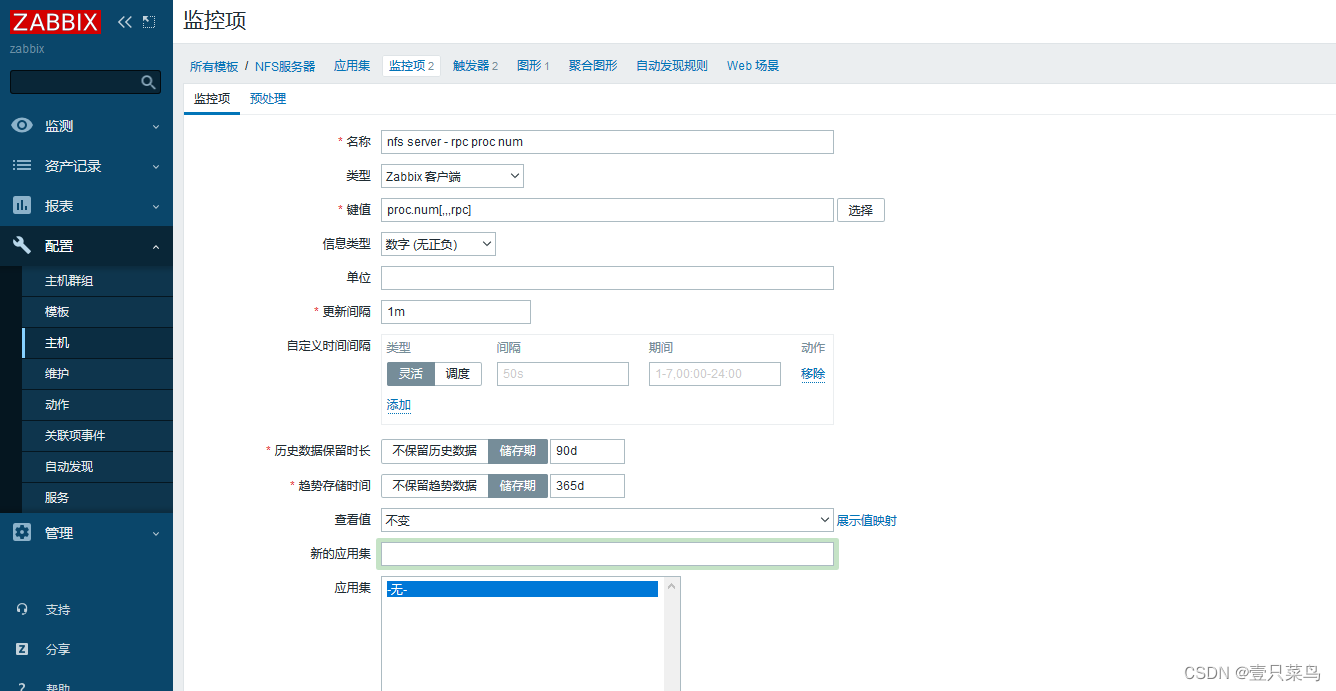
绑定到主机

4.4.4 监控MySQL服务器
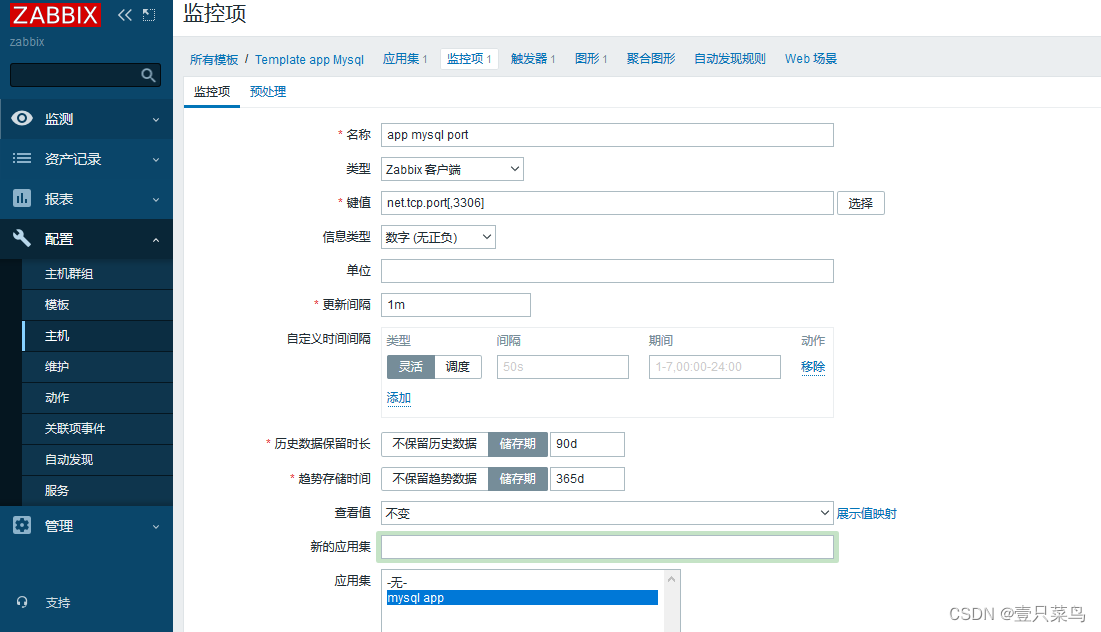
使用系统自带模板 net.tcp.port[<ip>,port] 利用自带的监控端口键值进行监控
在服务端进行测试
[root@dbc-server-554 new]# zabbix_get -s 192.168.71.183 -p 10050 -k "net.tcp.port[,3306]"
1

#检查是否能建立 TCP 连接到指定端口。返回 0 - 不能连接;1 - 可以连接

4.4.5 监控web服务器
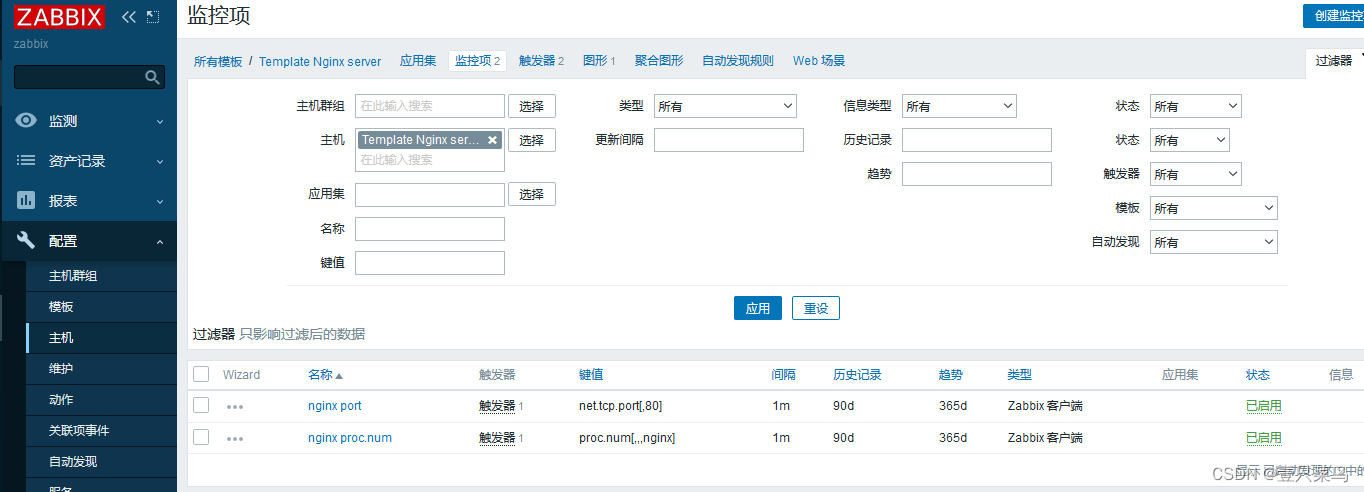
创建监控模板 监控 nginx服务与 80 端口
proc.num[,,,] 进程数。返回整数
net.tcp.port[,port] 检查是否能建立 TCP 连接到指定端口。返回 0 - 不能连接;1 - 可以连接
[root@dbc-server-554 new]# zabbix_get -s 192.168.71.183 -p 10050 -k "proc.num[,,,nginx]"
3
[root@dbc-server-554 new]# zabbix_get -s 192.168.71.183 -p 10050 -k "net.tcp.port[,80]"
1

4.4.6 监控URL地址
在两台服务器分别创建监测页面
cd /usr/share/nginx/html/
echo ok > check.html
测试监控面页
[root@dbc-server-554 new]# curl 192.168.71.183/check.html
ok
[root@dbc-server-554 new]# curl 192.168.71.253/check.html
ok
创建web监测模板
① 创建应用集

② 创建Web场景
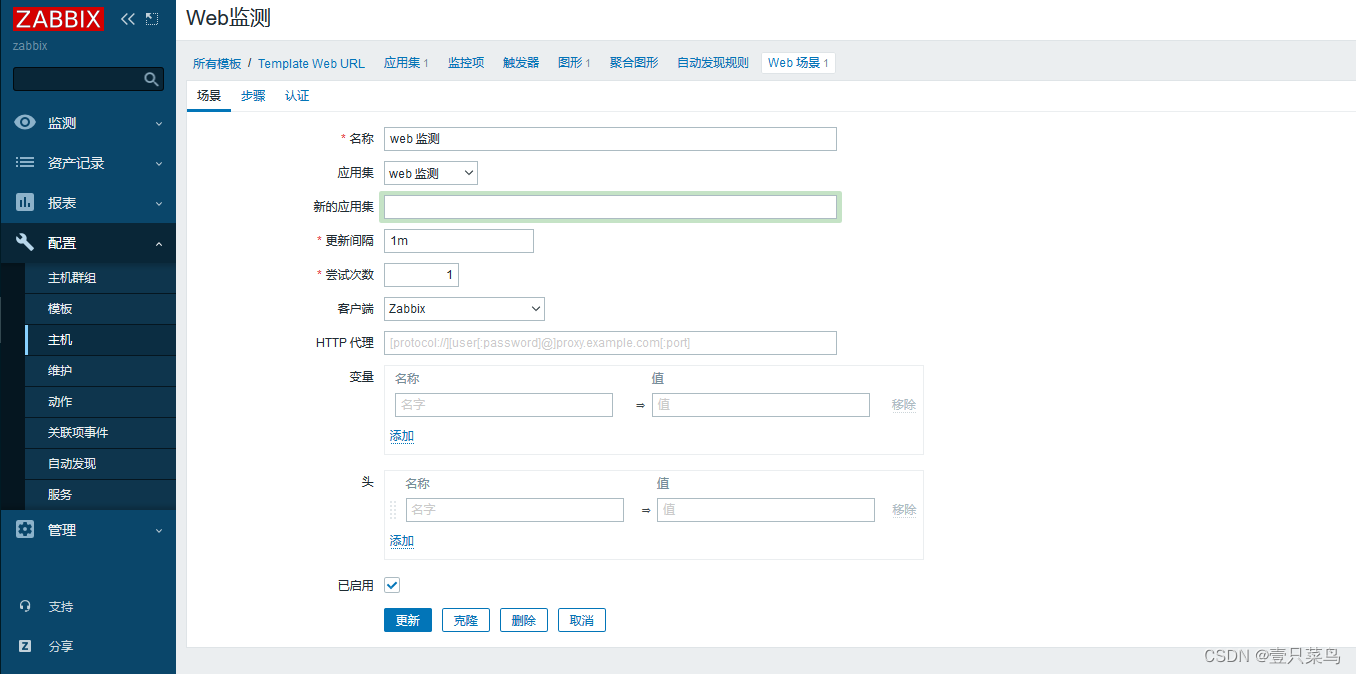
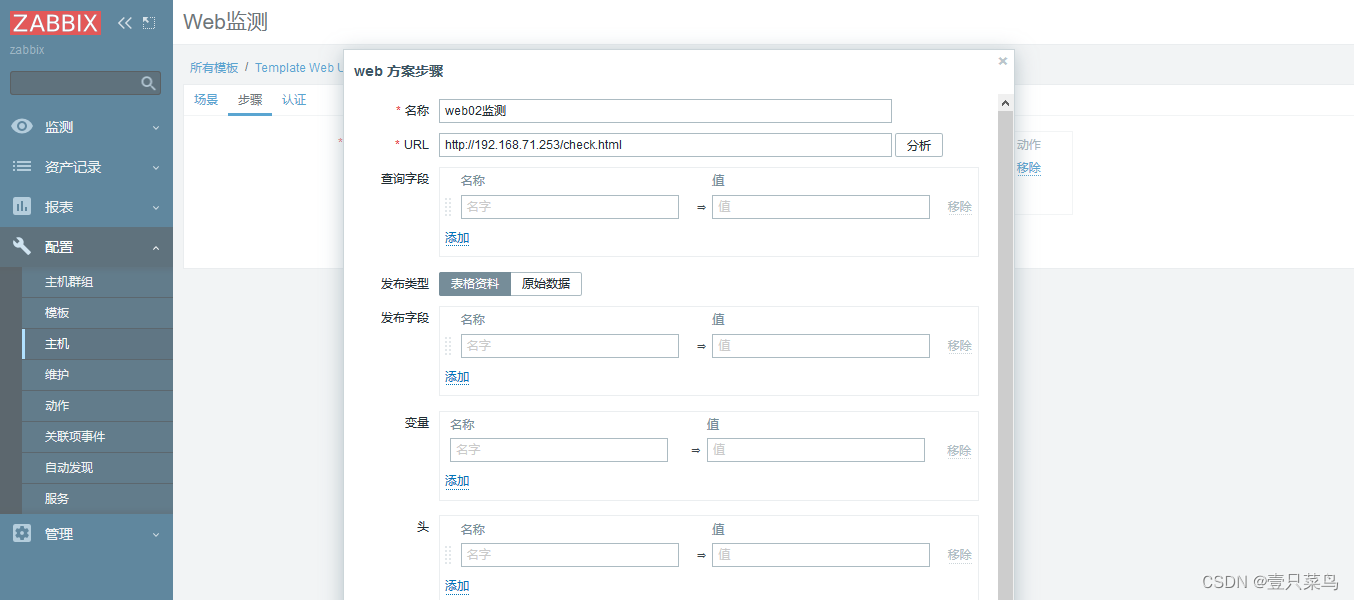
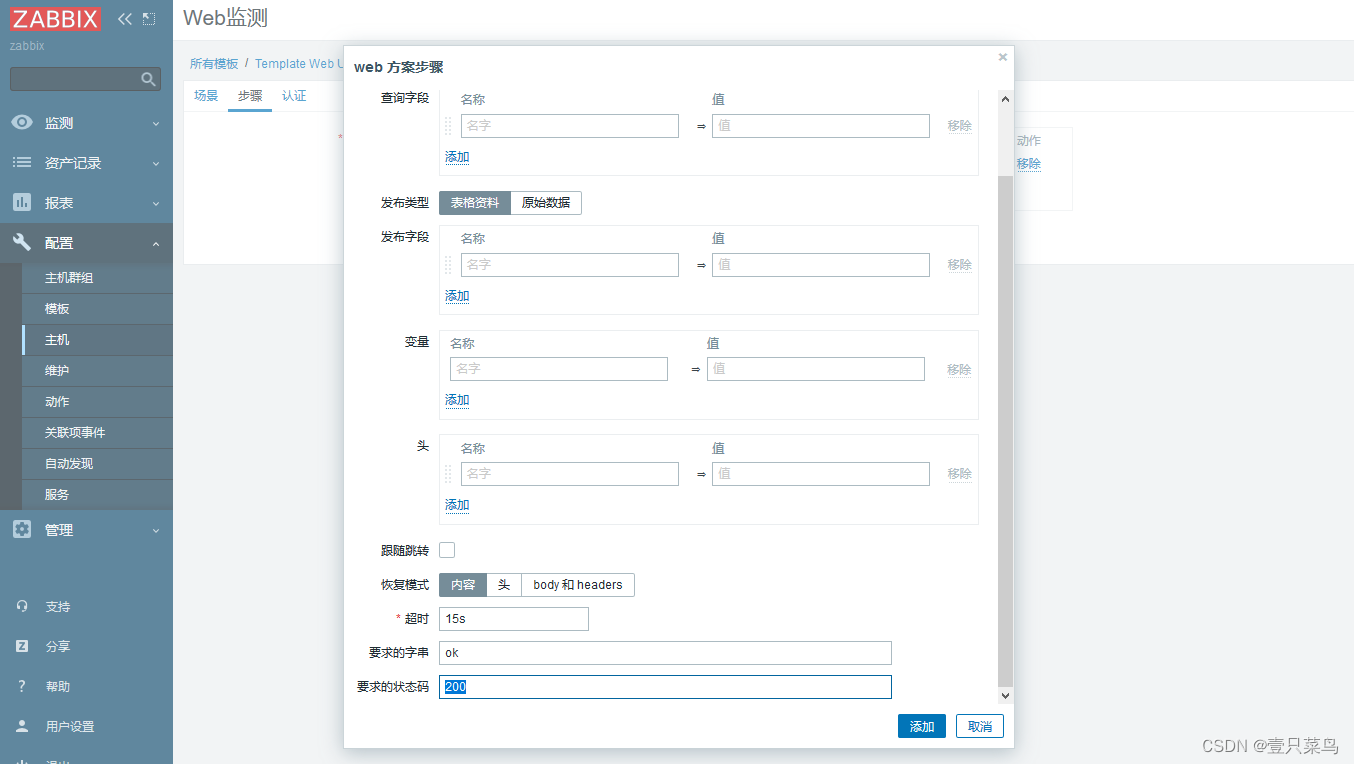
③ 创建图形
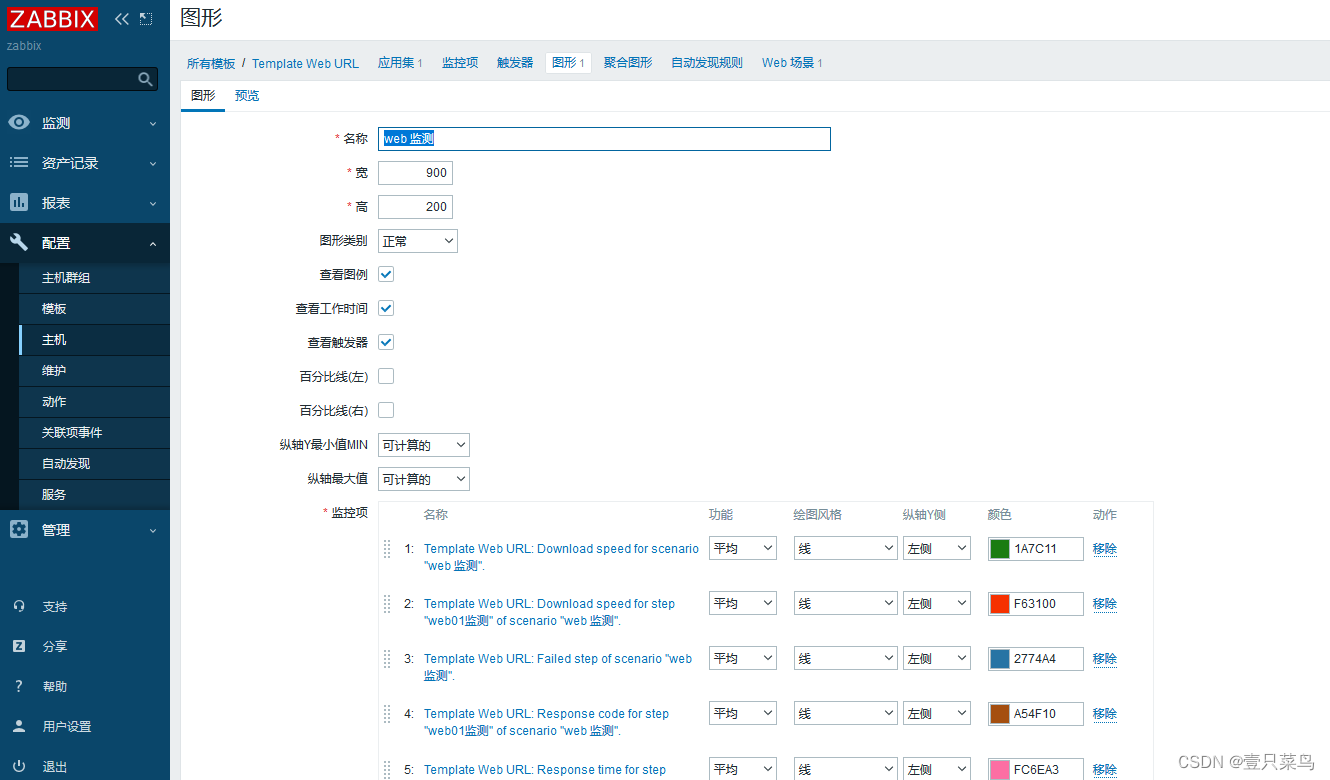
④ 将模板关联到主机
⑤ 监测结果
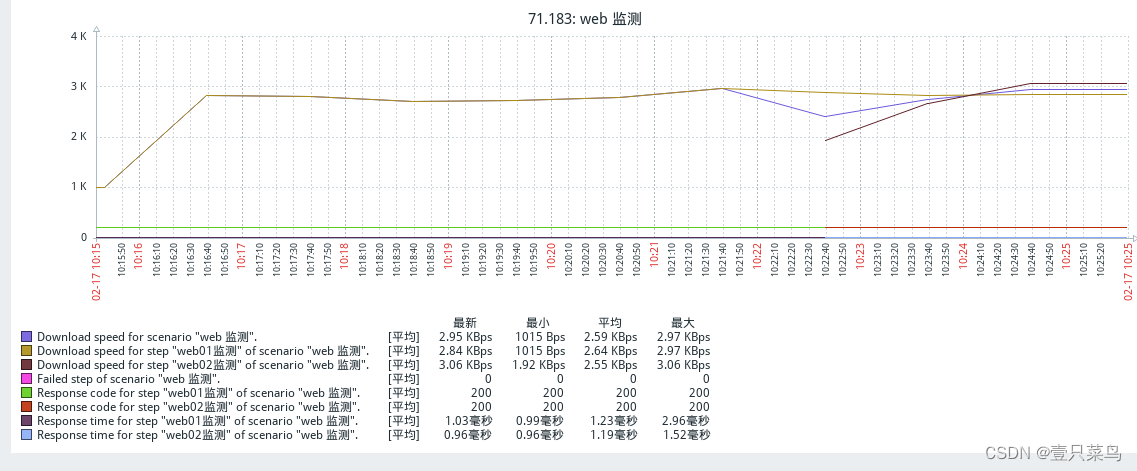
4.4.7 监控反向代理服务器
创建自定义key
[root@lb01 ~]# cat  /etc/zabbix/zabbix_agentd.d/userparameter_nk.conf
UserParameter=keep-ip,ip a |grep 192.168.71.253|wc -l
在服务端测试
[root@dbc-server-554 new]# zabbix_get -s 192.168.71.253  -p 10050 -k "keep-ip"
1
[root@dbc-server-554 new]# zabbix_get -s 192.168.71.183  -p 10050 -k "keep-ip"
ZBX_NOTSUPPORTED: Unsupported item key.
创建模板

关联到主机

4.4.8 监控Nginx的7种连接状态
服务器设置:
① 客户端(nginx服务器)设置:显示status
[root@k8s-node-02 html]# cat /etc/nginx/nginx.conf
...
    server {
        listen       80;
        listen       [::]:80;
        server_name  _;
        root         /usr/share/nginx/html;
        # Load configuration files for the default server block.
        include /etc/nginx/default.d/*.conf;

        location /status {
                stub_status on;
                access_log off;
        }
[root@k8s-node-02 html]# systemctl restart nginx
② 服务器测试
[root@dbc-server-554 new]# curl 192.168.71.183/status
Active connections: 1
server accepts handled requests
 2 2 2
Reading: 0 Writing: 1 Waiting: 0
③ 在nginx服务器上添加key
cat >/etc/zabbix/zabbix_agentd.d/userparameter_nginx_status.conf <<'EOF'
UserParameter=nginx_active,curl -s  127.0.0.1/status|awk '/Active/ {print $NF}'
UserParameter=nginx_accepts,curl -s  127.0.0.1/status|awk 'NR==3 {print $1}'
UserParameter=nginx_handled,curl -s  127.0.0.1/status|awk 'NR==3 {print $2}'
UserParameter=nginx_requests,curl -s  127.0.0.1/status|awk 'NR==3 {print $3}'
UserParameter=nginx_reading,curl -s  127.0.0.1/status|awk 'NR==4 {print $2}'
UserParameter=nginx_writing,curl -s  127.0.0.1/status|awk 'NR==4 {print $4}'
UserParameter=nginx_waiting,curl -s  127.0.0.1/status|awk 'NR==4 {print $6}'
EOF
systemctl restart zabbix-agent
④ 服务端测试
[root@dbc-server-554 new]# zabbix_get -s 192.168.71.183  -p 10050 -k "nginx_waiting"
0
[root@dbc-server-554 new]# zabbix_get -s 192.168.71.183  -p 10050 -k "nginx_handled"
34
zabbix创建模板:
使用key创建监控项
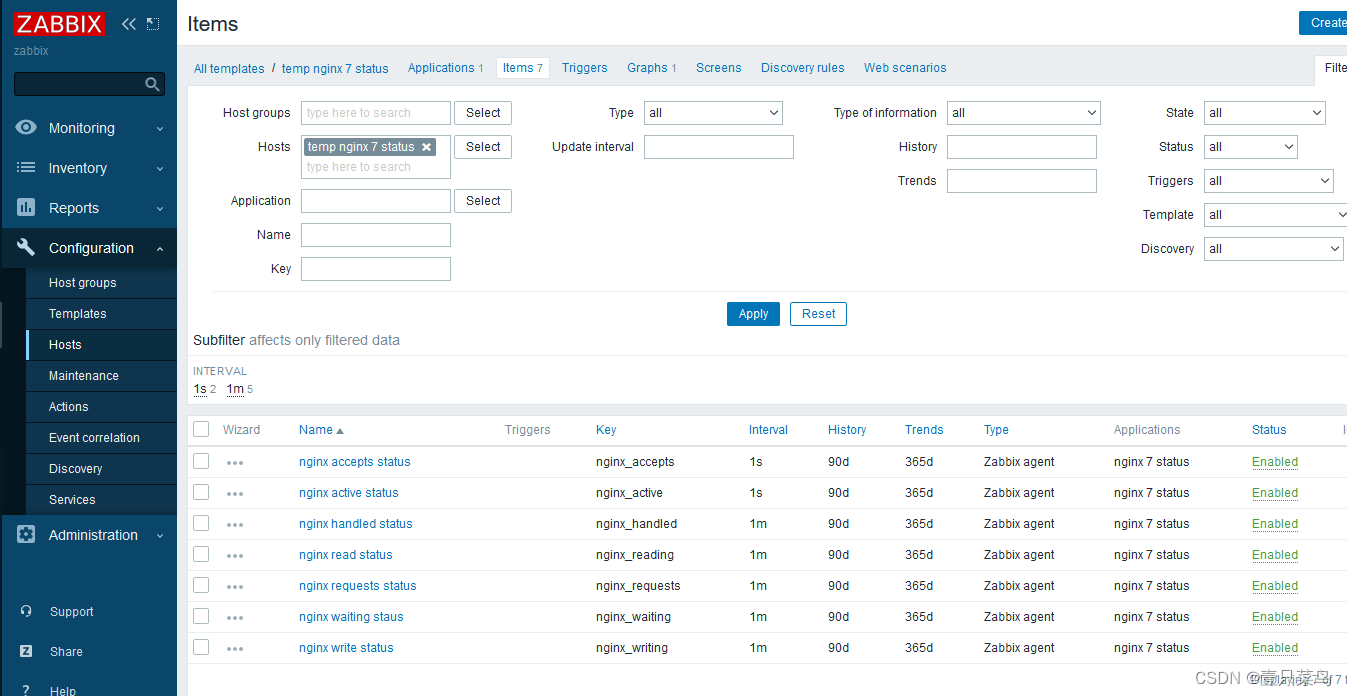
关联到主机


