案例
- 本文利用natty-all-source 包下的的demo案例 echo来分析下源码,代码如下:
- server 端代码
/**
 * Echoes back any received data from a client.
 */
public final class EchoServer {

    static final boolean SSL = System.getProperty("ssl") != null;
    static final int PORT = Integer.parseInt(System.getProperty("port", "8007"));

    public static void main(String[] args) throws Exception {
        // Configure SSL.
        final SslContext sslCtx;
        if (SSL) {
            SelfSignedCertificate ssc = new SelfSignedCertificate();
            sslCtx = SslContextBuilder.forServer(ssc.certificate(), ssc.privateKey()).build();
        } else {
            sslCtx = null;
        }

        // Configure the server.
        EventLoopGroup bossGroup = new NioEventLoopGroup(1);
        EventLoopGroup workerGroup = new NioEventLoopGroup();
        try {
            ServerBootstrap b = new ServerBootstrap();
            b.group(bossGroup, workerGroup)
             .channel(NioServerSocketChannel.class)
             .option(ChannelOption.SO_BACKLOG, 100)
             .handler(new LoggingHandler(LogLevel.INFO))
             .childHandler(new ChannelInitializer<SocketChannel>() {
                 @Override
                 public void initChannel(SocketChannel ch) throws Exception {
                     ChannelPipeline p = ch.pipeline();
                     if (sslCtx != null) {
                         p.addLast(sslCtx.newHandler(ch.alloc()));
                     }
                     //p.addLast(new LoggingHandler(LogLevel.INFO));
                     p.addLast(new EchoServerHandler());
                 }
             });

            // Start the server.
            ChannelFuture f = b.bind(PORT).sync();

            // Wait until the server socket is closed.
            f.channel().closeFuture().sync();
        } finally {
            // Shut down all event loops to terminate all threads.
            bossGroup.shutdownGracefully();
            workerGroup.shutdownGracefully();
        }
    }
}

/**
 * Handler implementation for the echo server.
 */
@Sharable
public class EchoServerHandler extends ChannelInboundHandlerAdapter {

    @Override
    public void channelRead(ChannelHandlerContext ctx, Object msg) {
        System.out.println("server msg:" + msg);
        ctx.write(msg);
    }

    @Override
    public void channelReadComplete(ChannelHandlerContext ctx) {
        ctx.flush();
    }

    @Override
    public void exceptionCaught(ChannelHandlerContext ctx, Throwable cause) {
        // Close the connection when an exception is raised.
        cause.printStackTrace();
        ctx.close();
    }
}
- client 端代码
/**
 * Sends one message when a connection is open and echoes back any received
 * data to the server.  Simply put, the echo client initiates the ping-pong
 * traffic between the echo client and server by sending the first message to
 * the server.
 */
public final class EchoClient {

    static final boolean SSL = System.getProperty("ssl") != null;
    static final String HOST = System.getProperty("host", "127.0.0.1");
    static final int PORT = Integer.parseInt(System.getProperty("port", "8007"));
    static final int SIZE = Integer.parseInt(System.getProperty("size", "256"));

    public static void main(String[] args) throws Exception {
        // Configure SSL.git
        final SslContext sslCtx;
        if (SSL) {
            sslCtx = SslContextBuilder.forClient()
                .trustManager(InsecureTrustManagerFactory.INSTANCE).build();
        } else {
            sslCtx = null;
        }

        // Configure the client.
        EventLoopGroup group = new NioEventLoopGroup();
        try {
            Bootstrap b = new Bootstrap();
            b.group(group)
             .channel(NioSocketChannel.class)
             .option(ChannelOption.TCP_NODELAY, true)
             .handler(new ChannelInitializer<SocketChannel>() {
                 @Override
                 public void initChannel(SocketChannel ch) throws Exception {
                     ChannelPipeline p = ch.pipeline();
                     if (sslCtx != null) {
                         p.addLast(sslCtx.newHandler(ch.alloc(), HOST, PORT));
                     }
                     //p.addLast(new LoggingHandler(LogLevel.INFO));
                     p.addLast(new EchoClientHandler());
                 }
             });

            // Start the client.
            ChannelFuture f = b.connect(HOST, PORT).sync();

            // Wait until the connection is closed.
            f.channel().closeFuture().sync();
        } finally {
            // Shut down the event loop to terminate all threads.
            group.shutdownGracefully();
        }
    }
}

/**
 * Handler implementation for the echo client.  It initiates the ping-pong
 * traffic between the echo client and server by sending the first message to
 * the server.
 */
public class EchoClientHandler extends ChannelInboundHandlerAdapter {

    private final ByteBuf firstMessage;

    /**
     * Creates a client-side handler.
     */
    public EchoClientHandler() {
        firstMessage = Unpooled.buffer(EchoClient.SIZE);
        for (int i = 0; i < firstMessage.capacity(); i ++) {
            firstMessage.writeByte((byte) i);
        }
    }

    @Override
    public void channelActive(ChannelHandlerContext ctx) {
        ctx.writeAndFlush(firstMessage);
    }

    @Override
    public void channelRead(ChannelHandlerContext ctx, Object msg) {
        System.out.println("msg:" + msg);
        ctx.write(msg);
    }

    @Override
    public void channelReadComplete(ChannelHandlerContext ctx) {
       ctx.flush();
    }

    @Override
    public void exceptionCaught(ChannelHandlerContext ctx, Throwable cause) {
        // Close the connection when an exception is raised.
        cause.printStackTrace();
        ctx.close();
    }
}
- 源码之前,我们先看下代码的流程,我们用一下图来说明Netty的一个基本流程,理解流程后我们可以更好的理解他的实现流程,如下:

源码剖析
- 首先看server启动类,首先创建了关于SSL的配置类,重点分析下创建的两个EventLoopGroup对象:
        // Configure the server.
        EventLoopGroup bossGroup = new NioEventLoopGroup(1);
        EventLoopGroup workerGroup = new NioEventLoopGroup();
- 这两个对象是整个Netty的核心对象,可以说整个Netty的运作都依赖于他们。boosGroup用于接受TCP请求,他会将请求交给workerGroup,workerGroup会获取真正的连接,然后与连接进行通信,比如读写编码解码等操作。
- 线通过NioEventLoopGroup对象的初始化来分析这辆对象内部实现。如下源码
 /**
     * @see MultithreadEventExecutorGroup#MultithreadEventExecutorGroup(int, Executor, Object...)
     */
    protected MultithreadEventLoopGroup(int nThreads, Executor executor, Object... args) {
        super(nThreads == 0 ? DEFAULT_EVENT_LOOP_THREADS : nThreads, executor, args);
    }
- 在bossGroup中参数1,workerGroup中参数是空,如上当nTHread==0 时候,我们给顶的线程数是DEFAULT。在来看这个默认值是多少:
private static final int DEFAULT_EVENT_LOOP_THREADS;

    static {
        DEFAULT_EVENT_LOOP_THREADS = Math.max(1, SystemPropertyUtil.getInt(
                "io.netty.eventLoopThreads", NettyRuntime.availableProcessors() * 2));

        if (logger.isDebugEnabled()) {
            logger.debug("-Dio.netty.eventLoopThreads: {}", DEFAULT_EVENT_LOOP_THREADS);
        }
    }
- 入上源码中,NettyRuntime.availableProcessors() 是获取操作系统中可用的核心数量,那么最终的值是CPU * 2,我们debug验证以是否正确:
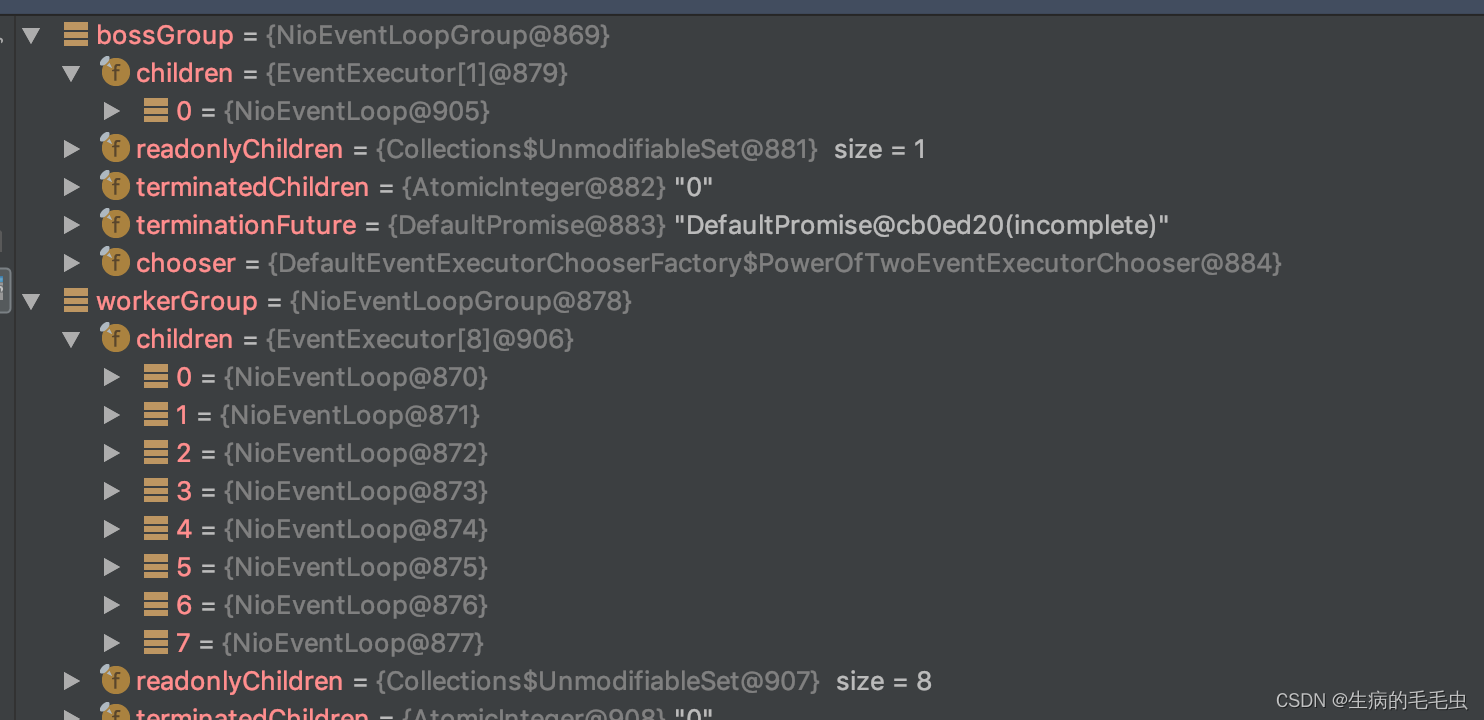
- 如上可看到,因为我们是4核处理器,workerGroup中的线程个数是4*2=8个
 /**
     * Create a new instance.
     *
     * @param nThreads          the number of threads that will be used by this instance.
     * @param executor          the Executor to use, or {@code null} if the default should be used.
     * @param chooserFactory    the {@link EventExecutorChooserFactory} to use.
     * @param args              arguments which will passed to each {@link #newChild(Executor, Object...)} call
     */
    protected MultithreadEventExecutorGroup(int nThreads, Executor executor,
                                            EventExecutorChooserFactory chooserFactory, Object... args) {
        if (nThreads <= 0) {
            throw new IllegalArgumentException(String.format("nThreads: %d (expected: > 0)", nThreads));
        }

        if (executor == null) {
            executor = new ThreadPerTaskExecutor(newDefaultThreadFactory());
        }

        children = new EventExecutor[nThreads];

        for (int i = 0; i < nThreads; i ++) {
            boolean success = false;
            try {
            //创建new NioEventLoop
                children[i] = newChild(executor, args);
                success = true;
            } catch (Exception e) {
                // TODO: Think about if this is a good exception type
                throw new IllegalStateException("failed to create a child event loop", e);
            } finally {
            // 如果创建失败,优雅关闭
                if (!success) {
                    for (int j = 0; j < i; j ++) {
                        children[j].shutdownGracefully();
                    }

                    for (int j = 0; j < i; j ++) {
                        EventExecutor e = children[j];
                        try {
                            while (!e.isTerminated()) {
                                e.awaitTermination(Integer.MAX_VALUE, TimeUnit.SECONDS);
                            }
                        } catch (InterruptedException interrupted) {
                            // Let the caller handle the interruption.
                            Thread.currentThread().interrupt();
                            break;
                        }
                    }
                }
            }
        }

        chooser = chooserFactory.newChooser(children);

        final FutureListener<Object> terminationListener = new FutureListener<Object>() {
            @Override
            public void operationComplete(Future<Object> future) throws Exception {
                if (terminatedChildren.incrementAndGet() == children.length) {
                    terminationFuture.setSuccess(null);
                }
            }
        };

        for (EventExecutor e: children) {
            e.terminationFuture().addListener(terminationListener);
        }

        Set<EventExecutor> childrenSet = new LinkedHashSet<EventExecutor>(children.length);
        Collections.addAll(childrenSet, children);
        readonlyChildren = Collections.unmodifiableSet(childrenSet);
    }
- 最终追踪到源码抽象类MultithreadEventExecutorGroup 的构造方法,MultithreadEventExecutorGroup 才是NioEventLoopGroup真正的初始化,这辆可以看出是一个模板方法,使用了设计模式的模板模式
- 在MultithreadEventExecutorGroup 的父类中AbstractEventExecutorGroup 定义了初始化需要 的一些固定流程,MultithreadEventExecutorGroup方法选择自己需要的方法去实现,这种设计模式就是模板模式
分析MultithreadEventExecutorGroup
- nThread:参数 使用的线程数,默认是core * 2(上面已经分析过)
- executor:执行器:如果传入null,那么会使用Netty默认的ThreadPerTaskExecutor
- chooserFactory :单例 new DefaultEventExecutorChooserFactory
- args:在创建执行器的时候传入的固定参数
children = new EventExecutor[nThreads];
- 如上按线程数量来初始化一个EventExxecutor数组,接着
//创建new NioEventLoop
                children[i] = newChild(executor, args);
                //newChild源码
                @Override
    protected EventLoop newChild(Executor executor, Object... args) throws Exception {
        EventLoopTaskQueueFactory queueFactory = args.length == 4 ? (EventLoopTaskQueueFactory) args[3] : null;
        return new NioEventLoop(this, executor, (SelectorProvider) args[0],
            ((SelectStrategyFactory) args[1]).newSelectStrategy(), (RejectedExecutionHandler) args[2], queueFactory);
    }
-
每个元素的类型给赋值了一个EventLoop,也就是我们的NioEventLoopGroup中是一个NioEventLoop的一个事件循环数组,包含了多个EventLoop,这个可以注册channel,用于在事件循环中去进行选择
-
对于NioEventLoopGroup的初始化总结来说如下:
- 如果executor是null,默认创建一个ThreadPerTaskExecutor,使用Netty默认的线程工厂
- 根据传入的线程数(CPU * 2)创建一个线程池数组
- 循环给数组赋值NioEventLoop。如果异常,则关闭所有单例线程池
- 根据线程选择工厂创建一个线程选择器 chooser = chooserFactory.newChooser(children);
- NioEventLoop 是SingleThreadEventLoop 的子类,也就是单例线程池,接着循环对child中的NioEventLoop添加一个关闭监听器
- 将所有单例线程池NioEventLoop添加到LinkedHashSet 中
ServerBootStrap创建和构造过程
- ServerBootStrap 是一个空构造方法,但是有默认的成员变量,部分代码如下
  // The order in which child ChannelOptions are applied is important they may depend on each other for validation
    // purposes.
    private final Map<ChannelOption<?>, Object> childOptions = new LinkedHashMap<ChannelOption<?>, Object>();
    private final Map<AttributeKey<?>, Object> childAttrs = new ConcurrentHashMap<AttributeKey<?>, Object>();
    private final ServerBootstrapConfig config = new ServerBootstrapConfig(this);
    private volatile EventLoopGroup childGroup;
    private volatile ChannelHandler childHandler;

 // 空构造
    public ServerBootstrap() { }
- 分析demo中ServerBootStrap使用情况
 ServerBootstrap b = new ServerBootstrap();
            b.group(bossGroup, workerGroup)
             .channel(NioServerSocketChannel.class)
             .option(ChannelOption.SO_BACKLOG, 100)
             .handler(new LoggingHandler(LogLevel.INFO))
             .childHandler(new ChannelInitializer<SocketChannel>() {
                 @Override
                 public void initChannel(SocketChannel ch) throws Exception {
                     ChannelPipeline p = ch.pipeline();
                     if (sslCtx != null) {
                         p.addLast(sslCtx.newHandler(ch.alloc()));
                     }
                     //p.addLast(new LoggingHandler(LogLevel.INFO));
                     p.addLast(new EchoServerHandler());
                 }
             });
- 链式调用:group方法,将上一步骤中的两个NioEventLoopGroup,bossGroup赋值给parentGroup属性,workerGroup赋值给childGroup属性
- channel方法传入NioServerSocketChannel 的class对象,会根据class对象利用反射机制创建一个NioServerSocketChannel
- option方法传入TCP参数,放在一个LinkHashMap中
- handler方法传入一个LoggingHandler,这个handler只专属于ServerSocketChannel 而不是SocketChannel
- childHandler传入一个handler,这个handler将会在每个客户端连接时候调用。共SockerChannel使用
最终版定端口分析
- 服务端版定端口代码如下:
 // Start the server.
 ChannelFuture f = b.bind(PORT).sync();
 //最终调用
  /**
     * Create a new {@link Channel} and bind it.
     */
    public ChannelFuture bind(SocketAddress localAddress) {
        validate();
        return doBind(ObjectUtil.checkNotNull(localAddress, "localAddress"));
    }
- 如上,线做了部分空判断,核心代码是doBind方法
- doBind代码的核心源码如下,其中最重要的两个方法是InitAndRegister,doBind0
private ChannelFuture doBind(final SocketAddress localAddress) {
        final ChannelFuture regFuture = initAndRegister();
        final Channel channel = regFuture.channel();
        if (regFuture.cause() != null) {
            return regFuture;
        }
        if (regFuture.isDone()) {
            // At this point we know that the registration was complete and successful.
            ChannelPromise promise = channel.newPromise();
            doBind0(regFuture, channel, localAddress, promise);
            return promise;
        } else {
            // Registration future is almost always fulfilled already, but just in case it's not.
            final PendingRegistrationPromise promise = new PendingRegistrationPromise(channel);
            regFuture.addListener(new ChannelFutureListener() {
                @Override
                public void operationComplete(ChannelFuture future) throws Exception {
                    Throwable cause = future.cause();
                    if (cause != null) {
                        // Registration on the EventLoop failed so fail the ChannelPromise directly to not cause an
                        // IllegalStateException once we try to access the EventLoop of the Channel.
                        promise.setFailure(cause);
                    } else {
                        // Registration was successful, so set the correct executor to use.
                        // See https://github.com/netty/netty/issues/2586
                        promise.registered();

                        doBind0(regFuture, channel, localAddress, promise);
                    }
                }
            });
            return promise;
        }
    }
分析initAndRegister
- 首先是channel的初始化如下,我们跟代码,发现他只是一个反射机制作的一个对象的获取,
channel = channelFactory.newChannel();
//最终反射获取对象 ReflectiveChannelFactory 中的方法
 @Override
    public T newChannel() {
        try {
            return constructor.newInstance();
        } catch (Throwable t) {
            throw new ChannelException("Unable to create Channel from class " + constructor.getDeclaringClass(), t);
        }
    }
-
我们线找到 ReflectiveChannelFactory对象中我们传入的class是哪个,这样我们直接去找对应class的构造方法,就可以得到改反射所执行的初始化代码。如下:

-
可以看到,这正是我们在group链式调用中在初始化 ServerBootstrap 中的channel传入的NioServerSocketChannel,接下来就直接到NioServerSocketChannel中的构造方法,如下代码
/**
* Create a new instance, 构造方法
*/
public NioServerSocketChannel() {
this(newSocket(DEFAULT_SELECTOR_PROVIDER));
}
//获取nio中channel
private static ServerSocketChannel newSocket(SelectorProvider provider) {
try {
return provider.openServerSocketChannel();
} catch (IOException e) {
throw new ChannelException(
"Failed to open a server socket.", e);
}
}
//接着 获取到nio中的方法,最终得到的是ServerSocketChannelImpl 是java.nio.channels.Channel 的子类,最终得到的是nio中的channel
public ServerSocketChannel openServerSocketChannel() throws IOException {
return new ServerSocketChannelImpl(this);
}
//构造方法中的this
this(newSocket(DEFAULT_SELECTOR_PROVIDER));
//继续追this中 super ---》 super ---〉 super ---》 得到如下:
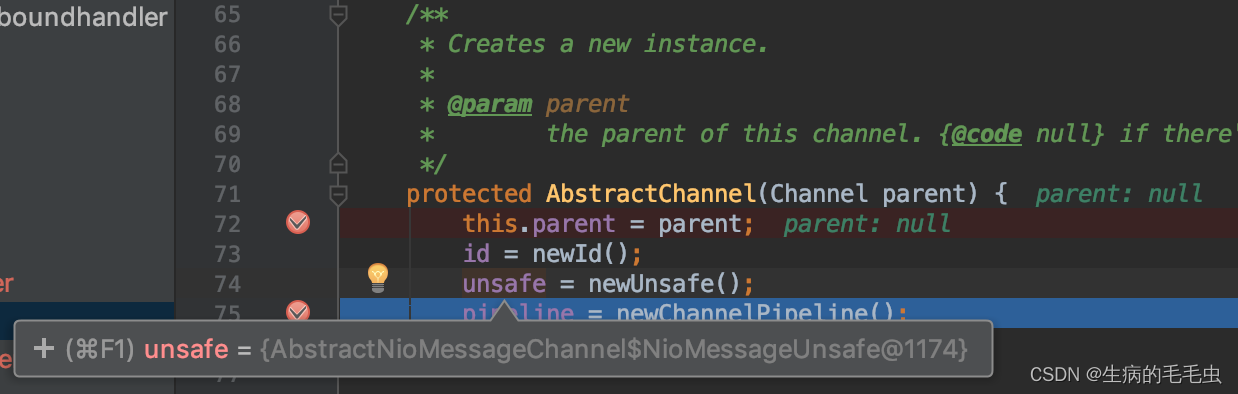
protected AbstractChannel(Channel parent) {
this.parent = parent;
id = newId();
unsafe = newUnsafe();
pipeline = newChannelPipeline();
}
-
总结一些channel的初始化如下:
- 通过Nio的SelectorProvider 的 openServerSocketChannel方法得到JDK的channel,目的是得到Netty包装的JDK的channel
- 利用newId() 方法 创建一个唯一的channelId, 利用 newUnsafe();创建了一个NioMessageUnsafe,用于操作消息,利用newChannelPipeline();创建了一个DefaultChannelPipeline,他是个双向链表结构,用于过滤所有进出的消息
- 创建一个NioServerSocketChannelConfig对用于对外展示一些配置
-
Unsafe对象示意图
-
NioServerSocketChannelConfig代码示意图

接着的init(channel);方法
- init方法是用来初始化NioServerSocketChannel,具体追踪代码如
- init方法是AbstractBootStrap累中的一个抽象方法
abstract void init(Channel channel) throws Exception;
- 具体实现是在ServerBootStrap类中,继续根进代码中
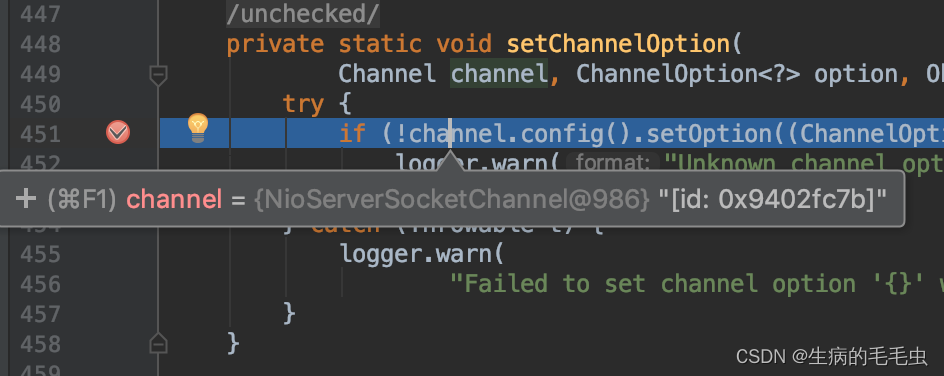
- 首先是对channel中的TCP参数赋值,其中的Option参数就是之前我们在ServerBootstrap 链式调用中设置的option,
setChannelOptions(channel, newOptionsArray(), logger);
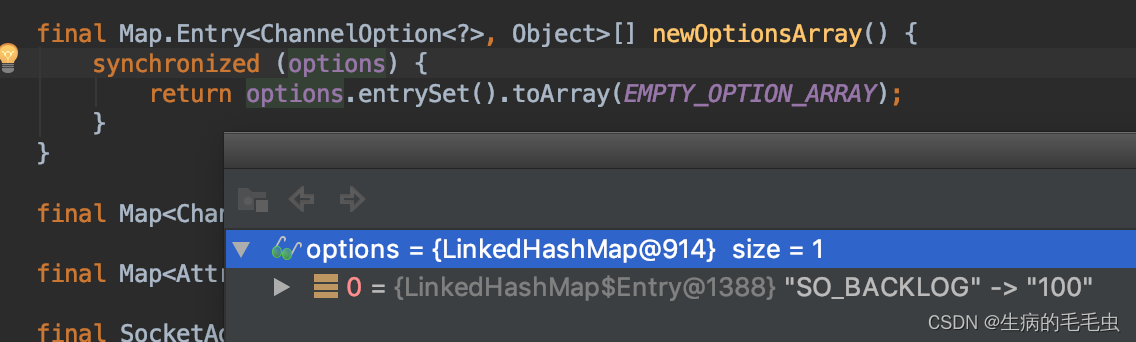
- 最终是设置了NioServerSocketChannel的TCP属性,如下图
- 接下来也是初始化NioServerSocketChannel中的一些属性,对其中的ChannelPipeline添加ChannelINitializer处理器
- 如下init方法核心addLast方法
@Override
    public final ChannelPipeline addLast(EventExecutorGroup group, String name, ChannelHandler handler) {
        final AbstractChannelHandlerContext newCtx;
        synchronized (this) {
            checkMultiplicity(handler);
            newCtx = newContext(group, filterName(name, handler), handler);
            addLast0(newCtx);
            if (!registered) {
                newCtx.setAddPending();
                callHandlerCallbackLater(newCtx, true);
                return this;
            }

            EventExecutor executor = newCtx.executor();
            if (!executor.inEventLoop()) {
                callHandlerAddedInEventLoop(newCtx, executor);
                return this;
            }
        }
        callHandlerAdded0(newCtx);
        return this;
    }
- addLast方法在DefaultChannelPipeline 类中,方法是pipeline方法的核心
- 首先 checkMultiplicity 监测handler是否符合标准
- 接着创建一个AbstractChannelHandlerContext newCtx = newContext(group, filterName(name, handler), handler); 对象,此处是ChannelHandlerContext对象的一个子类,而ChannelHandlerContext 是ChannelHandler和 ChannelPipeline之间的关联,每当有ChannelHandler添加到Pipeline中时候,都会创建Context。Context主要功能是管理他所关联的Handler和同一个pipeline中其他Handler的交互
- 接着是 addLast0(newCtx); 方法,如下
private void addLast0(AbstractChannelHandlerContext newCtx) {
        AbstractChannelHandlerContext prev = tail.prev;
        newCtx.prev = prev;
        newCtx.next = tail;
        prev.next = newCtx;
        tail.prev = newCtx;
    }
-
将 利用Handler 生成的context添加到双向队列中,并且是添加到tail节点的前面
-
最后同步或者一步或者晚点一步调用callHandlerAdded0(newCtx);方法
-
总结InitAndRegister方法
- initAndRegister()初始化NioServerSocketChannel 通道并且注册各个Handler,返回一个future
- 通过ServerBootStrap的通道工厂(ReflectiveChannelFactory)反射创建一个NioServerSocketChannel
- init 负责初始化这个NioServerSocketChannel
- 接着 ChannelFuture regFuture = config().group().register(channel); 通过ServerBootStrap的boosGroup 注册NioServerSocketChannel
- 最后繁华一步执行占位符regFuture,此处future是一个ChannelFuture是一个接口,真正的实现类是DefaultChannelPromise
initAndRegister之后的doBind0方法分析
 private static void doBind0(
            final ChannelFuture regFuture, final Channel channel,
            final SocketAddress localAddress, final ChannelPromise promise) {

        // This method is invoked before channelRegistered() is triggered.  Give user handlers a chance to set up
        // the pipeline in its channelRegistered() implementation.
        channel.eventLoop().execute(new Runnable() {
            @Override
            public void run() {
                if (regFuture.isSuccess()) {
                    channel.bind(localAddress, promise).addListener(ChannelFutureListener.CLOSE_ON_FAILURE);
                } else {
                    promise.setFailure(regFuture.cause());
                }
            }
        });
    }
     //继续更channel.bind方法,因为这里是异步只执行的,debug的时候注意可能跳过去,最终进入到AbstractChannelHandlerContext中的bind方法
     @Override
    public ChannelFuture bind(final SocketAddress localAddress, final ChannelPromise promise) {
        ObjectUtil.checkNotNull(localAddress, "localAddress");
        if (isNotValidPromise(promise, false)) {
            // cancelled
            return promise;
        }

        final AbstractChannelHandlerContext next = findContextOutbound(MASK_BIND);
        EventExecutor executor = next.executor();
        if (executor.inEventLoop()) {
            next.invokeBind(localAddress, promise);
        } else {
            safeExecute(executor, new Runnable() {
                @Override
                public void run() {
                    next.invokeBind(localAddress, promise);
                }
            }, promise, null, false);
        }
        return promise;
    }
    //继续根 next.invokeBind(localAddress, promise); 方法
     ((ChannelOutboundHandler) handler()).bind(this, localAddress, promise);
     //继续根bind
     @Override
        public void bind(
                ChannelHandlerContext ctx, SocketAddress localAddress, ChannelPromise promise) {
            unsafe.bind(localAddress, promise);
        }
     //继续根bind,到 LoggingHandler 这个handler是我们在ServerBootStrapt中添加的一个handler
     public void bind(ChannelHandlerContext ctx, SocketAddress localAddress, ChannelPromise promise) throws Exception {
        if (logger.isEnabled(internalLevel)) {
            logger.log(internalLevel, format(ctx, "BIND", localAddress));
        }
        ctx.bind(localAddress, promise);
    }
    //继续bind方法,此处还会在回到之前的bind方法,不用管,继续往下,到AbstractChannel中bind方法,此处已经获取到 localAddress 对象,并且此处点击步入到方法体实现中去,因为实现类太多了
     public final void bind(final SocketAddress localAddress, final ChannelPromise promise) {
         ......
            boolean wasActive = isActive();
            try {
                doBind(localAddress);
            } catch (Throwable t) {
                safeSetFailure(promise, t);
                closeIfClosed();
                return;
            }
......
            safeSetSuccess(promise);
        }
     //最后他到了NioServerSocketChannel类中的bind方法
      protected void doBind(SocketAddress localAddress) throws Exception {
        if (PlatformDependent.javaVersion() >= 7) {
            javaChannel().bind(localAddress, config.getBacklog());
        } else {
            javaChannel().socket().bind(localAddress, config.getBacklog());
        }
    }
- 如上,最终bind的方法居然是NioServerSocketChannel的dobind,说吗Netty底层就是NIO,最后的端口,ip版的信息由NIO完成
- 接着回到最初的bind方法,还剩最后一个步骤 safeSetSuccess(promise);,这里会高速所有promise任务成功了,器可以执行监听器的方法了,整个启动过程就结束了
- 此时还没结束,我们继续debug,一直下一步执行,他会进入一个无限循环中,如下代码
 protected boolean runAllTasks(long timeoutNanos) {
        fetchFromScheduledTaskQueue();
        Runnable task = pollTask();
        if (task == null) {
            afterRunningAllTasks();
            return false;
        }

        final long deadline = timeoutNanos > 0 ? ScheduledFutureTask.nanoTime() + timeoutNanos : 0;
        long runTasks = 0;
        long lastExecutionTime;
        for (;;) {
            safeExecute(task);

            runTasks ++;

            // Check timeout every 64 tasks because nanoTime() is relatively expensive.
            // XXX: Hard-coded value - will make it configurable if it is really a problem.
            if ((runTasks & 0x3F) == 0) {
                lastExecutionTime = ScheduledFutureTask.nanoTime();
                if (lastExecutionTime >= deadline) {
                    break;
                }
            }

            task = pollTask();
            if (task == null) {
                lastExecutionTime = ScheduledFutureTask.nanoTime();
                break;
            }
        }

        afterRunningAllTasks();
        this.lastExecutionTime = lastExecutionTime;
        return true;
    }
- 以上runAllTask方法就是监听功能
Netty启动过程梳理
- 创建两个EventLoopGroup线程池数组,数组默认大小是CPU*2,方便Channel注册选择线程池时候提高性能
- BootStrap将boss设置为group属性,将worker设置为childer属性
- 通过bind方法启动,内部重要方法是initAndRegister 和 dobind方法
- initAndRegister方法通过反射创建NioServerSocketChannel以及相关的NIO对象,pipeline,unsafe,同时也为pipeline初始化head节点和tail节点
- 在register0方法成功后调用在dobind方法中的doBind0,该方法会调用NioServerSocketChannel的doBind方法对JDK的channel和端口进行绑定,完成Netty服务器所有的启动后,开始监听连接事件