Zabbix介绍及安装
- 1.1 Zabbix监控
- 1 为什么要监控
- 1.1 网站可用性
- 2 监控什么东西
- 2.1 监控范畴
- 3 怎么来监控
- 3.1 远程管理服务器
- 3.2 监控硬件
- 3.3 查看cpu相关
- 3.4 内存
- 3.5 磁盘
- 3.6 监控网络
- 4 监控工具总览
- 5 zabbix介绍
- 5.1 zabbix的组成
- 5.2 zabbix监控范畴
- 1.2 安装zabbix
- 1 环境检查
- 2 安装zabbix过程
- 2.1 脚本安装方式
- 2.2 手动安装-服务器端
- 1.进入官方网站
- 2.选择版本
- 3.安装zabbix的源
- 4.安装 server and agent
- 5.安装前端(Install Zabbix frontend)
- 6.编辑/etc/yum.repos.d/zabbix.repo
- 7.安装web相关的软件
- 8.安装mariadb数据库
- 9.启动mariadb
- 10.进入mysql
- 11.修改数据库
- 12.导入初始化数据,会在zabbix内导入很多表
- 13.为Zabbix服务器配置数据库
- 14.为Zabbix前端配置PHP
- 15.关闭防火墙
- 16.关闭selinux
- 17.修改server的端口号
- 18.启动 Zabbix 服务器和代理进程
- 2.2 手动安装-客户端
- 1.下载安装源
- 2.安装agent
- 3.关闭防火墙及selinux
- 4.修改服务器IP及暴露端口
- 3 检测连通性
- 1.服务端安装zabbix-get检测工具
- 2.测试及结果
Zabbix是什么
Zabbix是企业级开源监控解决方案,支持实时监控数万台服务器、虚拟机和网络设备,采集百万级监控指标。
Zabbix完全开源免费。
zabbix中文官网
zabbix是一个分布式监视及管理系统,基于server-clinet架构,常用的部署环境包括:LAMP,LNMP,LAPP或LNPP
参考:https://www.zabbix.com/cn/download
1.1 Zabbix监控
1 为什么要监控
在需要的时刻,提前提醒我们服务器出问题了
当出问题之后,可以找到问题的根源
网站/服务器的可用性
1.1 网站可用性
在软件系统的高可靠性(也称为可用性,英文描述为HA,High Available)里有个衡量其可靠性的标准——X个9,这个X是代表数字3~5。X个9表示在软件系统1年时间的使用过程中,系统可以正常使用时间与总时间(1年)之比,我们通过下面的计算来感受下X个9在不同级别的可靠性差异。
- 1个9:(1-90%)*365=36.5天,表示该软件系统在连续运行1年时间里最多可能的业务中断时间是36.5天
- 2个9:(1-99%)*365=3.65天 , 表示该软件系统在连续运行1年时间里最多可能的业务中断时间是3.65天
- 3个9:(1-99.9%)36524=8.76小时,表示该软件系统在连续运行1年时间里最多可能的业务中断时间是8.76小时。
- 4个9:(1-99.99%)36524=0.876小时=52.6分钟,表示该软件系统在连续运行1年时间里最多可能的业务中断时间是52.6分钟。
- 5个9:(1-99.999%)36524*60=5.26分钟,表示该软件系统在连续运行1年时间里最多可能的业务中断时间是5.26分钟。
- 6个9:(1-99.9999%)365246060=31秒, 示该软件系统在连续运行1年时间里最多可能的业务中断时间是31秒
2 监控什么东西
监控一切需要监控的东西,只要能够想到,能够用命令实现的都能用来监控
2.1 监控范畴
| 监控类型 | 监控范围 |
|---|---|
| 硬件监控 | 1.通过远程控制卡:Dell的IDRAC,HP的ILO和IBM的IMM等 2.使用IPMI来完成物理设备的监控工作。通常必须要监控的包括温度、硬盘故障等 3.路由器,交换机(端口,光衰,日志),打印机,Windows等 |
| 系统监控 | cpu,内存,硬盘使用率,硬盘IO,系统负载,进程数 |
| 服务监控 | apache,nginx,php-fpm,mysql,memcache,redis,tomcat,JVM,TCP连接数 |
| 性能监控 | 网站性能,服务器性能,数据库性能,存储性能 |
| 日志监控 | 系统产生的系统日志,应用程序产生的应用访问日志,错误日志,服务器运行日志等,可以用ELK来进行日志监控 |
| 安全监控 | 1. Nginx+Lua编写了一个WAF通过kibana可以图形化的展示不同的攻击类型的统计 2.用户登录数,passwd文件变化,本地所有文件改动 |
| 网络监控 | 端口,web(URL),DB,ping包,IDC带宽网络流量,网络流出速率,网络入流量,网络出流量,网络使用率,SMTP,POP3 |
3 怎么来监控
3.1 远程管理服务器
如果想远程管理服务器就有远程管理卡,比如Dell idRAC,HP ILO,IBM IMM
3.2 监控硬件
查看硬件的温度/风扇转速,电脑有鲁大师,服务器就有ipmitool。
使用ipmitool实现对服务器的命令行远程管理
yum -y install OpenIPMI ipmitool  #->IPMI在物理机可以成功,虚拟机不行
[root@KVM ~]# ipmitool sdr type Temperature
3.3 查看cpu相关
lscpu、uptime、top、htop、vmstat和mpstat,其中htop需要安装,安装依赖与epel源。
[root@dbc-server-554 ~]# lscpu
Architecture:          x86_64
CPU op-mode(s):        32-bit, 64-bit
Byte Order:            Little Endian
CPU(s):                8
On-line CPU(s) list:   0-7
Thread(s) per core:    2
Core(s) per socket:    4
Socket(s):             1
NUMA node(s):          1
Vendor ID:             GenuineIntel
CPU family:            6
Model:                 60
Model name:            Intel(R) Core(TM) i7-4790 CPU @ 3.60GHz
Stepping:              3
CPU MHz:               3370.825
CPU max MHz:           4000.0000
CPU min MHz:           800.0000
BogoMIPS:              7195.61
Virtualization:        VT-x
L1d cache:             32K
L1i cache:             32K
L2 cache:              256K
L3 cache:              8192K
NUMA node0 CPU(s):     0-7
Flags:                 fpu vme de pse tsc msr pae mce cx8 apic sep mtrr pge mca cmov pat pse36 clflush dts acpi mmx fxsr sse sse2 ss ht tm pbe syscall nx pdpe1gb rdtscp lm constant_tsc arch_perfmon pebs bts rep_good nopl xtopology nonstop_tsc aperfmperf eagerfpu pni pclmulqdq dtes64 monitor ds_cpl vmx smx est tm2 ssse3 sdbg fma cx16 xtpr pdcm pcid sse4_1 sse4_2 x2apic movbe popcnt tsc_deadline_timer aes xsave avx f16c rdrand lahf_lm abm epb invpcid_single ssbd rsb_ctxsw ibrs ibpb stibp tpr_shadow vnmi flexpriority ept vpid fsgsbase tsc_adjust bmi1 avx2 smep bmi2 erms invpcid xsaveopt dtherm ida arat pln pts md_clear spec_ctrl intel_stibp flush_l1d
3.4 内存
free
[root@dbc-server-554 zabbix]# free -h
              total        used        free      shared  buff/cache   available
Mem:           7.5G        6.8G        353M         32M        335M        374M
Swap:          7.7G        1.1G        6.6G
3.5 磁盘
df、dd、iotop
[root@dbc-server-554 zabbix]# df -h
Filesystem               Size  Used Avail Use% Mounted on
devtmpfs                 3.8G     0  3.8G   0% /dev
tmpfs                    3.8G     0  3.8G   0% /dev/shm
tmpfs                    3.8G   11M  3.8G   1% /run
tmpfs                    3.8G     0  3.8G   0% /sys/fs/cgroup
/dev/mapper/centos-root   50G   34G   17G  68% /
/dev/mapper/DBCVG-DBCLV  3.6T  2.1T  1.4T  59% /mnt/DBC_Data
/dev/sda2               1014M  284M  731M  28% /boot
/dev/sda1                200M   12M  189M   6% /boot/efi
/dev/mapper/centos-home  1.8T  291M  1.8T   1% /home
tmpfs                    770M  8.0K  770M   1% /run/user/42
overlay                   50G   34G   17G  68% /var/lib/docker/overlay2/4b1e93400a93acd89cf9984f151d08f631909cb40d30aa7999bedc68048d0926/merged
overlay                   50G   34G   17G  68% /var/lib/docker/overlay2/2f74fa56f598961e7de136f5176ff0604d5f93bbf1ca1c57b32fc94d5944aa0a/merged
overlay                   50G   34G   17G  68% /var/lib/docker/overlay2/3b69d32cd3e3549efc0c6df8165096eb66786ab33affd16520a41edc960c10af/merged
tmpfs                    770M     0  770M   0% /run/user/0
[root@dbc-server-554 zabbix]# iotop

3.6 监控网络
iftop nethogs

4 监控工具总览
mrtg 流量监控出图
nagios 监控
cacti 流量监控出图
zabbix 监控+出图
5 zabbix介绍
Zabbix 是由 Alexei Vladishev 开发的一种网络监视、管理系统,基于 Server-Client 架构。可用于监视各种网络服务、服务器和网络机器等状态。
使用各种 Database-end 如 MySQL, PostgreSQL, SQLite, Oracle 或 IBM DB2 储存资料。Server 端基于 C语言、Web 管理端 frontend 则是基于 PHP 所制作的。Zabbix 可以使用多种方式监视。可以只使用 Simple Check 不需要安装 Client 端,亦可基于 SMTP 或 HTTP … 各种协定做死活监视。
在客户端如 UNIX, Windows 中安装 Zabbix Agent 之后,可监视 CPU Load、网络使用状况、硬盘容量等各种状态。而就算没有安装 Agent 在监视对象中,Zabbix 也可以经由 SNMP、TCP、ICMP、利用 IPMI、SSH、telnet 对目标进行监视。
另外,Zabbix 包含 XMPP 等各种 Item 警示功能。
5.1 zabbix的组成
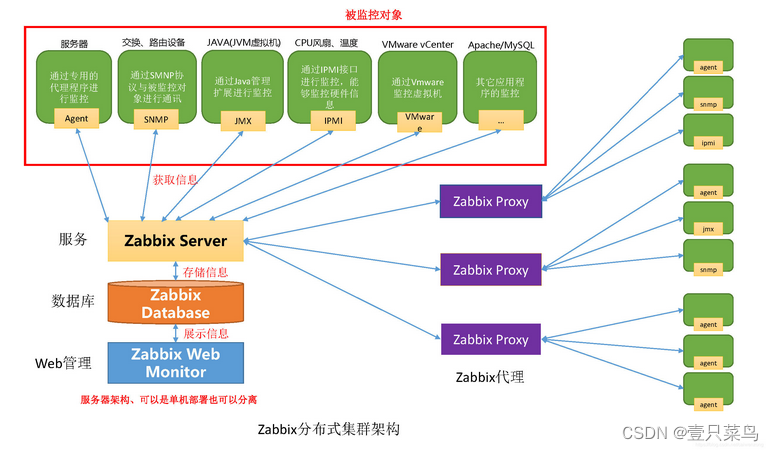
zabbix 主要由2部分构成 zabbix server和 zabbix agent
zabbix proxy是用来管理其他的agent,作为代理
5.2 zabbix监控范畴
硬件监控 :Zabbix IPMI Interface
系统监控 :Zabbix Agent Interface
Java 监控:ZabbixJMX Interface
网络设备监抟:Zabbix SNMP Interface
应用服务监控:Zabbix Agent UserParameter
MySQL 数据库监控:percona-monitoring-pldlgins
URL监控:Zabbix Web监控
1.2 安装zabbix
1 环境检查
[root@dbc-server-554 zabbix]# cat /etc/redhat-release
CentOS Linux release 7.9.2009 (Core)
[root@dbc-server-554 zabbix]# uname -r
3.10.0-1160.83.1.el7.x86_64
[root@dbc-server-554 zabbix]# getenforce
Disabled
[root@dbc-server-554 zabbix]# systemctl status firewalld.service
* firewalld.service - firewalld - dynamic firewall daemon
   Loaded: loaded (/usr/lib/systemd/system/firewalld.service; disabled; vendor preset: enabled)
   Active: inactive (dead)
     Docs: man:firewalld(1)
2 安装zabbix过程
官网安装教程
2.1 脚本安装方式
由于书中介绍的zabbix版本较早,此处仅介绍安装方式,实际安装参考后面手动部分
- 服务端快速安装脚本
#!/bin/bash
#clsn

#设置解析 注意:网络条件较好时,可以不用自建yum源
# echo '10.0.0.1 mirrors.aliyuncs.com mirrors.aliyun.com repo.zabbix.com' >> /etc/hosts

#安装zabbix源、aliyun YUM源
curl -o /etc/yum.repos.d/CentOS-Base.repo http://mirrors.aliyun.com/repo/Centos-7.repo
curl -o /etc/yum.repos.d/epel.repo http://mirrors.aliyun.com/repo/epel-7.repo
rpm -ivh http://repo.zabbix.com/zabbix/3.0/rhel/7/x86_64/zabbix-release-3.0-1.el7.noarch.rpm

#安装zabbix
yum install -y zabbix-server-mysql zabbix-web-mysql

#安装启动 mariadb数据库
yum install -y  mariadb-server
systemctl start mariadb.service

#创建数据库
mysql -e 'create database zabbix character set utf8 collate utf8_bin;'
mysql -e 'grant all privileges on zabbix.* to zabbix@localhost identified by "zabbix";'

#导入数据
zcat /usr/share/doc/zabbix-server-mysql-3.0.13/create.sql.gz|mysql -uzabbix -pzabbix zabbix

#配置zabbixserver连接mysql
sed -i.ori '115a DBPassword=123456' /etc/zabbix/zabbix_server.conf

#添加时区
sed -i.ori '18a php_value date.timezone  Asia/Shanghai' /etc/httpd/conf.d/zabbix.conf

#解决中文乱码
yum -y install wqy-microhei-fonts
\cp /usr/share/fonts/wqy-microhei/wqy-microhei.ttc /usr/share/fonts/dejavu/DejaVuSans.ttf

#启动服务
systemctl start zabbix-server
systemctl start httpd

#写入开机自启动
chmod +x /etc/rc.d/rc.local
cat >>/etc/rc.d/rc.local<<EOF
systemctl start mariadb.service
systemctl start httpd
systemctl start zabbix-server
EOF

#输出信息
echo "浏览器访问 http://`hostname -I|awk '{print $1}'`/zabbix"
- 客户端快速部署脚本
#!/bin/bash
#clsn

#设置解析
echo '10.0.0.1 mirrors.aliyuncs.com mirrors.aliyun.com repo.zabbix.com' >> /etc/hosts

#安装zabbix源、aliyu nYUM源
curl -o /etc/yum.repos.d/CentOS-Base.repo http://mirrors.aliyun.com/repo/Centos-7.repo
curl -o /etc/yum.repos.d/epel.repo http://mirrors.aliyun.com/repo/epel-7.repo
rpm -ivh http://repo.zabbix.com/zabbix/3.0/rhel/7/x86_64/zabbix-release-3.0-1.el7.noarch.rpm

#安装zabbix客户端
yum install zabbix-agent -y
sed -i.ori 's#Server=127.0.0.1#Server=172.16.1.61#' /etc/zabbix/zabbix_agentd.conf
systemctl start  zabbix-agent.service

#写入开机自启动
chmod +x /etc/rc.d/rc.local
cat >>/etc/rc.d/rc.local<<EOF
systemctl start  zabbix-agent.service
EOF
2.2 手动安装-服务器端
1.进入官方网站
Download and install Zabbix
2.选择版本
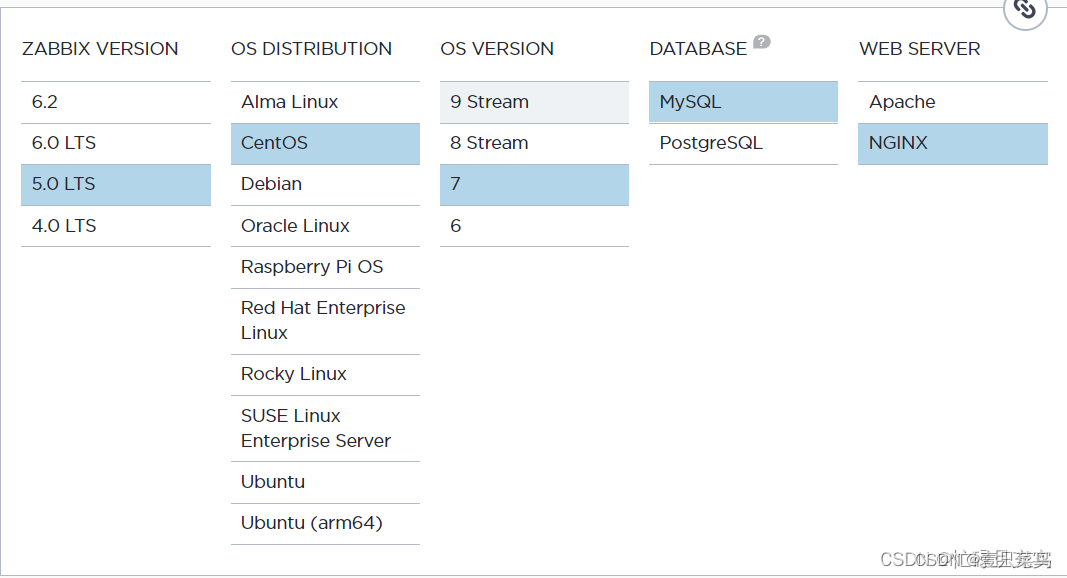
3.安装zabbix的源
使用rmp命令进行安装
rpm -Uvh https://repo.zabbix.com/zabbix/5.0/rhel/7/x86_64/zabbix-release-5.0-1.el7.noarch.rpm
4.安装 server and agent
yum install zabbix-server-mysql zabbix-agent
5.安装前端(Install Zabbix frontend)
yum install centos-release-scl
6.编辑/etc/yum.repos.d/zabbix.repo
修改仓库文件/etc/yum.repos.d/zabbix.repo ,启用前端的源
修改[zabbix-frontend]内的enabled=0改为enabled=1
[zabbix-frontend]
name=Zabbix Official Repository frontend - $basearch
baseurl=http://repo.zabbix.com/zabbix/5.0/rhel/7/$basearch/frontend
enabled=1
gpgcheck=1
gpgkey=file:///etc/pki/rpm-gpg/RPM-GPG-KEY-ZABBIX-A14FE591
7.安装web相关的软件
yum install zabbix-web-mysql-scl zabbix-nginx-conf-scl
8.安装mariadb数据库
yum install mariadb mariadb-server -y
如果已经安装了MySQL可省略这一步, mariadb-server — 服务器端的包,mariadb — 客户端的包。
9.启动mariadb
并设置为mariadb开机自启
service mariadb start
systemctl enable mariadb
要想知道是否启动成功可以使用ps aux|grep mariadb 或者 netstat -anplut|grep maraidb 者两条命令。
10.进入mysql
mysql -u root -p
如果是首次安装数据库,敲回车后显示需要密码直接再次敲回车即可
11.修改数据库
- 创建数据库名字叫zabbix
create database zabbix character set utf8 collate utf8_bin;
想知道是否创建成功可使用这条命令进行查看:
show databases;
- 创建用户zabbix其host为localhost密码为123456
create user zabbix@localhost identified by '123456';
- 赋予权限,zabbix@localhost对这个zabbix.*库所有的表都有增删改查的权限
grant all privileges on zabbix.* to zabbix@localhost;
- 退出数据库
quit;
12.导入初始化数据,会在zabbix内导入很多表
zcat /usr/share/doc/zabbix-server-mysql-5.0.24/create.sql.gz| mysql -uzabbix -p'123456' zabbix
复制执行该命令如果有问题,可能是由于zabbix-server 的版本号和安装的不一致,可以在 zabbix-server 按tab键会自动补齐,或者输入 zabbix_server --version 命令查看当前安装的 zabbx-server 的版本号。
也可以分两步执行:
- 进入/zabbix-server-mysql-5.0.24/
cd /usr/share/doc/zabbix-server-mysql-5.0.24/
- 列出create.sql.gz压缩包的安装文件,并在mysql中执行
zcat create.sql.gz| mysql -uzabbix -p'123456' zabbix
13.为Zabbix服务器配置数据库
修改 /etc/zabbix/zabbix_server.conf这个配置文件,将DBPassword=123456这行进行修改,密码为11步进行修改的密码
[root@dbc-server-554 zabbix-server-mysql-5.0.31]# cat /etc/zabbix/zabbix_server.conf|grep DBPassword
### Option: DBPassword
DBPassword=123456
14.为Zabbix前端配置PHP
共需要修改两个文件,包括:
- 编辑文件 /etc/opt/rh/rh-nginx116/nginx/conf.d/zabbix.conf,取消注释并设置 ‘listen’ 和 ‘server_name’ 。
[root@dbc-server-554 zabbix-server-mysql-5.0.31]# cat /etc/opt/rh/rh-nginx116/nginx/conf.d/zabbix.conf
server {
        listen          80;
        server_name     192.168.5.54;
server_name改为域名或IP都可以
- 编辑
/etc/opt/rh/rh-php72/php-fpm.d/zabbix.conf,修改时区为亚洲上海php_value[date.timezone] = Asia/Shanghai,还有listen.acl_users = apache,nginx
[root@dbc-server-554 zabbix-server-mysql-5.0.31]# cat /etc/opt/rh/rh-php72/php-fpm.d/zabbix.conf
[zabbix]
user = apache
group = apache

listen = /var/opt/rh/rh-php72/run/php-fpm/zabbix.sock
listen.acl_users = apache,nginx				#修改此处
listen.allowed_clients = 127.0.0.1

pm = dynamic
pm.max_children = 50
pm.start_servers = 5
pm.min_spare_servers = 5
pm.max_spare_servers = 35
pm.max_requests = 200

php_value[session.save_handler] = files
php_value[session.save_path]    = /var/opt/rh/rh-php72/lib/php/session/

php_value[max_execution_time] = 300
php_value[memory_limit] = 128M
php_value[post_max_size] = 16M
php_value[upload_max_filesize] = 2M
php_value[max_input_time] = 300
php_value[max_input_vars] = 10000
php_value[date.timezone] = Asia/Shanghai	#修改此处
15.关闭防火墙
[root@localhost ~]# systemctl stop firewalld
[root@localhost ~]# systemctl disable firewalld
Removed symlink /etc/systemd/system/multi-user.target.wants/firewalld.service.
Removed symlink /etc/systemd/system/dbus-org.fedoraproject.FirewallD1.service.
16.关闭selinux
建议一定要关闭selinux,不然会导致zabbix_server启动不了,selinux是安全增强型 Linux(Security-Enhanced Linux)简称 SELinux,它是一个 Linux 内核模块,也是 Linux 的一个安全子系统。
[root@localhost ~]# getenforce
Enforcing
[root@localhost ~]# setenforce 0
[root@localhost ~]# cat /etc/sysconfig/selinux

# This file controls the state of SELinux on the system.
# SELINUX= can take one of these three values:
#     enforcing - SELinux security policy is enforced.
#     permissive - SELinux prints warnings instead of enforcing.
#     disabled - No SELinux policy is loaded.
SELINUX=disabled									#修改此处
# SELINUXTYPE= can take one of three values:
#     targeted - Targeted processes are protected,
#     minimum - Modification of targeted policy. Only selected processes are protected.
#     mls - Multi Level Security protection.
SELINUXTYPE=targeted
17.修改server的端口号
zabbix和nginx默认都占用了80端口,会造成端口抢占,将其中一个的端口改掉就可以了,此处修改的是nginx的端口号。
[root@dbc-server-554 zabbix-server-mysql-5.0.31]# cat /etc/opt/rh/rh-nginx116/nginx/nginx.conf
...
    include /etc/opt/rh/rh-nginx116/nginx/conf.d/*.conf;

    server {
        listen       8080 default_server;						#修改此处
        listen       [::]:8080 default_server;					#修改此处
        server_name  _;
        root         /opt/rh/rh-nginx116/root/usr/share/nginx/html;
...
18.启动 Zabbix 服务器和代理进程
启动Zabbix服务器和代理进程,并使其在系统启动时启动。
systemctl restart zabbix-server zabbix-agent rh-nginx116-nginx rh-php72-php-fpm
systemctl enable zabbix-server zabbix-agent rh-nginx116-nginx rh-php72-php-fpm
至此,服务器端安装完成
2.2 手动安装-客户端
客户端安装相对步骤较少,因为不涉及数据库,前端等安装
1.下载安装源
[root@localhost ~]# rpm -Uvh https://repo.zabbix.com/zabbix/5.0/rhel/7/x86_64/zabbix-release-5.0-1.el7.noarch.rpm
Retrieving https://repo.zabbix.com/zabbix/5.0/rhel/7/x86_64/zabbix-release-5.0-1.el7.noarch.rpm
warning: /var/tmp/rpm-tmp.jmN7lC: Header V4 RSA/SHA512 Signature, key ID a14fe591: NOKEY
Preparing...                          ################################# [100%]
Updating / installing...
   1:zabbix-release-5.0-1.el7         ################################# [100%]
2.安装agent
yum install zabbix-agent
3.关闭防火墙及selinux
详细可以参考前文
systemctl status firewalld
systemctl stop firewalld
systemctl disable firewalld
getenforce
setenforce 0
vim /etc/sysconfig/selinux
4.修改服务器IP及暴露端口
[root@localhost ~]# cat /etc/zabbix/zabbix_agentd.conf
# This is a configuration file for Zabbix agent daemon (Unix)
# To get more information about Zabbix, visit http://www.zabbix.com
...

### Option: Server
#       List of comma delimited IP addresses, optionally in CIDR notation, or DNS names of Zabbix servers and Zabbix proxies.
#       Incoming connections will be accepted only from the hosts listed here.
#       If IPv6 support is enabled then '127.0.0.1', '::127.0.0.1', '::ffff:127.0.0.1' are treated equally
#       and '::/0' will allow any IPv4 or IPv6 address.
#       '0.0.0.0/0' can be used to allow any IPv4 address.
#       Example: Server=127.0.0.1,192.168.1.0/24,::1,2001:db8::/32,zabbix.example.com
#
# Mandatory: yes, if StartAgents is not explicitly set to 0
# Default:
# Server=

Server=192.168.5.54							#修改此处

### Option: ListenPort
#       Agent will listen on this port for connections from the server.
#
# Mandatory: no
# Range: 1024-32767
# Default:
ListenPort=10050							#修改此处
至此,客户端安装完成
3 检测连通性
1.服务端安装zabbix-get检测工具
yum install zabbix-get
注意:只能在服务端进行测试
2.测试及结果
[root@dbc-server-554 zabbix-server-mysql-5.0.31]# zabbix_get -s 192.168.70.183 -p 10050 -k "system.cpu.load[all,avg1]"
0.000000
[root@dbc-server-554 zabbix-server-mysql-5.0.31]# zabbix_get -s 192.168.71.183 -p 10050 -k "system.cpu.load[all,avg1]"
0.210000






![windows本地开发Spark[不开虚拟机]](https://img-blog.csdnimg.cn/a75e70f97c4b41be9ca4e040f9bfa151.png)


