1.简介
谈及版本控制系统,或许大多数程序员最开始接触的都是SVN(Subversion),它是一个集中式的版本控制系统,使用的时候需要提供一台的服务器来进行部署,所有的更新与同步操作都需要与这台服务器进行交互,一旦这台服务器宕机,便无法对代码库进行任何操作。
随着时间的推移,Git横空出现,那么Git又是怎样的一个版本控制系统呢?
Git是一种分布式版本的版本控制系统(Version Control System),与SVN最大的区别在于,使用Git,我们可以在本地进行提交并在本地进行完整的版本控制,当需要与远程仓库进行同步时,再进行同步与更新,对版本的控制不受中央服务器的影响。
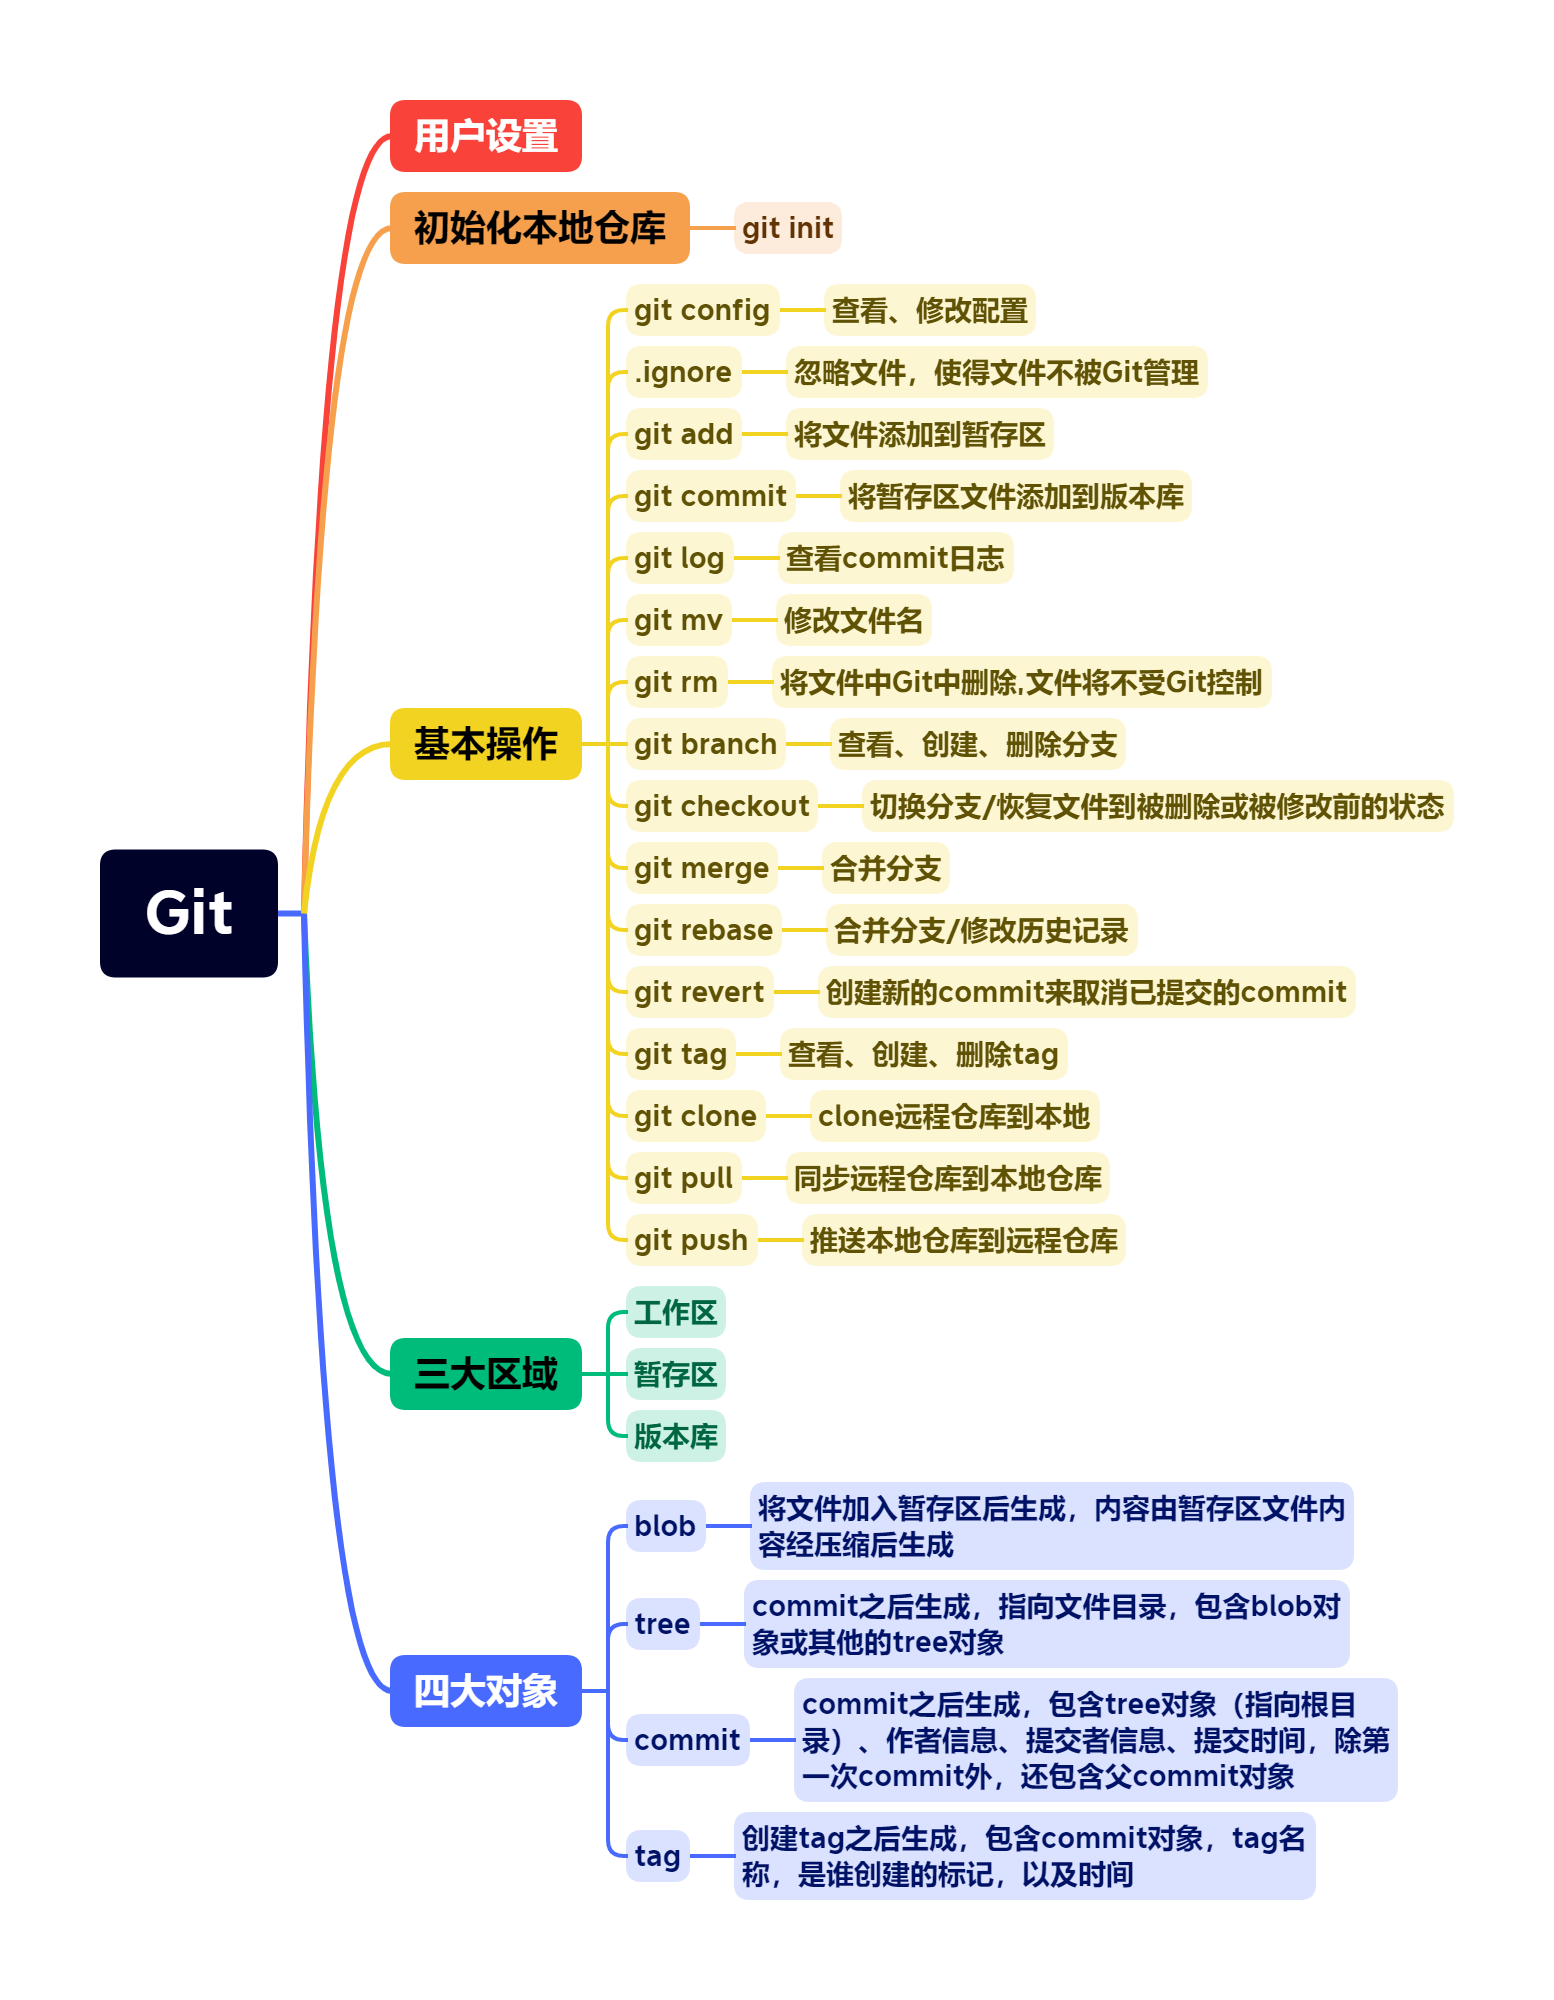
2.设置
在我们安装完Git之后,就可以对Git环境进行一些设置了。
2.1 用户设置
2.1.1 查看当前配置
查看当前配置
git config --list
2.1.1 自定义配置
# 全局设置
git config --global user.name StoNE
git config --global user.email stone@qq.com
# 项目设置,在项目目录下设置
git config --local  user.name StoNE
git config --local user.email stone@qq.com
3.Git基本使用
3.1 git仓库初始化
# 初始化这个目录,让Git对这个目录进行版本控制,会在该目录下创建一个.git目录
git init
# Initialized empty Git repository in C:/Users/StoNE/Desktop/test/.git/
如果想取消git对该目录的版本控制,只需要将.git目录删除即可
3.2 把文件交给git管理
在test目录下创建test.txt,使用git status查看git状态
3.2.1 查看git状态
git status
git status
On branch master

No commits yet

Untracked files:
  (use "git add <file>..." to include in what will be committed)
        test.txt

nothing added to commit but untracked files present (use "git add" to track)
3.2.2 添加文件到暂存区
如果在Git仓库根目录创建了空文件/空目录,即文件/目录中没有任何内容,是无法被Git追踪的,Git对内容敏感。
git add
# 将该文件添加到暂存区
git add test.txt

git status
On branch master

No commits yet

Changes to be committed:
  (use "git rm --cached <file>..." to unstage)
        new file:   test.txt
这时,文件状态已经由Untracked变成new file。表示该文件已经被安置到暂存区(Staging Area),此时该文件就交给Git进行版本控制了。
如果我们修改了多个文件,如果使用像git add test.txt一次只能添加一个文件的操作,就会增加很多,Git为我们提供了一次性添加多个文件的操作:git add --all和git add .。那么它们之间有什么区别呢?
git add --all:该操作会将仓库中所有的改动都会被加入暂存区。git add .:该操作只会将当前目录下(包括其子目录)的所有改动加入暂存区。
3.2.3 修改文件
我们修改test.txt的文件内容,再来查看文件状态
git status
On branch master

No commits yet

Changes to be committed:
  (use "git rm --cached <file>..." to unstage)
        new file:   test.txt

Changes not staged for commit:
  (use "git add <file>..." to update what will be committed)
  (use "git restore <file>..." to discard changes in working directory)
        modified:   test.txt
可以发现,我们在test.txt文件进行修改后,修改后的内容并没有被添加到暂存区。如果我们已经确定要对该文件进行修改,可以再次执行git add将其添加到暂存区。
3.2.4 把暂存区的内容提交到版本库
经过上面的
git add操作,只是将文件的改动添加到暂存区,此时还并没有对这些文件进行存档(也就是所谓的版本),如果要为这些内容生成它的第一个版本,需要使用git commit操作来完成。
git commit
# -m "init commit"表示这个commit修改了什么
git commit -m "init commit"
commit命令只会处理在暂存区中的内容,没有被加到暂存区的内容不会被commit到版本库中。
在commit时如果没有指定 -m “comment”,git默认是不会完成commit的,其目的主要就是体现这次提交做了什么改动。
当我们没有新增或修改文件时,想要测试commit命令也是可以的。使用git commit --allow-empty -m "test"
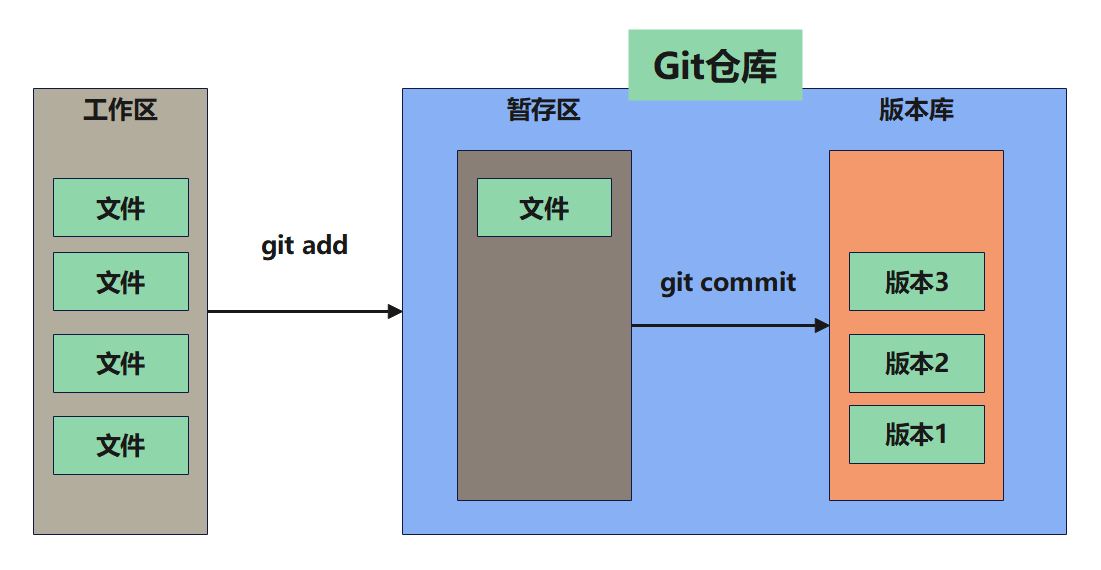
3.2.5 工作区、暂存区与版本库
- 工作区:指的是我们执行
git init命令的目录,由操作系统进行维护。 - 暂存区:执行
git add命令后,文件存放的位置,由Git维护。 - 版本库:执行
git commit命令后,信息存放的位置,由Git维护。
git add可以将工作区的文件添加到暂存区git commit可以将暂存区的文件提交到存储库
在暂存区的文件,如果进行了修改,此时
git commit不会将修改也提交到存储库中。因此在对暂存区的文件进行修改后,需要执行git add将修改添加到暂存区。如果想要在
git commit时,将对暂存区的文件的修改一起提交,可以使用-a参数,git commit -a -m "init commit"。这样即使没有执行git add也可以完成git commit。该参数只对已经存在于暂存区的文件有效
3.3 查看记录
3.3.1 查看整个仓库的记录
那么,我们在使用commit命令之后,要怎么来查询commit记录呢?使用git log命令。
git log
 git log
commit bf62d29800ce3e4d22fab67be8da7c7c1d8d7910 (HEAD -> master)
Author: StoNE <767864968@qq.com>
Date:   Fri Dec 9 22:10:52 2022 +0800

    test
如果想要输出的结果更为精简,可以添加参数--oneline来解决。
3.3.2 使用搜索条件
当然还有一些条件搜索的参数,例如:
--author:例如:git log --oneline --author=stone,可以查询该作者提交的commit。--grep:例如:git log --oneline --grep=Java,查询commit信息中包含该关键字的内容。-S:例如:git log --oneline -S=Java,查询commit文件中,符号条件的内容。--since、--until:例如:git log --oneline --since=2023-01-01 --until=2023-02-11,查询某个时间段内的commit。
3.3.3 查看特定文件的commit记录
# 查看该文件的commit记录
git log test1.txt

# 查看该文件的commit记录,以及每次commit做了什么改动
git log -p test1.txt
3.3.4 查看某一行是谁写的
想要知道某个文件的某一行的作者是谁,我们可以使用git blame命令来查看。
git blame -L 1 test1.txt

f3e6839b (StoNE 2022-12-10 15:30:21 +0800 1) Hello World
f3e6839b (StoNE 2022-12-10 15:30:21 +0800 2)
f3e6839b (StoNE 2022-12-10 15:30:21 +0800 3) success2
如果文件太大,可以加上-L参数,只显示指定行数而内容。
# 只显示第1行的内容
$ git blame -L 1,1 test1.txt

f3e6839b (StoNE 2022-12-10 15:30:21 +0800 1) Hello World
3.4 删除文件
3.4.1 直接删除
使用操作系统的命令,
rm。会将文件从工作区删除。
rm test.txt
rm test.txt

git status
On branch master
Changes not staged for commit:
  (use "git add/rm <file>..." to update what will be committed)
  (use "git restore <file>..." to discard changes in working directory)
        deleted:    test.txt

no changes added to commit (use "git add" and/or "git commit -a")
此时对文件的删除操作并没有添加到暂存区,如果我们想要删除该操作,可以执行git add test.txt将修改添加到暂存区。
无论是执行rm命令,还是执行git rm命令,都会将该文件从工作目录中删除。如果只是想将该文件不受git版本控制,可以使用
--cached
3.4.2 git删除
我们也可以使用git rm test.txt,直接就将修改添加到了暂存区,不需要再执行一次add命令。
无论是执行rm命令,还是执行git rm命令,都会将该文件从工作区删除,如果只是想让该文件不再由Git进行版本控制,可以加上--cached参数。
--cached
git rm test.txt --cached
rm 'test.txt'

git status
On branch master
Changes to be committed:
  (use "git restore --staged <file>..." to unstage)
        deleted:    test.txt

Untracked files:
  (use "git add <file>..." to include in what will be committed)
        test.txt
3.4.3 恢复被删除的文件/文件夹
有些时候,可能误删除了某些文件,只有
.git目录没被删除,被误删的文件是可以找回来的。
rm test1.txt

git status
On branch master
Changes not staged for commit:
  (use "git add/rm <file>..." to update what will be committed)
  (use "git restore <file>..." to discard changes in working directory)
        deleted:    test1.txt
可以看见,test1.txt文件处于deleted状态。可以使用git checkout恢复
# 恢复单个文件(如果文件被删除或修改后想恢复到未修改之前)
git checkout test1.txt

# 恢复当前目录的所有文件
git checkout .
如果git checkout后面跟的是分支名,则会切换分支,如果后面跟的是文件名或路径,则不会切换分支,而是从.git文件夹中将文件复制一份到当前工作目录。更精确地说是:将暂存区的文件拿来覆盖当前工作目录的文件。
3.5 修改文件名
3.5.1 直接修改文件名
mv test.txt test1.txt
mv test.txt test1.txt

git status
On branch master
Changes not staged for commit:
  (use "git add/rm <file>..." to update what will be committed)
  (use "git restore <file>..." to discard changes in working directory)
        deleted:    test.txt

Untracked files:
  (use "git add <file>..." to include in what will be committed)
        test1.txt
虽然只是更改文件名,但是对git来说却是两个动作,一个是删除test.txt文件,另一个是创建test1.txt文件。将这些改变添加到暂存区git add --all
git add --all

git status
On branch master
Changes to be committed:
  (use "git restore --staged <file>..." to unstage)
        renamed:    test.txt -> test1.txt
3.5.2 git修改文件名
git mv test.txt test1.txt
git mv test.txt test1.txt

git status
On branch master
Changes to be committed:
  (use "git restore --staged <file>..." to unstage)
        renamed:    test.txt -> test1.txt
可以看到,文件状态已经变成renamed了,同时省去了git add --all
3.6 修改commit记录
3.6.1 修改最后一次commit记录
--amend
git commit --amend -m "edit comment"
-
如果没有修改任何文件,执行该命令,就可以修改comment信息
-
如果修改了文件,并将文件添加到暂存区,就可以追加文件到最后一次commit中。
3.7 新增文件夹
git是根据文件的内容来进行处理的,如果只是新增一个文件夹,git是无法处理的,因此空的文件夹是无法提交的。
只要这个文件夹下有文件,我们就可以正常进行add和commit命令。
3.8 忽略文件
3.8.1 忽略某个文件
如果不想把文件放在git中,需要在项目根目录中创建一个.gitignore文件,并且设置想要忽略的规则。即使这个文件没有被commit或push到Git服务器,也会有效果。
虽然通过.gitignore文件,我们设置了一些忽略的规则,同样,我们也可以忽略这些设置的规则,使用git add -f 文件名称,还是可以将文件加入暂存区。
如果我们在添加.gitignore文件时,一些要被忽略的文件已经加入到Git版本控制了,那么这些忽略规则对这些文件就是无效的了。我们需要使用git rm --cached 文件名称将这些文件移除版本控制,它们就会被忽略了。
3.8.2 清除忽略的文件
如果想清除那些已经被忽略的文件,可以使用git clean -fX。
3.9 Reset命令
3.9.1 reset commit
commit之后,发现了一些错误,想要回滚到上一次提交。先来看看commit记录
git log --oneline
799f231 (HEAD -> master) Hello world
4161dc1 heihei
944e412 rename file
02852da update filename
81dd455 update filename
f5c310a delete test1.txt
9a08888 add test1.txt
0ce400e delete test1.txt
262e104 add test1.txt
10d9664 delete test.txt
9e0e265 hello world
a6cfb82 init commit
- 相对做法
# 因为当前HEAD和master都指向799f231这个commit,所以以下3个命令的效果是同等的。
git reset 799f231^

git reset master^

git reset HEAD^
^表示前一次,所以799f231^代表的是799f231这个commit的前一次commit
- 绝对做法
如果知道要回退到哪个commit,可以直接指明
git reset 4161dc1
3.9.2 reset模式
-
mixed模式
--mixed:git reset命令如果没有指定参数,将使用--mixed模式。该模式会将commit回退的文件留在工作区,但不会留在暂存区 -
soft模式
--soft:该模式会将commit回退的文件直接存放在暂存区 -
hard模式
--hard:该模式会将commit回退的文件从工作目录和暂存区一并删除
如果一开始回退时,使用
--hard参数,我们会发现commit的工作目录和暂存区都被删除了,并且忘记commit的SHA-1值,那么如何恢复。可以使用Reflog查看记录
git reflog
799f231 (HEAD -> master) HEAD@{0}: reset: moving to 799f231
799f231 (HEAD -> master) HEAD@{1}: reset: moving to 799f231
4161dc1 HEAD@{2}: reset: moving to 799f231^
799f231 (HEAD -> master) HEAD@{3}: reset: moving to 799f231
4161dc1 HEAD@{4}: reset: moving to 4161dc1
799f231 (HEAD -> master) HEAD@{5}: reset: moving to 799f231
4161dc1 HEAD@{6}: reset: moving to 799f231^
799f231 (HEAD -> master) HEAD@{7}: reset: moving to 799f231
4161dc1 HEAD@{8}: reset: moving to 799f231^
799f231 (HEAD -> master) HEAD@{9}: commit: Hello world
4161dc1 HEAD@{10}: commit (amend): heihei
40940ef HEAD@{11}: commit (amend): wtf
403d573 HEAD@{12}: commit (amend): renamed
f4aab38 HEAD@{13}: commit (amend): wtf
5b48069 HEAD@{14}: commit (amend): renamed
01c8884 HEAD@{15}: commit: wtf
944e412 HEAD@{16}: commit: rename file
02852da HEAD@{17}: commit: update filename
81dd455 HEAD@{18}: commit: update filename
f5c310a HEAD@{19}: commit: delete test1.txt
9a08888 HEAD@{20}: commit: add test1.txt
0ce400e HEAD@{21}: commit: delete test1.txt
262e104 HEAD@{22}: commit: add test1.txt
10d9664 HEAD@{23}: commit: delete test.txt
9e0e265 HEAD@{24}: commit: hello world
a6cfb82 HEAD@{25}: commit (initial): init commit
然后在恢复的时候,找到目标commit的值,使用git reset --hard commit值即可。
3.10 commit部分内容
有的时候,我们已经在文件中做了多处修改,但是在提交的时候,只想提交部分修改,可以通过一下方式来处理。
git add -p test1.txt

# 输出内容
diff --git a/test1.txt b/test1.txt
index 9801343..5791be4 100644
--- a/test1.txt
+++ b/test1.txt
@@ -1,2 +1,3 @@
 Hello World

+success2
\ No newline at end of file
(1/1) Stage this hunk [y,n,q,a,d,e,?]?
使用
git add -p test1.txt命令,会询问是否要把这个区域(hunk)加到暂存区,如果选择y时将整个文件添加到暂存区,选择e可以选择要添加的内容
# Manual hunk edit mode -- see bottom for a quick guide.
@@ -1,2 +1,3 @@
 Hello World

+success2
\ No newline at end of file
# ---
# To remove '-' lines, make them ' ' lines (context).
# To remove '+' lines, delete them.
# Lines starting with # will be removed.
# If the patch applies cleanly, the edited hunk will immediately be marked for staging.
# If it does not apply cleanly, you will be given an opportunity to
# edit again.  If all lines of the hunk are removed, then the edit is
# aborted and the hunk is left unchanged.
这个时候,如果我们不需要将success2那一行添加到暂存区,只需要将这一行删掉即可。
3.11 HEAD是什么
HEAD就像是一个标签,指向某一个分支,通常可以把他理解为:当前所在分支。
在.git目录中有一个名为HEAD的文件,我们可以来看看其中的内容:
cat .git/HEAD

ref: refs/heads/master
可以看出,HEAD目前指向master分支。当我们切换的分支的时候,HEAD文件的内容也会随着改变。
除了HEAD文件之外,还有一个**ORIG_HEAD**文件,在做一些比较“危险”的操作(merge,reset、rebase)时,Git会把HEAD的状态存放在该文件,让你随时回退到危险动作之前的状态。
3.12 Git运行原理
对于Git来说,.git目录是至关重要了,由Git进行版本控制的信息都存放在其中了,因此,探究.git目录的结构,才能更好地理解Git的运行原理。
3.12.1 四大对象
在Git中,有四大对象:blob对象、tree对象、commit对象和tag对象`。
首先,我们这里重新初始化一个Git仓库,新建一个index.html文件,并将其加入暂存区。
# 初始化Git仓库
git init

# 新建index.html文件,并加入暂存区。
echo "Hello World" > index.html
git add index.html

# 查看状态
git status

# 输出内容
On branch master

No commits yet

Changes to be committed:
  (use "git rm --cached <file>..." to unstage)
        new file:   index.html
可以看到,index.html已经加入到暂存区,当文件加入暂存区后,Git便会根据文件的内容,在.git/objects目录下生成对应的blob对象。该文件的内容是经过压缩的,可以使用git cat-file命令来查看。

git cat-file -t 557db03de997c86a4a028e1ebd3a1ceb225be238
# 输出内容,其确实是一个blob对象
blob
那么,我们来看一下该文件的内容是什么样子的?
git cat-file -p 557db03de997c86a4a028e1ebd3a1ceb225be238
# 输出内容,就是我们创建时输入的内容。
Hello World
此时,我们对上面的步骤进行一个总结:
- 当使用git add命令将文件加入暂存区时,Git会根据这个对象的内容计算出SHA-1值。
- Git使用SHA-1值的前两个字节作为目录名称,后38个字节作为文件名,创建目录以及文件并存放在
.git/objects目录下,文件的内容时GIt使用压缩算法把原本内容压缩之后的结果。
blob对象在进行
git add操作之后出现。
通过上面的操作,文件已经加入到暂存区,可以进行commit操作。
git commit -m 'inti commit'

# 输出内容
[master (root-commit) aeb827f] inti commit
 1 file changed, 1 insertion(+)
 create mode 100644 index.html

可以看到,多出了几个目录,我们来看看这些目录中的文件。
git cat-file -t efbd263bc3503e5ebc193a8051ee264b461f89bf

# 输出内容
tree
该对象是一个tree对象,我们来看看其内容,其中存放了一个blob对象。
目录或文件的名称存放在
tree对象中。**tree对象**在commit之后生成,根据目录的内容生成其SHA-1值。
git cat-file -p efbd263bc3503e5ebc193a8051ee264b461f89bf

# 输出内容
100644 blob 557db03de997c86a4a028e1ebd3a1ceb225be238    index.html
再看剩下的一个文件,查看其类型:
git cat-file -t aeb827f8087c395d0c38362328af8d41f1cee0c3

# 输出内容,表明其是一个commit对象
commit
**
commit对象**在commit之后生成。
查看其内容:
git cat-file -p aeb827f8087c395d0c38362328af8d41f1cee0c3

# 输出内容
tree efbd263bc3503e5ebc193a8051ee264b461f89bf
author StoNE <767864968@qq.com> 1676096772 +0800
committer StoNE <767864968@qq.com> 1676096772 +0800

inti commit
可以得知,**commit对象**包含的信息:
- commit对象中记录了tree对象。
- 本次commit的作者。
- 本次commit的提交者,一般情况下,作者和提交者是同一个人。
- 本次commit的信息。
通过以上的分析,得出以下结论:
- commit对象指向某个tree对象,该对象指向根目录。
- 除了第一个commit,其他的commit对象,会包含一个parent信息,指向它的前一个commit
- tree对象指向某个或某些blob对象,或其他tree对象。
最后,我们再来看看tag对象。
tag对象不会在commit过程中出现,必须手动将tag标记在某个commit上。我们可以用来标记程序的发布点。
# 在当前最新的commit上,标记一个tag,末尾的v1.0即tag的名称
git tag -a -m "v1.0" v1.0

# 当然,我们也可以在指定的commit上,标记一个tag,aeb827f为commit值
git tag -a -m "v1.0" v1.0 aeb827f
3.12.2 小总结
- 把文件放入Git的暂存区后,文件的内容会被Git压缩之后,存放在blob对象中。
- 目录即文件名会存放在tree对象中,tree对象会指向blob对象或其他的tree对象。
- 在将暂存区的文件提交到版本库后,会生成commit对象。commit对象会指向某个tree对象,同时,除了第一个commit,其他的commit,会包含一个parent信息,其指向前一个commit对象。
- tag对象需要手动创建,并指向某个commit对象。
4.分支
什么是分支。创建分支,并不会将文件复制到另外的目录。分支就像一张标签一样,贴在一个commit上。
当进行了一个新的commit之后,这个新的commit会指向它的前一个commit。而当前分支,也就是HEAD所指的这个分支,此时master会指向该commit,HEAD会指向该分支
4.1 查看分支
git branch
如果后面没有跟任何参数,会输出当前项目的所有分支,前面的*表示当前分支
# 获取分支列表
git branch
* master
4.2 新增分支
4.2.1 直接创建
在git branch后面加上分支名称,即可创建新的分支
# 创建新分支
git branch dev

# 获取分支列表
git branch
  dev
* master
4.2.2 从过去的某个commit创建
# 从777cde5上创建一个分支
git branch test3 777cde5

# 从777cde5上创建一个分支,并切换过去
git checkout -b test3 777cde5
4.3 修改分支名称
使用-m 参数
# 修改分支名称
git branch -m dev test

# 获取分支列表
git branch
* master
  test
4.4 删除分支
使用-d参数
# 删除分支
git branch -d test
Deleted branch test (was 799f231).

# 获取分支列表
git branch
* master
4.5 切换分支
# 获取分支列表
git branch
  dev
* master

# 切换分支到dev
git checkout dev
Switched to branch 'dev'

# 获取分支列表,可以看到*号在dev前面,表示当前分支已切换到dev
git branch
* dev
  master
如果要切换的分支不存在,可以添加-b参数,git会创建该分支,然后切换过去。
4.5.1 切换分支时发生了什么
首先,我在dev分支创建一个index.html并提交,查看git log
git log --oneline
6fb55ca (HEAD -> dev) index.html
f3e6839 dev commit
799f231 (master) Hello world
4161dc1 heihei
944e412 rename file
02852da update filename
81dd455 update filename
f5c310a delete test1.txt
9a08888 add test1.txt
0ce400e delete test1.txt
262e104 add test1.txt
10d9664 delete test.txt
9e0e265 hello world
a6cfb82 init commit
切换到master分支
git checkout master
Switched to branch 'master'

git log --oneline
799f231 (HEAD -> master) Hello world
4161dc1 heihei
944e412 rename file
02852da update filename
81dd455 update filename
f5c310a delete test1.txt
9a08888 add test1.txt
0ce400e delete test1.txt
262e104 add test1.txt
10d9664 delete test.txt
9e0e265 hello world
a6cfb82 init commit
在切换之后,发现index.html不见了。其实git在切换分支时主要做了两件事:
-
更新暂存区和工作目录
git切换分支时,会用该分支指向的那个commit的内容来更新暂存区以及工作目录。但在切换分支前所做的改动会留在工作目录,不受影响
-
变更HEAD位置
将HEAD指向切换后的分支
4.5.2 切换分支时,当前分支有未提交的改动
如果切换分支时,当前分支还有未提交的改动,Git会禁止切换分支,会提示让我们提交改动,或者stash。
git checkout master

# 输出内容
error: Your local changes to the following files would be overwritten by checkout:
        test2.html
Please commit your changes or stash them before you switch branches.
Aborting
1.先提交当前进度
git commit -m 'not finish'
然后切换到master分支,在master上进行完善后,再切换到test2分支,执行reset命令,恢复到之前的工作状态
git reset HEAD^
2.使用stash
将修改先stash起来:
git stash push -m 'test stash'

# 输出内容
Saved working directory and index state On test2: test stash

# 查看stash列表
git stash list

#输出内容
stash@{0}: On test2: test stash
将修改从stash中恢复回来
# 将修改恢复,并将其从stash列表中删除
git stash pop stash@{0}

# 将修改恢复,不会其从stash列表中删除
git stash apply stash@{0}
4.6 合并分支
4.6.1 合并分支
如果想要用master分支合并dev分支,需要先切换到master分支,然后使用git merge命令合并
git merge dev

# 输出内容
Updating 799f231..6fb55ca
Fast-forward
 inex.html | 0
 test1.txt | 4 +++-
 2 files changed, 3 insertions(+), 1 deletion(-)
 create mode 100644 inex.html

git log --oneline

# 输出内容
6fb55ca (HEAD -> master, dev) index.html
f3e6839 dev commit
799f231 Hello world
4161dc1 heihei
944e412 rename file
02852da update filename
81dd455 update filename
f5c310a delete test1.txt
9a08888 add test1.txt
0ce400e delete test1.txt
262e104 add test1.txt
10d9664 delete test.txt
9e0e265 hello world
a6cfb82 init commit
在合并后,我们可以看到master和dev分支的内容已经一致。
A合并B,与B合并A有什么不同?
首先test1分支与test2分支都来自master分支,所以不管master要合并test1分支还是test2分支,Git都会使用快转模式(Fast Forward)进行合并。
但是test1与test2这两个分支要进行互相合并就不一样了。假设用test1分支合并test2,这种情况下,Git会额外生成一个commit,这个commit分别指向两个分支的最新commit,HEAD随着test1分支往前,而test2分支停留在原地。同样的,如果是使用test2合并test1,HEAD随着test2分支往前,而test1分支停留在原地。
4.6.2 快转模式(Fast Forward)
快转模式,该模式不会产生新的commit,只是将master分支这个标签,往前贴到test1分支所指的commit上。
--no-ff参数是指不要使用快转模式合并,这样就会额外做出一个Commit对象。
4.6.2 删除未合并分支
如果删除了未合并的分支怎么恢复。
当前处于dev分支,新建index.txt文件并commit
git log --oneline
accd781 (HEAD -> dev) dev index.txt
6fb55ca (master) index.html
f3e6839 dev commit
799f231 Hello world
4161dc1 heihei
944e412 rename file
02852da update filename
81dd455 update filename
f5c310a delete test1.txt
9a08888 add test1.txt
0ce400e delete test1.txt
262e104 add test1.txt
10d9664 delete test.txt
9e0e265 hello world
a6cfb82 init commit
删除分支时,是不能删除当前分支的。先切换到master
git checkout master
Switched to branch 'master'

# 此时删除dev分支,会提示dev分支还没有完全合并到master,我们仍然将其删除
git branch -d dev
error: The branch 'dev' is not fully merged.
If you are sure you want to delete it, run 'git branch -D dev'

# 强行删除dev分支
git branch -D dev
Deleted branch dev (was accd781)
虽然dev分支被删除了,其实commit记录还是存在的,只是我们看不到了。分支就像一张标签一样指向某个commit,因此删除分支只是将这张标签从这个commit上撕了下来。只是我们可能没有记录下这个commit的SHA-1,所以不容易再拿来使用。
所以,即使分支没有合并就被删除了,还是有机会可以恢复回来的
# 创建dev分支,并让其指向accd781这个commit
git branch dev accd781
# 切换分支,发现index.txt又回来了
git checkout dev
4.6.3 Rebase
rebase,有重新定义分支的参考基准的含义。
我们在master分支基础上,创建一个新的test分支,在test分支上创建test.html文件并提交。
git checkout dev
Switched to branch 'dev'

git log --oneline
accd781 (HEAD -> dev) dev index.txt
6fb55ca (master) index.html
f3e6839 dev commit
799f231 Hello world
4161dc1 heihei
944e412 rename file
02852da update filename
81dd455 update filename
f5c310a delete test1.txt
9a08888 add test1.txt
0ce400e delete test1.txt
262e104 add test1.txt
10d9664 delete test.txt
9e0e265 hello world
a6cfb82 init commit

git checkout test
Switched to branch 'test'

git log --oneline
11757d4 (HEAD -> test) branch test commit
6fb55ca (master) index.html
f3e6839 dev commit
799f231 Hello world
4161dc1 heihei
944e412 rename file
02852da update filename
81dd455 update filename
f5c310a delete test1.txt
9a08888 add test1.txt
0ce400e delete test1.txt
262e104 add test1.txt
10d9664 delete test.txt
9e0e265 hello world
a6cfb82 init commit
可以看到dev和test分支都是基于master分支的。
git rebase dev
Successfully rebased and updated refs/heads/test.
上述命令的意思就是,test分支现在要重新定义其参考基准(其当前参考基准为master),并以dev分支作为新的参考基准
git log --oneline
b871de9 (HEAD -> test) branch commit test2.html
60a9a4c branch test commit
accd781 (dev) dev index.txt
6fb55ca (master) index.html
f3e6839 dev commit
799f231 Hello world
4161dc1 heihei
944e412 rename file
02852da update filename
81dd455 update filename
f5c310a delete test1.txt
9a08888 add test1.txt
0ce400e delete test1.txt
262e104 add test1.txt
10d9664 delete test.txt
9e0e265 hello world
a6cfb82 init commit
可以看到test分支的参考基准已经变成了dev分支,并且之前的commit 11757d4变成了commit 60a9a4c。说明rebase会修改commit的SHA-1值
4.6.4 取消rebase
如果知道rebase之前该分支的所指向的commit,可以直接git reset commit值 --hard
4.6.5 合并发生冲突
-
此时我们在test分支上修改inex.html,在首行添加一行
<h1>这是一个html文件</h1>,并commit。 -
切换到dev分支,修改inex.html,在首行添加一行
<h1>这不是一个html</h1>,并commit。 -
在dev分支上合并test分支
git merge test Auto-merging inex.html CONFLICT (content): Merge conflict in inex.html Automatic merge failed; fix conflicts and then commit the result -
查看git状态
git status
On branch dev
You have unmerged paths.
  (fix conflicts and run "git commit")
  (use "git merge --abort" to abort the merge)

Changes to be committed:
        new file:   test.html
        new file:   test2.html

Unmerged paths:
  (use "git add <file>..." to mark resolution)
        both modified:   inex.html
因为inex.html文件在两个分支上都修改了同一行,因此git将其标记为both modified状态
-
解决冲突
<<<<<<< HEAD
<h1>这不是一个html</h1>
=======
<h1>这是一个html文件</h1>
>>>>>>> test
git将有冲突的地方标记了出来,上面是HEAD,表示是当前分支dev,中间是分隔线,分隔线下面test分支的内容。最后我们决定使用test分支的内容,顺便把标记清除。处理之后的文本
<h1>这是一个html文件</h1>如果可以确定要使用谁的版本,也可以使用以下命令来解决冲突:
# 使用我们自己的版本来解决冲突 git checkout --ours inex.html # 使用被合并方的版本来解决冲突 git checkout --theirs inex.html -
将修改完的文本添加到暂存区
git add inex.html git status On branch dev All conflicts fixed but you are still merging. (use "git commit" to conclude merge) Changes to be committed: modified: inex.html new file: test.html new file: test2.html -
commit
5.修改历史记录
5.1 修改历史commit的信息
要修改历史记录信息,之前我们使用了
--amend参数,来修改最后一次commit的信息,但是,要改动更早的commit信息,就得使用其他的方法了。
我们这里还是使用git rebase命令,然后配置-i参数,开启互动模式,而后面的aeb827f指的是应用范围为“从当前commit到aeb827f这个commit”
git rebase -i aeb827f
会弹出vim编辑器,这里的commit顺序与git log指令结果的顺序是相反的。
pick de98713 test2
pick 777cde5 test stash

# Rebase aeb827f..777cde5 onto aeb827f (2 commands)
#
# Commands:
# p, pick <commit> = use commit
# r, reword <commit> = use commit, but edit the commit message
# e, edit <commit> = use commit, but stop for amending
# s, squash <commit> = use commit, but meld into previous commit
# f, fixup [-C | -c] <commit> = like "squash" but keep only the previous
#                    commit's log message, unless -C is used, in which case
#                    keep only this commit's message; -c is same as -C but
#                    opens the editor
# x, exec <command> = run command (the rest of the line) using shell
# b, break = stop here (continue rebase later with 'git rebase --continue')
# d, drop <commit> = remove commit
# l, label <label> = label current HEAD with a name
# t, reset <label> = reset HEAD to a label
# m, merge [-C <commit> | -c <commit>] <label> [# <oneline>]
#         create a merge commit using the original merge commit's
#         message (or the oneline, if no original merge commit was
我们将前两行的pick改成reword,表示要改动这两次commit的信息,存档并离开后,会继续弹出vim窗口,以便我们修改commit信息,在修改完之后,Git会继续完成后面的操作。
由于修改了commit的信息,两次commit的SHA-1值都变了,变成了两个全新的commit对象。
5.2 把多个commit合并为一个commit
有时候,commit太过琐碎,可能多个commit也就修改了一个文件,如果把这几个commit合并为一个commit,会让commit看起来更简洁。我们同样可以使用**
git rebase**来处理。
git rebase -i aeb827f
会弹出如下vim编辑窗口:
pick de98713 test2
pick 777cde5 test stash

# Rebase aeb827f..777cde5 onto aeb827f (2 commands)
#
# Commands:
# p, pick <commit> = use commit
# r, reword <commit> = use commit, but edit the commit message
# e, edit <commit> = use commit, but stop for amending
# s, squash <commit> = use commit, but meld into previous commit
# f, fixup [-C | -c] <commit> = like "squash" but keep only the previous
#                    commit's log message, unless -C is used, in which case
#                    keep only this commit's message; -c is same as -C but
#                    opens the editor
# x, exec <command> = run command (the rest of the line) using shell
# b, break = stop here (continue rebase later with 'git rebase --continue')
# d, drop <commit> = remove commit
# l, label <label> = label current HEAD with a name
# t, reset <label> = reset HEAD to a label
# m, merge [-C <commit> | -c <commit>] <label> [# <oneline>]
#         create a merge commit using the original merge commit's
#         message (or the oneline, if no original merge commit was
这里我们将第二行的pick修改为squash,表明就第二个commit与第一个commit进行合并。编辑并保存编辑器后,会继续弹出vim编辑窗口:
# This is a combination of 2 commits.
# This is the 1st commit message:

test2

# This is the commit message #2:

test stash

# Please enter the commit message for your changes. Lines starting
# with '#' will be ignored, and an empty message aborts the commit.
#
# Date:      Sat Feb 11 16:31:51 2023 +0800
#
# interactive rebase in progress; onto aeb827f
# Last commands done (2 commands done):
#    pick de98713 test2
#    squash 777cde5 test stash
# No commands remaining.
# You are currently rebasing branch 'test2' on 'aeb827f'.
#
# Changes to be committed:
这里我们将commit信息,修改为一个就好。编辑并保存后,Git会继续完成后续的rebase操作。
5.3 将一个commit拆解为多个commit
有的时候,我们在一个commit中提交了过多的文件,我们同样可以使用**
git rebase -i**来进行拆解。
git rebase -i aeb827f
会弹出vim编辑窗口:
pick de98713 test2
pick 777cde5 test stash
pick 3ac54d7 commit two files

# Rebase aeb827f..3ac54d7 onto aeb827f (3 commands)
#
# Commands:
# p, pick <commit> = use commit
# r, reword <commit> = use commit, but edit the commit message
# e, edit <commit> = use commit, but stop for amending
# s, squash <commit> = use commit, but meld into previous commit
# f, fixup [-C | -c] <commit> = like "squash" but keep only the previous
#                    commit's log message, unless -C is used, in which case
#                    keep only this commit's message; -c is same as -C but
#                    opens the editor
# x, exec <command> = run command (the rest of the line) using shell
# b, break = stop here (continue rebase later with 'git rebase --continue')
# d, drop <commit> = remove commit
# l, label <label> = label current HEAD with a name
# t, reset <label> = reset HEAD to a label
# m, merge [-C <commit> | -c <commit>] <label> [# <oneline>]
#         create a merge commit using the original merge commit's
因为3ac54d7提交了两个文件,我们将这个commit拆解为两个commit。将其前面的pick修改为edit,这个时候rebase就停止下来了。
git rebase -i aeb827f

Stopped at 3ac54d7...  commit two files
You can amend the commit now, with

  git commit --amend

Once you are satisfied with your changes, run

  git rebase --continue
先查看一下git log
git log --oneline

3ac54d7 (HEAD, test2) commit two files
777cde5 test stash
de98713 test2
aeb827f (tag: v1.0) inti commit
此时HEAD指向的3ac54d7这个commit,我们可以使用git reset HEAD^,再查看status
git status
interactive rebase in progress; onto aeb827f
Last commands done (3 commands done):
   pick 777cde5 test stash
   edit 3ac54d7 commit two files
  (see more in file .git/rebase-merge/done)
No commands remaining.
You are currently editing a commit while rebasing branch 'test2' on 'aeb827f'.
  (use "git commit --amend" to amend the current commit)
  (use "git rebase --continue" once you are satisfied with your changes)

Untracked files:
  (use "git add <file>..." to include in what will be committed)
        one.html
        two.html

nothing added to commit but untracked files present (use "git add" to track)
达到这个状态,我们就可以使用熟悉git add配合git commit命令了。
git add one.html
git commit -m 'add one.html'

git add two.html
git commit -m 'add two.html'
最后,我们使用git rebase --continue,就可以完成此次rebase操作了。再次查看git log:
git log --oneline

926265c (HEAD -> test2) add two.html
ca245ec add one.html
777cde5 test stash
de98713 test2
aeb827f (tag: v1.0) inti commit
5.4 在某些commit之间添加新的commit
这个操作的原理和我们上面讲到的将一个commit拆解为多个commit的原理是一样的,都是需要先将rebase操作暂停在某个commit之上,然后进行后续的操作。
5.5 调整commit的顺序/删除commit
1.使用
git rebase -i命令,在弹出的vim编辑器窗口中,调整commit的顺序即可。2.使用
git rebase -i命令,在弹出的vim编辑器窗口中,调整commit前面的pick改成drop即可。
但是,不管是调整commit的顺序,还是删除某个commit,都要注意相互关联性的问题,否则会出现很大的问题,因此在使用rebase指令时要特别注意。
5.6 reset、rebase和revert的区别
5.6.1 使用revert
先来看看revert指令的用法。如果要取消最后的commit,看看使用revert指令来处理,
# --no-edit:表示不编辑commit信息
git revert HEAD --no-edit

# 输出内容
[test2 8a27f7b] Revert "commit two files"
 Date: Sat Feb 11 22:01:32 2023 +0800
 2 files changed, 2 deletions(-)
 delete mode 100644 one.html
 delete mode 100644 two.html
这个时候,最后一次commit的文件删掉了,但是会新增一个commit。表明revert指令就是创建一个新的commit,来取消我们不需要的commit。
git log --oneline

# 输出内容
8a27f7b (HEAD -> test2) Revert "commit two files"
3ac54d7 commit two files
777cde5 test stash
de98713 test2
aeb827f (tag: v1.0) inti commit
5.6.2 取消revert
1.我们可以再开一个revert来取消上一个revert,但这又会增加一个commit,有点套娃的意思。
2.使用git reset HEAD^
5.6.3 3个指令的区别
| 指令 | 是否修改历史记录 | 说明 |
|---|---|---|
| reset | 是 | 把当前状态设置成某个指定的commit的状态,通常适用于尚未push的commit |
| rebase | 是 | 用来对commit进行新增、修改、删除等操作,通常适用于尚未push的commit |
| revert | 否 | 新增一个commit来取消另一个commit的内容,原来的commit会保留,通常适用于已经push的commit |
6.标签(tag)
通常我们开发的软件在完成特定的版本并上线后,就需要使用tag来做标记。
6.1 添加tag
标签可以分为轻量标签(lightweight tag)和有附注的标签(annotated tag),都存放与.git/refs/tags目录下。
# 轻量标签
git tag tag1 3ac54d7

# 有附注的标签,适用于程序发版时。-a:声明为有附注的标签,-m:添加说明
git tag tagv1 51d54ff -a -m "v1"
6.2 删除tag
git tag -d tag1
7.远程仓库
在这之前的操作,我们都是本地的Git仓库进行的,接下来我们需要把本地Git仓库推送到远程仓库中。
7.1 推送到Gitee
如果本地还不存在Git仓库,需要新创建一个目录,执行git init初始化,然后添加一些文件,执行git add和git commit,这个时候我们的本地仓库就配置好了。
7.1.1 为本地仓库添加远程节点
接下来,我们需要为本地仓库配置远程仓库,这样我们才能将本地的内容推送上去。
git remote add origin https://gitee.com/xx/test2.git
- git remote:是指与远程仓库相关的操作
- add指令:是指为本地仓库添加一个远程的节点
- origin:是一个节点代名词,默认使用这个名词,指的就是远程仓库的地址(https://gitee.com/xx/test2.git)
执行以上命令,就为本地仓库添加了远程仓库节点,接下来就可以将我们的本地仓库的内容推送到远程仓库了。
7.1.2 推送到远程仓库
# 意思是将本地仓库的master分支推送到origin远程仓库节点的master分支上,如果远程仓库中master分支不存在,就创建一个。
git push -u origin master

# 上面的指令与这个指令是一样的效果
git push -u origin master:master

# 意思是将本地仓库的master分支推送到origin远程仓库节点的test1分支上,如果远程仓库中test1分支不存在,就创建一个。
git push -u origin master:test1
-u:用来设置upstream,指代远程仓库的某个分支,设置之后,下次执行git push命令并且不加任何参数时,Git就会知道我们要把本地分支master分支推送到origin远程仓库节点的master分支上,使用起来更加简便。
7.2 更新远程仓库到本地
7.2.1 将远程仓库内容拉取到本地
git fetch
执行以上命令,会把远程仓库上更新的内容拉取下来,并让origin/master这个分支指向最新的commit,此时本地仓库的master分支的内容保持不变,所以该命令实际上并没有让本地仓库的内容与远程仓库的内容进行真正的同步。
7.2.2 同步内容到本地仓库
既然
git fetch拉取下来的内容在origin/master,那么我们将其合并过来,就实现了本地仓库内容与远程仓库内容的同步。
git merge origin/master
7.2.3 pull命令
git pull实际上是等于先执行git fetch操作,然后再执行git merge操作。
7.2.4 删除远程仓库分支
git push origin :test1
7.2.5 推送tag到远程仓库
前面我们在本地创建了tag,那么要怎样才能推送到远程仓库呢?
git push --tags
在push的时候加上--tags参数,就可以将本地的tag推送到远程仓库了。

