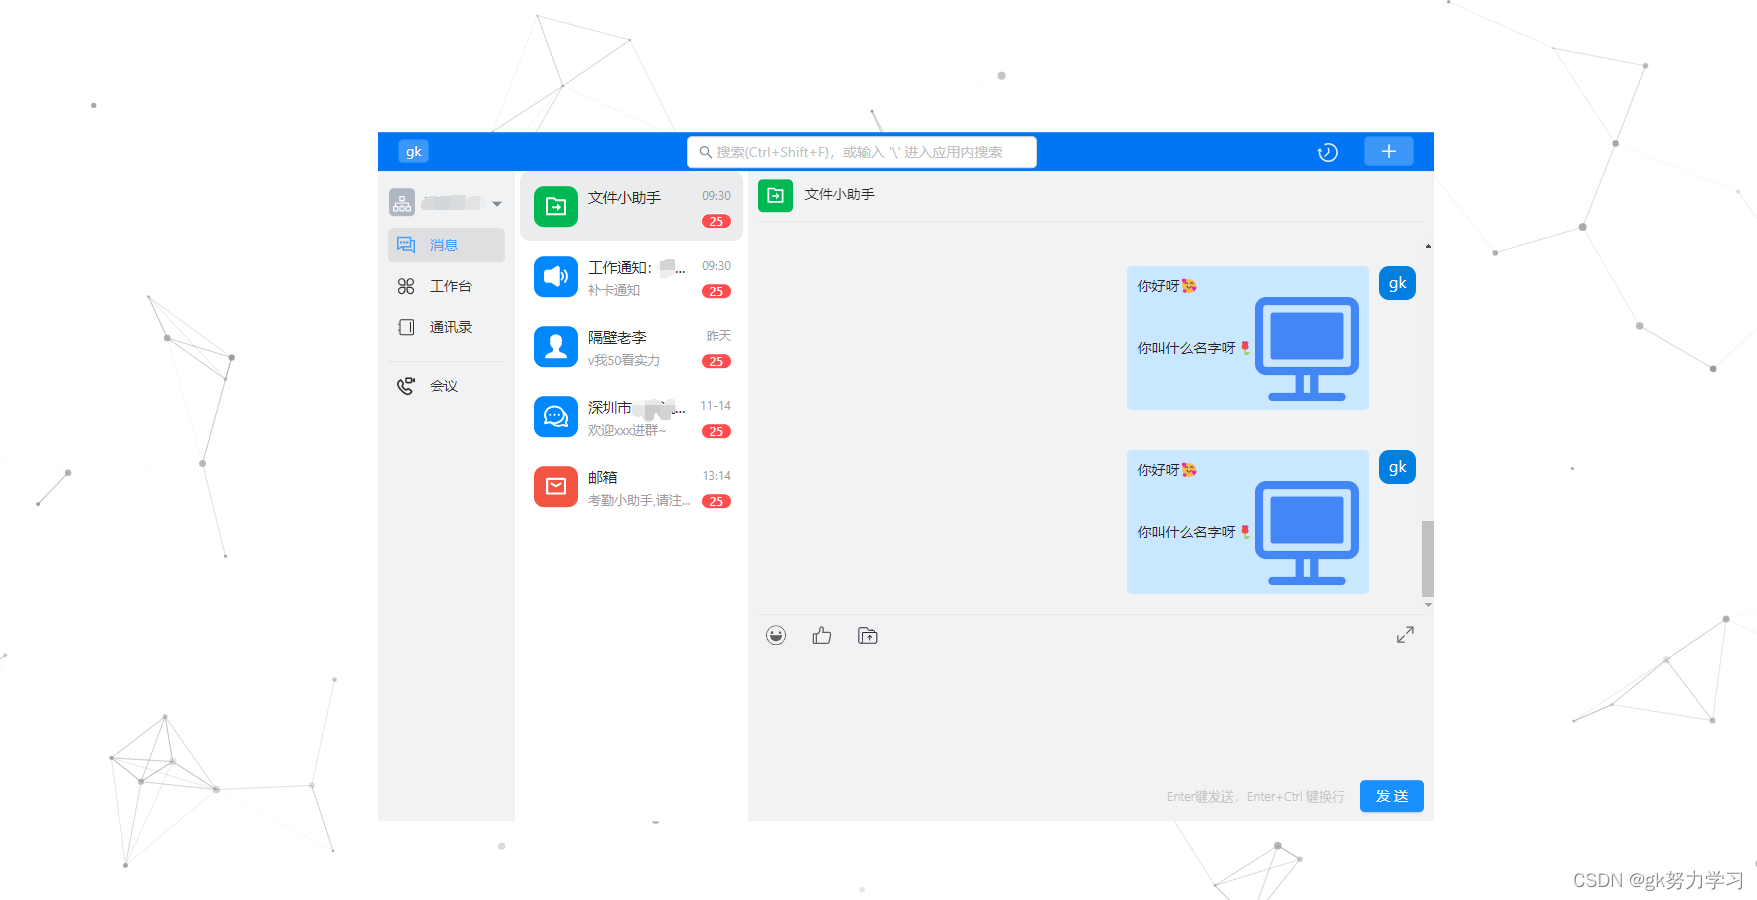
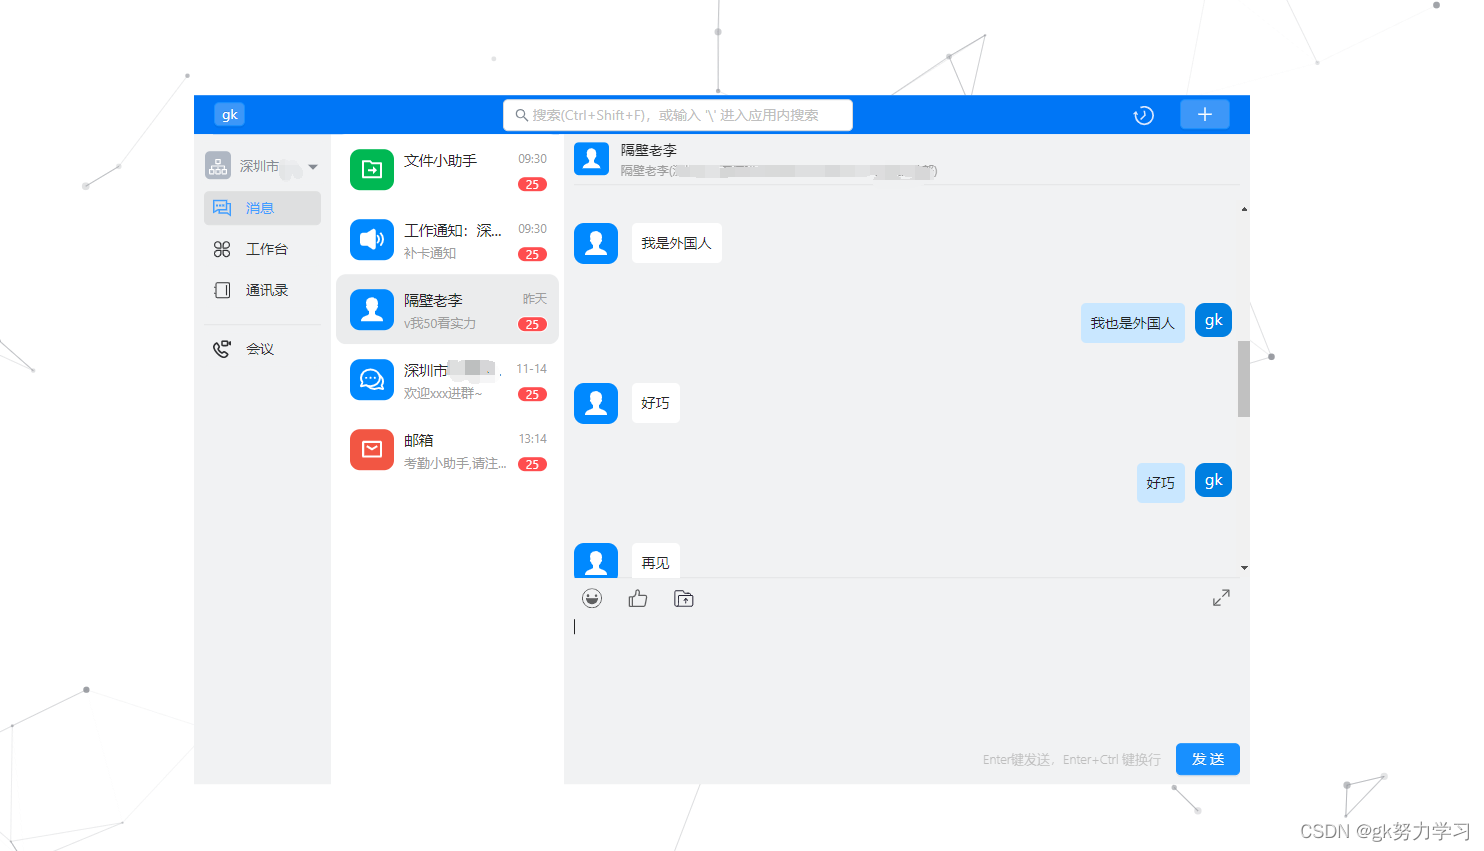
效果图
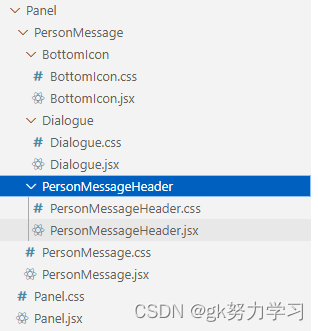
文件结构
对话框
一、 难点
对话框的难点主要在样式上
- 双方对话分布在左右
- 长对话的长度不能超过整个对话框宽度的一半
- 图片的大小最大不能超过整个对话框宽度的一半,并且需要按比例进行收缩
二、与要引入的插件
1、 阿里巴巴的iconfont 可以去这篇博客里面看是怎么使用的:https://blog.csdn.net/qq_45634989/article/details/127851878
三、对话框代码
组件代码 Dialogue.jsx
import React, { Component } from 'react'
import { Row, Col } from 'antd';//蚂蚁金服 Ant Design组件库
import { createFromIconfontCN } from '@ant-design/icons';//创建IconFont 对象需要的方法
import { ALIICONURL } from '../../../../../utils/constant';//个人阿里巴巴图库链接 因为随时会变,所以把他作为一个常量引入了
import { getToken } from '../../../../../utils/request/auth';//自定义的获取token值的方法,如果不需要判断可以不引入
import './Dialogue.css'//引入的css样式,下文中有

export default class Dialogue extends Component {
    IconFont = createFromIconfontCN({
        scriptUrl: ALIICONURL,
    });//创建IconFont 对象
    componentDidMount() {
    //这个方法是为了页面初始化的时候,用户看到的都是最后几条条消息
        if (this.messagesEnd) {
            const scrollHeight = this.messagesEnd.scrollHeight;//里面div的实际高度
            const height = this.messagesEnd.clientHeight;  //网页可见高度
            const maxScrollTop = scrollHeight - height;
            this.messagesEnd.scrollTop = maxScrollTop > 0 ? maxScrollTop : 0;
        }
    }
    componentDidUpdate() {
    //这个方法是为了页面更新的时候,用户看到的都是最后几条条消息
        if (this.messagesEnd) {
            const scrollHeight = this.messagesEnd.scrollHeight;//里面div的实际高度
            const height = this.messagesEnd.clientHeight;  //网页可见高度
            const maxScrollTop = scrollHeight - height;
            this.messagesEnd.scrollTop = maxScrollTop > 0 ? maxScrollTop : 0;
        }
    }
    //点击聊天中的图片时,会在新窗口看到放大的图片,而不是缩略形式
    showImg = (src) => {
        return () => {
            const img = new window.Image();
            img.src = src;
            const newWin = window.open('');
            newWin.document.write(img.outerHTML);
            newWin.document.title = '图片展示'
            newWin.document.close();
        }
    }
    /**
    采用的思路:
    1、使用Grid栅格来保证双方聊天记录左右分布
    2、使用position(父组件PersonMessage.jsx传过来)这个变量来控制聊天记录显示的位置时左还是右
    **/
    render() {
        let message = this.props
        message = Object.values(message)
        const name = getToken('nickName')
        return (
            <div className='dialogue_all' ref={(el) => { this.messagesEnd = el; }} >
                {
                    message.map((m) => {
                        return <div key={m.id} style={{ width: '100%', 'padding': "20px 0px 20px 0px" }}>
                            <Row>
                                <Col span={12} style={{ visibility: m.position === 'left' ? 'visible' : 'hidden', width: '100%' }}>
                                    <div className='dialogue_div1'>
                                        <span className='dialogue_icon1' style={{ backgroundColor: m.color }}>
                                            <this.IconFont type={m.icon} className='messageItem_icon' />
                                        </span>
                                    </div>
                                    <div className='dialogue_div3'>
                                        <span style={{ margin: '9px 10px 9px 10px', display: 'block' }}>
                                            {
                                                m.info.map((content, i) => {
                                                    return (
                                                        <span key={i}>
                                                            {content.insert.image ? <img onClick={this.showImg(content.insert.image)} src={content.insert.image} style={{ objectFit: 'contain', maxHeight: '100%', maxWidth: '100%' }} alt="" /> : <span>{content.insert}</span>}
                                                        </span>
                                                    )
                                                })
                                            }
                                        </span>
                                    </div>
                                </Col>
                                <Col span={12} style={{ textAlign: 'right', visibility: m.position === 'right' ? 'visible' : 'hidden', width: '100%' }} >
                                    <div className='dialogue_div2'>
                                        <span style={{ margin: '9px 10px 9px 10px', display: 'block', textAlign: 'left' }}>
                                            {
                                                m.info.map((content, i) => {
                                                    return (
                                                        <span key={i}>
                                                            {content.insert.image ? <img onClick={this.showImg(content.insert.image)} src={content.insert.image} style={{ objectFit: 'contain', maxHeight: '100%', maxWidth: '100%' }} alt="" /> : <span>{content.insert}</span>}
                                                        </span>
                                                    )
                                                })
                                            }
                                        </span>
                                    </div>
                                    <div className='dialogue_div1'>
                                        <span className='dialogue_icon2' style={{ backgroundColor: '#007FE1' }}>
                                            <span style={{ fontSize: '16px', color: '#ffffff' }}>{name}</span>
                                        </span>
                                    </div>
                                </Col>
                            </Row>
                        </div>
                    })
                }
            </div>
        )
    }
}
聊天框样式
.dialogue_all{
    max-height: 100%;
    height:100%;
    width: 100%;
    overflow-y:scroll;
    white-space: pre-wrap;
}
.dialogue_icon1 {
    font-size: 20px;
    padding: 7px 10px 7px 10px;
    margin: 0 4px 4px 0;
    border-radius: 10px;
    position: relative;
    top: 0.3rem;
}
.dialogue_icon2 {
    font-size: 20px;
    padding: 0px 10px 7px 10px;
    margin: 0 4px 4px 0;
    border-radius: 10px;
    position: relative;
    top: -0.1rem;
}
.dialogue_div1{
    display: inline-block;
    max-width: 20%;
}
.dialogue_div2{
    display: inline-block;
    background-color: rgb(201, 231, 255);
    max-width: 80%;
    vertical-align: top;
    border-radius: 5px;
    margin-right: 10px;
}
.dialogue_div3{
    display: inline-block;
    background-color: rgb(255, 255, 255);
    max-width: 80%;
    vertical-align: top;
    border-radius: 5px;
    margin-left: 10px;
}
输入框+所有组件
难点
1. 输入框能粘贴图片
对于聊天中的输入框,要求是可以输入一定数量的文字,并且能粘贴图片
- 第一时间就想到了textArea,但是textArea不能粘贴图片,pass
- 后面又想到div的可编辑模式,可以模拟输入框,但是后面尝试发现,这种办法的光标太难控制了(需要使用浏览器原生的操作光标的办法,比较难控制),pass
- 最后一个解决办法就是,引入富文本编辑器,将富文本编辑器的上半部分隐藏掉,就可以模拟成一个聊天系统输入框了
<div contenteditable="true">这里可以编辑</div>
2. 回车键发送,CTRL+回车键换行
- 使用onKeyUp键盘方法,判断keyCode是否为13+ctrlKey,是的话在文字后面+‘\n’
3. 在文字中间插入表情,光标在插入表情之后
使用富文本插件所带的getSelection方法获取光标位置,然后在光标位置插入表情
4. 回车不会产生\n
在插件的modules属性中插入这段代码,不能使用event.preventDefault(),无效
keyboard: {
            bindings: {
                enter: {
                    key: 13,
                    handler: (range, context) => {
                        console.log('enter');
                        let ops = this.reactQuillRef.getEditor().getContents().ops
                        console.log(ops)
                        this.setState({ sendMessage: ops }, () => {
                            this.addMessage();//光标放在中间会吞掉后面一个字
                        })
                    }
                },
            }
        }
所使用到的插件
1、emoji-mart 表情插件
yarn add @emoji-mart/data
或
npm install @emoji-mart/data
2、react-quill 富文本编辑器插件
地址:https://github.com/zenoamaro/react-quill
npm install react-quill --save
3、quill-image-drop-module 可以将图片拖拽复制到输入框
地址:https://github.com/kensnyder/quill-image-drop-module
npm install quill-image-drop-module -S
全部代码
组件代码 PersonMessage.jsx
import React, { Component } from 'react'
import { Divider, Button, message } from 'antd' //antd Degin 组件库
import ReactQuill, { Quill } from 'react-quill'; //富文本编辑器
import { ImageDrop } from 'quill-image-drop-module'; //拖拽图片可复制进编辑器
import 'react-quill/dist/quill.snow.css';//富文本编辑器的主题样式
import PersonMessageHeader from './PersonMessageHeader/PersonMessageHeader'//聊天框的头部组件 后面有粘贴(其他组件部分)
import BottomIcon from './BottomIcon/BottomIcon' // 表情选择等图标组件,后面有粘贴(其他组件部分)
import Dialogue from './Dialogue/Dialogue'//聊天界面组件,上文中有提及
import { getToken } from '../../../../utils/request/auth'//获取token值,不需要判断可以不写
import './PersonMessage.css'//css样式
Quill.register('modules/imageDrop', ImageDrop);//使富文本编辑器有拖拽图片的功能

class PersonMessage extends Component {
    state = {
        myMessage: [],//展示在聊天界面的所有记录
        lastEditIndex: '',//光标停留在输入框中的最后位置
        value: '',//聊天框中的内容
        sendMessage: ''//需要发送的那些消息
    }
    modules = {//富文本编辑器的属性
        toolbar: [
            ['bold', 'italic', 'underline', 'strike', 'blockquote'],
            [{ list: 'ordered' }, { list: 'bullet' }, { indent: '-1' }, { indent: '+1' }],
            ['link', 'image'],
            ['clean'],
        ],
        imageDrop: true,
        keyboard: {
            bindings: {
                enter: {
                    key: 13,
                    handler: (range, context) => {
                        console.log('enter');
                        let ops = this.reactQuillRef.getEditor().getContents().ops
                        console.log(ops)
                        this.setState({ sendMessage: ops }, () => {
                            this.addMessage();//光标放在中间会吞掉后面一个字
                        })
                    }
                },
            }
        }
    }
    formats = ['bold', 'italic', 'underline', 'strike', 'blockquote', 'list', 'bullet', 'indent', 'link', 'image',]//富文本编辑器的属性
    static getDerivedStateFromProps(nextProps, nextState) {//preState
        //TODO 此处有个根据id查询消息的请求
        // console.log('nextProps',nextProps.location.state)//id,messageIcon
        const { messageIcon, color } = nextProps.location.state
        //TODO 此处有个从sessionStorage中查出个人图标的请求 getToken('icon') 暂时定为名字
        let myState = nextState.myMessage
        myState.map((s) => {
            return (s.color = color, s.icon = messageIcon)
        })
        const myIcon = getToken('nickName')
        //假数据,如果是真实数据的话,可以在TODO那里请求
        //id 聊天记录的id
        //color:聊天记录的颜色
        //icon:这个是双方的头像,我用ixon来表示了,可以换成图片
        //position:聊天记录的位置,在左边还是右边
        //info:聊天内容 如果是图片,会在里面再包一层image(这个是根据quill的本身属性来的)
        let m = [
            { id: 1, color: color, icon: messageIcon, position: 'left', info: [{ insert: "你好呀😍" }, { insert: { image: 'https://gimg2.baidu.com/image_search/src=http%3A%2F%2Flmg.jj20.com%2Fup%2Fallimg%2F1114%2F041621122252%2F210416122252-1-1200.jpg&refer=http%3A%2F%2Flmg.jj20.com&app=2002&size=f9999,10000&q=a80&n=0&g=0n&fmt=auto?sec=1671784849&t=891f79c11335b0717366ef0105852e68' } }] },
            { id: 2, color: color, icon: myIcon, position: 'right', info: [{ insert: "你好呀🌹" }] },
            { id: 3, color: color, icon: messageIcon, position: 'left', info: [{ insert: "你叫什么名字" }] },
            { id: 4, color: color, icon: myIcon, position: 'right', info: [{ insert: "我叫Mary" }] },
            { id: 5, color: color, icon: messageIcon, position: 'left', info: [{ insert: "我叫jack" }] },
            { id: 6, color: color, icon: myIcon, position: 'right', info: [{ insert: "你是哪里人" }] },
            { id: 7, color: color, icon: messageIcon, position: 'left', info: [{ insert: "我是外国人" }] },
            { id: 8, color: color, icon: myIcon, position: 'right', info: [{ insert: "我也是外国人" }] },
            { id: 9, color: color, icon: messageIcon, position: 'left', info: [{ insert: "好巧" }] },
            { id: 10, color: color, icon: myIcon, position: 'right', info: [{ insert: "好巧" }] },
            { id: 11, color: color, icon: messageIcon, position: 'left', info: [{ insert: "再见" }] },
            { id: 12, color: color, icon: myIcon, position: 'right', info: [{ insert: "好的,我也要走了" }] },
            { id: 13, color: color, icon: messageIcon, position: 'right', info: [{ insert: "下次再聊" }] },
            { id: 14, color: color, icon: myIcon, position: 'right', info: [{ insert: "好的111111111111111111111111111111111111111111111111111111111111111111111111111111111111111111111111111111111111111111111" }] },
        ]
        if (myState.length === 0) {
            return {
                myMessage: m
            }
        } else {
            return {
                myMessage: myState
            }
        }
    }
    shouldComponentUpdate(nextProps, nextState) {
        if (this.props.location.state.id === nextProps.location.state.id && nextState.myMessage.length === this.state.myMessage.length) {
            return false
        } else {
            this.setState({ value: '' })
            return true
        }
    }

//选择表情
    pickEmoji = (emoji, event) => {
        const { lastEditIndex } = this.state
        var range = lastEditIndex;
        let position = range ? range.index : 0;
        this.reactQuillRef.getEditor().insertText(position, emoji.native);//插入表情
        this.reactQuillRef.focus()
        this.reactQuillRef.getEditor().setSelection(position + 2);//必须要+2,否则回车键会让表情变乱码
    }
    //将消息加进聊天界面
    addMessage = () => {
        const { myMessage, sendMessage } = this.state
        let value = sendMessage
        let length = value.length
        if (value.length !== 0) {
        //如果是换行就删除
            if (!value[length - 1].insert.image) {
                if (value[length - 1].insert === '\n' || value[length - 1].insert === '\n\n') {
                    console.log(111)
                    value = value.slice(0, -1)
                }
            }
            //将末尾的\n\n或\n删除
            for (let i = 0; i < value.length; i++) {
                if (!value[i].insert.image) {
                    let tt = value[i].insert
                    value[i].insert = tt.slice(0, tt.length - 1)
                }
            }
            if (value.length === 0) {
                message.info('发送内容不能为空,请输入');
            } else {
                let newArr = myMessage
                newArr = newArr.concat({ id: myMessage.length + 1, color: '"#00B853"', icon: 'gk', position: 'right', info: value })
                this.setState({ myMessage: newArr, value: '', sendMessage: '' })
            }

        } else {
            message.info('发送内容不能为空,请输入');
        }
        this.reactQuillRef.focus()
    }
//键盘事件 enter发送  ctrl+enter换行
    onKeyup = (e) => {
        if (e.keyCode === 13) {
            if (window.event.ctrlKey) {
                var range = this.reactQuillRef.getEditor().getSelection();
                let position = range ? range.index : 0;
                this.reactQuillRef.getEditor().insertText(position, "\n");
                this.reactQuillRef.focus()
                this.reactQuillRef.getEditor().setSelection(position + 1);
            }
        }
    }
    //当失去焦点之前,报讯光标在输入框中的最后位置
    blur = () => {
        var range = this.reactQuillRef.getEditor().getSelection();
        this.setState({ lastEditIndex: range })
    };
    render() {
        const { value } = this.state
        return (
            <div style={{ width: '100%', height: '100%' }}>
                <div className='personMessage_padd'>
                    <PersonMessageHeader {...this.props.location.state} />
                </div>
                <div className='person_line_padd'><Divider /></div>
                <div className='personMessageMain'>
                    <Dialogue {...this.state.myMessage} />
                </div>
                <div className='person_line_padd'><Divider /></div>
                <div style={{ marginTop: "10px" }} >
                    <BottomIcon title="表情" icon="icon-biaoqing" pickEmoji={this.pickEmoji} />
                    <BottomIcon title="点赞" icon="icon-dianzan" />
                    <BottomIcon title="发送文件" icon="icon-wenjianshangchuan" />
                    <BottomIcon title="富文本输入" icon="icon-zhankaiquanpingkuozhan" right={true} />
                </div>
                <div style={{ 'marginRight': '5px' }} onBlurCapture={this.blur}>
                    <ReactQuill
                        className='personMessage_textArea'
                        modules={this.modules}
                        formats={this.formats}
                        onChange={this.handleChange}
                        value={value}
                        theme="snow"
                        onKeyUp={this.onKeyup}
                        ref={c => {
                            if (c) {
                                this.reactQuillRef = c;
                                c.focus()
                            }
                        }
                        }

                    // onBlur={this.inputBlur}不可以,当富文本失去焦点的时候,会出现getSelection为null
                    />
                </div>
                <div style={{ padding: "0px 10px 10px 10px", 'float': 'right' }}>
                    <span style={{ marginRight: '15px', fontSize: '13px', 'color': '#BDBDBD', 'fontWeight': '300' }}>Enter键发送,Enter+Ctrl 键换行</span>
                    <Button type="primary" size="middle" style={{ 'borderRadius': '5px' }} onClick={this.addMessage}>
                        发送
                    </Button>
                </div>
            </div>

        )
    }
}
export default PersonMessage
css样式 PersonMessage.css
.personMessage_padd {
    margin: 0px 10px 0px 10px;
    width: 100%;
    height: 40px;
}

.person_line_padd {
    margin: 10px 10px 10px 10px;
}

.personMessageMain {
    /* background-color: aqua; */
    height: 58%;
    margin-top: 5px;
    max-height: 58%;
    min-height: 58%;
    margin-left: 10px;
    width: 99%;
    min-width: 99%;
    max-width: 99%;
    float: left;
}

.personMessage_textArea {
    /* padding: 40px 0px 0px 10px; */
    margin: 40px 10px 10px 10px;
    min-height: 115px;
    max-width: 98%;
    min-width: 98%;
    border: 0;
    background-color: #F1F2F3;
    max-height: 115px;
    resize: none;
    font-size: 15px;
    overflow:auto
}
.personMessage_textArea:focus {

    outline: none;
    white-space: pre-wrap;
    font-size: 15px;
}
/* 富文本框的样式 */
.ql-toolbar.ql-snow {
    border: 0;
    display: none;
}
.ql-editor{
    padding: 0;
    min-height: 115px;
    max-height: 115px;
}
.ql-container.ql-snow{
    border: 0;
}
.ql-container{
    min-height: 115px;
    max-height: 115px;
}

/* 输入框滚动条样式 */
/* .personMessage_textArea::-webkit-scrollbar {
    height: 0;
    width: 0;
    color: transparent;
} */
textarea.ant-input{
    min-height: 110px;
}
其他组件的代码和样式
头部组件 PersonMessage_header.jsx
import React, { Component } from 'react'
import { createFromIconfontCN } from '@ant-design/icons';
import { ALIICONURL } from '../../../../../utils/constant';
import './PersonMessageHeader.css'

class PersonMessage_header extends Component {
  state = { myName: '', myTeam: '' }
  IconFont = createFromIconfontCN({
    scriptUrl: ALIICONURL,
  });
  static getDerivedStateFromProps(nextProps, state) {
    const { team, name } = nextProps
    if (state.myName === name && state.myTeam === team) {
      return null
    }
    let t = team
    let n = name
    if (team.length > 40) {
      t = t.strstring(0, 38)+'...'
    }
    if (name.length > 40) {
      n = n.strstring(0, 38)+'...'
    }
    return {
      myName: n, myTeam: t
    }
  }
  render() {
  //messageIcon :聊天对方的头像,我这里用icon代替的可以用图片
  // color :头像的背景颜色
    const { messageIcon, color } = this.props
    const { myName, myTeam } = this.state
    return (
      <div className={myTeam === '' ?'PersonMessage_header_div0':'PersonMessage_header_div01'}>
      {/* <div className='PersonMessage_header_div0'> */}
        <div className='PersonMessage_header_div1'>
          <span className={myTeam === '' ? 'PersonMessage_header_button2' : 'PersonMessage_header_button1'} style={{ backgroundColor: color }}><this.IconFont type={messageIcon ? messageIcon : " "} className='PersonMessage_header_icon' /></span>
        </div>
        <div className='PersonMessage_header_div2'>
          <span className='PersonMessage_header_name'>{myName}</span>
          <br />
          <span className='PersonMessage_header_team'>{myTeam}</span>
        </div>
      </div>
    )
  }
}
export default PersonMessage_header
头部组件样式
PersonMessage_header.css
.PersonMessage_header_button1 {
    font-size: 16px;
    padding: 6px 8px 6px 8px;
    margin: 0 4px 4px 0;
    border-radius: 5px;
    position: relative;
    top: 0.45rem;
}
.PersonMessage_header_button2 {
    font-size: 16px;
    padding: 6px 8px 6px 8px;
    margin: 0 4px 4px 0;
    border-radius: 5px;
    position: relative;
    top: 0.01rem;
}


.PersonMessage_header_icon {
    font-size: larger;
    color: #fff;
}

.PersonMessage_header_name {
    font-weight: 520;
    font-size: 14px;
}

.PersonMessage_header_team {
    color: #9e9e9e;
    font-size: 12px;
}
.PersonMessage_header_div0{
    padding-top: 12px;
    height: 100%;
}
.PersonMessage_header_div01{
    height: 100%;
    padding: 5px 0px 5px 0px;
}
.PersonMessage_header_div1{
    float: left;
}
.PersonMessage_header_div2{
    font-size: 0;
    float: left;
    margin-left: 8px;
}
图标组件 BottomIcon.jsx
import React, { Component } from 'react'
import { Tooltip, Popover } from 'antd'
import data from '@emoji-mart/data'
import Picker from '@emoji-mart/react'
import { createFromIconfontCN } from '@ant-design/icons';
import { ALIICONURL } from '../../../../../utils/constant';
import './BottomIcon.css'

export default class BottomIcon extends Component {
    state = { move: false, emoji: false }
    IconFont = createFromIconfontCN({
        scriptUrl: ALIICONURL,
    });
    content = (
        <div>
            <Picker data={data} onEmojiSelect={(emoji, event) => {if (this.props.pickEmoji) { this.props.pickEmoji(emoji, event);this.setState({emoji: false}) } }} />
        </div>
    );
    mouseHander = (flag) => {
        return () => {
            this.setState({ move: flag })
        }
    }
    handleVisibleChange = (e) => {
        if (e) {
            if (this.props.title === '表情') {
                this.setState({ emoji: true })
            } else {
                this.setState({ emoji: false })
            }
        } else {
            this.setState({ emoji: false })
        }
    }
    render() {
        const { icon, title } = this.props
        const { move, emoji } = this.state
        return (
            <div >
                <div className={this.props.right ? 'BottomIcon_all1' : 'BottomIcon_all'}  >
                    <Popover content={this.content} open={emoji} trigger="click" onOpenChange={(e) => this.handleVisibleChange(e)}>
                        <Tooltip placement="bottom" title={title} mouseEnterDelay={0} mouseLeaveDelay={0}>
                            <span
                            onMouseEnter={this.mouseHander(true)}
                            onMouseLeave={this.mouseHander(false)}
                            className={move ? 'BottomIcon_icon1' : 'BottomIcon_icon'}
                            >
                                <this.IconFont type={icon} style={{ fontSize: "20px", color: '#5F6061' }} />
                                </span>
                        </Tooltip>
                    </Popover>
                </div>
            </div>
        )
    }
}
图标组件的样式 BottomIcon.css
.BottomIcon_all {
    float: left;
    margin-left: 10px;
}

.BottomIcon_all1 {
    float: right;
    margin-right: 10px;
}

.BottomIcon_icon {
    padding: 8px 8px 5px 8px;
    border-radius: 5px;
}

.BottomIcon_icon1 {
    padding: 8px 8px 5px 8px;
    border-radius: 5px;
    background-color: #D8DBDD;
}

.ant-tooltip-inner {
    font-size: 12px;
}

/* .emoji-mart-search {
    display: none !important;
}

.emoji-mart-preview {
    display: none !important;
} */
结语:如果疑问,欢迎私信或评论区交流~







![[附源码]java毕业设计医院档案管理系统](https://img-blog.csdnimg.cn/265a91fb4866483c9d6eae4287b94c36.png)
