一个简单的BMI计算APP
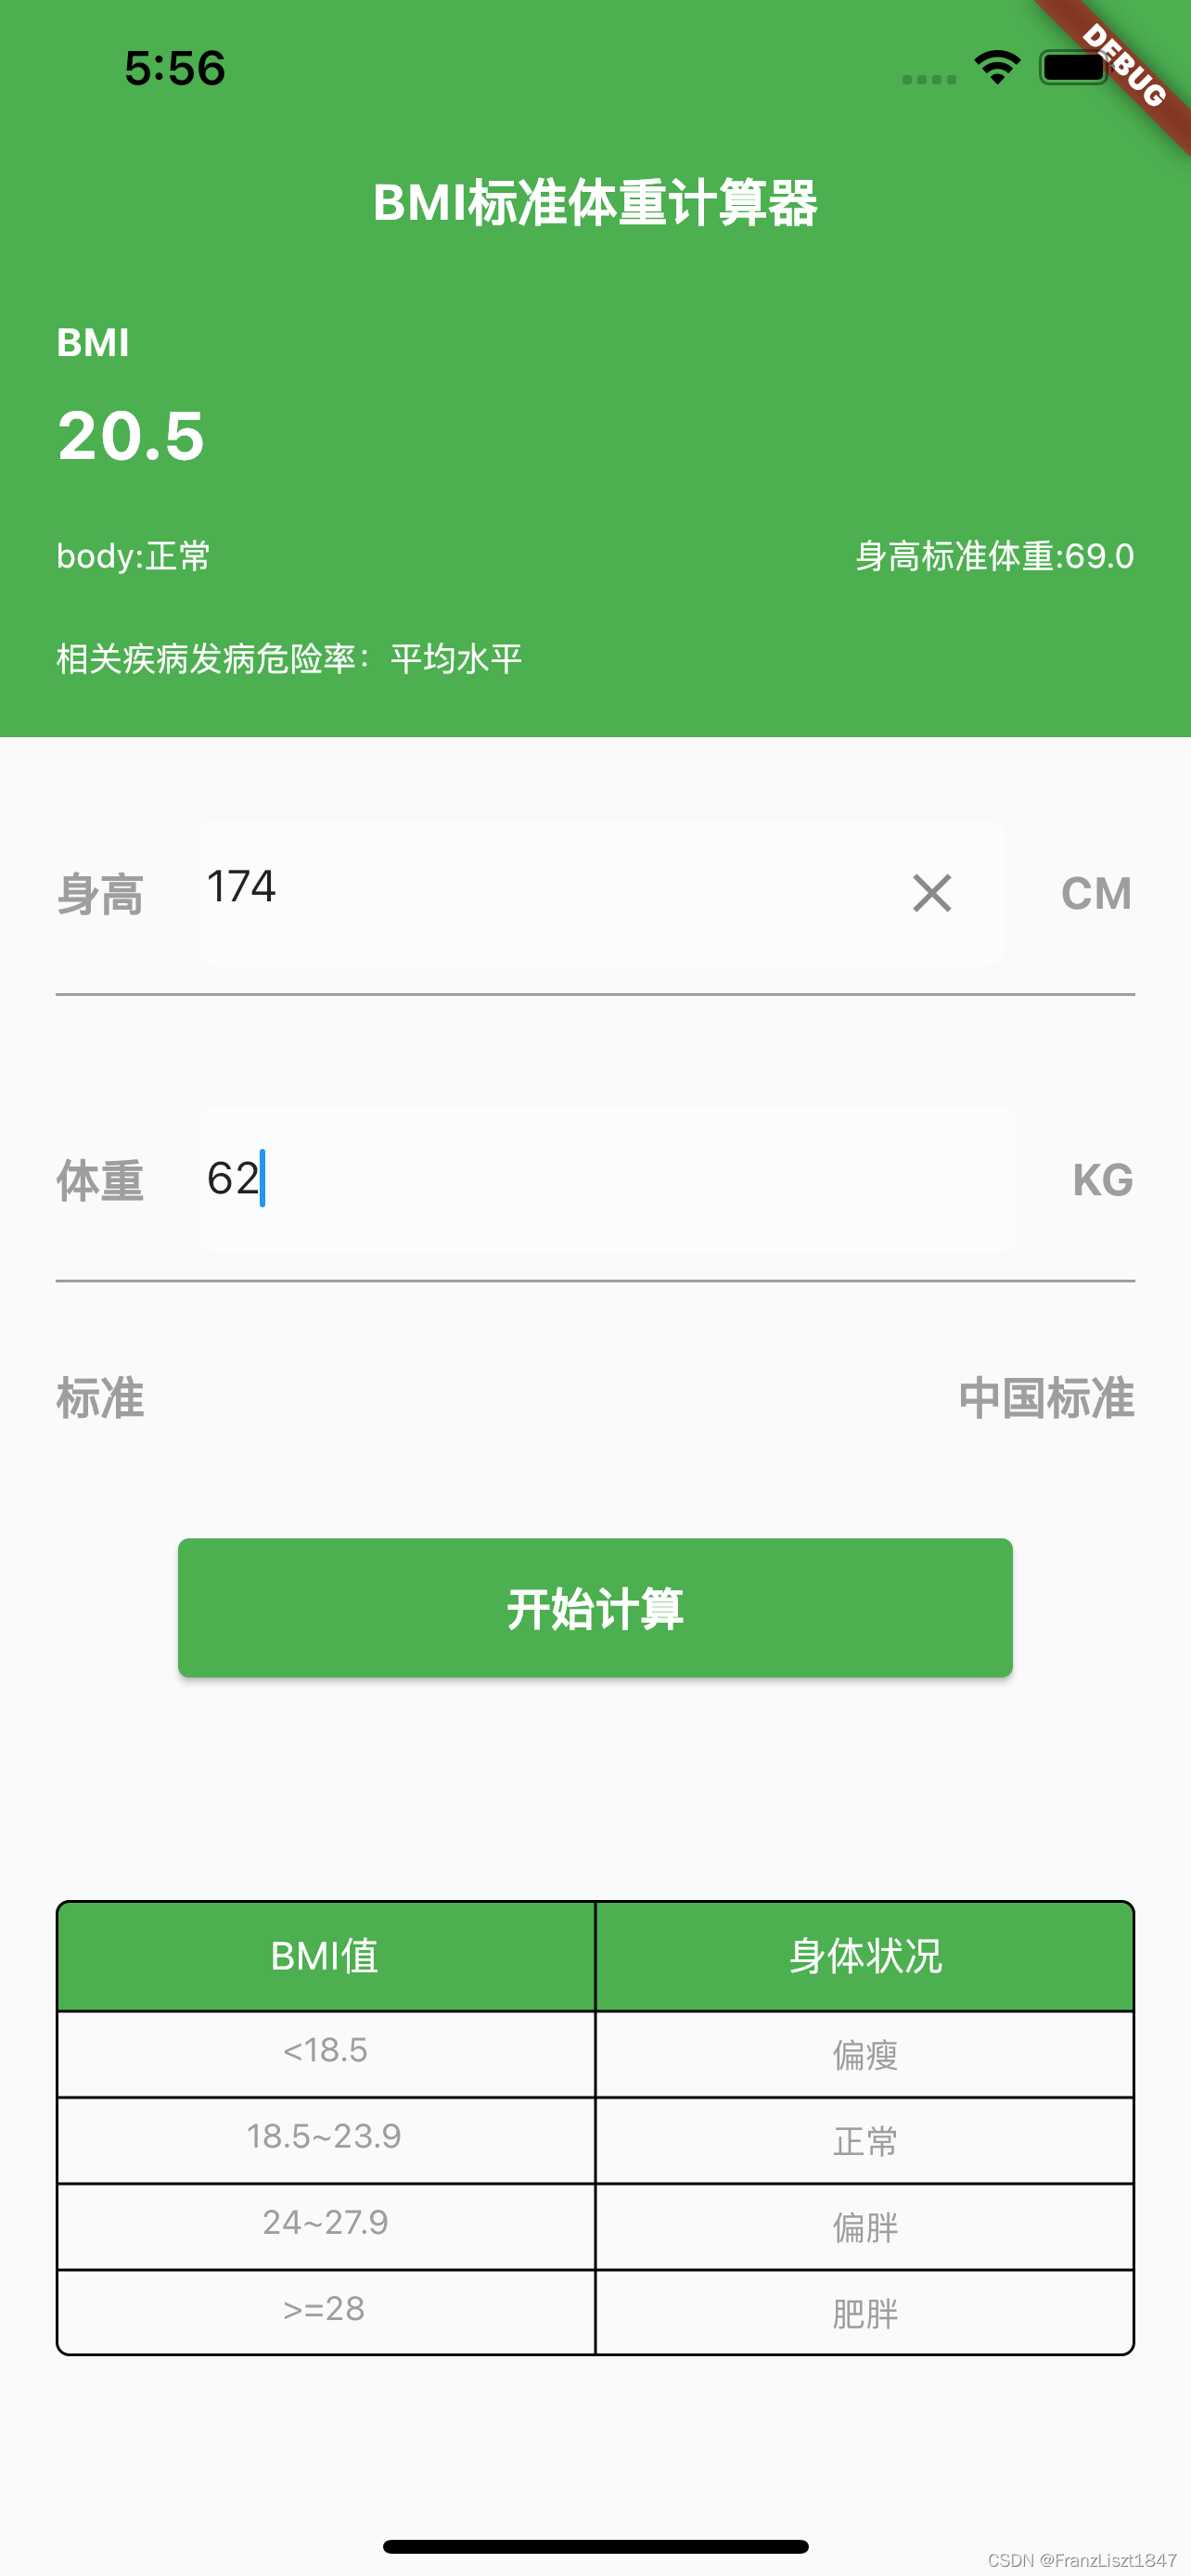
- 效果截图
- 初始化
- 布局
- 顶部区域
- 标题
- 计算结果
- 组合顶部区域
- 背景
- 中间区域
- 输入框
- 输入行
- 计算按钮
- 分界线
- 组合中间区域
- 底部区域
- 页面组合
- BMI计算
- Toast弹窗
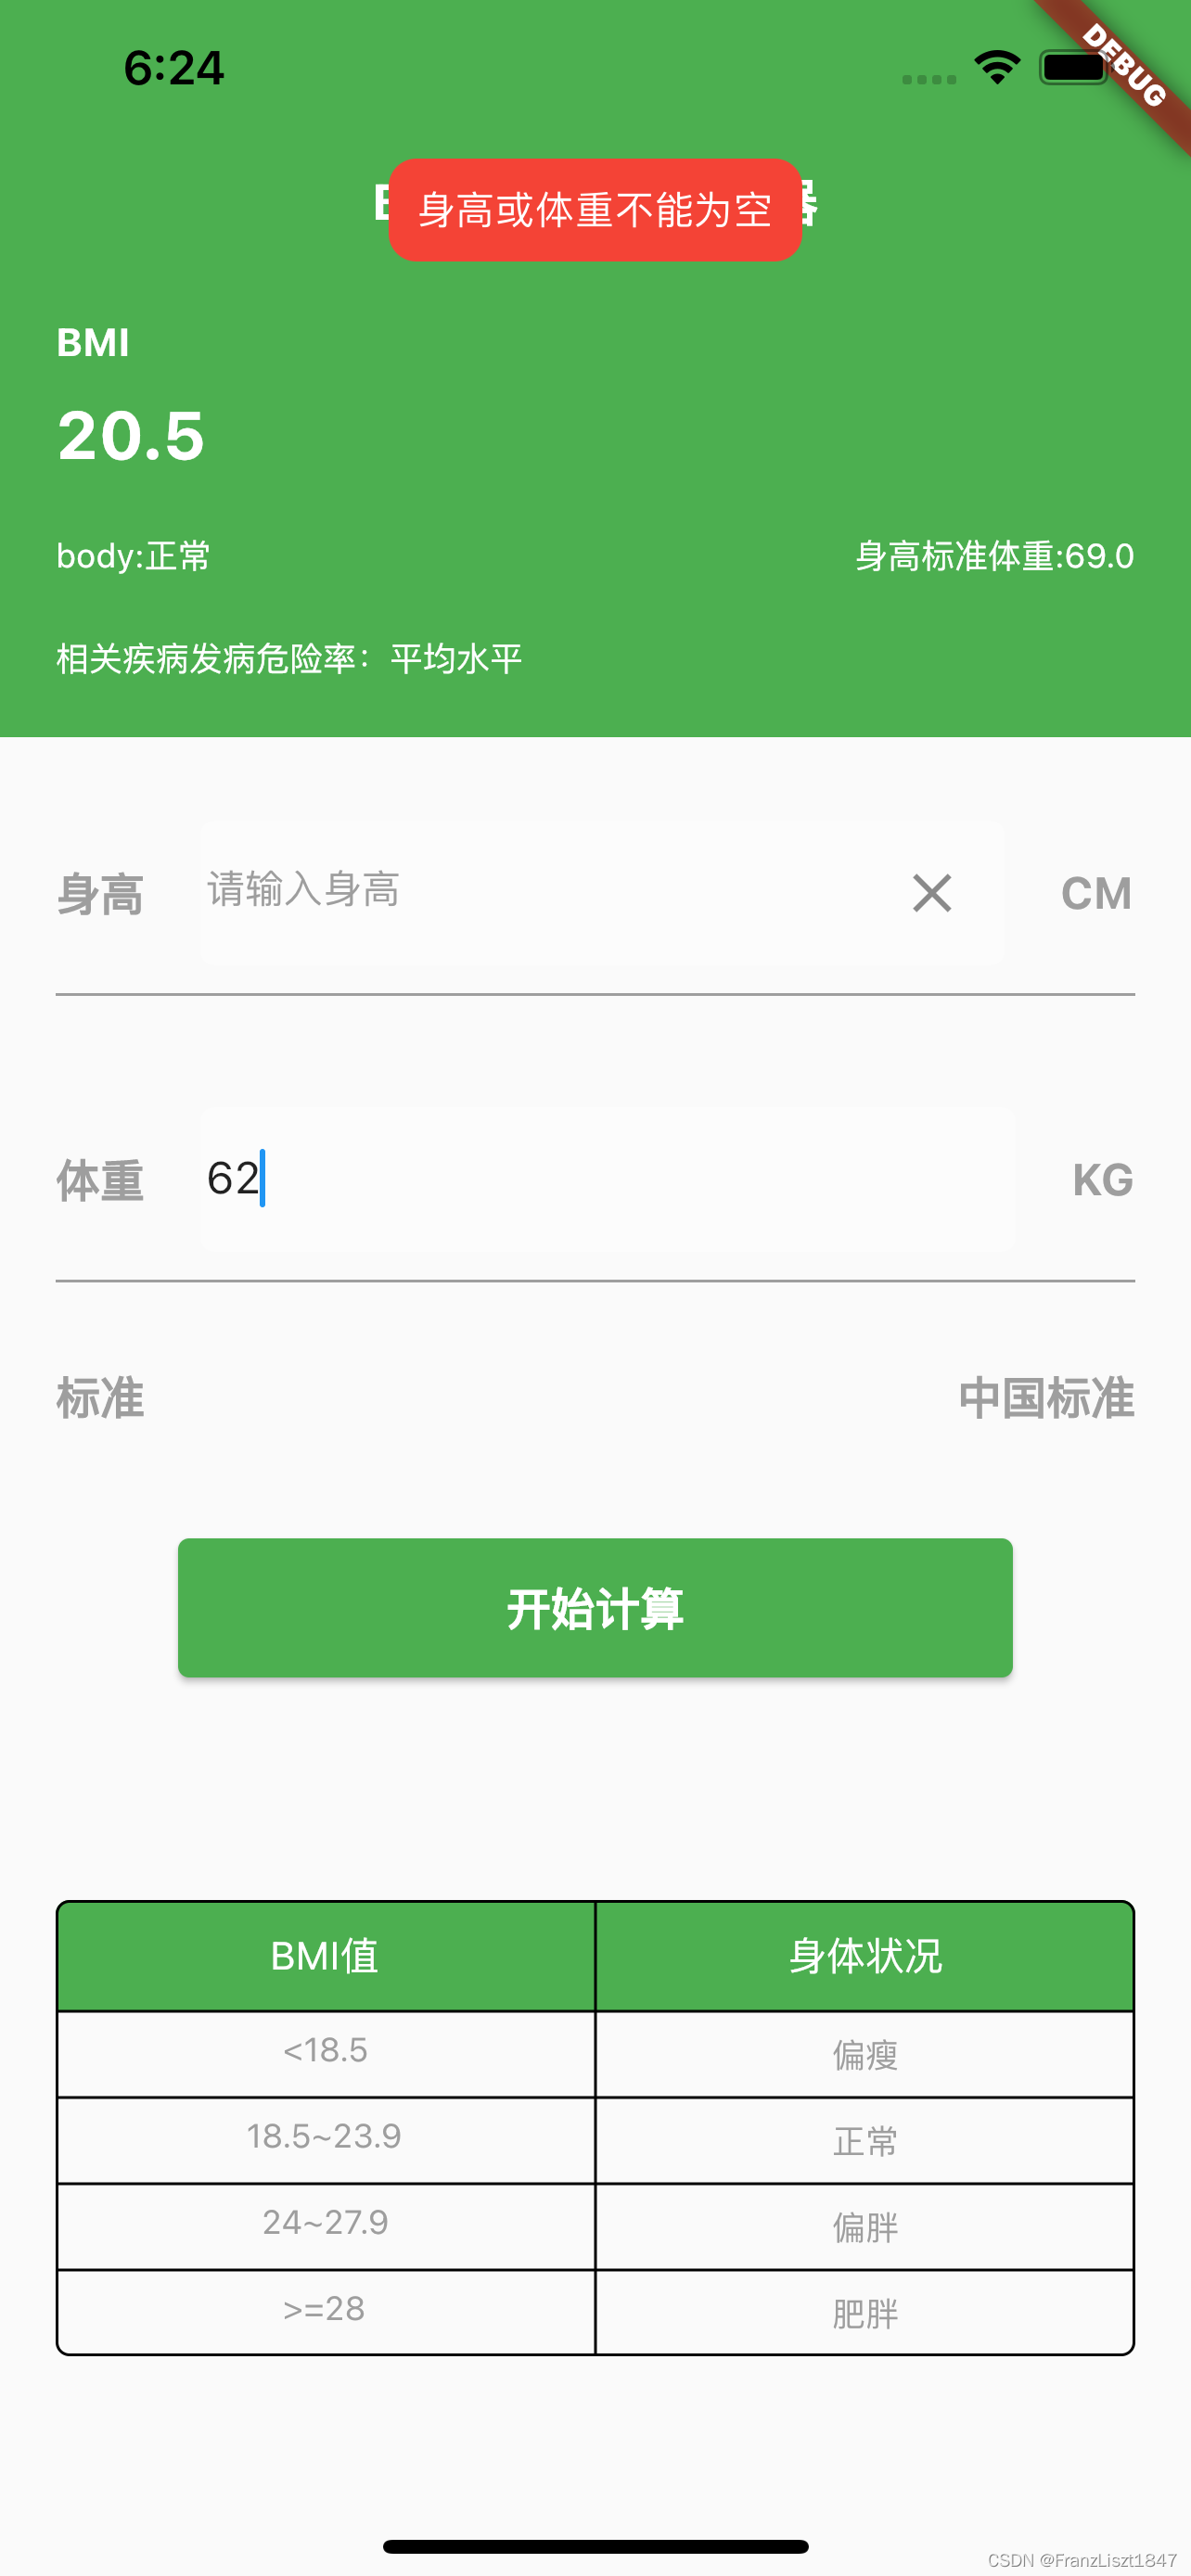
- 效果
- 导入依赖
- 封装
效果截图
初始化
初始化表单控制器和焦点节点
void initView(){
    formKey = GlobalKey<FormState>();
    heightController = TextEditingController();
    weightController = TextEditingController();
    heightNode = FocusNode();
    weightNode = FocusNode();
  }
为体重和升高焦点节点进行事件监听,并改变状态标志位
void addListener(){
    heightNode.addListener(() {
      if(heightController.text.isNotEmpty){
        heightClear = true;
      }else{
        heightClear = false;
      }
    });

    weightNode.addListener(() {
      if(weightController.text.isNotEmpty){
        weightClear = true;
      }else{
        weightClear = false;
      }
    });
  }
布局
顶部区域
标题
没有使用系统标题栏,通过将Text文本放到中间,作为标题使用
 ///标题
    Widget title = Center(
        child: Text(titleText,style: getTextStyle(18.0, Colors.white, FontWeight.bold),)
    );
计算结果
身体状况和标准体重通过Expanded各占一半宽度,并各执一边
///结果匹配值
    Widget physical = Row(
      children: [
        Expanded(child: Text(body,style: getTextStyle(12.0, Colors.white, FontWeight.normal),textAlign: TextAlign.left,)),
        Expanded(child: Text(standardWeight,style: getTextStyle(12.0, Colors.white, FontWeight.normal),textAlign: TextAlign.right))
      ],
    );
组合顶部区域
然后通过Column进行垂直排列,其中使用const SizedBox(height: 30.0,)做完高度间隔分隔符
///BMI计算结果
    Widget bmiResult = Column(
      children: [
        const SizedBox(height: 40.0,),
        title,
        const SizedBox(height: 30.0,),
        Align( alignment:Alignment.topLeft ,child: Text('BMI',style: getTextStyle(14.0, Colors.white, FontWeight.bold))),
        const SizedBox(height: 10.0,),
        Align( alignment:Alignment.topLeft ,child: Text(bmi,style: getTextStyle(24.0, Colors.white, FontWeight.bold))),
        const SizedBox(height: 20.0,),
        physical,
        const SizedBox(height: 20.0,),
        Align( alignment:Alignment.topLeft ,child: Text(diseaseTip,style: getTextStyle(12.0, Colors.white, FontWeight.normal))),
      ],
    );
背景
最后将上列用Container但布局进行包裹,并设置背景颜色
Widget topArea = Container(
      color: Colors.green,
      padding: const EdgeInsets.all(20.0),
      child: bmiResult,
    );
中间区域
中间区域包括两个输入框和计算按钮
输入框
身高和体重输入行一致,此处以身高为例;身高TextFormField包括啦上述初始化的控制权和焦点节点,并添加了一个末尾Icon,当输入内容不为空时,显示清空按钮,并对点击事件做清空处理,在onSaved中对输入的内容进行保存
   /**
     * 身高输入框*/
    Widget heightArea = Container(
      padding: const EdgeInsets.all(2.0),
      decoration: const BoxDecoration(
        shape: BoxShape.rectangle,
        borderRadius: BorderRadius.all(Radius.circular(5.0)),
        color: Colors.white30
      ),
      child: TextFormField(
        maxLines: 1,
        keyboardType: TextInputType.number,
        controller: heightController,
        focusNode: heightNode,
        decoration: InputDecoration(
            hintText: '请输入身高',
            hintStyle: getTextStyle(14.0, Colors.grey, FontWeight.normal),
            border: InputBorder.none,
            suffixIcon: heightClear ?
            IconButton(
                onPressed: (){heightController.clear();},
                icon: const Icon(Icons.clear)) : null
        ),
        onSaved: (value){
          inputHeight = value.toString();
        },
      ),
    );
输入行
然后用Row布局水平排列,同样使用 const SizedBox(width: 20.0,)做水平间隔分隔符
/**
     * 身高行*/
    Widget height = Row(
      children: [
        Text('身高',style: getTextStyle(16.0, Colors.grey, FontWeight.bold),),
        const SizedBox(width: 20.0,),
        Expanded(child: heightArea),
        const SizedBox(width: 20.0,),
        Text('CM',style: getTextStyle(16.0, Colors.grey, FontWeight.bold),),
      ],
    );
计算按钮
然后使用ElevatedButton,并对点击事件做计算处理
  ///计算按钮
    Widget calculateButton = SizedBox(
      width: 300.0,
      height: 50.0,
      child: ElevatedButton(
        onPressed: (){
          if(formKey.currentState!.validate()){
            formKey.currentState!.save();
            //do calculate tings
            BMICalculate(inputHeight,inputWeight);
          }
        },
        style: ButtonStyle(
          backgroundColor: MaterialStateProperty.all(Colors.green),
        ),
        child: Text('开始计算',style: getTextStyle(16.0, Colors.white, FontWeight.bold),),
      ),
    );
分界线
 /// 分界线
    Widget splitLine = const SizedBox(
      height: 1.0,
      width: double.infinity,
      child: DecoratedBox(
        decoration: BoxDecoration(color: Colors.grey),
      ),
    );
组合中间区域
并对表单进行监听,并通过Column进行子组件布局
Widget centerArea = Form(
      key: formKey,
        child:  Container(
          padding: const EdgeInsets.all(20.0),
          child: Column(
            children: [
              height,
              const SizedBox(height: 10.0,),
              splitLine,
              const SizedBox(height: 40.0,),
              weight,
              const SizedBox(height: 10.0,),
              splitLine,
              const SizedBox(height: 30.0,),
              standardTip,
              const SizedBox(height: 40.0,),
              calculateButton,
            ],
          ),
        )
    );
底部区域
底部使用的是Table表格进行布局,TableRow为行,TableCell为列,也可不使用TableCell进行布局,可输入自己需要的内容组件
Widget standardTable = Container(
      padding: const EdgeInsets.all(20.0),
      child: Table(
        border: TableBorder.all(
            color: Colors.black,
            width: 1.0,
            style: BorderStyle.solid,
            borderRadius: const BorderRadius.all(Radius.circular(5.0))
        ),
        children: [
          TableRow(
              decoration: const ShapeDecoration(
                  color: Colors.green,
                  shape: RoundedRectangleBorder(
                      borderRadius: BorderRadius.only(
                        topLeft: Radius.circular(5),
                        topRight: Radius.circular(5),
                      ),
                  ),
              ),
              children: [
                TableCell(child: Container(
                    padding: const EdgeInsets.all(10.0),
                    child: Center(child: Text('BMI值',style: getTextStyle(14.0, Colors.white, FontWeight.normal),),))
                ),
                TableCell(child: Container(
                    padding: const EdgeInsets.all(10.0),
                    child: Center(child: Text('身体状况',style: getTextStyle(14.0, Colors.white, FontWeight.normal),),))
                )
              ]
          ),
          TableRow(
              children: [
                TableCell(child: Container(
                    padding: const EdgeInsets.all(7.0),
                    child: Center(child: Text('<18.5',style: getTextStyle(12.0, Colors.grey, FontWeight.normal),),))
                ),
                TableCell(child: Container(
                    padding: const EdgeInsets.all(7.0),
                    child: Center(child: Text('偏瘦',style: getTextStyle(12.0, Colors.grey, FontWeight.normal),),))
                ),
              ]
          ),
          TableRow(
              children: [
                TableCell(child: Container(
                    padding: const EdgeInsets.all(7.0),
                    child: Center(child: Text('18.5~23.9',style: getTextStyle(12.0, Colors.grey, FontWeight.normal),),))
                ),
                TableCell(child: Container(
                    padding: const EdgeInsets.all(7.0),
                    child: Center(child: Text('正常',style: getTextStyle(12.0, Colors.grey, FontWeight.normal),),))
                ),
              ]
          ),
          TableRow(
              children: [
                TableCell(child: Container(
                    padding: const EdgeInsets.all(7.0),
                    child: Center(child: Text('24~27.9',style: getTextStyle(12.0, Colors.grey, FontWeight.normal),),))
                ),
                TableCell(child: Container(
                    padding: const EdgeInsets.all(7.0),
                    child: Center(child: Text('偏胖',style: getTextStyle(12.0, Colors.grey, FontWeight.normal),),))
                ),
              ]
          ),
          TableRow(
              children: [
                TableCell(child: Container(
                    padding: const EdgeInsets.all(7.0),
                    child: Center(child: Text('>=28',style: getTextStyle(12.0, Colors.grey, FontWeight.normal),),))
                ),
                TableCell(child: Container(
                    padding: const EdgeInsets.all(7.0),
                    child: Center(child: Text('肥胖',style: getTextStyle(12.0, Colors.grey, FontWeight.normal),),))
                ),
              ]
          ),
        ],
      ),
    );
页面组合
然后将上面三个区域进行组合
return Container(
      child: Column(
        children: [
          topArea,
          const SizedBox(height: 10.0,),
          centerArea,
          const SizedBox(height: 40.0,),
          standardTable,
        ],
      ),
    );
BMI计算
- BMI = 体重 / 身高的平方
- 身高标准体重 = 身高 - 105
每一个Text使用变量作为内容展示,然后修改其内容之后,使用setState进行值刷新
 ///BMI计算
  void BMICalculate(String sHeight,String sWeight){
    if(sHeight.isEmpty || sWeight.isEmpty){
      showFailedToast('身高或体重不能为空');
      return;
    }
    //bmi计算
    double dHeight = double.parse(sHeight) ;
    double dWeight = double.parse(sWeight);
    double bmiValue = dWeight / ((dHeight / 100)*(dHeight / 100));
    //身体状况计算
    String condition = "NaN";
    if(bmiValue < 18.5){
      condition = '偏瘦';
    }else if(bmiValue >= 18.5 && bmiValue < 23.9){
      condition = '正常';
    }else if(bmiValue >= 23.9 && bmiValue < 27.9){
      condition = '偏胖';
    }else{
      condition = '肥胖';
    }
    //标准体重计算 身高-105
    double standard = dHeight - 105;
    //刷新数据
    setState(() {
      ///保留一位小数
      bmi = bmiValue.toStringAsFixed(1);
      body = 'body:$condition';
      standardWeight = '身高标准体重:${standard.toStringAsFixed(1)}';
    });
    print('【计算结果】:$bmi');
  }
Toast弹窗
效果
导入依赖
在pubspec.yaml文件中导入如下第三方包
fluttertoast: ^8.1.1
封装
Web和APP有一些地方不一样,例如背景颜色,web需要单独进行设立,如下所示
///web端的位置和背景颜色需要重新设置,如webPosition| webBgColor
 void showSuccessToast(String text) {
  Fluttertoast.showToast(
      msg: text,
      toastLength: Toast.LENGTH_SHORT,
      gravity: ToastGravity.TOP,
      backgroundColor: Colors.green,
      fontSize: 14.0,
      webPosition: 'center',
      webBgColor: 'linear-gradient(0deg,#37ecba 0%, #72afd3 100%)',
  );
}

  void showFailedToast(String text) {
    Fluttertoast.showToast(
      msg: text,
      toastLength: Toast.LENGTH_SHORT,
      gravity: ToastGravity.TOP,
      backgroundColor: Colors.red,
      fontSize: 14.0,
      webPosition: 'center',
        webBgColor: 'linear-gradient(0deg,#f43b47 0%, #453a94 100%)'
    );
  }




![[附源码]计算机毕业设计JAVA教室用电控制系统](https://img-blog.csdnimg.cn/8209c6560dcb43228ec450fc2f0cc79b.png)
