转载请标明出处:http://blog.csdn.net/zhaoyanjun6/article/details/127967304
本文出自【赵彦军的博客】
文章目录
- 效果
- BottomSheet
- BottomSheetDialog
- BottomSheetDialogFragment
- 圆角效果
- 去掉背景蒙版
- 设置蒙版透明度
- 点击 dialog 外部区域,dialog 不消失
- 禁止向下拖动
- 设置弹框固定高度
- 内容铺满全屏
- 监听展开收起
- 底部常驻View
效果
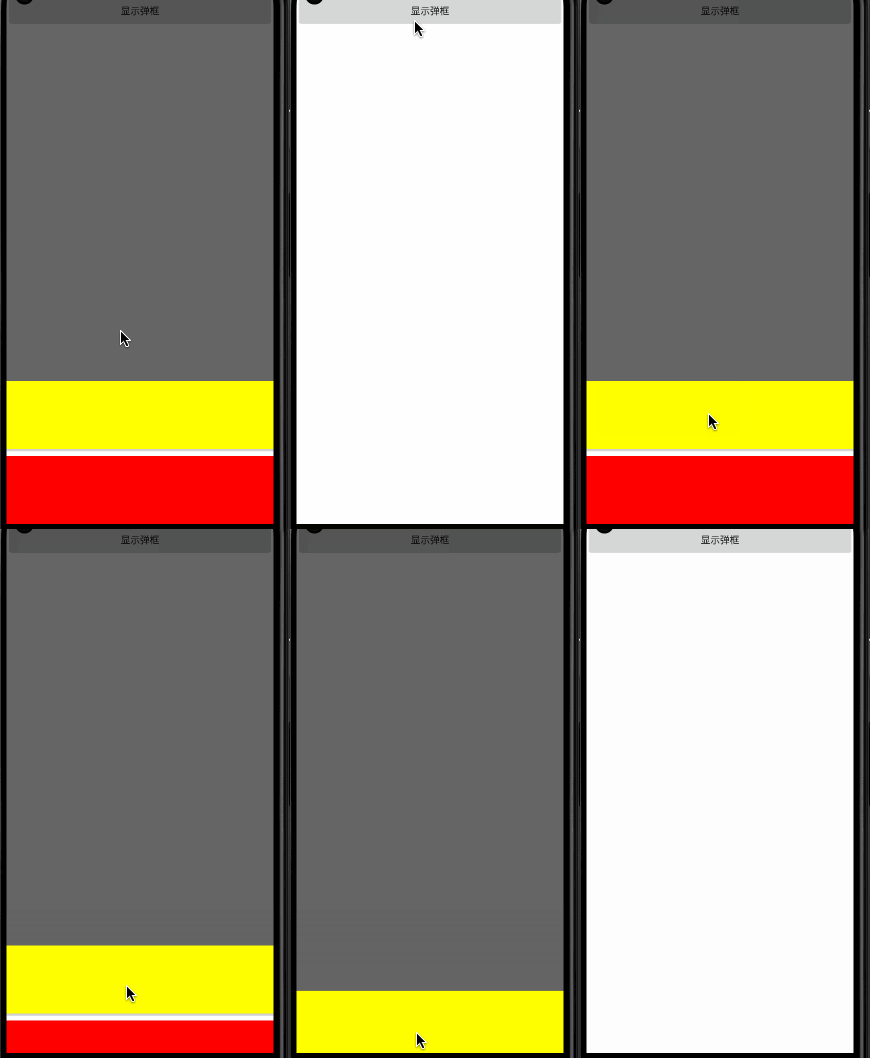

MD风格的底部弹窗,比自定义dialog或popupwindow使用更简单,功能也更强大。
其实细分来说,是BottomSheet、BottomSheetDialog、BottomSheetDialogFragment
代码 https://gitee.com/zhaoyanjun/bottomSheetDialogFragmentDemo
BottomSheet
与主界面同层级关系,可以事件触发,如果有设置显示高度的话,也可以拉出来,且不会影响主界面的交互。
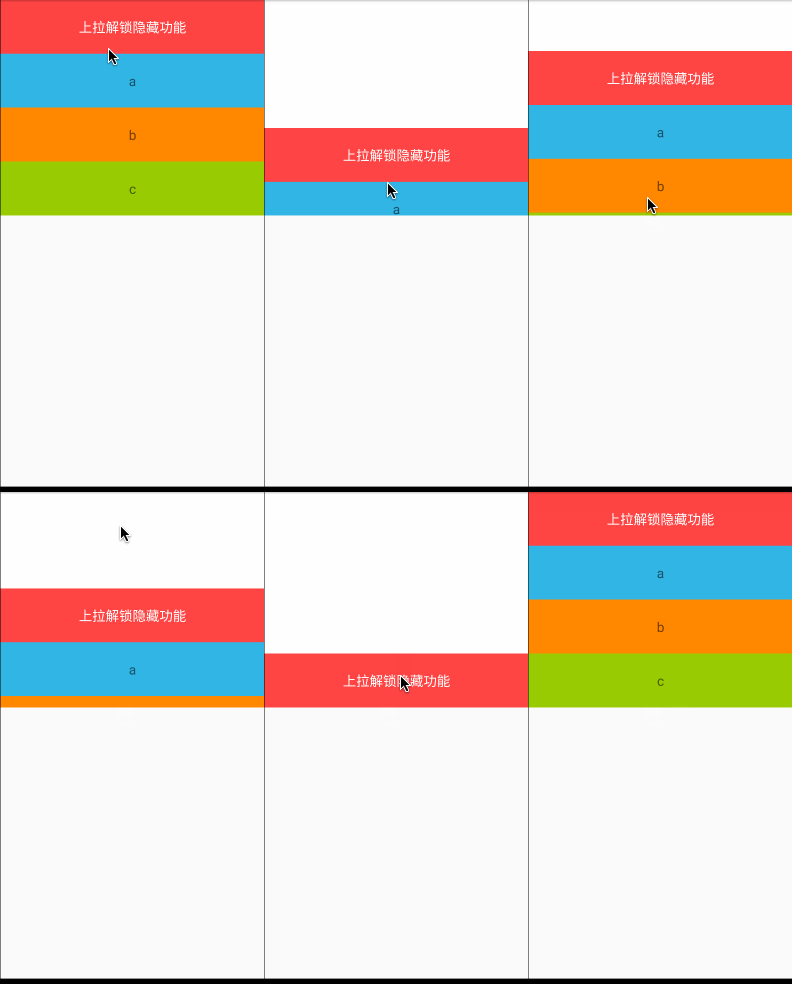
XML
<?xml version="1.0" encoding="utf-8"?>
<android.support.design.widget.CoordinatorLayout xmlns:android="http://schemas.android.com/apk/res/android"
    xmlns:app="http://schemas.android.com/apk/res-auto"
    android:layout_width="match_parent"
    android:layout_height="wrap_content"
    android:background="@color/white">

    <LinearLayout
        android:id="@+id/ll_bottom_sheet"
        android:layout_width="match_parent"
        android:layout_height="wrap_content"
        android:orientation="vertical"
        app:behavior_peekHeight="80dp"
        app:layout_behavior="@string/bottom_sheet_behavior"
        app:layout_constraintBottom_toBottomOf="parent"
        app:layout_constraintLeft_toLeftOf="parent">

        <TextView
            android:layout_width="match_parent"
            android:layout_height="80dp"
            android:background="@android:color/holo_red_light"
            android:gravity="center"
            android:text="上拉解锁隐藏功能"
            android:textColor="@color/white"
            android:textSize="20sp" />

        <TextView
            android:layout_width="match_parent"
            android:layout_height="80dp"
            android:background="@android:color/holo_blue_light"
            android:gravity="center"
            android:text="a"
            android:textSize="20sp" />

        <TextView
            android:layout_width="match_parent"
            android:layout_height="80dp"
            android:background="@android:color/holo_orange_dark"
            android:gravity="center"
            android:text="b"
            android:textSize="20sp" />

        <TextView
            android:layout_width="match_parent"
            android:layout_height="80dp"
            android:background="@android:color/holo_green_light"
            android:gravity="center"
            android:text="c"
            android:textSize="20sp" />

    </LinearLayout>

</android.support.design.widget.CoordinatorLayout>
注意,
- 这里需要协调布局CoordinatorLayout包裹才行
- app:behavior_peekHeight 显示高度,不显示的话设置为0即可
- app:layout_behavior 标示这是一个bottom_sheet
以上3个条件都是必须的。
代码
 View bottomView = findViewById(R.id.ll_bottom_sheet);
        bottomView.setOnClickListener(v -> {
            BottomSheetBehavior behavior = BottomSheetBehavior.from(bottomView);
            if (behavior.getState() == BottomSheetBehavior.STATE_EXPANDED) {
                //如果是展开状态,则关闭,反之亦然
                behavior.setState(BottomSheetBehavior.STATE_COLLAPSED);
            } else {
                behavior.setState(BottomSheetBehavior.STATE_EXPANDED);
            }
        });
- STATE_COLLAPSED: 折叠状态
- STATE_EXPANDED: 展开状态
- STATE_DRAGGING : 过渡状态
- STATE_SETTLING: 视图从脱离手指自由滑动到最终停下的这一小段时间
- STATE_HIDDEN : 默认无此状态(可通过app:behavior_hideable 启用此状态),启用后用户将能通过向下滑动完全隐藏 bottom sheet
BottomSheetDialog
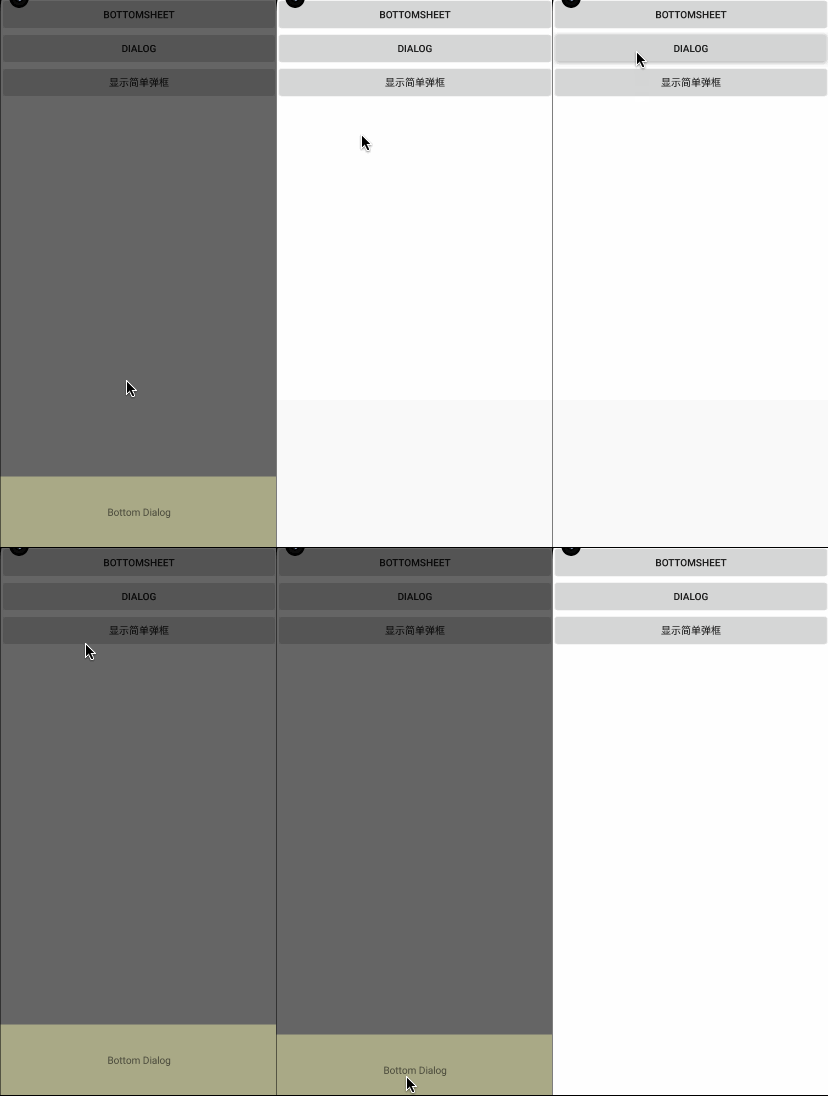
可以看到弹出来之后是有一个半透明的蒙层的,这时候是影响主界面交互的,也就意味着此时BottomSheetDialog的优先级是要高于主界面的。
代码
public class MyBottomSheetDialog extends BottomSheetDialog {

    public MyBottomSheetDialog(@NonNull Context context) {
        super(context);
    }

    public MyBottomSheetDialog(@NonNull Context context, int theme) {
        super(context, theme);
    }

    protected MyBottomSheetDialog(@NonNull Context context, boolean cancelable, OnCancelListener cancelListener) {
        super(context, cancelable, cancelListener);
    }
}
显示 Dialog
MyBottomSheetDialog bottomSheetDialog = new MyBottomSheetDialog(this);
bottomSheetDialog.setContentView(R.layout.bottom_dialog_layout);
bottomSheetDialog.show();
bottom_dialog_layout :
<?xml version="1.0" encoding="utf-8"?>
<LinearLayout xmlns:android="http://schemas.android.com/apk/res/android"
    xmlns:app="http://schemas.android.com/apk/res-auto"
    android:layout_width="match_parent"
    android:layout_height="wrap_content"
    android:background="@color/white"
    android:orientation="vertical">

    <TextView
        android:id="@+id/button"
        android:layout_width="match_parent"
        android:layout_height="100dp"
        android:background="#aa8"
        android:text="Bottom Dialog"
        android:gravity="center"
        android:layout_gravity="center"
        app:layout_constraintEnd_toEndOf="parent"
        app:layout_constraintStart_toStartOf="parent"
        app:layout_constraintTop_toTopOf="parent" />

</LinearLayout>
比较简单的使用方式,直接实例化之后setContentView,然后调用show就可以了。
这里只是一个展示效果,实际上使用场景可能会复杂一些,还要做一些操作等等,所以,也可以自定义dialog继承自BottomSheetDialog,然后处理自己的业务逻辑。
BottomSheetDialogFragment
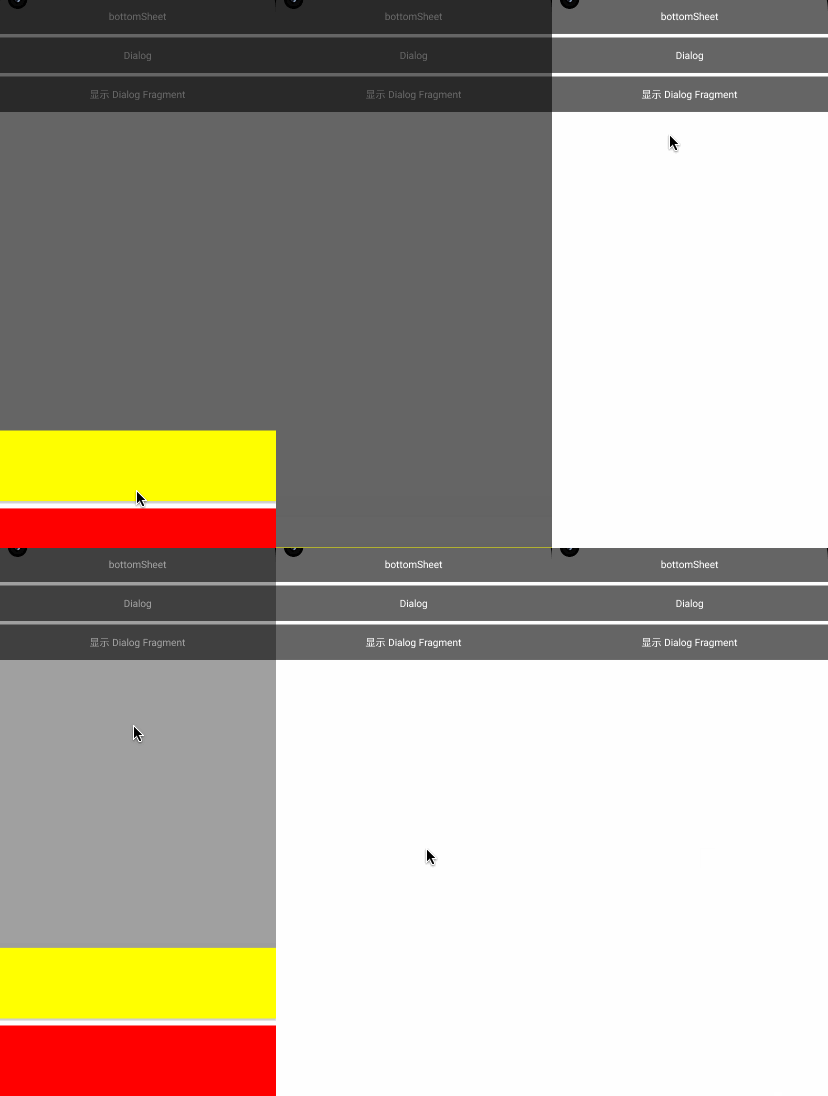
效果跟BottomSheetDialog差不多,代码跟DialogFragment差不多。
代码
public class MyDialogFragment extends BottomSheetDialogFragment {

    @Nullable
    @Override
    public View onCreateView(@NonNull LayoutInflater inflater, @Nullable ViewGroup container, @Nullable Bundle savedInstanceState) {
        View view = inflater.inflate(R.layout.bottom_dialog_fragment_layout, container, false);
        return view;
    }
}
bottom_dialog_fragment_layout
<?xml version="1.0" encoding="utf-8"?>
<LinearLayout xmlns:android="http://schemas.android.com/apk/res/android"
    xmlns:app="http://schemas.android.com/apk/res-auto"
    android:layout_width="match_parent"
    android:layout_height="wrap_content"
    android:orientation="vertical"
    android:background="@color/white">

    <Button
        android:id="@+id/button"
        android:layout_width="match_parent"
        android:layout_height="100dp"
        android:background="#ff0"
        app:layout_constraintEnd_toEndOf="parent"
        app:layout_constraintStart_toStartOf="parent"
        app:layout_constraintTop_toTopOf="parent" />

    <Button
        android:id="@+id/button2"
        android:layout_width="match_parent"
        android:layout_height="100dp"
        android:layout_marginTop="10dp"
        android:background="#f00"
        app:layout_constraintEnd_toEndOf="parent"
        app:layout_constraintStart_toStartOf="parent"
        app:layout_constraintTop_toTopOf="parent" />

</LinearLayout>
显示
MyDialogFragment dialog = new MyDialogFragment();
Bundle bundle = new Bundle();
dialog.setArguments(bundle);
dialog.show(getSupportFragmentManager(), "dialog_fragment");
但是在实际开发中,我们的需求可能并不能满足于此,比如上部分圆角效果、指定高度等
圆角效果
先设置原有背景透明
style.xml
 <style name="MyBottomSheetDialog" parent="Theme.Design.Light.BottomSheetDialog">
        <item name="bottomSheetStyle">@style/BottomSheetStyleWrapper</item>
        <item name="android:background">@android:color/transparent</item>
        <item name="android:windowBackground">@android:color/transparent</item>
        <item name="android:windowNoTitle">true</item>
        <item name="android:windowIsFloating">false</item>
    </style>

    <style name="BottomSheetStyleWrapper" parent="Widget.MaterialComponents.BottomSheet.Modal">
        <item name="android:background">@android:color/transparent</item>
    </style>
onCreate中设置style
public class MyDialogFragment extends BottomSheetDialogFragment {

    @Override
    public void onCreate(@Nullable Bundle savedInstanceState) {
        super.onCreate(savedInstanceState);
        setStyle(STYLE_NORMAL, R.style.MyBottomSheetDialog);
    }

    @Nullable
    @Override
    public View onCreateView(@NonNull LayoutInflater inflater, @Nullable ViewGroup container, @Nullable Bundle savedInstanceState) {
        View view = inflater.inflate(R.layout.bottom_dialog_fragment_layout, container, false);
        return view;
    }
}
在根布局的 view上设置 background
<?xml version="1.0" encoding="utf-8"?>
<LinearLayout xmlns:android="http://schemas.android.com/apk/res/android"
    xmlns:app="http://schemas.android.com/apk/res-auto"
    android:layout_width="match_parent"
    android:layout_height="wrap_content"
    android:orientation="vertical"
    android:padding="6dp"
    android:background="@drawable/fragment_dialog_bg">

    <Button
        android:id="@+id/button"
        android:layout_width="match_parent"
        android:layout_height="100dp"
        android:background="#ff0"
        app:layout_constraintEnd_toEndOf="parent"
        app:layout_constraintStart_toStartOf="parent"
        app:layout_constraintTop_toTopOf="parent" />

    <Button
        android:id="@+id/button2"
        android:layout_width="match_parent"
        android:layout_height="100dp"
        android:layout_marginTop="10dp"
        android:background="#f00"
        app:layout_constraintEnd_toEndOf="parent"
        app:layout_constraintStart_toStartOf="parent"
        app:layout_constraintTop_toTopOf="parent" />

</LinearLayout>
特别注意:根布局除了设置 android:background 属性外,还需要设置 android:padding 属性,否则圆角显示不出来。
fragment_dialog_bg
<?xml version="1.0" encoding="utf-8"?>
<shape xmlns:android="http://schemas.android.com/apk/res/android"
    android:shape="rectangle">
    <corners
        android:topLeftRadius="10dp"
        android:topRightRadius="10dp" />
    <solid android:color="@android:color/white" />

</shape>
去掉背景蒙版
需要在 style 中增加 android:backgroundDimEnabled 属性
<!--  没有蒙版的style-->
    <style name="MyBottomSheetDialog" parent="Theme.Design.Light.BottomSheetDialog">
        <item name="bottomSheetStyle">@style/BottomSheetStyleWrapper</item>
        <item name="android:background">@android:color/transparent</item>
        <item name="android:windowBackground">@android:color/transparent</item>
        <item name="android:windowNoTitle">true</item>
        <item name="android:windowIsFloating">false</item>
        <item name="android:backgroundDimEnabled">false</item>
    </style>
设置蒙版透明度
在 style 中增加 android:backgroundDimAmount 属性,属性值范围 0 - 1 .
- 0 : 完全透明
- 1:完全不透明
    <style name="MyBottomSheetDialog2" parent="Theme.Design.Light.BottomSheetDialog">
        <item name="bottomSheetStyle">@style/BottomSheetStyleWrapper</item>
        <item name="android:background">@android:color/transparent</item>
        <item name="android:windowBackground">@android:color/transparent</item>
        <item name="android:windowNoTitle">true</item>
        <item name="android:windowIsFloating">false</item>
        <item name="android:backgroundDimAmount">0.4</item>
    </style>
点击 dialog 外部区域,dialog 不消失
重写 onCreateDialog 方法,设置 setCanceledOnTouchOutside 值为 false
public class MyDialogFragment extends BottomSheetDialogFragment {

    @Override
    public void onCreate(@Nullable Bundle savedInstanceState) {
        super.onCreate(savedInstanceState);
        setStyle(STYLE_NORMAL, R.style.MyBottomSheetDialog);
    }

    @Override
    public Dialog onCreateDialog(Bundle savedInstanceState) {
        Dialog dialog =  super.onCreateDialog(savedInstanceState);
        dialog.setCanceledOnTouchOutside(false);
        return dialog;
    }

    @Nullable
    @Override
    public View onCreateView(@NonNull LayoutInflater inflater, @Nullable ViewGroup container, @Nullable Bundle savedInstanceState) {
        View view = inflater.inflate(R.layout.bottom_dialog_fragment_layout, container, false);
        return view;
    }
}
禁止向下拖动
bottomSheetBehavior.setHideable(false);
具体使用方法:
   @Override
    public Dialog onCreateDialog(Bundle savedInstanceState) {
        Dialog dialog = super.onCreateDialog(savedInstanceState);
        if (dialog instanceof BottomSheetDialog) {
            BottomSheetDialog bottomSheetDialog = (BottomSheetDialog) dialog;
            bottomSheetDialog.setOnShowListener(dialogInterface -> {
                FrameLayout bottomSheet = bottomSheetDialog.findViewById(android.support.design.R.id.design_bottom_sheet);
                BottomSheetBehavior bottomSheetBehavior = BottomSheetBehavior.from(bottomSheet);
                bottomSheetBehavior.setHideable(false);
            });
        }
        return dialog;
    }
设置弹框固定高度
bottomSheetBehavior.setPeekHeight(1200);
使用:
    @Override
    public Dialog onCreateDialog(Bundle savedInstanceState) {
        Dialog dialog = super.onCreateDialog(savedInstanceState);
        if (dialog instanceof BottomSheetDialog) {
            BottomSheetDialog bottomSheetDialog = (BottomSheetDialog) dialog;
            bottomSheetDialog.setOnShowListener(dialogInterface -> {
                FrameLayout bottomSheet = bottomSheetDialog.findViewById(android.support.design.R.id.design_bottom_sheet);
                BottomSheetBehavior bottomSheetBehavior = BottomSheetBehavior.from(bottomSheet);
                bottomSheetBehavior.setPeekHeight(1200);
            });
        }
        return dialog;
    }

    @Nullab
内容铺满全屏
当内容特别多,比如有 recyclerView 时,我们希望 dialog 展开的高度是全屏的。
//默认展开
bottomSheetBehavior.setState(BottomSheetBehavior.STATE_EXPANDED);
使用
 @Override
    public Dialog onCreateDialog(Bundle savedInstanceState) {
        Dialog dialog = super.onCreateDialog(savedInstanceState);
        if (dialog instanceof BottomSheetDialog) {
            BottomSheetDialog bottomSheetDialog = (BottomSheetDialog) dialog;
            bottomSheetDialog.setOnShowListener(dialogInterface -> {
                FrameLayout bottomSheet = bottomSheetDialog.findViewById(android.support.design.R.id.design_bottom_sheet);
                BottomSheetBehavior bottomSheetBehavior = BottomSheetBehavior.from(bottomSheet);
                //默认展开
                bottomSheetBehavior.setState(BottomSheetBehavior.STATE_EXPANDED);
            });
        }
        return dialog;
    }
监听展开收起
bottomSheetBehavior.setBottomSheetCallback()
使用
public class MyDialogFragment extends BottomSheetDialogFragment {

    @Override
    public void onCreate(@Nullable Bundle savedInstanceState) {
        super.onCreate(savedInstanceState);
        setStyle(STYLE_NORMAL, R.style.MyBottomSheetDialog);
    }

    @Override
    public Dialog onCreateDialog(Bundle savedInstanceState) {
        Dialog dialog = super.onCreateDialog(savedInstanceState);
        if (dialog instanceof BottomSheetDialog) {
            BottomSheetDialog bottomSheetDialog = (BottomSheetDialog) dialog;
            bottomSheetDialog.setOnShowListener(dialogInterface -> {
                FrameLayout bottomSheet = bottomSheetDialog.findViewById(android.support.design.R.id.design_bottom_sheet);
                BottomSheetBehavior bottomSheetBehavior = BottomSheetBehavior.from(bottomSheet);
                //默认展开
                bottomSheetBehavior.setBottomSheetCallback(new BottomSheetBehavior.BottomSheetCallback() {
                    @Override
                    public void onStateChanged(@NonNull View view, int newState) {
                        switch (newState) {
                            case BottomSheetBehavior.STATE_EXPANDED:

                                break;
                            case BottomSheetBehavior.STATE_COLLAPSED:

                                break;
                            case BottomSheetBehavior.STATE_DRAGGING:

                                break;
                            case BottomSheetBehavior.STATE_SETTLING:

                                break;
                            case BottomSheetBehavior.STATE_HIDDEN:

                                break;
                        }
                    }

                    @Override
                    public void onSlide(@NonNull View view, float v) {

                    }
                });
            });
        }
        return dialog;
    }

    @Nullable
    @Override
    public View onCreateView(@NonNull LayoutInflater inflater, @Nullable ViewGroup container, @Nullable Bundle savedInstanceState) {
        View view = inflater.inflate(R.layout.bottom_dialog_fragment_layout, container, false);
        return view;
    }
}
底部常驻View
在 BottomSheetDialogFragment 实现底部常驻布局是比较难的,好在有些人通过巧妙的方式实现了。
https://github.com/dorianpavetic/StickyBottomSheet
Android: Sticky view at the bottom of bottom sheet dialog fragment
