之前的项目常使用Apscheduler进行定时任务调度,但最近想通过接口对这些任务进行动态调整,比如调整任务启停、调整任务执行时间、间隔时间等等
flask-apscheduler这个基于flask的库能够满足上面的需求,而且由于基于flask,所以我常用的connexion这个库理论上也能够完美支持。
接口描述
先来看一下官方文档
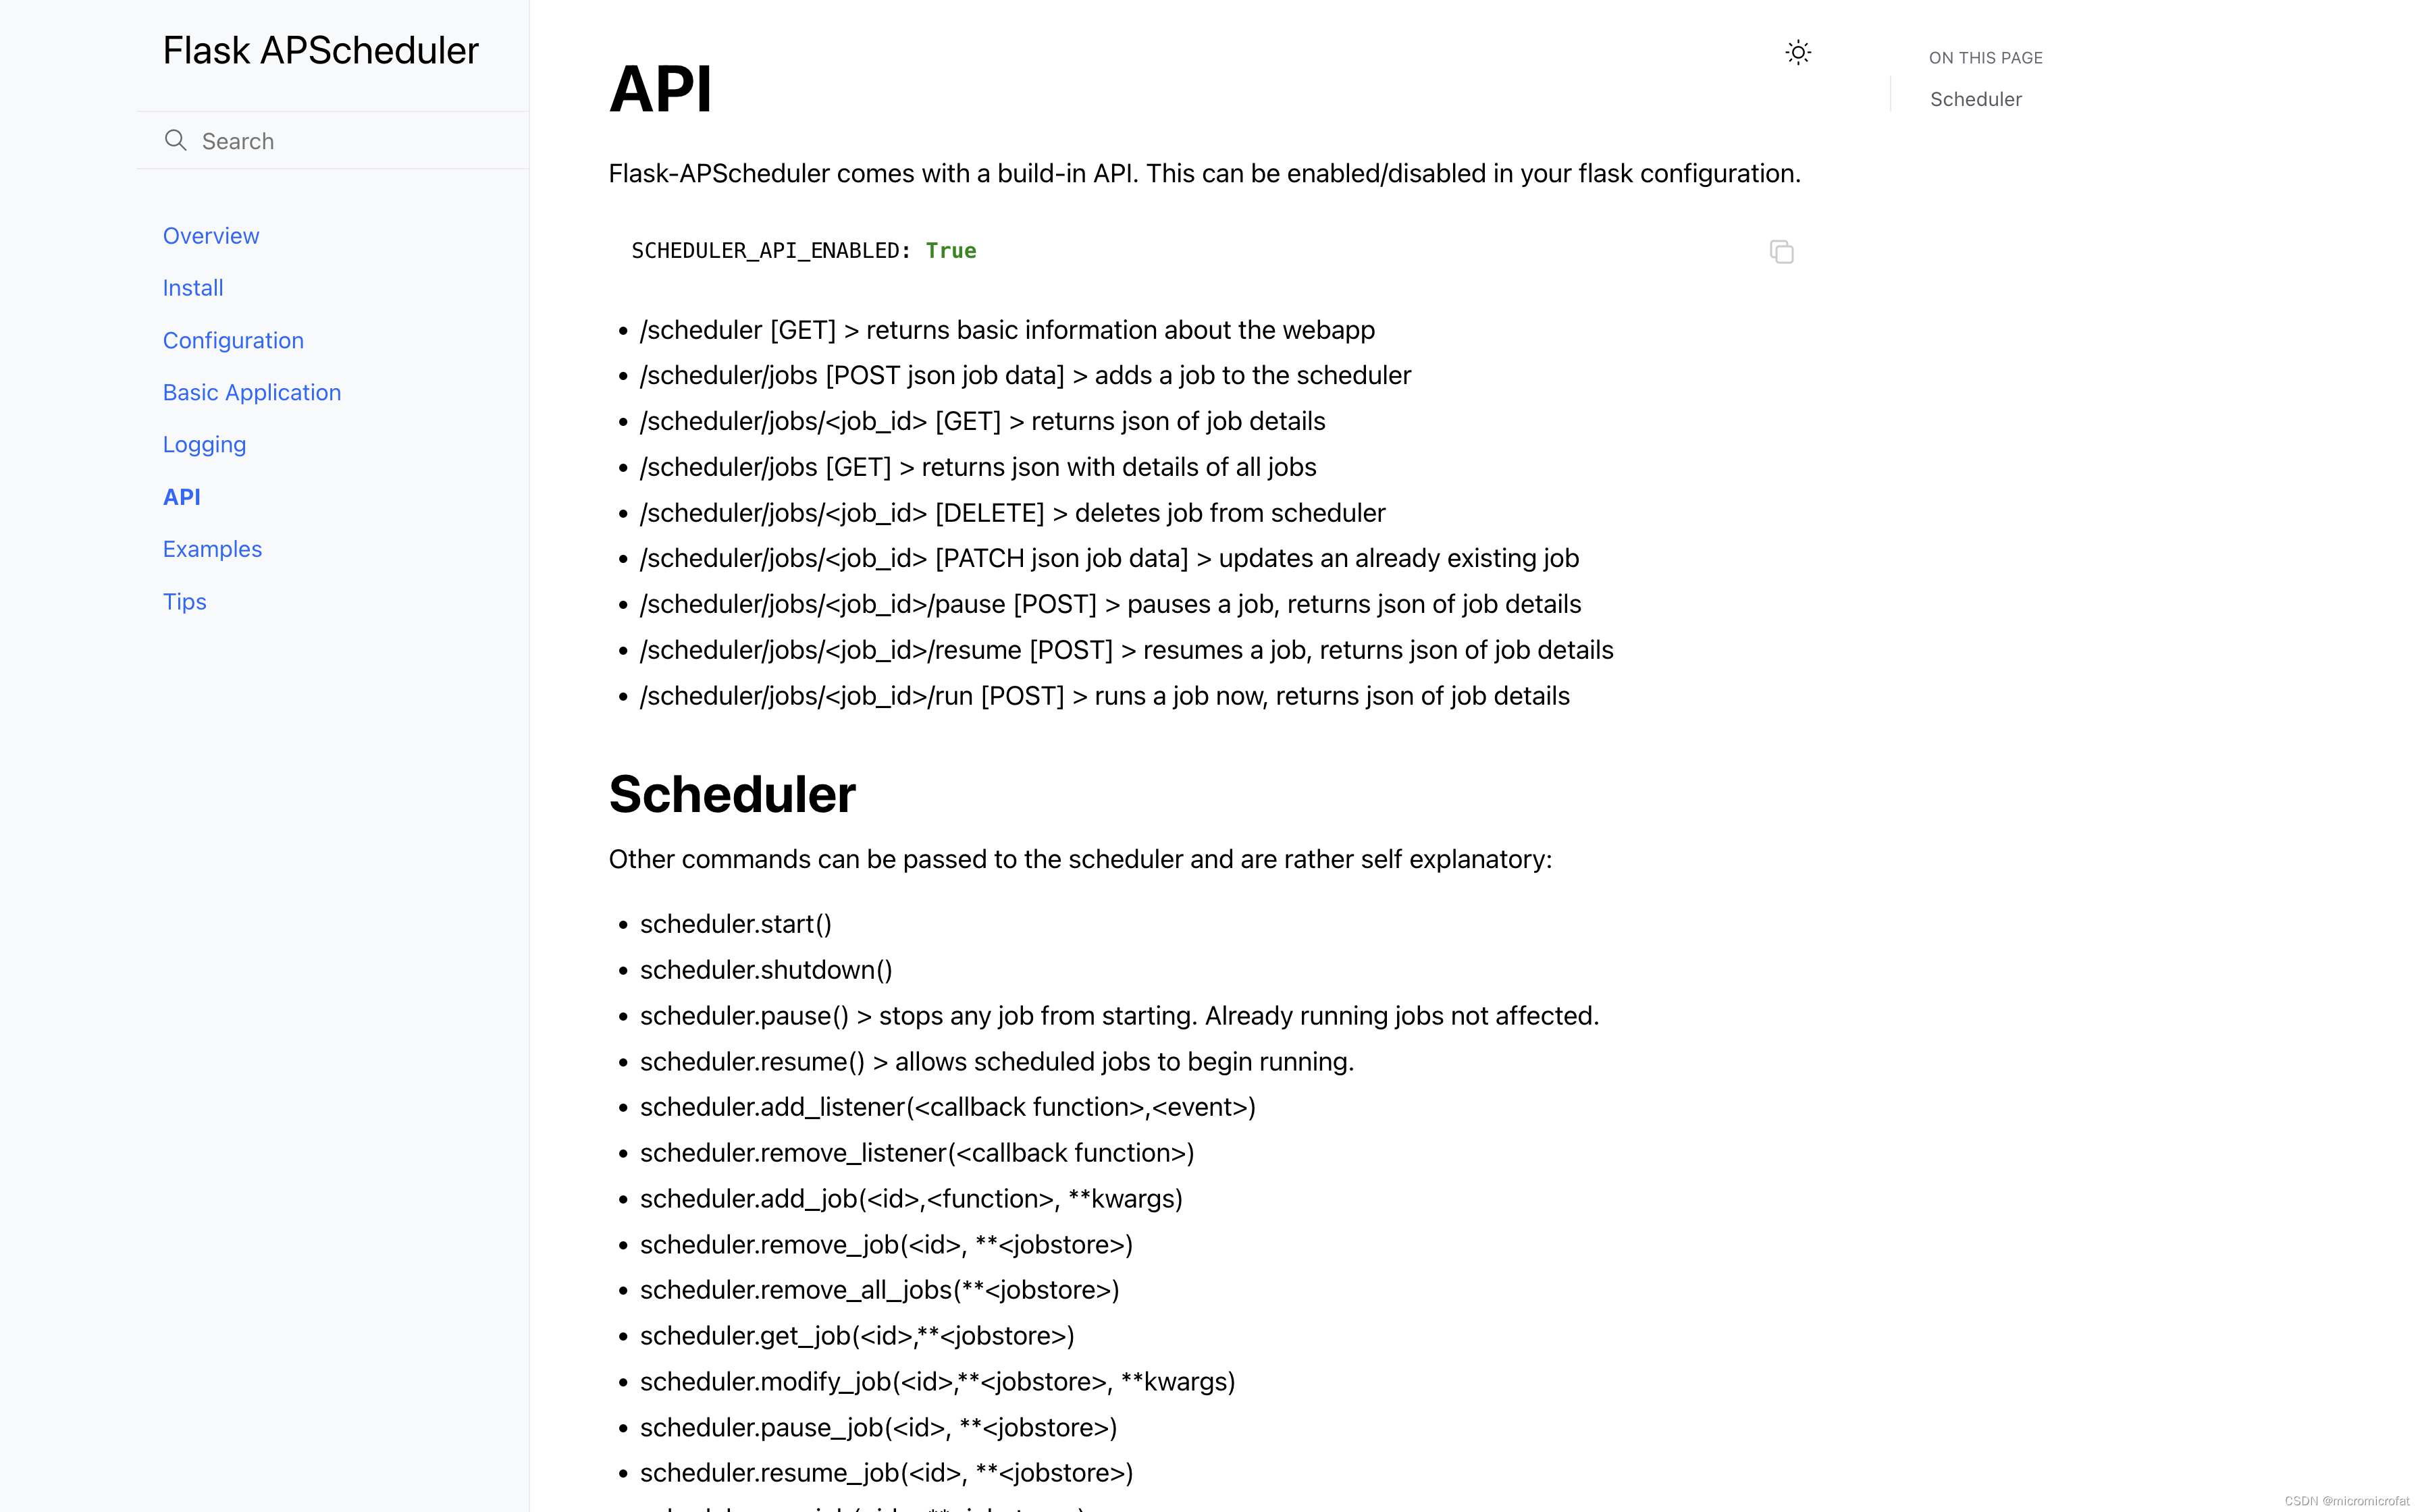
可以看到能够自动生成接口,接口详情如下:
- /scheduler [GET]
获取webapp基本信息
Response 200:
{
    "current_host": "6a1cc3879c58",
    "allowed_hosts": [
        "*"
    ],
    "running": true
}
- /scheduler/jobs [POST json job data]
给调度器添加作业
Request:
{
    "id": "job1",
    "func": "test:task",
    "args": [1, 2],
    "trigger": "interval",
    "seconds": 10
}
其中,上例func中的test为文件名,task为函数名
Response 200:
{
    "id": "job1",
    "name": "job1",
    "func": "test:task",
    "args": [
        1,
        2
    ],
    "kwargs": {},
    "trigger": "interval",
    "start_date": "2022-11-20T21:14:13.217787+08:00",
    "seconds": 10,
    "misfire_grace_time": 1,
    "max_instances": 1,
    "next_run_time": "2022-11-20T21:14:13.217787+08:00"
}
- /scheduler/jobs/<job_id> [GET]
获取作业详情
Response 200:
{
    "id": "job1",
    "name": "job1",
    "func": "test:task",
    "args": [
        1,
        2
    ],
    "kwargs": {},
    "trigger": "interval",
    "start_date": "2022-11-20T20:57:27.662972+08:00",
    "seconds": 10,
    "misfire_grace_time": 1,
    "max_instances": 1,
    "next_run_time": "2022-11-20T21:02:27.662972+08:00"
}
- /scheduler/jobs [GET]
获取所有作业详情
Response 200:
[
    {
        "id": "job1",
        "name": "job1",
        "func": "test:task",
        "args": [
            1,
            2
        ],
        "kwargs": {},
        "trigger": "interval",
        "start_date": "2022-11-20T20:57:27.662972+08:00",
        "seconds": 10,
        "misfire_grace_time": 1,
        "max_instances": 1,
        "next_run_time": "2022-11-20T21:02:47.662972+08:00"
    }
]
- /scheduler/jobs/<job_id> [DELETE]
从调度中删除某作业
Response 204 - /scheduler/jobs/<job_id> [PATCH json job data]
更新某作业
Request:
{
    "func": "test:task",
    "args": [2, 3],
    "trigger": "interval",
    "seconds": 10
}
Response 200:
{
    "id": "job1",
    "name": "job1",
    "func": "test:task",
    "args": [
        2,
        3
    ],
    "kwargs": {},
    "trigger": "interval",
    "start_date": "2022-11-20T21:15:31.187552+08:00",
    "seconds": 10,
    "misfire_grace_time": 1,
    "max_instances": 1,
    "next_run_time": "2022-11-20T21:15:31.187552+08:00"
}
- /scheduler/jobs/<job_id>/pause [POST]
暂停某作业
Response 200:
{
    "id": "job1",
    "name": "job1",
    "func": "test:task",
    "args": [
        2,
        3
    ],
    "kwargs": {},
    "trigger": "interval",
    "start_date": "2022-11-20T21:15:31.187552+08:00",
    "seconds": 10,
    "misfire_grace_time": 1,
    "max_instances": 1,
    "next_run_time": null
}
- /scheduler/jobs/<job_id>/resume [POST]
恢复某作业
Response 200:
{
    "id": "job1",
    "name": "job1",
    "func": "test:task",
    "args": [
        2,
        3
    ],
    "kwargs": {},
    "trigger": "interval",
    "start_date": "2022-11-20T21:15:31.187552+08:00",
    "seconds": 10,
    "misfire_grace_time": 1,
    "max_instances": 1,
    "next_run_time": "2022-11-20T21:17:01.187552+08:00"
}
- /scheduler/jobs/<job_id>/run [POST]
立即执行某作业
Response 200:
{
    "id": "job1",
    "name": "job1",
    "func": "test:task",
    "args": [
        2,
        3
    ],
    "kwargs": {},
    "trigger": "interval",
    "start_date": "2022-11-20T21:15:31.187552+08:00",
    "seconds": 10,
    "misfire_grace_time": 1,
    "max_instances": 1,
    "next_run_time": "2022-11-20T21:21:31.187552+08:00"
}
示例代码
可以使用示例代码,其中包括使用connexion以及flask两种方式的代码,具体看你的项目需求而定。
进入代码根目录
执行如下代码运行容器
>>> docker-compose up -d
完成后进入容器
>>> docker exec -it falsk-apscheduler-test /bin/bash
停止supervisord
>>> supervisorctl -c Services/falsk-apscheduler-test/supervisord.conf stop all
connexion
>>> python3 swagger_server/app.py
随后可以看到定时输出如下内容:
/app/swagger_server/app.py:47: DeprecationWarning: 'app.json_encoder' is deprecated and will be removed in Flask 2.3. Customize 'app.json_provider_class' or 'app.json' instead.
  app.app.json_encoder = encoder.JSONEncoder
 * Serving Flask app 'app'
 * Debug mode: off
WARNING: This is a development server. Do not use it in a production deployment. Use a production WSGI server instead.
 * Running on all addresses (0.0.0.0)
 * Running on http://127.0.0.1:8000
 * Running on http://172.22.0.2:8000
Press CTRL+C to quit
2022-11-20 22:21:14.358093 execute task 1+2=3
2022-11-20 22:21:24.358596 execute task 1+2=3
2022-11-20 22:21:34.357602 execute task 1+2=3
2022-11-20 22:21:44.357543 execute task 1+2=3
2022-11-20 22:21:54.357700 execute task 1+2=3
2022-11-20 22:22:04.357793 execute task 1+2=3
2022-11-20 22:22:14.358036 execute task 1+2=3
2022-11-20 22:22:24.358291 execute task 1+2=3
2022-11-20 22:22:34.358224 execute task 1+2=3
flask
>>> python3 test.py
随后可以看到定时输出如下内容:
 * Serving Flask app 'test'
 * Debug mode: off
WARNING: This is a development server. Do not use it in a production deployment. Use a production WSGI server instead.
 * Running on http://127.0.0.1:8000
Press CTRL+C to quit
2022-11-21 16:51:19.376061 execute task 1+2=3
2022-11-21 16:51:29.377086 execute task 1+2=3
2022-11-21 16:51:39.376033 execute task 1+2=3
2022-11-21 16:51:49.376166 execute task 1+2=3
2022-11-21 16:51:59.376259 execute task 1+2=3
2022-11-21 16:52:09.376141 execute task 1+2=3
2022-11-21 16:52:19.376926 execute task 1+2=3
2022-11-21 16:52:29.376742 execute task 1+2=3
接口测试
将代码中的flask-apscheduler-test.postman_collection.json文件导入Postman中
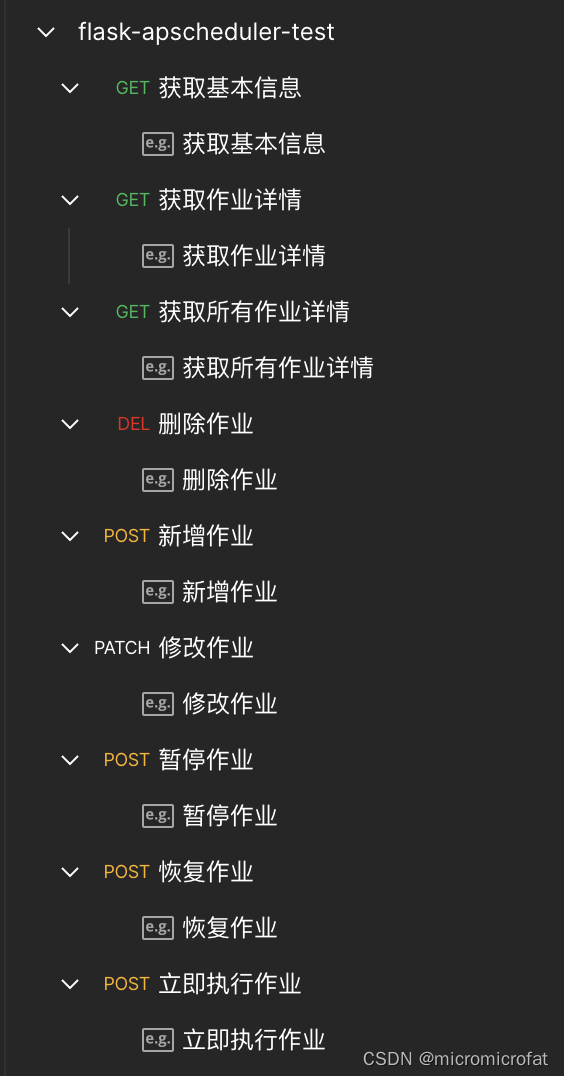
依次对接口进行测试即可

注意:
- 进行接口测试时,不要关闭容器终端;
- 测试代码运行在8000端口,如果有占用,可以手动改为别的端口,再重新运行


![[ros2实操]1-ros2的安装(ubuntu1804)与运行](https://img-blog.csdnimg.cn/39f3affd46ab45e492b79641596f4144.png)