注:本文使用maven创建项目。
目录:
- Hibernate简介:
- Hibernate使用:
- 一、手动创建:
- 1.建表:
- 2.pom.xml中导入相关依赖:
- 3.创建Hibernate核心配置文件hibernate.cfg.xml:
- 4.创建实体类UserEntity.java:
- 5.创建实体类-关系映射文件UserEntity.hbm.xml:
- 6.调用Hibernate API完成操作:
- 7.效果:
- 8.项目结构:
- 二、自动部署:
- 1.建表。
- 2.pom.xml中导入相关依赖:
- 3.添加框架支持。
- 4.添加数据库可视化。
- 5.自动生成实体类及实体类映射文件。
- 6.配置Hibernate核心配置文件。
- 7.调用Hibernate API完成操作。
- 8.项目结构:
Hibernate简介:
Hibernate是一个ORM框架,可以将对数据库的操作转换为对实体类Class的操作,使用Hibernate后,用户可以通过操作实体类Class操作数据库的表。
Hibernate使用:
一、手动创建:
1.建表:
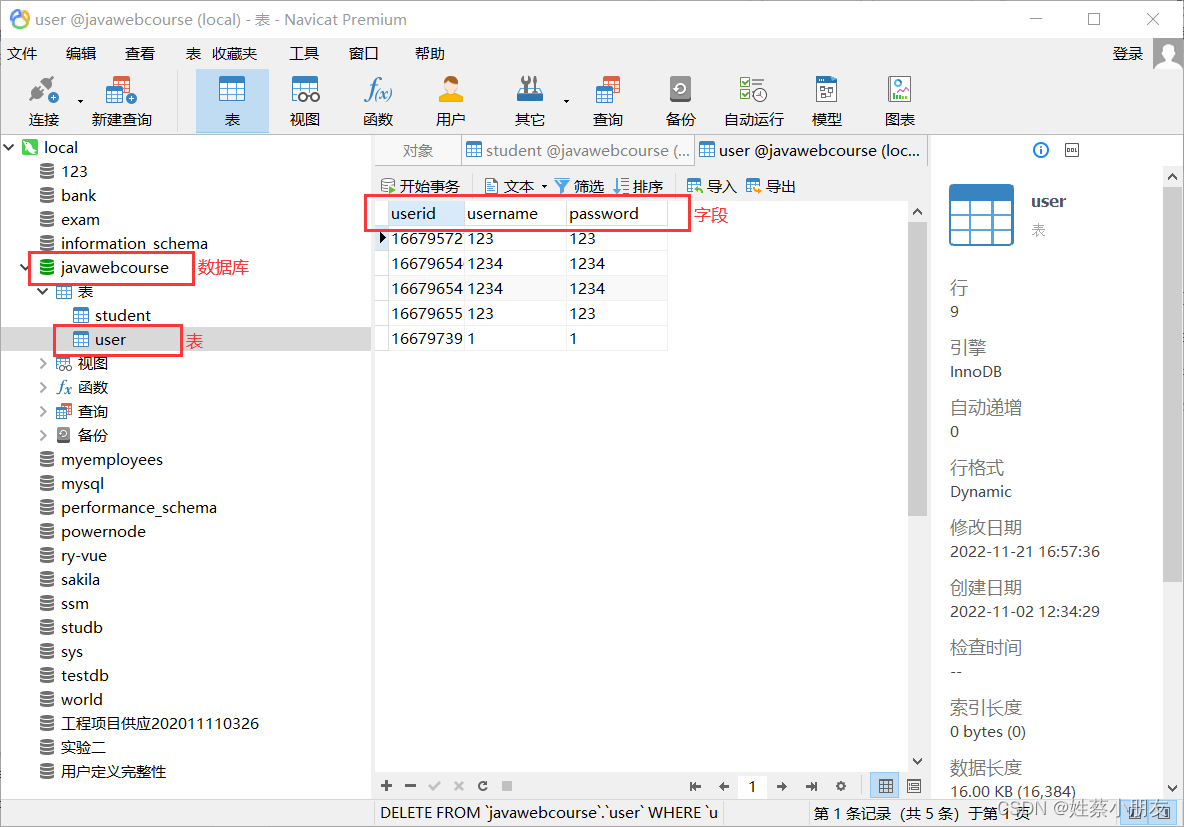
2.pom.xml中导入相关依赖:
<?xml version="1.0" encoding="UTF-8"?>

<project xmlns="http://maven.apache.org/POM/4.0.0" xmlns:xsi="http://www.w3.org/2001/XMLSchema-instance"
  xsi:schemaLocation="http://maven.apache.org/POM/4.0.0 http://maven.apache.org/xsd/maven-4.0.0.xsd">
  <modelVersion>4.0.0</modelVersion>

  <groupId>org.example</groupId>
  <artifactId>t00</artifactId>
  <version>1.0-SNAPSHOT</version>

  <properties>
    <project.build.sourceEncoding>UTF-8</project.build.sourceEncoding>
    <maven.compiler.source>1.8</maven.compiler.source>
    <maven.compiler.target>1.8</maven.compiler.target>
  </properties>
  <!--导入相关依赖-->
  <dependencies>
    <dependency>
      <groupId>junit</groupId>
      <artifactId>junit</artifactId>
      <version>4.11</version>
      <scope>test</scope>
    </dependency>
    <!--JDBC java连接mysql依赖-->
    <dependency>
      <groupId>mysql</groupId>
      <artifactId>mysql-connector-java</artifactId>
      <version>8.0.26</version>
    </dependency>
    <!--hibernate依赖-->
    <dependency>
      <groupId>org.hibernate</groupId>
      <artifactId>hibernate-core</artifactId>
      <version>5.6.10.Final</version>
    </dependency>
  </dependencies>

  <!--添加资源文件的指定-->
  <build>
    <resources>
      <!--src/main/java下的xml和properties文件在编译时都会被加到编译目录下-->
      <resource>
        <directory>src/main/java</directory>
        <includes>
          <include>**/*.xml</include>
          <include>**/*.properties</include>
        </includes>
      </resource>
      <!--src/main/resources下的xml和properties文件在编译时都会被加到编译目录下-->
      <resource>
        <directory>src/main/resources</directory>
        <includes>
          <include>**/*.xml</include>
          <include>**/*.properties</include>
        </includes>
      </resource>
    </resources>
  </build>
</project>
3.创建Hibernate核心配置文件hibernate.cfg.xml:
<?xml version='1.0' encoding='utf-8'?>
<!DOCTYPE hibernate-configuration PUBLIC
        "-//Hibernate/Hibernate Configuration DTD//EN"
        "http://www.hibernate.org/dtd/hibernate-configuration-3.0.dtd">
<!--核心配置文件-->
<hibernate-configuration>
    <session-factory>
        <!--数据源配置-->
        <property name="connection.url">jdbc:mysql://localhost:3306/javawebcourse</property>
        <property name="connection.driver_class">com.mysql.cj.jdbc.Driver</property>
        <property name="connection.username">Cailinhao</property>
        <property name="connection.password">CAIlinhao11014359</property>
        <!--打印SQL语句-->
        <property name="show_sql">true</property>
        <!--格式化SQL语句-->
        <property name="format_sql">true</property>
        <!--数据库方言,方便根据不同方言自动生成SQL语句-->
        <property name="dialect">org.hibernate.dialect.MySQL8Dialect</property>
        <!--没有表时是否自动生成在数据库生成表-->
        <property name="hibernate.hbm2ddl.auto">update</property>
        <!--数据库连接池,这里使用C3P0-->
        <!--连接数量不够时每次自增的个数-->
        <property name="hibernate.c3p0.acquire_increment">10</property>
        <!--设置连接失效时间-->
        <property name="c3p0.idle_test_period">10000</property>
        <!--设置连接超时时间-->
        <property name="c3p0.timeout">5000</property>
        <!--设置最大连接数-->
        <property name="c3p0.max_size">30</property>
        <!--设置最小连接数-->
        <property name="c3p0.min_size">5</property>
        <!--设置statement最大线程数-->
        <property name="hibernate.c3p0.max_statements">10</property>
        <!--注册实体类和xml映射文件-->
        <mapping class="org.example.Entity.UserEntity"/>
        <mapping resource="org/example/Entity/UserEntity.hbm.xml"/>
    </session-factory>
</hibernate-configuration>
4.创建实体类UserEntity.java:
package org.example.Entity;

public class UserEntity {
	//属性要与表的字段名对应
    private String userid;
    private String username;
    private String password;

	//每个属性要有get、set方法
    public String getUserid() {
        return userid;
    }

    public void setUserid(String userid) {
        this.userid = userid;
    }


    public String getUsername() {
        return username;
    }

    public void setUsername(String username) {
        this.username = username;
    }


    public String getPassword() {
        return password;
    }

    public void setPassword(String password) {
        this.password = password;
    }

}
5.创建实体类-关系映射文件UserEntity.hbm.xml:
用于将实体类UserEntity的各个属性和数据库表user的各个字段对应起来。
<?xml version='1.0' encoding='utf-8'?>
<!DOCTYPE hibernate-mapping PUBLIC
    "-//Hibernate/Hibernate Mapping DTD 3.0//EN"
    "http://www.hibernate.org/dtd/hibernate-mapping-3.0.dtd">
<hibernate-mapping>
    <!--配置实体类和表的映射关系
		name:实体类的全限定名
		table:数据库表名
	-->
    <class name="org.example.Entity.UserEntity" table="user" schema="javawebcourse">
        <!--主键用id,其他属性用property-->
        <!--表的字段名与实体类名匹配-->
        <id name="userid" column="userid"/>
        <property name="username" column="username"/>
        <property name="password" column="password"/>
    </class>
</hibernate-mapping>
6.调用Hibernate API完成操作:
package org.example;

import org.example.Entity.UserEntity;
import org.example.Util.HibernateUtil;
import org.hibernate.Session;
import org.hibernate.SessionFactory;
import org.hibernate.Transaction;
import org.hibernate.cfg.Configuration;
import org.junit.Test;

public class AppTest{
    @Test
    public void test(){
        //创建SessionFactory,从根路径下获取核心配置文件
        SessionFactory factory = new Configuration().configure("hibernate.cfg.xml").buildSessionFactory();
        //创建session
        Session session = factory.openSession();
        //创建事务
        Transaction transaction = session.beginTransaction();
        //创建实体类对象并给相应属性赋值
        UserEntity user = new UserEntity();
        user.setUserid("004");
        user.setUsername("zhangsan");
        user.setPassword("123456");
        //保存
        session.save(user);
        //提交事务
        transaction.commit();
        //关闭SessionFactory
        factory.close();
    }
}
7.效果:
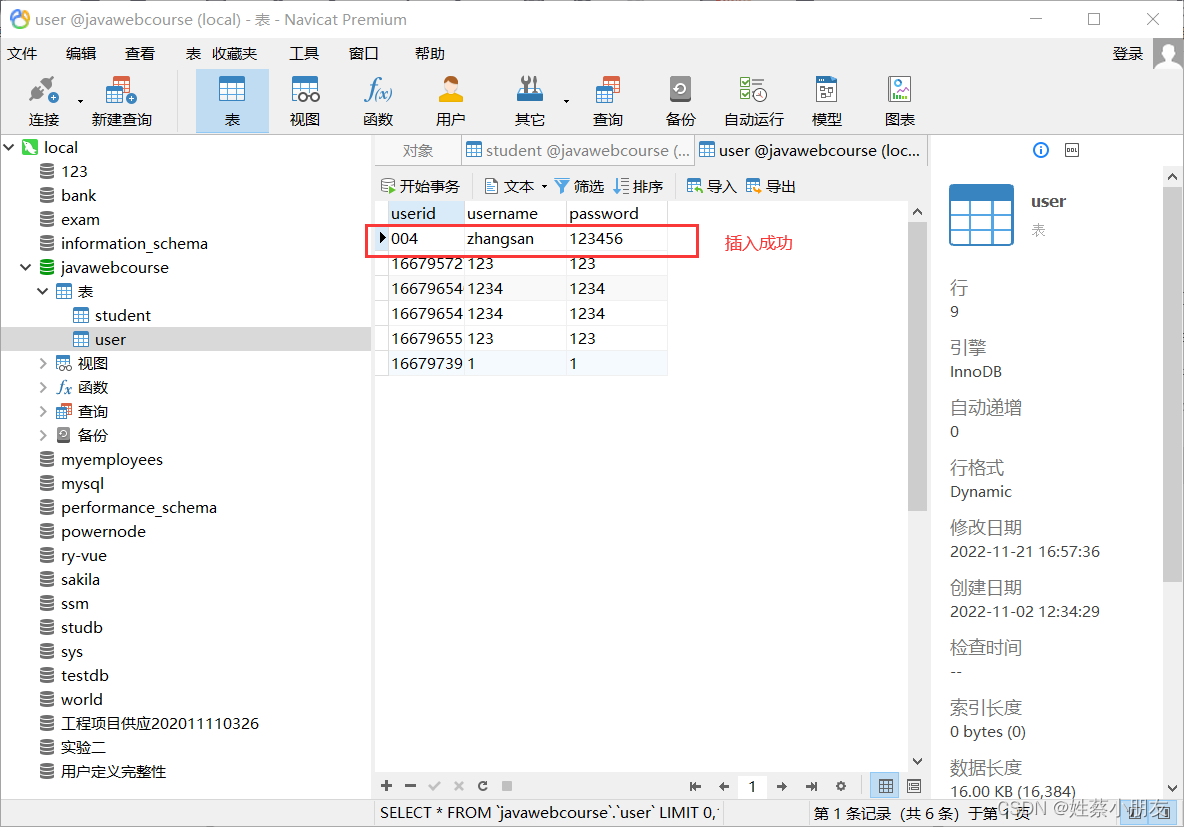
8.项目结构:
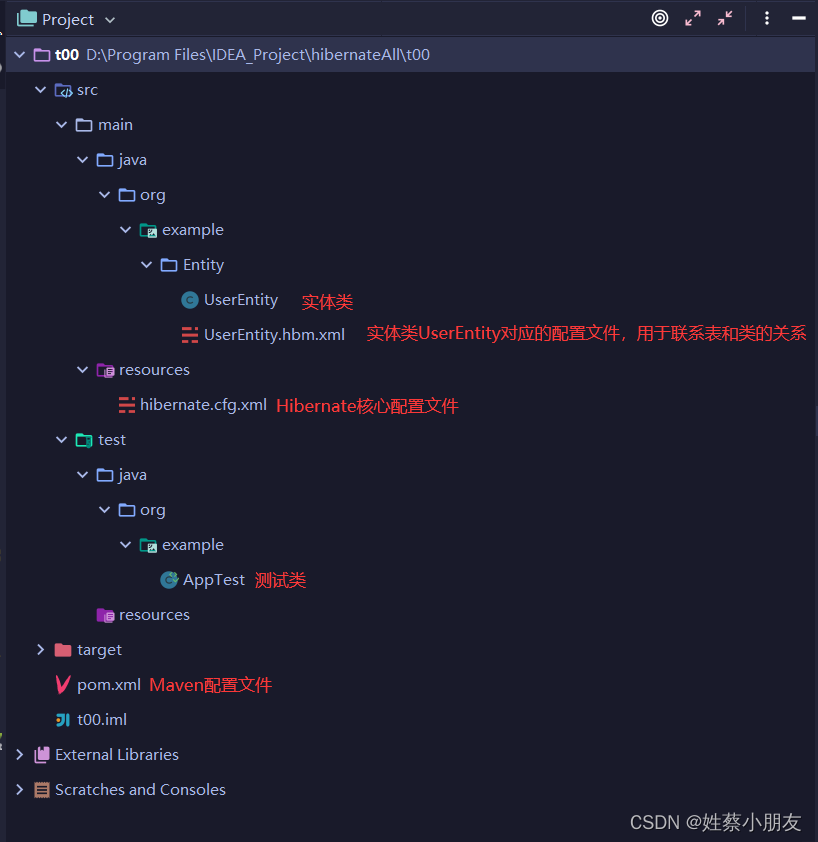
二、自动部署:
自动部署省去了创建实体类和实体关系映射文件的步骤,我们只需要编写核心配置文件即可。
1.建表。
具体表结构同上。
2.pom.xml中导入相关依赖:
<?xml version="1.0" encoding="UTF-8"?>

<project xmlns="http://maven.apache.org/POM/4.0.0" xmlns:xsi="http://www.w3.org/2001/XMLSchema-instance"
  xsi:schemaLocation="http://maven.apache.org/POM/4.0.0 http://maven.apache.org/xsd/maven-4.0.0.xsd">
  <modelVersion>4.0.0</modelVersion>

  <groupId>org.example</groupId>
  <artifactId>t00</artifactId>
  <version>1.0-SNAPSHOT</version>

  <properties>
    <project.build.sourceEncoding>UTF-8</project.build.sourceEncoding>
    <maven.compiler.source>1.8</maven.compiler.source>
    <maven.compiler.target>1.8</maven.compiler.target>
  </properties>
  <!--导入相关依赖-->
  <dependencies>
    <dependency>
      <groupId>junit</groupId>
      <artifactId>junit</artifactId>
      <version>4.11</version>
      <scope>test</scope>
    </dependency>
    <!--JDBC java连接mysql依赖-->
    <dependency>
      <groupId>mysql</groupId>
      <artifactId>mysql-connector-java</artifactId>
      <version>8.0.26</version>
    </dependency>
    <!--hibernate依赖-->
    <dependency>
      <groupId>org.hibernate</groupId>
      <artifactId>hibernate-core</artifactId>
      <version>5.6.10.Final</version>
    </dependency>
  </dependencies>

  <!--添加资源文件的指定-->
  <build>
    <resources>
      <!--src/main/java下的xml和properties文件在编译时都会被加到编译目录下-->
      <resource>
        <directory>src/main/java</directory>
        <includes>
          <include>**/*.xml</include>
          <include>**/*.properties</include>
        </includes>
      </resource>
      <!--src/main/resources下的xml和properties文件在编译时都会被加到编译目录下-->
      <resource>
        <directory>src/main/resources</directory>
        <includes>
          <include>**/*.xml</include>
          <include>**/*.properties</include>
        </includes>
      </resource>
    </resources>
  </build>
</project>
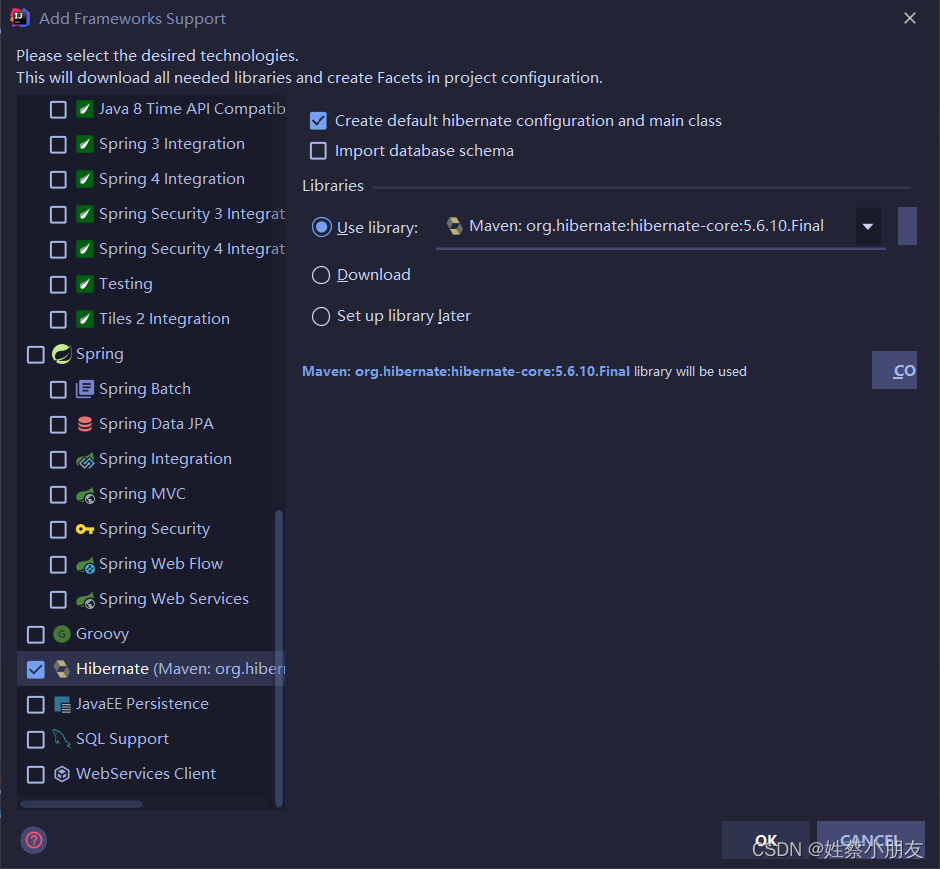
3.添加框架支持。
右键module,点击Add Framework Support,添加Hibernate依赖。
4.添加数据库可视化。
点击查看IDEA添加数据库可视化的方法。
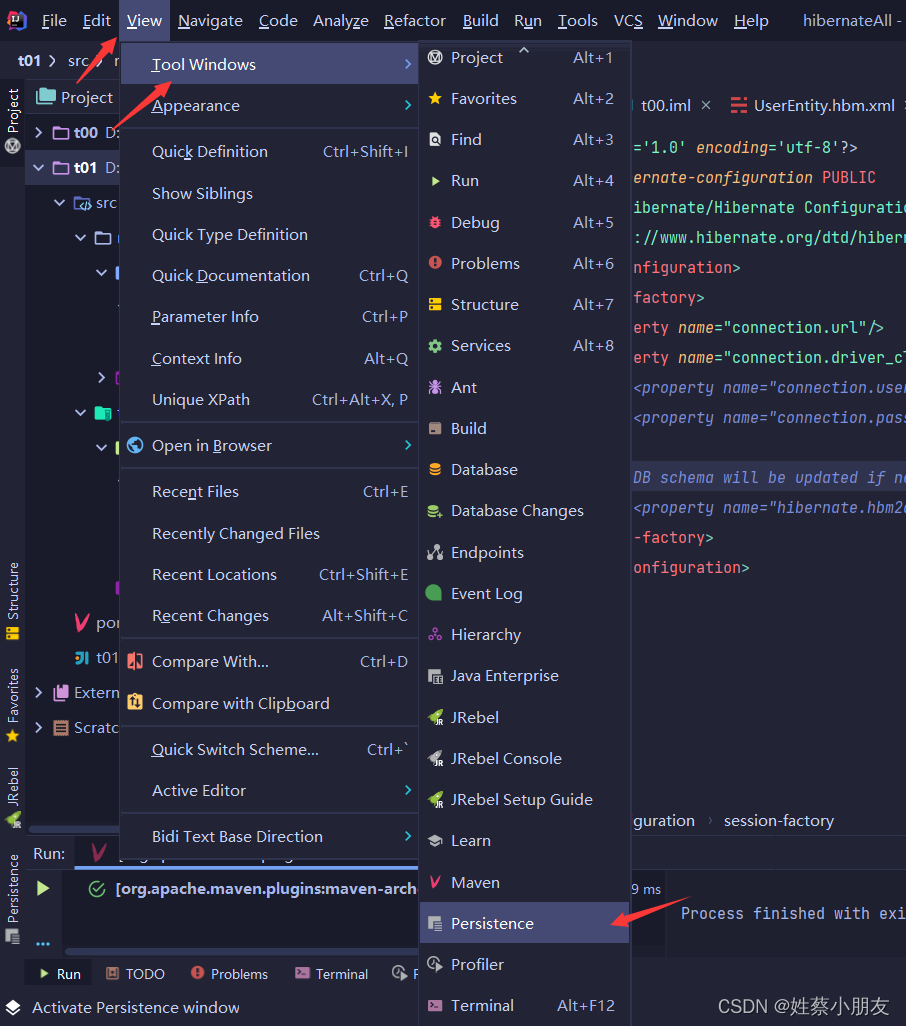
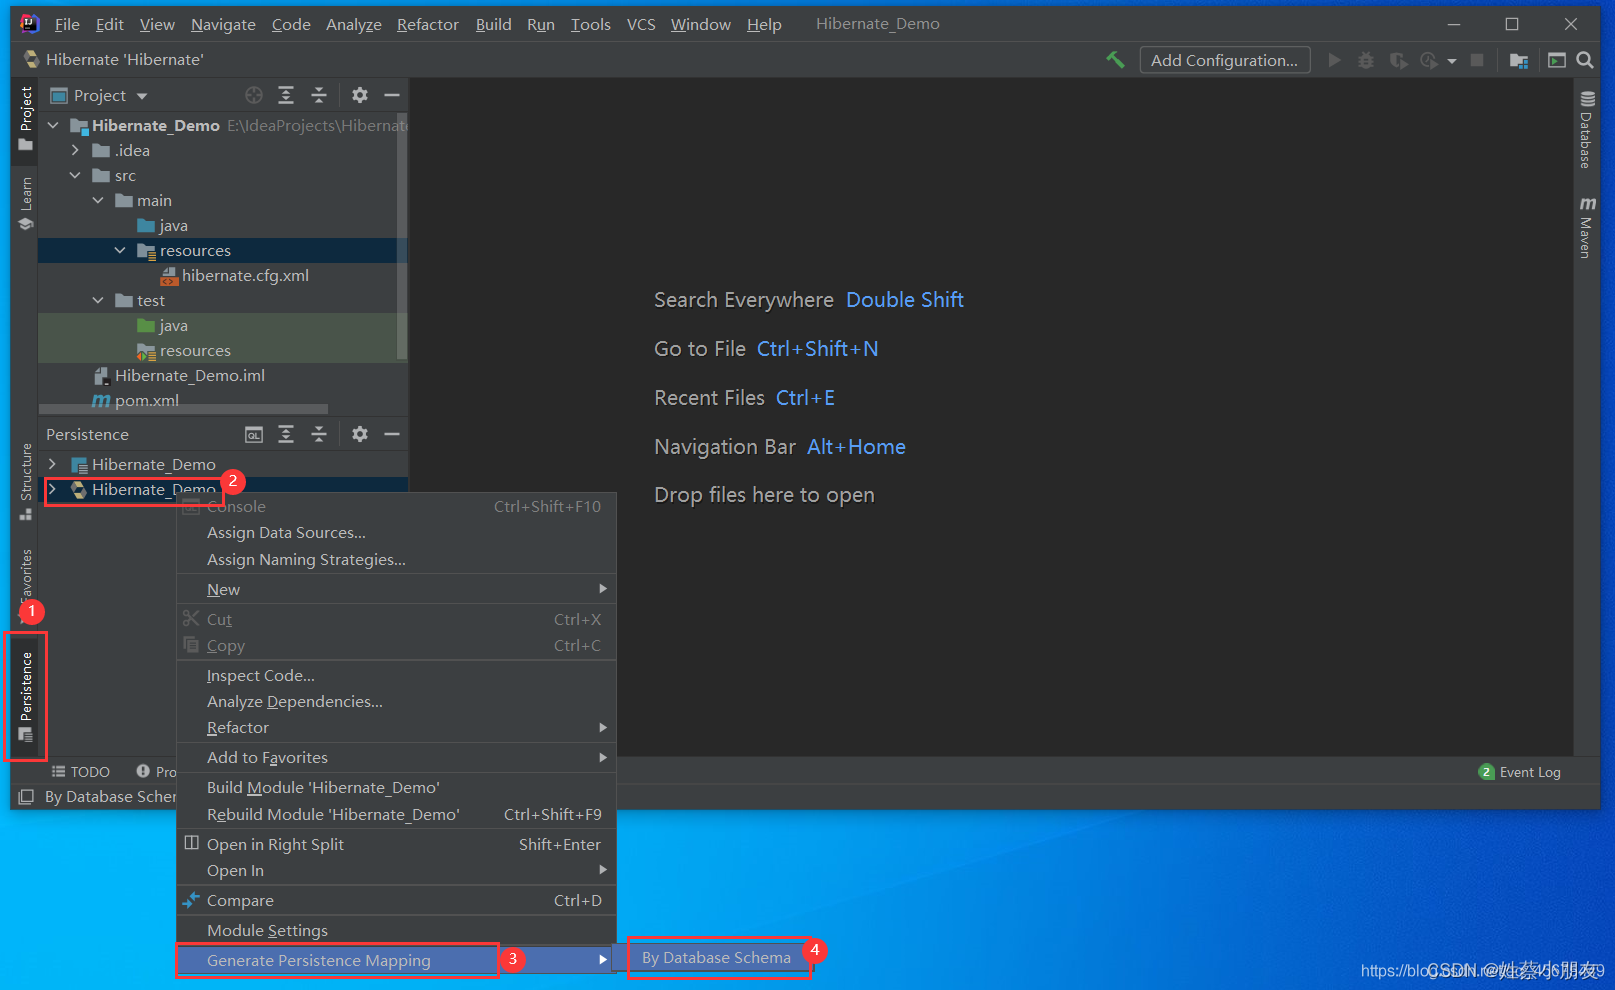
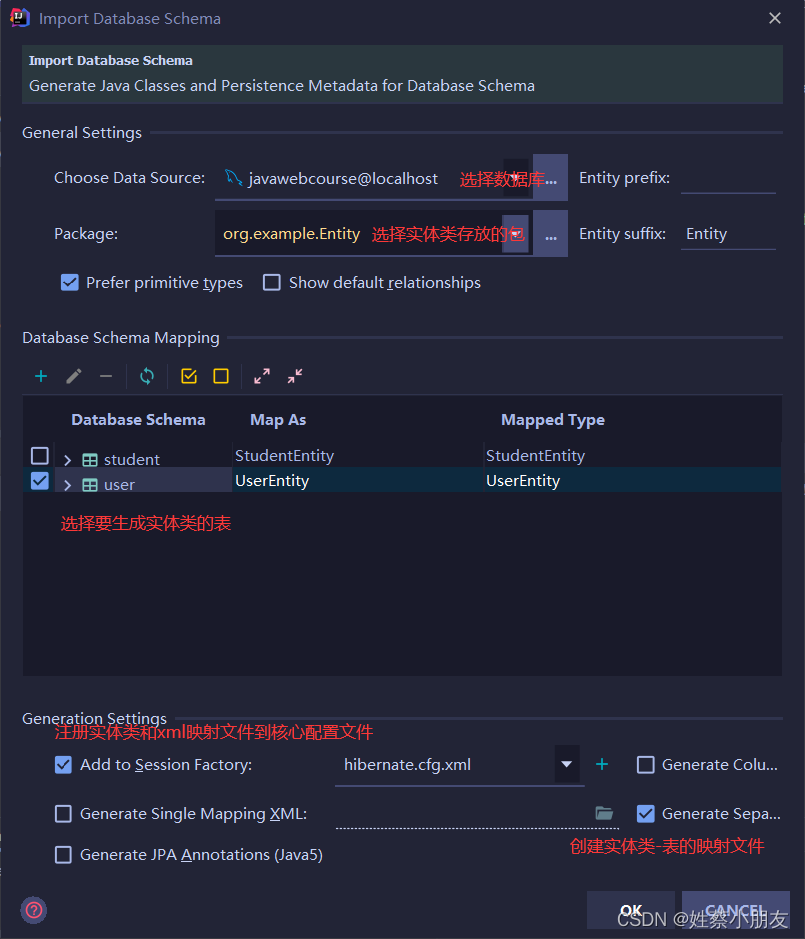
5.自动生成实体类及实体类映射文件。
6.配置Hibernate核心配置文件。
具体内容同上。
7.调用Hibernate API完成操作。
具体内容同上。
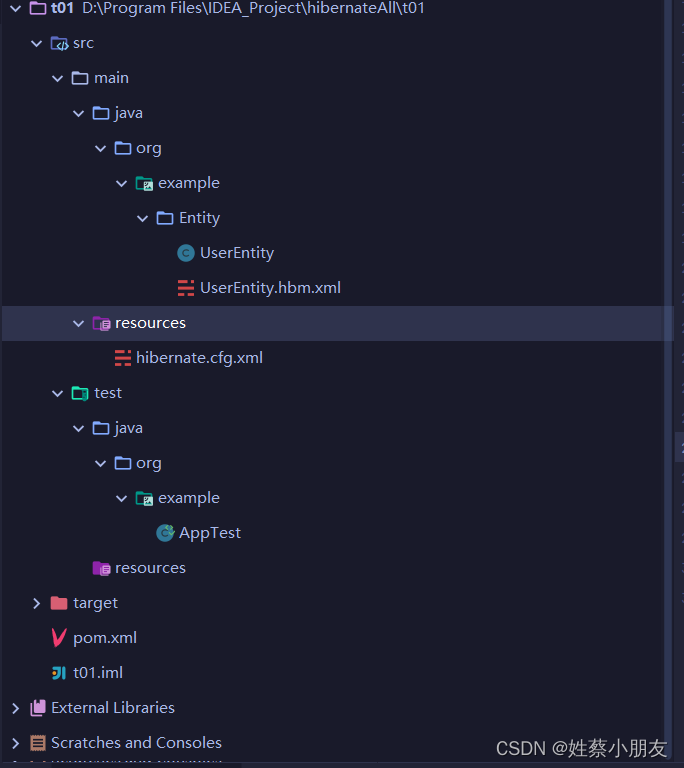
8.项目结构:



![[ros2实操]1-ros2的安装(ubuntu1804)与运行](https://img-blog.csdnimg.cn/39f3affd46ab45e492b79641596f4144.png)


![(C语言)P1002 [NOIP2002 普及组] 过河卒](https://img-blog.csdnimg.cn/48476eecdc984366bcaa0e793f9b6b55.png)



![[附源码]Python计算机毕业设计成绩管理与学情分析系统](https://img-blog.csdnimg.cn/1ac88af5ed984cf08bcfc1f16accbd3f.png)