目标:
- @SpringBootApplication注解认识
- 了解SpringBoot的启动流程
- 了解SpringFactoriesLoader对META-INF/spring.factories的反射加载
- 认识AutoConfigurationImportSelector这个ImportSelector
- starter的认识和使用
目录
- SpringBoot 启动原理
- @SpringBootApplication 注解分析
- @EnableAutoConfiguration注解
- AutoConfigurationImportSelector类
- eg:AutoConfigurationImportSelector扫描出mybatis-spring-starter的spring.factories配置
- new SpringApplication类
- 附:SpringFactoriesLoader
- 附:spring-boot的spring.factories内容
- SpringApplication类的run方法流程
- prepareEnvironment
- printBanner
- createApplicationContext
- prepareContext
- refreshContext
- ImportSelector 的 selectImports 方法
- 再次说明starter
- SpringBoot starter机制
- 自定义一个starter并引用
SpringBoot 启动原理
springboot项目启动主类如下
@SpringBootApplication
@ComponentScan("com.example")
@EnableScheduling
public class DemoApiApplication {

	public static void main(String[] args) {
		SpringApplication.run(DemoApiApplication.class, args);
	}
}
主要就是@SpringBootApplication这个注解
@SpringBootApplication 注解分析
- @SpringBootApplication
@Target(ElementType.TYPE)
@Retention(RetentionPolicy.RUNTIME)
@Documented
@Inherited
@SpringBootConfiguration
@EnableAutoConfiguration
@ComponentScan(excludeFilters = {
		@Filter(type = FilterType.CUSTOM, classes = TypeExcludeFilter.class),
		@Filter(type = FilterType.CUSTOM, classes = AutoConfigurationExcludeFilter.class) })
public @interface SpringBootApplication {
- @SpringBootConfiguration
@Target(ElementType.TYPE)
@Retention(RetentionPolicy.RUNTIME)
@Documented
@Configuration
public @interface SpringBootConfiguration {

}
可以看到全注解类的@Configuration注解
- @EnableAutoConfiguration
@Target(ElementType.TYPE)
@Retention(RetentionPolicy.RUNTIME)
@Documented
@Inherited
@AutoConfigurationPackage
@Import(AutoConfigurationImportSelector.class)
public @interface EnableAutoConfiguration {
@EnableAutoConfiguration注解
EnableAutoConfiguration是一个组合注解,用@Import把AutoConfigurationImportSelector导入容器中,SpringBoot启动的时候会加载所有的selector并执行selectImports方法,这个方法会加载META-INF/spring.factories中配置的EnableAutoConfiguration,从而实现加载自动配置
而mybatis-spring-boot-starter、spring-boot-starter-web等组件的META-INF文件下均含有spring.factories文件,自动配置模块中,SpringFactoriesLoader收集到文件中的类全名并返回一个类全名的数组,返回的类全名通过反射被实例化,就形成了具体的工厂实例,工厂实例来生成组件具体需要的bean。

AutoConfigurationImportSelector类
public class AutoConfigurationImportSelector
		implements DeferredImportSelector, BeanClassLoaderAware, ResourceLoaderAware,
		BeanFactoryAware, EnvironmentAware, Ordered {

AutoConfigurationImportSelector实现了ImportSelector(选择器)和BeanClassLoaderAware(bean类加载器中间件)
关于ImportSelector在https://blog.csdn.net/qq_26437925/article/details/144865082 这篇文章中有分析到,即在使用@Import注解来注册bean的时候(Import注解的值可以是ImportSelector或者DeferredImportSelector的实现类)spring容器会实例化这个实现类,并执行其selectImports方法;
具体是在 spring refresh 12 个方法中的invokeBeanFactoryPostProcessors(beanFactory);会执行ConfigurationClassPostProcessor的processConfigBeanDefinitions方法中
eg:AutoConfigurationImportSelector扫描出mybatis-spring-starter的spring.factories配置

debug Springboot启动过程

new SpringApplication类
/**
	 * Create a new {@link SpringApplication} instance. The application context will load
	 * beans from the specified primary sources (see {@link SpringApplication class-level}
	 * documentation for details. The instance can be customized before calling
	 * {@link #run(String...)}.
	 * @param resourceLoader the resource loader to use
	 * @param primarySources the primary bean sources
	 * @see #run(Class, String[])
	 * @see #setSources(Set)
	 */
	@SuppressWarnings({ "unchecked", "rawtypes" })
	public SpringApplication(ResourceLoader resourceLoader, Class<?>... primarySources) {
		this.resourceLoader = resourceLoader;
		Assert.notNull(primarySources, "PrimarySources must not be null");
		this.primarySources = new LinkedHashSet<>(Arrays.asList(primarySources));
		this.webApplicationType = WebApplicationType.deduceFromClasspath();
		// 通过SpringFactoriesLoader,获取到所有META-INF/spring.factories中的ApplicationContextInitializer,并实例化
		setInitializers((Collection) getSpringFactoriesInstances(
				ApplicationContextInitializer.class));
		// 通过SpringFactoriesLoader,获取到所有META-INF/spring.factories中的ApplicationListener,并实例化
		setListeners((Collection) getSpringFactoriesInstances(ApplicationListener.class));
		// 获取执行当前main方法的类,也就是启动类
		this.mainApplicationClass = deduceMainApplicationClass();
	}
- 判断应用类型为
WebApplicationType.SERVLET
- 利用SpringFactoriesLoader加载所有META-INF/spring.factories中的ApplicationContextInitializer
- SpringFactoriesLoader加载所有META-INF/spring.factories中的ApplicationListener
附:SpringFactoriesLoader
其原理AI回答如下:


附:spring-boot的spring.factories内容

# PropertySource Loaders
org.springframework.boot.env.PropertySourceLoader=\
org.springframework.boot.env.PropertiesPropertySourceLoader,\
org.springframework.boot.env.YamlPropertySourceLoader

# Run Listeners
org.springframework.boot.SpringApplicationRunListener=\
org.springframework.boot.context.event.EventPublishingRunListener

# Error Reporters
org.springframework.boot.SpringBootExceptionReporter=\
org.springframework.boot.diagnostics.FailureAnalyzers

# Application Context Initializers
org.springframework.context.ApplicationContextInitializer=\
org.springframework.boot.context.ConfigurationWarningsApplicationContextInitializer,\
org.springframework.boot.context.ContextIdApplicationContextInitializer,\
org.springframework.boot.context.config.DelegatingApplicationContextInitializer,\
org.springframework.boot.web.context.ServerPortInfoApplicationContextInitializer

# Application Listeners
org.springframework.context.ApplicationListener=\
org.springframework.boot.ClearCachesApplicationListener,\
org.springframework.boot.builder.ParentContextCloserApplicationListener,\
org.springframework.boot.context.FileEncodingApplicationListener,\
org.springframework.boot.context.config.AnsiOutputApplicationListener,\
org.springframework.boot.context.config.ConfigFileApplicationListener,\
org.springframework.boot.context.config.DelegatingApplicationListener,\
org.springframework.boot.context.logging.ClasspathLoggingApplicationListener,\
org.springframework.boot.context.logging.LoggingApplicationListener,\
org.springframework.boot.liquibase.LiquibaseServiceLocatorApplicationListener

# Environment Post Processors
org.springframework.boot.env.EnvironmentPostProcessor=\
org.springframework.boot.cloud.CloudFoundryVcapEnvironmentPostProcessor,\
org.springframework.boot.env.SpringApplicationJsonEnvironmentPostProcessor,\
org.springframework.boot.env.SystemEnvironmentPropertySourceEnvironmentPostProcessor

# Failure Analyzers
org.springframework.boot.diagnostics.FailureAnalyzer=\
org.springframework.boot.diagnostics.analyzer.BeanCurrentlyInCreationFailureAnalyzer,\
org.springframework.boot.diagnostics.analyzer.BeanDefinitionOverrideFailureAnalyzer,\
org.springframework.boot.diagnostics.analyzer.BeanNotOfRequiredTypeFailureAnalyzer,\
org.springframework.boot.diagnostics.analyzer.BindFailureAnalyzer,\
org.springframework.boot.diagnostics.analyzer.BindValidationFailureAnalyzer,\
org.springframework.boot.diagnostics.analyzer.UnboundConfigurationPropertyFailureAnalyzer,\
org.springframework.boot.diagnostics.analyzer.ConnectorStartFailureAnalyzer,\
org.springframework.boot.diagnostics.analyzer.NoSuchMethodFailureAnalyzer,\
org.springframework.boot.diagnostics.analyzer.NoUniqueBeanDefinitionFailureAnalyzer,\
org.springframework.boot.diagnostics.analyzer.PortInUseFailureAnalyzer,\
org.springframework.boot.diagnostics.analyzer.ValidationExceptionFailureAnalyzer,\
org.springframework.boot.diagnostics.analyzer.InvalidConfigurationPropertyNameFailureAnalyzer,\
org.springframework.boot.diagnostics.analyzer.InvalidConfigurationPropertyValueFailureAnalyzer

# FailureAnalysisReporters
org.springframework.boot.diagnostics.FailureAnalysisReporter=\
org.springframework.boot.diagnostics.LoggingFailureAnalysisReporter
SpringApplication类的run方法流程
使用的spring-boot-starter版本如下
<parent>
     <groupId>org.springframework.boot</groupId>
     <artifactId>spring-boot-starter-parent</artifactId>
     <version>2.1.4.RELEASE</version>
 </parent>
- org.springframework.boot.SpringApplication#run(java.lang.String…)
/**
	 * Run the Spring application, creating and refreshing a new
	 * {@link ApplicationContext}.
	 * @param args the application arguments (usually passed from a Java main method)
	 * @return a running {@link ApplicationContext}
	 */
	public ConfigurableApplicationContext run(String... args) {
		StopWatch stopWatch = new StopWatch();
		stopWatch.start();
		ConfigurableApplicationContext context = null;
		Collection<SpringBootExceptionReporter> exceptionReporters = new ArrayList<>();
		configureHeadlessProperty();
		SpringApplicationRunListeners listeners = getRunListeners(args);
		listeners.starting();
		try {
			ApplicationArguments applicationArguments = new DefaultApplicationArguments(
					args);
			ConfigurableEnvironment environment = prepareEnvironment(listeners,
					applicationArguments);
			configureIgnoreBeanInfo(environment);
			Banner printedBanner = printBanner(environment);
			context = createApplicationContext();
			exceptionReporters = getSpringFactoriesInstances(
					SpringBootExceptionReporter.class,
					new Class[] { ConfigurableApplicationContext.class }, context);
			prepareContext(context, environment, listeners, applicationArguments,
					printedBanner);
			refreshContext(context);
			afterRefresh(context, applicationArguments);
			stopWatch.stop();
			if (this.logStartupInfo) {
				new StartupInfoLogger(this.mainApplicationClass)
						.logStarted(getApplicationLog(), stopWatch);
			}
			listeners.started(context);
			callRunners(context, applicationArguments);
		}
		catch (Throwable ex) {
			handleRunFailure(context, ex, exceptionReporters, listeners);
			throw new IllegalStateException(ex);
		}

		try {
			listeners.running(context);
		}
		catch (Throwable ex) {
			handleRunFailure(context, ex, exceptionReporters, null);
			throw new IllegalStateException(ex);
		}
		return context;
	}
-
首先遍历执行所有通过SpringFactoriesLoader,在当前classpath下的META-INF/spring.factories中查找所有可用的
SpringApplicationRunListeners并实例化。调用它们的starting()方法,通知这些监听器SpringBoot应用启动。 -
创建并配置当前SpringBoot应用将要使用的Environment,包括当前有效的PropertySource以及Profile。
-
遍历调用所有的SpringApplicationRunListeners的environmentPrepared()的方法,通知这些监听器SpringBoot应用的Environment已经完成初始化。
-
打印SpringBoot应用的banner,SpringApplication的showBanner属性为true时,如果classpath下存在banner.txt文件,则打印其内容,否则打印默认banner。
-
根据启动时设置的applicationContextClass和在initialize方法设置的webEnvironment,创建对应的applicationContext。
-
创建异常解析器,用在启动中发生异常的时候进行异常处理(包括记录日志、释放资源等)。
-
设置SpringBoot的Environment,注册Spring Bean名称的序列化器BeanNameGenerator,并设置资源加载器ResourceLoader,通过SpringFactoriesLoader加载ApplicationContextInitializer初始化器,调用initialize方法,对创建的ApplicationContext进一步初始化。
-
调用所有的SpringApplicationRunListeners的contextPrepared方法,通知这些Listener当前ApplicationContext已经创建完毕。
-
最核心的一步,将之前通过@EnableAutoConfiguration获取的所有配置以及其他形式的IoC容器配置加载到已经准备完毕的ApplicationContext。
-
调用所有的SpringApplicationRunListener的contextLoaded方法,加载准备完毕的ApplicationContext。
-
调用refreshContext(即spring容器refresh方法),并注册一个关闭Spring容器的钩子ShutdownHook,当程序在停止的时候释放资源(包括:销毁Bean,关闭SpringBean的创建工厂等)
注: 钩子可以在以下几种场景中被调用:
1)程序正常退出
2)使用System.exit()
3)终端使用Ctrl+C触发的中断
4)系统关闭
5)使用Kill pid命令杀死进程
获取当前所有ApplicationRunner和CommandLineRunner接口的实现类,执行其run方法
遍历所有的SpringApplicationRunListener的finished()方法,完成SpringBoot的启动。
prepareEnvironment
环境准备的时候会new ApplicationEnvironmentPreparedEvent()并广播这个事件
而ConfigFileApplicationListener是Spring Boot中的一个监听器,主要负责配置文件的加载和处理。它通过监听特定的应用事件,来加载和解析配置文件,并将解析后的配置信息添加到Spring的环境中。会监听到
如下:

加载application.properties文件,具体使用的是spring-boot的spring.factories中配置的org.springframework.boot.env.PropertiesPropertySourceLoader
org.springframework.boot.env.PropertySourceLoader=\
org.springframework.boot.env.PropertiesPropertySourceLoader,\
org.springframework.boot.env.YamlPropertySourceLoader
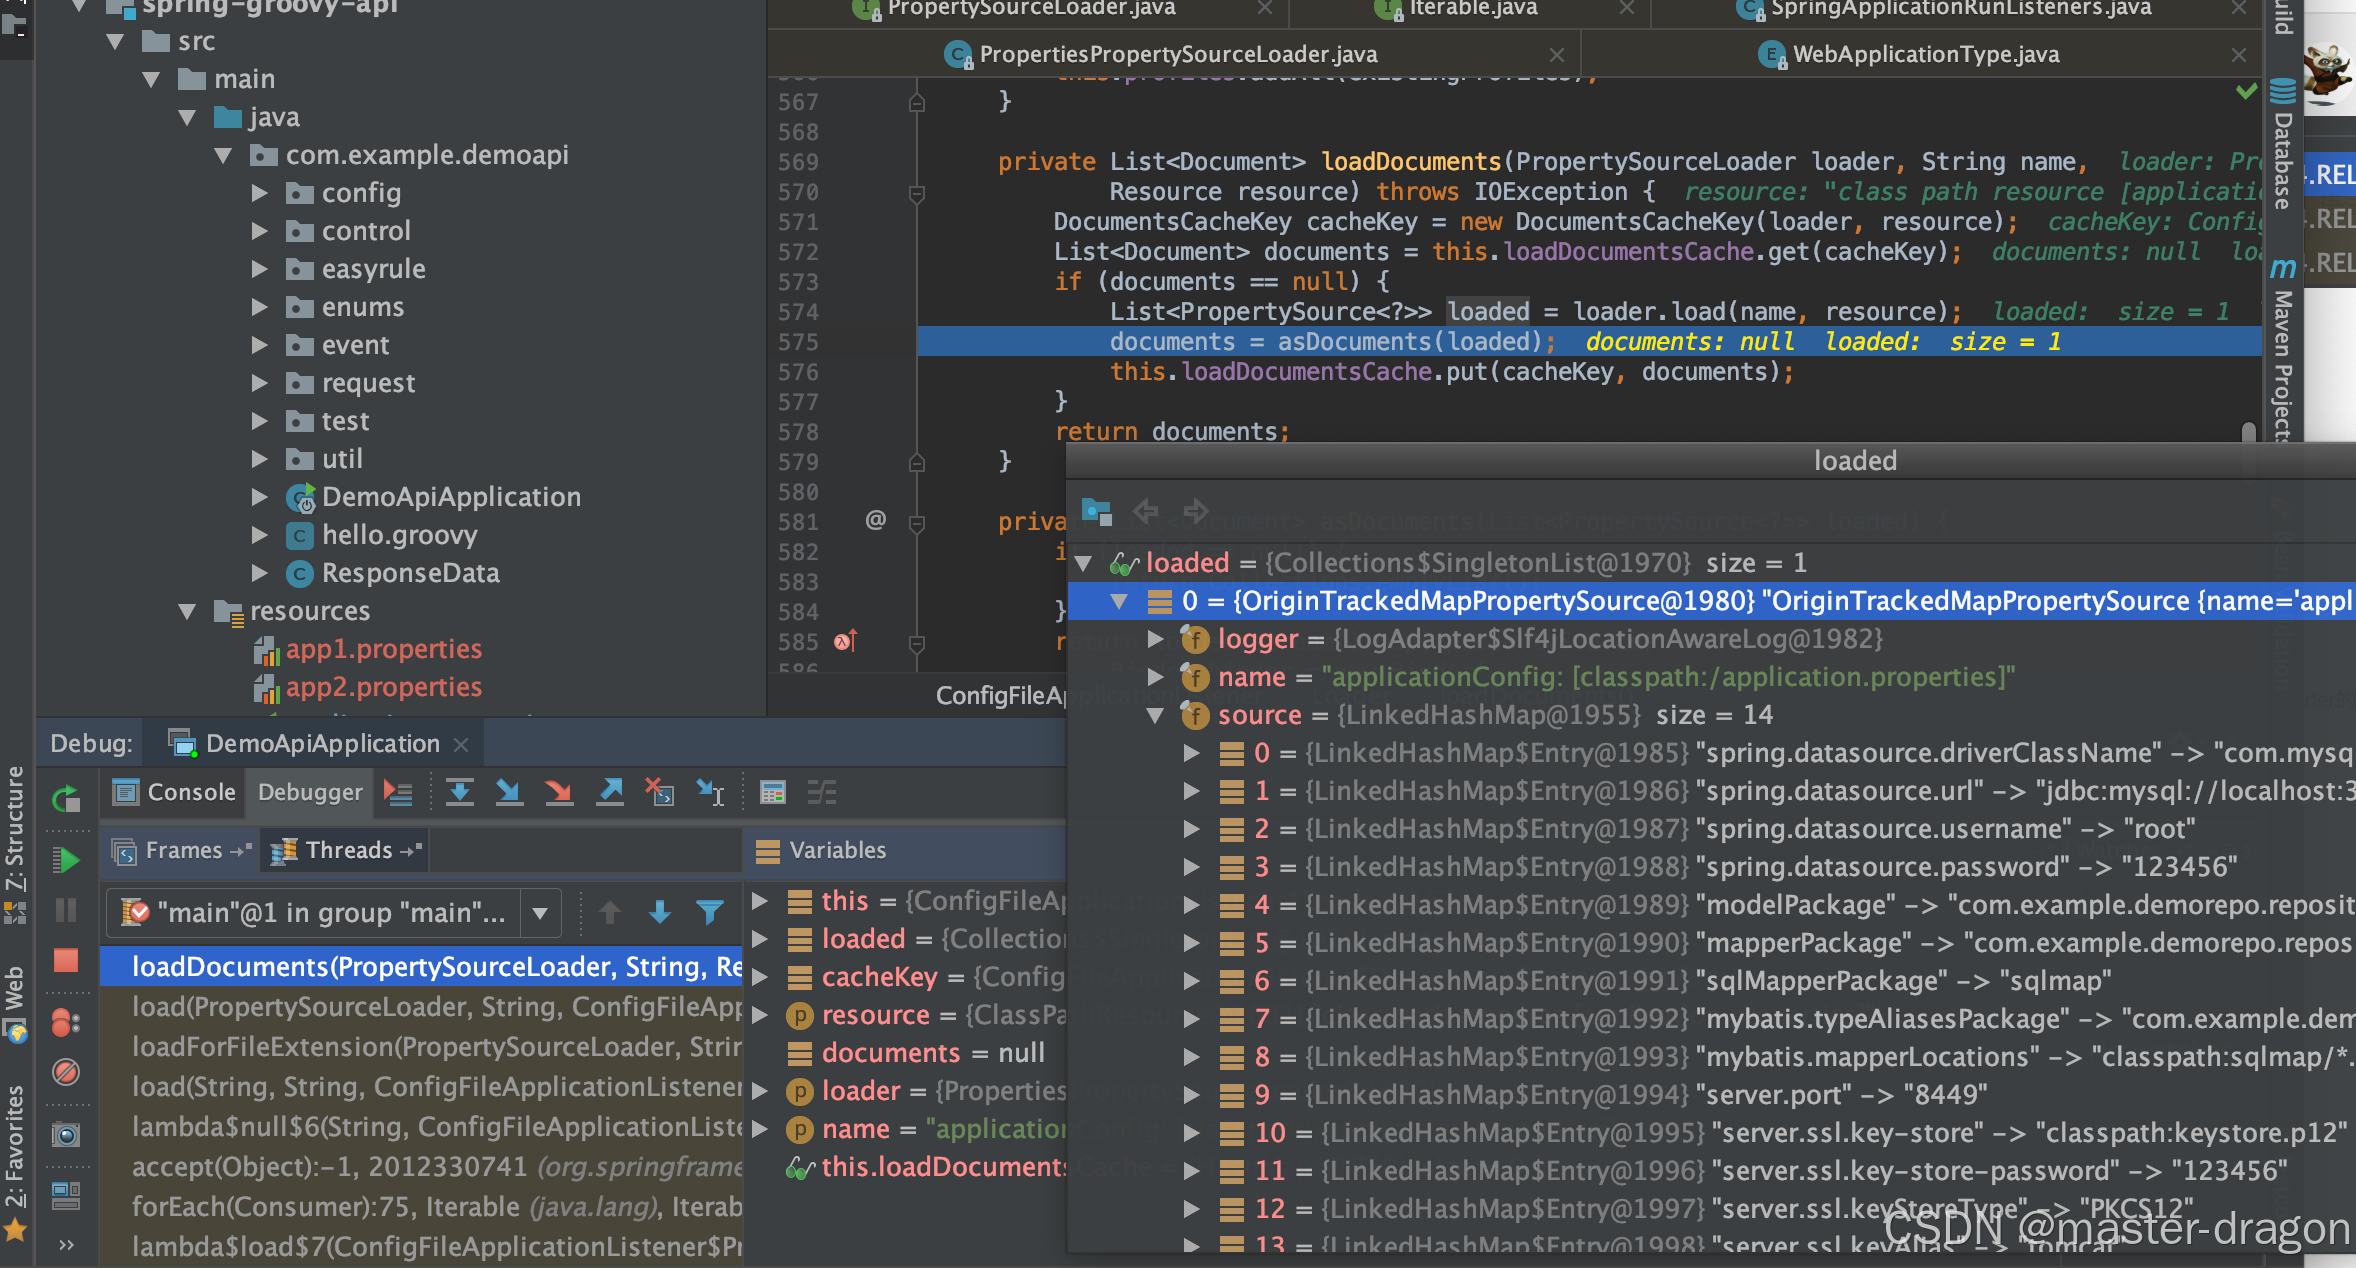
PropertiesPropertySourceLoader怎么实例化出来的?
- 事件监听触发后,使用EnvironmentPostProcessor后处理加载配置,后处理通过SpringFactoriesLoader加载获得到

- 然后添加配置new Loader()
/**
 * Add config file property sources to the specified environment.
 * @param environment the environment to add source to
 * @param resourceLoader the resource loader
 * @see #addPostProcessors(ConfigurableApplicationContext)
 */
protected void addPropertySources(ConfigurableEnvironment environment,
		ResourceLoader resourceLoader) {
	RandomValuePropertySource.addToEnvironment(environment);
	new Loader(environment, resourceLoader).load();
}
Loader构造函数:
Loader(ConfigurableEnvironment environment, ResourceLoader resourceLoader) {
	this.environment = environment;
	this.placeholdersResolver = new PropertySourcesPlaceholdersResolver(
			this.environment);
	this.resourceLoader = (resourceLoader != null) ? resourceLoader
			: new DefaultResourceLoader();
	this.propertySourceLoaders = SpringFactoriesLoader.loadFactories(
			PropertySourceLoader.class, getClass().getClassLoader());
}
- PropertySourcesPlaceholdersResolver通过SpringFactoriesLoader load出来
this.propertySourceLoaders = SpringFactoriesLoader.loadFactories(
					PropertySourceLoader.class, getClass().getClassLoader());
printBanner

createApplicationContext
根据webApplicationType创建ConfigurableApplicationContext,具体为:
org.springframework.boot.web.servlet.context.AnnotationConfigServletWebServerApplicationContext
prepareContext
- profile信息设置并打印,否则使用默认的default
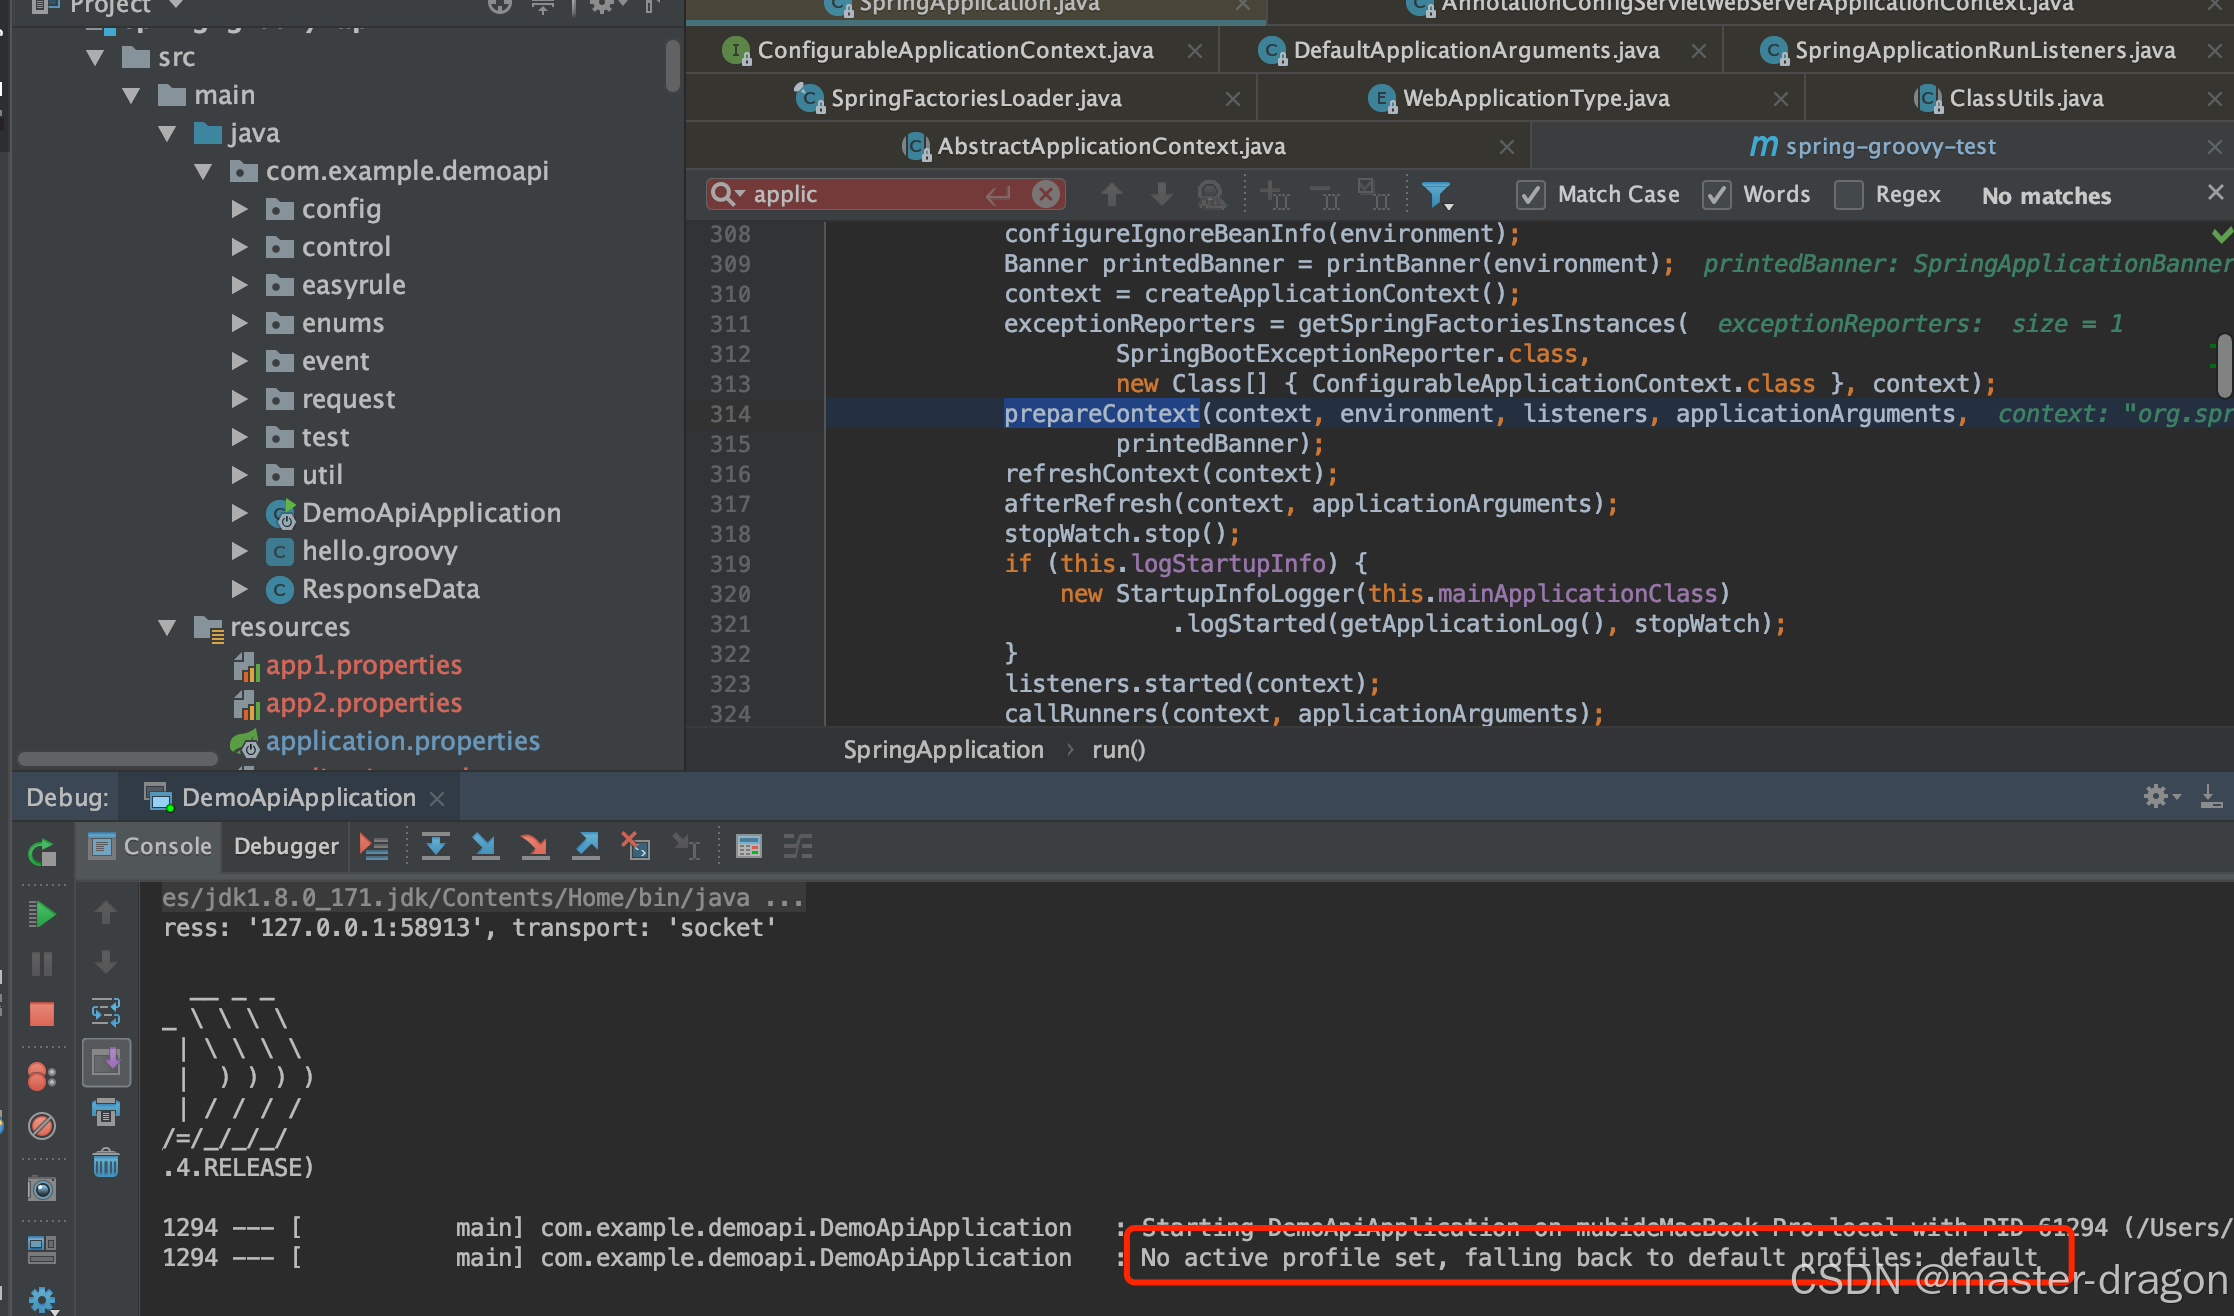
- 加载启动类

refreshContext
private void refreshContext(ConfigurableApplicationContext context) {
	refresh(context);
	if (this.registerShutdownHook) {
		try {
			context.registerShutdownHook();
		}
		catch (AccessControlException ex) {
			// Not allowed in some environments.
		}
	}
}
如下图走到spring容器的refresh方法:

ImportSelector 的 selectImports 方法

其中List<String> configurations = this.getCandidateConfigurations(annotationMetadata, attributes);一句如下
/**
 * Return the auto-configuration class names that should be considered. By default
 * this method will load candidates using {@link SpringFactoriesLoader} with
 * {@link #getSpringFactoriesLoaderFactoryClass()}.
 * @param metadata the source metadata
 * @param attributes the {@link #getAttributes(AnnotationMetadata) annotation
 * attributes}
 * @return a list of candidate configurations
 */
protected List<String> getCandidateConfigurations(AnnotationMetadata metadata,
        AnnotationAttributes attributes) {
    List<String> configurations = SpringFactoriesLoader.loadFactoryNames(
            getSpringFactoriesLoaderFactoryClass(), getBeanClassLoader());
    Assert.notEmpty(configurations,
            "No auto configuration classes found in META-INF/spring.factories. If you "
                    + "are using a custom packaging, make sure that file is correct.");
    return configurations;
}
使用SpringFactoryLoader,读取META-INF/spring.factories文件里所配置的EnableAutoConfiguration。经过exclude和filter等操作,最终确定要装配的类
Spring的SpringFactoriesLoader工厂的加载机制类似java提供的SPI机制一样,是Spring提供的一种加载方式。只需要在classpath路径下新建一个文件META-INF/spring.factories,并在里面按照properties格式填写好接口和实现类即可通过SpringFactoriesLoader来实例化相应的Bean。其中key可以是接口、注解、或者抽象类的全名。value为相应的实现类,当存在多个实现类时,用","进行分割。

loadFactoryNames方法如下:
/**
 * Load the fully qualified class names of factory implementations of the
 * given type from {@value #FACTORIES_RESOURCE_LOCATION}, using the given
 * class loader.
 * @param factoryClass the interface or abstract class representing the factory
 * @param classLoader the ClassLoader to use for loading resources; can be
 * {@code null} to use the default
 * @see #loadFactories
 * @throws IllegalArgumentException if an error occurs while loading factory names
 */
public static List<String> loadFactoryNames(Class<?> factoryClass, @Nullable ClassLoader classLoader) {
    String factoryClassName = factoryClass.getName();
    return loadSpringFactories(classLoader).getOrDefault(factoryClassName, Collections.emptyList());
}

private static Map<String, List<String>> loadSpringFactories(@Nullable ClassLoader classLoader) {
    MultiValueMap<String, String> result = cache.get(classLoader);
    if (result != null) {
        return result;
    }

    try {
        Enumeration<URL> urls = (classLoader != null ?
                classLoader.getResources(FACTORIES_RESOURCE_LOCATION) :
                ClassLoader.getSystemResources(FACTORIES_RESOURCE_LOCATION));
        result = new LinkedMultiValueMap<>();
        while (urls.hasMoreElements()) {
            URL url = urls.nextElement();
            UrlResource resource = new UrlResource(url);
            Properties properties = PropertiesLoaderUtils.loadProperties(resource);
            for (Map.Entry<?, ?> entry : properties.entrySet()) {
                List<String> factoryClassNames = Arrays.asList(
                        StringUtils.commaDelimitedListToStringArray((String) entry.getValue()));
                result.addAll((String) entry.getKey(), factoryClassNames);
            }
        }
        cache.put(classLoader, result);
        return result;
    }
    catch (IOException ex) {
        throw new IllegalArgumentException("Unable to load factories from location [" +
                FACTORIES_RESOURCE_LOCATION + "]", ex);
    }
}


后续就能完成bean的自动注入了
再次说明starter
SpringBoot将所有的常见开发功能,分成了一个个场景启动器(starter),这样我们需要开发什么功能,就导入什么场景启动器依赖即可

SpringBoot starter机制
SpringBoot中的starter能够抛弃以前繁杂的配置,将其统一集成进starter,应用者只需要在maven中引入starter依赖,SpringBoot就能自动扫描到要加载的信息并启动相应的默认配置。starter让我们摆脱了各种依赖库的处理,需要配置各种信息的困扰。SpringBoot会自动通过classpath路径下的类发现需要的Bean,并注册进IOC容器。SpringBoot提供了针对日常企业应用研发各种场景的spring-boot-starter依赖模块。所有这些依赖模块都遵循着约定成俗的默认配置,并允许我们调整这些配置,即遵循"约定大于配置"的理念。
自定义一个starter并引用

- 其/META-INF/spring.factories的内容
#-------starter自动装配---------
org.springframework.boot.autoconfigure.EnableAutoConfiguration=com.demo.starter.config.DemoConfig
- DemoConfig类如下
//
// Source code recreated from a .class file by IntelliJ IDEA
// (powered by Fernflower decompiler)
//

package com.demo.starter.config;

import com.demo.starter.properties.DemoProperties;
import com.demo.starter.service.DemoService;
import org.springframework.beans.factory.annotation.Autowired;
import org.springframework.boot.autoconfigure.condition.ConditionalOnProperty;
import org.springframework.boot.context.properties.EnableConfigurationProperties;
import org.springframework.context.annotation.Bean;
import org.springframework.context.annotation.Configuration;

@Configuration
@EnableConfigurationProperties({DemoProperties.class})
@ConditionalOnProperty(
    prefix = "demo",
    name = {"isopen"},
    havingValue = "true"
)
public class DemoConfig {
    @Autowired
    private DemoProperties demoProperties;

    public DemoConfig() {
    }

    @Bean(
        name = {"demo"}
    )
    public DemoService demoService() {
        return new DemoService(this.demoProperties.getSayWhat(), this.demoProperties.getToWho());
    }
}
- 引用并测试
	// 引入自定义的starter
	compile files('src/libs/demo-spring-boot-starter-0.0.1-RELEASE.jar')
- 使用&测试
@RestController
public class DemoControl {

    @Resource(name = "demo")
    private DemoService demoService;

    @GetMapping("/say")
    public String sayWhat() {
        return demoService.say();
    }

}


![93,【1】buuctf web [网鼎杯 2020 朱雀组]phpweb](https://i-blog.csdnimg.cn/direct/fb79d26bc7ac41ae8b8d4b901ae51988.png)