目录
第八章-Java-AMQP-Client源码分析
1、背景
1.1 客户端介绍
1.2 看源码好处
1.3 如何看源码
2、生产者
3、消费者监听
4、创建连接
5、消费者消费
6. 总结:
第八章-Java-AMQP-Client源码分析
1、背景
1.1 客户端介绍
通过前面几章的学习,大家对rabbitmq 的基本使用应该ok了,但有的同学可能仍然不满足先去看看Rabbitmq如何实现的,由于rabbitmq 使用Erlang实现的,大家可以自行研究。
看不了mq的实现,可以看下他的客户端的实现。客户端也有多种语言的实现,我们以java的amqp-client来看。
<dependency>
    <groupId>com.rabbitmq</groupId>
    <artifactId>amqp-client</artifactId>
    <version>5.7.3</version>
</dependency>
1.2 看源码好处
另外有些同学会有疑问,能用不就行了,看这源码有啥用呢。
首先,看源码能满足我们的好奇心,做到知其然又知其所以然。
其次,在实际运用的过程中,出现的一些问题,需要靠看源码来分析解决。例如,我们之前发现mq的消费很慢,但是消费者处理速度和生产者处理的速度都很快,所以想从mq的客户端看看,有没有什么瓶颈。
再有,看源码能提升我们的编码能力,学到很多优秀的编码习惯,算法,架构等等。既然这些中间件能开源出来,被广泛使用,肯定有他优秀的地方,开阔自己视野,站在巨人的肩膀上看世界。
等等...
1.3 如何看源码
有的同学可能认为,直接拔开就看呗,一个类一个类的,一个方法一个方法的看。从上往下。不可否认这是一种看法,但这不太适合初期刚看代码的时机,会搞的很懵,直接失去看源码的兴趣。
总结几个小方法:
1、可以把源码下载到本地,部署起来,一定要能跑起来。另外也可以省事些,在IDE里面点进Jar包,下载源码,直接从Jar包里看。
2、按图索骥,看的时候一定不是按一个网来看的,而是专注的一个点,从这个点进去,一步一步跟随到源码中,串成一条线,最后很多的线就会组成一个网,是逐步按照 点、线、面的方式来。
3、开启Debug,直接读有时候会绕进去,找不到绕出来的方向,因为源码中各个类的实现关联都很多,不如直接按Debug模式,跟随着读进去。这里面有一个很重要的点,-有的源码中是靠新启线程实现的,所以记得Debug断点的时候,要使用Thread模式哦。
4、抓大放小,读源码我们有时候需要一些不求甚解,需要一些模棱两可,我们无法搞懂所有的东西,特别是刚读的时候,但我们一定要清楚哪些是主线,哪些是边角料。把主线搞清楚即可。
5、Again and Again, 源码不可能一遍就让你读懂,都熟悉。这是需要不断的重复的一个过程,一遍不懂,就再来一遍,十遍不行就 二十遍,三十遍,每一遍都会有新的收获。
6、坚持,不轻易放弃。
后续我们看源码的这几个点,也是按照我们之前讲过的 RabbitMQ的 Simple模式,最简单的案例,涉及到的,追踪到源码中去分析。
2、生产者
生产者,代码很简单,追进去,也比较清晰。
业务代码:
channel.basicPublish("", QUEUE_NAME, null, msg.getBytes());这就是生产者通过channel 发布了一条消息 给默认的 Exchange,并指定了 队列的名称。
好,追进去,一直追到 ChannelIN 的 basicPublish方法:
    /** Public API - {@inheritDoc} */
    @Override
    public void basicPublish(String exchange, String routingKey,
                             boolean mandatory, boolean immediate,
                             BasicProperties props, byte[] body)
        throws IOException
    {
        if (nextPublishSeqNo > 0) {
            unconfirmedSet.add(getNextPublishSeqNo());
            nextPublishSeqNo++;
        }
        if (props == null) {
            props = MessageProperties.MINIMAL_BASIC;
        }
        //组装 AMQCommand对象,后续进行网络传输
        // 拼装了 交换机,路由键,消息等内容
        AMQCommand command = new AMQCommand(
            new Basic.Publish.Builder()
                .exchange(exchange)
                .routingKey(routingKey)
                .mandatory(mandatory)
                .immediate(immediate)
                .build(), props, body);
        try {
            // 核心发送方法
            transmit(command);
        } catch (IOException e) {
            metricsCollector.basicPublishFailure(this, e);
            throw e;
        }
        metricsCollector.basicPublish(this);
    }
继续追transmit方法,追至 AMQCommand.transmit 方法即可,中间其他的方法可以略过
这里面的内容也没啥太多关注的,就是拿到Connection去写信息,最后Flush过去。
public void transmit(AMQChannel channel) throws IOException {
        int channelNumber = channel.getChannelNumber();
        AMQConnection connection = channel.getConnection();

        synchronized (assembler) {
            Method m = this.assembler.getMethod();
            if (m.hasContent()) {
                byte[] body = this.assembler.getContentBody();

                Frame headerFrame = this.assembler.getContentHeader().toFrame(channelNumber, body.length);

                int frameMax = connection.getFrameMax();
                boolean cappedFrameMax = frameMax > 0;
                int bodyPayloadMax = cappedFrameMax ? frameMax - EMPTY_FRAME_SIZE : body.length;

                if (cappedFrameMax && headerFrame.size() > frameMax) {
                    String msg = String.format("Content headers exceeded max frame size: %d > %d", headerFrame.size(), frameMax);
                    throw new IllegalArgumentException(msg);
                }
                connection.writeFrame(m.toFrame(channelNumber));
                connection.writeFrame(headerFrame);

                for (int offset = 0; offset < body.length; offset += bodyPayloadMax) {
                    int remaining = body.length - offset;

                    int fragmentLength = (remaining < bodyPayloadMax) ? remaining
                            : bodyPayloadMax;
                    Frame frame = Frame.fromBodyFragment(channelNumber, body,
                            offset, fragmentLength);
                    connection.writeFrame(frame);
                }
            } else {
                connection.writeFrame(m.toFrame(channelNumber));
            }
        }

        connection.flush();
    }
至此就把,消息推送到了 MQ Broker。
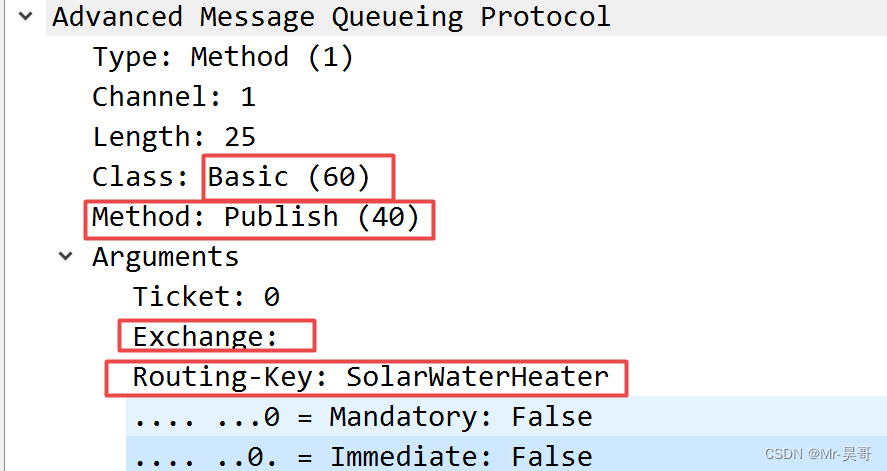
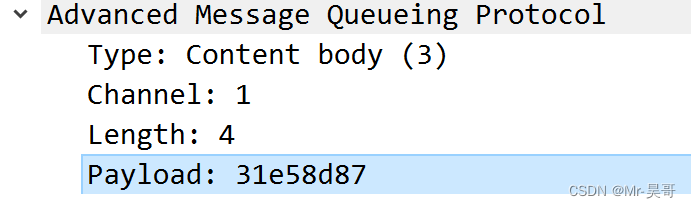
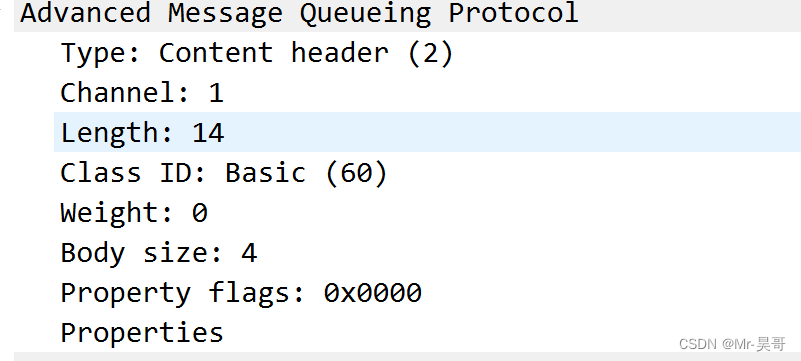
大家用抓包工具抓下会看的更清晰:

这一次的发送有3个AMQP协议的内容

第一个,Method
这些都是我们代码中的参数,完全匹配:
第二个:头信息

第三个:消息内容:
3、消费者监听
业务代码是要开启一个监听然后将此监听发送到MQ中
        //4.开启监听Queue
        DefaultConsumer consumer = new DefaultConsumer(channel) {
            @Override
            public void handleDelivery(String consumerTag, Envelope envelope, AMQP.BasicProperties properties, byte[] body) throws IOException {
                try {
                    Thread.sleep(1000);
                } catch (InterruptedException e) {
                    e.printStackTrace();
                }
                System.out.println("小明洗澡用水: " + new String(body, "UTF-8"));
            }
        };
        /**
         * 参数1:queue 指定消费哪个队列
         * 参数1:deliverCallback 指定是否ACK(true:收到消息会立即告诉RabbiMQ,false:手动告诉)
         * 参数1:cancelCallback 指定消费回调
         */
        channel.basicConsume(QUEUE_NAME, true, consumer);
我们从basicConsume跟进去:一直到ChannelN 的 basicConsume 中去:
   /** Public API - {@inheritDoc} */
    @Override
    public String basicConsume(String queue, final boolean autoAck, String consumerTag,
                               boolean noLocal, boolean exclusive, Map<String, Object> arguments,
                               final Consumer callback)
        throws IOException
    {
        // 拼装 Method 对象,Basic.Consume 后续传输使用
        final Method m = new Basic.Consume.Builder()
            .queue(queue)
            .consumerTag(consumerTag)
            .noLocal(noLocal)
            .noAck(autoAck)
            .exclusive(exclusive)
            .arguments(arguments)
            .build();

        // 声明监听对象 为后续 传输至MQ,MQ返回消息接收使用
        BlockingRpcContinuation<String> k = new BlockingRpcContinuation<String>(m) {
            @Override
            public String transformReply(AMQCommand replyCommand) {
                String actualConsumerTag = ((Basic.ConsumeOk) replyCommand.getMethod()).getConsumerTag();
                _consumers.put(actualConsumerTag, callback);

                // need to register consumer in stats before it actually starts consuming
                metricsCollector.basicConsume(ChannelN.this, actualConsumerTag, autoAck);

                dispatcher.handleConsumeOk(callback, actualConsumerTag);
                return actualConsumerTag;
            }
        };

        // 核心调用 传输信息
        rpc(m, k);

        try {
            if(_rpcTimeout == NO_RPC_TIMEOUT) {
                return k.getReply();
            } else {
                try {
                    return k.getReply(_rpcTimeout);
                } catch (TimeoutException e) {
                    throw wrapTimeoutException(m, e);
                }
            }
        } catch(ShutdownSignalException ex) {
            throw wrap(ex);
        }
    }
然后经过后面的方法,还会上面的Method对象包装一层 成为 AMQCommand,最后又调用到了和生产者调用一致的部分:不再赘述了。
AMQPCommand
public void transmit(AMQChannel channel) throws IOException {
到此为止,就会出现疑问了,我们把消费的信息推送给MQ了,啥时候消费,啥时候调用我们自定义的监听的消费方法呢?这里相当于一个异步了,断层了。
这个就得往后看了,实际上是后续MQ得知有消费者注册到queue上之后,就会推送给消费者消息,消费者再去获取这个消息。先不急。
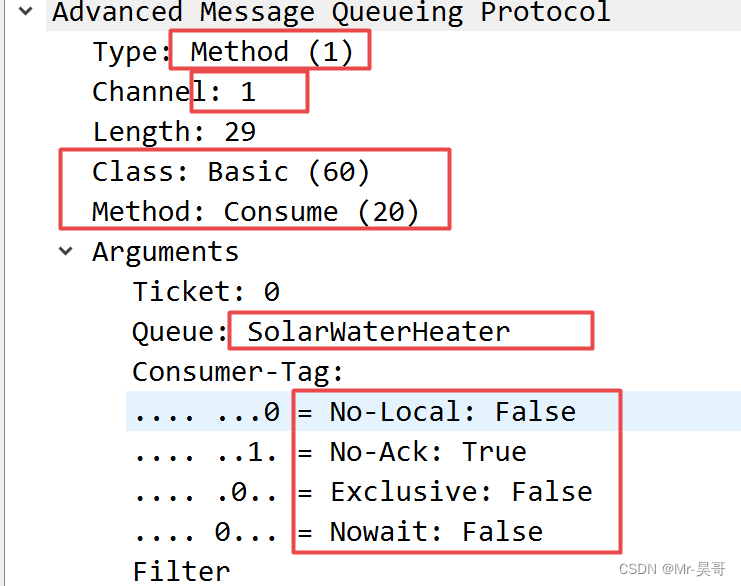
看下网络数据包的情况:
这时候我们先产生一个交互,先告诉MQ说,我是个消费者,想要消费SolarWaterHeater 这个队列的消息了。MQ如果告诉他,可以。后续MQ再推送消息过来。

协议信息内容:
4、创建连接
我们看下创建连接的部分:因为无论生产者和消费者与MQ交互都得首先创建连接,而且创建连接里面还干了一件重要的事,来解决刚才上面提到的 如何消费MQ推送过来的消息的问题。
业务创建连接代码:
  Connection connection = null;
        //创建Connection工厂
        ConnectionFactory factory = new ConnectionFactory();
        factory.setVirtualHost("my-test-virtual");
        factory.setPassword("test");
        factory.setUsername("test");
        factory.setHost("127.0.0.1");
        factory.setPort(5672);
        //拿到连接
        try {
            connection = factory.newConnection();
跟进newConnection : 来到 ConnectionFactory .newConnection
 public Connection newConnection(ExecutorService executor, AddressResolver addressResolver, String clientProvidedName)
        throws IOException, TimeoutException {
        if(this.metricsCollector == null) {
            this.metricsCollector = new NoOpMetricsCollector();
        }
        // make sure we respect the provided thread factory
        FrameHandlerFactory fhFactory = createFrameHandlerFactory();
        ConnectionParams params = params(executor);
        // set client-provided via a client property
        if (clientProvidedName != null) {
            Map<String, Object> properties = new HashMap<String, Object>(params.getClientProperties());
            properties.put("connection_name", clientProvidedName);
            params.setClientProperties(properties);
        }

        if (isAutomaticRecoveryEnabled()) {
            // see com.rabbitmq.client.impl.recovery.RecoveryAwareAMQConnectionFactory#newConnection
            AutorecoveringConnection conn = new AutorecoveringConnection(params, fhFactory, addressResolver, metricsCollector);

            conn.init();
            return conn;
        } else {
            List<Address> addrs = addressResolver.getAddresses();
            Exception lastException = null;
            for (Address addr : addrs) {
                try {
                    // 创建 FrameHandler
                    FrameHandler handler = fhFactory.create(addr, clientProvidedName);
                    // 组装AMQConnection 对象
                    AMQConnection conn = createConnection(params, handler, metricsCollector);
                    // 核心启动
                    conn.start();
                    this.metricsCollector.newConnection(conn);
                    return conn;
                } catch (IOException e) {
                    lastException = e;
                } catch (TimeoutException te) {
                    lastException = te;
                }
            }
            if (lastException != null) {
                if (lastException instanceof IOException) {
                    throw (IOException) lastException;
                } else if (lastException instanceof TimeoutException) {
                    throw (TimeoutException) lastException;
                }
            }
            throw new IOException("failed to connect");
        }
    }
所做的一切,拿配置,地址,拼接FrameHandler 都是为了 组装 AMQConnection 对象,组装对象完成后即需要,conn.start(); 启动连接。继续往下跟:
  /**
     * Start up the connection, including the MainLoop thread.
     * Sends the protocol
     * version negotiation header, and runs through
     * Connection.Start/.StartOk, Connection.Tune/.TuneOk, and then
     * calls Connection.Open and waits for the OpenOk. Sets heart-beat
     * and frame max values after tuning has taken place.
     * @throws IOException if an error is encountered
     * either before, or during, protocol negotiation;
     * sub-classes {@link ProtocolVersionMismatchException} and
     * {@link PossibleAuthenticationFailureException} will be thrown in the
     * corresponding circumstances. {@link AuthenticationFailureException}
     * will be thrown if the broker closes the connection with ACCESS_REFUSED.
     * If an exception is thrown, connection resources allocated can all be
     * garbage collected when the connection object is no longer referenced.
     */
    public void start()
            throws IOException, TimeoutException {
        initializeConsumerWorkService();
        initializeHeartbeatSender();
        this._running = true;
        // Make sure that the first thing we do is to send the header,
        // which should cause any socket errors to show up for us, rather
        // than risking them pop out in the MainLoop
        AMQChannel.SimpleBlockingRpcContinuation connStartBlocker =
            new AMQChannel.SimpleBlockingRpcContinuation();
        // We enqueue an RPC continuation here without sending an RPC
        // request, since the protocol specifies that after sending
        // the version negotiation header, the client (connection
        // initiator) is to wait for a connection.start method to
        // arrive.
        _channel0.enqueueRpc(connStartBlocker);
        try {
            // The following two lines are akin to AMQChannel's
            // transmit() method for this pseudo-RPC.
            _frameHandler.setTimeout(handshakeTimeout);
            _frameHandler.sendHeader();
        } catch (IOException ioe) {
            _frameHandler.close();
            throw ioe;
        }

        this._frameHandler.initialize(this);

        AMQP.Connection.Start connStart;
        AMQP.Connection.Tune connTune = null;
        try {
            connStart =
                    (AMQP.Connection.Start) connStartBlocker.getReply(handshakeTimeout/2).getMethod();

            _serverProperties = Collections.unmodifiableMap(connStart.getServerProperties());

            Version serverVersion =
                    new Version(connStart.getVersionMajor(),
                                       connStart.getVersionMinor());

            if (!Version.checkVersion(clientVersion, serverVersion)) {
                throw new ProtocolVersionMismatchException(clientVersion,
                                                                  serverVersion);
            }

            String[] mechanisms = connStart.getMechanisms().toString().split(" ");
            SaslMechanism sm = this.saslConfig.getSaslMechanism(mechanisms);
            if (sm == null) {
                throw new IOException("No compatible authentication mechanism found - " +
                                              "server offered [" + connStart.getMechanisms() + "]");
            }

            String username = credentialsProvider.getUsername();
            String password = credentialsProvider.getPassword();
            LongString challenge = null;
            LongString response = sm.handleChallenge(null, username, password);

            do {
                Method method = (challenge == null)
                                        ? new AMQP.Connection.StartOk.Builder()
                                                  .clientProperties(_clientProperties)
                                                  .mechanism(sm.getName())
                                                  .response(response)
                                                  .build()
                                        : new AMQP.Connection.SecureOk.Builder().response(response).build();

                try {
                    Method serverResponse = _channel0.rpc(method, handshakeTimeout/2).getMethod();
                    if (serverResponse instanceof AMQP.Connection.Tune) {
                        connTune = (AMQP.Connection.Tune) serverResponse;
                    } else {
                        challenge = ((AMQP.Connection.Secure) serverResponse).getChallenge();
                        response = sm.handleChallenge(challenge, username, password);
                    }
                } catch (ShutdownSignalException e) {
                    Method shutdownMethod = e.getReason();
                    if (shutdownMethod instanceof AMQP.Connection.Close) {
                        AMQP.Connection.Close shutdownClose = (AMQP.Connection.Close) shutdownMethod;
                        if (shutdownClose.getReplyCode() == AMQP.ACCESS_REFUSED) {
                            throw new AuthenticationFailureException(shutdownClose.getReplyText());
                        }
                    }
                    throw new PossibleAuthenticationFailureException(e);
                }
            } while (connTune == null);
        } catch (TimeoutException te) {
            _frameHandler.close();
            throw te;
        } catch (ShutdownSignalException sse) {
            _frameHandler.close();
            throw AMQChannel.wrap(sse);
        } catch(IOException ioe) {
            _frameHandler.close();
            throw ioe;
        }

        try {
            int channelMax =
                negotiateChannelMax(this.requestedChannelMax,
                                    connTune.getChannelMax());
            _channelManager = instantiateChannelManager(channelMax, threadFactory);

            int frameMax =
                negotiatedMaxValue(this.requestedFrameMax,
                                   connTune.getFrameMax());
            this._frameMax = frameMax;

            int heartbeat =
                negotiatedMaxValue(this.requestedHeartbeat,
                                   connTune.getHeartbeat());

            setHeartbeat(heartbeat);

            _channel0.transmit(new AMQP.Connection.TuneOk.Builder()
                                .channelMax(channelMax)
                                .frameMax(frameMax)
                                .heartbeat(heartbeat)
                              .build());
            _channel0.exnWrappingRpc(new AMQP.Connection.Open.Builder()
                                      .virtualHost(_virtualHost)
                                    .build());
        } catch (IOException ioe) {
            _heartbeatSender.shutdown();
            _frameHandler.close();
            throw ioe;
        } catch (ShutdownSignalException sse) {
            _heartbeatSender.shutdown();
            _frameHandler.close();
            throw AMQChannel.wrap(sse);
        }

        // We can now respond to errors having finished tailoring the connection
        this._inConnectionNegotiation = false;
    }
上面这段代码比较长,也是最核心的启动连接代码了,其实他的注释已经说的很清楚了,我们来看下注释:
* Start up the connection, including the MainLoop thread.
启动连接,包括MainLoop thread  重点来了-后续我们的消费消息,就主要靠这哥们了。
* Sends the protocol
发送协议
* version negotiation header, and runs through
协议头
* Connection.Start/.StartOk, Connection.Tune/.TuneOk, and then
这都是建立连接的相关协议内容了
* calls Connection.Open and waits for the OpenOk.
有来有回
* Sets heart-beat
心跳
* and frame max values after tuning has taken place.
所以,这个方法主要是发送创建连接的各种协议,双方经过沟通建立连接的过程。当然,最最最重要的一点,创建了MainLoop
创建连接的内容,我们不在过多关注了,我们主要看下创建的MainLoop,
找到:
this._frameHandler.initialize(this);跟进去:一直跟到 AMQConnection.startMainLoop
    public void startMainLoop() {
        MainLoop loop = new MainLoop();
        final String name = "AMQP Connection " + getHostAddress() + ":" + getPort();
        mainLoopThread = Environment.newThread(threadFactory, loop, name);
        mainLoopThread.start();
    }
很明显MainLoop 是一个线程,通过 ThreadFactory new出来,并启动了。来看下这个线程是做什么的:
private class MainLoop implements Runnable {

        /**
         * Channel reader thread main loop. Reads a frame, and if it is
         * not a heartbeat frame, dispatches it to the channel it refers to.
         * Continues running until the "running" flag is set false by
         * shutdown().
         */
        @Override
        public void run() {
            boolean shouldDoFinalShutdown = true;
            try {
                while (_running) {
                    Frame frame = _frameHandler.readFrame();
                    readFrame(frame);
                }
            } catch (Throwable ex) {
                if (ex instanceof InterruptedException) {
                    // loop has been interrupted during shutdown,
                    // no need to do it again
                    shouldDoFinalShutdown = false;
                } else {
                    handleFailure(ex);
                }
            } finally {
                if (shouldDoFinalShutdown) {
                    doFinalShutdown();
                }
            }
        }
    }
读注释即可:
* Channel reader thread main loop. Reads a frame,
读数据帧

* and if it is not a heartbeat frame,
如果不是心跳帧

* dispatches it to the channel it refers to.
分发到对应的处理channel中去

* Continues running until the "running" flag is set false by shutdown().
一直在持续运行,直至关闭
总结:
这就很清楚了,这是一个无限循环的线程,一直在读取Broker传递给我们的信息,读到对应的非心跳的内容,转交到对应的处理类进行处理。
到这里我们是不是有些思路了,其实 消费者的消费就是在这里监听到,并处理的。
截止到此,创建连接的内容完毕,并引出了MainLoop的内容。
5、消费者消费
好,我们继续看下这个死循环,是如何读消息的:
Frame frame = _frameHandler.readFrame();
这个是读到的消息,并包装成了Frame 对象,我们不再看这部分内容了
继续:跟进
readFrame(frame);private void readFrame(Frame frame) throws IOException {
if (frame != null) {
_missedHeartbeats = 0;
if (frame.type == AMQP.FRAME_HEARTBEAT) {
// Ignore it: we've already just reset the heartbeat counter.
} else {
if (frame.channel == 0) { // the special channel
_channel0.handleFrame(frame);
} else {
if (isOpen()) {
// If we're still _running, but not isOpen(), then we
// must be quiescing, which means any inbound frames
// for non-zero channels (and any inbound commands on
// channel zero that aren't Connection.CloseOk) must
// be discarded.
ChannelManager cm = _channelManager;
if (cm != null) {
ChannelN channel;
try {
channel = cm.getChannel(frame.channel);
} catch(UnknownChannelException e) {
// this can happen if channel has been closed,
// but there was e.g. an in-flight delivery.
// just ignoring the frame to avoid closing the whole connection
LOGGER.info("Received a frame on an unknown channel, ignoring it");
return;
}
channel.handleFrame(frame);
}
}
}
}
} else {
// Socket timeout waiting for a frame.
// Maybe missed heartbeat.
handleSocketTimeout();
}
}上面的内容是真正的去解析处理 读到的Frame 的内容了,我们看 channel.handleFrame(frame);
即可,继续追踪:
 public void handleFrame(Frame frame) throws IOException {
        AMQCommand command = _command;
        if (command.handleFrame(frame)) { // a complete command has rolled off the assembly line
            _command = new AMQCommand(); // prepare for the next one
            handleCompleteInboundCommand(command);
        }
    }
继续追踪处理:
command.handleFrame(frame)
这个实际上是解析消息的具体内容,然后设置到对应的对象中的属性中去了。pass掉了
继续:
handleCompleteInboundCommand(command);
追踪至 AMQChannel中的
handleCompleteInboundCommand- >
processAsync(command)
一至到ChannelN 中的 processAsync
/**
     * Protected API - Filters the inbound command stream, processing
     * Basic.Deliver, Basic.Return and Channel.Close specially.  If
     * we're in quiescing mode, all inbound commands are ignored,
     * except for Channel.Close and Channel.CloseOk.
     */
    @Override public boolean processAsync(Command command) throws IOException
    {
        // If we are isOpen(), then we process commands normally.
        //
        // If we are not, however, then we are in a quiescing, or
        // shutting-down state as the result of an application
        // decision to close this channel, and we are to discard all
        // incoming commands except for a close and close-ok.

        Method method = command.getMethod();
        // we deal with channel.close in the same way, regardless
        if (method instanceof Channel.Close) {
            asyncShutdown(command);
            return true;
        }

        if (isOpen()) {
            // We're in normal running mode.

            if (method instanceof Basic.Deliver) {
                processDelivery(command, (Basic.Deliver) method);
                return true;
            } else if (method instanceof Basic.Return) {
                callReturnListeners(command, (Basic.Return) method);
                return true;
            } else if (method instanceof Channel.Flow) {
                Channel.Flow channelFlow = (Channel.Flow) method;
                synchronized (_channelMutex) {
                    _blockContent = !channelFlow.getActive();
                    transmit(new Channel.FlowOk(!_blockContent));
                    _channelMutex.notifyAll();
                }
                return true;
            } else if (method instanceof Basic.Ack) {
                Basic.Ack ack = (Basic.Ack) method;
                callConfirmListeners(command, ack);
                handleAckNack(ack.getDeliveryTag(), ack.getMultiple(), false);
                return true;
            } else if (method instanceof Basic.Nack) {
                Basic.Nack nack = (Basic.Nack) method;
                callConfirmListeners(command, nack);
                handleAckNack(nack.getDeliveryTag(), nack.getMultiple(), true);
                return true;
            } else if (method instanceof Basic.RecoverOk) {
                for (Map.Entry<String, Consumer> entry : Utility.copy(_consumers).entrySet()) {
                    this.dispatcher.handleRecoverOk(entry.getValue(), entry.getKey());
                }
                // Unlike all the other cases we still want this RecoverOk to
                // be handled by whichever RPC continuation invoked Recover,
                // so return false
                return false;
            } else if (method instanceof Basic.Cancel) {
                Basic.Cancel m = (Basic.Cancel)method;
                String consumerTag = m.getConsumerTag();
                Consumer callback = _consumers.remove(consumerTag);
                if (callback == null) {
                    callback = defaultConsumer;
                }
                if (callback != null) {
                    try {
                        this.dispatcher.handleCancel(callback, consumerTag);
                    } catch (WorkPoolFullException e) {
                        // couldn't enqueue in work pool, propagating
                        throw e;
                    } catch (Throwable ex) {
                        getConnection().getExceptionHandler().handleConsumerException(this,
                                                                                      ex,
                                                                                      callback,
                                                                                      consumerTag,
                                                                                      "handleCancel");
                    }
                }
                return true;
            } else {
                return false;
            }
        } else {
            // We're in quiescing mode == !isOpen()

            if (method instanceof Channel.CloseOk) {
                // We're quiescing, and we see a channel.close-ok:
                // this is our signal to leave quiescing mode and
                // finally shut down for good. Let it be handled as an
                // RPC reply one final time by returning false.
                return false;
            } else {
                // We're quiescing, and this inbound command should be
                // discarded as per spec. "Consume" it by returning
                // true.
                return true;
            }
        }
    }
开始逐步烧脑了,这一段debug的时候,记得开启Thread模式哦。
首先看方法名吧:processAsync 明显的一个异步处理,究竟处理啥?看注释:
* Protected API - Filters the inbound command stream, processing
* Basic.Deliver, Basic.Return and Channel.Close specially.  If
* we're in quiescing mode, all inbound commands are ignored,
* except for Channel.Close and Channel.CloseOk.
处理 Basic.Deliver, Basic.Return and Channel.Close ,我们最关注的是 Deliver 投递对吧,
这就是Broker把消息投递给我们呢方法。
所以,我们找到了我们的关注点:
  if (method instanceof Basic.Deliver) {
                processDelivery(command, (Basic.Deliver) method);
                return true;
继续哦:
 protected void processDelivery(Command command, Basic.Deliver method) {
        Basic.Deliver m = method;

        Consumer callback = _consumers.get(m.getConsumerTag());
        if (callback == null) {
            if (defaultConsumer == null) {
                // No handler set. We should blow up as this message
                // needs acking, just dropping it is not enough. See bug
                // 22587 for discussion.
                throw new IllegalStateException("Unsolicited delivery -" +
                        " see Channel.setDefaultConsumer to handle this" +
                        " case.");
            }
            else {
                callback = defaultConsumer;
            }
        }

        Envelope envelope = new Envelope(m.getDeliveryTag(),
                                         m.getRedelivered(),
                                         m.getExchange(),
                                         m.getRoutingKey());
        try {
            // call metricsCollector before the dispatching (which is async anyway)
            // this way, the message is inside the stats before it is handled
            // in case a manual ack in the callback, the stats will be able to record the ack
            metricsCollector.consumedMessage(this, m.getDeliveryTag(), m.getConsumerTag());
            this.dispatcher.handleDelivery(callback,
                                           m.getConsumerTag(),
                                           envelope,
                                           (BasicProperties) command.getContentHeader(),
                                           command.getContentBody());
        } catch (WorkPoolFullException e) {
            // couldn't enqueue in work pool, propagating
            throw e;
        } catch (Throwable ex) {
            getConnection().getExceptionHandler().handleConsumerException(this,
                ex,
                callback,
                m.getConsumerTag(),
                "handleDelivery");
        }
    }
哦哦,我们看到了什么 Consumer callback ,消费者回调,That's whant we want.
this.dispatcher.handleDelivery(callback,
                               m.getConsumerTag(),
                               envelope,
                               (BasicProperties) command.getContentHeader(),
                               command.getContentBody());
继续哦
进入到了ConsumerDispatcher
handleDelivery
public void handleDelivery(final Consumer delegate,
                               final String consumerTag,
                               final Envelope envelope,
                               final AMQP.BasicProperties properties,
                               final byte[] body) throws IOException {
        executeUnlessShuttingDown(
        new Runnable() {
            @Override
            public void run() {
                try {
                    delegate.handleDelivery(consumerTag,
                            envelope,
                            properties,
                            body);
                } catch (Throwable ex) {
                    connection.getExceptionHandler().handleConsumerException(
                            channel,
                            ex,
                            delegate,
                            consumerTag,
                            "handleDelivery");
                }
            }
        });
    }
哇,handleDelivery 有没有很熟悉,我们的业务代码监听不就是实现的她吗? 真的是她吗?
是她是她就是她。。。

再来波回忆杀:
DefaultConsumer consumer = new DefaultConsumer(channel) {
            @Override
            public void handleDelivery(String consumerTag, Envelope envelope, AMQP.BasicProperties properties, byte[] body) throws IOException {
                try {
                    Thread.sleep(1000);
                } catch (InterruptedException e) {
                    e.printStackTrace();
                }
                System.out.println("小明洗澡用水: " + new String(body, "UTF-8"));
            }
        };
好了,到此我们终于找到了,是死循环读来的消息,调用回调Consumer,调用到了子类的实现的handleDelivery 方法,真正的去实现消息的消费。
不过还没完,她到底是怎么触发的呢?
 private void executeUnlessShuttingDown(Runnable r) {
        if (!this.shuttingDown) execute(r);
    }
    private void execute(Runnable r) {
        checkShutdown();
        this.workService.addWork(this.channel, r);
    }
继续来到
ConsumerWorkService.addWork
    public void addWork(Channel channel, Runnable runnable) {
        if (this.workPool.addWorkItem(channel, runnable)) {
            this.executor.execute(new WorkPoolRunnable());
        }
    }
继续:WorkPool
addWorkItem
/**
* Add (enqueue) an item for a specific client.
* No change and returns <code><b>false</b></code> if client not registered.
* If <i>dormant</i>, the client will be marked <i>ready</i>.
* @param key the client to add to the work item to
* @param item the work item to add to the client queue
* @return <code><b>true</b></code> if and only if the client is marked <i>ready</i>
* — <i>as a result of this work item</i>
*/
public boolean addWorkItem(K key, W item) {
VariableLinkedBlockingQueue<W> queue;
synchronized (this) {
queue = this.pool.get(key);
}
// The put operation may block. We need to make sure we are not holding the lock while that happens.
if (queue != null) {
enqueueingCallback.accept(queue, item);
synchronized (this) {
if (isDormant(key)) {
dormantToReady(key);
return true;
}
}
}
return false;
}这稍微有点绕了,首先我们要从 Map 缓存pool 取出 一个 VariableLinkedBlockingQueue
根据啥取呢,根据的是Channel,所以每个Channel是相独立的,Blocking Queue后续的操作也是阻塞的。
来到 了
enqueueingCallback.accept(queue, item);这是个啥鬼? 这又一个回调,使用了@FunctionalInterface
真实的方法在初始WorkPool 的时候
 public WorkPool(final int queueingTimeout) {
        if (queueingTimeout > 0) {
            this.enqueueingCallback = (queue, item) -> {
                try {
                    boolean offered = queue.offer(item, queueingTimeout, TimeUnit.MILLISECONDS);
                    if (!offered) {
                        throw new WorkPoolFullException("Could not enqueue in work pool after " + queueingTimeout + " ms.");
                    }
                } catch (InterruptedException e) {
                    Thread.currentThread();
                }
            };
        } else {
            this.enqueueingCallback = (queue, item) -> {
                try {
                    queue.put(item);
                } catch (InterruptedException e) {
                    Thread.currentThread().interrupt();
                }
            };
        }
    }
我们看后面的else内容即可:
queue.put(item);What ?竟然把内容放到了一个本地的BlockingQueue 中去了,放的啥内容呢?
就是我们前面的那个线程对象
Runnable runnable倒腾一下嘛,就是那个
delegate.handleDelivery(consumerTag,
        envelope,
        properties,
        body);
有点意思了吧,把整个需要消费的内容扔进了队列里,这时候程序就可以返回给MainLoop了,他有可以继续抓包了。
但我们还没结束,对吧,继续咯
代码倒回来:
  if (this.workPool.addWorkItem(channel, runnable)) {
            this.executor.execute(new WorkPoolRunnable());
        }
这次要看
executor.execute了
首先我们看下这个 ExecutorService executor 这个没特殊指定的话,我们再初始Connection的时候就会初始化这个 ConsumerWorkService,就把 executor 初始化了,一个固定的线程池:
public ConsumerWorkService(ExecutorService executor, ThreadFactory threadFactory, int queueingTimeout, int shutdownTimeout) {
        this.privateExecutor = (executor == null);
        this.executor = (executor == null) ? Executors.newFixedThreadPool(DEFAULT_NUM_THREADS, threadFactory)
                                           : executor;
        this.workPool = new WorkPool<>(queueingTimeout);
        this.shutdownTimeout = shutdownTimeout;
    }
几个线程呢?
private static final int DEFAULT_NUM_THREADS = Runtime.getRuntime().availableProcessors() * 2;当前计算机的核数 * 2 , 八核的就是初始化 16个线程。
这16个线程是跟随Connection的,所以,每个Connection就只有这16个线程在处理呗。
继续咯
this.executor.execute(new WorkPoolRunnable());又要搞个线程,
 private final class WorkPoolRunnable implements Runnable {

        @Override
        public void run() {
            int size = MAX_RUNNABLE_BLOCK_SIZE;
            List<Runnable> block = new ArrayList<Runnable>(size);
            try {
                Channel key = ConsumerWorkService.this.workPool.nextWorkBlock(block, size);
                if (key == null) return; // nothing ready to run
                try {
                    for (Runnable runnable : block) {
                        runnable.run();
                    }
                } finally {
                    if (ConsumerWorkService.this.workPool.finishWorkBlock(key)) {
                        ConsumerWorkService.this.executor.execute(new WorkPoolRunnable());
                    }
                }
            } catch (RuntimeException e) {
                Thread.currentThread().interrupt();
            }
        }
    }
终于等到你,这就是我们核心中的核心了,触发消费也就靠这了。
这个线程被线程池搞起后,做啥了呢?
1.声明一个 16个大小的 ArrayList
2. 取出我们的BlockingQueue,再接着呢,从Queue中取出16个Runnable对象【真正的消费逻辑】,放到ArrayList 中
3. 循环16个 Runable对象,直接调用其run 方法, 这时候自然就调到了我们的handleDelivery- 业务方法愉快的去消费了。
4. 最后呢,还要看我们这队列中还没有待处理的数据了,如果还要有的话,通过线程池再起线程继续执行 WorkPoolRunnable 的run 方法,也就是本方法,
如果队列中一直有消息,而且还一直有消息进来,那线程池就会一直在启线程处理,直到16个线程都启动满负载运转,这时候就会存在本地BlockingQueue的堆积了。
补充下消费的抓包情况:

第一个AMQP

第二个:
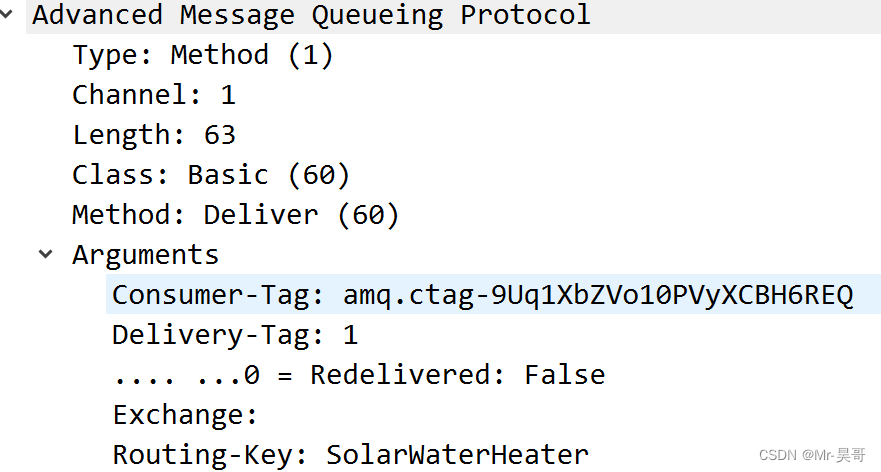
第三个:
第四个:消息内容:

6. 总结:
总的来说,amqp的代码相对简单的,最绕的就是消费者那块了。
首先是靠 MainLoop驱动,
其次,将消息内容的处理方法投递到了本地 BlockingQueue中,
最后,靠启动线程取出Queue中的处理方法,进行本地消费。
来个汇总小图,大家结合代码看:


![[附源码]SSM计算机毕业设计高校教师教学助手系统的设计与实现JAVA](https://img-blog.csdnimg.cn/9da2adb4bf4e40769fe87c8e40b73e2b.png)


