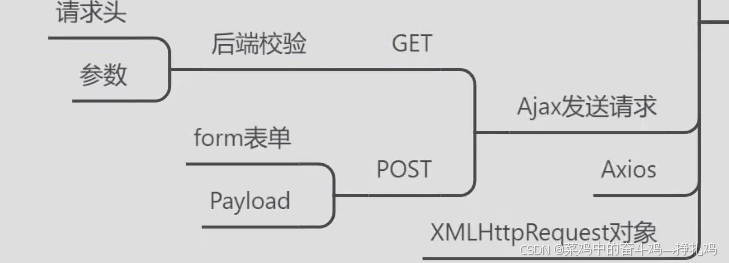
1.搭建简单网站1

from flask import Flask,render_template
import requests
import json
app = Flask('name')
# **location**的温度是**temp**度,天气状况:**desc**
@app.route('/') # 绑定处理函数
def index_url():
location = '101010100'
data = get_weather(location)
return render_template('index.html',location=data['name'],temp=data['temp'],desc=data['desc'])
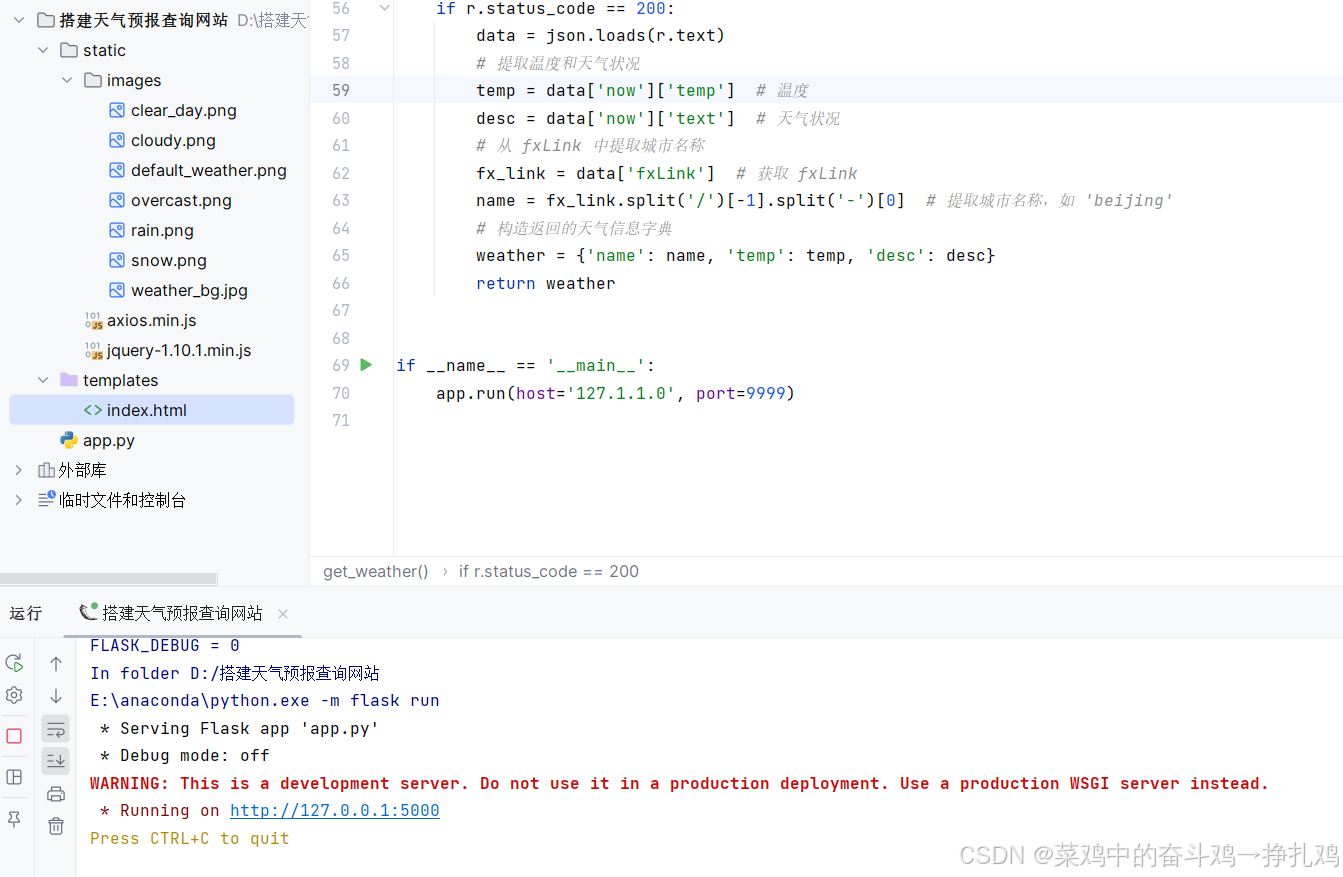
def get_weather(location='101010100'):
url = f'https://devapi.qweather.com/v7/weather/now?location={location}&key=251bac74792b4c53839b2394b5ee45cc'
r = requests.get(url)
# 确保请求成功
if r.status_code == 200:
data = json.loads(r.text)
# 提取温度和天气状况
temp = data['now']['temp'] # 温度
desc = data['now']['text'] # 天气状况
# 从 fxLink 中提取城市名称
fx_link = data['fxLink'] # 获取 fxLink
name = fx_link.split('/')[-1].split('-')[0] # 提取城市名称,如 'beijing'
# 构造返回的天气信息字典
weather = {'name': name, 'temp': temp, 'desc': desc}
return weather
if __name__ == '__main__':
# app.run(host='127.1.1.0', port=9999)
print(get_weather())<!DOCTYPE html>
<html lang="en">
<head>
<meta charset="UTF-8">
<title>查询天气预报</title>
</head>
<body>
<h1>{{location}}的温度是{{temp}}度,天气状况:{{desc}}</h1>
<script src="static\jquery-1.10.1.min.js"></script>
<script>
$(function (){
alert('已经加载jQuery')
})
</script>
</body>
</html>

2.搭建简单网站2
from flask import Flask,render_template,request
import requests
import json
app = Flask('name')


# **location**的温度是**temp**度,天气状况:**desc**

@app.route('/')  # 绑定处理函数
def index_url():
    location = '101010100'
    data = get_weather(location)
    return render_template('index.html',location=data['name'],temp=data['temp'],desc=data['desc'])

@app.route('/get_data')
def get_data():
    loc = request.args.get('loc')
    ua = requests.headers.get('User-Agent')
    token = requests.cookies.get('token')
    data = ''
    if 'python' in ua:
        msg = '检测到自动化程序'
    elif not token or token != 'abc':
        msg = 'Token参数错误'
    elif not loc:
        msg = '查询参数错误'
    else:
        data = get_weather(loc)
        msg = '请求正常'


    sender_data = {'msg':msg,'data':data}
    sender_str = json.dumps(sender_data)
    return sender_str

@app.route('/post_data', methods=['POST'])
def post_data():
    # loc = request.form.get('loc')  # 获取数据
    loc = request.json.get('loc') # payload
    data = get_weather(loc)
    msg = '请求正常'
    sender_data = {'msg': msg, 'data': data}
    sender_str = json.dumps(sender_data)
    return sender_str


def get_weather(location='101010100'):
    url = f'https://devapi.qweather.com/v7/weather/now?location={location}&key=251bac74792b4c53839b2394b5ee45cc'
    r = requests.get(url)

    # 确保请求成功
    if r.status_code == 200:
        data = json.loads(r.text)
        # 提取温度和天气状况
        temp = data['now']['temp']  # 温度
        desc = data['now']['text']  # 天气状况
        # 从 fxLink 中提取城市名称
        fx_link = data['fxLink']  # 获取 fxLink
        name = fx_link.split('/')[-1].split('-')[0]  # 提取城市名称,如 'beijing'
        # 构造返回的天气信息字典
        weather = {'name': name, 'temp': temp, 'desc': desc}
        return weather


if __name__ == '__main__':
    app.run(host='127.1.1.0', port=9999)
<!DOCTYPE html>
<html lang="en">
<head>
<meta charset="UTF-8">
<title>查询天气预报</title>
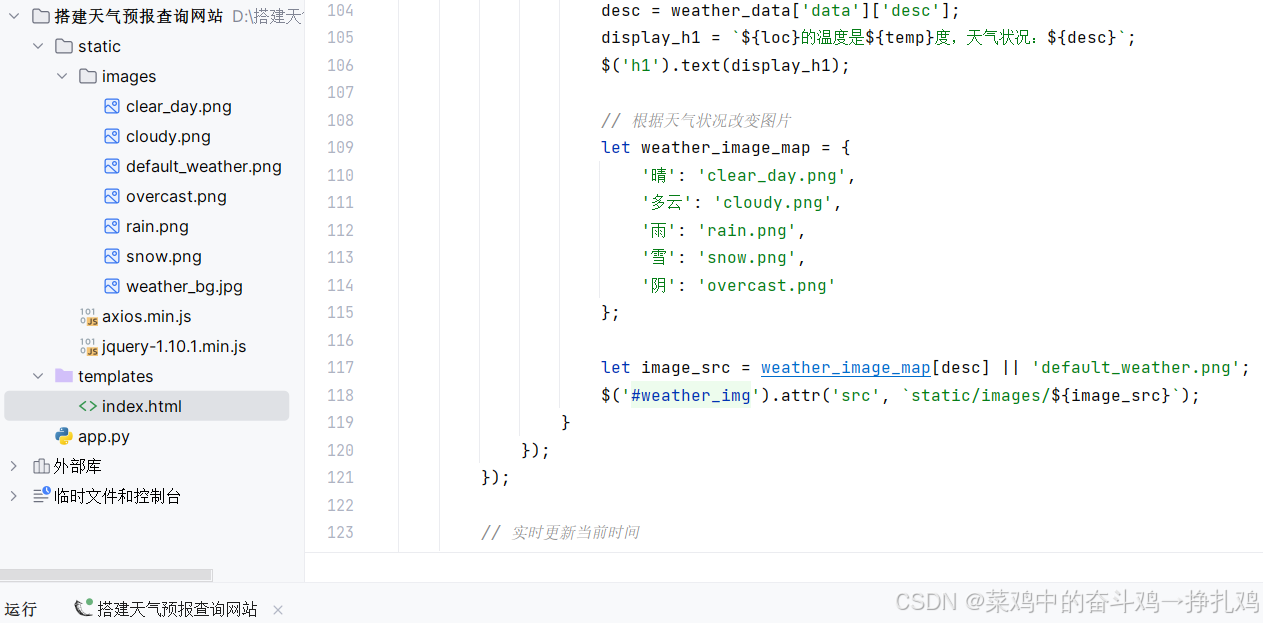
</head>
<body>
<h1>{{ location }}的温度是{{ temp }}度,天气状况:{{ desc }}</h1>
<script src="static\jquery-1.10.1.min.js"></script>
<script>
let date = new Date(); // 获取当前时间
console.log(date.toString());
date.setTime(date.getTime() + 1000 * 1000); // 单位为毫秒,设置几秒后删除cookie,这里为1000秒
// 使用方法打开浏览器页面,查看cookie值,最后把下面设置cookie和时间的(下面这行)注释掉,静等两分钟查看浏览器即可。
document.cookie = `token=abc;expires=${date.toString()}`; // 给添加的cookie值加上日期
$(function () {
$('#b1').click(function () {
var query = $('#t1').val()
$.ajax({
// url: `/get_data?loc=${query}`,
url: '/post_data',
method: 'post',
data: JSON.stringify({ //
loc: query
}),
contentType: 'Application/json',
success: function (data) {
weather_data = JSON.parse(data) //python json.loads
loc = weather_data['data']['name']
temp = weather_data['data']['temp']
desc = weather_data['data']['desc']
display_h1 = `${loc}的温度是${temp}度,天气状况:${desc}`
$('h1').text(display_h1)
}
})
})
})
</script>
<br><br><input id="t1" placeholder="请输入要查询的城市名字">
<button id="b1">查询天气预报</button>
</body>
</html>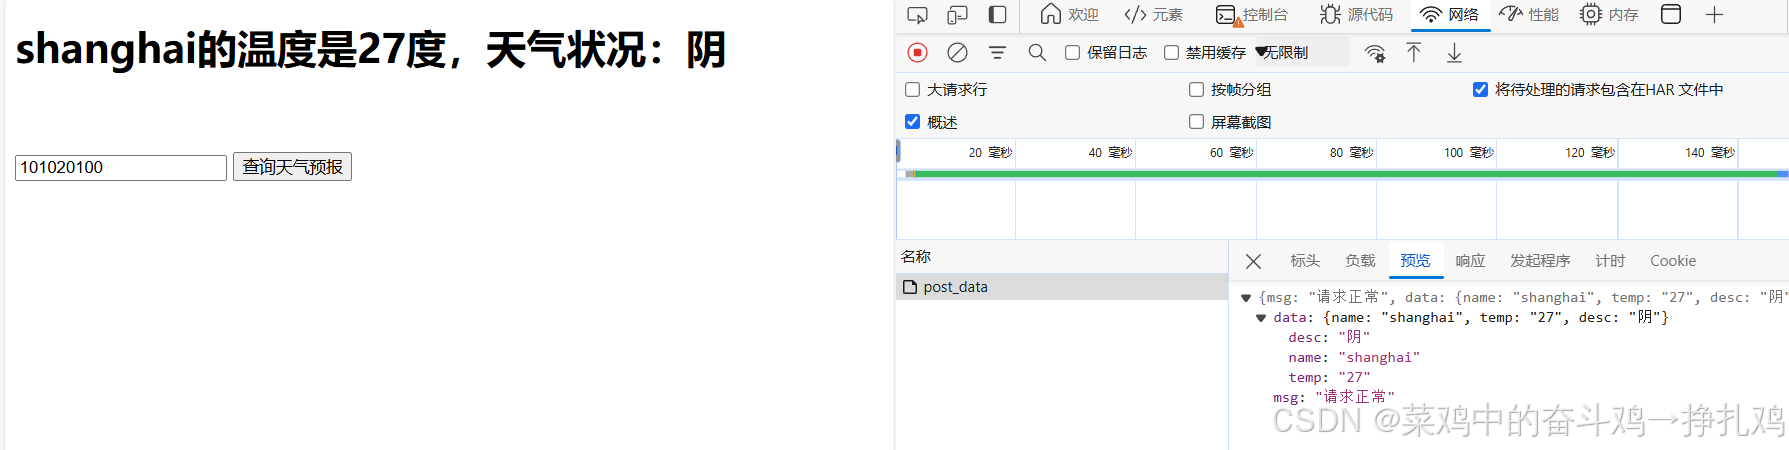
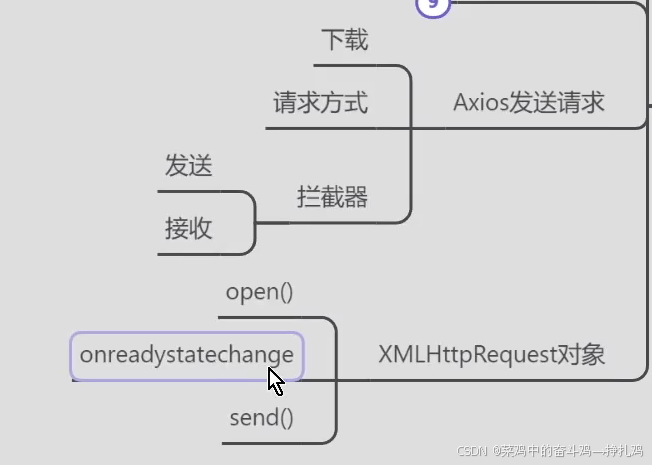
3.搭建简单网站3
from flask import Flask,render_template,request
import requests
import json
app = Flask('name')


# **location**的温度是**temp**度,天气状况:**desc**

@app.route('/')  # 绑定处理函数
def index_url():
    location = '101010100'
    data = get_weather(location)
    return render_template('index.html',location=data['name'],temp=data['temp'],desc=data['desc'])

@app.route('/get_data')
def get_data():
    loc = request.args.get('loc')
    ua = requests.headers.get('User-Agent')
    token = requests.cookies.get('token')
    data = ''
    if 'python' in ua:
        msg = '检测到自动化程序'
    elif not token or token != 'abc':
        msg = 'Token参数错误'
    elif not loc:
        msg = '查询参数错误'
    else:
        data = get_weather(loc)
        msg = '请求正常'

    sender_data = {'msg':msg,'data':data}
    sender_str = json.dumps(sender_data)
    return sender_str

@app.route('/post_data', methods=['POST'])
def post_data():
    # loc = request.form.get('loc')  # 获取数据
    loc = request.json.get('loc') # payload
    data = get_weather(loc)
    msg = '请求正常'
    sender_data = {'msg': msg, 'data': data}
    sender_str = json.dumps(sender_data)
    return sender_str

# @app.route('/axios')
# def axios():
#     return '这是一个axios的请求数据'


def get_weather(location='101010100'):
    url = f'https://devapi.qweather.com/v7/weather/now?location={location}&key=251bac74792b4c53839b2394b5ee45cc'
    r = requests.get(url)

    # 确保请求成功
    if r.status_code == 200:
        data = json.loads(r.text)
        # 提取温度和天气状况
        temp = data['now']['temp']  # 温度
        desc = data['now']['text']  # 天气状况
        # 从 fxLink 中提取城市名称
        fx_link = data['fxLink']  # 获取 fxLink
        name = fx_link.split('/')[-1].split('-')[0]  # 提取城市名称,如 'beijing'
        # 构造返回的天气信息字典
        weather = {'name': name, 'temp': temp, 'desc': desc}
        return weather


if __name__ == '__main__':
    app.run(host='127.1.1.0', port=9999)
<!DOCTYPE html>
<html lang="en">
<head>
<meta charset="UTF-8">
<title>查询天气预报</title>
</head>
<body>
<h1>{{ location }}的温度是{{ temp }}度,天气状况:{{ desc }}</h1>
<script src="static\jquery-1.10.1.min.js"></script>
<script>
let date = new Date(); // 获取当前时间
console.log(date.toString());
date.setTime(date.getTime() + 1000 * 1000); // 单位为毫秒,设置几秒后删除cookie,这里为1000秒
// 使用方法打开浏览器页面,查看cookie值,最后把下面设置cookie和时间的(下面这行)注释掉,静等两分钟查看浏览器即可。
document.cookie = `token=abc;expires=${date.toString()}`; // 给添加的cookie值加上日期
$(function () {
$('#b1').click(function () {
var query = $('#t1').val()
$.ajax({
// url: `/get_data?loc=${query}`,
url: '/post_data',
method: 'post',
data: JSON.stringify({ //
loc: query
}),
contentType: 'Application/json',
success: function (data) {
weather_data = JSON.parse(data) //python json.loads
loc = weather_data['data']['name']
temp = weather_data['data']['temp']
desc = weather_data['data']['desc']
display_h1 = `${loc}的温度是${temp}度,天气状况:${desc}`
$('h1').text(display_h1)
}
})
})
})
</script>
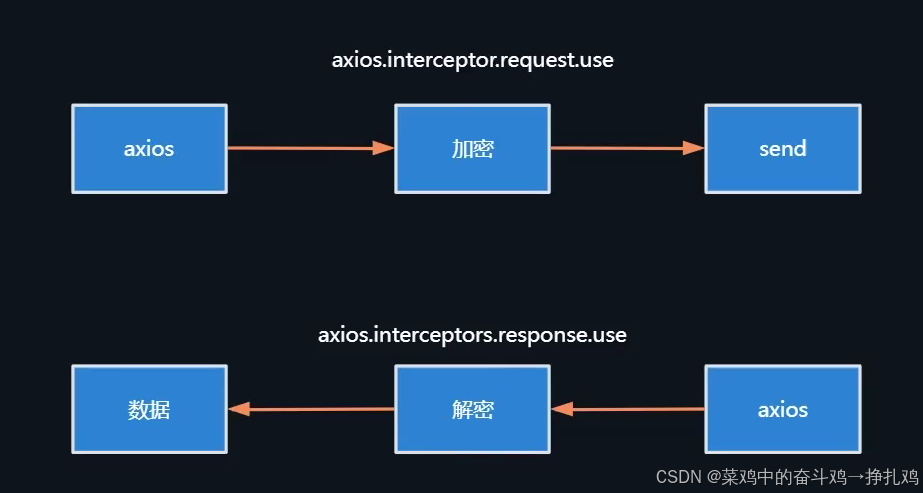
{#<script src="static/axios.min.js"></script>#}
{#<script>#}
{# axios.interceptors.request.use(function (config) {#}
{# console.log('拦截发送数据', config)#}
{# //加密处理#}
{# return config#}
{# })#}
{##}
{# axios.interceptors.response.use(function (config) {#}
{# console.log('拦截收到的数据', config)#}
{# //解密处理#}
{# return config#}
{# })#}
{##}
{# window.onload = function () {#}
{# document.getElementById('b1').addEventListener('click', function () {#}
{# axios.get('/axios').then(function (res) {#}
{# console.log(res.data)#}
{# })#}
{# })#}
{# }#}
{#</script>#}
<br><br><input id="t1" placeholder="请输入要查询的城市名字">
<button id="b1">查询天气预报</button>
</body>
</html>4.简单网站最终呈现:
此网页可以进行爬虫爬取数据,对比发现get,post等请求的不同与相同,同时兼具了一定的反爬机制等知识

查询一下信阳城市天气,得到结果: