关于EGG
egg框架的第一个版本还是2017-03-21,距今已有7年了。虽然最近几年没有什么更新,但它在国内的使用还是挺多的,mvc的分层模式也很受大家喜欢。虽然声称是面向企业级、中大型项目场景的框架,但这种约定式在大型项目中其实也很容易导致依赖混乱,service层管理不好容易不断膨胀,变成一个大文件,同时service层内部也会存在多个交叉调用的情况。不过这不是重点。我们这次来看看egg-core。
Egg-Core
Egg-core 是 Egg.js 框架的核心模块,用于管理整个框架的底层机制和核心功能。它负责框架的启动、插件加载、应用生命周期管理等关键任务,是 Egg.js 的基础组件之一。今天先介绍一下egg的生命周期的实现。
egg的生命周期如下:
export interface ILifecycleBoot {
  /**
   * Ready to call configDidLoad,
   * Config, plugin files are referred,
   * this is the last chance to modify the config.
   */
  configWillLoad?(): void;

  /**
   * Config, plugin files have loaded
   */
  configDidLoad?(): void;

  /**
   * All files have loaded, start plugin here
   */
  didLoad?(): Promise<void>;

  /**
   * All plugins have started, can do some thing before app ready
   */
  willReady?(): Promise<void>;

  /**
   * Worker is ready, can do some things,
   * don't need to block the app boot
   */
  didReady?(err?: Error): Promise<void>;

  /**
   * Server is listening
   */
  serverDidReady?(): Promise<void>;

  /**
   * Do some thing before app close
   */
  beforeClose?(): Promise<void>;
}
其实现原理主要依赖于这两个包get-ready和ready-callback。其中ready-callback是对get-ready的二次封装。我们先来看看这两个包的作用。
什么是get-ready
get-ready是用于一次性就绪事件,这其实在我们实际的项目中也是经常会需要用到。例如项目启动前需要先请求几个接口,这些数据都准备好之后,才启动。这种场景就很合适了。
其实现的主要代码如下:
export class Ready {
  #isReady: boolean;
  #readyCallbacks: CallbackFunction[];
  #readyArg?: Error = undefined;

  constructor() {
    this.#isReady = false;
    this.#readyCallbacks = [];
  }

  ready(flagOrFunction?: ReadyFunctionArg) {
    // 注册回调
    if (flagOrFunction === undefined || typeof flagOrFunction === 'function') {
      return this.#register(flagOrFunction);
    }
    // emit callbacks
    this.#emit(flagOrFunction);
  }

  /**
   * 注册回调函数
   */
  #register(func?: CallbackFunction) {
    // support `this.ready().then(onready);` and `await this.ready()`;
    if (!func) {
      return new Promise<void>((resolve, reject) => {
        function func(err?: Error) {
          if (err) {
            reject(err);
          } else {
            resolve();
          }
        }
        if (this.#isReady) {
          return func(this.#readyArg);
        }
        this.#readyCallbacks.push(func);
      });
    }

    // this.ready(fn)
    if (this.#isReady) {
      func(this.#readyArg);
    } else {
      this.#readyCallbacks.push(func);
    }
  }

  /**
  * 调用已注册的回调,并清理回调堆栈。
  *如果标志不是假的,它将被标记为就绪。然后,回调将在注册时立即调用。
  * @param {Boolean|Error} 标志 - 设置标志是否已准备就绪。如果标志是错误,它也已准备就绪,但回调将使用参数“错误”调用
*/
  #emit(flag: boolean | Error) {
    // this.ready(true);
    // this.ready(false);
    // this.ready(err);
    this.#isReady = flag !== false;
    this.#readyArg = flag instanceof Error ? flag : undefined;
    // this.ready(true)
    if (this.#isReady) {
      this.#readyCallbacks
        .splice(0, Infinity)
        .forEach(callback => process.nextTick(() => callback(this.#readyArg)));
    }
  }

  /**
   * @param {Object} obj - an object that be mixed
   */
  static mixin(obj?: any) {
    if (!obj) return;
    const ready = new Ready();
    // delegate method
    obj.ready = (flagOrFunction: any) => ready.ready(flagOrFunction);
  }
}
这段代码定义了一个名为 Ready 的类,它用于管理异步操作的就绪状态。
-
类
Ready包含三个私有成员变量:-
#isReady:一个布尔值,表示是否已经就绪。 -
#readyCallbacks:一个回调函数数组,用于存储需要在就绪时调用的函数。 -
#readyArg:一个可选的Error对象,用于传递给回调函数的错误信息。
-
-
构造函数
constructor初始化这些私有成员变量:-
this.#isReady被设置为false,表示初始状态为未就绪。 -
this.#readyCallbacks被初始化为空数组。
-
-
ready方法是类的公共接口,用于注册回调函数或触发回调:-
如果传入的参数 flagOrFunction是undefined或者是一个函数,那么会调用#register方法注册回调函数。 -
如果 flagOrFunction是一个布尔值或Error对象,那么会调用#emit方法触发回调。
-
-
#register方法用于注册回调函数:-
如果没有传入回调函数( func),则返回一个Promise对象,以便可以在回调被触发时解析或拒绝。 -
如果已经就绪( this.#isReady为true),则立即调用回调函数。 -
如果尚未就绪,将回调函数添加到 #readyCallbacks数组中。
-
-
#emit方法用于触发所有注册的回调函数,并清理回调栈:-
如果传入的 flag不是false,则将#isReady设置为true。 -
如果 flag是一个Error对象,那么#readyArg被设置为这个错误对象。 -
如果已经就绪,那么遍历 #readyCallbacks数组,使用process.nextTick异步调用每个回调函数,并传递#readyArg作为参数。
-
-
mixin方法是一个静态方法,用于将Ready类的功能混入到其他对象中:-
如果传入了对象 obj,则在该对象上添加一个ready方法,该方法会委托给Ready类的实例。
-
其使用方法如下:
import { Ready } from 'get-ready';

const obj = new Ready();

// register a callback
obj.ready(() => console.log('ready'));

// mark ready
obj.ready(true);
比较巧妙的是,上面的ready支持无参,无参的时候register会自动注册一个包含promise的方法。这样,如果只想等待ready后再执行后续代码,那可以这样子使用。
await obj.ready();
// 执行其它业务
在效果上,其实跟vue里面的$nextTick有点类似,既可以传回调,也可以提供一个无参的调用。
在设计上,它坚持了开闭原则、最小知识原则,暴露了mixin去提供拓展,二次包装的可能,同时对修改关闭,只有一个ready方法去控制注册和触发,让使用者无需关心过多的接口,无需考虑过多的使用依赖问题。
在使用上,我们可以在需要的时候注册回调函数,并在某个时刻标记为就绪,触发所有回调函数。这在处理异步初始化或等待多个异步操作完成时非常有用。
什么是ready-callback
我们再来看看ready-callback,其内部实现引用了get-ready模块,说明其是对get-ready的二次封装。
import EventEmitter from 'node:events';
import { debuglog } from 'node:util';
import { randomUUID } from 'node:crypto';
import once from 'once';
import { Ready as ReadyObject, type ReadyFunctionArg } from 'get-ready';

const debug = debuglog('ready-callback');

const defaults: ReadyCallbackOption = {
  timeout: 10000,
  isWeakDep: false,
};
class Ready extends EventEmitter {
  isError = false;
  cache: ReadyCallbackCache = new Map();

  opt: ReadyOption;
  obj: any;

  ready: (flagOrFunction?: ReadyFunctionArg) => void;

  constructor(opt: ReadyOption = {}) {
    super();
    ReadyObject.mixin(this);

    this.opt = opt;

    if (!this.opt.lazyStart) {
      this.start();
    }
  }

  start() {
    setImmediate(() => {
      // 当没有注册的准备回调时,直接触发回调
      if (this.cache.size === 0) {
        debug('Fire callback directly');
        this.ready(true);
      }
    });
  }

  /**
   * Mix `ready` and `readyCallback` to `obj`
   * @function Ready#mixin
   * @param  {Object} obj - The mixed object
   * @return {Ready} this
   */
  mixin(obj?: any) {
    // only mixin once
    if (!obj || this.obj) return null;

    // delegate API to object
    obj.ready = this.ready.bind(this);
    obj.readyCallback = this.readyCallback.bind(this);

    // only ready once with error
    this.once('error', err => obj.ready(err));

    // delegate events
    if (obj.emit) {
      this.on('ready_timeout', obj.emit.bind(obj, 'ready_timeout'));
      this.on('ready_stat', obj.emit.bind(obj, 'ready_stat'));
      this.on('error', obj.emit.bind(obj, 'error'));
    }
    this.obj = obj;

    return this;
  }

  readyCallback(name: string, opt: ReadyCallbackOption = {}) {
    opt = Object.assign({}, defaults, this.opt, opt);
    const cacheKey = randomUUID();
    opt.name = name || cacheKey;
    const timer = setTimeout(() => this.emit('ready_timeout', opt.name), opt.timeout);
    const cb = once((err?: any) => {
      if (err != null && !(err instanceof Error)) {
        err = new Error(err);
      }
      clearTimeout(timer);
      // won't continue to fire after it's error
      if (this.isError === true) return;
      // fire callback after all register
      setImmediate(() => this.readyDone(cacheKey, opt, err));
    }) as unknown as ReadyCallbackFn;
    debug('[%s] Register task id `%s` with %j', cacheKey, opt.name, opt);
    cb.id = opt.name;
    this.cache.set(cacheKey, cb);
    return cb;
  }

  readyDone(id: string, opt: ReadyCallbackOption, err?: Error) {
    if (err != null && !opt.isWeakDep) {
      this.isError = true;
      debug('[%s] Throw error task id `%s`, error %s', id, opt.name, err);
      return this.emit('error', err);
    }

    debug('[%s] End task id `%s`, error %s', id, opt.name, err);
    this.cache.delete(id);

    this.emit('ready_stat', {
      id: opt.name,
      remain: getRemain(this.cache),
    });

    if (this.cache.size === 0) {
      debug('[%s] Fire callback async', id);
      this.ready(true);
    }
    return this;
  }
}

function getRemain(map: ReadyCallbackCache) {
  const names: string[] = [];
  for (const cb of map.values()) {
    names.push(cb.id);
  }
  return names;
}

export { Ready };

export default function(opt: ReadyOption = {}) {
  return new Ready(opt);
}
这段代码也定义了一个名为Ready的类,该类继承自EventEmitter类。Ready类用于管理和执行一组回调函数,这些回调函数在某个条件满足时被调用。它的构造函数接受一个opt参数,用于配置类的实例。
-
再构建函数里mixin了 get-ready类,使其具备了get-ready的ready方法。可以注册回调和触发回调。 -
start方法用于开始处理回调队列。 -
mixin方法允许将ready和readyCallback方法添加到另一个对象。 -
readyCallback方法用于登记一个调用标识,其内部会返回一个函数,函数被调用会触发readyDone方法。 -
readyDone方法用于标记一个调用标识已完成,并触发相应的事件。 -
getRemain函数用于获取尚未完成的回调函数的ID列表。
在start方法和readyDone方法都会去检查是否所有注册的调用标识都已完成,完成则触发get-ready.ready(true),以便执行自己注册的回调。
使用案例如下:
var koa = require('koa');
var ready = require('ready-callback')();
var app = koa();
ready.mixin(app);

const endA = app.readyCallback('a');
const endB = app.readyCallback('b');
const endC = app.readyCallback('c');
const endD = app.readyCallback('d');
setTimeout(endA, 1);
setTimeout(endB, 80);
setTimeout(endC, 10);
setTimeout(endD, 50);

// callback will be fired after all service launched
app.ready(function() {
  app.listen();
});
在使用上,这个类允许用户注册回调函数,并在所有回调都完成或超时后触发一个最终的回调。它还提供了错误处理和事件发射机制,以便用户可以响应不同的状态变化。
get-ready和ready-callback的区别
了解了两个模块,在egg-core的Lifecycle里两者都有使用,其有三个内置成员变量,如下:
-
readyObject: get-ready实例,私有变量 -
loadReady: ready-callback实例,共有变量 -
bootReady: ready-callback实例,共有变量
那他们有什么区别呢?两者的流程示意图如下:

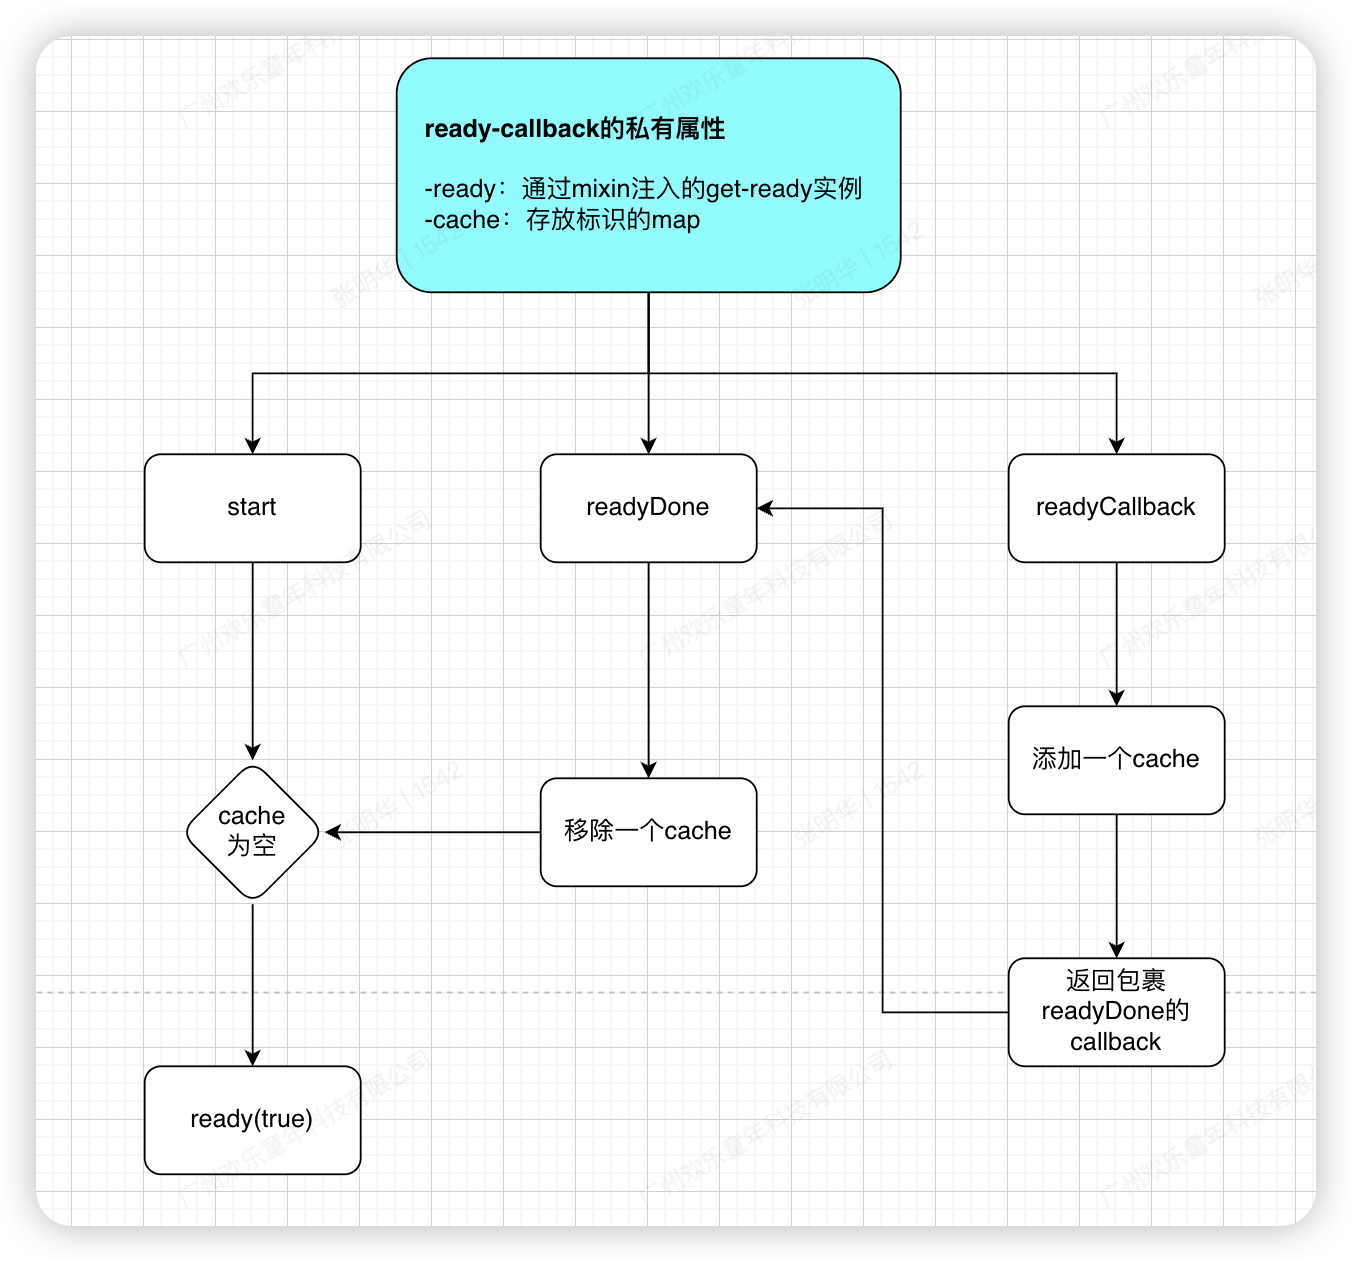
ready-callback是对get-ready的二次包装,增加了超时、延迟启动的特性。同时增加了一个计数器的功能,可以通过程序代码,在自己的业务逻辑里登记标识,消费标识,最终在所有都准备好之后,执行一些回调。
egg-core的Lifecycle
那我们接下来看看Lifecycle,从字面上就可以知道它是管理生命周期的,在app.js文件加载的时候,就会先调用这个方法把它关联进去this.lifecycle.addBootHook(bootHook);,egg自身是支持框架拓展和第三方拓展的,所以可能会有多个启动钩子被注册进去,Lifecycle都统一存储到了私有变量this.#bootHooks上。添加完后,则调用this.lifecycle.init();去初始化实例bootHook对象,并存储到this.#boots数组上。
Lifecycle统一封装了生命周期函数的调用,当要调用具体的钩子的时候则遍历上面的this.#boots
for (const boot of this.#boots) {
      if (typeof boot.configDidLoad === 'function') {
        boot.configDidLoad();
      }
      // function boot hook register after configDidLoad trigger
      if (typeof boot.beforeClose === 'function') {
        const beforeClose = boot.beforeClose.bind(boot);
        this.registerBeforeClose(beforeClose);
      }
    }
在Lifecycle里,生命周期函数的触发都被命名为trigger的触发函数里。
triggerConfigWillLoad() {
    debug('trigger configWillLoad start');
    for (const boot of this.#boots) {
      if (typeof boot.configWillLoad === 'function') {
        boot.configWillLoad();
      }
    }
    debug('trigger configWillLoad end');
    this.triggerConfigDidLoad();
  }

  triggerConfigDidLoad() {
    debug('trigger configDidLoad start');
    for (const boot of this.#boots) {
      if (typeof boot.configDidLoad === 'function') {
        boot.configDidLoad();
      }
      // function boot hook register after configDidLoad trigger
      if (typeof boot.beforeClose === 'function') {
        const beforeClose = boot.beforeClose.bind(boot);
        this.registerBeforeClose(beforeClose);
      }
    }
    debug('trigger configDidLoad end');
    this.triggerDidLoad();
  }

  triggerServerDidReady() {
    debug('trigger serverDidReady start');
    return (async () => {
      for (const boot of this.#boots) {
        if (typeof boot.serverDidReady !== 'function') {
          continue;
        }
        try {
          await boot.serverDidReady();
        } catch (err) {
          this.emit('error', err);
        }
      }
      debug('trigger serverDidReady end');
    })();
  }
  triggerDidLoad() {
    debug('trigger didLoad start');
    debug('loadReady start');
    this.loadReady.start();
    for (const boot of this.#boots) {
      if (typeof boot.didLoad === 'function') {
        const didLoad = boot.didLoad.bind(boot);
        this.#registerReadyCallback({
          scope: didLoad,
          ready: this.loadReady,
          timingKeyPrefix: 'Did Load',
          scopeFullName: boot.fullPath + ':didLoad',
        });
      }
    }
  }
  triggerWillReady() {
    debug('trigger willReady start');
    debug('bootReady start');
    this.bootReady.start();
    for (const boot of this.#boots) {
      if (typeof boot.willReady === 'function') {
        const willReady = boot.willReady.bind(boot);
        this.#registerReadyCallback({
          scope: willReady,
          ready: this.bootReady,
          timingKeyPrefix: 'Will Ready',
          scopeFullName: boot.fullPath + ':willReady',
        });
      }
    }
  }

  triggerDidReady(err?: Error) {
    debug('trigger didReady start');
    return (async () => {
      for (const boot of this.#boots) {
        if (typeof boot.didReady === 'function') {
          try {
            await boot.didReady(err);
          } catch (e) {
            this.emit('error', e);
          }
        }
      }
      debug('trigger didReady end');
    })();
  }
这里上面就涉及了5个生命周期函数:
-
配置文件即将加载,这是最后动态修改配置的时机(configWillLoad); -
配置文件加载完成(configDidLoad); -
文件加载完成(didLoad); -
应用启动完成(serverDidReady); -
插件启动完毕(willReady); -
worker 准备就绪(didReady);
那这些函数是怎么流转起来的呢?这就需要用到上面的2个模块了。主要涉及3个对象。其中1个get-ready实例和2个ready-callback实例。
在Lifecycle里,get-ready实例readyObject,它在构造函数里实例化
this.#readyObject = new ReadyObject();
并暴露了一个ready方法
ready(arg?: ReadyFunctionArg) {
    return this.#readyObject.ready(arg);
  }
这个方法会通过EggCore的ready暴露出去给外部调用。官方的说明是注册一个回调函数,该函数将在应用程序准备就绪时调用。例如:
import { EggCore as Application } from '@eggjs/core';

const app = new Application({
  baseDir: '/path/to/app'
});
app.ready(() => {
  app.listen(3000);
});
那它什么时候会被置为true呢?bootReady完成的时候。后面会串起来讲一下。
还有两位两个loadReady和bootReady,是ready-callback实例,也是在构建函数里实例化的。
this.loadReady = new Ready({ timeout: this.readyTimeout, lazyStart: true });

this.bootReady = new Ready({ timeout: this.readyTimeout, lazyStart: true });
从这里可以看到,其设置了超时和lazyStart,也就是要手动调用start的。
其暴露了两个方法,用于调用readyCallback设置计数标识,以便第三方插件去调用。
legacyReadyCallback(name: string, opt?: object) {
    const timingKeyPrefix = 'readyCallback';
    const timing = this.timing;
    const cb = this.loadReady.readyCallback(name, opt);
    const timingKey = `${timingKeyPrefix} in ` + utils.getResolvedFilename(name, this.app.baseDir);
    this.timing.start(timingKey);
    debug('register legacyReadyCallback');
    return function legacyReadyCallback(...args: any[]) {
      timing.end(timingKey);
      debug('end legacyReadyCallback');
      cb(...args);
    };
  }

  registerReadyCallback(args: {
    scope: Fun;
    ready: Ready;
    timingKeyPrefix: string;
    scopeFullName?: string;
  }) {
    const { scope, ready, timingKeyPrefix, scopeFullName } = args;
    if (typeof scope !== 'function') {
      throw new Error('boot only support function');
    }

    // get filename from stack if scopeFullName is undefined
    const name = scopeFullName || utils.getCalleeFromStack(true, 4);
    const timingKey = `${timingKeyPrefix} in ` + utils.getResolvedFilename(name, this.app.baseDir);

    this.timing.start(timingKey);

    debug('[registerReadyCallback] start name: %o', name);
    const done = ready.readyCallback(name);

    // ensure scope executes after load completed
    process.nextTick(() => {
      utils.callFn(scope).then(() => {
        debug('[registerReadyCallback] end name: %o', name);
        done();
        this.timing.end(timingKey);
      }, (err: Error) => {
        done(err);
        this.timing.end(timingKey);
      });
    });
  }
第三方插件通过egg的api去调用上面的函数,就可以去声明计数标识。 this.loadReady会在didLoad钩子里去调用this.loadReady.start()方法启动,启动之后会为this.#boots实例调用registerReadyCallback,增加计数标识。
triggerDidLoad() {
    debug('trigger didLoad start');
    debug('loadReady start');
    this.loadReady.start();
    for (const boot of this.#boots) {
      if (typeof boot.didLoad === 'function') {
        const didLoad = boot.didLoad.bind(boot);
        this.#registerReadyCallback({
          scope: didLoad,
          ready: this.loadReady,
          timingKeyPrefix: 'Did Load',
          scopeFullName: boot.fullPath + ':didLoad',
        });
      }
    }
  }
同样的this.bootReady则是在triggerWillReady去启动和为this.#boots实例调用registerReadyCallback,增加计数标识。
triggerWillReady() {
    debug('trigger willReady start');
    debug('bootReady start');
    this.bootReady.start();
    for (const boot of this.#boots) {
      if (typeof boot.willReady === 'function') {
        const willReady = boot.willReady.bind(boot);
        this.#registerReadyCallback({
          scope: willReady,
          ready: this.bootReady,
          timingKeyPrefix: 'Will Ready',
          scopeFullName: boot.fullPath + ':willReady',
        });
      }
    }
  }
不同的是,它的调用时机,它是在this.loadReady完成之后再调用的。
this.loadReady.ready((err?: Error) => {
      debug('loadReady end, err: %o', err);
      debug('trigger didLoad end');
      if (err) {
        this.ready(err);
      } else {
        this.triggerWillReady();
      }
    });
那readyObject呢?它在什么时候会被标识为完成?只需要在this.bootReady.ready之后即可。
this.bootReady.ready((err?: Error) => {
      debug('bootReady end, err: %o', err);
      debug('trigger willReady end');
      this.ready(err || true);
    });
我们再来整理一下对应的调用链路:
-
线路1: this.loadCustomApp -> this.lifecycle.addBootHook() -> this.lifecycle.init() -> triggerConfigWillLoad -> configWillLoad -> configDidLoad -> this.loadReady.start -> this.loadReady.readyCallback
-
线路2: this.loadReady.ready(true) -> didLoad -> this.bootReady.start -> this.loadReady.readyCallback
-
线路3: this.bootReady.ready(true) -> willReady -> this.ready -> didReady -> 初始化完成 -> serverDidReady
每个线路的衔接就是通过ready-callback来完成的。其中加粗部分表示生命周期函数的调用。
egg的生命周期除了应用自身使用之外,还要给它的插件和框架开发使用的。它在设计上的巧妙之处在于引入Boot类来解耦跟插件和框架的藕合。允许开发者将应用程序的初始化、配置加载、插件启动、就绪和关闭等逻辑分散到不同的模块中。这种设计不仅使代码更加清晰和易于维护,而且便于扩展,因为新的Boot类可以轻松地添加到生命周期中。
而在事件衔接方面,则利用了计数标识的增加,满足条件后触发回调的方式,通过ready-callback模块衔接不同的事件,即便于开发者定义一系列需要完成的任务(通过readyCallback方法),并在所有任务都完成后触发一个就绪事件。它还支持设置超时时间,以确保在任务长时间无法完成时能够触发相应的处理逻辑。
总结
Egg虽然发布很多年了,但其内部还是有很多值得我们学习的地方。通过本文,我们了解了两个优秀的模块:
-
get-ready:可以用于简单的初始化管理 -
ready-callback:适合用于多状态、多插件的回调执行
另外我们也了解了egg生命周期的实现原理,其内部不同周期的串联逻辑。我觉得可以借鉴的是其解耦流程和插件的这种设计模式。希望对你有所帮助。
本文由 mdnice 多平台发布


