YOLOv8 基于MGD的知识蒸馏
接着上一篇我们介绍了YOLOv8的剪枝方案和代码,本篇文章将剪枝后的模型作为学生模型,剪枝前的模型作为教师模型对剪枝模型进行蒸馏,从而进一步提到轻量模型的性能。
Channel-wise Distillation (CWD)

问题和方法
在计算机视觉任务中,图像分类只需要预测整张图像的类别,而密集预测需要对每个像素或对象进行预测,输出更丰富的结果,如语义分割、目标检测等。直接应用分类任务中的知识蒸馏方法于密集预测任务效果不佳。已有的方法通过建模空间位置之间(指的是图像中的像素位置)的关系来传递结构化知识。
论文提出了一种通道级的知识蒸馏方法。主要分为两个步骤:
- 对特征图的每个通道进行softmax标准化,得到一个概率分布(表示了该通道中每个位置的相对重要性或响应强度)。
- 计算教师网络和学生网络相应通道概率分布之间的asymmetric KL散度作为损失,使学生网络在前景显著区域模仿教师网络。
具体实现
对特征图或logits的每个通道,对H×W个位置的激活值进行softmax计算,得到概率分布表示每个位置的相对重要性。
然后计算这个分布与教师网络中相应通道分布的asymmetric KL距离,重点对齐前景显著区域。
代码如下:
class CWDLoss(nn.Module):
    """PyTorch version of `Channel-wise Distillation for Semantic Segmentation.
    <https://arxiv.org/abs/2011.13256>`_.
    """

    def __init__(self, channels_s, channels_t, tau=1.0):
        super(CWDLoss, self).__init__()
        self.tau = tau

    def forward(self, y_s, y_t):
        """Forward computation.
        Args:
            y_s (list): The student model prediction with
                shape (N, C, H, W) in list.
            y_t (list): The teacher model prediction with
                shape (N, C, H, W) in list.
        Return:
            torch.Tensor: The calculated loss value of all stages.
        """
        assert len(y_s) == len(y_t)
        losses = []

        for idx, (s, t) in enumerate(zip(y_s, y_t)):
            assert s.shape == t.shape

            N, C, H, W = s.shape

            # normalize in channel diemension
            import torch.nn.functional as F
            softmax_pred_T = F.softmax(t.view(-1, W * H) / self.tau, dim=1)  # [N*C, H*W]

            logsoftmax = torch.nn.LogSoftmax(dim=1)
            cost = torch.sum(
                softmax_pred_T * logsoftmax(t.view(-1, W * H) / self.tau) -
                softmax_pred_T * logsoftmax(s.view(-1, W * H) / self.tau)) * (self.tau ** 2)

            losses.append(cost / (C * N))
        loss = sum(losses)

        return loss
Masked Generative Distillation (MGD)
问题和方法
知识蒸馏主要可以分为logit蒸馏和feature蒸馏。其中feature蒸馏具有更好的拓展性,已经在很多视觉任务中得到了应用。但由于不同任务的模型结构差异,许多feature蒸馏方法是针对某个特定任务设计的。
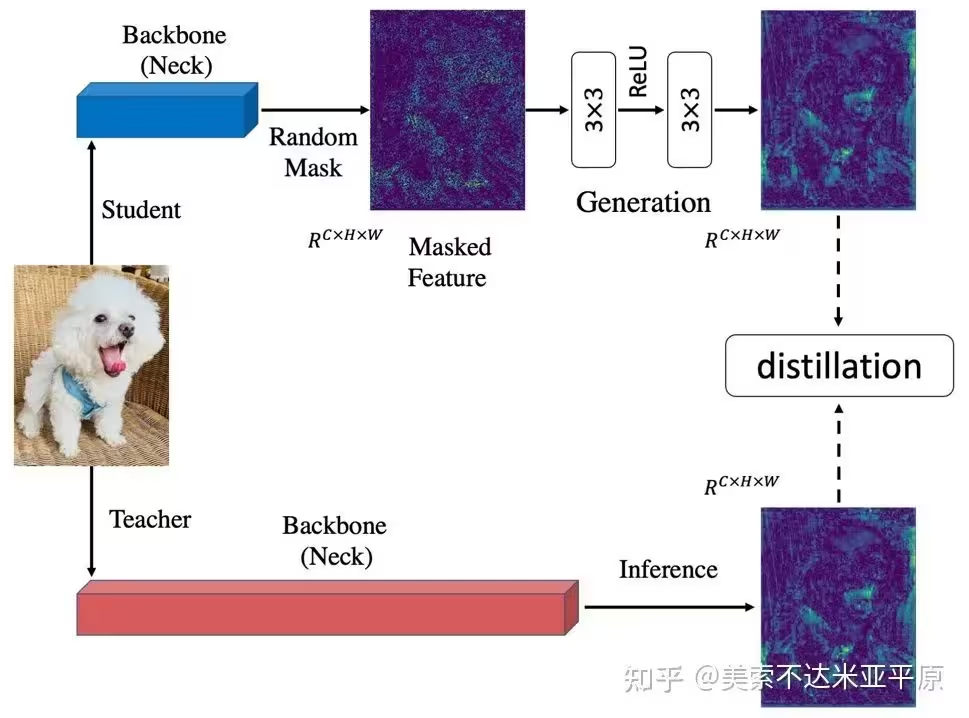
之前的知识蒸馏方法着力于使学生去模仿更强的教师的特征,以使学生特征具有更强的表征能力。我们认为提升学生的表征能力并不一定需要通过直接模仿教师实现。从这点出发,我们把模仿任务修改成了生成任务:让学生凭借自己较弱的特征去生成教师较强的特征。在蒸馏过程中,我们对学生特征进行了随机mask,强制学生仅用自己的部分特征去生成教师的所有特征,以提升学生的表征能力。
具体实现
对特征图或logits生成1×H×W的随机mask,广播到所有通道然后对特征图所有通道进行掩码操作,基于masked特征图输入生成网络,输出特征与教师特征图计算mse损失进行回归训练。
代码如下:
class MGDLoss(nn.Module):
    def __init__(self, channels_s, channels_t, alpha_mgd=0.00002, lambda_mgd=0.65):
        super(MGDLoss, self).__init__()
        device = 'cuda' if torch.cuda.is_available() else 'cpu'

        self.alpha_mgd = alpha_mgd
        self.lambda_mgd = lambda_mgd

        self.generation = [
            nn.Sequential(
                nn.Conv2d(channel_s, channel, kernel_size=3, padding=1),
                nn.ReLU(inplace=True),
                nn.Conv2d(channel, channel, kernel_size=3, padding=1)).to(device) for channel_s, channel in
            zip(channels_s, channels_t)
        ]

    def forward(self, y_s, y_t, layer=None):
        """Forward computation.
        Args:
            y_s (list): The student model prediction with
                shape (N, C, H, W) in list.
            y_t (list): The teacher model prediction with
                shape (N, C, H, W) in list.
        Return:
            torch.Tensor: The calculated loss value of all stages.
        """
        assert len(y_s) == len(y_t)
        losses = []
        for idx, (s, t) in enumerate(zip(y_s, y_t)):
            # print(s.shape)
            # print(t.shape)
            # assert s.shape == t.shape
            if layer == "outlayer":
                idx = -1
            losses.append(self.get_dis_loss(s, t, idx) * self.alpha_mgd)
        loss = sum(losses)
        return loss

    def get_dis_loss(self, preds_S, preds_T, idx):
        loss_mse = nn.MSELoss(reduction='sum')
        N, C, H, W = preds_T.shape

        device = preds_S.device
        mat = torch.rand((N, 1, H, W)).to(device)
        mat = torch.where(mat > 1 - self.lambda_mgd, 0, 1).to(device)

        masked_fea = torch.mul(preds_S, mat)
        new_fea = self.generation[idx](masked_fea)

        dis_loss = loss_mse(new_fea, preds_T) / N

        return dis_loss
YOLOv8蒸馏
基于前一章所述的剪枝模型作为学生模型,剪枝前的模型作为教师模型
model_s = YOLO(weights="weights/prune.pt")
model_t = YOLO(weights="weights/last.pt")
为了在训练过程中使用教师模型指导学生模型训练,我们首先修改接口,在train函数中传入教师模型和蒸馏损失类型。
self.yolo.train(data="diagram.yaml", Distillation=model_t.model, loss_type=loss_type, amp=False, imgsz=640,
                        epochs=100, batch=20, device=0, workers=4, lr0=0.001)
同时修改ultralytics/engine/trainer.py-333行,读取Distillation参数和loss_type参数。
Args:
    cfg (str, optional): Path to a configuration file. Defaults to DEFAULT_CFG.
    overrides (dict, optional): Configuration overrides. Defaults to None.
# 新增=======================================
if overrides and "Distillation" in overrides:
    self.Distillation = overrides["Distillation"]
    overrides.pop("Distillation")
else:
    self.Distillation = None
if overrides and "loss_type" in overrides:
    self.loss_type = overrides['loss_type']
    overrides.pop("loss_type")
else:
    self.loss_type = 'None'
# 新增=======================================
self.args = get_cfg(cfg, overrides)
修改了接口处之后,在加载当前学生模型的时候,同时对教师模型进行处理。trainer.py修改481行
def _setup_train(self, world_size):
    """Builds dataloaders and optimizer on correct rank process."""

    # Model
    self.run_callbacks("on_pretrain_routine_start")
    ckpt = self.setup_model()
    self.model = self.model.to(self.device)
    # 新增=======================================
    if self.Distillation is not None:
    #    for k, v in self.Distillation.model.named_parameters():
    #        v.requires_grad = True
        self.Distillation = self.Distillation.to(self.device)
    # 新增=======================================
    self.set_model_attributes()
    ...
    ...
这里新增的注释部分是打开教师模型的梯度计算,但是一般我们不需要,然后将教师模型也移动到device上。
    self.amp = bool(self.amp)  # as boolean
    self.scaler = torch.cuda.amp.GradScaler(enabled=self.amp)
    if world_size > 1:
        self.model = nn.parallel.DistributedDataParallel(self.model, device_ids=[RANK], find_unused_parameters=True)
        # 新增=======================================
        if self.Distillation is not None:
            self.Distillation = nn.parallel.DistributedDataParallel(self.Distillation, device_ids=[RANK])
            self.Distillation.eval()
        # 新增=======================================
    # Check imgsz
然后在_setup_train函数的521行进行分布式训练模型处理的时候,将教师模型做同样的处理。
然后是增加蒸馏损失,这一块我们可以添加到_do_train函数中。
if self.args.close_mosaic:
    base_idx = (self.epochs - self.args.close_mosaic) * nb
    self.plot_idx.extend([base_idx, base_idx + 1, base_idx + 2])
# 新增=======================================
if self.Distillation is not None:
    distillation_loss = Distillation_loss(self.model, self.Distillation, distiller=self.loss_type)
epoch = self.start_epoch
self.optimizer.zero_grad()  # zero any resumed gradients to ensure stability on train start
while True:
    self.epoch = epoch
    self.run_callbacks("on_train_epoch_start")
这里Distillation_loss传入学生模型和教师模型,以及蒸馏损失的类型,该类实现如下:
class Distillation_loss:
    def __init__(self, modeln, modelL, distiller="CWDLoss"):  # model must be de-paralleled

        self.distiller = distiller
        # layers = ["2","4","6","8","12","15","18","21"]
        layers = ["6", "8", "12", "15", "18", "21"]
        # layers = ["15","18","21"]

        # get channels_s, channels_t from modelL and modeln
        channels_s = []
        channels_t = []
        for name, ml in modelL.named_modules():
            if name is not None:
                name = name.split(".")
                if name[0] == "module":
                    name.pop(0)
                if len(name) == 3:
                    if name[1] in layers:
                        if "cv2" in name[2]:
                            channels_t.append(ml.conv.out_channels)
        for name, ml in modeln.named_modules():
            if name is not None:
                name = name.split(".")
                if name[0] == "module":
                    name.pop(0)
                if len(name) == 3:
                    if name[1] in layers:
                        if "cv2" in name[2]:
                            channels_s.append(ml.conv.out_channels)
        nl = len(layers)
        channels_s = channels_s[-nl:]
        channels_t = channels_t[-nl:]
        self.D_loss_fn = FeatureLoss(channels_s=channels_s, channels_t=channels_t, distiller=distiller[:3])

        self.teacher_module_pairs = []
        self.student_module_pairs = []
        self.remove_handle = []

        for mname, ml in modelL.named_modules():
            if mname is not None:
                name = mname.split(".")
                if name[0] == "module":
                    name.pop(0)
                if len(name) == 3:
                    if name[1] in layers:
                        if "cv2" in mname:
                            self.teacher_module_pairs.append(ml)

        for mname, ml in modeln.named_modules():

            if mname is not None:
                name = mname.split(".")
                if name[0] == "module":
                    name.pop(0)
                if len(name) == 3:
                    # print(mname)
                    if name[1] in layers:
                        if "cv2" in mname:
                            self.student_module_pairs.append(ml)

    def register_hook(self):
        self.teacher_outputs = []
        self.origin_outputs = []

        def make_layer_forward_hook(l):
            def forward_hook(m, input, output):
                l.append(output)

            return forward_hook

        for ml, ori in zip(self.teacher_module_pairs, self.student_module_pairs):
            # 为每层加入钩子,在进行Forward的时候会自动将每层的特征传送给model_outputs和origin_outputs
            self.remove_handle.append(ml.register_forward_hook(make_layer_forward_hook(self.teacher_outputs)))
            self.remove_handle.append(ori.register_forward_hook(make_layer_forward_hook(self.origin_outputs)))

    def get_loss(self):
        quant_loss = 0
        # for index, (mo, fo) in enumerate(zip(self.teacher_outputs, self.origin_outputs)):
        #     print(mo.shape,fo.shape)
        # quant_loss += self.D_loss_fn(mo, fo)
        quant_loss += self.D_loss_fn(y_t=self.teacher_outputs, y_s=self.origin_outputs)
        if self.distiller != 'cwd':
            quant_loss *= 0.3
        self.teacher_outputs.clear()
        self.origin_outputs.clear()
        return quant_loss

    def remove_handle_(self):
        for rm in self.remove_handle:
            rm.remove()
这个类里面指定了一些要进行蒸馏的层,然后定义了一个注册每一层的钩子的函数,这样每一层前向传播完会得到所有层的特征,这些特征传入FeatureLoss类,进行特征损失计算。FeatureLoss类如下:
class FeatureLoss(nn.Module):
    def __init__(self, channels_s, channels_t, distiller='mgd', loss_weight=1.0):
        super(FeatureLoss, self).__init__()
        self.loss_weight = loss_weight
        self.distiller = distiller

        device = 'cuda' if torch.cuda.is_available() else 'cpu'
        self.align_module = nn.ModuleList([
            nn.Conv2d(channel, tea_channel, kernel_size=1, stride=1, padding=0).to(device)
            for channel, tea_channel in zip(channels_s, channels_t)
        ])
        self.norm = [
            nn.BatchNorm2d(tea_channel, affine=False).to(device)
            for tea_channel in channels_t
        ]
        self.norm1 = [
            nn.BatchNorm2d(set_channel, affine=False).to(device)
            for set_channel in channels_s
        ]

        if distiller == 'mgd':
            self.feature_loss = MGDLoss(channels_s, channels_t)
        elif distiller == 'cwd':
            self.feature_loss = CWDLoss(channels_s, channels_t)
        else:
            raise NotImplementedError

    def forward(self, y_s, y_t):
        assert len(y_s) == len(y_t)
        tea_feats = []
        stu_feats = []

        for idx, (s, t) in enumerate(zip(y_s, y_t)):
            if self.distiller == 'cwd':
                s = self.align_module[idx](s)
                s = self.norm[idx](s)
            else:
                s = self.norm1[idx](s)
            t = self.norm[idx](t)
            tea_feats.append(t)
            stu_feats.append(s)

        loss = self.feature_loss(stu_feats, tea_feats)
        return self.loss_weight * loss
上面DistillationLoss和FeatureLoss两个类呢我们单独放到trainer.py文件开头。
回到_do_train函数,在前面声明了distillation_loss实例之后,首先我们为教师模型和学生模型注册钩子函数,这个必须在模型调用之前,因此放在了for循环训练之前。
self.tloss = None
# 新增=======================================
if self.Distillation is not None:
    distillation_loss.register_hook()
# 新增=======================================
for i, batch in pbar:
    self.run_callbacks("on_train_batch_start")
	# Warmup
然后就是模型计算损失的部分,如下:
self.tloss = (
    (self.tloss * i + self.loss_items) / (i + 1) if self.tloss is not None else self.loss_items
)
# 新增=======================================
if self.Distillation is not None:
    distill_weight = ((1 - math.cos(i * math.pi / len(self.train_loader))) / 2) * (0.1 - 1) + 1
    with torch.no_grad():
        pred = self.Distillation(batch['img'])

    self.d_loss = distillation_loss.get_loss()
    self.d_loss *= distill_weight
    if i == 0:
    	print(self.d_loss, '-----------------')
	    print(self.loss, '-----------------')
    self.loss += self.d_loss
# 新增=======================================
这里呢,设置了蒸馏损失的权重,大致是下面的曲线。然后把蒸馏损失加到原损失上即可。注意,在教师模型推理的时候,用了with torch.no_grad()包装,因为不需要训练教师模型,也就不计算梯度,这样做可以减少显存消耗。
最后,模型train完一轮,需要把钩子函数给去掉,如下:
        if self.args.plots and ni in self.plot_idx:
            self.plot_training_samples(batch, ni)

    self.run_callbacks("on_train_batch_end")
# 新增=======================================
if self.Distillation is not None:
    distillation_loss.remove_handle_()
self.lr = {f"lr/pg{ir}": x["lr"] for ir, x in enumerate(self.optimizer.param_groups)}  # for loggers
self.run_callbacks("on_train_epoch_end")
至此,所有要修改的地方都改完了。此时,使用如下语句训练即可
self.yolo.train(data="diagram.yaml", Distillation=model_t.model, loss_type=loss_type, amp=False, imgsz=640,
                        epochs=100, batch=20, device=0, workers=4, lr0=0.001)
为了代码简洁方便,对稀疏训练、剪枝和蒸馏做了封装,形成如下类:
import os
from tqdm import tqdm
from prune import prune_model
from relation import find_parent_nodes, visualize_nodes, metric
from ultralytics import YOLO


class PruneModel:
    def __init__(self, weights="weights/last.pt"):
        # Load a model
        self.yolo = YOLO(weights)

    def prune(self, factor=0.7, save_dir="weights/prune.pt"):
        prune_model(self.yolo, save_dir, factor)

    def train(self, save_dir="weights/retrain.pt"):
        self.yolo.train(data='diagram.yaml', Distillation=None, loss_type='None', amp=False, imgsz=640,
                        epochs=50, batch=20, device=1, workers=4, name="default")
        self.yolo.save(save_dir)

    def sparse_train(self, save_dir='weight/sparse.pt'):
        self.yolo.train(data='diagram.yaml', Distillation=None, loss_type='sparse', amp=False, imgsz=640,
                        epochs=50, batch=20, device=0, workers=4, name="sparse")
        self.yolo.save(save_dir)

    def distill(self, t_weight, loss_type='mgd', save_dir="weights/distill.pt"):
        model_t = YOLO(t_weight)
        self.yolo.train(data="diagram.yaml", Distillation=model_t.model, loss_type=loss_type, amp=False, imgsz=640,
                        epochs=100, batch=20, device=0, workers=4, lr0=0.001)
        self.yolo.save(save_dir)

    def export(self, **kwargs):
        self.yolo.export(**kwargs)

    @staticmethod
    def compare(weights=None):
        # 统计压缩前后的参数量,精度,计算量
        if weights is None:
            weights = []
        results = []
        for weight in weights:
            yolo = YOLO(weight)
            metric = yolo.val(data='diagram.yaml', imgsz=640)
            n_l, n_p, n_g, flops = yolo.info()
            acc = metric.box.map
            results.append((weight, n_l, n_p, n_g, flops, acc))
        for weight, layer, n_p, n_g, flops, acc in results:
            print(f"Weight: {weight}, Acc: {acc}, Params: {n_p}, FLOPs: {flops}")

    def predict(self, source):
        results = self.yolo.predict(source)[0]
        nodes = results.boxes.xyxy
        nodes = nodes.tolist()
        ori_img = results.orig_img
        parent_nodes = find_parent_nodes(nodes)
        visualize_nodes(ori_img, nodes, parent_nodes)

    def evaluate(self, data_path):
        bboxes_list = []
        pred_bboxes_list = []
        parent_ids_list = []
        pred_parent_ids_list = []

        imgs_path = os.path.join(data_path, "images/val")
        labels_path = os.path.join(data_path, "plabels/val")

        # 读取标注文件
        for img in tqdm(os.listdir(imgs_path)):
            img_path = os.path.join(imgs_path, img)

            # 检查文件后缀并构建相应的标注文件路径
            if img.endswith(".png"):
                label_path = os.path.join(labels_path, img.replace(".png", ".txt"))
            elif img.endswith(".webp"):
                label_path = os.path.join(labels_path, img.replace(".webp", ".txt"))
            else:
                continue

            with open(label_path, "r") as f:
                lines = f.readlines()

            results = self.yolo.predict(img_path)[0]
            pred_bboxes = results.boxes.xyxy
            pred_bboxes = pred_bboxes.tolist()
            pred_bboxes_list.append(pred_bboxes)
            pred_parent_ids = find_parent_nodes(pred_bboxes)
            pred_parent_ids_list.append(pred_parent_ids)
            ih, iw = results.orig_img.shape[:2]
            bboxes = []
            parent_ids = []
            for line in lines:
                line = line.strip().split()
                x, y, w, h, px, py, pw, ph, p = map(float, line[1:])
                x1, y1, x2, y2 = int((x - w / 2) * iw), int((y - h / 2) * ih), int((x + w / 2) * iw), int(
                    (y + h / 2) * ih)
                bboxes.append((x1, y1, x2, y2))
                parent_ids.append(int(p))
            bboxes_list.append(bboxes)
            parent_ids_list.append(parent_ids)
        precision, recall, f1_score = metric(bboxes_list, pred_bboxes_list, parent_ids_list, pred_parent_ids_list)
        print(f"Precision: {precision}")
        print(f"Recall: {recall}")
        print(f"F1 Score: {f1_score}")

if __name__ == '__main__':
    model = PruneModel("weights/yolov8n.pt")
    model.sparse_train("weights/sparse.pt")
    model.prune(factor=0.2, save_dir="weights/prune.pt")
    model.train()
    model.distill("weights/sparse.pt", loss_type="mgd")
    model.evaluate("datasets/diagram")
    model.predict("datasets/diagram/images/val/0593.png")