目录
- 环境和工程搭建
- 开发环境安装
- JDK
- JDK版本介绍
- JDK17安装
- Windows
- Linux - Ubuntu
- Linux - CentOs
- MySQL安装
- Ubuntu
- CentOS
- 案例介绍
- 需求
- 服务拆分
- 服务拆分原则
- 服务拆分示例
- 数据准备
- 工程搭建
- 构建父子工程
- 创建父工程
- DependencyManagement 和 Dependencies
- Spring Cloud版本
- 创建子项目-订单服务
- 创建子项目-商品服务
- 完善订单服务
- 完善启动类, 配置文件
- 业务代码
- 测试
- 完善商品服务
- 完善启动类, 配置文件
- 业务代码
- 测试
- 远程调用
- 需求
- 实现
- 测试
- RestTemplate
- 什么是 REST?
- 什么是 RESTful?
- RESTful 实践
- 项目存在问题
环境和工程搭建
Spring Cloud 是分布式微服务架构的⼀站式解决⽅案, 也可以理解为Spring Cloud是帮助我们管理这些微服务的, 那么在学习Spring Cloud之前, 我们需要先具备⼀些微服务.
开发环境安装
JDK
JDK版本介绍
Oracle从JDK9开始每半年发布⼀个新版本, 新版本发布后, ⽼版本就不再进⾏维护. 但是会有⼏个⻓期维护的版本.
⽬前⻓期维护的版本有: JDK8, JDK11, JDK17, JDK21
在 JDK版本的选择上,尽量选择⻓期维护的版本.
为什么选择JDK17?
Spring Cloud 是基于 SpringBoot 进⾏开发的, SpringBoot 3.X以下的版本, Spring官⽅已不再进⾏维护(还可以继续使⽤), SpringBoot 3.X的版本, 使⽤的JDK版本基线为JDK17. 鉴于JDK21 是2023.09⽉发布的, 很多功能还没有在⽣产环境验证, 所以选择使⽤JDK17来学习
JDK17安装
Windows
- 下载JDK
下载地址: https://www.oracle.com/java/technologies/downloads/#java17
Windows环境下载:
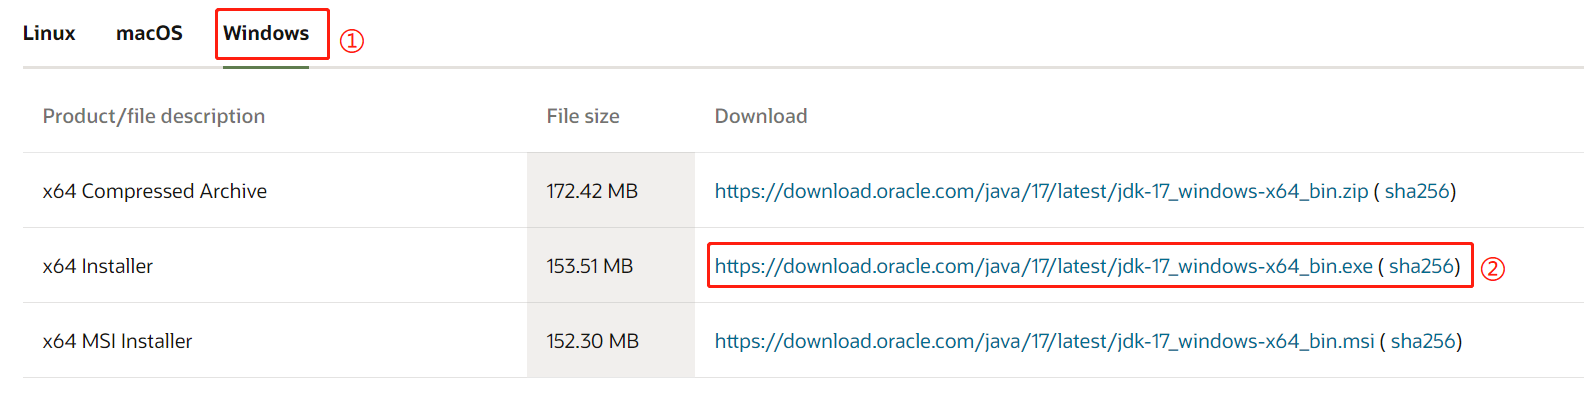
- 安装JDK
双击运⾏exe⽂件, 选择安装⽬录(D:\Program Files\Java\jdk-17\), 直⾄安装完成.

- 配置环境变量
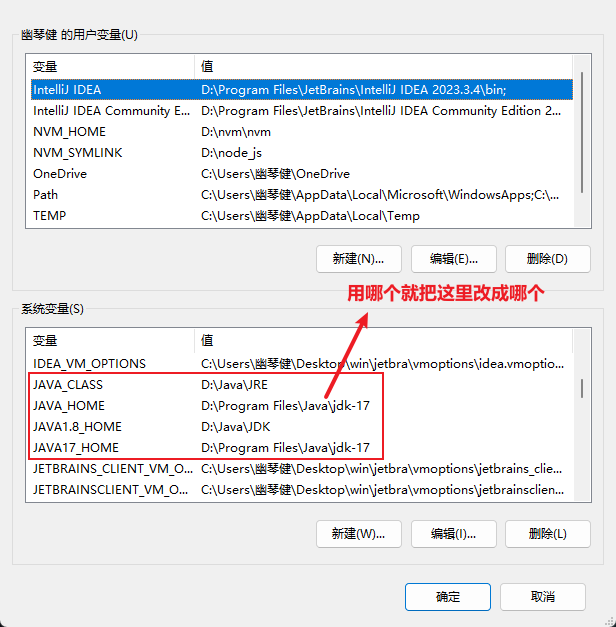
配置JAVA_HOME
| 变量名 | 变量值 |
|---|---|
| JAVA_HOME | D:\Program Files\Java\jdk-17 |
在Path中添加 JAVA_HOME 的值
在系统环境变量中找到Path,点击编辑->新建,加上变量值 %JAVA_HOME%\bin
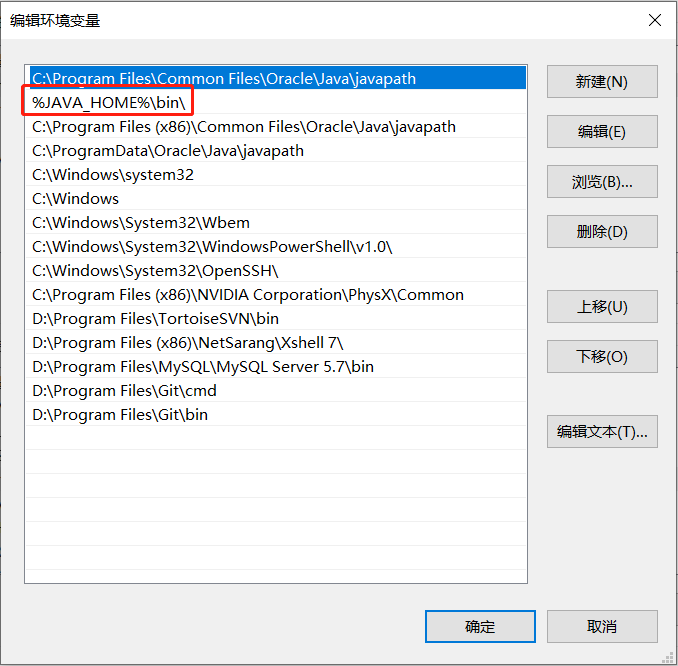
这里最好也区分一下 JDK1.8 和 JDK17
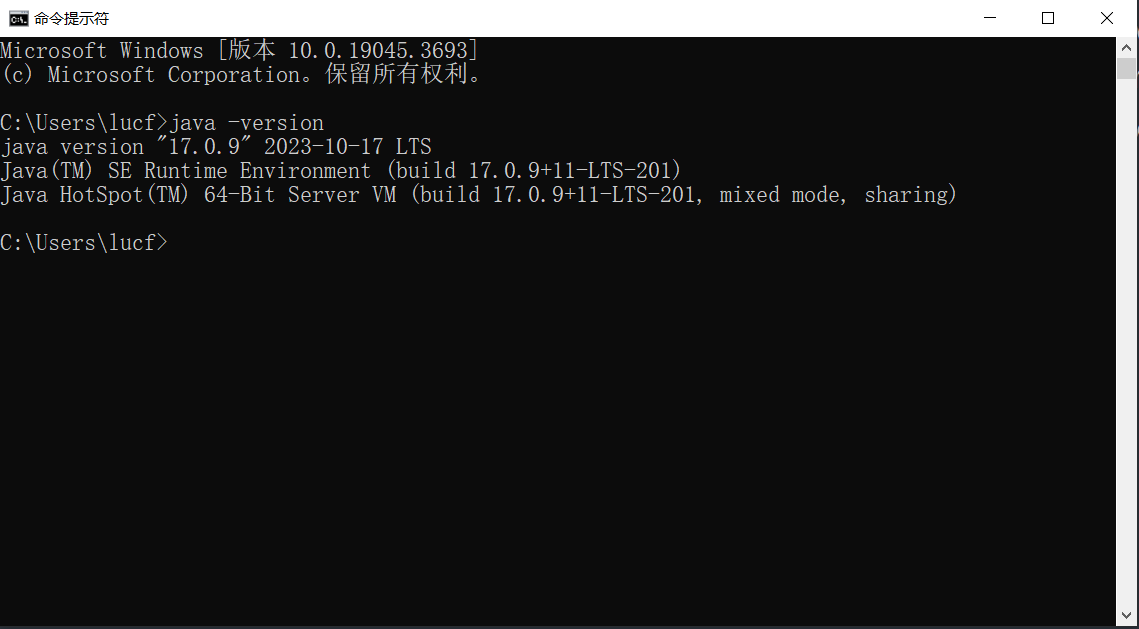
验证
在 cmd 中输⼊ java -version , 确认JDK是否安装和配置成功
Linux - Ubuntu
这里用的是 Ubuntu20.4
- 安装JDK
更新软件包
sudo apt update
安装JDK
sudo apt install openjdk-17-jdk
Linux上安装的JDK为OpenJDK
OpenJDK是Oracle JDK的开放源码版本, Oracle公司每次发布JDK新版本时, 会发布两个版本: ⼀个是
Oracle JDK(加了⼀些Oracle公司商业技术) , 另⼀个是OpenJDK(纯净版).
OpenJDK在功能上, ⼏乎可以认为⼀模⼀样, 学习阶段使⽤OpenJDK就可以.
- 确定JDK版本
输⼊ java -version , 确认JDK版本

检查安装的是哪个OpenJDK
# dpkg --list | grep -i jdk
移除 openjdk包:
# apt-get purge openjdk*
卸载 OpenJDK 相关包:
# apt-get purge icedtea-* openjdk-*
检查所有 OpenJDK包是否都已卸载完毕:
# dpkg --list | grep -i jdk
Linux - CentOs
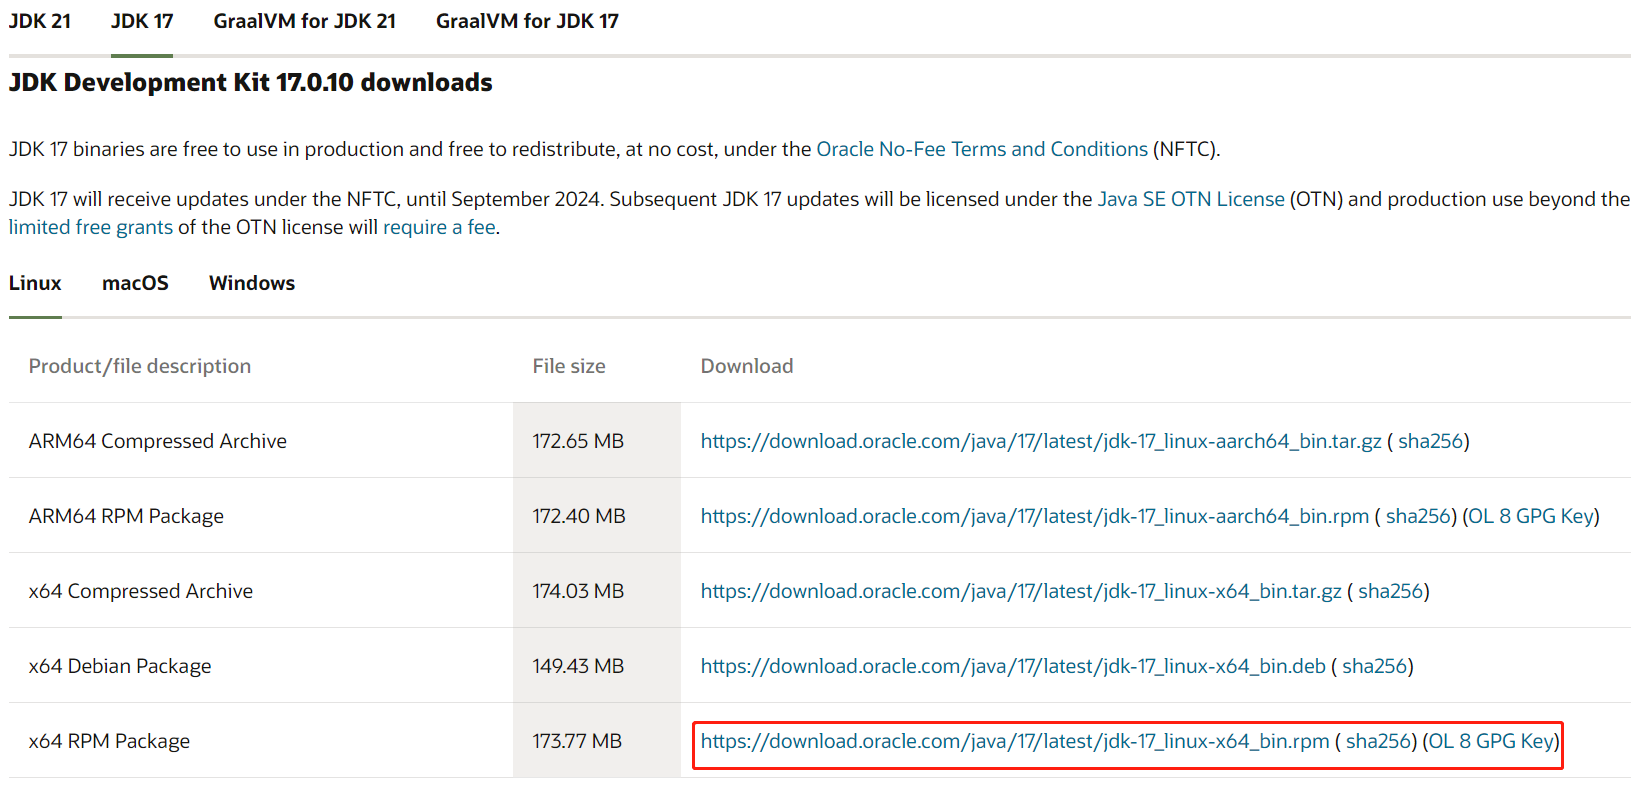
- 下载JDK
wget https://download.oracle.com/java/17/latest/jdk-17_linux-x64_bin.rpm
获取链接⽅式
https://www.oracle.com/java/technologies/downloads/#java17
- 安装JDK
yum -y install jdk-17_linux-x64_bin.rpm
- 验证JDK
[root@VM-0-17-centos spring-cloud]# java -version
java version "17.0.10" 2024-01-16 LTS
Java(TM) SE Runtime Environment (build 17.0.10+11-LTS-240)
Java HotSpot(TM) 64-Bit Server VM (build 17.0.10+11-LTS-240, mixed mode, sharing)
MySQL安装
Ubuntu
- 使⽤apt安装MySQL
#查找安装包
apt list |grep "mysql-server"

#安装mysql
sudo apt install mysql-server
执行结果
root@bite:~# apt list | grep "mysql-server"  # 查找 mysql 的安装包

WARNING: apt does not have a stable CLI interface. Use with caution in scripts.

default-mysql-server-core/focal,focal 1.0.5ubuntu2 all
default-mysql-server/focal,focal 1.0.5ubuntu2 all
mysql-server-8.0/focal-updates,focal-security 8.0.35-0ubuntu0.20.04.1 amd64
mysql-server-8.0/focal-updates,focal-security 8.0.35-0ubuntu0.20.04.1 i386
mysql-server-core-8.0/focal-updates,focal-security 8.0.35-0ubuntu0.20.04.1 amd64
mysql-server-core-8.0/focal-updates,focal-security 8.0.35-0ubuntu0.20.04.1 i386
mysql-server/focal-updates,focal-updates,focal-security,focal-security 8.0.35-0ubuntu0.20.04.1 all

ubuntu@VM-24-3-ubuntu:~$ sudo apt install mysql-server  # 输入安装命令

Reading package lists... Done
Building dependency tree... Done
Reading state information... Done
...
After this operation, 243 MB of additional disk space will be used.
Do you want to continue? [Y/n] Y  # 输入 Y 确认

emitting matrix : 100% |###########################################|

done!
update-alternatives: using /var/lib/mecab/dic/ipadic-utf8 to provide /var/lib/mecab/dic/debian (mecab-dictionary) in auto mode
Setting up libhtml-parser-perl:amd64 (3.76-1build2) ...
Setting up libhttp-message-perl (6.36-1) ...
Setting up mysql-server (8.0.35-0ubuntu0.22.04.1) ...
Setting up libcgi-pm-perl (4.54-1) ...
Setting up libhtml-template-perl (2.97-1.1) ...
Setting up libcgi-fast-perl (1:2.15-1) ...
Processing triggers for man-db (2.10.2-1) ...
Processing triggers for libc-bin (2.35-0ubuntu3.4) ...
- 查看MySQL状态
sudo systemctl status mysql
执行结果
root@bite:~# apt list | grep "mysql-server"  # 查找 mysql 的安装包

WARNING: apt does not have a stable CLI interface. Use with caution in scripts.

default-mysql-server-core/focal,focal 1.0.5ubuntu2 all
default-mysql-server/focal,focal 1.0.5ubuntu2 all
mysql-server-8.0/focal-updates,focal-security 8.0.35-0ubuntu0.20.04.1 amd64
mysql-server-8.0/focal-updates,focal-security 8.0.35-0ubuntu0.20.04.1 i386
mysql-server-core-8.0/focal-updates,focal-security 8.0.35-0ubuntu0.20.04.1 amd64
mysql-server-core-8.0/focal-updates,focal-security 8.0.35-0ubuntu0.20.04.1 i386
mysql-server/focal-updates,focal-updates,focal-security,focal-security 8.0.35-0ubuntu0.20.04.1 all

ubuntu@VM-24-3-ubuntu:~$ sudo apt install mysql-server  # 输入安装命令

Reading package lists... Done
Building dependency tree... Done
Reading state information... Done
...
After this operation, 243 MB of additional disk space will be used.
Do you want to continue? [Y/n] Y  # 输入 Y 确认

emitting matrix : 100% |###########################################|

done!
update-alternatives: using /var/lib/mecab/dic/ipadic-utf8 to provide /var/lib/mecab/dic/debian (mecab-dictionary) in auto mode
Setting up libhtml-parser-perl:amd64 (3.76-1build2) ...
Setting up libhttp-message-perl (6.36-1) ...
Setting up mysql-server (8.0.35-0ubuntu0.22.04.1) ...
Setting up libcgi-pm-perl (4.54-1) ...
Setting up libhtml-template-perl (2.97-1.1) ...
Setting up libcgi-fast-perl (1:2.15-1) ...
Processing triggers for man-db (2.10.2-1) ...
Processing triggers for libc-bin (2.35-0ubuntu3.4) ...
- MySQL 安装安全设置
默认的 MySQL 设置是不安全的, MySQL 安装提供了⼀个安全脚本, ⽤于解决不太安全的默认选项.
运⾏以下命令:
sudo mysql_secure_installation
接下来按照提⽰输⼊:
root@hcss-ecs-0bb1:~# sudo mysql_secure_installation #安装安全设置

Securing the MySQL server deployment.

Connecting to MySQL using a blank password.

VALIDATE PASSWORD COMPONENT can be used to test passwords
and improve security. It checks the strength of password
and allows the users to set only those passwords which are
secure enough. Would you like to setup VALIDATE PASSWORD component?

Press y|Y for Yes, any other key for No: Y #是否设置验证密码组件

There are three levels of password validation policy:

LOW    Length >= 8
MEDIUM Length >= 8, numeric, mixed case, and special characters
STRONG Length >= 8, numeric, mixed case, special characters and dictionary file

Please enter 0 = LOW, 1 = MEDIUM and 2 = STRONG: 2 #设置密码强度

Skipping password set for root as authentication with auth_socket is used by default.
If you would like to use password authentication instead, this can be done with the "ALTER_USER" command.
See https://dev.mysql.com/doc/refman/8.0/en/alter-user.html#alter-user-password-management for more information.

By default, a MySQL installation has an anonymous user,
allowing anyone to log into MySQL without having to have
a user account created for them. This is intended only for
testing, and to make the installation go a bit smoother.
You should remove them before moving into a production environment.

Remove anonymous users? (Press y|Y for Yes, any other key for No) : Y #默认情况下,MySQL安装有一个匿名用户, 允许任何人登录MySQL. 是否删除匿名用户?
Success.

Normally, root should only be allowed to connect from
'localhost'. This ensures that someone cannot guess at
the root password from the network.

Disallow root login remotely? (Press y|Y for Yes, any other key for No) : Y #仅应允许root从'localhost'连接
Success.

By default, MySQL comes with a database named 'test' that
anyone can access. This is also intended only for testing,
and should be removed before moving into a production environment.

Remove test database and access to it? (Press y|Y for Yes, any other key for No) : Y #默认情况下, MySQL带有一个test数据库, 是否删除?
- Dropping test database...
Success.

- Removing privileges on test database...
Success.

Reloading the privilege tables will ensure that all changes
made so far will take effect immediately.

Reload privilege tables now? (Press y|Y for Yes, any other key for No) : Y #是否现在加载配置, 使刚才的修改生效?
Success.

All done!
- 设置密码
连接mysql服务器
sudo mysql
使⽤alter user 命令修改密码
--密码强度为2时, 密码要包含⼤⼩写字符, 特殊符号
ALTER USER 'root'@'localhost' IDENTIFIED WITH mysql_native_password BY 'BITE@yyds.666';
卸载MySQL
# 停止 MySQL
sudo systemctl stop mysql

# 卸载 MySQL
sudo apt-get remove --purge mysql-server mysql-client mysql-common

# 删除 MySQL 配置文件和数据
sudo rm -rf /etc/mysql /var/lib/mysql

# 清理残留文件和目录
sudo apt-get autoremove
sudo apt-get autoclean

# 验证卸载结果
mysql --version
CentOS
- 确认当前的系统版本
不同的系统版本对应的MySQL安装版本不同, 需要先确认系统版本
[root@VM-0-17-centos ~]# cat /etc/redhat-release
CentOS Linux release 7.6.1810 (Core)
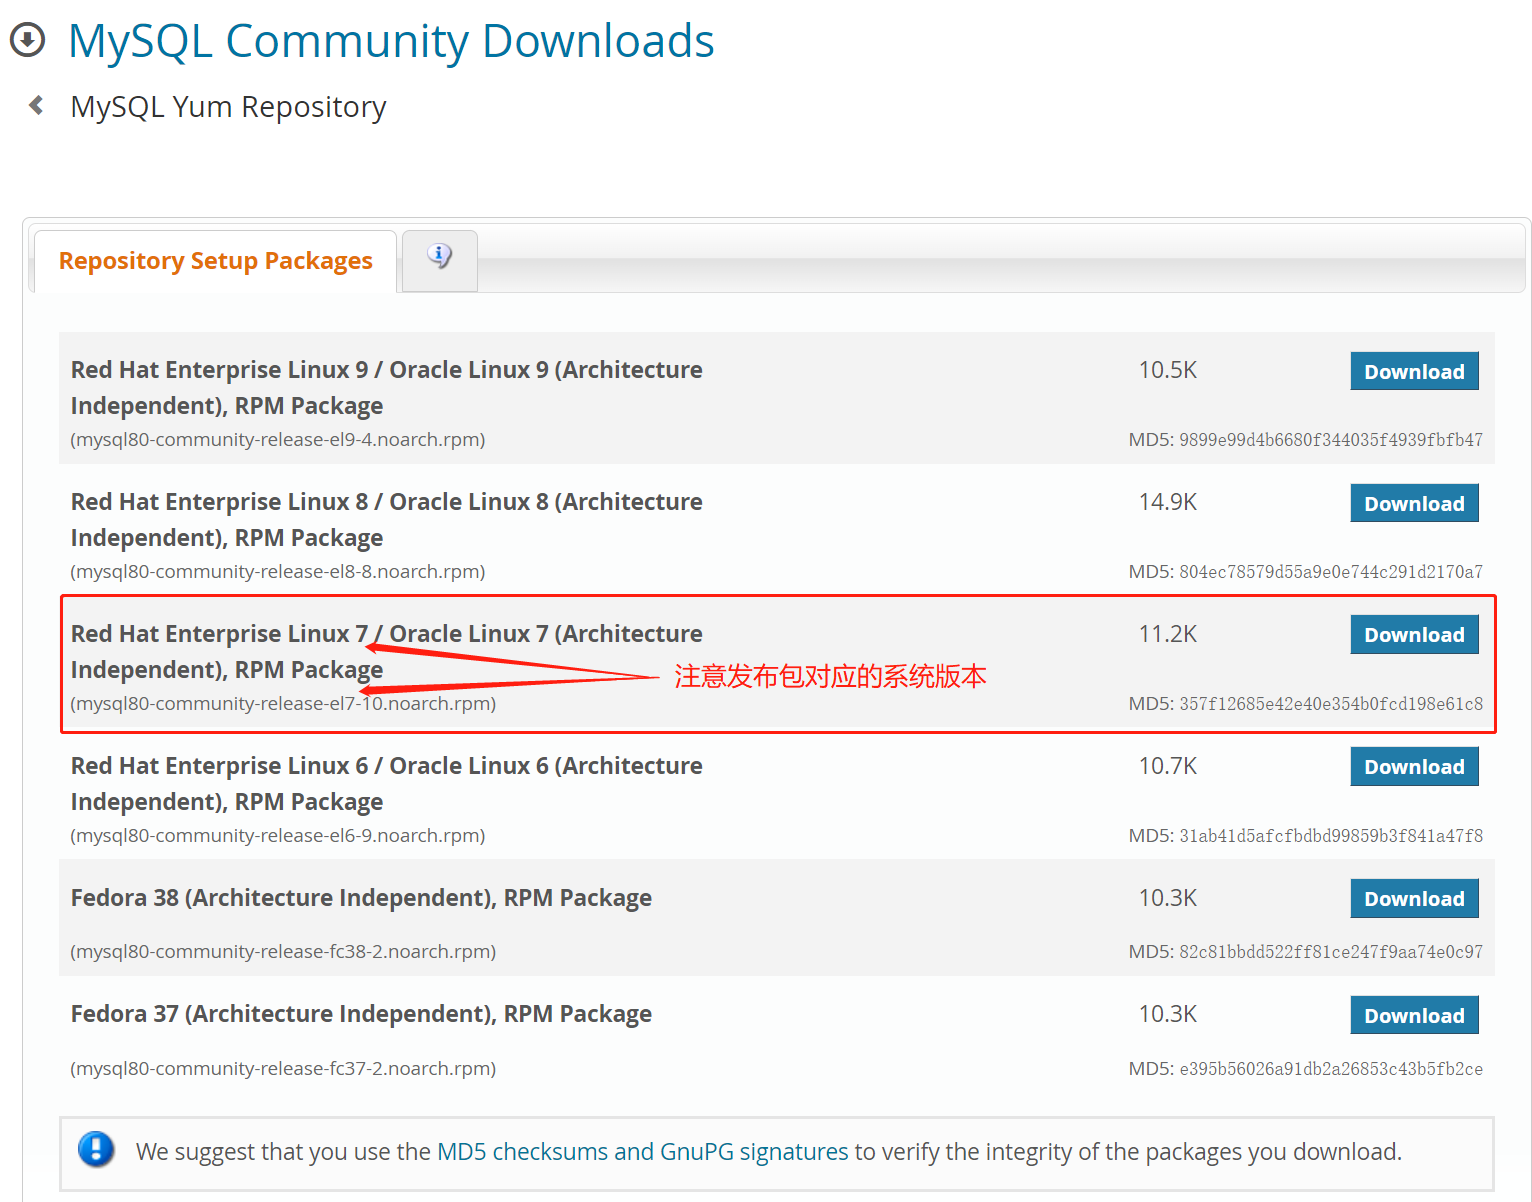
- 下载MySQL源
[root@VM-0-17-centos ~]# wget https://dev.mysql.com/get/mysql80-communityrelease-el7-11.noarch.rpm
MySQL源地址查找⽅法:
- 访问MySQL开发者专区:https://dev.mysql.com/downloads/repo/yum
- 点击Download,右键复制链接
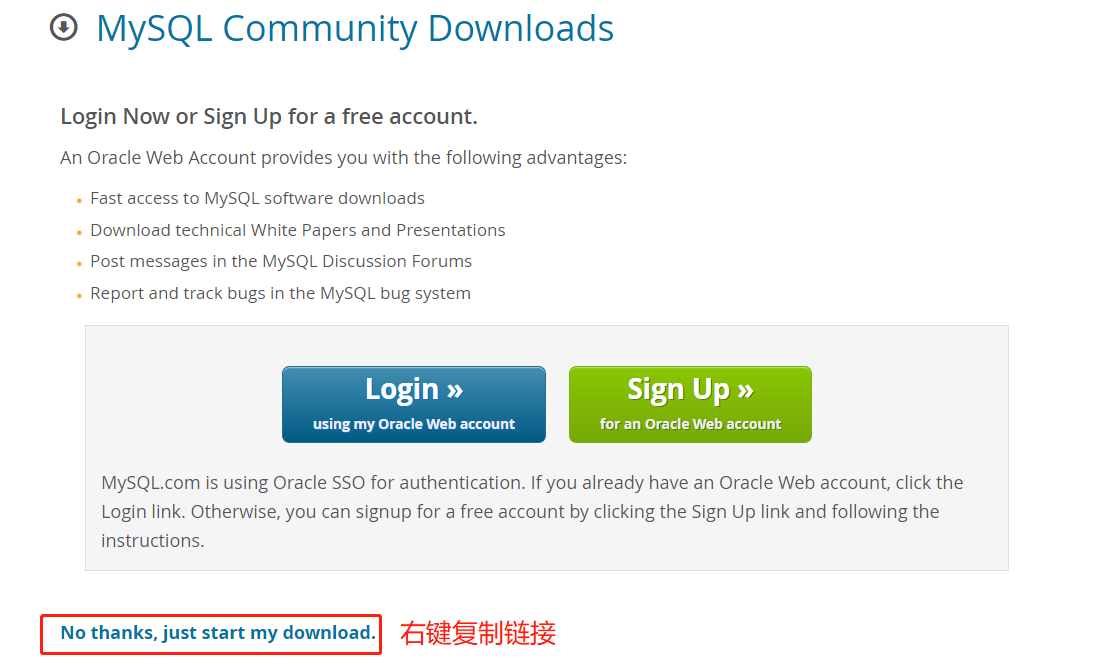
- 安装MySQL
# 安装发布包
yum -y install mysql80-community-release-el7-11.noarch.rpm

# 安装 MySQL,过程中输入 Y 确认
yum install mysql-community-server
- 启动mysql
systemctl start mysqld
- 查看MySQL状态
● mysqld.service - MySQL Server
   Loaded: loaded (/usr/lib/systemd/system/mysqld.service; enabled; vendor preset: disabled)
   Active: active (running) since 一 2024-01-29 18:43:59 CST; 30s ago
     Docs: man:mysqld(8)
           http://dev.mysql.com/doc/refman/en/using-systemd.html
  Process: 2464 ExecStartPre=/usr/bin/mysqld_pre_systemd (code=exited, status=0/SUCCESS)
 Main PID: 2667 (mysqld)
   Status: "Server is operational"
    CGroup: /system.slice/mysqld.service
            └─2667 /usr/sbin/mysqld

1月 29 18:43:53 VM-0-17-centos systemd[1]: Starting MySQL Server...
1月 29 18:43:59 VM-0-17-centos systemd[1]: Started MySQL Server.
- 设置开机⾃启动
systemctl enable mysqld
- 查看mysql密码, 并登录
⾸次安装成功,MySQL把root⽤⼾的默认密码保存在错误⽇志中
[root@VM-0-17-centos ~]# grep "password" /var/log/mysqld.log
2024-01-29T10:43:55.523053Z 6 [Note] [MY-010454] [Server] A temporary password
is generated for root@localhost: &hpkaqO:c4oK #默认⽣成的密码
[root@VM-0-17-centos ~]# mysql -uroot -p
Enter password:
Welcome to the MySQL monitor. Commands end with ; or \g.
Your MySQL connection id is 12
Server version: 8.0.36

Copyright (c) 2000, 2024, Oracle and/or its affiliates.
Oracle is a registered trademark of Oracle Corporation and/or its
affiliates. Other names may be trademarks of their respective
owners.

Type 'help;' or '\h' for help. Type '\c' to clear the current input statement.

mysql>
- 修改密码
mysql> ALTER USER 'root'@'localhost' IDENTIFIED BY 'BITE@yyds.666';
Query OK, 0 rows affected (0.01 sec)
默认安装模式, MySQL对密码强度有⼀定要求, 不能设置的过于简单, 否则会报ERROR
默认要求密码⻓度⼤于8, 且包含⼤写字⺟, ⼩写字⺟, 数字及特殊字符
案例介绍
需求
实现⼀个电商平台(不真实实现, 仅为演⽰)
⼀个电商平台包含的内容⾮常多, 以京东为例, 仅从⾸⻚上就可以看到巨多的功能

我们该如何实现呢? 如果把这些功能全部写在⼀个服务⾥, 这个服务将是巨⼤的.
巨多的会员, 巨⼤的流量, 微服务架构是最好的选择.
微服务应⽤开发的第⼀步, 就是服务拆分. 拆分后才能进⾏"各⾃开发"
服务拆分
服务拆分原则
微服务到底多小才算"微",这个在业界并没有明确的标准。微服务并不是越小越好,服务越小,微服务架构的优点和缺点都会越来越明显。
服务越小,微服务的独立性就会越来越高,但同时,微服务的数量也会越多,管理这些微服务的难度也会提高。所以服务拆分也要考虑场景。
还是以企业管理为例
企业中一个员工的工作内容与企业规模、项目规模等都有关系。
在小公司,一个员工可能需要负责很多部门的事情;而在大公司,一个部门的工作可能需要多个员工来处理。
拆分微服务一般遵循如下原则:
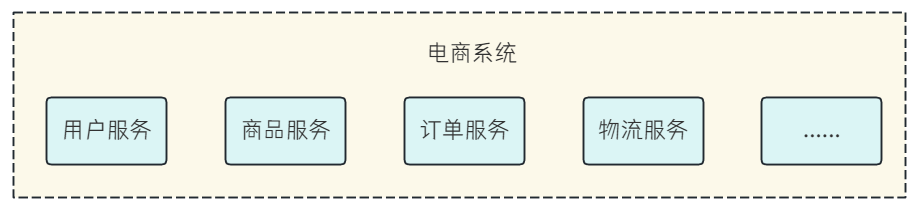
- 单一职责原则
单一职责原则原本是面向对象设计中的一个基本原则,它指的是一个类应该专注于单一功能,不要存在多于一个导致类变更的原因。
在微服务架构中,一个微服务也应该只负责一个功能或业务领域,每个服务应该有清晰的定义和边界,只关注自己的特定业务领域。
组织团队也是,一个人专注做一件事情的效率远高于同时关注多件事情。
比如一个人同时管理和维护一份代码,要比多个人同时维护多份代码的效率高。
例如电商系统:
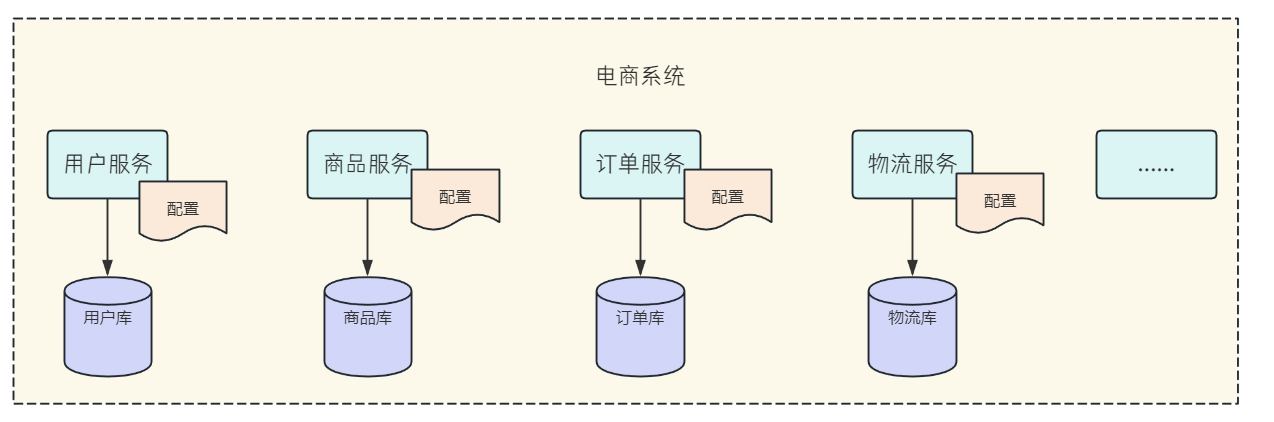
- 服务自治
服务自治是指每个微服务都应该具备高度自治的能力,即每个服务要能做到独立开发、独立测试、独立构建、独立部署、独立运行。
以上面的电商系统为例,每一个微服务应该有自己的存储、配置,在进行开发、构建、部署、运行和测试时,并不需要过多关注其他微服务的状态和数据。
例如企业管理
每个部门负责自己的事情,并且尽可能少的受其他团队影响。
研发部门只负责需求功能的开发,而不负责需求文档的书写和 UI 的设计。并且其他部门的人员变动、流程变更,也尽可能少的影响研发部门。部门和部门之间尽可能自治。
- 单向依赖
微服务之间需要做到单向依赖,严禁循环依赖、双向依赖。
- 循环依赖:A -> B -> C -> A
- 双向依赖:A -> B, B -> A
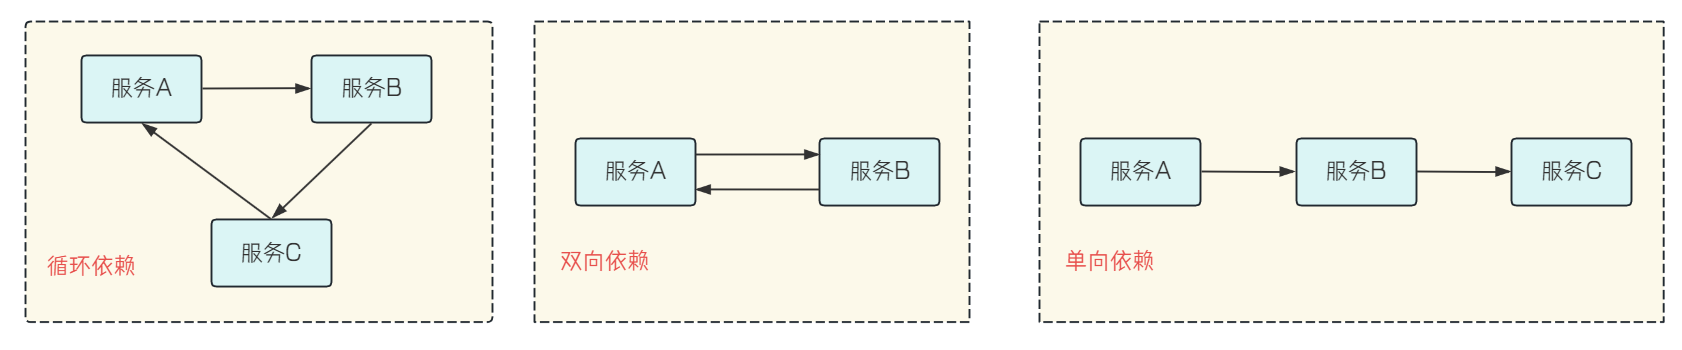
如果一些场景确实无法避免循环依赖或者双向依赖,可以考虑使用消息队列等其他方式来实现。
微服务架构并无标准架构,合适的就是最好的,不然架构师大会也不会各个系统架构百花齐放了。
在架构设计的过程中,坚持"合适优于业界领先",避免"过度设计"(为了设计而设计)。
罗马不是一天建成的,很多业界领先方案并不是一群天才在某个时期一下子做出来的,而是经过数年的发展逐步完善。业界领先的方案大多是"逼"出来的,随着业务的发展,量变导致质变,新的问题出现了,当前的方案无法满足需求,需要用新的方案来解决。通过不断的创新和尝试,业界领先的方案才得以形成。
服务拆分示例
⼀个完整的电商系统是庞⼤的, 当然这也不是我们的重点, 我们重点关注如何使⽤Spring Cloud解决微服务架构中遇到的问题.
以订单列表为例:
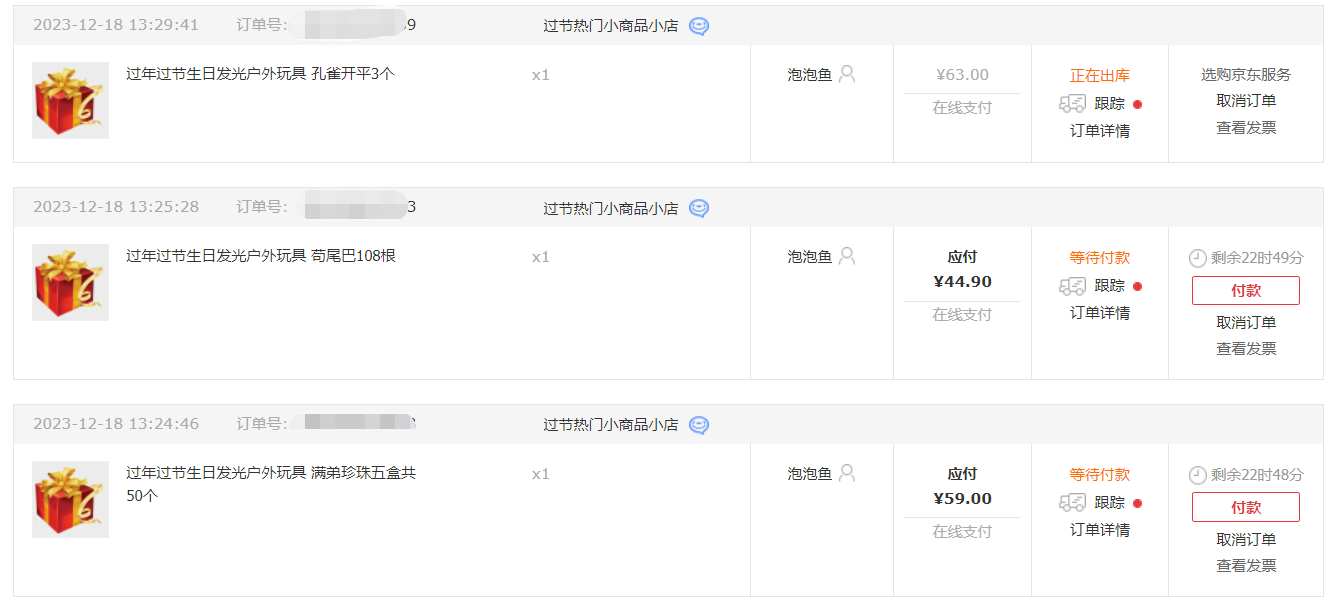
简单来看, 这个⻚⾯提供了以下信息:
- 订单列表
- 商品信息
根据服务的单⼀职责原则, 我们把服务进⾏拆分为: 订单服务, 商品服务
订单服务: 提供订单ID, 获取订单详细信息
商品服务: 根据商品ID, 返回商品详细信息.
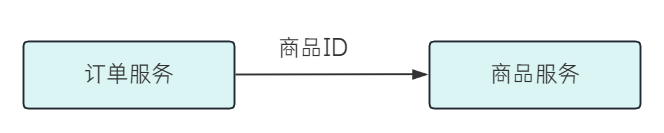
真实的订单服务和我们的并不⼀致, 企业中拆分的粒度更加细, 此处仅为举例
数据准备
根据服务⾃治原则, 每个服务都应有⾃⼰独⽴的数据库
订单服务:
-- 建库
CREATE DATABASE IF NOT EXISTS cloud_order; CHARSET utf8mb4;

use cloud_order;

-- 订单表
DROP TABLE IF EXISTS order_detail;
CREATE TABLE order_detail (
    `id` INT NOT NULL AUTO_INCREMENT COMMENT '订单id',
    `user_id` BIGINT (20) NOT NULL COMMENT '用户ID',
    `product_id` BIGINT (20) NULL COMMENT '产品id',
    `num` INT (10) NULL DEFAULT 0 COMMENT '下单数量',
    `price` BIGINT (20) NOT NULL COMMENT '实付款',
    `delete_flag` TINYINT (4) NULL DEFAULT 0,
    `create_time` DATETIME DEFAULT now(),
    `update_time` DATETIME DEFAULT now(),
    PRIMARY KEY (id)
) ENGINE = INNODB DEFAULT CHARACTER SET = utf8mb4 COMMENT = '订单表';

-- 数据初始化
INSERT INTO order_detail (user_id, product_id, num, price)
VALUES
    (2001, 1001, 1, 99),
    (2002, 1002, 1, 30),
    (2001, 1003, 1, 40),
    (2003, 1004, 3, 58),
    (2004, 1005, 7, 85),
    (2005, 1006, 7, 94);
-- 创建 cloud_product 数据库
CREATE DATABASE IF NOT EXISTS cloud_product CHARSET utf8mb4;

use cloud_product;

-- 产品表
DROP TABLE IF EXISTS product_detail;
CREATE TABLE product_detail (
    `id` INT NOT NULL AUTO_INCREMENT COMMENT '产品id',
    `product_name` VARCHAR (128) NULL COMMENT '产品名称',
    `product_price` BIGINT (20) NOT NULL COMMENT '产品价格',
    `state` TINYINT (4) NULL DEFAULT 0 COMMENT '产品状态 0-有效 1-下架',
    `create_time` DATETIME DEFAULT now(),
    `update_time` DATETIME DEFAULT now(),
    PRIMARY KEY (id)
) ENGINE = INNODB DEFAULT CHARACTER SET = utf8mb4 COMMENT = '产品表';

-- 数据初始化
INSERT INTO product_detail (id, product_name, product_price, state)
VALUES
    (1001, "T恤", 101, 0),
    (1002, "短袖", 30, 0),
    (1003, "短裤", 44, 0),
    (1004, "卫衣", 58, 0),
    (1005, "马甲", 98, 0),
    (1006, "羽绒服", 101, 0),
    (1007, "冲锋衣", 30, 0),
    (1008, "袜子", 44, 0),
    (1009, "鞋子", 58, 0),
    (10010, "毛衣", 98, 0);
工程搭建
构建父子工程
创建父工程
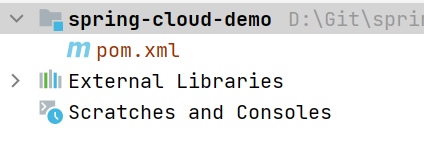
- 创建⼀个空的Maven项⽬, 删除所有代码, 只保留pom.xml
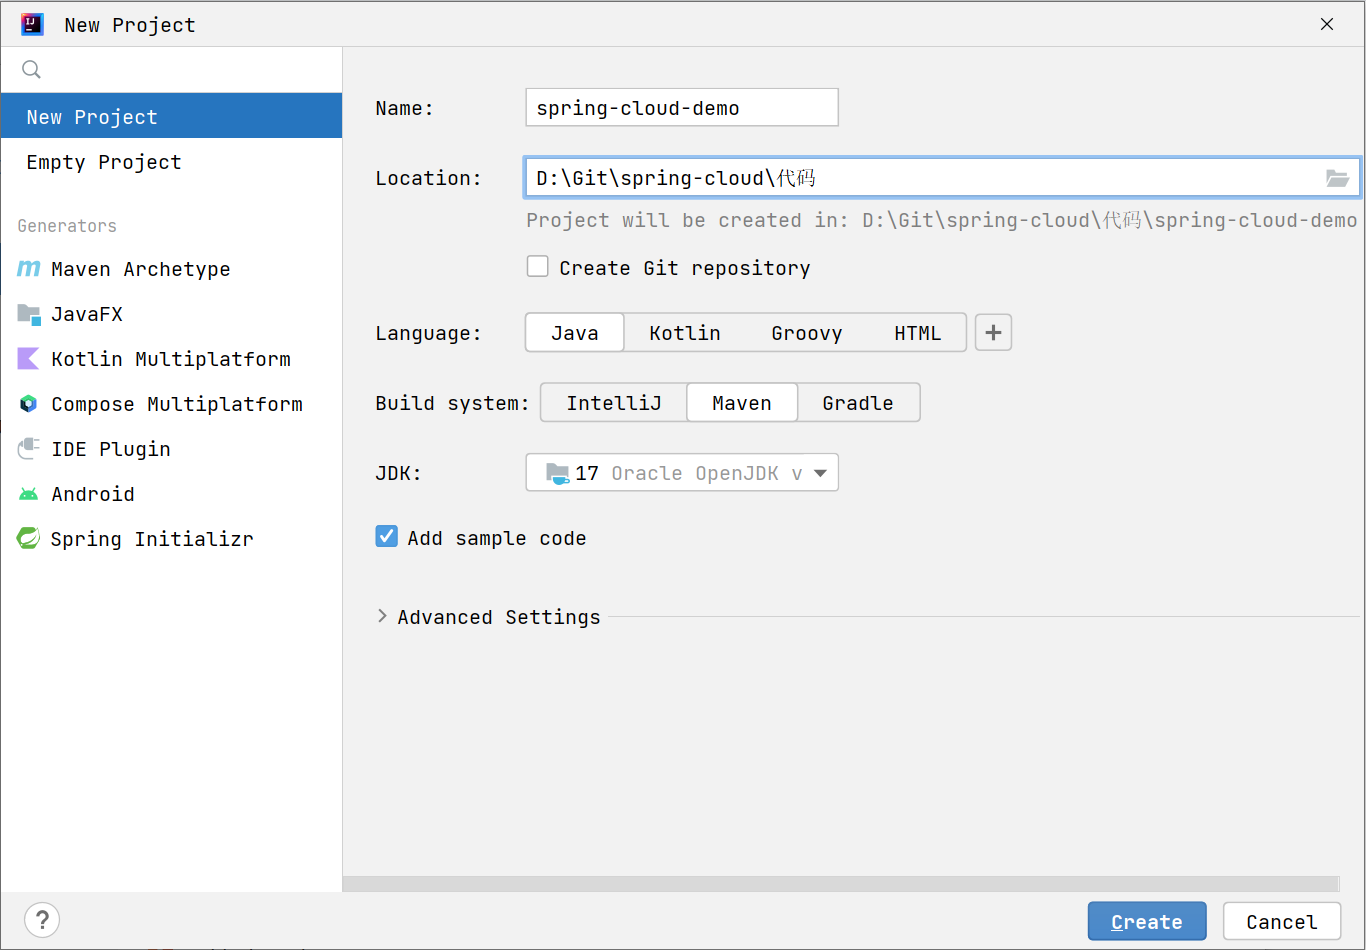
⽬录结构:
创建好以后删除 src 目录
- 完善pom⽂件
使⽤properties来进⾏版本号的统⼀管理, 使⽤dependencyManagement来管理依赖, 声明⽗⼯程的打包⽅式为pom
<?xml version="1.0" encoding="UTF-8"?>
<project xmlns="http://maven.apache.org/POM/4.0.0"
    xmlns:xsi="http://www.w3.org/2001/XMLSchema-instance"
    xsi:schemaLocation="http://maven.apache.org/POM/4.0.0
    http://maven.apache.org/xsd/maven-4.0.0.xsd">

    <modelVersion>4.0.0</modelVersion>

    <groupId>org.example</groupId>
    <artifactId>spring-cloud-demo</artifactId>
    <packaging>pom</packaging>
    <version>1.0-SNAPSHOT</version>

    <parent>
        <groupId>org.springframework.boot</groupId>
        <artifactId>spring-boot-starter-parent</artifactId>
        <version>3.1.6</version>
        <relativePath/> <!-- lookup parent from repository -->
    </parent>

    <properties>
        <maven.compiler.source>17</maven.compiler.source>
        <maven.compiler.target>17</maven.compiler.target>
        <java.version>17</java.version>
        <mybatis.version>3.0.3</mybatis.version>
        <mysql.version>8.0.33</mysql.version>
        <spring-cloud.version>2022.0.3</spring-cloud.version>
    </properties>

    <dependencies>
        <dependency>
            <groupId>org.projectlombok</groupId>
            <artifactId>lombok</artifactId>
            <optional>true</optional>
        </dependency>
    </dependencies>

    <dependencyManagement>
        <dependencies>
            <dependency>
                <groupId>org.springframework.cloud</groupId>
                <artifactId>spring-cloud-dependencies</artifactId>
                <version>${spring-cloud.version}</version>
                <type>pom</type>
                <scope>import</scope>
            </dependency>
            <dependency>
                <groupId>org.mybatis.spring.boot</groupId>
                <artifactId>mybatis-spring-boot-starter</artifactId>
                <version>${mybatis.version}</version>
            </dependency>
            <dependency>
                <groupId>com.mysql</groupId>
                <artifactId>mysql-connector-j</artifactId>
                <version>${mysql.version}</version>
            </dependency>
            <dependency>
                <groupId>org.mybatis.spring.boot</groupId>
                <artifactId>mybatis-spring-boot-starter-test</artifactId>
                <version>${mybatis.version}</version>
                <scope>test</scope>
            </dependency>
        </dependencies>
    </dependencyManagement>
</project>
主要是复制这一部分
<parent>
    <groupId>org.springframework.boot</groupId>
    <artifactId>spring-boot-starter-parent</artifactId>
    <version>3.1.6</version>
    <relativePath/> <!-- lookup parent from repository -->
</parent>

<properties>
    <maven.compiler.source>17</maven.compiler.source>
    <maven.compiler.target>17</maven.compiler.target>
    <java.version>17</java.version>
    <mybatis.version>3.0.3</mybatis.version>
    <mysql.version>8.0.33</mysql.version>
    <spring-cloud.version>2022.0.3</spring-cloud.version>
</properties>

<dependencies>
    <dependency>
        <groupId>org.projectlombok</groupId>
        <artifactId>lombok</artifactId>
        <optional>true</optional>
    </dependency>
</dependencies>

<dependencyManagement>
    <dependencies>
        <dependency>
            <groupId>org.springframework.cloud</groupId>
            <artifactId>spring-cloud-dependencies</artifactId>
            <version>${spring-cloud.version}</version>
            <type>pom</type>
            <scope>import</scope>
        </dependency>
        <dependency>
            <groupId>org.mybatis.spring.boot</groupId>
            <artifactId>mybatis-spring-boot-starter</artifactId>
            <version>${mybatis.version}</version>
        </dependency>
        <dependency>
            <groupId>com.mysql</groupId>
            <artifactId>mysql-connector-j</artifactId>
            <version>${mysql.version}</version>
        </dependency>
        <dependency>
            <groupId>org.mybatis.spring.boot</groupId>
            <artifactId>mybatis-spring-boot-starter-test</artifactId>
            <version>${mybatis.version}</version>
            <scope>test</scope>
        </dependency>
    </dependencies>
</dependencyManagement>
其中原本的项目 pom.xml 可能有以下部分,但我们复制的上面这部分已经有了,因此要把原来的下面这部分删除掉
<maven.compiler.source>17</maven.compiler.source>
<maven.compiler.target>17</maven.compiler.target>
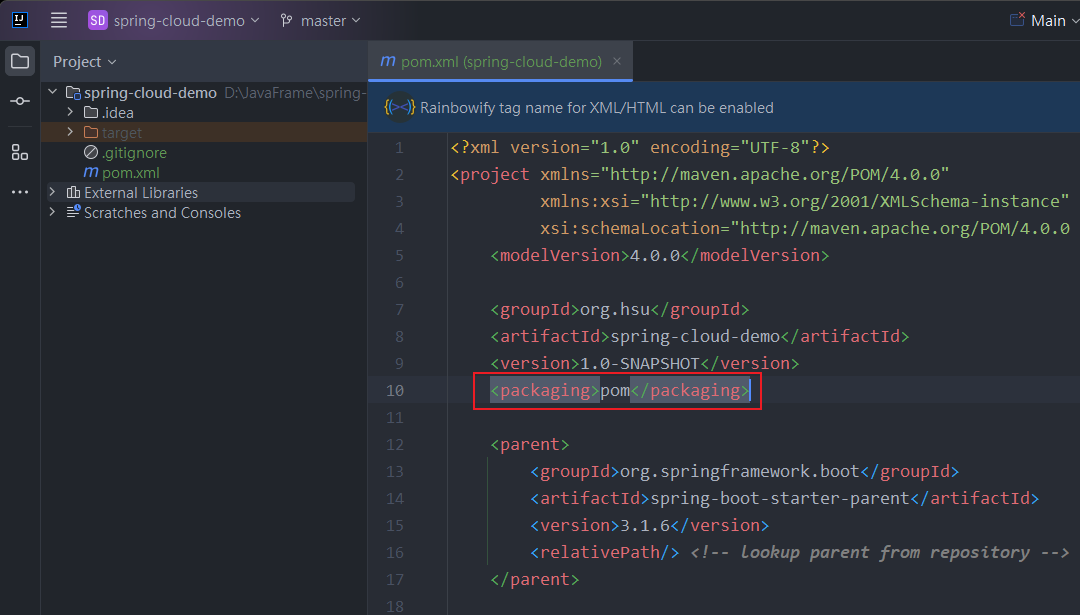
最终是这样的(注意要多加 <packaging>pom</packaging>)
<?xml version="1.0" encoding="UTF-8"?>
<project xmlns="http://maven.apache.org/POM/4.0.0"
         xmlns:xsi="http://www.w3.org/2001/XMLSchema-instance"
         xsi:schemaLocation="http://maven.apache.org/POM/4.0.0 http://maven.apache.org/xsd/maven-4.0.0.xsd">
    <modelVersion>4.0.0</modelVersion>

    <groupId>org.hsu</groupId>
    <artifactId>spring-cloud-demo</artifactId>
    <version>1.0-SNAPSHOT</version>
    <packaging>pom</packaging>

    <parent>
        <groupId>org.springframework.boot</groupId>
        <artifactId>spring-boot-starter-parent</artifactId>
        <version>3.1.6</version>
        <relativePath/> <!-- lookup parent from repository -->
    </parent>

    <properties>
        <maven.compiler.source>17</maven.compiler.source>
        <maven.compiler.target>17</maven.compiler.target>
        <java.version>17</java.version>
        <mybatis.version>3.0.3</mybatis.version>
        <mysql.version>8.0.33</mysql.version>
        <spring-cloud.version>2022.0.3</spring-cloud.version>
    </properties>

    <dependencies>
        <dependency>
            <groupId>org.projectlombok</groupId>
            <artifactId>lombok</artifactId>
            <optional>true</optional>
        </dependency>
    </dependencies>

    <dependencyManagement>
        <dependencies>
            <dependency>
                <groupId>org.springframework.cloud</groupId>
                <artifactId>spring-cloud-dependencies</artifactId>
                <version>${spring-cloud.version}</version>
                <type>pom</type>
                <scope>import</scope>
            </dependency>
            <dependency>
                <groupId>org.mybatis.spring.boot</groupId>
                <artifactId>mybatis-spring-boot-starter</artifactId>
                <version>${mybatis.version}</version>
            </dependency>
            <dependency>
                <groupId>com.mysql</groupId>
                <artifactId>mysql-connector-j</artifactId>
                <version>${mysql.version}</version>
            </dependency>
            <dependency>
                <groupId>org.mybatis.spring.boot</groupId>
                <artifactId>mybatis-spring-boot-starter-test</artifactId>
                <version>${mybatis.version}</version>
                <scope>test</scope>
            </dependency>
        </dependencies>
    </dependencyManagement>

</project>
DependencyManagement 和 Dependencies
dependencies:将所依赖的 jar 直接加到项目中,子项目也会继承该依赖。dependencyManagement:只是声明依赖,并不实现 Jar 包引入。如果子项目需要用到相关依赖,需要显式声明。如果子项目没有指定具体版本,会从父项目中读取 version。如果子项目中指定了版本号,就会使用子项目中指定的 jar 版本。此外父工程的打包方式应该是 pom,而不是 jar,这里需要手动使用packaging来声明。
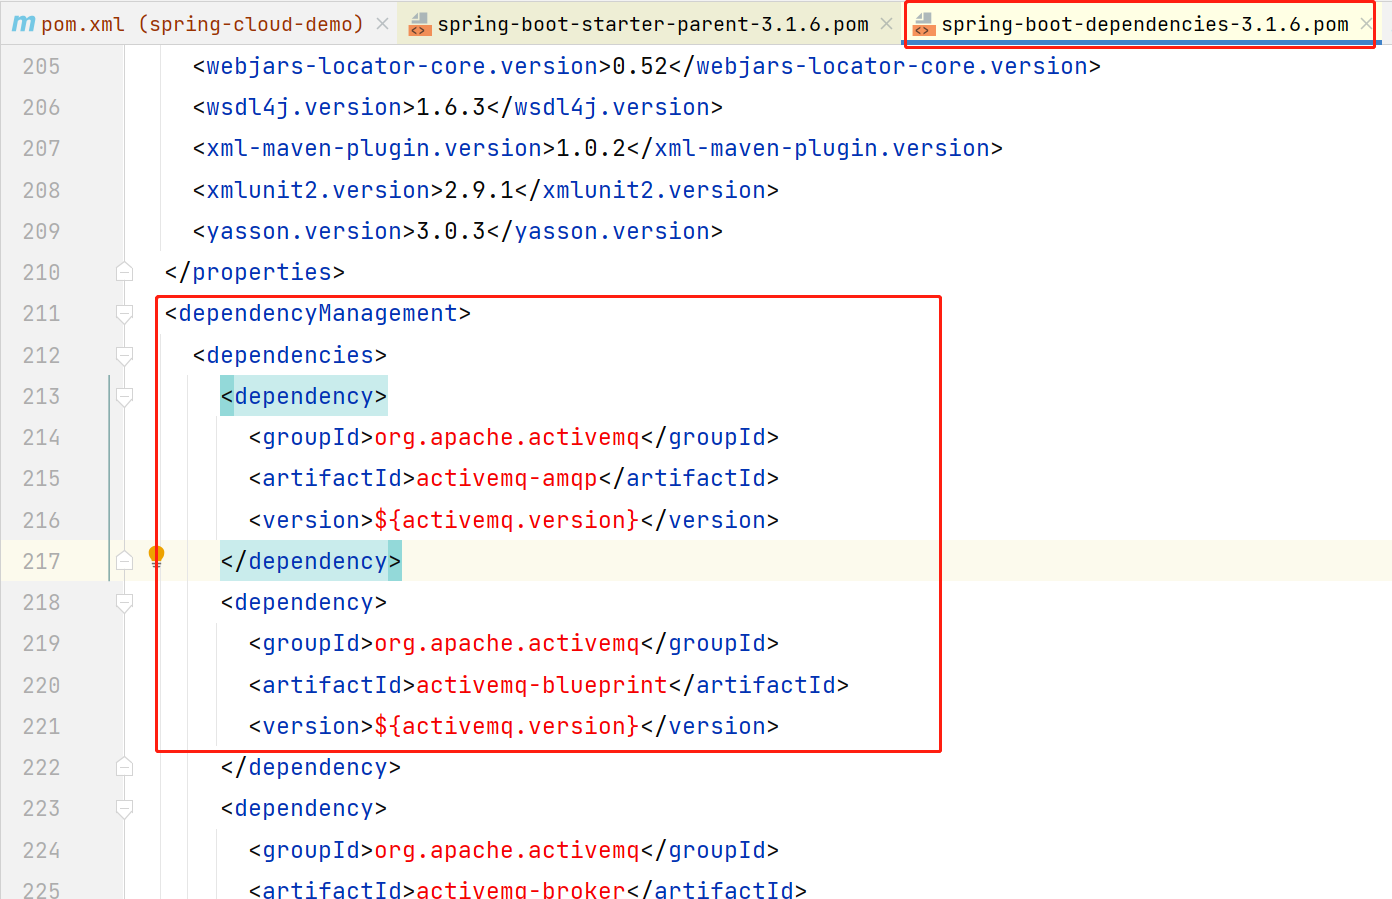
Spring Boot 实现依赖 jar 包版本的管理,也是这种方式
依赖 Jar 的版本判断
<dependencies>
<dependency>
<groupId>org.projectlombok</groupId>
<artifactId>lombok</artifactId>
<optional>true</optional>
</dependency>
</dependencies>

<dependencyManagement>
<dependencies>
<dependency>
<groupId>com.mysql</groupId>
<artifactId>mysql-connector-j</artifactId>
<version>${mysql.version}</version>
</dependency>
</dependencies>
</dependencyManagement>
上述代码中,
lombok会被直接引入到当前项目以及子项目中,mysql-connector-j不会实际引入 jar,子项目继承时必须显式声明。
Spring Cloud版本
Spring Cloud 是基于SpringBoot搭建的, 所以Spring Cloud 版本与SpringBoot版本有关
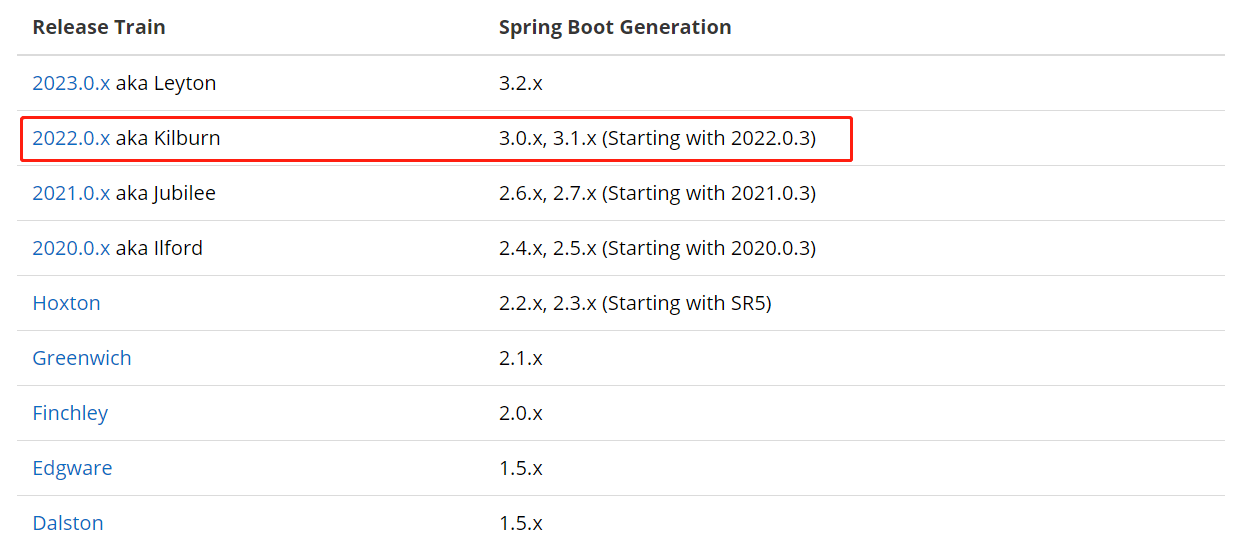
我们项⽬中使⽤的SpringBoot 版本为 3.1.6, 对应的Spring Cloud版本应该为2022.0.x, 选择任⼀就可以
创建子项目-订单服务
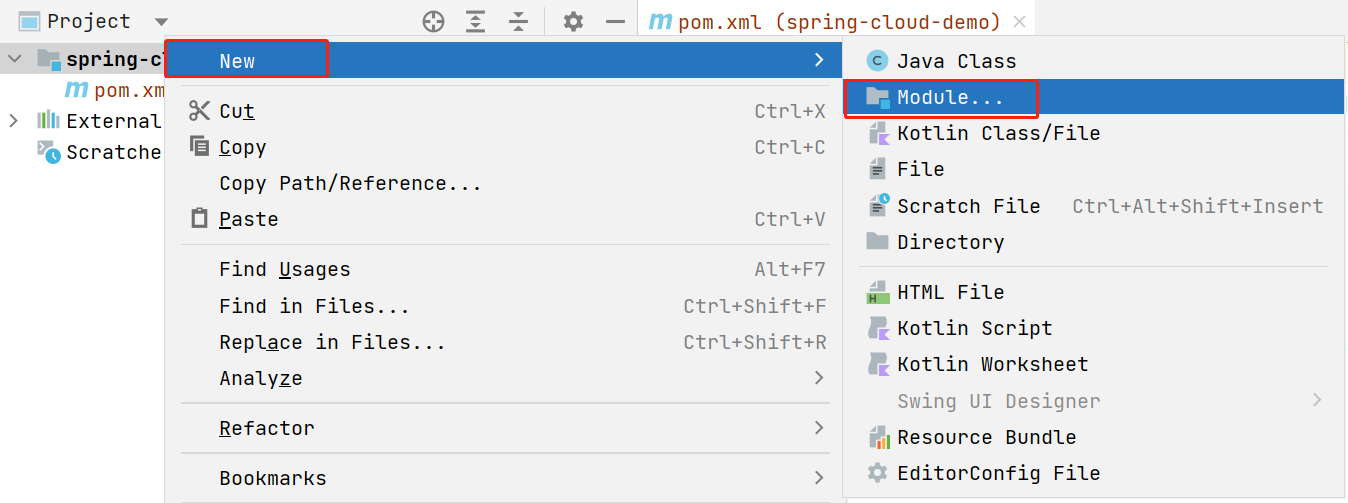
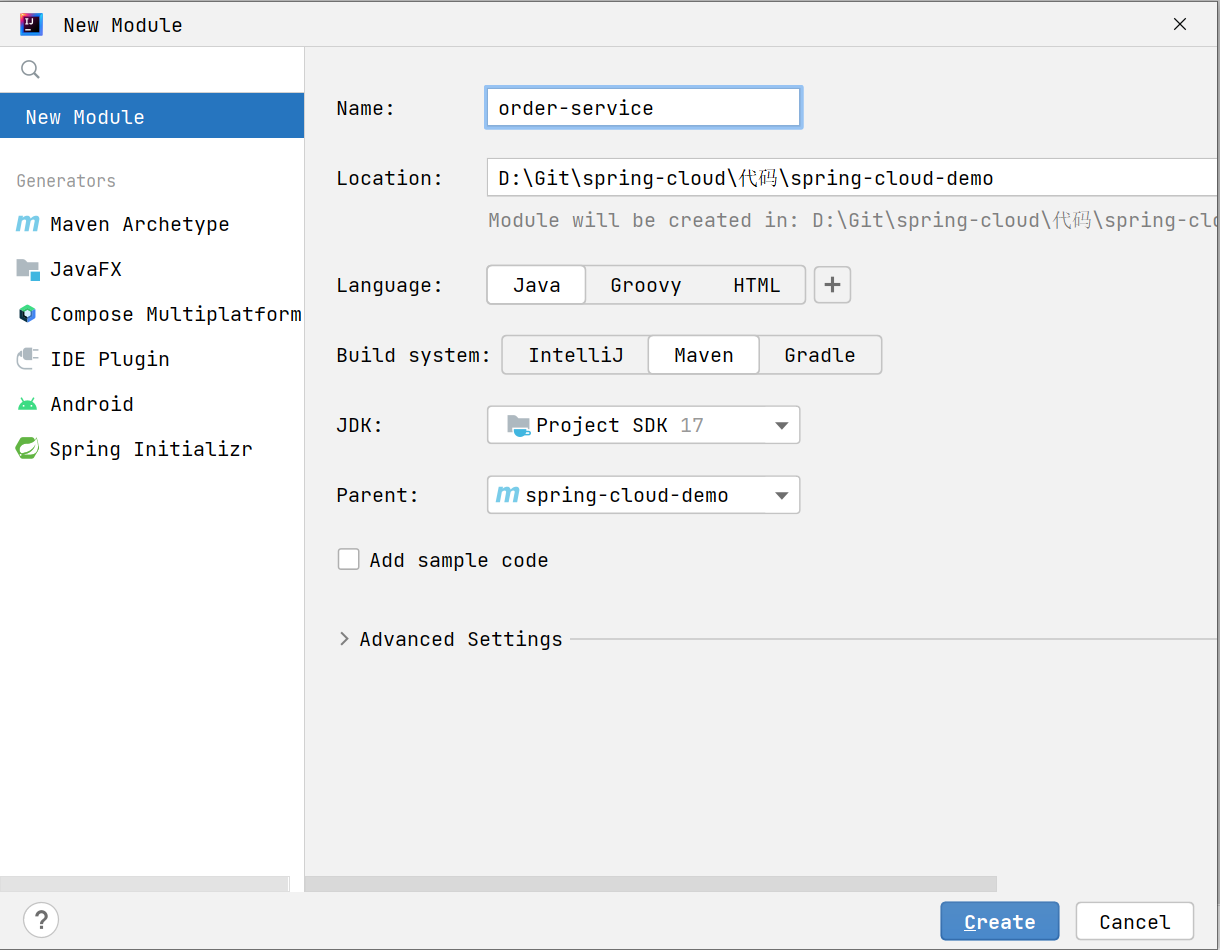
声明项⽬依赖和项⽬构建插件
<dependencies>
    <dependency>
        <groupId>org.springframework.boot</groupId>
        <artifactId>spring-boot-starter-web</artifactId>
    </dependency>
    <dependency>
        <groupId>com.mysql</groupId>
        <artifactId>mysql-connector-j</artifactId>
    </dependency>
    <!-- mybatis -->
    <dependency>
        <groupId>org.mybatis.spring.boot</groupId>
        <artifactId>mybatis-spring-boot-starter</artifactId>
    </dependency>
</dependencies>

<build>
    <plugins>
        <plugin>
            <groupId>org.springframework.boot</groupId>
            <artifactId>spring-boot-maven-plugin</artifactId>
        </plugin>
    </plugins>
</build>
创建子项目-商品服务
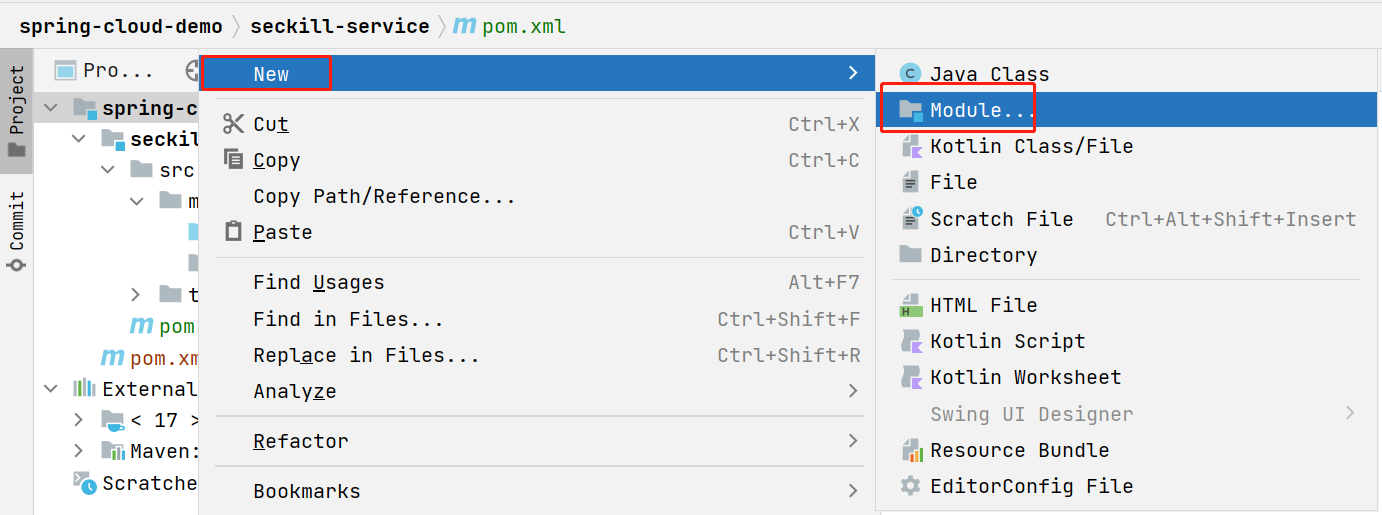
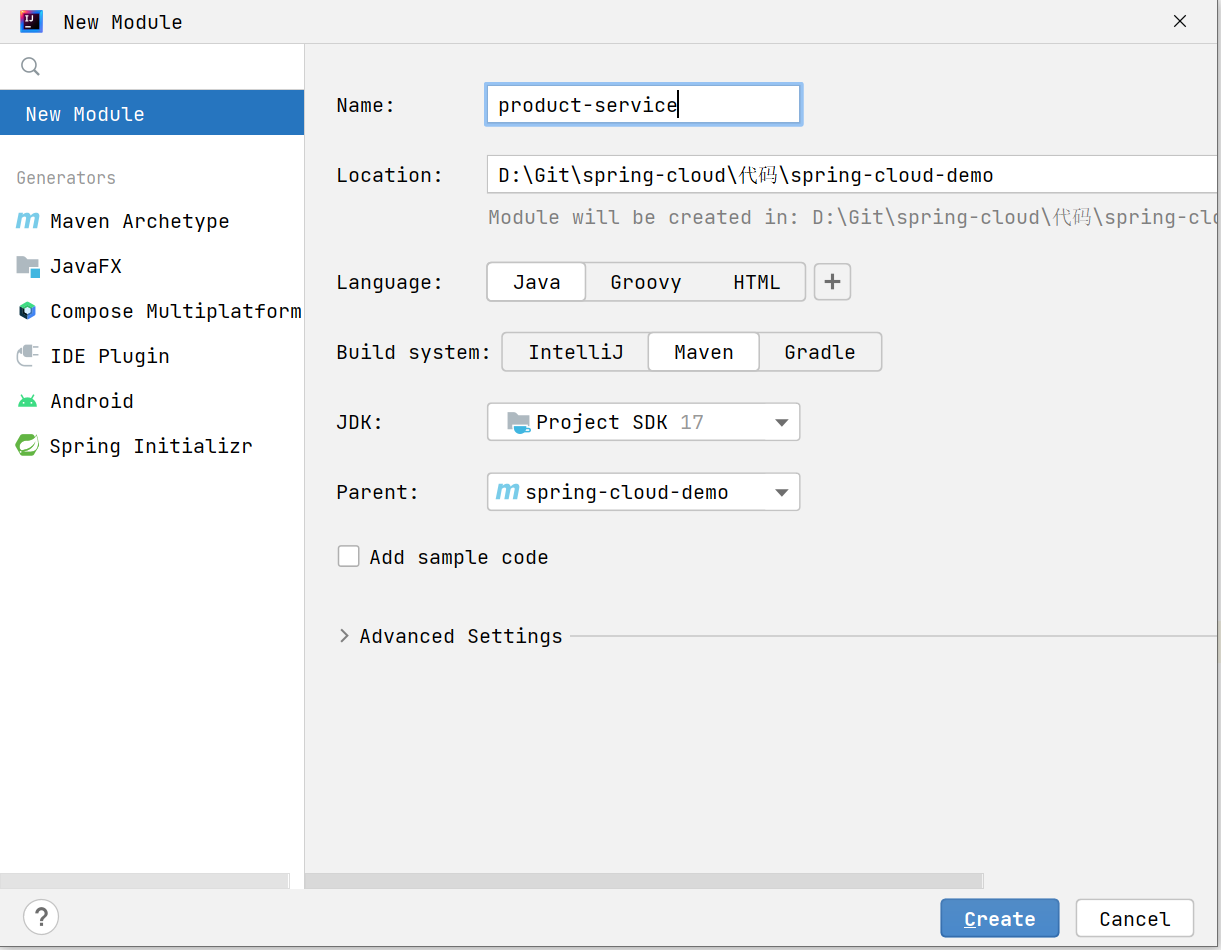
声明项⽬依赖和项⽬构建插件
<dependencies>
    <dependency>
        <groupId>org.springframework.boot</groupId>
        <artifactId>spring-boot-starter-web</artifactId>
    </dependency>
    <dependency>
        <groupId>com.mysql</groupId>
        <artifactId>mysql-connector-j</artifactId>
    </dependency>
    <!-- mybatis -->
    <dependency>
        <groupId>org.mybatis.spring.boot</groupId>
        <artifactId>mybatis-spring-boot-starter</artifactId>
    </dependency>
</dependencies>

<build>
    <plugins>
        <plugin>
            <groupId>org.springframework.boot</groupId>
            <artifactId>spring-boot-maven-plugin</artifactId>
        </plugin>
    </plugins>
</build>
完善订单服务
完善启动类, 配置文件
启动类
@SpringBootApplication
public class OrderServiceApplication {
    public static void main(String[] args) {
        SpringApplication.run(OrderServiceApplication.class, args);
    }
}
配置⽂件
server:
  port: 8080

spring:
  datasource:
    url: jdbc:mysql://127.0.0.1:3306/cloud_order?characterEncoding=utf8&useSSL=false
    username: root
    password: 123456
    driver-class-name: com.mysql.cj.jdbc.Driver

mybatis:
  configuration:
    log-impl: org.apache.ibatis.logging.stdout.StdOutImpl
    map-underscore-to-camel-case: true # 配置驼峰自动转换
业务代码
- 实体类
@Data
public class OrderInfo {
    private Integer id;
    private Integer userId;
    private Integer productId;
    private Integer num;
    private Integer price;
    private Integer deleteFlag;
    private Date createTime;
    private Date updateTime;
}
- Controller
@RestController
@RequestMapping("/order")
public class OrderController {

    @Autowired
    private OrderService orderService;

    @RequestMapping("/{orderId}")
    public OrderInfo getOrderById(@PathVariable("orderId") Integer orderId) {
        return orderService.selectOrderById(orderId);
    }
}
- Service
@Service
public class OrderService {

    @Autowired
    private OrderMapper orderMapper;

    public OrderInfo selectOrderById(Integer orderId) {
        return orderMapper.selectOrderById(orderId);
    }
}
- Mapper
@Mapper
public interface OrderMapper {

    @Select("SELECT * FROM order_detail WHERE id = #{orderId}")
    OrderInfo selectOrderById(Integer orderId);
}
测试
访问url: http://127.0.0.1:8080/order/1
⻚⾯正常返回结果:

完善商品服务
完善启动类, 配置文件
启动类
@SpringBootApplication
public class ProductServiceApplication {
    public static void main(String[] args) {
        SpringApplication.run(ProductServiceApplication.class, args);
    }
}
配置⽂件
server:
  port: 9090

spring:
  datasource:
    url: jdbc:mysql://127.0.0.1:3306/cloud_product?characterEncoding=utf8&useSSL=false
    username: root
    password: 123456
    driver-class-name: com.mysql.cj.jdbc.Driver

mybatis:
  configuration:
    log-impl: org.apache.ibatis.logging.stdout.StdOutImpl
    map-underscore-to-camel-case: true
后⾯需要多个服务⼀起启动, 所以设置为不同的端⼝号
业务代码
- 实体类
@Data
public class ProductInfo {
    private Integer id;
    private String productName;
    private Integer productPrice;
    private Integer state;
    private Date createTime;
    private Date updateTime;
}
- Controller
@RestController
@RequestMapping("/product")
public class ProductController {

    @Autowired
    private ProductService productService;

    @RequestMapping("/{productId}")
    public ProductInfo getProductById(@PathVariable("productId") Integer productId) {
        System.out.println("收到请求, Id:" + productId);
        return productService.selectProductById(productId);
    }
}
- Service
@Service
public class ProductService {

    @Autowired
    private ProductMapper productMapper;

    public ProductInfo selectProductById(Integer id) {
        return productMapper.selectProductById(id);
    }
}
- Mapper
@Mapper
public interface ProductMapper {

    @Select("SELECT * FROM product_detail WHERE id = #{id}")
    ProductInfo selectProductById(Integer id);
}
测试
访问url: http://127.0.0.1:9090/product/1001
⻚⾯正常返回结果:

远程调用
需求
根据订单查询订单信息时, 根据订单⾥产品ID, 获取产品的详细信息.
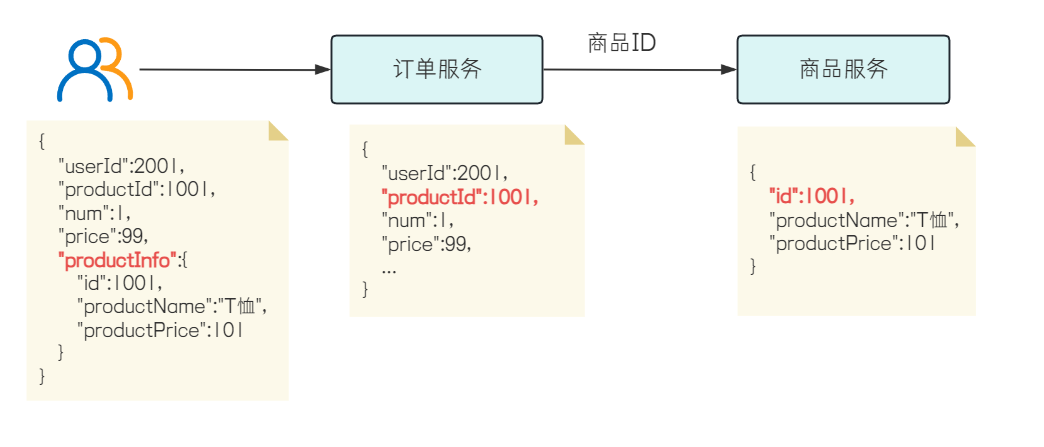
这就需要 http 访问,从商品服务获取订单服务的信息
实现
实现思路: order-service服务向product-service服务发送⼀个http请求, 把得到的返回结果, 和订单结果融合在⼀起, 返回给调⽤⽅.
要先修改订单服务的实体类,先把 ProductInfo 复制过来,再修改 OrderInfo,添加下面这个字段
private ProductInfo productInfo;
实现方式: 采⽤Spring 提供的RestTemplate
实现http请求的⽅式, 有很多, 可参考: https://zhuanlan.zhihu.com/p/670101467
- config 包:定义RestTemplate
@Configuration
public class BeanConfig {
    @Bean
    public RestTemplate restTemplate() {
        return new RestTemplate();
    }
}
- 修改order-service中的 OrderService
@Service
public class OrderService {
    @Autowired
    private OrderMapper orderMapper;

    @Autowired
    private RestTemplate restTemplate;

    public OrderInfo selectOrderById(Integer orderId) {
        OrderInfo orderInfo = orderMapper.selectOrderById(orderId);
        String url = "http://127.0.0.1:9090/product/" + orderInfo.getProductId();
        ProductInfo productInfo = restTemplate.getForObject(url, ProductInfo.class);
        orderInfo.setProductInfo(productInfo);
        return orderInfo;
    }
}
测试
访问url: http://127.0.0.1:8080/order/1
⻚⾯返回结果:

RestTemplate
RestTemplate 是从 Spring 3.0 开始支持的一个 HTTP 请求工具,它是一个同步的 REST API 客户端,提供了常见的 REST 请求方案的模板。
什么是 REST?
REST (Representational State Transfer),表现层资源状态转移。
REST 是由 HTTP 的主要设计者 Roy Fielding 博士在 2000 年他的博士论文中提出来的一种软件架构风格。这里面主要有三个概念:
- 资源:网络上的所有事物都可以抽象为资源,每个资源都有一个唯一的资源标识符 (URI)。
- 表现层:资源的表现形式,例如文本作为资源,可以用 txt 格式表现,也可以通过 HTML、XML、JSON 等格式来表现,甚至以二进制的格式表现。
- 状态转移:访问 URI,也就是客户端和服务器的交互过程。客户端用到的手段,只能是 HTTP 协议。这个过程中,可能会涉及到数据状态的变化,例如对数据的增删改查,都是状态的转移。
REST 是一种设计风格,指资源在网络中以某种表现形式进行状态转移。
简单来说,REST 描述的是在网络中 Client 和 Server 的一种交互形式,REST 本身不实用,实用的是如何设计 RESTful API(REST 风格的网络接口)。
什么是 RESTful?
REST 是一种设计风格,并没有一个明确的标准。满足这种设计风格的程序或接口我们称之为 RESTful(从单词字面来看就是一个形容词)。所以 RESTful API 就是满足 REST 架构风格的接口。
RESTful 风格大致有以下几个主要特征:
- 资源:资源可以是一个图片、音频、视频或者 JSON 格式等网络上的一个实体,除了一些二进制的资源外普通的文本资源更多以 JSON 为载体、面向用户的一组数据(通常从数据库中查询而得到)。
- 统一接口:对资源的操作,例如获取、创建、修改和删除。这些操作正好对应 HTTP 协议提供的 GET、POST、PUT 和 DELETE 方法。换言而知,如果使用 RESTful 风格的接口,从接口上你可能只能定位其资源,但是无法知晓它具体进行了什么操作,需要具体了解其发生了什么操作动作要从其 HTTP 请求方法类型上进行判断。
例如同一个 URL:
- GET /blog/{blogId}:查询博客
- DELETE /blog/{blogId}:删除博客
这些内容都是通过 HTTP 协议来呈现的。所以 RESTful 是基于 HTTP 协议的。
RestTemplate 是 Spring 提供,封装 HTTP 调用,并强制使用 RESTful 风格。它会处理 HTTP 连接和关闭,只需要使用者提供资源的地址和参数即可。
RESTful 实践
RESTful 风格的 API 固然很好很规范,但大多数互联网公司并没有按照其规则来设计,因为 REST 是一种风格,而不是一种约束或规则,过于理想的 RESTful API 会付出太多的成本。
RESTful API 缺点:
- 操作方式繁琐。RESTful API 通常根据 GET、POST、PUT、DELETE 来区分对资源的操作动作。但是 HTTP Method 并不可直接见到,需要通过抓包等工具才能观察。如果把动作放在 URL 上反而更加直观,更利于团队的理解和交流。
- 一些浏览器对 GET、POST 之外的请求支持不太友好,需要额外处理。
- 过分强调资源。而实际业务需求可能比较复杂,并不能单纯使用增删改查就能满足需求,强行使用 RESTful API 会增加开发难度和成本。
所以,在实际开发中,如果业务需求和 RESTful API 不太匹配或者很麻烦时,也可以不用 RESTful API。如果使用场景和 REST 风格比较匹配,就可以采用 RESTful API。
总之:无论哪种风格的 API,都是为了方便团队开发、协商以及管理,不能墨守成规。尽信书不如无书,尽信规范不如无规范。
项目存在问题
-
远程调⽤时, URL的IP和端⼝号是写死的(http://127.0.0.1:9090/product/), 如果更换IP, 需要修改代码
- 调⽤⽅如何可以不依赖服务提供⽅的IP?
-
多机部署, 如何处理, 如何分摊压⼒?
-
返回结果如何共用?
-
远程调⽤时, URL⾮常容易写错, ⽽且复⽤性不⾼, 如何优雅的实现远程调⽤
-
所有的服务都可以调⽤该接⼝, 是否有⻛险?
-
…
除此之外, 微服务架构还⾯临很多问题, 接下来我们学习如何使⽤Spring Cloud 来解决这些问题.