背景:
在android开发过程中,做内容的时候,不仅只有字符,基本都是图文混排,甚至还会对内容中某段文字进行特殊处理,比如:字体加粗、字体变大、改变字体颜色、对某一段文字新增点击事件,等等。这些内容不可能通过一个一个view去拼接,这么复杂的其实可以通过一个textview控件就可以完成,但是需要搭配一个助手
SpannableStringBuilder:
可生成字符串生成器,这是内容和标记都可以更改的文本类。常见的富文本修饰如:新增、删除、字体颜色、大小、背景色、图片、上标、下标、删除、点击等,接下来我们将介绍常用的一些
一、SpannableStringBuilderAPI介绍
1.初始化:
1.1创建一个空对象
public SpannableStringBuilder() {
    this("");
}
1.2 创建其中包含指定的文本,包括其跨度
public SpannableStringBuilder(CharSequence text) {
    this(text, 0, text.length());
}
1.3创建一个对象,包含指定的文本,指定文本内容的起始和结束
public SpannableStringBuilder(CharSequence text, int start, int end)
2.API的使用
2.1类型转换:
public static SpannableStringBuilder valueOf(CharSequence source)
如果source是SpannableStringBuilder将直接强行转换,否则new一个新的对象,这个方法也使用创建对象使用。
2.2返回SpannStringBuild的内容指定的下标字符
public char charAt(int where)
如果当前内容为:ABCDE
那么charAt(int 0)返回A,否则会出现数组越界等问题
2.3追加内容
public SpannableStringBuilder append(CharSequence text)
2.4从指定的位置插入内容
public SpannableStringBuilder insert(int where, CharSequence tb)
weher是要插入的地方,插入进去,原来内容会接在新的后面
oldTxt="ABCDEFG"
newTxt="abcdefg"
where=5
buildText="ABCDEabcdefgFG"
2.5删除内容,从哪个位置开始,删除到哪里
public SpannableStringBuilder delete(int start, int end)
2.6设置Span样式,可以支持多个span
public void setSpan(Object what, int start, int end, int flags)
what:Span对象,是一个object,这些Span都在android.text.style包下。
start:内容的起始位置
end:内容的结束位置
flags:默认使用SPAN_EXCLUSIVE_INCLUSIVE
SPAN_EXCLUSIVE_INCLUSIVE:类型的非0长度跨度展开包括在其终点插入但不在其终点处插入的文本起点。当长度为0时,它们的行为类似于点。
SPAN_EXCLUSIVE_EXCLUSIVE:类型的跨度不展开以包括在其起点或终点插入的文本。它们的长度永远不能为0,并且会自动删除如果它们覆盖的所有文本都被删除,则从缓冲区中删除
SPAN_INCLUSIVE_INCLUSIVE:类型的跨度展开以包括在其起点或终点插入的文本。
SPAN_INCLUSIVE_EXCLUSIVE:类型的非0长度跨度展开包括在起点插入但不在起点插入的文本结束点。当长度为0时,它们的行为类似于标记。
常见的Span使用
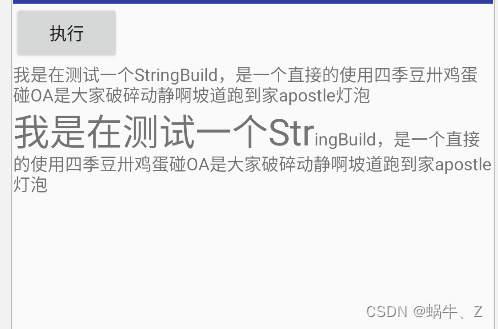
3.1 AbsoluteSizeSpan:设置字体大小
默认是px像素,可以在构造时指定为dp
SpannableStringBuilder  builder=new SpannableStringBuilder(msg);

AbsoluteSizeSpan absoluteSizeSpan=new AbsoluteSizeSpan(30,true);

builder.setSpan(absoluteSizeSpan,0,10, Spannable.SPAN_EXCLUSIVE_INCLUSIVE);
text_span.setText(builder);
//text在设置的时候,不要将build转成toStrin个(),否则会出现不生效
3.2:BackgroundColorSpan设置背景色
1.初始化
public BackgroundColorSpan(int color) {
mColor = color;
}
2.初始化
public BackgroundColorSpan(Parcel src) {
mColor = src.readInt();
}
初始化两种方式,第一种直接给出涂颜色color,第二种将颜色序列化
BackgroundColorSpan colorSpan=new BackgroundColorSpan(Color.RED);


builder.setSpan(colorSpan,0,10, Spannable.SPAN_EXCLUSIVE_INCLUSIVE);


text_span.setText(builder);
3.3 BulletSpan距离左边的宽度
public BulletSpan(int gapWidth, int color)
BulletSpan bulletSpan = new BulletSpan(40,Color.RED);
gapWidth: 距左边的距离
color:小球色值
这个小球点默认半径是很小,固定值,在更高的API中,半径是可以修改,或者自己扩展也可以
BulletSpan bulletSpan = new BulletSpan(40,Color.RED);

 builder.setSpan(bulletSpan, 0, 5, Spannable.SPAN_EXCLUSIVE_EXCLUSIVE); text_span.setText(builder);
注意:起始位置只有是从最左边开始,如果内容在中间,将不生效

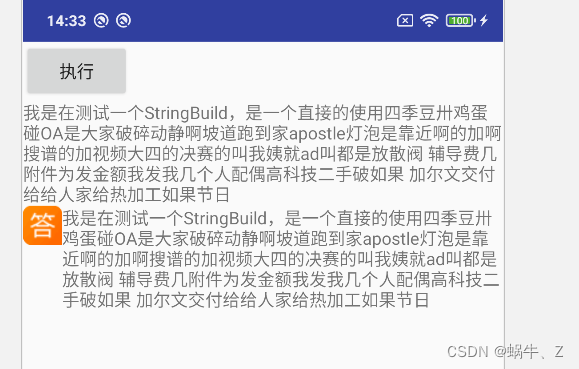
3.4 DrawableMarginSpan边缘draw
DrawableMarginSpan drawableMarginSpan=new DrawableMarginSpan(getDrawable(R.drawable.ask_answer_tag2));


builder.setSpan(drawableMarginSpan,10,10, Spannable.SPAN_EXCLUSIVE_INCLUSIVE);


text_span.setText(builder);
这个设置完只会在最左边显示,所以不管start和end起始和结束位置在哪,都会显示在最左边。如果出现没有效果,可能是因为start!=end,把这两个值设置一样即可
3.5 ForegroundColorSpan 设置文本字体颜色
ForegroundColorSpan foregroundColorSpan=new ForegroundColorSpan(Color.RED);

builder.setSpan(foregroundColorSpan,0,10, Spannable.SPAN_EXCLUSIVE_INCLUSIVE);


text_span.setText(builder);
3.6 IconMarginSpan:首占位符为图片
IconMarginSpan和DrawMarginSpan用法一样,都是作为icon在最顶部出现,不受start和end位置影响。
Bitmap bitmap= BitmapFactory.decodeResource(getResources(),R.drawable.ask_answer_tag2);


IconMarginSpan iconMarginSpan=new IconMarginSpan(bitmap);

builder.setSpan(iconMarginSpan,10,10, Spannable.SPAN_EXCLUSIVE_INCLUSIVE);


text_span.setText(builder);
3.6 ImageSpan图片跨度
ImageSpan imageSpan=new ImageSpan(bitmap);

builder.setSpan(imageSpan,10,20, Spannable.SPAN_EXCLUSIVE_INCLUSIVE);

text_span.setText(builder);
ImageSpan与IconMarginSpan、DrawMarginSpan的效果不一样,ImageSpan会占用文本位置,也就是说start和end这中间的内容会被图片覆盖了,而且end>start。

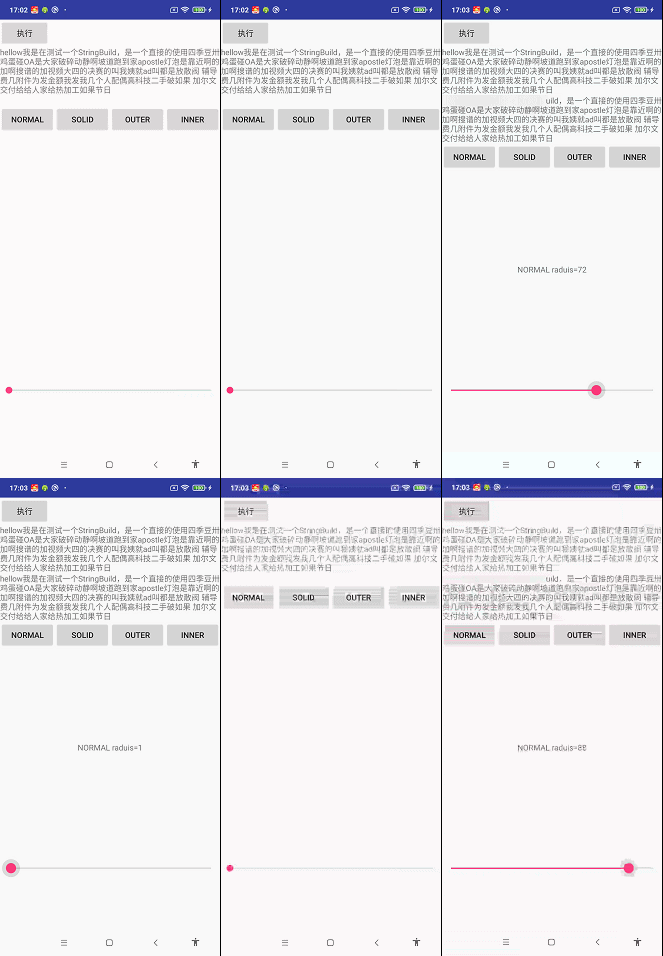
3.7 MaskFilterSpan 掩码筛选器范围
常见的Maskfilter如下:
EmbossMaskFilter:浮雕
BlurMaskFilter:模糊
BlurMaskFilter的使用:也可以实现高斯模糊效果
public BlurMaskFilter(float radius, Blur style)
radius:模糊半径,必须>0
style:
Blur.NORMAL:正常
Blur.SOLID:加粗
Blur.OUTER:外部
Blur.INNER:内部
   private void setTextColor() {
//        msg=getString(R.string.hellow);

        SpannableStringBuilder builder = new SpannableStringBuilder(msg);

//        text_span.setText(""+builder.charAt(1));
//        text_span.setText(builder.append("new123"));

        AbsoluteSizeSpan absoluteSizeSpan = new AbsoluteSizeSpan(30, true);

//        builder.setSpan(absoluteSizeSpan,0,10, Spannable.SPAN_EXCLUSIVE_INCLUSIVE);


        BackgroundColorSpan colorSpan = new BackgroundColorSpan(Color.RED);
//        builder.setSpan(colorSpan,0,10, Spannable.SPAN_EXCLUSIVE_INCLUSIVE);

        BulletSpan bulletSpan = new BulletSpan(100);


        DrawableMarginSpan drawableMarginSpan = new DrawableMarginSpan(getDrawable(R.drawable.ask_answer_tag2));

        Intent intent = new Intent(this, SimpleWebViewActivity.class);

        ForegroundColorSpan foregroundColorSpan = new ForegroundColorSpan(Color.RED);


        Bitmap bitmap = BitmapFactory.decodeResource(getResources(), R.drawable.ask_answer_tag2);


        IconMarginSpan iconMarginSpan = new IconMarginSpan(bitmap);

        ImageSpan imageSpan = new ImageSpan(bitmap, 100);


        LocaleSpan localeSpan = new LocaleSpan(Locale.ENGLISH);

        MaskFilter maskFilter = new MaskFilter();

//        EmbossMaskFilter embossMaskFilter=new EmbossMaskFilter();


        seekbar.setOnSeekBarChangeListener(new SeekBar.OnSeekBarChangeListener() {

            @Override
            public void onProgressChanged(SeekBar seekBar, int progress, boolean fromUser) {
                text_progress.setText(textMsg + progress);
                BlurMaskFilter blurMaskFilter = new BlurMaskFilter(progress, blur);
                MaskFilterSpan maskFilterSpan = new MaskFilterSpan(blurMaskFilter);


                builder.setSpan(maskFilterSpan, 0, 20, Spannable.SPAN_EXCLUSIVE_INCLUSIVE);


                text_span.setText(builder);
            }

            @Override
            public void onStartTrackingTouch(SeekBar seekBar) {

            }

            @Override
            public void onStopTrackingTouch(SeekBar seekBar) {

            }
        });


    }

    public void setStyle(View view) {
        int id = view.getId();
        switch (id) {
            case R.id.normal: {
                blur= BlurMaskFilter.Blur.NORMAL;
                textMsg="NORMAL raduis=";
            }
            break;
            case R.id.solid: {
                blur= BlurMaskFilter.Blur.SOLID;
                textMsg="SOLID raduis=";
            }
            break;
            case R.id.out: {
                blur= BlurMaskFilter.Blur.OUTER;
                textMsg="OUTER raduis=";
            }
            break;
            case R.id.inner: {
                blur= BlurMaskFilter.Blur.INNER;
                textMsg="INNER raduis=";
            }
            break;
        }

    }

EmbossMaskFilter:浮雕
改方法在textview的api这块,直接使用看不出来效果,下面我将会通过自定义view来做一个效果
3.8 QuoteSpan:引用,在内容最左侧会有一条竖线
color:引用线的颜色
QuoteSpan quoteSpan = new QuoteSpan(Color.RED);


builder.setSpan(quoteSpan, 0, builder.length(), SpannableStringBuilder.SPAN_INCLUSIVE_EXCLUSIVE);
text_new.setText(builder);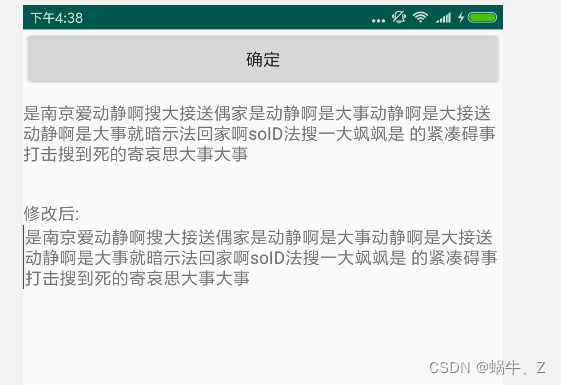
3.9 RelativeSizeSpan:相对大小,将原来的textsize放大或缩小相应的倍数
RelativeSizeSpan relativeSizeSpan=new RelativeSizeSpan(2f);

builder.setSpan(relativeSizeSpan, 0, builder.length(), SpannableStringBuilder.SPAN_INCLUSIVE_EXCLUSIVE);
text_new.setText(builder);
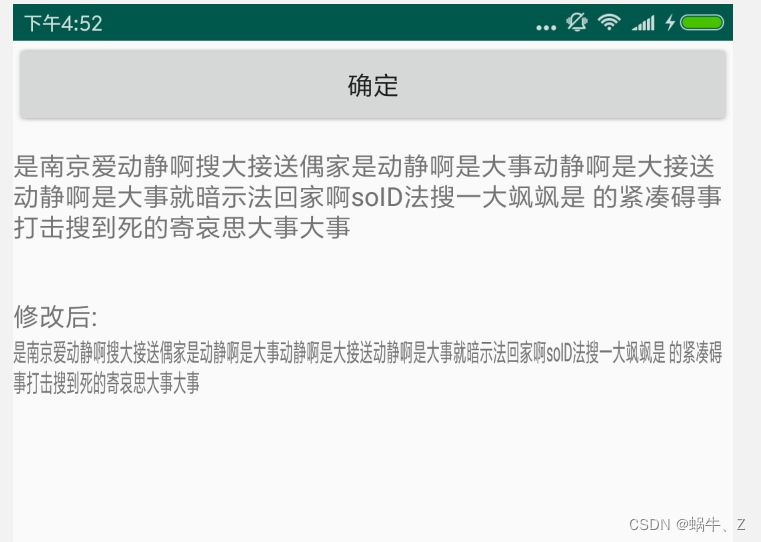
3.10 ScaleXSpan :水平缩放
ScaleXSpan scaleXSpan=new ScaleXSpan(0.5f);
//proportion:缩放倍数
builder.setSpan(scaleXSpan, 0, builder.length(), SpannableStringBuilder.SPAN_INCLUSIVE_EXCLUSIVE);
text_new.setText(builder);
3.11 StrikethroughSpan:删除线(非下划线)
StrikethroughSpan span=new StrikethroughSpan();


builder.setSpan(span, 0, builder.length(), SpannableStringBuilder.SPAN_INCLUSIVE_EXCLUSIVE);
text_new.setText(builder);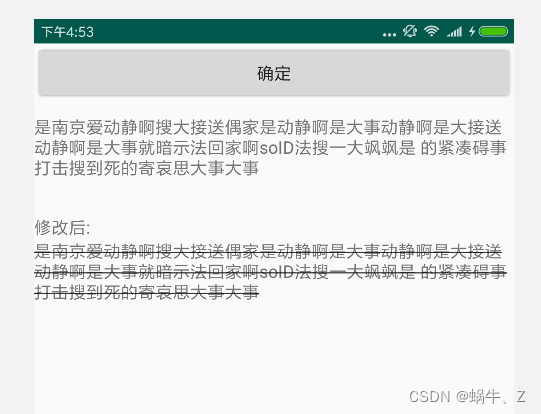
3.12 StyleSpan :内容style设置,该方法和textview的style一致,
/**
 *
 * @param style An integer constant describing the style for this span. Examples
 * include bold, italic, and normal. Values are constants defined
 * in {@link android.graphics.Typeface}.
 */
public StyleSpan(int style) {
    mStyle = style;
}
// Style
public static final int NORMAL = 0;//正常
public static final int BOLD = 1;//加粗
public static final int ITALIC = 2;//斜体
public static final int BOLD_ITALIC = 3;//加粗斜体
styleSpan=new StyleSpan(Typeface.BOLD);


builder.setSpan(styleSpan, 0, builder.length(), SpannableStringBuilder.SPAN_INCLUSIVE_EXCLUSIVE);
text_new.setText(builder);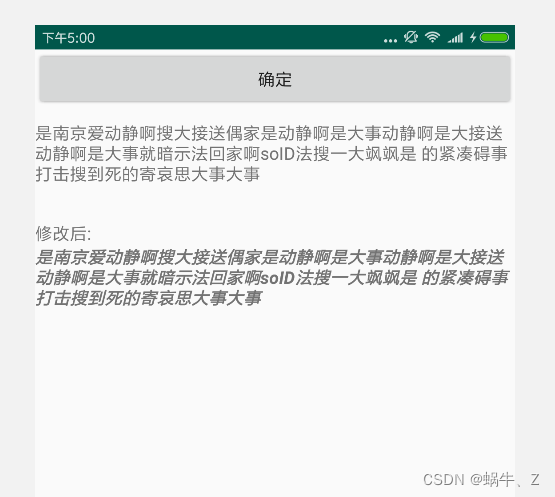
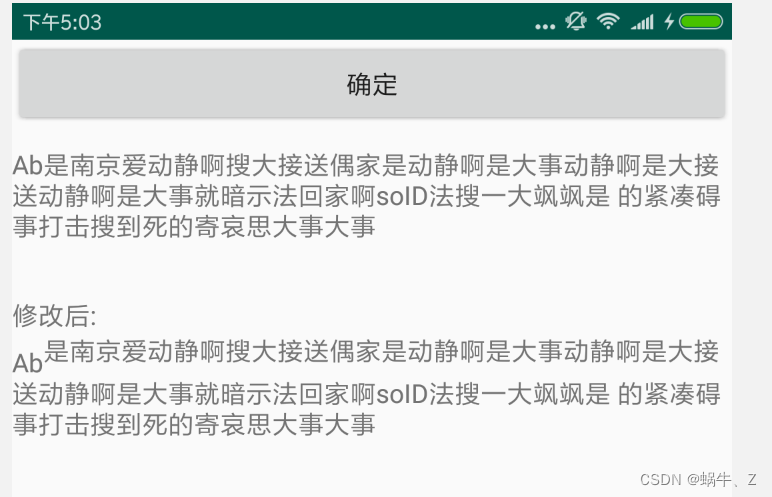
3.12 SubscriptSpan:下标(常见化学公式)
SubscriptSpan subscriptSpan=new SubscriptSpan();
builder.setSpan(subscriptSpan, 0, 2, SpannableStringBuilder.SPAN_INCLUSIVE_EXCLUSIVE);
text_new.setText(builder);
3.14 SuperscriptSpan:上标(常见化学公式)
SuperscriptSpan superscriptSpan=new SuperscriptSpan();


builder.setSpan(superscriptSpan, 2, 3, SpannableStringBuilder.SPAN_INCLUSIVE_EXCLUSIVE);
text_new.setText(builder);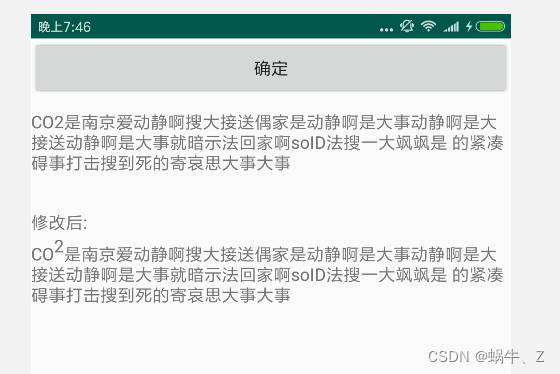
3.15 UnderlineSpan:下划线
UnderlineSpan  underlineSpan=new UnderlineSpan();

builder.setSpan(underlineSpan, 2, builder.length(), SpannableStringBuilder.SPAN_INCLUSIVE_EXCLUSIVE);
text_new.setText(builder);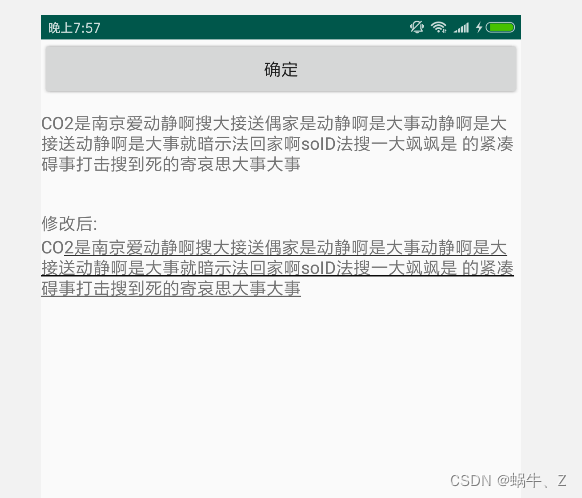
3.16 URLSpan :连接跳转
URLSpan  urlSpan=new URLSpan("http://www.baidu.com");
builder.insert(4,"点击百度");
builder.setSpan(underlineSpan, 4, 8, SpannableStringBuilder.SPAN_EXCLUSIVE_EXCLUSIVE);
builder.setSpan(urlSpan, 4, 8, SpannableStringBuilder.SPAN_EXCLUSIVE_EXCLUSIVE);
text_new.setText(builder);
text_new.setMovementMethod(LinkMovementMethod.getInstance());

注意:
1、如果不设置text_new.setMovementMethod(LinkMovementMethod.getInstance());方法,在点击事件触发可能失效。
2、URLSpan如果url直接是www.baidu.com无法启动,所以需要加上http://或者https://头部
3.17 ClickableSpan:点击事件拦截
        ClickableSpan clickableSpan=new ClickableSpan() {
            @Override
            public void onClick(@NonNull  View widget) {
                Uri uri = Uri.parse("http://www.baidu.com");
                Context context = widget.getContext();
                Intent intent = new Intent(Intent.ACTION_VIEW, uri);
                intent.putExtra(Browser.EXTRA_APPLICATION_ID, context.getPackageName());
                try {
                    context.startActivity(intent);
                } catch (ActivityNotFoundException e) {
                    Log.w("URLSpan", "Actvity was not found for intent, " + intent.toString());
                }
            }
        };
        builder.insert(4,"点击安卓");

//        builder.setSpan(underlineSpan, 4, 8, SpannableStringBuilder.SPAN_EXCLUSIVE_EXCLUSIVE);
        builder.setSpan(clickableSpan, 4, 8, SpannableStringBuilder.SPAN_EXCLUSIVE_EXCLUSIVE);
        text_new.setText(builder);
        text_new.setMovementMethod(LinkMovementMethod.getInstance());


