目录
1. DataContext数据上下文
2. Binding绑定源
2.1 绑定实体
2.2 绑定资源
2.3 ElementName属性指明另一个控件作为数据源
2.4 RelativeSource属性绑定一个相对的数据源
2.4.1 Self(绑定自身控件)
2.4.2 FindAncestor(找上级)
2.4.3 TemplatedParent绑定模板元素
3. Binding绑定模式
3.1 Mode属性
3.2 值改变时机
4. 前后端数据通知
4.1 INotifyPropertyChanged接口
4.2 ObservableCollection泛型集合
5. 值转换器
5.1 IValueConverter转换器
5.2 IMultiValueConverter多值转换器
6. ValidationRule验证规则
7. 命令
7.1 命令概述
7.2 ICommand接口
7.2.1 ICommand简单实现(不带参数)
7.2.2 ICommand带参数实现
7.2.3 ICommand的泛型参数实现
7.3 WPF事件转Command命令
1. DataContext数据上下文
DataContext是获取或设置元素参与数据绑定时的数据上下文。也就是ViewModel
下面是MVVM模型的结构图:
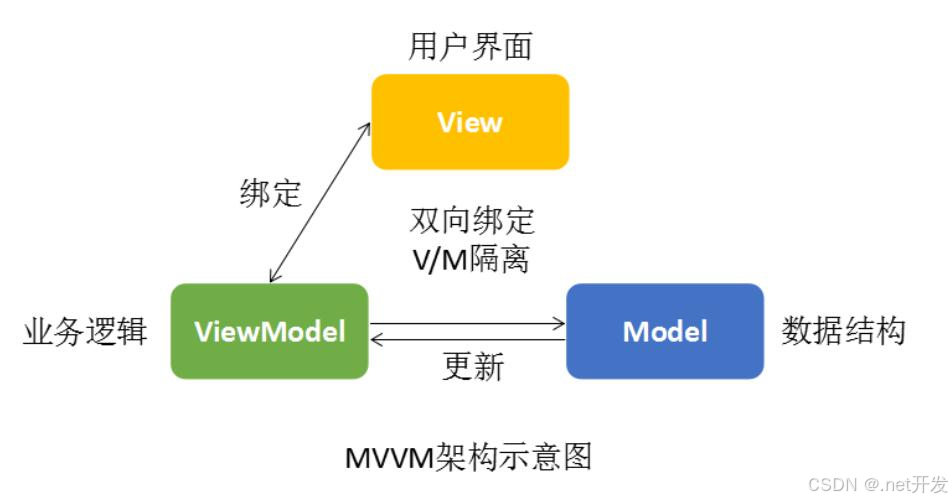
Model作为属性存在于ViewModel中,而Model想要显示在Ul界面(View)上的,只需要将ViewModel赋值给View的DataContext(数据上下文)属性,View就可以引用ViewModel中的那些Model了。
案例如下:
首先我们定义一个ViewModel
public class PersonViewModel
{
    private string name = "Tom";
    public string Name
    {
        get { return name; }
        set
        {
            name = value;
        }
    }

    private int age = 18;
    public int Age
    {
        get { return age; }
        set
        {
            age = value;
        }
    }
}
然后再前端cs文件中将ViewModel赋值给View的数据上下文
public partial class MainWindow : Window
{
    public MainWindow()
    {
        InitializeComponent();

        // 绑定上下文
        panel.DataContext = new PersonViewModel();
    }
}
最后在xaml中进行绑定就可以显示数据了(以下几种方式都可,使用后面两种不用手动绑定上下文)
<StackPanel x:Name="panel">
    <TextBlock Text="{Binding Name}" />
    <TextBlock Text="{Binding Age}" />
</StackPanel>
<StackPanel x:Name="panel">
<StackPanel.DataContext>
<local:PersonViewModel />
</StackPanel.DataContext>
<TextBlock Text="{Binding Name}" />
<TextBlock Text="{Binding Age}" />
</StackPanel><Window.DataContext>
<local:PersonViewModel />
</Window.DataContext>
<StackPanel x:Name="panel">
    <TextBlock Text="{Binding Name}" />
    <TextBlock Text="{Binding Age}" />
</StackPanel>

2. Binding绑定源
2.1 绑定实体
<StackPanel x:Name="panel">
<TextBlock Text="{Binding Name}" />
<TextBlock Text="{Binding Age}" />
</StackPanel>2.2 绑定资源
<Window.Resources>
    <SolidColorBrush x:Key="BackgroundBrush" Color="Red" />
</Window.Resources>
<StackPanel>
    <TextBlock Text="{Binding Source={StaticResource BackgroundBrush}, Path=Color}" />
</StackPanel>
2.3 ElementName属性指明另一个控件作为数据源
<StackPanel x:Name="panel">
    <TextBox x:Name="txt" Text="textBox" />
    <Label Content="{Binding ElementName=txt, Path=Text}" />
</StackPanel>
2.4 RelativeSource属性绑定一个相对的数据源
Mode:表示寻找相对数据源的模式,一共有4种模式
| 模式 | 说明 |
| PreviousData | 允许在当前显示的数据项列表中绑定上一个数据项(不是包含数据项的控件)。 |
| TemplatedParent | 引用应用了模板的元素,其中此模板中存在数据绑定元素。 |
| Self | 引用正在其上设置绑定的元素,并允许你将该元素的一个属性绑定到同一元素的其他属性上。 |
| FindAncestor | 引用数据绑定元素的父链中的上级。 这可用于绑定到特定类型的上级或其子类。 |
2.4.1 Self(绑定自身控件)
 <StackPanel>
     <TextBlock Margin="10">
             <Run Text="Hello" />
             <Run Foreground="Green"
                  Text="{Binding RelativeSource={RelativeSource Mode=Self},
                 Path=Foreground}" />
     </TextBlock>
 </StackPanel>
2.4.2 FindAncestor(找上级)
<StackPanel>
    <Border Margin="10">
        <Border Margin="20">
            <TextBlock>
                <Run Text="Hello" />
                <!--AncestorType:上级类型 RelativeSource:相对源 AncestorLevel:上级层级-->
                <Run Text="{Binding RelativeSource={RelativeSource Mode=FindAncestor,
                    AncestorType=Border,AncestorLevel=2}, Path=Margin}" />
            </TextBlock>
        </Border>
    </Border>
</StackPanel>
2.4.3 TemplatedParent绑定模板元素
<Window.Resources>
    <ControlTemplate x:Key="MyControlTemplate" TargetType="Button">
        <Canvas>
            <Ellipse Width="{Binding RelativeSource={RelativeSource Mode=TemplatedParent},Path=Width}"
                     Height="{Binding RelativeSource={RelativeSource Mode=TemplatedParent},Path=Height}"
                     Fill="{Binding RelativeSource={RelativeSource Mode=TemplatedParent},Path=Background}"/>
        </Canvas>
    </ControlTemplate>
</Window.Resources>
<StackPanel>
    <Button Width="120" Height="45" Margin="5" Background="Green"
            Template="{StaticResource MyControlTemplate}">
    </Button>
</StackPanel>
3. Binding绑定模式
3.1 Mode属性
当一个实体的属性绑定到控件的属性之后,还需要指明这两者之间的绑定关系。这个就是Binding类的Mode属性,Mode属性是一个枚举类型。它有如下几个情况:
注:目标属性即前台UI,源属性即后台
| 枚举值 | 说明 |
| TwoWay(常用) | 双向绑定,即导致更改源属性或目标属性时自动更新另一方。 |
| OneWay(常用) | 单向绑定,在更改绑定源(源)时更新绑定目标(目标)。 |
| OneTime | 一次绑定,在应用程序启动或数据上下文更改时,更新绑定目标。 |
| OneWayToSource | 在目标属性更改时,更新源属性。 |
| Default | 默认绑定,文本框的默认绑定是双向的,而其他大多数属性默认为单向绑定。 |
3.2 值改变时机
如果前端的值发生改变,后端的值在什么时候跟着改变。它由Binding类的UpdateSourceTrigger属性的值决定 。这个属性也是一个枚举类型。
| 枚举值 | 说明 |
| Default | 采用控件各自的UpdateSourceTrigger默认值。 |
| PropertyChanged | 每当绑定目标属性发生更改时,都会更新绑定源。 |
| LostFocus | 每当绑定目标元素失去焦点时,都会更新绑定源。 |
| Explicit | 仅在调用 System.Windows.Data.BindingExpression.UpdateSource 方法时更新绑定源。 |
4. 前后端数据通知
4.1 INotifyPropertyChanged接口
INotifyPropertyChanged接口,通知客户端属性值已更改。通常情况下 我们单独创建一个类来继承该接口,目的是ViewModel、Model都可以继承这个类,不用重复去写冗余代码。
namespace WpfApp2.Common
{
    public class NotifyPropertyChanged :INotifyPropertyChanged
    {
        public event PropertyChangedEventHandler? PropertyChanged;
        /// <summary>
        /// 属性更改通知事件
        /// [CallerMemberName]添加该属性后,可以自动获取调用该方法的属性名作为参数
        /// </summary>
        /// <param name="propertyName"></param>
        protected virtual void OnPropertyChanged([CallerMemberName] string? propertyName = null)
        {
            PropertyChanged?.Invoke(this, new PropertyChangedEventArgs(propertyName));
        }
    }
}
public class PersonViewModel : NotifyPropertyChanged
{
private string name = "Tom";
public string Name
{
get { return name; }
set
{
name = value;
OnPropertyChanged();
}
}
private int age = 18;
public int Age
{
get { return age; }
set
{
age = value;
OnPropertyChanged();
}
}
}4.2 ObservableCollection泛型集合
ObservableCollection<T>泛型集合是一个动态数据集合,它可在添加、删除项目或刷新整个列表时提供通知。它继承了INotifyCollectionChanged和INotifyPropertyChanged,所以当元素数量发生变化时,前端界面也会同步发生变化。
首先定义界面用于测试:
<Grid>
    <Grid.ColumnDefinitions>
        <ColumnDefinition Width="*" />
        <ColumnDefinition Width="*" />
    </Grid.ColumnDefinitions>
    <ListView x:Name="myList" ItemsSource="{Binding Persons}">
        <ListView.View>
            <GridView>
                <GridViewColumn Header="姓名" DisplayMemberBinding="{Binding Name}" Width="60" />
                <GridViewColumn Header="年龄" DisplayMemberBinding="{Binding Age}" Width="50" />
            </GridView>
        </ListView.View>
    </ListView>

    <StackPanel Grid.Column="1" Orientation="Vertical">
        <StackPanel Orientation="Horizontal" Height="Auto" Margin="10">
            <TextBlock Text="姓名:" />
            <TextBox x:Name="txtName" Width="200" />
        </StackPanel>
        <StackPanel Orientation="Horizontal" Height="Auto" Margin="10">
            <TextBlock Text="年龄:" />
            <TextBox x:Name="txtAge" Width="200" />
        </StackPanel>
        <Button Width="100" Height="20" Content="添加" Click="Add_Person" />
    </StackPanel>
</Grid>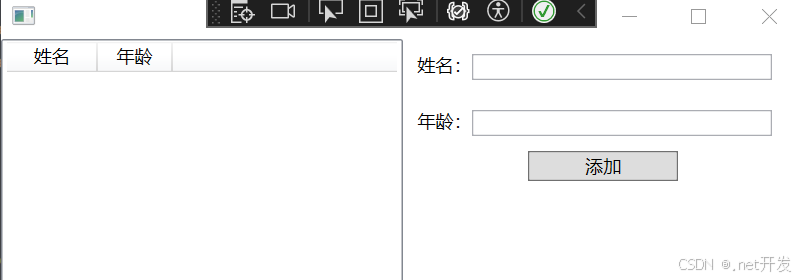
定义一个ViewModel对象,类型为ObservableCollection<PersonViewModel>:
public class BindListViewModel
{
    public ObservableCollection<PersonViewModel> Persons { get; set; } = new();
}
实现添加按钮:
private void Add_Person(object sender, RoutedEventArgs e)
{
    if (DataContext is BindListViewModel person)
    {
        PersonViewModel newPerson = new PersonViewModel()
        {
            Name = txtName.Text,
            Age = int.Parse(txtAge.Text)
        };
        person.Persons.Add(newPerson);
    }
}
运行效果:

可以发现我们没有继承 INotifyPropertyChanged,但是依然实现说数据的通知,这是因为ObservableCollection继承了INotifyCollectionChanged和INotifyPropertyChanged。
5. 值转换器
5.1 IValueConverter转换器
前后端建立绑定时,定义一套自定义逻辑,让前端显示的数据与后端获取的数据建立一定的对应关系。
比如Person对象有一个年龄(Age)属性,我们在前端显示某个人的年龄时,可以根据不同的年龄,显示不同的背景颜色。这个时候,实际上是根据这个输入的整型数据返回一个不同颜色的画刷。
首先,我们定义一个根据年龄转换成不同颜色的画刷的转换器,继承IValueConverter接口,并实现它的方法:
public class AgeToBrush : IValueConverter
{
    /// <summary>
    /// 根据自定义逻辑判断,返回一个object对象给前端XAML使用
    /// </summary>
    /// <param name="value"></param>
    /// <param name="targetType"></param>
    /// <param name="parameter"></param>
    /// <param name="culture"></param>
    /// <returns></returns>
    public object Convert(object value, Type targetType, object parameter, CultureInfo culture)
    {
        Brush brush = Brushes.White;
        if (value != null && int.TryParse(value.ToString(), out int age))
        {

            brush = age switch
            {
                <= 10 => Brushes.Green,
                <= 20 => Brushes.Yellow,
                <= 30 => Brushes.Orange,
                _ => Brushes.Red
            };
        }
        return brush;
    }

    /// <summary>
    /// 将前端输入的数据转换成另一个对象返回给后端的数据源
    /// </summary>
    /// <param name="value"></param>
    /// <param name="targetType"></param>
    /// <param name="parameter"></param>
    /// <param name="culture"></param>
    /// <returns></returns>
    public object ConvertBack(object value, Type targetType, object parameter, CultureInfo culture)
    {
        throw new Exception();
    }
}
讲转换器定义为资源:
<Window.Resources>
    <local1:AgeToBrush x:Key="AgeToBrush" />
</Window.Resources>
进行绑定:
<Window.Resources>
    <local1:AgeToBrush x:Key="AgeToBrush" />
</Window.Resources>
<StackPanel Margin="10">
    <StackPanel Orientation="Horizontal" Margin="5">
        <TextBlock Text="姓名:" />
        <TextBox x:Name="txtName" Width="100" />
    </StackPanel>
    <StackPanel Orientation="Horizontal" Margin="5">
        <TextBlock Text="年龄:" />
        <TextBox x:Name="txtAge" Width="100"
                 Background="{Binding Converter={StaticResource AgeToBrush},ElementName=txtAge,Path=Text}" />
    </StackPanel>
</StackPanel>
5.2 IMultiValueConverter多值转换器
实例:根据年龄以及存款进行显示评价
public class MultiValueConverter : IMultiValueConverter
{
    // 第一个参数变成了values,表示它可以传入多个值
    public object Convert(object[] values, Type targetType, object parameter, CultureInfo culture)
    {
        string result = "";
        if (int.TryParse(values[0].ToString(), out int age) && decimal.TryParse(values[1].ToString(), out decimal money))
        {
            result = (age, money) switch
            {
                (<=20,>=50000) => "优秀",
                (>=40, <=50000) => "差劲",
                _ => "未知"
            };
        }
        return result;
    }

    public object[] ConvertBack(object value, Type[] targetTypes, object parameter, CultureInfo culture)
    {
        throw new NotImplementedException();
    }
}
<Window.Resources>
<local1:AgeToBrush x:Key="AgeToBrush" />
<local1:MultiValueConverter x:Key="MultiValueConverter" />
</Window.Resources>
<StackPanel Margin="10">
<StackPanel Orientation="Horizontal" Margin="5">
<TextBlock Text="姓名:" />
<TextBox x:Name="txtName" Width="100" />
</StackPanel>
<StackPanel Orientation="Horizontal" Margin="5">
<TextBlock Text="年龄:" />
<TextBox x:Name="txtAge" Width="100"
Background="{Binding Converter={StaticResource AgeToBrush},ElementName=txtAge,Path=Text}" />
</StackPanel>
<StackPanel Orientation="Horizontal" Margin="5">
<TextBlock Text="存款:" />
<TextBox x:Name="txtMoney" Width="100" />
</StackPanel>
<StackPanel Orientation="Horizontal" Margin="5">
<TextBlock Text="评价:"/>
<TextBlock>
<Run>
<Run.Text>
<MultiBinding Converter="{StaticResource MultiValueConverter}">
<Binding ElementName="txtAge" Path="Text" />
<Binding ElementName="txtMoney" Path="Text" />
</MultiBinding>
</Run.Text>
</Run>
</TextBlock>
</StackPanel>
</StackPanel>
6. ValidationRule验证规则
ValidationRule是一个抽象类,提供创建自定义规则的一个方式,用于检查用户输入的有效性。
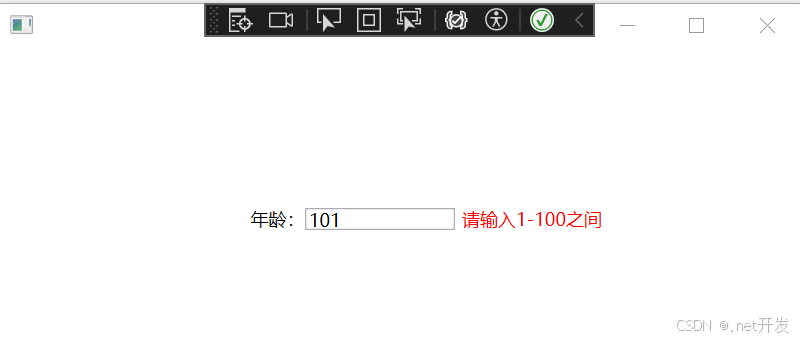
案例:判断用户输入年龄是否正常
1. 定义验证规则,需要继承ValidationRule,并重写它的Validate方法
public class AgeValidationRule : ValidationRule
{
    public override ValidationResult Validate(object value, CultureInfo cultureInfo)
    {
        if (int.TryParse(value.ToString(),out int age))
        {
            if (age >=1 && age <= 100)
            {
                return new ValidationResult(true, null);
            }
        }
        return new ValidationResult(false, "请输入1-100之间");
    }
}
2. 在xaml中绑定绑定验证规则(在进行错误信息展示时,ValidationRule会把验证结果保存在AdornedElementPlaceholder的AdornedElement属性中,所以,需要利用绑定的方法去绑定下面这个路径:AdornedElement.(Validation.Errors).CurrentItem.ErrorContent)
 <Window.DataContext>
     <local3:ValidationRuleVIewModel />
 </Window.DataContext>
 <StackPanel Height="100" Width="200">
     <StackPanel Orientation="Horizontal">
         <TextBlock Text="年龄:" />
         <TextBox Width="100" Height="15">
             <!--文本绑定验证-->
             <TextBox.Text>
                 <Binding Path="Age" UpdateSourceTrigger="PropertyChanged">
                     <Binding.ValidationRules>
                         <local2:AgeValidationRule ValidatesOnTargetUpdated="True" />
                     </Binding.ValidationRules>
                 </Binding>
             </TextBox.Text>
             <!--显示错误信息-->
             <Validation.ErrorTemplate>
                 <ControlTemplate>
                     <DockPanel>
                         <TextBlock Foreground="Red" Margin="5,0,0,0" DockPanel.Dock="Right"
                             Text="{Binding ElementName=AdornedElementPlaceholder,Path=AdornedElement.(Validation.Errors).CurrentItem.ErrorContent}" />
                         <AdornedElementPlaceholder x:Name="AdornedElementPlaceholder" />
                     </DockPanel>
                 </ControlTemplate>
             </Validation.ErrorTemplate>
         </TextBox>
     </StackPanel>
 </StackPanel>
3. 运行项目
7. 命令
7.1 命令概述
WPF 中的路由命令模型可分解为四个主要概念:命令、命令源、命令目标和命令绑定:
- 命令是要执行的操作。
- 命令源是调用命令的对象。
- 命令目标是在其上执行命令的对象。
- 命令绑定是将命令逻辑映射到命令的对象。
如上所述,命令其实就是ICommand接口的实现,命令源是调用命令的对象,这些对象一定会继承ICommandSource接口,而命令绑定就像是一座桥梁,它将命令与逻辑代码建立一种映射,这座桥梁就是CommandBinding。最后使用Binding对象将命令与命令源建立绑定。
7.2 ICommand接口
7.2.1 ICommand简单实现(不带参数)
案例:模拟登陆
1. 实现ICommand(在这里定义了一个委托,因为我们虽然命令的执行逻辑一般是写在Execute中的,但是如果说项目庞大后,Execute中就会有许多内容,所以我们定义一个委托来代替我们完成)
public class CommandDemo : ICommand
{
    private readonly Action _action; // 委托要执行的业务逻辑

    public CommandDemo(Action action)
    {
        _action = action;
    }

    public event EventHandler? CanExecuteChanged;

    /// <summary>
    /// 当前命令是否可以执行
    /// </summary>
    /// <param name="parameter"></param>
    /// <returns></returns>
    /// <exception cref="NotImplementedException"></exception>
    public bool CanExecute(object? parameter)
    {
        return true;
    }

    /// <summary>
    /// 执行命令
    /// </summary>
    /// <param name="parameter"></param>
    /// <exception cref="NotImplementedException"></exception>
    public void Execute(object? parameter)
    {
        _action?.Invoke();
    }
}
2. 建立ViewModel
using System;
using System.Collections.Generic;
using System.Linq;
using System.Text;
using System.Threading.Tasks;
using System.Windows;
using WpfApp3.Common;

namespace WpfApp3.ViewMode
{
    public class ICommandViewModel : NotifyPropertyChanged
    {
        // 初始化命令
        public ICommandViewModel()
        {
            // 将登陆事件逻辑绑定到登陆命令
            LoginCommand = new CommandDemo(() =>
            {
                if (UserName == "1" && PassWord == "1")
                {
                    MessageBox.Show("登陆成功!");
                }
                else
                {
                    MessageBox.Show("用户名或密码错误!");
                }
            });
        }

        private string userName;

        public string UserName
        {
            get { return userName; }
            set
            {
                userName = value;
                OnPropertyChanged();
            }
        }

        private string passWord;

        public string PassWord
        {
            get { return passWord; }
            set
            {
                passWord = value;
                OnPropertyChanged();
            }
        }

        // 声明一个登陆命令
        public CommandDemo LoginCommand { get; set; }
    }

}
3. 在xaml中绑定命令
    <Window.DataContext>
        <local1:ICommandViewModel />
    </Window.DataContext>
    <StackPanel Width="300" Height="200">
        <StackPanel Orientation="Horizontal" Margin="10">
            <TextBlock Text="账号:" />
            <TextBox Width="120" Text="{Binding UserName}" />
        </StackPanel>
        <StackPanel Orientation="Horizontal" Margin="10">
            <TextBlock Text="密码:" />
            <TextBox Width="120" Text="{Binding PassWord}" />
        </StackPanel>
        <Button Content="登录" Width="100" Height="30" Command="{Binding LoginCommand}" />
    </StackPanel>
4. 运行项目
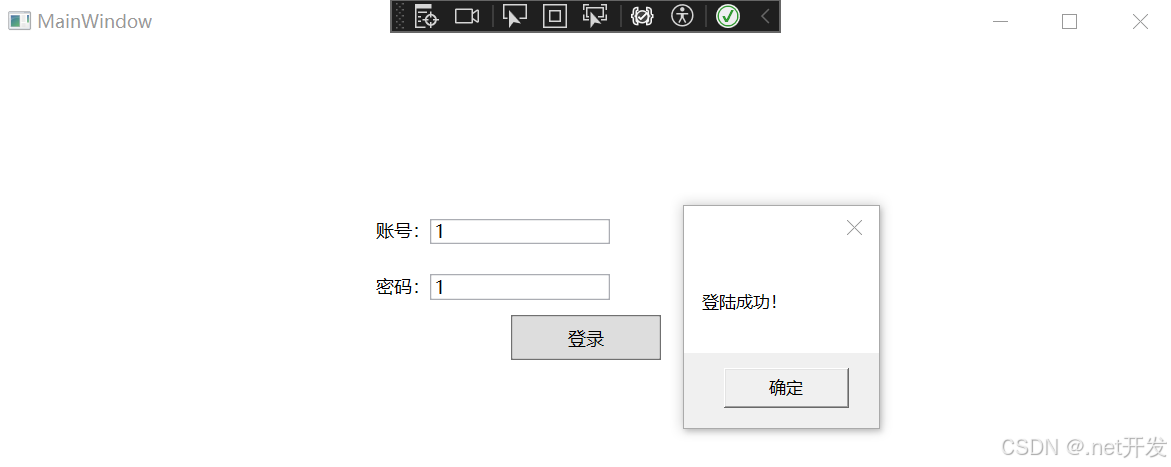
7.2.2 ICommand带参数实现
带参数的跟不带参数的实现是相似的,主需要做以下修改
1. 定义带参数的委托并初始化
private readonly Action<Object> _action2;

public CommandDemo(Action<Object> action)
{
    _action2 = action;
}
2. 在Execute方法中实现
public void Execute(object? parameter)
{
    _action?.Invoke();
    _action2?.Invoke(parameter);
}
3. 在ViewModel中声明命令并实现
public CommandDemo LoginCommand2 { get; set; }public ICommandViewModel()
{
// 将登陆事件逻辑绑定到登陆命令
LoginCommand2 = new CommandDemo(p =>
{
MessageBox.Show(p.ToString());
});
}4. 在xaml中进行绑定
<Button Content="参数命令" Width="100" Height="30" Command="{Binding LoginCommand2}"
        CommandParameter="hello"/>
5. 运行项目
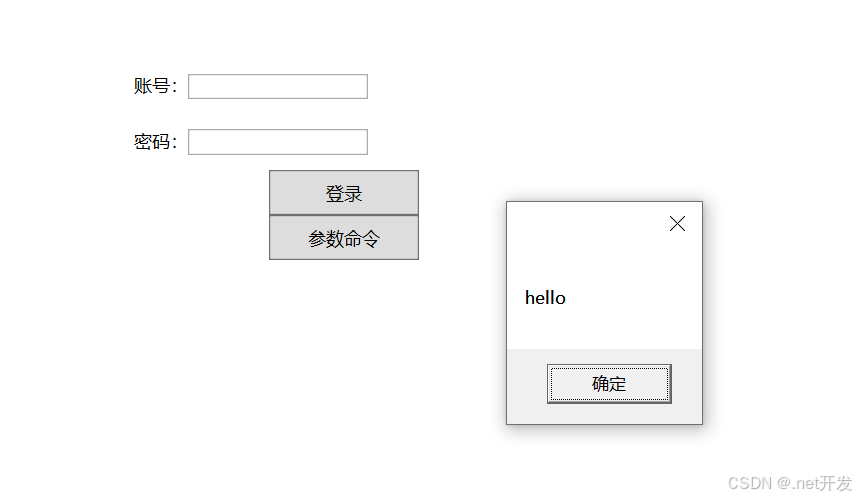
7.2.3 ICommand的泛型参数实现
1. 定义泛型委托命令并初始化
 public class RelayCommand<T> : ICommand
 {
     public event EventHandler? CanExecuteChanged;
     private Action<T> _action { get; set; }
     public RelayCommand(Action<T> action)
     {
         _action = action;
     }

     public bool CanExecute(object? parameter)
     {
         return true;
     }

     public void Execute(object? parameter)
     {
         _action?.Invoke((T)parameter);
     }
 }
2. 建ViewModel,初始化委托
namespace WpfApp3.ViewMode
{
    public class ManyMultiCommandViewModel : NotifyPropertyChanged
    {
        public RelayCommand<InputCommandParam> MutilParamCommand { get; set; }
        public ManyMultiCommandViewModel()
        {
            MutilParamCommand = new RelayCommand<InputCommandParam>(p =>
            {
                MessageBox.Show($"Id:{p.Id},Name:{p.Name}");
            });
        }
    }

    // 声明接收多个参数的类型
    public class InputCommandParam
    {
        public int Id { get; set; }
        public string Name { get; set; }
    }
}
3. 创建值转换器
public class MultiCommandParamConverter : IMultiValueConverter
{
    public object Convert(object[] values, Type targetType, object parameter, CultureInfo culture)
    {
        InputCommandParam input = new()
        {
            Id = System.Convert.ToInt32(values[0]),
            Name = values[1].ToString()
        };
        return input;
    }

    public object[] ConvertBack(object value, Type[] targetTypes, object parameter, CultureInfo culture)
    {
        throw new NotImplementedException();
    }
}
4. xaml中进行绑定
<Window.DataContext>
    <local1:ManyMultiCommandViewModel />
</Window.DataContext>
<StackPanel>
    <Button Content="多值传参" Width="120" Height="40"
            Command="{Binding MutilParamCommand}">
        <Button.Resources>
            <local2:MultiCommandParamConverter x:Key="MultiCommandParamConverter" />
        </Button.Resources>
        <Button.CommandParameter>
            <!--Source:直接给参数赋值-->
            <MultiBinding Converter="{StaticResource MultiCommandParamConverter}">
                <Binding Source="1" />
                <Binding Source="baobao" />
            </MultiBinding>
        </Button.CommandParameter>
    </Button>
</StackPanel>
5. 运行项目
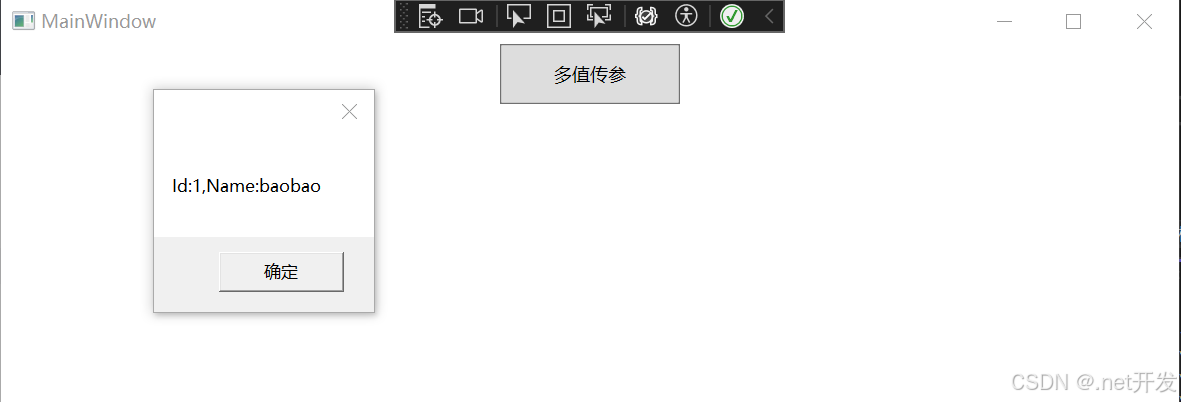
7.3 WPF事件转Command命令
什么是WPF事件转Command命令?就比如我们执行某个事件后需要通过这个事件去执行其他的命令。
这时候就需要用到WPF提供的一个组件,它的名字叫Microsoft.Xaml.Behaviors.Wpf,通过NuGet去下载。
1. 安装NuGet包

2. 定义ViewModel,初始化命令
public class EventToCommandViewModel : NotifyPropertyChanged
{
    public CommandDemo TextClick { get; set; }

    private string text;

    public string Text
    {
        get { return text; }
        set
        {
            text = value;
            OnPropertyChanged();
        }
    }

    public EventToCommandViewModel()
    {
        TextClick = new CommandDemo(p =>
        {
            Text += $"当前时间:{DateTime.Now},参数:{p} \n";
        });
    }
}
3. 在xaml中进行绑定(鼠标点击表格后实现TextClick命令操作)
<Window.DataContext>
    <local1:EventToCommandViewModel />
</Window.DataContext>
<StackPanel>
    <TextBox TextWrapping="Wrap" Text="{Binding Path=Text}">
        <nuget1:Interaction.Triggers>
            <!--PreViewMouseDown:鼠标按下时引发的事件-->
            <nuget1:EventTrigger EventName="PreviewMouseDown">
                <nuget1:InvokeCommandAction Command="{Binding TextClick}"
                                            CommandParameter="hello">

                </nuget1:InvokeCommandAction>
            </nuget1:EventTrigger>
        </nuget1:Interaction.Triggers>
    </TextBox>
</StackPanel>
4. 运行项目


