【Rust】007-包管理与模块管理
文章目录
- 【Rust】007-包管理与模块管理
- 一、包管理器:Cargo
- 1、简介
- Cargo 官方文档
- 仓库
- 2、项目初始化
- 3、写一个小程序
- 任务目标
- 寻找合适的库
- 添加库到我们的项目中
- 代码实现
- `cargo run`运行
- 二、模块管理
- 1、概述
- 2、文件作为模块
- 第一步:创建文件 `apple.rs`
- 第二步:创建文件 `pear.rs`
- 第三步:在 `main.rs` 引入
- 第四步:调用模块内的函数
- 另一种写法
- 3、文件夹作为模块
- 概述
- 文件结构
- 相关文件
- 在 `main.rs` 中引入并调用函数
- 4、文件内新建子模块
- 子模块代码示例
- `main.rs` 中调用
- 5、一个文件下定义多个模块
- 文件结构
- `fruit.rs` 定义
- `main.rs` 调用
- 6、子模块新版写法
- 说明
- 文件结构
- `fruit.rs` 写法
- `main.rs` 调用
一、包管理器:Cargo
1、简介
Cargo 是Rust 语言的包管理器。Cargo 可以:
- 下载你的 Rust 包的依赖项;
- 编译你的包;
- 创建可分发的包,并将它们上传到crates.io(即Rust社区的包注册表)。
Cargo 官方文档
https://doc.rust-lang.org/cargo/
仓库
https://crates.io/
2、项目初始化
首先我们新建一个文件夹my_project,然后为这个文件夹初始化一个 Rust 项目吧!
mkdir my_project
>> cd my_project
>> cargo init
执行完上述三个命令之后,Cargo 会为my_project文件夹初始化一个 bin 类型的 Rust 项目(即默认编译目标为一个可执行的二进制文件)。我们可以看一下my_project文件夹里的内容:
my_project
├── Cargo.toml
└── src
    └── main.rs
其中src/main.rs中的main函数为整个程序的入口。Cargo.toml为这个项目的配置文件,可以配置包括依赖的包,编译选项等,但因为这个项目是一个新的项目,目前除了基本信息外没有其他内容。
我们用cargo run运行一下这个项目,成功输出 Hello, world!
cargo run
   Compiling my_project v0.1.0 (/Users/bytedance/rust/my_project)
    Finished dev [unoptimized + debuginfo] target(s) in 0.99s
     Running `target/debug/my_project`
Hello, world!
如果想要初始化一个库类型的项目,供其他使用方使用(例如发布到 crates.io 上),在初始化的时候需要运行
cargo init --lib
它会在src文件夹下新建一个lib.rs的文件作为整个库的入口。
3、写一个小程序
任务目标
我们随机从 0,1 中取一个数,如果是 0,就输出 Hello,如果是 1 就输出 World。
寻找合适的库
我们首先去https://crates.io/上找一下有没有随机相关的库可以用。搜索一下就可以发现,有一个使用量非常多的库 rand。
添加库到我们的项目中
第一种方式:
>> cargo add rand
第二种方式:直接编辑Cargo.toml,在[dependencies]这一栏下增加:
rand = "0.8.5"
代码实现
// 引入 rand 库中的 random 函数,用于生成随机数
use rand::random;

fn main() {
    // 生成一个随机的 i64 类型的整数,然后对 2 取模
    // 结果要么是 0,要么是 1
    let gen = random::<i64>() % 2;

    // 如果随机数取模结果是 0,打印 "Hello"
    if gen == 0 {
        println!("Hello");
    } else { // 否则(结果是 1),打印 "World"
        println!("World");
    }
}
cargo run运行
PS D:\MyFile\RustroverProjects\hello> cargo run
   Compiling byteorder v1.5.0
   Compiling getrandom v0.2.15
   Compiling rand_core v0.6.4
   Compiling zerocopy v0.7.35
   Compiling ppv-lite86 v0.2.20
   Compiling rand_chacha v0.3.1
   Compiling rand v0.8.5
   Compiling hello v0.1.0 (D:\MyFile\RustroverProjects\hello)
    Finished dev [unoptimized + debuginfo] target(s) in 2.26s
     Running `target\debug\hello.exe`
World
PS D:\MyFile\RustroverProjects\hello>


# 多运行两次
PS D:\MyFile\RustroverProjects\hello> cargo run
    Finished dev [unoptimized + debuginfo] target(s) in 0.02s
     Running `target\debug\hello.exe`
World
PS D:\MyFile\RustroverProjects\hello> cargo run
    Finished dev [unoptimized + debuginfo] target(s) in 0.02s
     Running `target\debug\hello.exe`
Hello
PS D:\MyFile\RustroverProjects\hello>
二、模块管理
1、概述
当项目非常大的时候,我们需要一种将项目代码根据不同功能划分的方法,且各个功能之间的访问是可以自主控制的。这个方法在 Rust 中就是模块。
通过 Rust 的模块管理,我们可以做到:
- 组织项目代码;
- 可见性控制。
2、文件作为模块
第一步:创建文件 apple.rs
pub fn eat_apple() {
    println!("I eat apple");
}
第二步:创建文件 pear.rs
pub fn eat_pear() {
    println!("I eat pear");
}
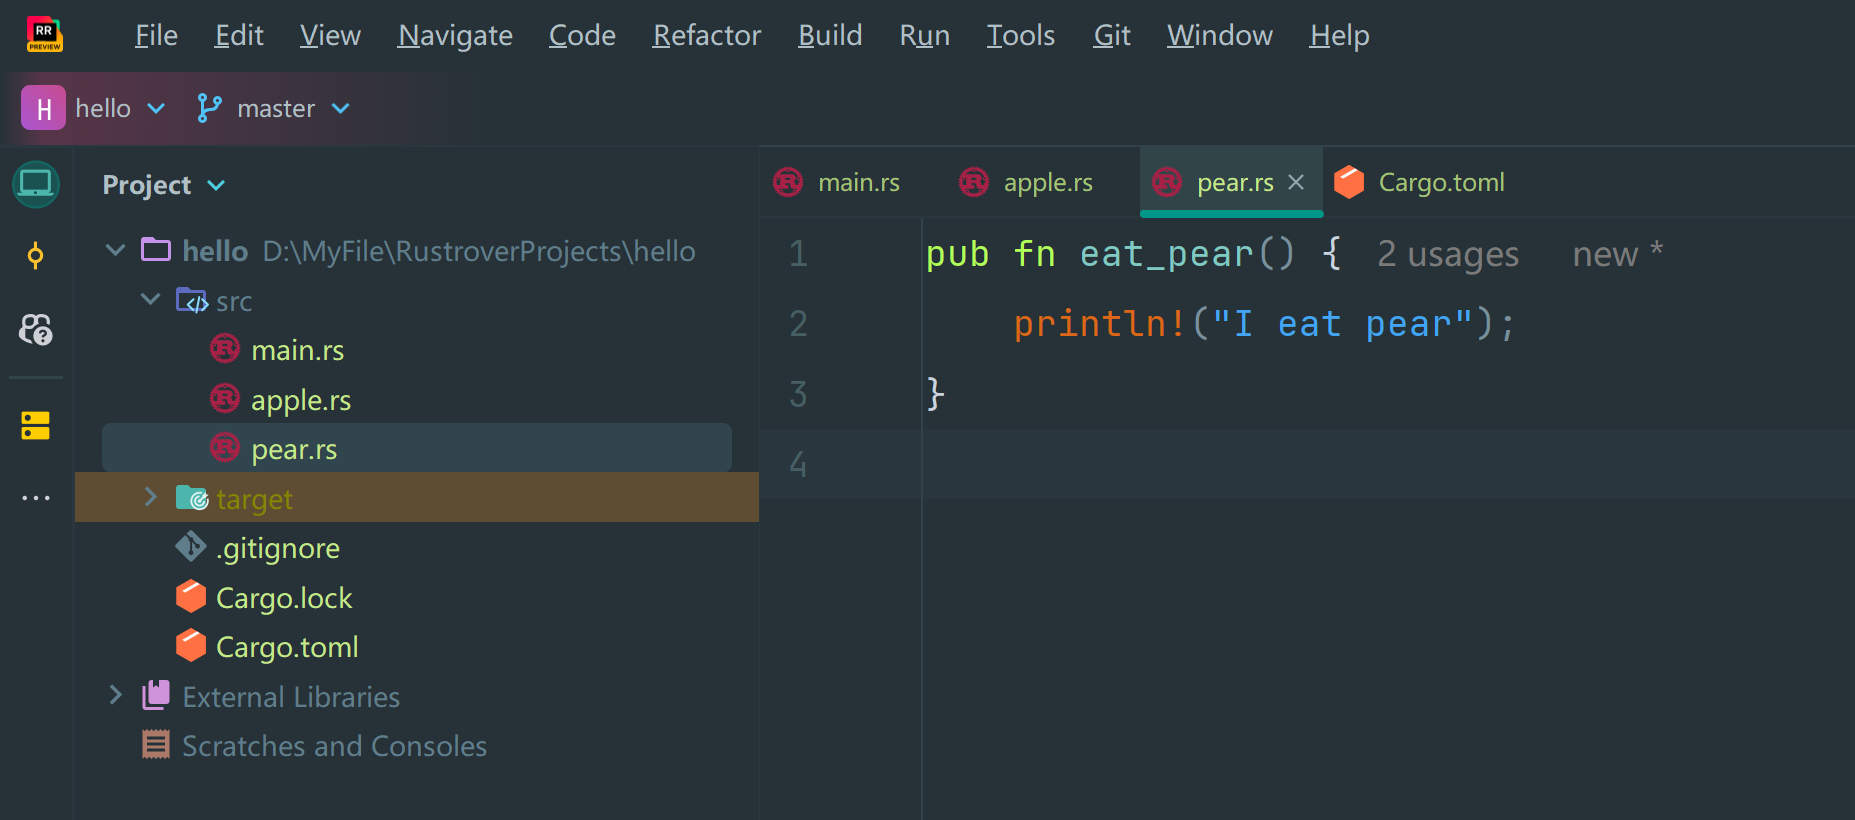
当前目录结构:
第三步:在 main.rs 引入
mod apple;
mod pear;

fn main() {
}
第四步:调用模块内的函数
mod apple;
mod pear;

fn main() {
    apple::eat_apple();
    pear::eat_pear();
}
另一种写法
mod apple;
mod pear;

use crate::apple::eat_apple;
use crate::pear::eat_pear;

fn main() {
    eat_apple();
    eat_pear();
}
3、文件夹作为模块
概述
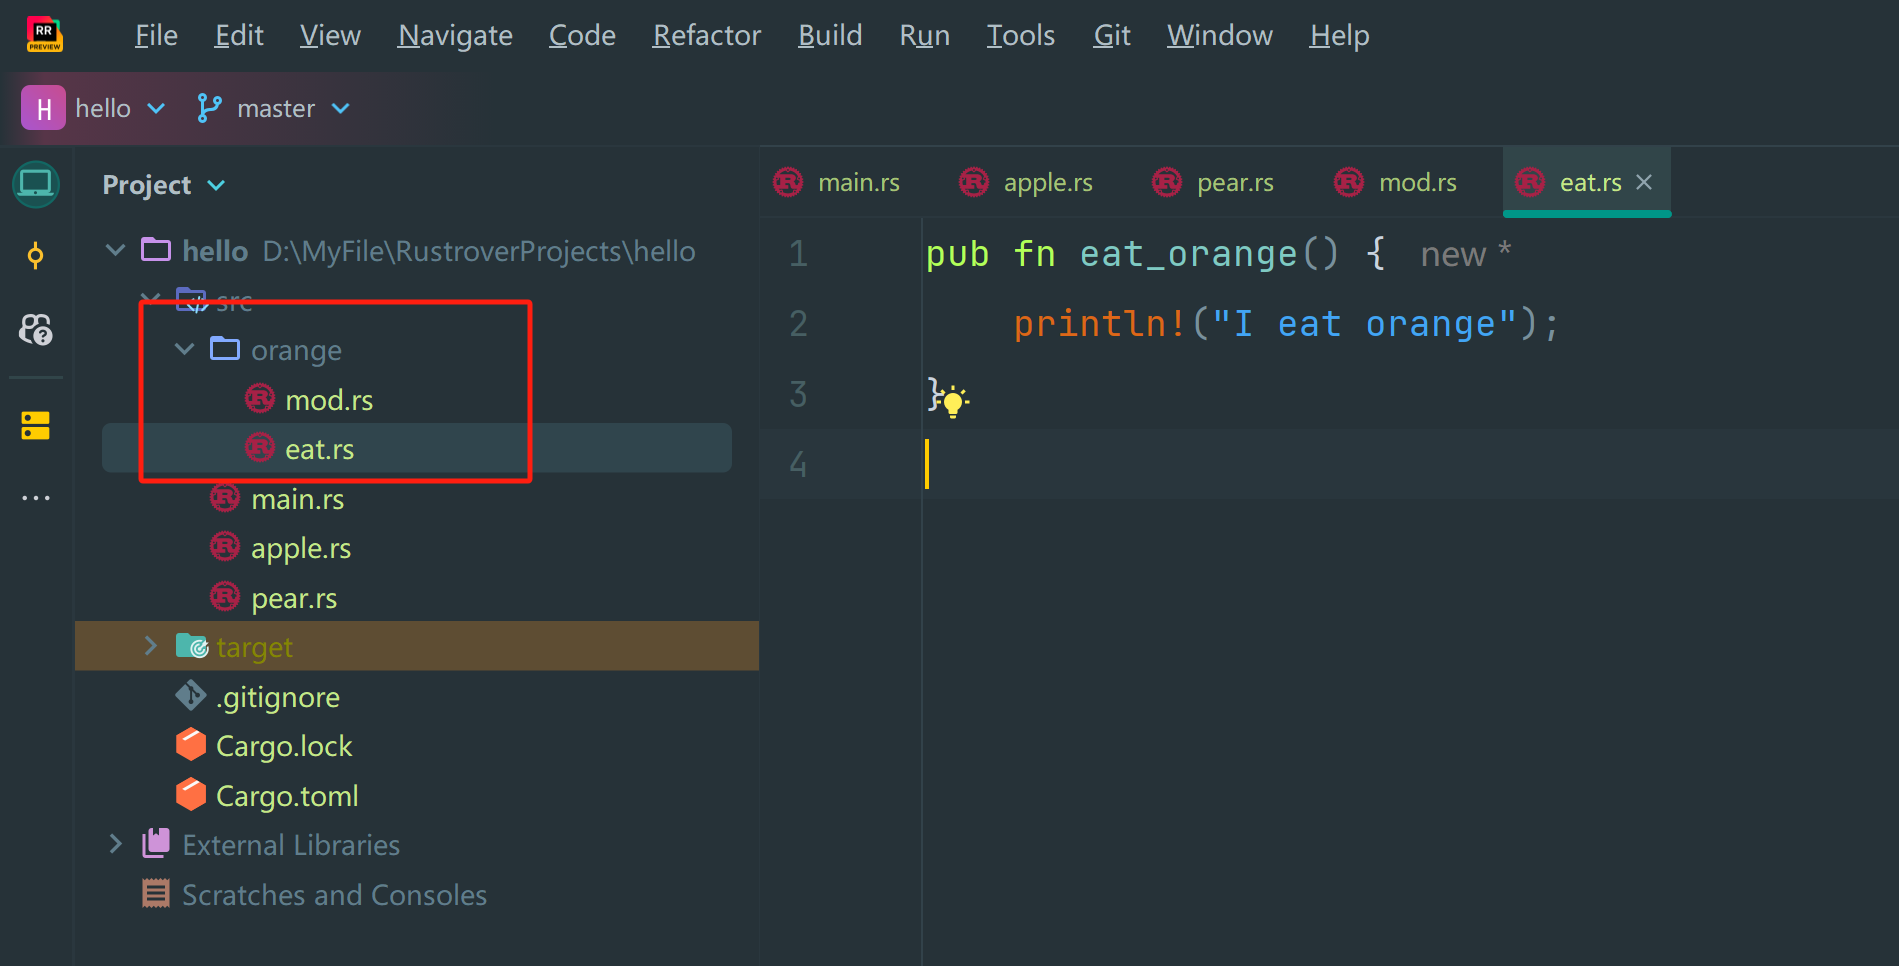
如果把所有模块都平铺到src/文件夹下的话,项目一大文件就会非常多。所以我们需要一个通过文件夹组织模块的方法。如果要将文件夹作为模块,在文件夹下一定要有一个mod.rs的文件。这个文件类似src/main.rs或者src/lib.rs,该文件(mod.rs)控制该文件夹下所有其他文件模块的引入。
文件结构
相关文件
// eat.rs
pub fn eat_orange() {
    println!("I eat orange");
}


// mod.rs
pub mod eat;
在 main.rs 中引入并调用函数
mod apple;
mod pear;
// 引入文件夹模块 orange
mod orange;

use crate::apple::eat_apple;
use crate::pear::eat_pear;

fn main() {
    eat_apple();
    eat_pear();
    // 调用 orange 文件夹下的 eat.rs 文件
    orange::eat::eat_orange();
}
4、文件内新建子模块
子模块代码示例
在文件内如果想新建模块的话,可以用mod关键字,且这个是可以嵌套的
mod fruit {
    mod apple {
        pub fn eat_apple() {
            println!("I eat apple");
        }
    }

    mod pear {
        pub fn eat_pear() {
            println!("I eat pear");
        }
    }

    mod orange {
        pub fn eat_orange() {
            println!("I eat orange");
        }
    }
}
main.rs 中调用
mod fruit {
    pub mod apple {
        pub fn eat_apple() {
            println!("I eat apple");
        }
    }

    pub mod pear {
        pub fn eat_pear() {
            println!("I eat pear");
        }
    }

    pub mod orange {
        pub fn eat_orange() {
            println!("I eat orange");
        }
    }
}

fn main() {
    fruit::apple::eat_apple();
}
5、一个文件下定义多个模块
文件结构
your_project/
├── src/
│   ├── main.rs
│   └── fruit.rs
fruit.rs 定义
pub mod apple {
    pub fn eat_apple() {
        println!("I eat apple");
    }
}

pub mod pear {
    pub fn eat_pear() {
        println!("I eat pear");
    }
}

pub mod orange {
    pub fn eat_orange() {
        println!("I eat orange");
    }
}
main.rs 调用
mod fruit;

fn main() {
    fruit::apple::eat_apple();
}
6、子模块新版写法
说明
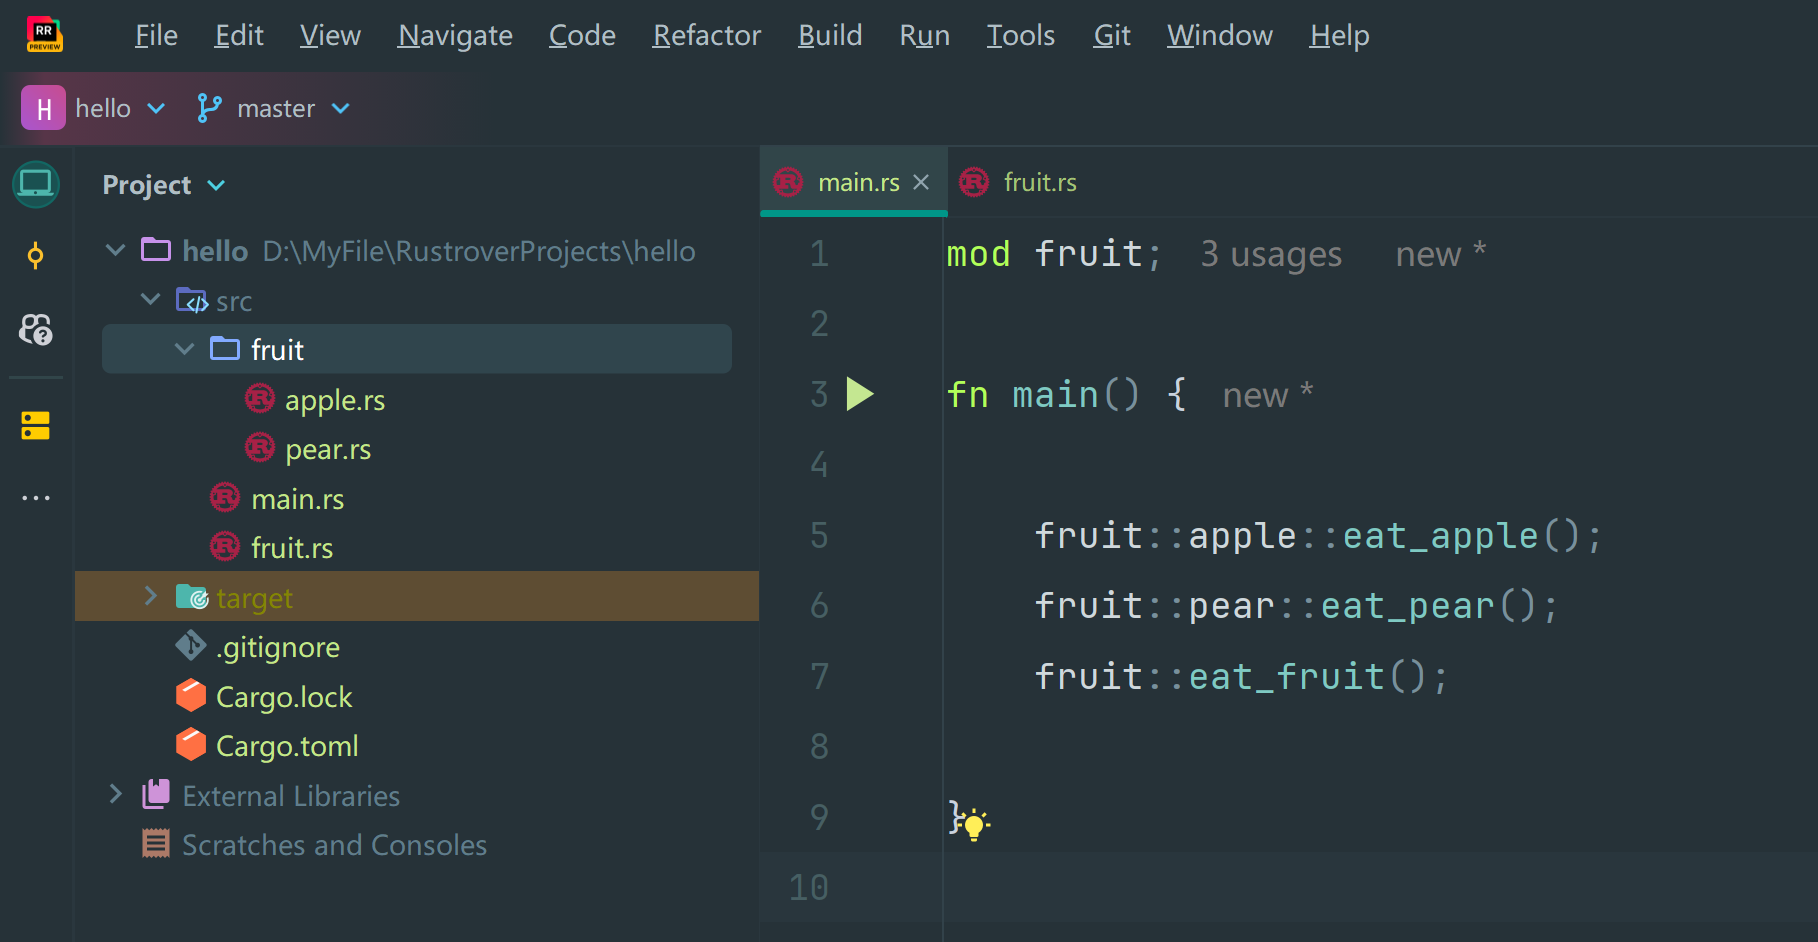
新版本的改进:在较新的 Rust 版本中,你可以将 fruit.rs 模块的子模块放在一个同名的目录中,即 fruit/ 目录。这种方式让代码结构更清晰,尤其是当模块变得复杂时。
例如,你有一个 fruit.rs 文件,它是一个模块。你可以在项目的同一层级下创建一个名为 fruit 的目录,然后在这个目录中放置该模块的子模块文件。
文件结构
fruit.rs 写法
pub mod apple;
pub mod pear;

pub fn eat_fruit() {
    println!("I eat apple");
}
main.rs 调用
mod fruit;

fn main() {

    fruit::apple::eat_apple();
    fruit::pear::eat_pear();
    fruit::eat_fruit();

}


