需求:将一个组件拖动至页面任何位置,记录并回显
要拖动的组件:
         <div
            class="left left_module_text"
            draggable="true"
            @dragstart="dragstart($event)"
            @dragend.stop="dragend1($event, { left: 0, top: 0 }, '文本', 1)"
          >文本 </div>
拖动后的组件:
说明(如果是需要拖动一个组件并且回显在同一个组件,那么只需要将两个div的style组合就起来就可以了)我得项目里需求是需要多个组件,所以就是用了for循环,再次拖动的时候就传入item,index,根据此参数修改组件对象的left和top记录位置
           <div
                v-for="(item, index) in mediaFrameList"
                :key="item.id"
                :style="`z-index:${item.zindex};background-image:${item.bkImage ? 'url(' + baseUrl+item.bkImage + ')' : 'none'};justify-content:${item.textAlign};background-color:${item.bkColor ? item.bkColor : 'transparent'};color:${item.fontColor};font-size:${item.fontSize + 'px'};align-items:${item.alignItem};font-weight:${item.bold == 1 ? 'bold' : 'normal'};font-style:${item.italic == 1 ? 'italic' : 'normal'};font-family:${item.fontFamily};left:${item.flLeft + 'px'};top:${item.flTop + 'px'};width:${item.flWidth + 'px'};height:${item.flHeight + 'px'};`"
                style="position: absolute; display: flex;background-size:100% 100%"
                ref="text"
                draggable="true"
                @dragstart="dragstart1($event, item)"
                @dragend.stop="dragend($event, item, index)"
                @click="handleClick(item, index)"
              >
{{item.content }}
            </div>
开始拖拽的方法,记录刚开始拖拽时组件的位置:
// 开始拖拽位置
    dragstart(e, item, index) {
      this.left = this.$refs['ceshi'].getBoundingClientRect().left//记录组件拖拽时的位置
      this.top = this.$refs['ceshi'].getBoundingClientRect().top
    },
    dragstart1(e, item, index) {
      this.left = e.clientX * 1
      this.top = e.clientY * 1
    },
拖拽后的方法,将拖拽后组件的位置存到数组中(mediaFrameList[index].flLeft):
  // 停止拖拽位置
    dragend(e, item, index) {
      let x = e.clientX - this.left
      let y = e.clientY - this.top
      const width = this.$refs.canvas.offsetWidth;
      const height = this.$refs.canvas.offsetHeight;

      this.mediaFrameList[index].flLeft = item.flLeft + x
      this.mediaFrameList[index].flTop = item.flTop + y
    }
 dragend1(e, item, content, flType) {
      let x = e.clientX - this.left
      let y = e.clientY - this.top
        this.mediaFrameList.push({
        flLeft: item.left + x,
        flTop: item.top + y,
        })
}
最后,我上面的代码由于逻辑比较多,所以不看也行,拿着我下面的代码就是一个简单的demo,没有使用任何插件
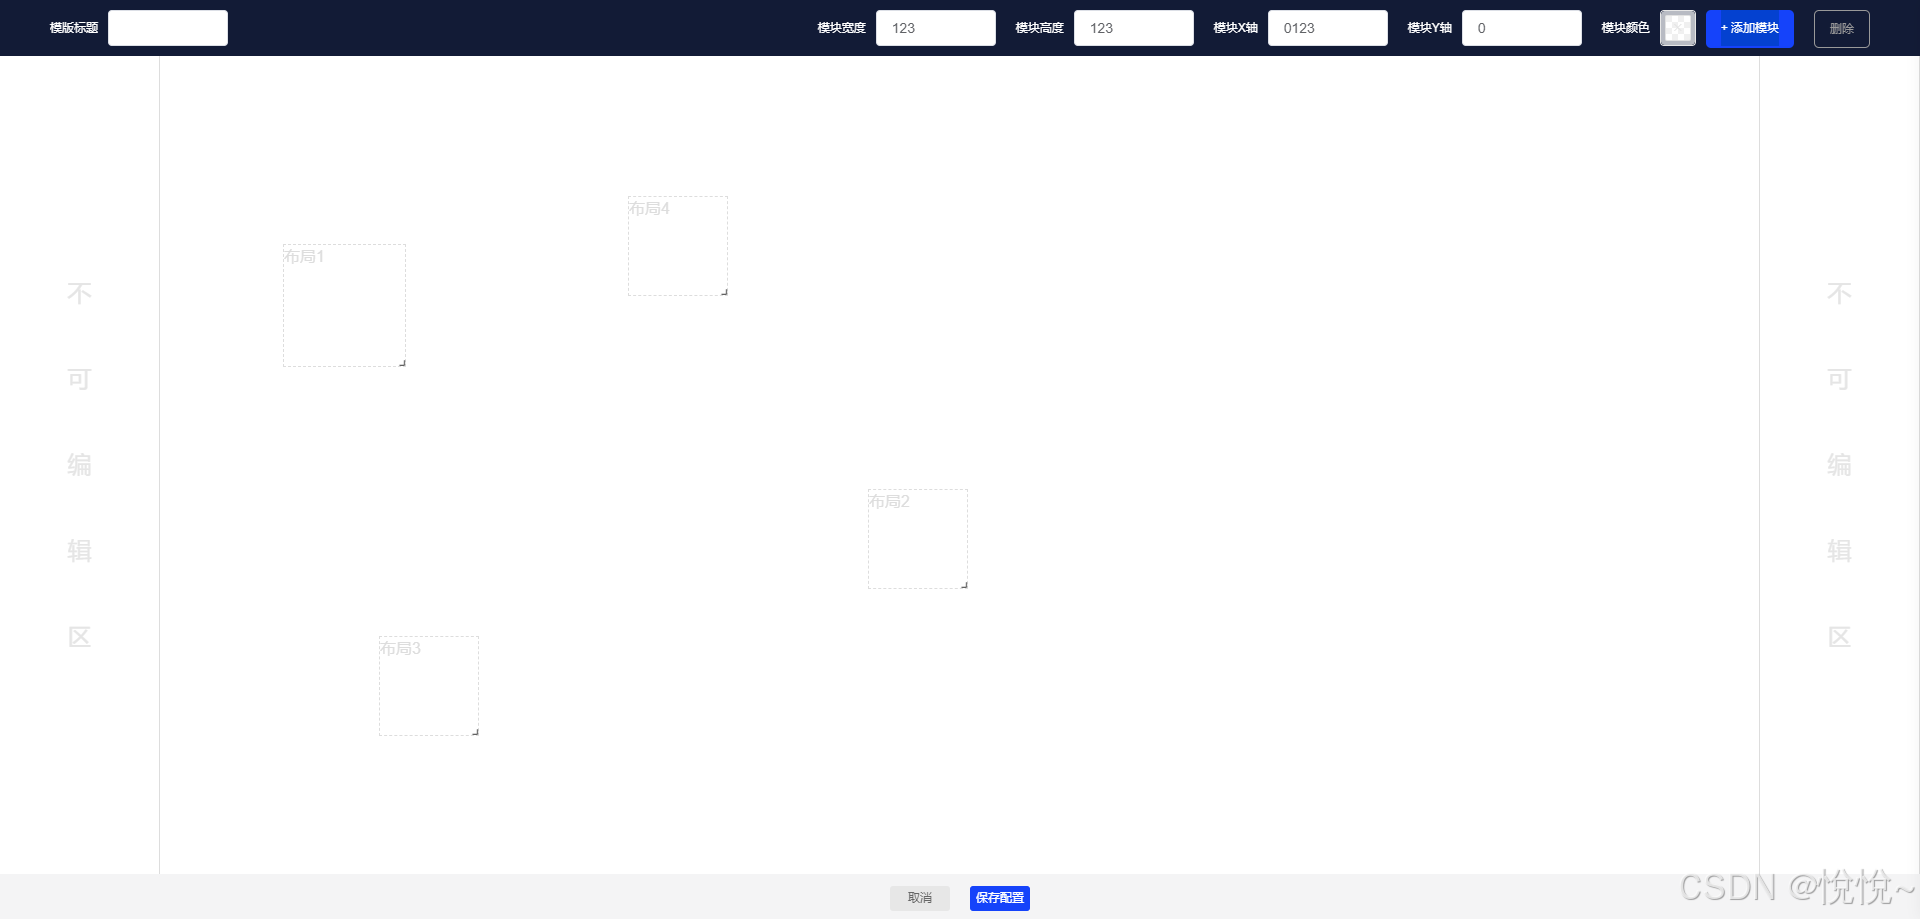
可以以这个为基础,这个开发空间还是很大的,比如:我在项目中还添加了设置组件的字体、字号、居中等等很多属性,自由度很高,还有回显示添加的等比缩,等比放大
<template>
  <div
    class="index_admin_form"
    v-loading="loading"
  >
    <div
      class="top_box"
      style="position: relative;"
    >
      <div
        class="top"
        style="display: flex;"
      >
        <div class="title">模版标题</div>
        <el-input
          style="width: 120px;"
          v-model="cfName"
          maxlength="20"
        ></el-input>

        <!-- <div class="title">状态</div>
        <el-switch
          style="align-items: center;height: 36px;"
          v-model="value"
          active-color="#1543FA"
          inactive-color="#999"
        >
        </el-switch> -->
      </div>
      <div
        class="top_right"
        style="display: flex;"
      >
        <div class="title">模块宽度</div>
        <el-input
          style="width: 120px;"
          v-model="selectWidth"
          @change="selectWidthChange"
        ></el-input>
        <div class="title">模块高度</div>
        <el-input
          style="width: 120px;"
          v-model="selectHeight"
          @change="selectHeightChange"
        ></el-input>
        <div class="title">模块X轴</div>
        <el-input
          style="width: 120px;"
          v-model="selectX"
          @change="selectXChange"
        ></el-input>
        <div class="title">模块Y轴</div>
        <el-input
          style="width: 120px;"
          v-model="selectY"
          @change="selectYChange"
        ></el-input>
        <div class="title">模块颜色</div>
        <el-color-picker
          show-alpha
          class="font_color"
          title="字体颜色"
          style="margin-right: 10px;"
          v-model="bkColor"
          @change="fontColorChange"
          :disabled="colordisabled"
        ></el-color-picker>
        <div
          class="top_right_btn_add"
          @click="addMoudle"
        >+ 添加模块</div>
        <div
          class="top_right_btn_del"
          @click="delMoudle"
        >删除</div>

      </div>
    </div>
    <el-row style="height: 89%;">
      <el-col
        :span="2"
        style="height:  100%;border-right: 1px solid #ddd;position: relative;"
      >
        <div class="no_edit">
          <div style="align-self: center;">
            <div class="no_edit_title">不</div>
            <div class="no_edit_title">可</div>
            <div class="no_edit_title">编</div>
            <div class="no_edit_title">辑</div>
            <div class="no_edit_title">区</div>
          </div>
        </div>

      </el-col>
      <el-col
        :span="20"
        style="height:  100%;border-right: 1px solid #ddd;position: relative;"
      >

        <div
          style="position: relative;width: 100%;height: 100%;"
          ref="canvas"
        >

          <div
            v-for="(item,index) in moduleList"
            :key="index"
            style=""
            :style="`position: absolute;left:${item.flLeft}px;top:${item.flTop}px;border:${item.isSelect?'1px dashed #333333':'1px dashed #DDDDDD'} ;color:${item.isSelect?' #333333':'#DDDDDD'} ;background:${item.bkColor};width:${item.flWidth}px;height:${item.flHeight}px;`"
            draggable="true"
            @dragstart="dragstart($event, item)"
            @dragend.stop="dragend($event, item, index)"
            @click="itemClick(index)"
          >
            <div> 布局{{ index+1 }}</div>
            <div
              class="icon el-icon-arrow-right"
              title="缩放"
              draggable="true"
              @dragstart.stop="dragstart2($event, item, index)"
              @dragend.stop="dragend2($event, item, index)"
              style="color:#000"
            ></div>
          </div>
        </div>
      </el-col>
      <el-col
        :span="2"
        style="height:  100%;border-right: 1px solid #ddd;"
      >
        <div class="no_edit">
          <div style="align-self: center;">
            <div class="no_edit_title">不</div>
            <div class="no_edit_title">可</div>
            <div class="no_edit_title">编</div>
            <div class="no_edit_title">辑</div>
            <div class="no_edit_title">区</div>
          </div>
        </div>
      </el-col>
    </el-row>
    <div style="background-color: #F4F4F5;width: 100%;position: absolute;">
      <div style="display: flex;margin: 0 auto; height: 50px; justify-content: center;  align-items: center;">
        <div
          class="programcanvas_box_del"
        >取消</div>
        <div
          class="programcanvas_box_save"
        >保存配置</div>
      </div>
    </div>
  </div>
</template>

<script>
export default {
  props: {
    id: { type: String, default: '' },
    // isEdit: { type: String, required: true },

  },
  data() {
    return {
      loading: false,
      colordisabled: true,
      bkColor: '',
      cfName: '',
      textAlign: '',
      value: '',
      moduleList: [],
      moudle: {},
      selectWidth: 0,
      selectHeight: 0,
      selectX: 0,
      selectY: 0,
      selectIndex: -1
    };
  },
  watch: {

  },
  computed: {

  },
  mounted() {

  },
  methods: {
    itemClick(index){
      this.selectIndex = index
    },
    fontColorChange() {
      this.moduleList[this.selectIndex].bkColor = this.bkColor
    },
    selectWidthChange(e) {
      this.moduleList[this.selectIndex].flWidth = e * 1

    },
    selectHeightChange(e) {
      this.moduleList[this.selectIndex].flHeight = e * 1

    },
    selectXChange(e) {
      this.moduleList[this.selectIndex].flLeft = e * 1


    },
    selectYChange(e) {
      this.moduleList[this.selectIndex].flTop = e * 1

    },


    dragstart(e, item, index) {
      this.left = e.clientX * 1
      this.top = e.clientY * 1
    },
    // 停止拖拽位置
    dragend(e, item, index) {
      let x = Math.round(e.clientX - this.left)
      let y = Math.round(e.clientY - this.top)

      this.moduleList[index].flLeft = Math.round(item.flLeft + x)
      this.moduleList[index].flTop = Math.round(item.flTop + y)
      if (this.moduleList[index].flLeft < 0) {
        this.moduleList[index].flLeft = 0
      } if (this.moduleList[index].flTop < 0) {
        this.moduleList[index].flTop = 0
      }
      if (this.moduleList[index].flLeft + this.moduleList[index].flWidth > this.width) {
        this.moduleList[index].flLeft = Math.round(this.width - this.moduleList[index].flWidth)
      }
      if (this.moduleList[index].flTop + this.moduleList[index].flHeight > this.height) {
        this.moduleList[index].flTop = Math.round(this.height - this.moduleList[index].flHeight)
      }

    },
    // 开始拖拽大小 右下角
    dragstart2(e, item, index) {
      this.startX = e.clientX
      this.startY = e.clientY
    },
    // 停止拖拽大小 右下角
    dragend2(e, item, index) {
      let x = e.clientX - this.startX
      let y = e.clientY - this.startY
      this.moduleList[index].flWidth = Math.round(item.flWidth + x)
      this.moduleList[index].flHeight = Math.round(item.flHeight + y)

      if (this.moduleList[index].flLeft + this.moduleList[index].flWidth > this.width) {
        this.moduleList[index].flWidth = Math.round(this.width - this.moduleList[index].flLeft)
      }
      if (this.moduleList[index].flTop + this.moduleList[index].flHeight > this.height) {
        this.moduleList[index].flHeight = Math.round(this.height - this.moduleList[index].flTop)
      }
      if (this.moduleList[index].isSelect) {
        this.selectWidth = this.setLeft1(this.moduleList[index].flWidth)
        this.selectHeight = this.setTop1(this.moduleList[index].flHeight)
      }
    },
    addMoudle() {
      console.log(this.$refs.canvas)
      this.width = this.$refs.canvas.offsetWidth;
      this.height = this.$refs.canvas.offsetHeight;
      this.moduleList.push({
        bkColor: "#fff",
        cfName: "布局",
        flHeight: 100,
        flWidth: 100,
        flLeft: 0,
        flTop: 0,
        isSelect: false
      });
    },
    delMoudle() {
      console.log(this.selectIndex)
      if (this.selectIndex == -1) return
      this.moduleList.splice(this.selectIndex, 1)
      this.selectIndex = -1
    },


  }
};
</script>

<style scoped lang="scss">
.index_admin_form {
  width: 100%;
  height: 100%;
  background-color: #fff;
  z-index: 2000;
  position: fixed;
  top: 0;
  left: 0;
}

.title {
  line-height: 36px;
  font-size: 12px;
  margin-right: 10px;
  color: #fff;
  margin-left: 20px;
}
.top_box {
  width: 100%;
  padding: 10px 30px;
  background-color: #121b36;
}
.top_right {
  position: absolute;
  right: 50px;
  top: 10px;
}
.top_right_btn_add {
  background: #1543fa;
  border-radius: 5px;
  line-height: 36px;
  font-size: 12px;
  padding: 0 15px;
  color: #fff;
  margin-right: 20px;
  cursor: pointer;
}
.top_right_btn_del {
  background: #121b36;
  border-radius: 5px;
  border: 1px solid #999999;
  color: #999999;
  line-height: 36px;
  font-size: 12px;
  padding: 0 15px;
  cursor: pointer;
}
.no_edit {
  width: 100%;
  height: 100%;
  display: flex;
  justify-content: center;
}
.no_edit_title {
  width: 100%;
  text-align: center;
  line-height: 86px;
  font-size: 24px;
  color: #e5e5e5;
}
.bottom {
  width: 100%;
  height: 36px;
}
.programcanvas_box_del {
  line-height: 25px;
  width: 60px;
  height: 25px;
  background: #e7e7e7;
  border-radius: 3px;
  text-align: center;
  font-size: 12px;
  margin-right: 20px;
  cursor: pointer;
  color: #666;
}
.programcanvas_box_save {
  line-height: 25px;
  width: 60px;
  height: 25px;
  background: #1543fa;
  border-radius: 3px;
  text-align: center;
  font-size: 12px;
  cursor: pointer;
  color: #fff;
}
.icon {
  position: absolute;
  z-index: 13;
  width: 12px;
  height: 13px;
  font-size: 10px;
  cursor: pointer;
  font-weight: bold;
  transform: rotate(45deg);
  right: -4px;
  bottom: -6px;
}
</style>


![[SimCLR v2] Big Self-Supervised Models are Strong Semi-Supervised Learners](https://i-blog.csdnimg.cn/direct/4cc9701420354cecb5eba7197a705453.png)