补间动画:动画本质就是在一个时间段内对象尺寸、位移、旋转角度、缩放、颜色、透明度等属性值的连续变化。也包括图形变形的属性。时间、变化的对象、变化的值
工业应用场景:蚂蚁线、旋转、高度变化、指针偏移、小车
WPF动画与分类
特定对象处理动画过程。
3大类共43个动画类:
简单线性动画:18
关键帧动画:22
路径动画:3
| 简单线性动画 | ByteAnimation | ColorAnimation | DecimalAnimation | DoubleAnimation |
| Int16Animation | Int32Animation | Int64Animation | Point3DAnimation | |
| PointAnimation | PopupAnimation | QuaternionAnimation | RectAnimation | |
| Rotation3DAnimation | SingleAnimation | SizeAnimation | ThicknessAnimation | |
| Vector3DAnimation | VectorAnimation | |||
| 关键帧动画 | BooleanAnimationUsingKeyFrames | ByteAnimationUsingKeyFrames | CharAnimationUsingKeyFrames | ColorAnimationUsingKeyFrames |
| DecimalAnimationUsingKeyFrames | DoubleAnimationUsingKeyFrames | Int16AnimationUsingKeyFrames | Int32AnimationUsingKeyFrames | |
| Int64AnimationUsingKeyFrames | MatrixAnimationUsingKeyFrames | ObjectAnimationUsingKeyFrames | Point3DAnimationUsingKeyFrames | |
| PointAnimationUsingKeyFrames | QuaternionAnimationUsingKeyFrames | RectAnimationUsingKeyFrames | Rotation3DAnimationUsingKeyFrames | |
| SingleAnimationUsingKeyFrames | SizeAnimationUsingKeyFrames | StringAnimationUsingKeyFrames | ThicknessAnimationUsingKeyFrames | |
| Vector3DAnimationUsingKeyFrames | VectorAnimationUsingKeyFrames | |||
| 路径动画 | DoubleAnimationUsingPath | PointAnimationUsingPath | MatrixAnimationUsingPath |
动画的选择
根据属性类型确定
例如:width是double类型的,就可以选择double的动画
变个大小、变个位置、变个颜色、变个显示
动画类基本使用
创建类对象,设置相关属性,动画的执行
C#使用动画:
C#代码:
using System.Windows;
using System.Windows.Media.Animation;

namespace XH.AnimationLesson
{
    /// <summary>
    /// LinearAniamtionWindow.xaml 的交互逻辑
    /// </summary>
    public partial class LinearAniamtionWindow : Window
    {
        public LinearAniamtionWindow()
        {
            InitializeComponent();
        }

        private void Button_Click(object sender, RoutedEventArgs e)
        {
            // 5秒钟 100变300
            DoubleAnimation widthAnimation = new DoubleAnimation();
            widthAnimation.Duration = new TimeSpan(0,0,5);
            widthAnimation.From = 100;
            widthAnimation.To = 300;
            // 变化宽度
            this.border.BeginAnimation(WidthProperty, widthAnimation);

            DoubleAnimation heightAnimation = new DoubleAnimation();
            heightAnimation.Duration = new TimeSpan(0, 0, 5);
            heightAnimation.From = 50;
            heightAnimation.To = 350;
            // 变化高度
            this.border.BeginAnimation(HeightProperty, heightAnimation);
        }
    }
}
XAML控件定义:
  <Grid>
      <Border x:Name="border" Background="Orange"
              Height="50" Width="100"
              HorizontalAlignment="Left" VerticalAlignment="Top" />

      <Button Content="开始" Name="btn" VerticalAlignment="Bottom" Click="Button_Click" />
  </Grid>
XAML中使用动画:
效果和C#是一样的
<Window x:Class="XH.AnimationLesson.LinearAniamtionWindow"
        xmlns="http://schemas.microsoft.com/winfx/2006/xaml/presentation"
        xmlns:x="http://schemas.microsoft.com/winfx/2006/xaml"
        xmlns:d="http://schemas.microsoft.com/expression/blend/2008"
        xmlns:mc="http://schemas.openxmlformats.org/markup-compatibility/2006"
        xmlns:local="clr-namespace:XH.AnimationLesson"
        mc:Ignorable="d" FontSize="20"
        Title="LinearAniamtionWindow" Height="450" Width="800">
    <Window.Triggers>
        <EventTrigger RoutedEvent="Button.Click" SourceName="btn">
            <BeginStoryboard>
                <Storyboard>
                    <DoubleAnimation Duration="0:0:5" From="100" To="300"
                                     Storyboard.TargetName="border"
                                     Storyboard.TargetProperty="Width"/>
                </Storyboard>
            </BeginStoryboard>
            <BeginStoryboard>
                <Storyboard>
                    <DoubleAnimation Duration="0:0:5" From="50" To="350"
                                     Storyboard.TargetName="border"
                                     Storyboard.TargetProperty="Height"/>
                </Storyboard>
            </BeginStoryboard>
        </EventTrigger>
    </Window.Triggers>
    <Grid>
        <Border x:Name="border" Background="Orange"
                Height="50" Width="100"
                HorizontalAlignment="Left" VerticalAlignment="Top" />

        <Button Content="开始" Name="btn" VerticalAlignment="Bottom" />
    </Grid>
</Window>
动画的独立控制与整合:C#整合
// 5秒钟 100变300
DoubleAnimation widthAnimation = new DoubleAnimation();
widthAnimation.Duration = new TimeSpan(0,0,5);
widthAnimation.From = 100;
widthAnimation.To = 300;

DoubleAnimation heightAnimation = new DoubleAnimation();
heightAnimation.Duration = new TimeSpan(0, 0, 5);
heightAnimation.From = 50;
heightAnimation.To = 350;

// 将两个动画同步触发 如果多个动画需要同时执行 可以将相应的对象放到一个 Storyboard
Storyboard sb = new Storyboard();
sb.Children.Add(widthAnimation);
sb.Children.Add(heightAnimation);

// 这里指定相关的动画对象,与哪个页面对象相关
// 第一个参数:动画对象
// 第二个参数:附加对象
Storyboard.SetTarget(widthAnimation,border);
Storyboard.SetTargetProperty(widthAnimation,new PropertyPath("Width"));

Storyboard.SetTarget(heightAnimation,border);
Storyboard.SetTargetProperty(heightAnimation, new PropertyPath("Height"));
sb.Begin();
动画类使用小结:
- 必须针对依赖属性
- 对象必须派生自DependencyObject,并且实现IAnimatable接口
- 必须存在可用的兼容动画类(支持自定义)
位移动画处理
XAML代码:
<Window x:Class="XH.AnimationLesson.LinearAniamtionWindow"
  xmlns="http://schemas.microsoft.com/winfx/2006/xaml/presentation"
  xmlns:x="http://schemas.microsoft.com/winfx/2006/xaml"
  xmlns:d="http://schemas.microsoft.com/expression/blend/2008"
  xmlns:mc="http://schemas.openxmlformats.org/markup-compatibility/2006"
  xmlns:local="clr-namespace:XH.AnimationLesson"
  mc:Ignorable="d" FontSize="20"
  Title="LinearAniamtionWindow" Height="450" Width="800">

  <Window.Resources>
    <Storyboard x:Key="sb">
      <!--对象的位移变化对象-->
      <ThicknessAnimation Duration="0:0:5" From="0 0 0 0" To="100 50 0 0"
                          Storyboard.TargetName="border"
                          Storyboard.TargetProperty="Margin"/>
      <DoubleAnimation Duration="0:0:5" From="0" To="100"
                       Storyboard.TargetProperty="X"
                       Storyboard.TargetName="tt"/>
      <DoubleAnimation Duration="0:0:5" From="10" To="100"
                       Storyboard.TargetProperty="(Border.RenderTransform).(TranslateTransform.X)"
                       Storyboard.TargetName="border"/>
    </Storyboard>
  </Window.Resources>

  <Window.Triggers>
    <EventTrigger RoutedEvent="Button.Click" SourceName="btn">
      <BeginStoryboard Storyboard="{StaticResource sb}" />
    </EventTrigger>
  </Window.Triggers>

  <Grid>
    <Border x:Name="border" Background="Orange"
                Height="50" Width="100" Margin="0 0 0 0" Canvas.Left="0"
                HorizontalAlignment="Left" VerticalAlignment="Top" Opacity="1">
            <Border.RenderTransform>
                <TranslateTransform X="10" Y="50" x:Name="tt"/>
            </Border.RenderTransform>
        </Border>

        <Button Content="开始" Name="btn" Canvas.Left="200" VerticalAlignment="Bottom" />
    </Grid>
</Window>
只要是改变控件位置的都可以进行动画变化。
对于复杂的属性变化写法:(Border.RenderTransform).(TranslateTransform.X)
颜色与显示变更动画处理
<Window x:Class="XH.AnimationLesson.LinearAniamtionWindow"
        xmlns="http://schemas.microsoft.com/winfx/2006/xaml/presentation"
        xmlns:x="http://schemas.microsoft.com/winfx/2006/xaml"
        xmlns:d="http://schemas.microsoft.com/expression/blend/2008"
        xmlns:mc="http://schemas.openxmlformats.org/markup-compatibility/2006"
        xmlns:local="clr-namespace:XH.AnimationLesson"
        mc:Ignorable="d" FontSize="20"
        Title="LinearAniamtionWindow" Height="450" Width="800">

    <Window.Resources>
        <Storyboard x:Key="sb">
            <!--对象的颜色变化对象
                不可以直接变化资源对象 会报错:找不到对象名称-->
            <ColorAnimation Duration="0:0:5" From="Orange" To="Green"
                            Storyboard.TargetName="border"
                            Storyboard.TargetProperty="Background.Color"/>
            <ColorAnimation Duration="0:0:3" From="Orange" To="Green"
                            Storyboard.TargetName="border"
                            Storyboard.TargetProperty="(Border.Background).(SolidColorBrush.Color)"/>
            <!--BeginTime:多久开始执行-->
            <ColorAnimation Duration="0:0:3" From="Green" To="Red"
                            BeginTime="0:0:3"
                            Storyboard.TargetName="border"
                            Storyboard.TargetProperty="(Border.Background).(SolidColorBrush.Color)"/>
        </Storyboard>
    </Window.Resources>

    <Window.Triggers>
        <EventTrigger RoutedEvent="Button.Click" SourceName="btn">
            <BeginStoryboard Storyboard="{StaticResource sb}" />
        </EventTrigger>
    </Window.Triggers>

    <Grid>
        <Border x:Name="border" Background="Orange"
                Height="50" Width="100" Margin="0 0 0 0" Canvas.Left="0"
                HorizontalAlignment="Left" VerticalAlignment="Top" Opacity="1" />

        <Button Content="开始" Name="btn" Canvas.Left="200" VerticalAlignment="Bottom" />
    </Grid>
</Window>
属性:BeginTime 多久开始执行,使用的时候和关键帧差不多
注意:Background实际上改变颜色的属性是:(Border.Background).(SolidColorBrush.Color),不是Brush
关键帧处理:
四大帧对象类型:
- Linear+【类型名称】+KeyFrame 线性变化关键帧,(简单线性动画的处理基本一样)
- Discrete +【类型名称】+ KeyFrame 离散变化关键帧,不连续变化
- Spline +【类型名称】+ KeyFrame 样条关键帧-》样条函数(二次贝塞尔曲线-Path)
- Easing +【类型名称】+ KeyFrame 缓冲式关键帧,使用简单动画时介绍的缓动效果
线性关键帧动画基本使用
<Window x:Class="XH.AnimationLesson.KeyFrameAnimationWindow"
        xmlns="http://schemas.microsoft.com/winfx/2006/xaml/presentation"
        xmlns:x="http://schemas.microsoft.com/winfx/2006/xaml"
        xmlns:d="http://schemas.microsoft.com/expression/blend/2008"
        xmlns:mc="http://schemas.openxmlformats.org/markup-compatibility/2006"
        xmlns:local="clr-namespace:XH.AnimationLesson"
        mc:Ignorable="d" FontSize="20"
        Title="KeyFrameAnimationWindow" Height="450" Width="800">
    <Window.Resources>
        <Storyboard x:Key="sb">
            <!--1、如果动画对象的Duration时长大于子帧的时长,多出来的时间无变化-->
            <!--2、如果动画对象的Duration时长小于子帧的时长,以对象的事件为准,超出的子帧时间不执行-->
            <!--3、如果不指定动画对象的Duration时长,以关键帧时间全部执行-->
            <!--注意:关键帧的时间没有先后顺序要求,严格按照时间轴进行执行-->
            <ColorAnimationUsingKeyFrames Storyboard.TargetName="border"
                                          Storyboard.TargetProperty="Background.Color">
                <LinearColorKeyFrame Value="Orange" KeyTime="0:0:0" />
                <LinearColorKeyFrame Value="Green" KeyTime="0:0:2" />
                <LinearColorKeyFrame Value="Red" KeyTime="0:0:4" />
            </ColorAnimationUsingKeyFrames>
        </Storyboard>
    </Window.Resources>
    <Window.Triggers>
        <EventTrigger RoutedEvent="Button.Click" SourceName="btn">
            <BeginStoryboard Storyboard="{StaticResource sb}" />
        </EventTrigger>
    </Window.Triggers>
    <Grid>
        <Border x:Name="border" Background="Orange"
                Height="50" Width="100" Visibility="Collapsed"
                HorizontalAlignment="Left"/>
        <Button Content="开始" Name="btn" Canvas.Left="200" VerticalAlignment="Bottom" />
    </Grid>
</Window>
注意:
1、如果动画对象的Duration时长大于子帧的时长,多出来的时间无变化
2、如果动画对象的Duration时长小于子帧的时长,以对象的事件为准,超出的子帧时间不执行
3、如果不指定动画对象的Duration时长,以关键帧时间全部执行
注意:关键帧的时间没有先后顺序要求,严格按照时间轴进行执行
离散关键帧动画基本使用
<Window x:Class="XH.AnimationLesson.KeyFrameAnimationWindow"
        xmlns="http://schemas.microsoft.com/winfx/2006/xaml/presentation"
        xmlns:x="http://schemas.microsoft.com/winfx/2006/xaml"
        xmlns:d="http://schemas.microsoft.com/expression/blend/2008"
        xmlns:mc="http://schemas.openxmlformats.org/markup-compatibility/2006"
        xmlns:local="clr-namespace:XH.AnimationLesson"
        mc:Ignorable="d" FontSize="20"
        Title="KeyFrameAnimationWindow" Height="450" Width="800">
    <Window.Resources>
        <Storyboard x:Key="sb">
            <!--String 变化只有DiscreteStringKeyFrame离散关键帧变化-->
            <StringAnimationUsingKeyFrames Duration="0:0:5"
                                           Storyboard.TargetName="tb"
                                           Storyboard.TargetProperty="Text">
                <DiscreteStringKeyFrame Value="你好" KeyTime="0:0:2" />
            </StringAnimationUsingKeyFrames>
        </Storyboard>
    </Window.Resources>
    <Window.Triggers>
        <EventTrigger RoutedEvent="Button.Click" SourceName="btn">
            <BeginStoryboard Storyboard="{StaticResource sb}" />
        </EventTrigger>
    </Window.Triggers>
    <Grid>
        <TextBlock Text="Hello" Name="tb"/>
        <Button Content="开始" Name="btn" Canvas.Left="200" VerticalAlignment="Bottom" />
    </Grid>
</Window>
注意:String 变化只有DiscreteStringKeyFrame离散关键帧变化
样条关键帧动画基本使用
<Window x:Class="XH.AnimationLesson.KeyFrameAnimationWindow"
        xmlns="http://schemas.microsoft.com/winfx/2006/xaml/presentation"
        xmlns:x="http://schemas.microsoft.com/winfx/2006/xaml"
        xmlns:d="http://schemas.microsoft.com/expression/blend/2008"
        xmlns:mc="http://schemas.openxmlformats.org/markup-compatibility/2006"
        xmlns:local="clr-namespace:XH.AnimationLesson"
        mc:Ignorable="d" FontSize="20"
        Title="KeyFrameAnimationWindow" Height="450" Width="800">
    <Window.Resources>
        <Storyboard x:Key="sb">
            <ThicknessAnimationUsingKeyFrames Storyboard.TargetName="ellipse"
                                              Storyboard.TargetProperty="Margin" >
                <SplineThicknessKeyFrame Value="0 0 0 0" KeyTime="0:0:0" />
                <SplineThicknessKeyFrame KeyTime="00:00:04" Value="780 0 0 0" KeySpline="0 1 1 0">
                    <!--可以简写-->
                    <!--<SplineThicknessKeyFrame.KeySpline>
                        <KeySpline ControlPoint1="0,1" ControlPoint2="1,0"/>
                    </SplineThicknessKeyFrame.KeySpline>-->
                </SplineThicknessKeyFrame>
            </ThicknessAnimationUsingKeyFrames>
        </Storyboard>
    </Window.Resources>
    <Window.Triggers>
        <EventTrigger RoutedEvent="Button.Click" SourceName="btn">
            <BeginStoryboard Storyboard="{StaticResource sb}" />
        </EventTrigger>
    </Window.Triggers>
    <Grid>
        <Ellipse Width="20" Height="20" Fill="Red" VerticalAlignment="Top" HorizontalAlignment="Left"
                 Margin="0 0 0 0" Name="ellipse"/>

        <Button Content="开始" Name="btn" Canvas.Left="200" VerticalAlignment="Bottom" />
    </Grid>
</Window>
KeySpline可以在Blend中设置属性:
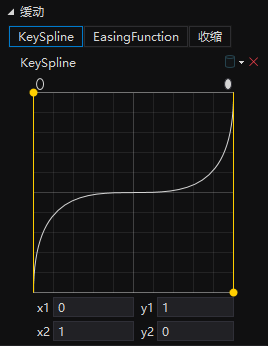
可以设置某一段时间变化快和慢
缓冲式关键帧
<Window x:Class="XH.AnimationLesson.KeyFrameAnimationWindow"
        xmlns="http://schemas.microsoft.com/winfx/2006/xaml/presentation"
        xmlns:x="http://schemas.microsoft.com/winfx/2006/xaml"
        xmlns:d="http://schemas.microsoft.com/expression/blend/2008"
        xmlns:mc="http://schemas.openxmlformats.org/markup-compatibility/2006"
        xmlns:local="clr-namespace:XH.AnimationLesson"
        mc:Ignorable="d" FontSize="20"
        Title="KeyFrameAnimationWindow" Height="450" Width="800">
    <Window.Resources>
        <Storyboard x:Key="ease_sb">
            <ThicknessAnimationUsingKeyFrames Storyboard.TargetName="border" Storyboard.TargetProperty="Margin">
                <LinearThicknessKeyFrame Value="0 0 0 0" KeyTime="0:0:0" />
                <LinearThicknessKeyFrame Value="100 0 0 0" KeyTime="0:0:2"/>
                <LinearThicknessKeyFrame Value="100 0 0 0" KeyTime="0:0:3"/>
                <EasingThicknessKeyFrame Value="300 0 0 0" KeyTime="0:0:5">
                    <EasingThicknessKeyFrame.EasingFunction>
                        <!--EasingMode:在起始或者末尾哪个地方适用此缓冲-->
                        <!--BackEase:路径中进行动画处理之前略微收回动画的动作-->
                        <BackEase EasingMode="EaseInOut"/>
                    </EasingThicknessKeyFrame.EasingFunction>
                </EasingThicknessKeyFrame>
            </ThicknessAnimationUsingKeyFrames>
        </Storyboard>
    </Window.Resources>
    <Window.Triggers>
        <EventTrigger RoutedEvent="Button.Click" SourceName="btn">
            <BeginStoryboard Storyboard="{StaticResource ease_sb}" />
        </EventTrigger>
    </Window.Triggers>
    <Grid>
        <Border x:Name="border" Background="Orange" Margin="0 0 0 0"
                Height="50" Width="100"
                HorizontalAlignment="Left" VerticalAlignment="Top"/>
      <Button Content="开始" Name="btn" Canvas.Left="200" VerticalAlignment="Bottom" />
    </Grid>
</Window>
EasingMode:在起始或者末尾哪个地方适用此缓冲
BackEase:路径中进行动画处理之前略微收回动画的动作
ObjectAnimationUsingKeyFrames
<Window x:Class="XH.AnimationLesson.KeyFrameAnimationWindow"
        xmlns="http://schemas.microsoft.com/winfx/2006/xaml/presentation"
        xmlns:x="http://schemas.microsoft.com/winfx/2006/xaml"
        xmlns:d="http://schemas.microsoft.com/expression/blend/2008"
        xmlns:mc="http://schemas.openxmlformats.org/markup-compatibility/2006"
        xmlns:local="clr-namespace:XH.AnimationLesson"
        mc:Ignorable="d" FontSize="20"
        Title="KeyFrameAnimationWindow" Height="450" Width="800">
    <Window.Resources>
        <Storyboard x:Key="obj_sb">
            <ObjectAnimationUsingKeyFrames Storyboard.TargetName="border" Storyboard.TargetProperty="Visibility"
                                           RepeatBehavior="Forever">
                <!--只能离散形式的动画效果-->
                <DiscreteObjectKeyFrame KeyTime="0:0:0">
                    <DiscreteObjectKeyFrame.Value>
                        <Visibility>Visible</Visibility>
                    </DiscreteObjectKeyFrame.Value>
                </DiscreteObjectKeyFrame>
                <DiscreteObjectKeyFrame KeyTime="0:0:0.1">
                    <DiscreteObjectKeyFrame.Value>
                        <Visibility>Hidden</Visibility>
                    </DiscreteObjectKeyFrame.Value>
                </DiscreteObjectKeyFrame>
                <DiscreteObjectKeyFrame KeyTime="0:0:0.2">
                    <DiscreteObjectKeyFrame.Value>
                        <Visibility>Visible</Visibility>
                    </DiscreteObjectKeyFrame.Value>
                </DiscreteObjectKeyFrame>
            </ObjectAnimationUsingKeyFrames>
        </Storyboard>
    </Window.Resources>
    <Window.Triggers>
        <EventTrigger RoutedEvent="Button.Click" SourceName="btn">
            <BeginStoryboard Storyboard="{StaticResource obj_sb}" />
        </EventTrigger>
    </Window.Triggers>
    <Grid>
        <Border x:Name="border" Background="Orange" Margin="0 0 0 0"
                Height="50" Width="100" Visibility="Hidden"
                HorizontalAlignment="Left" VerticalAlignment="Top"/>

        <Button Content="开始" Name="btn" Canvas.Left="200" VerticalAlignment="Bottom" />
    </Grid>
</Window>
注意:理论让任意类型参与动画,只能离散形式的动画效果 复杂类型用value包着即可
路劲动画
根据Path数据,限定动画路径
类型名称+ AnimationUsingPath
3个对象 Double、Point(X、Y)、Matrix(不需要记矩阵)
路径Path
DoubleAnimationUsingPath:
位移(TranslateTransform、CanvasLeftTop)、旋转(RoateTransform)
<Window x:Class="XH.AnimationLesson.PathAnimationWindow"
        xmlns="http://schemas.microsoft.com/winfx/2006/xaml/presentation"
        xmlns:x="http://schemas.microsoft.com/winfx/2006/xaml"
        xmlns:d="http://schemas.microsoft.com/expression/blend/2008"
        xmlns:mc="http://schemas.openxmlformats.org/markup-compatibility/2006"
        xmlns:local="clr-namespace:XH.AnimationLesson"
        mc:Ignorable="d"
        Title="PathAnimationWindow" Height="450" Width="800">
    <Window.Resources>
        <Storyboard x:Key="sb">
            <!--Source:Path中的X值:X点位
                Storyboard.TargetProperty:需要变化的属性-->
            <DoubleAnimationUsingPath Duration="0:0:4" Storyboard.TargetName="tt" Storyboard.TargetProperty="X"
                                      Source="X">
                <DoubleAnimationUsingPath.PathGeometry>
                    <PathGeometry Figures="M0 0 60,100 A100 50 0 0 1 400 150" />
                </DoubleAnimationUsingPath.PathGeometry>
            </DoubleAnimationUsingPath>

            <DoubleAnimationUsingPath Duration="0:0:4" Storyboard.TargetName="tt" Storyboard.TargetProperty="Y"
                                      Source="Y">
                <DoubleAnimationUsingPath.PathGeometry>
                    <PathGeometry Figures="M0 0 60,100 A100 50 0 0 1 400 150" />
                </DoubleAnimationUsingPath.PathGeometry>
            </DoubleAnimationUsingPath>

            <DoubleAnimationUsingPath Duration="0:0:4" Storyboard.TargetName="rt" Storyboard.TargetProperty="Angle"
                                      Source="Angle">
                <DoubleAnimationUsingPath.PathGeometry>
                    <PathGeometry Figures="M0 0 60,100 A100 50 0 0 1 400 150" />
                </DoubleAnimationUsingPath.PathGeometry>
            </DoubleAnimationUsingPath>
        </Storyboard>
    </Window.Resources>
    <Window.Triggers>
        <EventTrigger RoutedEvent="Button.Click" SourceName="btn">
            <BeginStoryboard Storyboard="{StaticResource sb}" />
        </EventTrigger>
    </Window.Triggers>
    <Grid>
        <Path Data="M0 0 60,100 A100 50 0 0 1 400 150" Stroke="Gray" StrokeThickness="2" />

        <Border x:Name="border" Background="Orange"
                Height="50" Width="100" Visibility="Collapsed"
                RenderTransformOrigin="0.5 0.5" Margin="-50 -25 0 0"
                HorizontalAlignment="Left" VerticalAlignment="Top">
            <Border.RenderTransform>
                <TransformGroup>
                    <RotateTransform Angle="0" x:Name="rt" />
                    <TranslateTransform X="0" Y="0" x:Name="tt"/>
                </TransformGroup>
            </Border.RenderTransform>
        </Border>

        <Button Content="开始" Name="btn" Canvas.Left="200" VerticalAlignment="Bottom" />
    </Grid>
</Window>
PointAnimationUsingPath:位移
<Window x:Class="XH.AnimationLesson.PathAnimationWindow"
        xmlns="http://schemas.microsoft.com/winfx/2006/xaml/presentation"
        xmlns:x="http://schemas.microsoft.com/winfx/2006/xaml"
        xmlns:d="http://schemas.microsoft.com/expression/blend/2008"
        xmlns:mc="http://schemas.openxmlformats.org/markup-compatibility/2006"
        xmlns:local="clr-namespace:XH.AnimationLesson"
        mc:Ignorable="d"
        Title="PathAnimationWindow" Height="450" Width="800">
    <Window.Resources>
        <Storyboard x:Key="sb">
            <PointAnimationUsingPath Duration="0:0:4" Storyboard.TargetName="eg" Storyboard.TargetProperty="Center">
                <PointAnimationUsingPath.PathGeometry>
                    <PathGeometry Figures="M0 0 60,100 A100 50 0 0 1 400 150" />
                </PointAnimationUsingPath.PathGeometry>
            </PointAnimationUsingPath>
        </Storyboard>
    </Window.Resources>
    <Window.Triggers>
        <EventTrigger RoutedEvent="Button.Click" SourceName="btn">
            <BeginStoryboard Storyboard="{StaticResource sb}" />
        </EventTrigger>
    </Window.Triggers>
    <Grid>
        <Path Data="M0 0 60,100 A100 50 0 0 1 400 150" Stroke="Gray" StrokeThickness="2" />
        <Path Fill="Orange" Visibility="Collapsed">
            <Path.Data>
                <EllipseGeometry Center="0 0" RadiusX="40" RadiusY="40" x:Name="eg"/>
            </Path.Data>
        </Path>
        <Button Content="开始" Name="btn" Canvas.Left="200" VerticalAlignment="Bottom" />
    </Grid>
</Window>
注意:必须是Point的依赖属性,否则不可以
MatrixAnimationUsingPath:合体,上面两个都包含
<Window x:Class="XH.AnimationLesson.PathAnimationWindow"
        xmlns="http://schemas.microsoft.com/winfx/2006/xaml/presentation"
        xmlns:x="http://schemas.microsoft.com/winfx/2006/xaml"
        xmlns:d="http://schemas.microsoft.com/expression/blend/2008"
        xmlns:mc="http://schemas.openxmlformats.org/markup-compatibility/2006"
        xmlns:local="clr-namespace:XH.AnimationLesson"
        mc:Ignorable="d"
        Title="PathAnimationWindow" Height="450" Width="800">
    <Window.Resources>
        <Storyboard x:Key="sb">
            <MatrixAnimationUsingPath Duration="0:0:4" Storyboard.TargetName="mt" Storyboard.TargetProperty="Matrix"
                                      DoesRotateWithTangent="True">
                <!--DoesRotateWithTangent:是否沿着路径旋转-->
                <MatrixAnimationUsingPath.PathGeometry>
                    <PathGeometry Figures="M0 0 60,100 A100 50 0 0 1 400 150" />
                </MatrixAnimationUsingPath.PathGeometry>
            </MatrixAnimationUsingPath>
        </Storyboard>
    </Window.Resources>
    <Window.Triggers>
        <EventTrigger RoutedEvent="Button.Click" SourceName="btn">
            <BeginStoryboard Storyboard="{StaticResource sb}" />
        </EventTrigger>
    </Window.Triggers>
    <Grid>
        <Path Data="M0 0 60,100 A100 50 0 0 1 400 150" Stroke="Gray" StrokeThickness="2" />
        <Border Background="Orange" Height="50" Width="100" Visibility="Visible"
                RenderTransformOrigin="0.5 0.5" Margin="-50 -25 0 0"
                HorizontalAlignment="Left" VerticalAlignment="Top">
            <Border.RenderTransform>
                <MatrixTransform x:Name="mt" />
            </Border.RenderTransform>
        </Border>

        <Button Content="开始" Name="btn" Canvas.Left="200" VerticalAlignment="Bottom" />
    </Grid>
</Window>DoesRotateWithTangent:是否沿着路径旋转
默认是位移变化。
动画辅助属性
SpeedRatio:播放速度
SpeedRatio:速率 默认为1,需要大于0,小于1变慢,大于1变快
 <ThicknessAnimation Duration="0:0:4" Storyboard.TargetName="border2" Storyboard.TargetProperty="Margin"
                     From="0" To="400 0 0 0"
                     SpeedRatio="2"/>
AccelerationRatio:加速速率
AccelerationRatio:百分比,百分之多少的路程加速运动 和DecelerationRatio之和必须小于1
<ThicknessAnimation Duration="0:0:4" Storyboard.TargetName="border3" Storyboard.TargetProperty="Margin"
                    From="0" To="400 0 0 0"
                    AccelerationRatio="0.3"
                    DecelerationRatio="0.7"/>
DecelerationRatio:减速速率
DecelerationRatio:百分比,百分之多少的路程减速速运动 和AccelerationRatio之和必须小于1
<ThicknessAnimation Duration="0:0:4" Storyboard.TargetName="border3" Storyboard.TargetProperty="Margin"
                    From="0" To="400 0 0 0"
                    AccelerationRatio="0.3"
DecelerationRatio="0.7"/>AutoReverse:是否执行相反的动画
是否执行相反的动画 默认False,先执行一遍,再反着执行一遍
<ThicknessAnimation Duration="0:0:4" Storyboard.TargetName="border4" Storyboard.TargetProperty="Margin"
                    From="0" To="400 0 0 0"
                    AutoReverse="True"/>
FillBehavior:动画结束状态:HoldEnd、Stop
FillBehavior:获取保持的行为方式
HoldEnd:保持最后到最后
Stop:不保持,动画直接结束
 <ThicknessAnimation Duration="0:0:4" Storyboard.TargetName="border5" Storyboard.TargetProperty="Margin"
                     From="0" To="400 0 0 0"
FillBehavior="Stop"/>RepeatBehavior:动画重复方式,包括三种值:Forever、次数、时间
RepeatBehavior:
Forever 永远执行 重复动画
numx 例如2x 重复2次 指定重复的次数 只能小写x
时:分:秒 例如:0:0:5 执行5秒结束 指定重复执行的时间
 <ThicknessAnimation Duration="0:0:4" Storyboard.TargetName="border6" Storyboard.TargetProperty="Margin"
                     From="0" To="400 0 0 0"
                     RepeatBehavior="0:0:5"
                     AutoReverse="True"/>
前面这些属性在Animation对象中也可以设置
IsAddtive:将目标属性的当前值添加到动画的起始值
IsAdditive:分段加载 可以当前位置继续动画,无视From
 <ThicknessAnimation Duration="0:0:4" Storyboard.TargetName="border7" Storyboard.TargetProperty="Margin"
                     From="0" To="200 0 0 0"
                     IsAdditive="True"/>
<!--不指定From是从默认位置出发-->
<ThicknessAnimation Duration="0:0:4" Storyboard.TargetName="border8" Storyboard.TargetProperty="Margin"
                    To="200 0 0 0"
                    IsAdditive="True"/>
IsCumulative:如果动画不断重复,就累积动画值
IsCumulative:累计计算 在使用RepeatBehavior的时候累计动画
<ThicknessAnimation Duration="0:0:4" Storyboard.TargetName="border9" Storyboard.TargetProperty="Margin"
                    From="0" To="200 0 0 0"
                    IsCumulative="True"
                    RepeatBehavior="2x"/>
<!--没有From也不会累计-->
<ThicknessAnimation Duration="0:0:4" Storyboard.TargetName="border10" Storyboard.TargetProperty="Margin"
                    To="200 0 0 0"
IsCumulative="True"/>BeginTime:动画线启动等待时长
<ThicknessAnimation Duration="0:0:4"
Storyboard.TargetName="border2"
Storyboard.TargetProperty="Margin"
From="0" To="400 0 0 0"
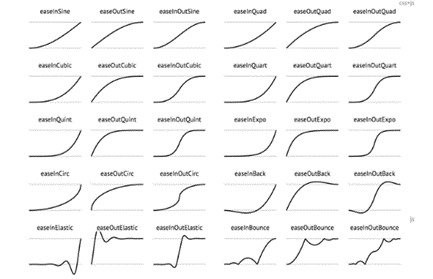
BeginTime="0:0:2"/>EasingFunction:动画缓动属性,EasingMode
BackEase、CircleEase、CubicEase、ElasticEase、ExponentialEase、PowerEase、QuadraticEase、QuarticEase、QuinticEase、SineEase
 <Window.Triggers>
     <!--EasingFunction:缓动函数
              SineEase:正弦公式创建加速和/或减速的动画
              CubicEase:函数创建一个使用公式 f(t) = t3 进行加速和/或减速的动画-->
     <EventTrigger RoutedEvent="Button.Click" SourceName="bt1">
         <BeginStoryboard>
             <Storyboard>
                 <ThicknessAnimation Duration="0:0:1" From="0" To="500,0,0,0" Storyboard.TargetName="bor1" Storyboard.TargetProperty="Margin"/>
             </Storyboard>
         </BeginStoryboard>
     </EventTrigger>
     <EventTrigger RoutedEvent="Button.Click" SourceName="bt2">
         <BeginStoryboard>
             <Storyboard>
                 <ThicknessAnimation Duration="0:0:5" From="0" To="500,0,0,0" Storyboard.TargetName="bor2" Storyboard.TargetProperty="Margin">
                     <ThicknessAnimation.EasingFunction>
                         <BounceEase/>
                     </ThicknessAnimation.EasingFunction>
                 </ThicknessAnimation>
             </Storyboard>
         </BeginStoryboard>
     </EventTrigger>
     <EventTrigger RoutedEvent="Button.Click" SourceName="bt3">
         <BeginStoryboard>
             <Storyboard>
                 <ThicknessAnimation Duration="0:0:5" From="0" To="500,0,0,0" Storyboard.TargetName="bor3" Storyboard.TargetProperty="Margin">
                     <ThicknessAnimation.EasingFunction>
                         <BackEase/>
                     </ThicknessAnimation.EasingFunction>
                 </ThicknessAnimation>
             </Storyboard>
         </BeginStoryboard>
     </EventTrigger>
     <EventTrigger RoutedEvent="Button.Click" SourceName="bt4">
         <BeginStoryboard>
             <Storyboard>
                 <ThicknessAnimation Duration="0:0:5" From="0" To="500,0,0,0" Storyboard.TargetName="bor4" Storyboard.TargetProperty="Margin">
                     <ThicknessAnimation.EasingFunction>
                         <CircleEase/>
                     </ThicknessAnimation.EasingFunction>
                 </ThicknessAnimation>
             </Storyboard>
         </BeginStoryboard>
     </EventTrigger>
     <EventTrigger RoutedEvent="Button.Click" SourceName="bt5">
         <BeginStoryboard>
             <Storyboard>
                 <ThicknessAnimation Duration="0:0:5" From="0" To="500,0,0,0" Storyboard.TargetName="bor5" Storyboard.TargetProperty="Margin">
                     <ThicknessAnimation.EasingFunction>
                         <CubicEase/>
                     </ThicknessAnimation.EasingFunction>
                 </ThicknessAnimation>
             </Storyboard>
         </BeginStoryboard>
     </EventTrigger>
     <EventTrigger RoutedEvent="Button.Click" SourceName="bt6">
         <BeginStoryboard>
             <Storyboard>
                 <ThicknessAnimation Duration="0:0:5" From="0" To="500,0,0,0" Storyboard.TargetName="bor6" Storyboard.TargetProperty="Margin">
                     <ThicknessAnimation.EasingFunction>
                         <ElasticEase/>
                     </ThicknessAnimation.EasingFunction>
                 </ThicknessAnimation>
             </Storyboard>
         </BeginStoryboard>
     </EventTrigger>
     <EventTrigger RoutedEvent="Button.Click" SourceName="bt7">
         <BeginStoryboard>
             <Storyboard>
                 <ThicknessAnimation Duration="0:0:5" From="0" To="500,0,0,0" Storyboard.TargetName="bor7" Storyboard.TargetProperty="Margin">
                     <ThicknessAnimation.EasingFunction>
                         <ExponentialEase/>
                     </ThicknessAnimation.EasingFunction>
                 </ThicknessAnimation>
             </Storyboard>
         </BeginStoryboard>
     </EventTrigger>
     <EventTrigger RoutedEvent="Button.Click" SourceName="bt8">
         <BeginStoryboard>
             <Storyboard>
                 <ThicknessAnimation Duration="0:0:5" From="0" To="500,0,0,0" Storyboard.TargetName="bor8" Storyboard.TargetProperty="Margin">
                     <ThicknessAnimation.EasingFunction>
                         <PowerEase/>
                     </ThicknessAnimation.EasingFunction>
                 </ThicknessAnimation>
             </Storyboard>
         </BeginStoryboard>
     </EventTrigger>
     <EventTrigger RoutedEvent="Button.Click" SourceName="bt9">
         <BeginStoryboard>
             <Storyboard>
                 <ThicknessAnimation Duration="0:0:5" From="0" To="500,0,0,0" Storyboard.TargetName="bor9" Storyboard.TargetProperty="Margin">
                     <ThicknessAnimation.EasingFunction>
                         <QuadraticEase/>
                     </ThicknessAnimation.EasingFunction>
                 </ThicknessAnimation>
             </Storyboard>
         </BeginStoryboard>
     </EventTrigger>
     <EventTrigger RoutedEvent="Button.Click" SourceName="bt10">
         <BeginStoryboard>
             <Storyboard>
                 <ThicknessAnimation Duration="0:0:5" From="0" To="500,0,0,0" Storyboard.TargetName="bor10" Storyboard.TargetProperty="Margin">
                     <ThicknessAnimation.EasingFunction>
                         <QuarticEase/>
                     </ThicknessAnimation.EasingFunction>
                 </ThicknessAnimation>
             </Storyboard>
         </BeginStoryboard>
     </EventTrigger>
     <EventTrigger RoutedEvent="Button.Click" SourceName="bt11">
         <BeginStoryboard>
             <Storyboard>
                 <ThicknessAnimation Duration="0:0:5" From="0" To="500,0,0,0" Storyboard.TargetName="bor11" Storyboard.TargetProperty="Margin">
                     <ThicknessAnimation.EasingFunction>
                         <QuinticEase/>
                     </ThicknessAnimation.EasingFunction>
                 </ThicknessAnimation>
             </Storyboard>
         </BeginStoryboard>
     </EventTrigger>
     <EventTrigger RoutedEvent="Button.Click" SourceName="bt12">
         <BeginStoryboard>
             <Storyboard>
                 <ThicknessAnimation Duration="0:0:5" From="0" To="500,0,0,0" Storyboard.TargetName="bor12" Storyboard.TargetProperty="Margin">
                     <ThicknessAnimation.EasingFunction>
                         <SineEase/>
                     </ThicknessAnimation.EasingFunction>
                 </ThicknessAnimation>
             </Storyboard>
         </BeginStoryboard>
     </EventTrigger>

 </Window.Triggers>

<Grid Height="auto">
    <Grid.ColumnDefinitions>
        <ColumnDefinition/>
        <ColumnDefinition Width="auto"/>
    </Grid.ColumnDefinitions>
    <Grid.RowDefinitions>
        <RowDefinition/>
        <RowDefinition/>
        <RowDefinition/>
        <RowDefinition/>
        <RowDefinition/>
        <RowDefinition/>
        <RowDefinition/>
        <RowDefinition/>
        <RowDefinition/>
        <RowDefinition/>
        <RowDefinition/>
        <RowDefinition/>
    </Grid.RowDefinitions>
    <TextBlock Text="无" VerticalAlignment="Center" HorizontalAlignment="Center"/>
    <TextBlock Text="BounceEase" VerticalAlignment="Center" HorizontalAlignment="Center" Grid.Row="1"/>
    <TextBlock Text="BackEase" VerticalAlignment="Center" HorizontalAlignment="Center" Grid.Row="2"/>
    <TextBlock Text="CircleEase" VerticalAlignment="Center" HorizontalAlignment="Center" Grid.Row="3"/>
    <TextBlock Text="CubicEase" VerticalAlignment="Center" HorizontalAlignment="Center" Grid.Row="4"/>
    <TextBlock Text="ElasticEase" VerticalAlignment="Center" HorizontalAlignment="Center" Grid.Row="5"/>
    <TextBlock Text="ExponentialEase" VerticalAlignment="Center" HorizontalAlignment="Center" Grid.Row="6"/>
    <TextBlock Text="PowerEase" VerticalAlignment="Center" HorizontalAlignment="Center" Grid.Row="7"/>
    <TextBlock Text="QuadraticEase" VerticalAlignment="Center" HorizontalAlignment="Center" Grid.Row="8"/>
    <TextBlock Text="QuarticEase" VerticalAlignment="Center" HorizontalAlignment="Center" Grid.Row="9"/>
    <TextBlock Text="QuinticEase" VerticalAlignment="Center" HorizontalAlignment="Center" Grid.Row="10"/>
    <TextBlock Text="SineEase" VerticalAlignment="Center" HorizontalAlignment="Center" Grid.Row="11"/>

    <Border Width="30" Height="30" Background="Orange" VerticalAlignment="Center" HorizontalAlignment="Left" Name="bor1"/>
    <Border Width="30" Height="30" Background="Orange" VerticalAlignment="Center" HorizontalAlignment="Left" Grid.Row="1" Name="bor2"/>
    <Border Width="30" Height="30" Background="Orange" VerticalAlignment="Center" HorizontalAlignment="Left" Grid.Row="2" Name="bor3"/>
    <Border Width="30" Height="30" Background="Orange" VerticalAlignment="Center" HorizontalAlignment="Left" Grid.Row="3" Name="bor4"/>
    <Border Width="30" Height="30" Background="Orange" VerticalAlignment="Center" HorizontalAlignment="Left" Grid.Row="4" Name="bor5"/>
    <Border Width="30" Height="30" Background="Orange" VerticalAlignment="Center" HorizontalAlignment="Left" Grid.Row="5" Name="bor6"/>
    <Border Width="30" Height="30" Background="Orange" VerticalAlignment="Center" HorizontalAlignment="Left" Grid.Row="6" Name="bor7"/>
    <Border Width="30" Height="30" Background="Orange" VerticalAlignment="Center" HorizontalAlignment="Left" Grid.Row="7" Name="bor8"/>
    <Border Width="30" Height="30" Background="Orange" VerticalAlignment="Center" HorizontalAlignment="Left" Grid.Row="8" Name="bor9"/>
    <Border Width="30" Height="30" Background="Orange" VerticalAlignment="Center" HorizontalAlignment="Left" Grid.Row="9" Name="bor10"/>
    <Border Width="30" Height="30" Background="Orange" VerticalAlignment="Center" HorizontalAlignment="Left" Grid.Row="10" Name="bor11"/>
    <Border Width="30" Height="30" Background="Orange" VerticalAlignment="Center" HorizontalAlignment="Left" Grid.Row="11" Name="bor12"/>

    <Button Width="40" Height="30" Content="开始" Grid.Column="1" VerticalAlignment="Center" Name="bt1"/>
    <Button Width="40" Height="30" Content="开始" Grid.Column="1" VerticalAlignment="Center" Grid.Row="1" Name="bt2"/>
    <Button Width="40" Height="30" Content="开始" Grid.Column="1" VerticalAlignment="Center" Grid.Row="2" Name="bt3"/>
    <Button Width="40" Height="30" Content="开始" Grid.Column="1" VerticalAlignment="Center" Grid.Row="3" Name="bt4"/>
    <Button Width="40" Height="30" Content="开始" Grid.Column="1" VerticalAlignment="Center" Grid.Row="4" Name="bt5"/>
    <Button Width="40" Height="30" Content="开始" Grid.Column="1" VerticalAlignment="Center" Grid.Row="5" Name="bt6"/>
    <Button Width="40" Height="30" Content="开始" Grid.Column="1" VerticalAlignment="Center" Grid.Row="6" Name="bt7"/>
    <Button Width="40" Height="30" Content="开始" Grid.Column="1" VerticalAlignment="Center" Grid.Row="7" Name="bt8"/>
    <Button Width="40" Height="30" Content="开始" Grid.Column="1" VerticalAlignment="Center" Grid.Row="8" Name="bt9"/>
    <Button Width="40" Height="30" Content="开始" Grid.Column="1" VerticalAlignment="Center" Grid.Row="9" Name="bt10"/>
    <Button Width="40" Height="30" Content="开始" Grid.Column="1" VerticalAlignment="Center" Grid.Row="10" Name="bt11"/>
    <Button Width="40" Height="30" Content="开始" Grid.Column="1" VerticalAlignment="Center" Grid.Row="11" Name="bt12"/>
</Grid>
Timeline.DesiredFrameRate:设置帧率
 <Storyboard x:Key="sb" Timeline.DesiredFrameRate="120">

</Storyboard>
Timeline.DesiredFrameRate:帧率刷新率 默认是60 最大120
生命周期事件
- Completed动画结束
- CurrentGlobalSpeedInvalidated:速度变化
- CurrentStateInvalidated:状态变化
- CurretnTimeInvalidated:时间线
执行顺序:
CurrentTimeInvalidated-->CurrentGlobalSpeedInvalidated-->CurrentStateInvalidated
-->...CurrentTimeInvalidated...-->CurrentGlobalSpeedInvalidated-->CurrentStateInvalidated
-->Completed
动画控制
动画的启动:事件、触发器、视觉管理器
事件控制
BeginStoryboard:开始中一个故事板
PauseStoryboard:暂停
ResumeStoryboard:恢复
StopStoryboard:停止
SeekStoryboard:跳转某一帧,某个时刻
SetStoryboardSpeedRatio:加速、减速
<Window x:Class="XH.AnimationLesson.AnimationControlWindow"
        xmlns="http://schemas.microsoft.com/winfx/2006/xaml/presentation"
        xmlns:x="http://schemas.microsoft.com/winfx/2006/xaml"
        xmlns:d="http://schemas.microsoft.com/expression/blend/2008"
        xmlns:mc="http://schemas.openxmlformats.org/markup-compatibility/2006"
        xmlns:local="clr-namespace:XH.AnimationLesson"
        mc:Ignorable="d"
        Title="AnimationControlWindow" Height="450" Width="800">
    <!--动画控制-->
    <Window.Resources>
        <Storyboard x:Key="sb">
            <ThicknessAnimation Duration="0:0:5"
                                From="0 0 0 0" To="600 0 0 0"
                                Storyboard.TargetName="bor_1" Storyboard.TargetProperty="Margin" />
        </Storyboard>
    </Window.Resources>
    <Window.Triggers>
        <!--开始-->
        <EventTrigger RoutedEvent="Button.Click" SourceName="btn_1">
            <BeginStoryboard Storyboard="{StaticResource sb}" x:Name="bsb" />
        </EventTrigger>
        <!--暂停-->
        <EventTrigger RoutedEvent="Button.Click" SourceName="btn_2">
            <PauseStoryboard BeginStoryboardName="bsb" />
        </EventTrigger>
        <!--恢复-->
        <EventTrigger RoutedEvent="Button.Click" SourceName="btn_3">
            <ResumeStoryboard BeginStoryboardName="bsb" />
        </EventTrigger>
        <!--停止-->
        <EventTrigger RoutedEvent="Button.Click" SourceName="btn_4">
            <StopStoryboard BeginStoryboardName="bsb" />
        </EventTrigger>
        <!--跳转某一帧-->
        <EventTrigger RoutedEvent="Button.Click" SourceName="btn_5">
            <SeekStoryboard BeginStoryboardName="bsb" Offset="0:0:3" />
        </EventTrigger>
        <!--加速-->
        <EventTrigger RoutedEvent="Button.Click" SourceName="btn_6">
            <SetStoryboardSpeedRatio BeginStoryboardName="bsb" SpeedRatio="10" />
        </EventTrigger>
        <!--减速-->
        <EventTrigger RoutedEvent="Button.Click" SourceName="btn_7">
            <SetStoryboardSpeedRatio BeginStoryboardName="bsb" SpeedRatio="0.1" />
        </EventTrigger>
    </Window.Triggers>
    <Grid>
        <Border Background="Orange" Width="50" Height="50" Name="bor_1" HorizontalAlignment="Left" />
        <UniformGrid Rows="1" VerticalAlignment="Bottom">
            <Button Content="开始" Name="btn_1"/>
            <Button Content="暂停" Name="btn_2"/>
            <Button Content="恢复" Name="btn_3"/>
            <Button Content="停止" Name="btn_4"/>
            <Button Content="跳转某一帧" Name="btn_5"/>
            <Button Content="加速" Name="btn_6"/>
            <Button Content="减速" Name="btn_7"/>
        </UniformGrid>
    </Grid>
</Window>
触发器控制
EnterActions:符合触发器条件进入触发器的时候
ExitActions:与触发器触发事件相反的时候
<Window x:Class="XH.AnimationLesson.AnimationTriggerWindow"
        xmlns="http://schemas.microsoft.com/winfx/2006/xaml/presentation"
        xmlns:x="http://schemas.microsoft.com/winfx/2006/xaml"
        xmlns:d="http://schemas.microsoft.com/expression/blend/2008"
        xmlns:mc="http://schemas.openxmlformats.org/markup-compatibility/2006"
        xmlns:local="clr-namespace:XH.AnimationLesson"
        mc:Ignorable="d"
        Title="AnimationTriggerWindow" Height="450" Width="800">
    <!--触发器中调用动画-->
    <Window.Resources>
        <ControlTemplate TargetType="CheckBox" x:Key="cbTemp">
            <Border Background="{TemplateBinding Background}" Height="50" Width="50"
                    Name="bor">
                <ContentPresenter VerticalAlignment="Center" HorizontalAlignment="Center" />
            </Border>
            <ControlTemplate.Triggers>
                <Trigger Property="IsChecked" Value="True">
                    <Setter Property="Background" Value="Orange" TargetName="bor"/>
                    <!--触发器条件满足的时候-->
                    <!--没有写From:表示动画执行的起始值从当前对象状态小哎的相关属性值开始变化-->
                    <Trigger.EnterActions>
                        <BeginStoryboard>
                            <Storyboard>
                                <DoubleAnimation Duration="0:0:2" To="100"
                                                 Storyboard.TargetName="bor" Storyboard.TargetProperty="Width"/>
                                <DoubleAnimation Duration="0:0:2" To="100"
                                                 Storyboard.TargetName="bor" Storyboard.TargetProperty="Height"/>
                            </Storyboard>
                        </BeginStoryboard>
                    </Trigger.EnterActions>
                    <!--触发器条件不满足的时候-->
                    <!--没有写From:表示动画执行的起始值从当前对象状态小哎的相关属性值开始变化
                        没有写To:表示动画执行的目标值以对象的初始状态下的相关属性值为结束-->
                    <Trigger.ExitActions>
                        <BeginStoryboard>
                            <Storyboard>
                                <DoubleAnimation Duration="0:0:2"
                                                 Storyboard.TargetName="bor" Storyboard.TargetProperty="Width"/>
                                <DoubleAnimation Duration="0:0:2"
                                                 Storyboard.TargetName="bor" Storyboard.TargetProperty="Height"/>
                            </Storyboard>
                        </BeginStoryboard>
                    </Trigger.ExitActions>
                </Trigger>
            </ControlTemplate.Triggers>
        </ControlTemplate>
    </Window.Resources>
    <Grid>
        <CheckBox Background="Gray"
                  VerticalAlignment="Center" HorizontalAlignment="Center"
                  IsChecked="False" Template="{StaticResource cbTemp}" x:Name="cb"/>
    </Grid>
</Window>
没有写From:表示动画执行的起始值从当前对象状态小哎的相关属性值开始变化
没有写To:表示动画执行的目标值以对象的初始状态下的相关属性值为结束
视觉状态管理器
VisualState: 视图状态(Visual States)表示控件在一个特殊的逻辑状态下的样式、外观;
VisualStateGroup: 状态组由相互排斥的状态组成,状态组与状态组并不互斥;
VisualTransition: 视图转变 (Visual Transitions) 代表控件从一个视图状态向另一个状态转换时的过渡;
VisualStateManager: 由它负责在代码中来切换到不同的状态;
<VisualStateManager.VisualStateGroups>
    <!--这里面可以存放多个Group-->
    <VisualStateGroup>
        <!--可以存放多个VisualState,状态互斥-->
        <VisualState x:Name="state_1">
            <Storyboard>
                <ThicknessAnimation Duration="0:0:2" From="0 0 0 0" To="600 0 0 0"
                                    Storyboard.TargetName="bor_1" Storyboard.TargetProperty="Margin" />
            </Storyboard>
        </VisualState>
        <VisualState x:Name="state_2">
            <Storyboard>
                <ColorAnimation Duration="0:0:2" From="Orange" To="Green"
                                Storyboard.TargetName="bor_1" Storyboard.TargetProperty="Background.Color" />
            </Storyboard>
        </VisualState>
        <!--空着是指回到原始状态-->
        <VisualState x:Name="state_3"/>
    </VisualStateGroup>

    <VisualStateGroup>

    </VisualStateGroup>
</VisualStateManager.VisualStateGroups>
GoToState:针对控件模板中的视觉状态进行切换
GoToElementState:针对某个对象中的视觉状态进行切换
private void Button_Click(object sender, RoutedEventArgs e)
{
    VisualStateManager.GoToElementState(this,"state_1",true);
}

private void Button_Click_1(object sender, RoutedEventArgs e)
{
    VisualStateManager.GoToElementState(this, "state_2", true);
}

private void Button_Click_2(object sender, RoutedEventArgs e)
{
    VisualStateManager.GoToElementState(this, "state_3", true);
}
案例实操
菜单隐藏:
<Window x:Class="XH.AnimationLesson.Demo.DrawerWindow"
  xmlns="http://schemas.microsoft.com/winfx/2006/xaml/presentation"
  xmlns:x="http://schemas.microsoft.com/winfx/2006/xaml"
  xmlns:d="http://schemas.microsoft.com/expression/blend/2008"
  xmlns:mc="http://schemas.openxmlformats.org/markup-compatibility/2006"
  xmlns:local="clr-namespace:XH.AnimationLesson.Demo"
  mc:Ignorable="d"
  Title="DrawerWindow" Height="450" Width="800">
  <Window.Resources>
    <!--<Storyboard x:Key="sb">
    <ThicknessAnimation Duration="0:0:0.5" To="0" Storyboard.TargetName="border" Storyboard.TargetProperty="Margin" />
  </Storyboard>-->
  </Window.Resources>
  <Window.Triggers>
    <EventTrigger RoutedEvent="Button.Click" SourceName="btn_1">
      <BeginStoryboard>
        <Storyboard>
          <ThicknessAnimation Duration="0:0:0.5" To="0" Storyboard.TargetName="border" Storyboard.TargetProperty="Margin" />
        </Storyboard>
      </BeginStoryboard>
    </EventTrigger>

    <EventTrigger RoutedEvent="Button.Click" SourceName="btn_2">
      <BeginStoryboard>
        <Storyboard>
          <ThicknessAnimation Duration="0:0:0.5" To="-180 0 0 0" Storyboard.TargetName="border" Storyboard.TargetProperty="Margin" />
        </Storyboard>
      </BeginStoryboard>
    </EventTrigger>
  </Window.Triggers>
  <Grid>
    <Button Width="30" Name="btn_1" Height="30" VerticalAlignment="Top" HorizontalAlignment="Left" />
    <Border Width="180" Background="#DDD" HorizontalAlignment="Left" Margin="-180 0 0 0" Name="border">
      <Button Width="30" Height="30" VerticalAlignment="Top" HorizontalAlignment="Right" Name="btn_2" />
    </Border>
  </Grid>
</Window>
进度等待:
<Window x:Class="XH.AnimationLesson.Demo.LoadingWindow"
        xmlns="http://schemas.microsoft.com/winfx/2006/xaml/presentation"
        xmlns:x="http://schemas.microsoft.com/winfx/2006/xaml"
        xmlns:d="http://schemas.microsoft.com/expression/blend/2008"
        xmlns:mc="http://schemas.openxmlformats.org/markup-compatibility/2006"
        xmlns:local="clr-namespace:XH.AnimationLesson.Demo"
        mc:Ignorable="d" Name="win"
        Title="LoadingWindow" Height="450" Width="800">
    <Window.Resources>
        <Storyboard x:Key="sb" RepeatBehavior="Forever">
            <ThicknessAnimationUsingKeyFrames Storyboard.TargetName="ellipse_1"
                                              Storyboard.TargetProperty="Margin">
                <SplineThicknessKeyFrame Value="0 0 0 0" KeyTime="0:0:0" />
                <SplineThicknessKeyFrame KeyTime="00:00:02" Value="315 0 0 0" KeySpline="0.1,0.7,0.3,0.1" />
            </ThicknessAnimationUsingKeyFrames>
            <ThicknessAnimationUsingKeyFrames Storyboard.TargetName="ellipse_2"
                                              Storyboard.TargetProperty="Margin" BeginTime="0:0:0.3">
                <SplineThicknessKeyFrame Value="0 0 0 0" KeyTime="0:0:0" />
                <SplineThicknessKeyFrame KeyTime="00:00:02" Value="315 0 0 0" KeySpline="0.1,0.7,0.3,0.1" />
            </ThicknessAnimationUsingKeyFrames>
            <ThicknessAnimationUsingKeyFrames Storyboard.TargetName="ellipse_3"
                                              Storyboard.TargetProperty="Margin" BeginTime="0:0:0.6">
                <SplineThicknessKeyFrame Value="0 0 0 0" KeyTime="0:0:0" />
                <SplineThicknessKeyFrame KeyTime="00:00:02" Value="315 0 0 0" KeySpline="0.1,0.7,0.3,0.1" />
            </ThicknessAnimationUsingKeyFrames>
            <ThicknessAnimationUsingKeyFrames Storyboard.TargetName="ellipse_4"
                                              Storyboard.TargetProperty="Margin" BeginTime="0:0:0.9">
                <SplineThicknessKeyFrame Value="0 0 0 0" KeyTime="0:0:0" />
                <SplineThicknessKeyFrame KeyTime="00:00:02" Value="315 0 0 0" KeySpline="0.1,0.7,0.3,0.1" />
            </ThicknessAnimationUsingKeyFrames>
        </Storyboard>
    </Window.Resources>
    <Window.Triggers>
        <EventTrigger RoutedEvent="Loaded" SourceName="win">
            <BeginStoryboard Storyboard="{StaticResource sb}" />
        </EventTrigger>
    </Window.Triggers>
    <Grid>
        <Grid VerticalAlignment="Center" Width="300" Background="AliceBlue" ClipToBounds="True">
            <Ellipse Width="15" Height="15" Fill="Red" VerticalAlignment="Center" HorizontalAlignment="Left"
                 Margin="-15 0 0 0" Name="ellipse_1"/>
            <Ellipse Width="15" Height="15" Fill="Red" VerticalAlignment="Center" HorizontalAlignment="Left"
                 Margin="-15 0 0 0" Name="ellipse_2"/>
            <Ellipse Width="15" Height="15" Fill="Red" VerticalAlignment="Center" HorizontalAlignment="Left"
                 Margin="-15 0 0 0" Name="ellipse_3"/>
            <Ellipse Width="15" Height="15" Fill="Red" VerticalAlignment="Center" HorizontalAlignment="Left"
                 Margin="-15 0 0 0" Name="ellipse_4"/>
        </Grid>
    </Grid>
</Window>
机械臂控制
<Window x:Class="XH.AnimationLesson.Demo.RobotWindow"
        xmlns="http://schemas.microsoft.com/winfx/2006/xaml/presentation"
        xmlns:x="http://schemas.microsoft.com/winfx/2006/xaml"
        xmlns:d="http://schemas.microsoft.com/expression/blend/2008"
        xmlns:mc="http://schemas.openxmlformats.org/markup-compatibility/2006"
        xmlns:local="clr-namespace:XH.AnimationLesson.Demo"
        mc:Ignorable="d" Name="win"
        Title="RobotWindow" Height="450" Width="800">
    <!--多轴机械臂动画-->
    <Window.Resources>
        <Storyboard x:Key="sb" AutoReverse="True" RepeatBehavior="Forever">
            <DoubleAnimation Duration="0:0:2" From="0" To="200" Storyboard.TargetName="tt" Storyboard.TargetProperty="X"/>
            <DoubleAnimation Duration="0:0:2" From="-40" To="20" Storyboard.TargetName="rt" Storyboard.TargetProperty="Angle"/>
            <DoubleAnimation Duration="0:0:2" From="40" To="80" Storyboard.TargetName="rt_1" Storyboard.TargetProperty="Angle"/>
            <DoubleAnimation Duration="0:0:2" From="40" To="80" Storyboard.TargetName="rt_2" Storyboard.TargetProperty="Angle"/>
        </Storyboard>
    </Window.Resources>
    <Window.Triggers>
        <EventTrigger RoutedEvent="Loaded" SourceName="win">
            <BeginStoryboard Storyboard="{StaticResource sb}" />
        </EventTrigger>
    </Window.Triggers>
    <Grid>
        <Border Width="50" Height="50" Background="Orange" CornerRadius="10">
            <Border.RenderTransform>
                <TranslateTransform X="0" x:Name="tt" />
            </Border.RenderTransform>
            <!--想要在现有的空间内显示超出范围的部分 用Canvas-->
            <Canvas>
                <Border Height="20" Width="120" Background="Gray" VerticalAlignment="Bottom" Canvas.Left="13" Canvas.Top="-10" CornerRadius="10">
                    <Border.RenderTransform>
                        <RotateTransform Angle="0" x:Name="rt" CenterX="10" CenterY="10" />
                    </Border.RenderTransform>

                    <Canvas HorizontalAlignment="Right">
                        <Border Height="13" Width="100" Background="Red" CornerRadius="10" Canvas.Left="-10" Canvas.Top="3.5">
                            <Border.RenderTransform>
                                <RotateTransform Angle="0" x:Name="rt_1" CenterX="6.5" CenterY="6.5"/>
                            </Border.RenderTransform>

                            <Canvas HorizontalAlignment="Right">
                                <Border Background="Green" Height="10" Width="20" CornerRadius="10" Canvas.Left="-6" Canvas.Top="1.5">
                                    <Border.RenderTransform>
                                        <RotateTransform Angle="0" x:Name="rt_2" CenterX="5" CenterY="5" />
                                    </Border.RenderTransform>
                                </Border>
                            </Canvas>
                        </Border>
                    </Canvas>
                </Border>
            </Canvas>
        </Border>
    </Grid>
</Window>
效果如下:

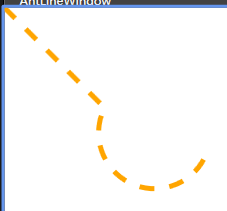
蚂蚁线
<Window x:Class="XH.AnimationLesson.Demo.AntLineWindow"
        xmlns="http://schemas.microsoft.com/winfx/2006/xaml/presentation"
        xmlns:x="http://schemas.microsoft.com/winfx/2006/xaml"
        xmlns:d="http://schemas.microsoft.com/expression/blend/2008"
        xmlns:mc="http://schemas.openxmlformats.org/markup-compatibility/2006"
        xmlns:local="clr-namespace:XH.AnimationLesson.Demo"
        mc:Ignorable="d" Name="win"
        Title="AntLineWindow" Height="450" Width="800">
    <!--蚂蚁线-->
    <Window.Resources>
        <Storyboard x:Key="sb" RepeatBehavior="Forever">
            <DoubleAnimation Duration="0:0:2" From="6" To="0" Storyboard.TargetName="path" Storyboard.TargetProperty="StrokeDashOffset"/>
        </Storyboard>
    </Window.Resources>
    <Window.Triggers>
        <EventTrigger RoutedEvent="Loaded" SourceName="win">
            <BeginStoryboard Storyboard="{StaticResource sb}" />
        </EventTrigger>
    </Window.Triggers>
    <Grid>
        <Path Data="M0 0 100 100A50 50 0 0 0 200 150" Stroke="Orange" StrokeThickness="5"
              StrokeDashArray="3 3" StrokeDashOffset="0" Name="path"/>
    </Grid>
</Window>
效果图:
液面
<Window x:Class="XH.AnimationLesson.Demo.WaterWindow"
        xmlns="http://schemas.microsoft.com/winfx/2006/xaml/presentation"
        xmlns:x="http://schemas.microsoft.com/winfx/2006/xaml"
        xmlns:d="http://schemas.microsoft.com/expression/blend/2008"
        xmlns:mc="http://schemas.openxmlformats.org/markup-compatibility/2006"
        xmlns:local="clr-namespace:XH.AnimationLesson.Demo"
        mc:Ignorable="d"
        Title="WaterWindow" Height="450" Width="800">
    <!--水液面-->
    <Window.Resources>
        <Storyboard x:Key="sb">
            <DoubleAnimation RepeatBehavior="Forever" Duration="0:0:1" From="0" To="-100" Storyboard.TargetName="tt" Storyboard.TargetProperty="X"/>
            <DoubleAnimation RepeatBehavior="Forever" BeginTime="0:0:0.3" Duration="0:0:1.3" From="0" To="-100" Storyboard.TargetName="tt_2" Storyboard.TargetProperty="X"/>
            <DoubleAnimation RepeatBehavior="Forever" BeginTime="0:0:0.6" Duration="0:0:1.6" From="-100" To="0" Storyboard.TargetName="tt_3" Storyboard.TargetProperty="X"/>
        </Storyboard>
    </Window.Resources>
    <Window.Triggers>
        <EventTrigger RoutedEvent="Loaded">
            <BeginStoryboard Storyboard="{StaticResource sb}" />
        </EventTrigger>
    </Window.Triggers>
    <Grid>
        <Border Width="100" Height="100" Background="#ddd">
            <Border.Clip>
                <EllipseGeometry Center="50 50" RadiusX="50" RadiusY="50" />
            </Border.Clip>
            <Canvas>
                <Path Data="M0 0
                            A40 40 0 0 0 50 0
                            A40 40 0 0 1 100 0
                            A40 40 0 0 0 150 0
                            A40 40 0 0 1 200 0
                            L 200 100 0 100" Fill="Orange">
                    <Path.RenderTransform>
                        <TranslateTransform X="-100" Y="40" x:Name="tt" />
                    </Path.RenderTransform>
                </Path>

                <Path Data="M0 0
                            A40 40 0 0 0 50 0
                            A40 40 0 0 1 100 0
                            A40 40 0 0 0 150 0
                            A40 40 0 0 1 200 0
                            L 200 100 0 100" Fill="#9f90">
                    <Path.RenderTransform>
                        <TranslateTransform X="-100" Y="40" x:Name="tt_2" />
                    </Path.RenderTransform>
                </Path>

                <Path Data="M0 0
                            A40 40 0 0 0 50 0
                            A40 40 0 0 1 100 0
                            A40 40 0 0 0 150 0
                            A40 40 0 0 1 200 0
                            L 200 100 0 100" Fill="#9f80">
                    <Path.RenderTransform>
                        <TranslateTransform X="0" Y="40" x:Name="tt_3" />
                    </Path.RenderTransform>
                </Path>
            </Canvas>
        </Border>
    </Grid>
</Window>