1、概述
在前面已经提到,容器的生命周期可能很短,会被频繁地创建和销毁。那么容器在销毁时,保存在容器中的数据也会被清除。这种结果对用户来说,在某些情况下是不乐意看到的。为了持久化保存容器的数据,kubernetes引入了Volume的概念。
Volume是Pod中能够被多个容器访问的共享目录,它被定义在Pod上,然后被一个Pod里的多个容器挂载到具体的文件目录下,kubernetes通过Volume实现同一个Pod中不同容器之间的数据共享以及数据的持久化存储。Volume的生命容器不与Pod中单个容器的生命周期相关,当容器终止或者重启时,Volume中的数据也不会丢失。
kubernetes的Volume支持多种类型,比较常见的有下面几个:
基本存储:EmptyDir、HostPath、NFS
高级存储:PV、PVC
配置存储:ConfigMap、Secret
2、基本存储
2.1、EmptyDir(空目录)
EmptyDir是最基础的Volume类型,一个EmptyDir就是Host(主机)上的一个空目录。
EmptyDir是在Pod被分配到Node时创建的,它的初始内容为空,并且无须指定宿主机上对应的目录文件,因为kubernetes会自动分配一个目录,当Pod销毁时, EmptyDir中的数据也会被永久删除。 EmptyDir用途如下:
临时空间,例如用于某些应用程序运行时所需的临时目录,最常用的就是一些程序缓存,且无须永久保留
一个容器需要从另一个容器中获取数据的目录(多容器共享目录)
接下来,通过一个容器之间文件共享的案例来使用一下EmptyDir。
在一个Pod中准备两个容器nginx和busybox,然后声明一个Volume分别挂在到两个容器的目录中,然后nginx容器负责向Volume中写日志,busybox中通过命令将日志内容读到控制台。
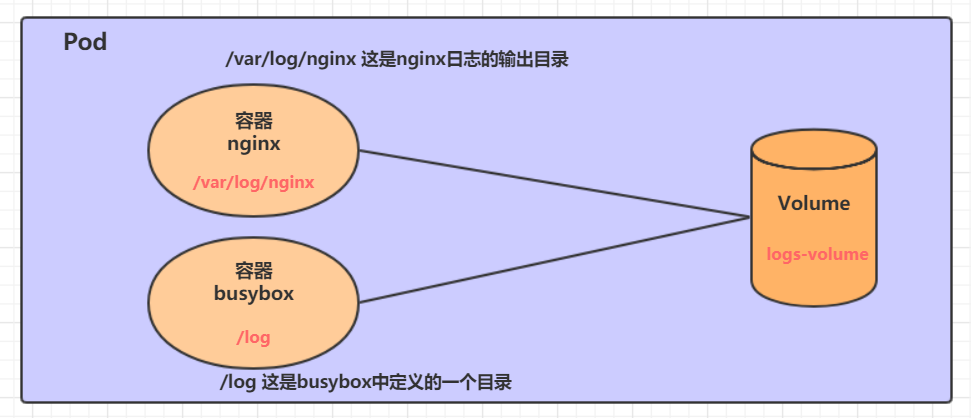
创建一个volume-emptydir.yaml
apiVersion: v1
kind: Pod
metadata:
  name: volume-emptydir
  namespace: dev
spec:
  containers:
  - name: nginx
    image: nginx
    ports:
    - containerPort: 80
    volumeMounts:  # 将logs-volume挂在到nginx容器中,对应的目录为 /var/log/nginx
    - name: logs-volume
      mountPath: /var/log/nginx
  - name: busybox
    image: busybox:1.30
    command: ["/bin/sh","-c","tail -f /logs/access.log"] # 初始命令,动态读取指定文件中内容
    volumeMounts:  # 将logs-volume 挂在到busybox容器中,对应的目录为 /logs
    - name: logs-volume
      mountPath: /logs
  volumes: # 声明volume, name为logs-volume,类型为emptyDir
  - name: logs-volume
    emptyDir: {}
实际操作
# 创建
[root@k8s-master ~]# kubectl apply -f volume-emptydir.yaml
pod/volume-emptydir created
[root@k8s-master ~]#
# 查看pod详情
[root@k8s-master ~]# kubectl get pod -n dev -owide
NAME              READY   STATUS    RESTARTS   AGE   IP               NODE        NOMINATED NODE   READINESS GATES
volume-emptydir   2/2     Running   0          35s   172.17.169.191   k8s-node2   <none>           <none>
# 访问nginx
[root@k8s-master ~]# curl 172.17.169.191
<!DOCTYPE html>
<html>
<head>
<title>Welcome to nginx!</title>
<style>
html { color-scheme: light dark; }
body { width: 35em; margin: 0 auto;
font-family: Tahoma, Verdana, Arial, sans-serif; }
</style>
</head>
<body>
<h1>Welcome to nginx!</h1>
<p>If you see this page, the nginx web server is successfully installed and
working. Further configuration is required.</p>

<p>For online documentation and support please refer to
<a href="http://nginx.org/">nginx.org</a>.<br/>
Commercial support is available at
<a href="http://nginx.com/">nginx.com</a>.</p>

<p><em>Thank you for using nginx.</em></p>
</body>
</html>

# 通过kubectl logs命令查看指定容器的标准输出 可以看出 busybox 将 nginx 日志给输出了
[root@k8s-master ~]# kubectl logs -f volume-emptydir -n dev -c busybox
192.168.13.63 - - [07/Jan/2023:02:52:07 +0000] "GET / HTTP/1.1" 200 615 "-" "curl/7.29.0" "-"2.2、HostPath
EmptyDir中数据不会被持久化,它会随着Pod的结束而销毁,如果想简单的将数据持久化到主机中,可以选择HostPath。
HostPath就是将Node主机中一个实际目录挂在到Pod中,以供容器使用,这样的设计就可以保证Pod销毁了,但是数据依据可以存在于Node主机上。
接下来,我们改造2.1 EmptyDir的yaml将日志以HostPath方式存储在主机/root/logs 目录下
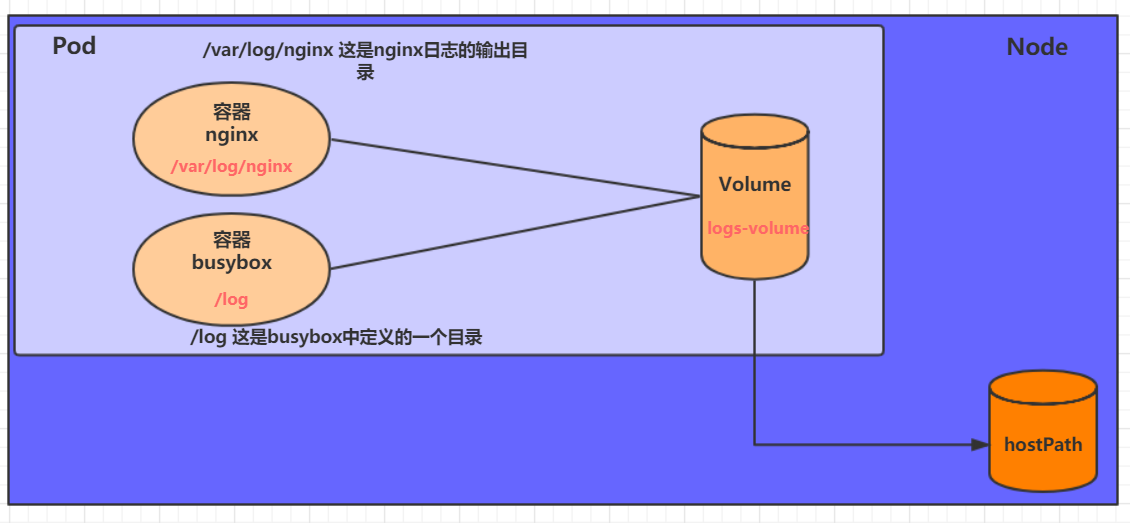
创建一个volume-hostpath.yaml:
apiVersion: v1
kind: Pod
metadata:
  name: volume-hostpath
  namespace: dev
spec:
  containers:
  - name: nginx
    image: nginx
    ports:
    - containerPort: 80
    volumeMounts:
    - name: logs-volume
      mountPath: /var/log/nginx
  - name: busybox
    image: busybox:1.30
    command: ["/bin/sh","-c","tail -f /logs/access.log"]
    volumeMounts:
    - name: logs-volume
      mountPath: /logs
  volumes:
  - name: logs-volume
    hostPath:
      path: /root/logs         # 日志存储在主机这个目录下
      type: DirectoryOrCreate  # 目录存在就使用,不存在就先创建后使用
关于type的值的一点说明:
DirectoryOrCreate 目录存在就使用,不存在就先创建后使用
Directory 目录必须存在
FileOrCreate 文件存在就使用,不存在就先创建后使用
File 文件必须存在
Socket unix套接字必须存在
CharDevice 字符设备必须存在
BlockDevice 块设备必须存在
实例操作
# 创建
[root@k8s-master ~]# kubectl apply -f volume-hostpath.yaml
pod/volume-hostpath created
[root@k8s-master ~]#
[root@k8s-master ~]#
# 获取pod 详情 发现pod 运行在k8s-node2 节点上
[root@k8s-master ~]# kubectl get pod -n dev -owide
NAME              READY   STATUS    RESTARTS   AGE   IP               NODE        NOMINATED NODE   READINESS GATES
volume-hostpath   2/2     Running   0          31s   172.17.169.129   k8s-node2   <none>           <none>
[root@k8s-master ~]#
# 访问nginx
[root@k8s-master ~]# curl 172.17.169.129
<!DOCTYPE html>
<html>
<head>
<title>Welcome to nginx!</title>
<style>
html { color-scheme: light dark; }
body { width: 35em; margin: 0 auto;
font-family: Tahoma, Verdana, Arial, sans-serif; }
</style>
</head>
<body>
<h1>Welcome to nginx!</h1>
<p>If you see this page, the nginx web server is successfully installed and
working. Further configuration is required.</p>

<p>For online documentation and support please refer to
<a href="http://nginx.org/">nginx.org</a>.<br/>
Commercial support is available at
<a href="http://nginx.com/">nginx.com</a>.</p>

<p><em>Thank you for using nginx.</em></p>
</body>
</html>
[root@k8s-master ~]#

# 查看日志
[root@k8s-master ~]# kubectl logs -f volume-hostpath -n dev -c busybox
192.168.13.63 - - [07/Jan/2023:03:01:14 +0000] "GET / HTTP/1.1" 200 615 "-" "curl/7.29.0" "-"

# 接下来就可以去host的/root/logs目录下查看存储的文件了
###  注意: 下面的操作需要到Pod所在的节点运行(案例中是k8s-node2)
[root@k8s-node2 ~]# cd /root/logs/
[root@k8s-node2 logs]# ls
access.log  error.log

# 同样的道理,如果在此目录下创建一个文件,到容器中也是可以看到的
本篇文章先到此处,下一篇我们继续讲解NFS存储

