1.什么是Spring Batch?
Spring Batch 是一个轻量级的开源框架,它提供了一种简单的方式来处理大量的数据。它基于Spring框架,提供了一套批处理框架,可以处理各种类型的批处理任务,如ETL、数据导入/导出、报表生成等。Spring Batch提供了一些重要的概念,如Job、Step、ItemReader、ItemProcessor、ItemWriter等,这些概念可以帮助我们构建可重用的批处理应用程序。通过Spring Batch,我们可以轻松地实现批处理的并发、容错、重试等功能,同时也可以方便地与其他Spring组件集成,如Spring Boot、Spring Data等。总之,Spring Batch是一个非常强大、灵活、易于使用的批处理框架,可以帮助我们快速构建高效、可靠的批处理应用程序。
分层架构
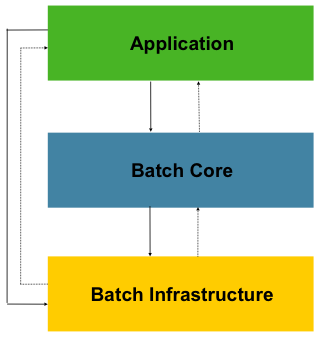
可以看到它分为三层,分别是:
Application应用层:包含了所有任务batch jobs和开发人员自定义的代码,主要是根据项目需要开发的业务流程等。Batch Core核心层:包含启动和管理任务的运行环境类,如JobLauncher等。Batch Infrastructure基础层:上面两层是建立在基础层之上的,包含基础的读入reader和写出writer、重试框架等。
主要概念

2.2.1 JobRepository
专门负责与数据库打交道,对整个批处理的新增、更新、执行进行记录。所以Spring Batch是需要依赖数据库来管理的。
2.2.2 任务启动器JobLauncher
负责启动任务Job。
2.2.3 任务Job
Job是封装整个批处理过程的单位,跑一个批处理任务,就是跑一个Job所定义的内容。
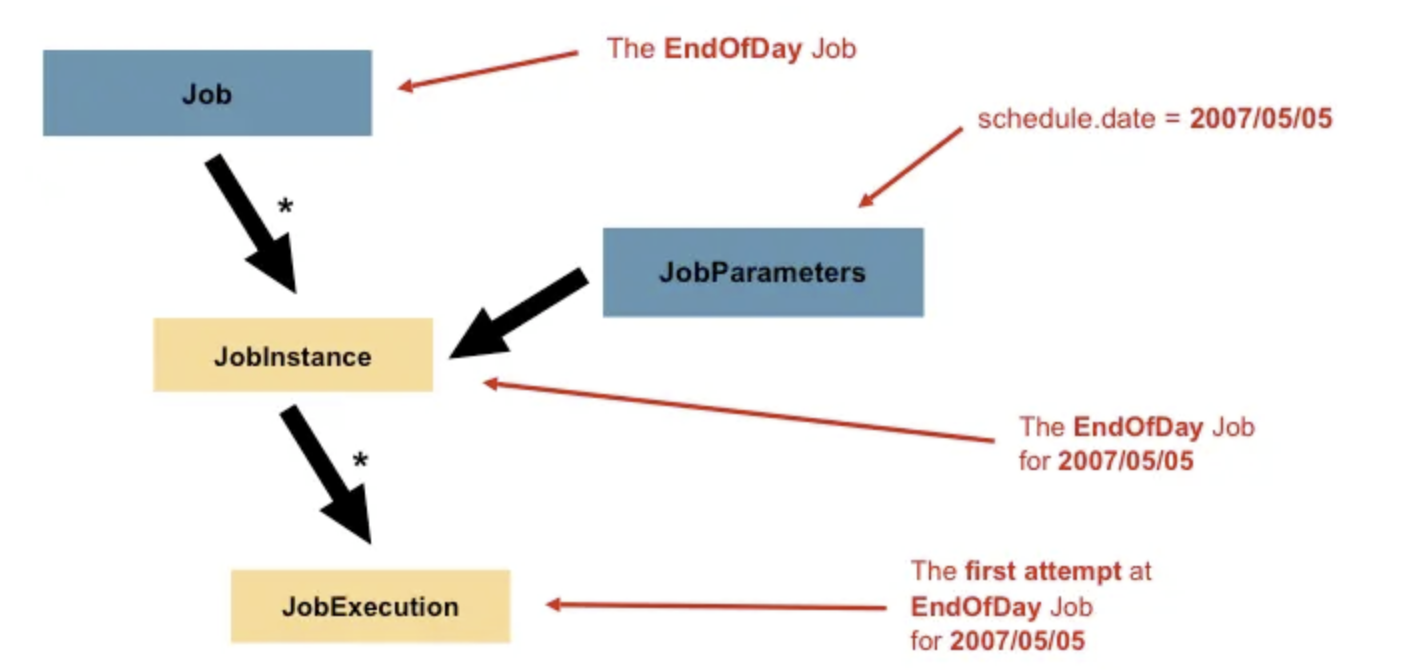
上图介绍了Job的一些相关概念:
Job:封装处理实体,定义过程逻辑。JobInstance:Job的运行实例,不同的实例,参数不同,所以定义好一个Job后可以通过不同参数运行多次。JobParameters:与JobInstance相关联的参数。JobExecution:代表Job的一次实际执行,可能成功、可能失败。
所以,开发人员要做的事情,就是定义Job。
2.2.4 步骤Step
Step是对Job某个过程的封装,一个Job可以包含一个或多个Step,一步步的Step按特定逻辑执行,才代表Job执行完成。

通过定义Step来组装Job可以更灵活地实现复杂的业务逻辑。
2.2.5 输入——处理——输出
所以,定义一个Job关键是定义好一个或多个Step,然后把它们组装好即可。而定义Step有多种方法,但有一种常用的模型就是输入——处理——输出,即Item Reader、Item Processor和Item Writer。比如通过Item Reader从文件输入数据,然后通过Item Processor进行业务处理和数据转换,最后通过Item Writer写到数据库中去。 Spring Batch为我们提供了许多开箱即用的Reader和Writer,非常方便。
2.环境搭建
参照代码仓库mysql模块里面docker目录搭建
3.代码工程
实验目标
如何使用 Spring Boot 创建各种不同类型 Spring Batch Job
pom.xml
<?xml version="1.0" encoding="UTF-8"?>
<project xmlns="http://maven.apache.org/POM/4.0.0"
         xmlns:xsi="http://www.w3.org/2001/XMLSchema-instance"
         xsi:schemaLocation="http://maven.apache.org/POM/4.0.0 http://maven.apache.org/xsd/maven-4.0.0.xsd">
    <parent>
        <artifactId>springboot-demo</artifactId>
        <groupId>com.et</groupId>
        <version>1.0-SNAPSHOT</version>
    </parent>
    <modelVersion>4.0.0</modelVersion>

    <artifactId>SpringBatch</artifactId>

    <properties>
        <maven.compiler.source>8</maven.compiler.source>
        <maven.compiler.target>8</maven.compiler.target>
    </properties>
    <dependencies>
        <dependency>
            <groupId>org.springframework.boot</groupId>
            <artifactId>spring-boot-starter-web</artifactId>
        </dependency>

        <dependency>
            <groupId>org.springframework.boot</groupId>
            <artifactId>spring-boot-autoconfigure</artifactId>
        </dependency>
        <dependency>
            <groupId>org.springframework.boot</groupId>
            <artifactId>spring-boot-starter-test</artifactId>
            <scope>test</scope>
        </dependency>
        <dependency>
            <groupId>org.springframework.boot</groupId>
            <artifactId>spring-boot-starter-batch</artifactId>
        </dependency>

        <dependency>
            <groupId>mysql</groupId>
            <artifactId>mysql-connector-java</artifactId>
        </dependency>
        <dependency>
            <groupId>org.springframework.boot</groupId>
            <artifactId>spring-boot-starter-jdbc</artifactId>
        </dependency>
    </dependencies>
    <build>
        <plugins>
            <plugin>
                <groupId>org.springframework.boot</groupId>
                <artifactId>spring-boot-maven-plugin</artifactId>
            </plugin>
        </plugins>
    </build>
</project>
job
第一个简单的任务
package com.et.batch.job;

import org.springframework.batch.core.Job;
import org.springframework.batch.core.Step;
import org.springframework.batch.core.configuration.annotation.JobBuilderFactory;
import org.springframework.batch.core.configuration.annotation.StepBuilderFactory;
import org.springframework.batch.repeat.RepeatStatus;
import org.springframework.beans.factory.annotation.Autowired;
import org.springframework.context.annotation.Bean;
import org.springframework.stereotype.Component;

@Component
public class FirstJobDemo {

    @Autowired
    private JobBuilderFactory jobBuilderFactory;
    @Autowired
    private StepBuilderFactory stepBuilderFactory;

    @Bean
    public Job firstJob() {
        return jobBuilderFactory.get("firstJob")
                .start(step())
                .build();
    }

    private Step step() {
        return stepBuilderFactory.get("step")
                .tasklet((contribution, chunkContext) -> {
                    System.out.println("execute  step....");
                    return RepeatStatus.FINISHED;
                }).build();
    }
}
多步骤的job
package com.et.batch.job;

import org.springframework.batch.core.ExitStatus;
import org.springframework.batch.core.Job;
import org.springframework.batch.core.Step;
import org.springframework.batch.core.configuration.annotation.JobBuilderFactory;
import org.springframework.batch.core.configuration.annotation.StepBuilderFactory;
import org.springframework.batch.repeat.RepeatStatus;
import org.springframework.beans.factory.annotation.Autowired;
import org.springframework.context.annotation.Bean;
import org.springframework.stereotype.Component;

@Component
public class MultiStepJobDemo {

    @Autowired
    private JobBuilderFactory jobBuilderFactory;
    @Autowired
    private StepBuilderFactory stepBuilderFactory;

    @Bean
    public Job multiStepJob() {
        /*return jobBuilderFactory.get("multiStepJob")
                .start(step1())
                .next(step2())
                .next(step3())
                .build();*/
        // control the next step by last Status
        return jobBuilderFactory.get("multiStepJob2")
          .start(step1())
                .on(ExitStatus.COMPLETED.getExitCode()).to(step2())
                .from(step2())
                .on(ExitStatus.COMPLETED.getExitCode()).to(step3())
                .from(step3()).end()
                .build();
    }

    private Step step1() {
        return stepBuilderFactory.get("step1")
                .tasklet((stepContribution, chunkContext) -> {
                    System.out.println("execute step1。。。");
                    return RepeatStatus.FINISHED;
                }).build();
    }

    private Step step2() {
        return stepBuilderFactory.get("step2")
                .tasklet((stepContribution, chunkContext) -> {
                    System.out.println("execute step2。。。");
                    return RepeatStatus.FINISHED;
                }).build();
    }

    private Step step3() {
        return stepBuilderFactory.get("step3")
                .tasklet((stepContribution, chunkContext) -> {
                    System.out.println("execute step3。。。");
                    return RepeatStatus.FINISHED;
                }).build();
    }
}
多flow控制的job, 创建一个flow对象,包含若干个step
package com.et.batch.job;

import org.springframework.batch.core.Job;
import org.springframework.batch.core.Step;
import org.springframework.batch.core.configuration.annotation.JobBuilderFactory;
import org.springframework.batch.core.configuration.annotation.StepBuilderFactory;
import org.springframework.batch.core.job.builder.FlowBuilder;
import org.springframework.batch.core.job.flow.Flow;
import org.springframework.batch.repeat.RepeatStatus;
import org.springframework.beans.factory.annotation.Autowired;
import org.springframework.context.annotation.Bean;
import org.springframework.stereotype.Component;

@Component
public class FlowJobDemo {

    @Autowired
    private JobBuilderFactory jobBuilderFactory;
    @Autowired
    private StepBuilderFactory stepBuilderFactory;

    @Bean
    public Job flowJob() {
        return jobBuilderFactory.get("flowJob")
                .start(flow())
                .next(step3())
                .end()
                .build();
    }

    private Step step1() {
        return stepBuilderFactory.get("step1")
                .tasklet((stepContribution, chunkContext) -> {
                    System.out.println("execute step1。。。");
                    return RepeatStatus.FINISHED;
                }).build();
    }

    private Step step2() {
        return stepBuilderFactory.get("step2")
                .tasklet((stepContribution, chunkContext) -> {
                    System.out.println("execute step2。。。");
                    return RepeatStatus.FINISHED;
                }).build();
    }

    private Step step3() {
        return stepBuilderFactory.get("step3")
                .tasklet((stepContribution, chunkContext) -> {
                    System.out.println("execute step3。。。");
                    return RepeatStatus.FINISHED;
                }).build();
    }

    private Flow flow() {
        return new FlowBuilder<Flow>("flow")
                .start(step1())
                .next(step2())
                .build();
    }
}
并发执行的jobs
package com.et.batch.job;

import org.springframework.batch.core.Job;
import org.springframework.batch.core.Step;
import org.springframework.batch.core.configuration.annotation.JobBuilderFactory;
import org.springframework.batch.core.configuration.annotation.StepBuilderFactory;
import org.springframework.batch.core.job.builder.FlowBuilder;
import org.springframework.batch.core.job.flow.Flow;
import org.springframework.batch.repeat.RepeatStatus;
import org.springframework.beans.factory.annotation.Autowired;
import org.springframework.context.annotation.Bean;
import org.springframework.core.task.SimpleAsyncTaskExecutor;
import org.springframework.stereotype.Component;

@Component
public class SplitJobDemo {

    @Autowired
    private JobBuilderFactory jobBuilderFactory;
    @Autowired
    private StepBuilderFactory stepBuilderFactory;

    @Bean
    public Job splitJob() {
        return jobBuilderFactory.get("splitJob")
                .start(flow1())
                .split(new SimpleAsyncTaskExecutor()).add(flow2())
                .end()
                .build();

    }

    private Step step1() {
        return stepBuilderFactory.get("step1")
                .tasklet((stepContribution, chunkContext) -> {
                    System.out.println("execute step1。。。");
                    return RepeatStatus.FINISHED;
                }).build();
    }

    private Step step2() {
        return stepBuilderFactory.get("step2")
                .tasklet((stepContribution, chunkContext) -> {
                    System.out.println("execute step2。。。");
                    return RepeatStatus.FINISHED;
                }).build();
    }

    private Step step3() {
        return stepBuilderFactory.get("step3")
                .tasklet((stepContribution, chunkContext) -> {
                    System.out.println("execute step3。。。");
                    return RepeatStatus.FINISHED;
                }).build();
    }

    private Flow flow1() {
        return new FlowBuilder<Flow>("flow1")
                .start(step1())
                .next(step2())
                .build();
    }

    private Flow flow2() {
        return new FlowBuilder<Flow>("flow2")
                .start(step3())
                .build();
    }
}
根据上次运行结果判断是否执行下一步
package com.et.batch.job;

import org.springframework.batch.core.Job;
import org.springframework.batch.core.Step;
import org.springframework.batch.core.configuration.annotation.JobBuilderFactory;
import org.springframework.batch.core.configuration.annotation.StepBuilderFactory;
import org.springframework.batch.repeat.RepeatStatus;
import org.springframework.beans.factory.annotation.Autowired;
import org.springframework.context.annotation.Bean;
import org.springframework.stereotype.Component;

@Component
public class DeciderJobDemo {

    @Autowired
    private JobBuilderFactory jobBuilderFactory;
    @Autowired
    private StepBuilderFactory stepBuilderFactory;
    @Autowired
    private MyDecider myDecider;

    @Bean
    public Job deciderJob() {
        return jobBuilderFactory.get("deciderJob")
                .start(step1())
                .next(myDecider)
                .from(myDecider).on("weekend").to(step2())
                .from(myDecider).on("workingDay").to(step3())
                .from(step3()).on("*").to(step4())
                .end()
                .build();
    }

    private Step step1() {
        return stepBuilderFactory.get("step1")
                .tasklet((stepContribution, chunkContext) -> {
                    System.out.println("execute step1。。。");
                    return RepeatStatus.FINISHED;
                }).build();
    }

    private Step step2() {
        return stepBuilderFactory.get("step2")
                .tasklet((stepContribution, chunkContext) -> {
                    System.out.println("execute step2。。。");
                    return RepeatStatus.FINISHED;
                }).build();
    }

    private Step step3() {
        return stepBuilderFactory.get("step3")
                .tasklet((stepContribution, chunkContext) -> {
                    System.out.println("execute step3。。。");
                    return RepeatStatus.FINISHED;
                }).build();
    }


    private Step step4() {
        return stepBuilderFactory.get("step4")
                .tasklet((stepContribution, chunkContext) -> {
                    System.out.println("execute step4。。。");
                    return RepeatStatus.FINISHED;
                }).build();
    }
}
父子嵌套job
package com.et.batch.job;

import org.springframework.batch.core.Job;
import org.springframework.batch.core.Step;
import org.springframework.batch.core.configuration.annotation.JobBuilderFactory;
import org.springframework.batch.core.configuration.annotation.StepBuilderFactory;
import org.springframework.batch.core.launch.JobLauncher;
import org.springframework.batch.core.repository.JobRepository;
import org.springframework.batch.core.step.builder.JobStepBuilder;
import org.springframework.batch.core.step.builder.StepBuilder;
import org.springframework.batch.repeat.RepeatStatus;
import org.springframework.beans.factory.annotation.Autowired;
import org.springframework.context.annotation.Bean;
import org.springframework.stereotype.Component;
import org.springframework.transaction.PlatformTransactionManager;

@Component
public class NestedJobDemo {

    @Autowired
    private JobBuilderFactory jobBuilderFactory;
    @Autowired
    private StepBuilderFactory stepBuilderFactory;
    @Autowired
    private JobLauncher jobLauncher;
    @Autowired
    private JobRepository jobRepository;
    @Autowired
    private PlatformTransactionManager platformTransactionManager;

    @Bean
    public Job parentJob() {
        return jobBuilderFactory.get("parentJob")
                .start(childJobOneStep())
                .next(childJobTwoStep())
                .build();
    }


    private Step childJobOneStep() {
        return new JobStepBuilder(new StepBuilder("childJobOneStep"))
                .job(childJobOne())
                .launcher(jobLauncher)
                .repository(jobRepository)
                .transactionManager(platformTransactionManager)
                .build();
    }

    private Step childJobTwoStep() {
        return new JobStepBuilder(new StepBuilder("childJobTwoStep"))
                .job(childJobTwo())
                .launcher(jobLauncher)
                .repository(jobRepository)
                .transactionManager(platformTransactionManager)
                .build();
    }

    private Job childJobOne() {
        return jobBuilderFactory.get("childJobOne")
                .start(
                    stepBuilderFactory.get("childJobOneStep")
                            .tasklet((stepContribution, chunkContext) -> {
                                System.out.println("subtask1。。。");
                                return RepeatStatus.FINISHED;
                            }).build()
                ).build();
    }

    private Job childJobTwo() {
        return jobBuilderFactory.get("childJobTwo")
                .start(
                    stepBuilderFactory.get("childJobTwoStep")
                            .tasklet((stepContribution, chunkContext) -> {
                                System.out.println("subtask2。。。");
                                return RepeatStatus.FINISHED;
                            }).build()
                ).build();
    }
}
application.yaml
自动会初始化脚本,只需要建立以恶搞空库就行
spring:
  datasource:
    driver-class-name: com.mysql.cj.jdbc.Driver
    url: jdbc:mysql://localhost:3306/springbatch
    username: root
    password: 123456

  batch:
    jdbc:
      schema: classpath:org/springframework/batch/core/schema-mysql.sql
    initialize-schema: always #Since Spring Boot 2.5.0 use spring.batch.jdbc.initialize-schema=never

    job:
      enabled: true
以上只是一些关键代码,所有代码请参见下面代码仓库
代码仓库
- GitHub - Harries/springboot-demo: a simple springboot demo with some components for example: redis,solr,rockmq and so on.
4.测试
- 启动Spring Boot应用程序,系统会自动运行job,跑过一次,下次启动不会继续执行
- 如果要执行定时任务,可以利用spring提供的scheduledTaskRegistrar注册一个定时任务,扫描最新的定时任务,将这些定时任务注册到scheduleFuture中从而实现动态定时任务。
5.引用
- Batch Applications :: Spring Boot
- Spring Boot集成Spring Batch快速入门Demo | Harries Blog™