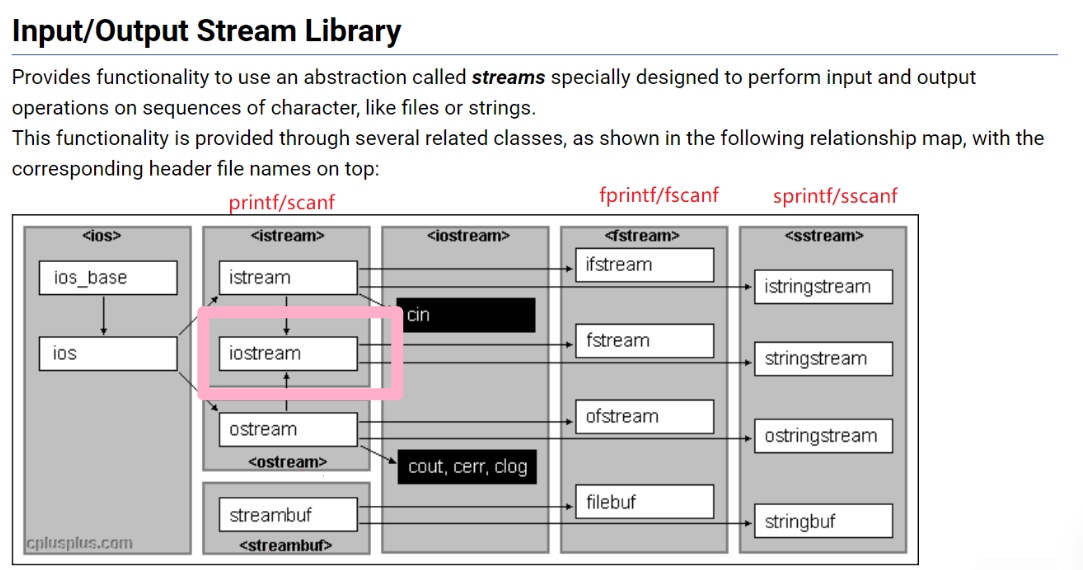
文章目录
- 1、需求介绍
- 2、算法实现
- 3、完整代码
1、需求介绍
调用 opencv 库,绘制轮廓的矩形边框,坐标顺序为右下→左下→左上→右上,我们实现一下转化为熟悉的 左上→右上→右下→左下 形式
按照这样的顺序组织边界框坐标是执行透视转换或匹配对象角点(例如计算对象之间的距离)等操作的先决条件
2、算法实现
#!/usr/bin/env python
# -*- coding: utf-8 -*-
# @Time    : 2021/10/17 0:20
# @File    : order_coordinates.py.py
# @Software: PyCharm
# 导入包
from __future__ import print_function
from imutils import perspective
from imutils import contours
import numpy as np
import argparse
import imutils
import cv2
from scipy.spatial import distance as dist

def order_points_old(pts):
    # 初始化将被排序的坐标列表,这样,列表中的第一个条目是左上,第二个条目是右上,第三个条目是右下,第四个条目是左下
    rect = np.zeros((4, 2), dtype="float32")
    """
    array([[ 90, 236],
       [ 42, 236],
       [ 42, 190],
       [ 90, 190]])
    """
    # 左上点的总和最小,而右下点的总和最大
    s = pts.sum(axis=1)  # x+y array([326, 278, 232, 280])
    rect[0] = pts[np.argmin(s)]  # 2, array([ 42., 190.], dtype=float32)
    rect[2] = pts[np.argmax(s)]  # 0, array([ 90., 236.], dtype=float32)
    # 现在,计算点之间的差值,右上角的差值最小,而左下角的差值最大
    diff = np.diff(pts, axis=1)  # array([[146], [194], [148], [100]])
    rect[1] = pts[np.argmin(diff)]
    rect[3] = pts[np.argmax(diff)]
    # 返回有序坐标
    return rect
def order_points_old 前,边界框四个顶点的坐标顺序
右下→左下→左上→右上
def order_points_old 后,边界框四个顶点的坐标顺序
左上→右上→右下→左下
假设矩形框比较正,无倾斜,左上角坐标为 (x,y)
- 右上角(x+w,y)
- 左下角(x,y+h)
- 右下角(x+w,y+h)
横纵坐标之差的大小
- 左上角(y-x)
- 右上角(y-x-w)
- 左下角(y-x+h)
- 右下角(y-x+h-w)
这么对比分析的话,确实差值右上角最小,最下角最大
缺陷
当两点的和或差相同时会发生什么?如果数组 和 或数组 diff 有相同的值,我们有选择不正确索引的风险,这会对我们的排序产生严重影响。
改进:
def order_points(pts):
    # 根据点的 x 坐标对点进行排序
    xSorted = pts[np.argsort(pts[:, 0]), :]
    # 从根据点的 x 坐标排序的坐标点中获取最左和最右的点
    leftMost = xSorted[:2, :]
    rightMost = xSorted[2:, :]
    # 现在,根据y坐标对最左边的坐标排序,这样我们就可以分别获取左上角和左下角的点
    leftMost = leftMost[np.argsort(leftMost[:, 1]), :]
    (tl, bl) = leftMost
    # 现在我们有了左上角的坐标,用它作为锚点来计算左上角和右下角点之间的欧氏距离;根据勾股定理,距离最大的点就是右下点
    D = dist.cdist(tl[np.newaxis], rightMost, "euclidean")[0]
    (br, tr) = rightMost[np.argsort(D)[::-1], :]
    # 按左上、右上、右下和左下顺序返回坐标
    return np.array([tl, tr, br, bl], dtype="float32")
下面找张图片来实战一下
输入图片

# 构造参数解析并解析参数
ap = argparse.ArgumentParser()
ap.add_argument("-n", "--new", type=int, default=1,
                help="whether or not the new order points should should be used")
args = vars(ap.parse_args())
# 加载我们的输入图像,将其转换为灰度,并稍微模糊它
image = cv2.imread("1.jpg")

gray = cv2.cvtColor(image, cv2.COLOR_BGR2GRAY)
cv2.imwrite("gray.jpg", gray)
gray.jpg

gray = cv2.GaussianBlur(gray, (7, 7), 0)
cv2.imwrite("GaussianBlur.jpg", gray)
GaussianBlur.jpg

# 执行边缘检测,然后执行膨胀+腐蚀以缩小对象边缘之间的间隙
edged = cv2.Canny(gray, 50, 100)
cv2.imwrite("Canny.jpg", edged)
Canny.jpg

edged = cv2.dilate(edged, None, iterations=1)
cv2.imwrite("dilate.jpg", edged)
dilate.jpg

edged = cv2.erode(edged, None, iterations=1)
cv2.imwrite("erode.jpg", edged)
erode.jpg

# 在边缘图中找到轮廓
cnts = cv2.findContours(edged.copy(), cv2.RETR_EXTERNAL,
                        cv2.CHAIN_APPROX_SIMPLE)
cnts = imutils.grab_contours(cnts)
# 从左到右对轮廓进行排序并初始化边界框点颜色
(cnts, _) = contours.sort_contours(cnts)
colors = ((0, 0, 255), (240, 0, 159), (255, 0, 0), (255, 255, 0))
# 分别在轮廓上循环
for (i, c) in enumerate(cnts):
    # 如果轮廓不够大,则忽略它
    if cv2.contourArea(c) < 100:
        continue
    # 计算轮廓的旋转边界框,然后绘制轮廓
    box = cv2.minAreaRect(c)
    box = cv2.cv.BoxPoints(box) if imutils.is_cv2() else cv2.boxPoints(box)
    box = np.array(box, dtype="int")
    cv2.drawContours(image, [box], -1, (0, 255, 0), 2)
    # 显示原始坐标
    print("Object #{}:".format(i + 1))
    print("detect order:\n", box)

    # 对轮廓中的点进行排序,使它们以左上、右上、右下和左下的顺序出现,然后绘制旋转边界框的轮廓
    rect = order_points_old(box)
    print("old order:\n", rect)

    rect_new = order_points(box)
    print("new order1:\n", rect_new)
    # 检查是否应使用新方法对坐标进行排序
    if args["new"] > 0:
        rect = perspective.order_points(box)
    # 显示重新排序的坐标
    print("new order2:\n", rect.astype("int"))
    print("")
    # 遍历原始点并绘制它们
    for ((x, y), color) in zip(rect, colors):
        cv2.circle(image, (int(x), int(y)), 5, color, -1)
    # 在左上角绘制对象编号
    cv2.putText(image, "Object #{}".format(i + 1),
                (int(rect[0][0] - 15), int(rect[0][1] - 15)),
                cv2.FONT_HERSHEY_SIMPLEX, 0.55, (255, 255, 255), 2)
    # 显示
    cv2.imwrite(f"result_{i+1}.jpg", image)
    cv2.imshow("Image", image)
    cv2.waitKey(0)
输出
result_1.jpg

Object #1:
detect order:
 [[ 90 236]
 [ 42 236]
 [ 42 190]
 [ 90 190]]
old order:
 [[ 42. 190.]
 [ 90. 190.]
 [ 90. 236.]
 [ 42. 236.]]
new order1:
 [[ 42. 190.]
 [ 90. 190.]
 [ 90. 236.]
 [ 42. 236.]]
new order2:
 [[ 42 190]
 [ 90 190]
 [ 90 236]
 [ 42 236]]
result_2.jpg

Object #2:
detect order:
 [[192 192]
 [171  94]
 [342  59]
 [362 157]]
old order:
 [[171.  94.]
 [342.  59.]
 [362. 157.]
 [192. 192.]]
new order1:
 [[171.  94.]
 [342.  59.]
 [362. 157.]
 [192. 192.]]
new order2:
 [[171  94]
 [342  59]
 [362 157]
 [192 192]]
result_3.jpg

Object #3:
detect order:
 [[395 229]
 [348 229]
 [348 183]
 [395 183]]
old order:
 [[348. 183.]
 [395. 183.]
 [395. 229.]
 [348. 229.]]
new order1:
 [[348. 183.]
 [395. 183.]
 [395. 229.]
 [348. 229.]]
new order2:
 [[348 183]
 [395 183]
 [395 229]
 [348 229]]
result_4.jpg

Object #4:
detect order:
 [[400 383]
 [377 258]
 [489 237]
 [512 363]]
old order:
 [[377. 258.]
 [489. 237.]
 [512. 363.]
 [400. 383.]]
new order1:
 [[377. 258.]
 [489. 237.]
 [512. 363.]
 [400. 383.]]
new order2:
 [[377 258]
 [489 237]
 [512 363]
 [400 383]]
result_5.jpg

Object #5:
detect order:
 [[495 211]
 [392 161]
 [450  42]
 [553  92]]
old order:
 [[450.  42.]
 [553.  92.]
 [495. 211.]
 [392. 161.]]
new order1:
 [[450.  42.]
 [553.  92.]
 [495. 211.]
 [392. 161.]]
new order2:
 [[450  42]
 [553  92]
 [495 211]
 [392 161]]
result_6.jpg

Object #6:
detect order:
 [[520 255]
 [491 226]
 [520 197]
 [549 226]]
old order:
 [[491. 226.]
 [520. 197.]
 [520. 255.]
 [520. 255.]]
new order1:
 [[491. 226.]
 [520. 197.]
 [549. 226.]
 [520. 255.]]
new order2:
 [[491 226]
 [520 197]
 [549 226]
 [520 255]]
注意到目标 6:
横纵坐标和:
520 + 255 = 775
491 + 226 = 717
520 + 197 = 717
549 + 226 = 775
横纵坐标差:
520 – 255 = 265
491 – 226 = 265
520 – 197 = 323
549 – 226 = 323
和、差里面出现了相等的元素,old order 方法可能会出现错误顺序的赋值导致错误,新的方法则不会
3、完整代码
#!/usr/bin/env python
# -*- coding: utf-8 -*-
# @Time    : 2021/10/17 0:20
# @File    : order_coordinates.py.py
# @Software: PyCharm
# 导入包
from __future__ import print_function
from imutils import perspective
from imutils import contours
import numpy as np
import argparse
import imutils
import cv2
from scipy.spatial import distance as dist

def order_points_old(pts):
    # 初始化将被排序的坐标列表,这样,列表中的第一个条目是左上,第二个条目是右上,第三个条目是右下,第四个条目是左下
    rect = np.zeros((4, 2), dtype="float32")
    """
    array([[ 90, 236],
       [ 42, 236],
       [ 42, 190],
       [ 90, 190]])
    """
    # 左上点的总和最小,而右下点的总和最大
    s = pts.sum(axis=1)  # x+y array([326, 278, 232, 280])
    rect[0] = pts[np.argmin(s)]  # 2, array([ 42., 190.], dtype=float32)
    rect[2] = pts[np.argmax(s)]  # 0, array([ 90., 236.], dtype=float32)
    # 现在,计算点之间的差值,右上角的差值最小,而左下角的差值最大
    diff = np.diff(pts, axis=1)  # array([[146], [194], [148], [100]])
    rect[1] = pts[np.argmin(diff)]
    rect[3] = pts[np.argmax(diff)]
    # 返回有序坐标
    return rect


def order_points(pts):
    # 根据点的 x 坐标对点进行排序
    xSorted = pts[np.argsort(pts[:, 0]), :]
    # 从根据点的 x 坐标排序的坐标点中获取最左和最右的点
    leftMost = xSorted[:2, :]
    rightMost = xSorted[2:, :]
    # 现在,根据y坐标对最左边的坐标排序,这样我们就可以分别获取左上角和左下角的点
    leftMost = leftMost[np.argsort(leftMost[:, 1]), :]
    (tl, bl) = leftMost
    # 现在我们有了左上角的坐标,用它作为锚点来计算左上角和右下角点之间的欧氏距离;根据勾股定理,距离最大的点就是右下点
    D = dist.cdist(tl[np.newaxis], rightMost, "euclidean")[0]
    (br, tr) = rightMost[np.argsort(D)[::-1], :]
    # 按左上、右上、右下和左下顺序返回坐标
    return np.array([tl, tr, br, bl], dtype="float32")

# 构造参数解析并解析参数
ap = argparse.ArgumentParser()
ap.add_argument("-n", "--new", type=int, default=1,
                help="whether or not the new order points should should be used")
args = vars(ap.parse_args())
# 加载我们的输入图像,将其转换为灰度,并稍微模糊它
image = cv2.imread("1.jpg")
gray = cv2.cvtColor(image, cv2.COLOR_BGR2GRAY)
cv2.imwrite("gray.jpg", gray)
gray = cv2.GaussianBlur(gray, (7, 7), 0)
cv2.imwrite("GaussianBlur.jpg", gray)
# 执行边缘检测,然后执行膨胀+腐蚀以缩小对象边缘之间的间隙
edged = cv2.Canny(gray, 50, 100)
cv2.imwrite("Canny.jpg", edged)
edged = cv2.dilate(edged, None, iterations=1)
cv2.imwrite("dilate.jpg", edged)
edged = cv2.erode(edged, None, iterations=1)
cv2.imwrite("erode.jpg", edged)
# 在边缘图中找到轮廓
cnts = cv2.findContours(edged.copy(), cv2.RETR_EXTERNAL,
                        cv2.CHAIN_APPROX_SIMPLE)
cnts = imutils.grab_contours(cnts)
# 从左到右对轮廓进行排序并初始化边界框点颜色
(cnts, _) = contours.sort_contours(cnts)
colors = ((0, 0, 255), (240, 0, 159), (255, 0, 0), (255, 255, 0))
# 分别在轮廓上循环
for (i, c) in enumerate(cnts):
    # 如果轮廓不够大,则忽略它
    if cv2.contourArea(c) < 100:
        continue
    # 计算轮廓的旋转边界框,然后绘制轮廓
    box = cv2.minAreaRect(c)
    box = cv2.cv.BoxPoints(box) if imutils.is_cv2() else cv2.boxPoints(box)
    box = np.array(box, dtype="int")
    cv2.drawContours(image, [box], -1, (0, 255, 0), 2)
    # 显示原始坐标
    print("Object #{}:".format(i + 1))
    print("detect order:\n", box)

    # 对轮廓中的点进行排序,使它们以左上、右上、右下和左下的顺序出现,然后绘制旋转边界框的轮廓
    rect = order_points_old(box)
    print("old order:\n", rect)

    rect_new = order_points(box)
    print("new order1:\n", rect_new)
    # 检查是否应使用新方法对坐标进行排序
    if args["new"] > 0:
        rect = perspective.order_points(box)
    # 显示重新排序的坐标
    print("new order2:\n", rect.astype("int"))
    print("")
    # 遍历原始点并绘制它们
    for ((x, y), color) in zip(rect, colors):
        cv2.circle(image, (int(x), int(y)), 5, color, -1)
    # 在左上角绘制对象编号
    cv2.putText(image, "Object #{}".format(i + 1),
                (int(rect[0][0] - 15), int(rect[0][1] - 15)),
                cv2.FONT_HERSHEY_SIMPLEX, 0.55, (255, 255, 255), 2)
    # 显示
    cv2.imwrite(f"result_{i+1}.jpg", image)
    cv2.imshow("Image", image)
    cv2.waitKey(0)
参考学习来自:OpenCV基础(26)使用 Python 和 OpenCV 顺时针排序坐标