🌈个人主页:人不走空
💖系列专栏:算法专题
⏰诗词歌赋:斯是陋室,惟吾德馨

目录
🌈个人主页:人不走空
💖系列专栏:算法专题
⏰诗词歌赋:斯是陋室,惟吾德馨
Atomic 原子类介绍
基本类型原子类
数组类型原子类
引用类型原子类
对象的属性修改类型原子类
作者其他作品:
JavaGuide官方网站:javaguide.cn
Atomic 原子类介绍
Atomic 翻译成中文是“原子”的意思。在化学上,原子是构成物质的最小单位,在化学反应中不可分割。在编程中,Atomic 指的是一个操作具有原子性,即该操作不可分割、不可中断。即使在多个线程同时执行时,该操作要么全部执行完成,要么不执行,不会被其他线程看到部分完成的状态。
原子类简单来说就是具有原子性操作特征的类。
java.util.concurrent.atomic 包中的 Atomic 原子类提供了一种线程安全的方式来操作单个变量。
Atomic 类依赖于 CAS(Compare-And-Swap,比较并交换)乐观锁来保证其方法的原子性,而不需要使用传统的锁机制(如 synchronized 块或 ReentrantLock)。
这篇文章我们只介绍 Atomic 原子类的概念,具体实现原理可以阅读笔者写的这篇文章:什么是乐观锁和悲观锁?Java 中 CAS 是如何实现的?。
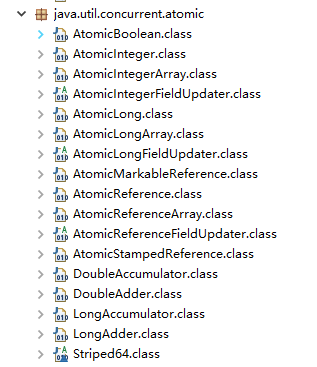
JUC原子类概览
根据操作的数据类型,可以将 JUC 包中的原子类分为 4 类:
1、基本类型
使用原子的方式更新基本类型
-
AtomicInteger:整型原子类 -
AtomicLong:长整型原子类 -
AtomicBoolean:布尔型原子类
2、数组类型
使用原子的方式更新数组里的某个元素
-
AtomicIntegerArray:整型数组原子类 -
AtomicLongArray:长整型数组原子类 -
AtomicReferenceArray:引用类型数组原子类
3、引用类型
-
AtomicReference:引用类型原子类 -
AtomicMarkableReference:原子更新带有标记的引用类型。该类将 boolean 标记与引用关联起来,也可以解决使用 CAS 进行原子更新时可能出现的 ABA 问题。 -
AtomicStampedReference:原子更新带有版本号的引用类型。该类将整数值与引用关联起来,可用于解决原子的更新数据和数据的版本号,可以解决使用 CAS 进行原子更新时可能出现的 ABA 问题。
🐛 修正(参见:issue#626:https://github.com/Snailclimb/JavaGuide/issues/626) : AtomicMarkableReference 不能解决 ABA 问题。
4、对象的属性修改类型
-
AtomicIntegerFieldUpdater:原子更新整型字段的更新器 -
AtomicLongFieldUpdater:原子更新长整型字段的更新器 -
AtomicReferenceFieldUpdater:原子更新引用类型里的字段
基本类型原子类
使用原子的方式更新基本类型
-
AtomicInteger:整型原子类 -
AtomicLong:长整型原子类 -
AtomicBoolean:布尔型原子类
上面三个类提供的方法几乎相同,所以我们这里以 AtomicInteger 为例子来介绍。
AtomicInteger 类常用方法 :
public final int get() //获取当前的值
public final int getAndSet(int newValue)//获取当前的值,并设置新的值
public final int getAndIncrement()//获取当前的值,并自增
public final int getAndDecrement() //获取当前的值,并自减
public final int getAndAdd(int delta) //获取当前的值,并加上预期的值
boolean compareAndSet(int expect, int update) //如果输入的数值等于预期值,则以原子方式将该值设置为输入值(update)
public final void lazySet(int newValue)//最终设置为newValue, lazySet 提供了一种比 set 方法更弱的语义,可能导致其他线程在之后的一小段时间内还是可以读到旧的值,但可能更高效。
AtomicInteger 类使用示例 :
// 初始化 AtomicInteger 对象,初始值为 0
AtomicInteger atomicInt = new AtomicInteger(0);

// 使用 getAndSet 方法获取当前值,并设置新值为 3
int tempValue = atomicInt.getAndSet(3);
System.out.println("tempValue: " + tempValue + "; atomicInt: " + atomicInt);

// 使用 getAndIncrement 方法获取当前值,并自增 1
tempValue = atomicInt.getAndIncrement();
System.out.println("tempValue: " + tempValue + "; atomicInt: " + atomicInt);

// 使用 getAndAdd 方法获取当前值,并增加指定值 5
tempValue = atomicInt.getAndAdd(5);
System.out.println("tempValue: " + tempValue + "; atomicInt: " + atomicInt);

// 使用 compareAndSet 方法进行原子性条件更新,期望值为 9,更新值为 10
boolean updateSuccess = atomicInt.compareAndSet(9, 10);
System.out.println("Update Success: " + updateSuccess + "; atomicInt: " + atomicInt);

// 获取当前值
int currentValue = atomicInt.get();
System.out.println("Current value: " + currentValue);

// 使用 lazySet 方法设置新值为 15
atomicInt.lazySet(15);
System.out.println("After lazySet, atomicInt: " + atomicInt);
输出:
tempValue: 0; atomicInt: 3
tempValue: 3; atomicInt: 4
tempValue: 4; atomicInt: 9
Update Success: true; atomicInt: 10
Current value: 10
After lazySet, atomicInt: 15
数组类型原子类
使用原子的方式更新数组里的某个元素
-
AtomicIntegerArray:整形数组原子类 -
AtomicLongArray:长整形数组原子类 -
AtomicReferenceArray:引用类型数组原子类
上面三个类提供的方法几乎相同,所以我们这里以 AtomicIntegerArray 为例子来介绍。
AtomicIntegerArray 类常用方法:
public final int get(int i) //获取 index=i 位置元素的值
public final int getAndSet(int i, int newValue)//返回 index=i 位置的当前的值,并将其设置为新值:newValue
public final int getAndIncrement(int i)//获取 index=i 位置元素的值,并让该位置的元素自增
public final int getAndDecrement(int i) //获取 index=i 位置元素的值,并让该位置的元素自减
public final int getAndAdd(int i, int delta) //获取 index=i 位置元素的值,并加上预期的值
boolean compareAndSet(int i, int expect, int update) //如果输入的数值等于预期值,则以原子方式将 index=i 位置的元素值设置为输入值(update)
public final void lazySet(int i, int newValue)//最终 将index=i 位置的元素设置为newValue,使用 lazySet 设置之后可能导致其他线程在之后的一小段时间内还是可以读到旧的值。
AtomicIntegerArray 类使用示例 :
int[] nums = {1, 2, 3, 4, 5, 6};
// 创建 AtomicIntegerArray
AtomicIntegerArray atomicArray = new AtomicIntegerArray(nums);

// 打印 AtomicIntegerArray 中的初始值
System.out.println("Initial values in AtomicIntegerArray:");
for (int j = 0; j < nums.length; j++) {
    System.out.print("Index " + j + ": " + atomicArray.get(j) + " ");
}

// 使用 getAndSet 方法将索引 0 处的值设置为 2,并返回旧值
int tempValue = atomicArray.getAndSet(0, 2);
System.out.println("\nAfter getAndSet(0, 2):");
System.out.println("Returned value: " + tempValue);
for (int j = 0; j < atomicArray.length(); j++) {
    System.out.print("Index " + j + ": " + atomicArray.get(j) + " ");
}

// 使用 getAndIncrement 方法将索引 0 处的值加 1,并返回旧值
tempValue = atomicArray.getAndIncrement(0);
System.out.println("\nAfter getAndIncrement(0):");
System.out.println("Returned value: " + tempValue);
for (int j = 0; j < atomicArray.length(); j++) {
    System.out.print("Index " + j + ": " + atomicArray.get(j) + " ");
}

// 使用 getAndAdd 方法将索引 0 处的值增加 5,并返回旧值
tempValue = atomicArray.getAndAdd(0, 5);
System.out.println("\nAfter getAndAdd(0, 5):");
System.out.println("Returned value: " + tempValue);
for (int j = 0; j < atomicArray.length(); j++) {
    System.out.print("Index " + j + ": " + atomicArray.get(j) + " ");
}
输出:
Initial values in AtomicIntegerArray:
Index 0: 1 Index 1: 2 Index 2: 3 Index 3: 4 Index 4: 5 Index 5: 6
After getAndSet(0, 2):
Returned value: 1
Index 0: 2 Index 1: 2 Index 2: 3 Index 3: 4 Index 4: 5 Index 5: 6
After getAndIncrement(0):
Returned value: 2
Index 0: 3 Index 1: 2 Index 2: 3 Index 3: 4 Index 4: 5 Index 5: 6
After getAndAdd(0, 5):
Returned value: 3
Index 0: 8 Index 1: 2 Index 2: 3 Index 3: 4 Index 4: 5 Index 5: 6
引用类型原子类
基本类型原子类只能更新一个变量,如果需要原子更新多个变量,需要使用 引用类型原子类。
-
AtomicReference:引用类型原子类 -
AtomicStampedReference:原子更新带有版本号的引用类型。该类将整数值与引用关联起来,可用于解决原子的更新数据和数据的版本号,可以解决使用 CAS 进行原子更新时可能出现的 ABA 问题。 -
AtomicMarkableReference:原子更新带有标记的引用类型。该类将 boolean 标记与引用关联起来,也可以解决使用 CAS 进行原子更新时可能出现的 ABA 问题。
上面三个类提供的方法几乎相同,所以我们这里以 AtomicReference 为例子来介绍。
AtomicReference 类使用示例 :
// Person 类
class Person {
    private String name;
    private int age;
    //省略getter/setter和toString
}


// 创建 AtomicReference 对象并设置初始值
AtomicReference<Person> ar = new AtomicReference<>(new Person("SnailClimb", 22));

// 打印初始值
System.out.println("Initial Person: " + ar.get().toString());

// 更新值
Person updatePerson = new Person("Daisy", 20);
ar.compareAndSet(ar.get(), updatePerson);

// 打印更新后的值
System.out.println("Updated Person: " + ar.get().toString());

// 尝试再次更新
Person anotherUpdatePerson = new Person("John", 30);
boolean isUpdated = ar.compareAndSet(updatePerson, anotherUpdatePerson);

// 打印是否更新成功及最终值
System.out.println("Second Update Success: " + isUpdated);
System.out.println("Final Person: " + ar.get().toString());
输出:
Initial Person: Person{name='SnailClimb', age=22}
Updated Person: Person{name='Daisy', age=20}
Second Update Success: true
Final Person: Person{name='John', age=30}
AtomicStampedReference 类使用示例 :
// 创建一个 AtomicStampedReference 对象,初始值为 "SnailClimb",初始版本号为 1
AtomicStampedReference<String> asr = new AtomicStampedReference<>("SnailClimb", 1);

// 打印初始值和版本号
int[] initialStamp = new int[1];
String initialRef = asr.get(initialStamp);
System.out.println("Initial Reference: " + initialRef + ", Initial Stamp: " + initialStamp[0]);

// 更新值和版本号
int oldStamp = initialStamp[0];
String oldRef = initialRef;
String newRef = "Daisy";
int newStamp = oldStamp + 1;

boolean isUpdated = asr.compareAndSet(oldRef, newRef, oldStamp, newStamp);
System.out.println("Update Success: " + isUpdated);

// 打印更新后的值和版本号
int[] updatedStamp = new int[1];
String updatedRef = asr.get(updatedStamp);
System.out.println("Updated Reference: " + updatedRef + ", Updated Stamp: " + updatedStamp[0]);

// 尝试用错误的版本号更新
boolean isUpdatedWithWrongStamp = asr.compareAndSet(newRef, "John", oldStamp, newStamp + 1);
System.out.println("Update with Wrong Stamp Success: " + isUpdatedWithWrongStamp);

// 打印最终的值和版本号
int[] finalStamp = new int[1];
String finalRef = asr.get(finalStamp);
System.out.println("Final Reference: " + finalRef + ", Final Stamp: " + finalStamp[0]);
输出结果如下:
Initial Reference: SnailClimb, Initial Stamp: 1
Update Success: true
Updated Reference: Daisy, Updated Stamp: 2
Update with Wrong Stamp Success: false
Final Reference: Daisy, Final Stamp: 2
AtomicMarkableReference 类使用示例 :
// 创建一个 AtomicMarkableReference 对象,初始值为 "SnailClimb",初始标记为 false
AtomicMarkableReference<String> amr = new AtomicMarkableReference<>("SnailClimb", false);

// 打印初始值和标记
boolean[] initialMark = new boolean[1];
String initialRef = amr.get(initialMark);
System.out.println("Initial Reference: " + initialRef + ", Initial Mark: " + initialMark[0]);

// 更新值和标记
String oldRef = initialRef;
String newRef = "Daisy";
boolean oldMark = initialMark[0];
boolean newMark = true;

boolean isUpdated = amr.compareAndSet(oldRef, newRef, oldMark, newMark);
System.out.println("Update Success: " + isUpdated);

// 打印更新后的值和标记
boolean[] updatedMark = new boolean[1];
String updatedRef = amr.get(updatedMark);
System.out.println("Updated Reference: " + updatedRef + ", Updated Mark: " + updatedMark[0]);

// 尝试用错误的标记更新
boolean isUpdatedWithWrongMark = amr.compareAndSet(newRef, "John", oldMark, !newMark);
System.out.println("Update with Wrong Mark Success: " + isUpdatedWithWrongMark);

// 打印最终的值和标记
boolean[] finalMark = new boolean[1];
String finalRef = amr.get(finalMark);
System.out.println("Final Reference: " + finalRef + ", Final Mark: " + finalMark[0]);
输出结果如下:
Initial Reference: SnailClimb, Initial Mark: false
Update Success: true
Updated Reference: Daisy, Updated Mark: true
Update with Wrong Mark Success: false
Final Reference: Daisy, Final Mark: true
对象的属性修改类型原子类
如果需要原子更新某个类里的某个字段时,需要用到对象的属性修改类型原子类。
-
AtomicIntegerFieldUpdater:原子更新整形字段的更新器 -
AtomicLongFieldUpdater:原子更新长整形字段的更新器 -
AtomicReferenceFieldUpdater:原子更新引用类型里的字段的更新器
要想原子地更新对象的属性需要两步。第一步,因为对象的属性修改类型原子类都是抽象类,所以每次使用都必须使用静态方法 newUpdater()创建一个更新器,并且需要设置想要更新的类和属性。第二步,更新的对象属性必须使用 public volatile 修饰符。
上面三个类提供的方法几乎相同,所以我们这里以 AtomicIntegerFieldUpdater为例子来介绍。
AtomicIntegerFieldUpdater 类使用示例 :
// Person 类
class Person {
    private String name;
    // 要使用 AtomicIntegerFieldUpdater,字段必须是 public volatile
    private volatile int age;
    //省略getter/setter和toString
}

// 创建 AtomicIntegerFieldUpdater 对象
AtomicIntegerFieldUpdater<Person> ageUpdater = AtomicIntegerFieldUpdater.newUpdater(Person.class, "age");

// 创建 Person 对象
Person person = new Person("SnailClimb", 22);

// 打印初始值
System.out.println("Initial Person: " + person);

// 更新 age 字段
ageUpdater.incrementAndGet(person); // 自增
System.out.println("After Increment: " + person);

ageUpdater.addAndGet(person, 5); // 增加 5
System.out.println("After Adding 5: " + person);

ageUpdater.compareAndSet(person, 28, 30); // 如果当前值是 28,则设置为 30
System.out.println("After Compare and Set (28 to 30): " + person);

// 尝试使用错误的比较值进行更新
boolean isUpdated = ageUpdater.compareAndSet(person, 28, 35); // 这次应该失败
System.out.println("Compare and Set (28 to 35) Success: " + isUpdated);
System.out.println("Final Person: " + person);
输出结果:
Initial Person: Name: SnailClimb, Age: 22
After Increment: Name: SnailClimb, Age: 23
After Adding 5: Name: SnailClimb, Age: 28
After Compare and Set (28 to 30): Name: SnailClimb, Age: 30
Compare and Set (28 to 35) Success: false
Final Person: Name: SnailClimb, Age: 30
本文来自于恩师 公众号Guide JavaGuide
作者其他作品:
【Java】Spring循环依赖:原因与解决方法
OpenAI Sora来了,视频生成领域的GPT-4时代来了
[Java·算法·简单] LeetCode 14. 最长公共前缀 详细解读
【Java】深入理解Java中的static关键字
[Java·算法·简单] LeetCode 28. 找出字a符串中第一个匹配项的下标 详细解读
了解 Java 中的 AtomicInteger 类
算法题 — 整数转二进制,查找其中1的数量
深入理解MySQL事务特性:保证数据完整性与一致性
Java企业应用软件系统架构演变史