ResNet
ResNet在2015年由微软实验室提出,斩获当年lmageNet竞赛中分类任务第一名,目标检测第一名。获得coco数据集中目标检测第一名,图像分割第一名。
ResNet亮点
1.超深的网络结构(突破1000层)
2.提出residual模块
3.使用Batch Normalization加速训练(丢弃dropout)
网络一定是越深越好吗?
一般来说,网络越深,咱们能获取的信息越多,而且特征也越丰富。我们思考一个问题,我们一直加深我们的网络,取得的效果一定越好吗?
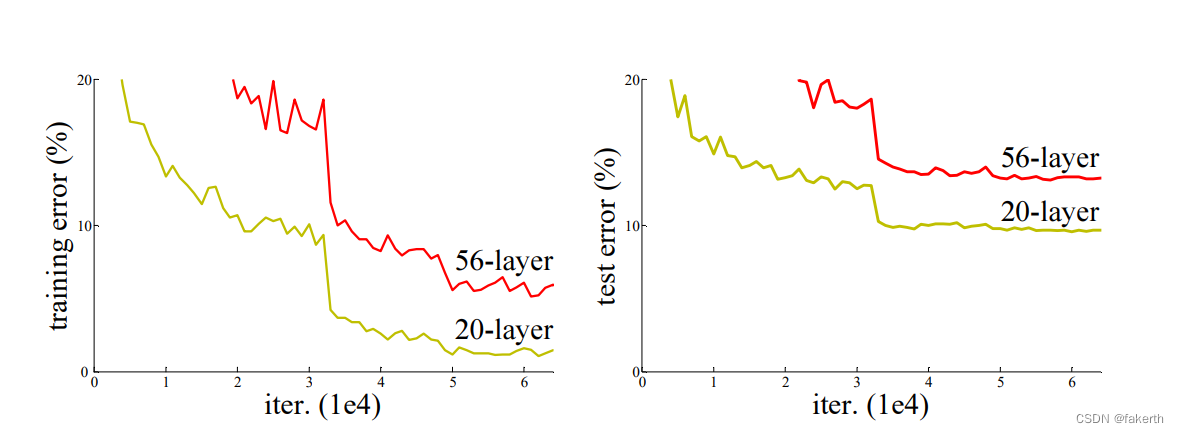
看到这两幅图我们看到,网络并不是深度越深效果越好,那么是什么原因导致的呢?在ResNet论文中,提出了两个问题,一个是随着网络深度的增加,梯度消失或梯度爆炸问题;另一个是退化问题。为了让更深的网络也能训练出好的效果,何恺明提出了ResNet网络。

残差结构
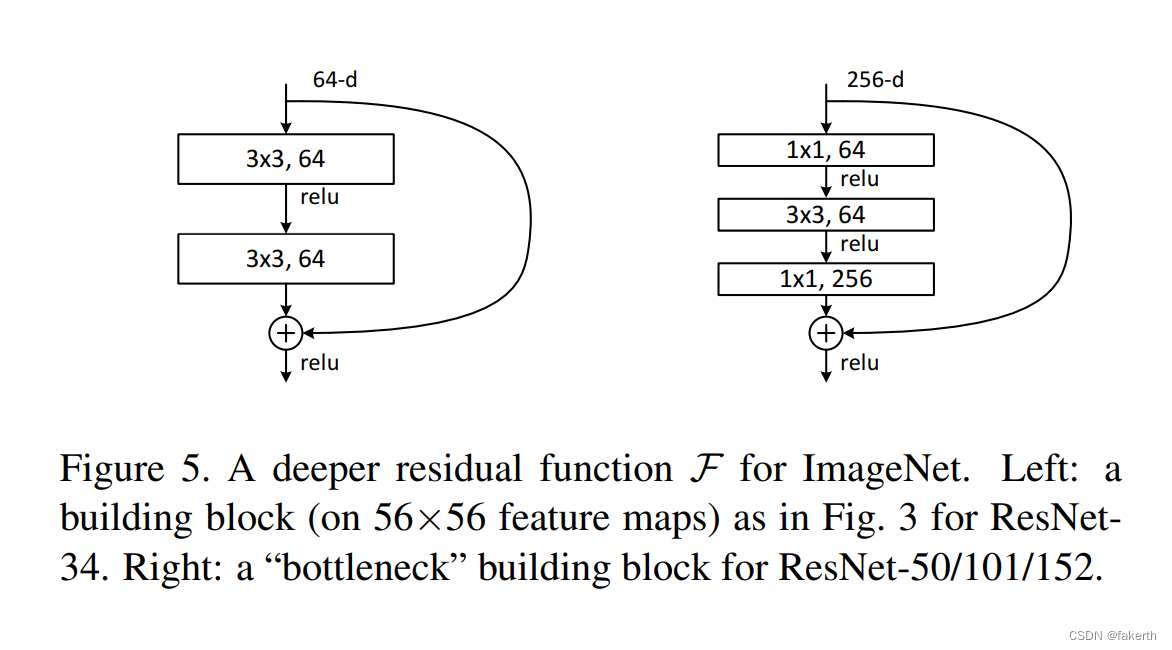
左边的残差结构用于ResNet-34,右边的残差结构用于ResNet-50/101/152。残差结构可以用表达式F(x)=f(x)+x表示。左边的残差结构很简单,主线f(x)是两个3x3的卷积,最后与x合并。右边多了两个1x1的卷积,用来降维和升维(减少参数量)。
ResNet网络结构

我们着重分析一下ResNet-34结构,可以看到是由多个残差结构堆叠而成:
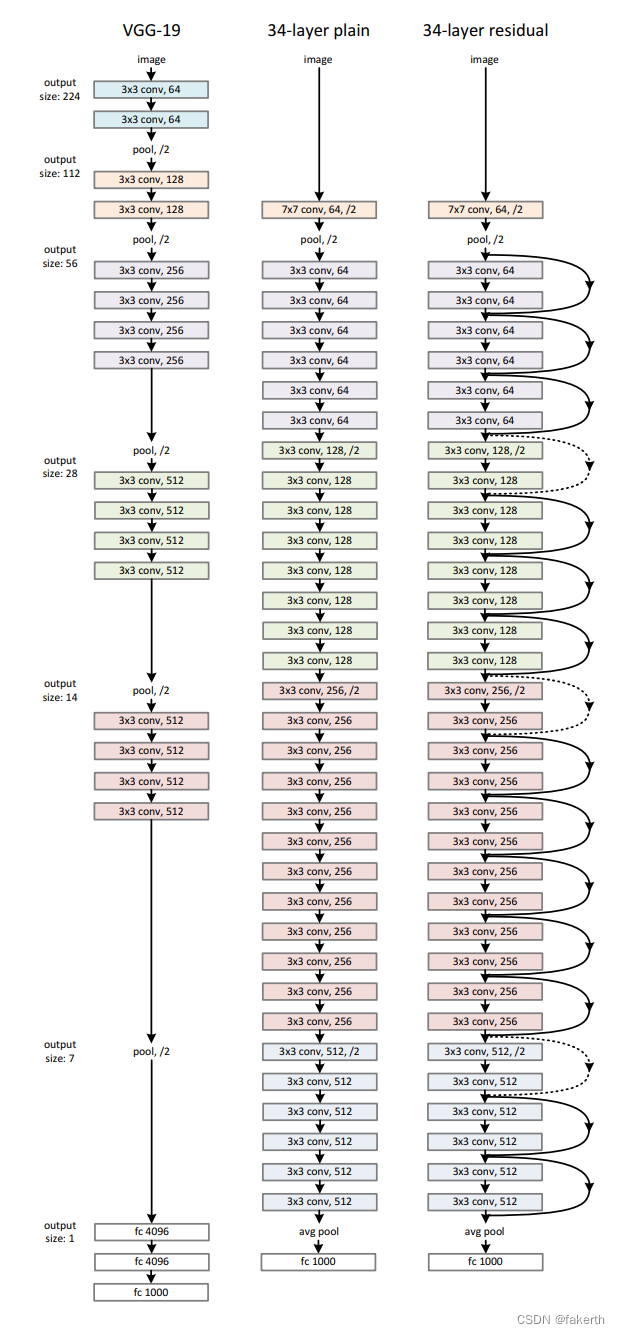
为什么会有实线和虚线之分呢?从网络参数图上可以看到,经过一个类型的第一个残差结构后,图像的大小为原来的一半,我们拿第一条虚线举例:输入图像为56x56x64,输出为28x28x128,所以分支需要一个1x1卷积来将输入图处理成输出大小。
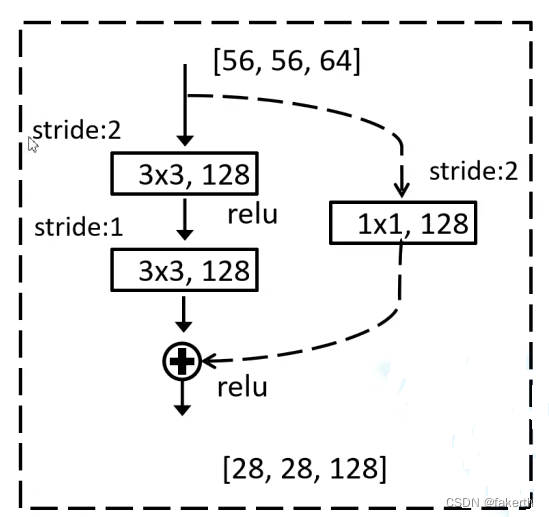
右侧虚线残差结构的主分支上第一个1x1卷积层的步距是2,第二个3x3卷积层步距是1。但在pytorch官方实现过程中是第一个1x1卷积层的步距是1,第二个3x3卷积层步距是2,这样能够在imagenet的top1上提升大概0.5%的准确率。
Batch Normalization
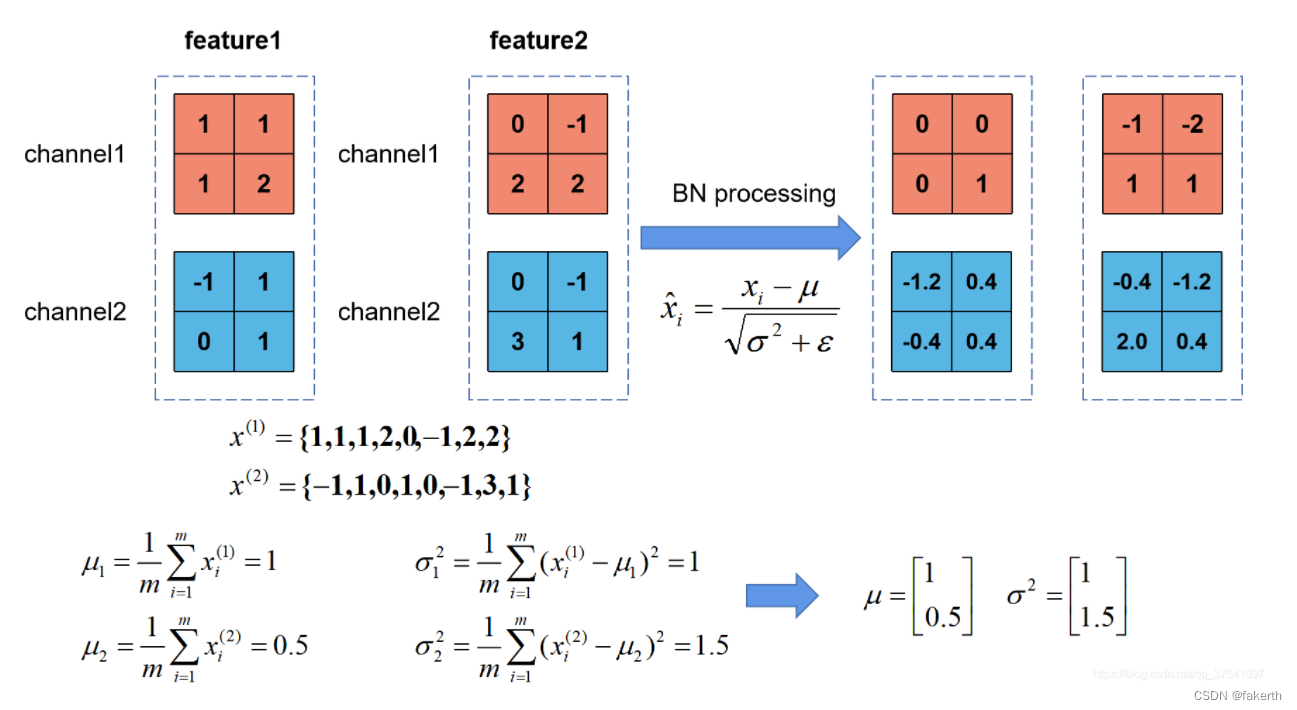
Batch Normalization是google团队在2015年论文《Batch Normalization: Accelerating Deep Network Training by Reducing Internal Covariate Shift》提出的。通过该方法能够加速网络的收敛并提升准确率。我们在图像预处理过程中通常会对图像进行标准化处理,这样能够加速网络的收敛,假设对于Conv1来说输入的就是满足某一分布的特征矩阵,但对于Conv2而言经过Conv1卷积后输入的feature map就不一定满足某一分布规律了。而我们Batch Normalization的目的就是使我们的feature map满足均值为0,方差为1的分布规律。下图是一个示例:
我们需要知道的是将bn层放在卷积层(Conv)和激活层(例如Relu)之间,且卷积层不要使用偏置bias,如图所示:

ResNet实现
1.建立模型:
import torch.nn as nn
import torch


class BasicBlock(nn.Module):
    expansion = 1

    def __init__(self, in_channel, out_channel, stride=1, downsample=None, **kwargs):
        super(BasicBlock, self).__init__()
        self.conv1 = nn.Conv2d(in_channels=in_channel, out_channels=out_channel,
                               kernel_size=3, stride=stride, padding=1, bias=False)
        self.bn1 = nn.BatchNorm2d(out_channel)
        self.relu = nn.ReLU()
        self.conv2 = nn.Conv2d(in_channels=out_channel, out_channels=out_channel,
                               kernel_size=3, stride=1, padding=1, bias=False)
        self.bn2 = nn.BatchNorm2d(out_channel)
        self.downsample = downsample

    def forward(self, x):
        identity = x
        if self.downsample is not None:
            identity = self.downsample(x)

        out = self.conv1(x)
        out = self.bn1(out)
        out = self.relu(out)

        out = self.conv2(out)
        out = self.bn2(out)

        out += identity
        out = self.relu(out)

        return out


class Bottleneck(nn.Module):
    expansion = 4

    def __init__(self, in_channel, out_channel, stride=1, downsample=None,
                 groups=1, width_per_group=64):
        super(Bottleneck, self).__init__()

        width = int(out_channel * (width_per_group / 64.)) * groups

        self.conv1 = nn.Conv2d(in_channels=in_channel, out_channels=width,
                               kernel_size=1, stride=1, bias=False)  # squeeze channels
        self.bn1 = nn.BatchNorm2d(width)
        # -----------------------------------------
        self.conv2 = nn.Conv2d(in_channels=width, out_channels=width, groups=groups,
                               kernel_size=3, stride=stride, bias=False, padding=1)
        self.bn2 = nn.BatchNorm2d(width)
        # -----------------------------------------
        self.conv3 = nn.Conv2d(in_channels=width, out_channels=out_channel*self.expansion,
                               kernel_size=1, stride=1, bias=False)  # unsqueeze channels
        self.bn3 = nn.BatchNorm2d(out_channel*self.expansion)
        self.relu = nn.ReLU(inplace=True)
        self.downsample = downsample

    def forward(self, x):
        identity = x
        if self.downsample is not None:
            identity = self.downsample(x)

        out = self.conv1(x)
        out = self.bn1(out)
        out = self.relu(out)

        out = self.conv2(out)
        out = self.bn2(out)
        out = self.relu(out)

        out = self.conv3(out)
        out = self.bn3(out)

        out += identity
        out = self.relu(out)

        return out


class ResNet(nn.Module):

    def __init__(self,
                 block,
                 blocks_num,
                 num_classes=1000,
                 include_top=True,
                 groups=1,
                 width_per_group=64):
        super(ResNet, self).__init__()
        self.include_top = include_top
        self.in_channel = 64

        self.groups = groups
        self.width_per_group = width_per_group

        self.conv1 = nn.Conv2d(3, self.in_channel, kernel_size=7, stride=2,
                               padding=3, bias=False)
        self.bn1 = nn.BatchNorm2d(self.in_channel)
        self.relu = nn.ReLU(inplace=True)
        self.maxpool = nn.MaxPool2d(kernel_size=3, stride=2, padding=1)
        self.layer1 = self._make_layer(block, 64, blocks_num[0])
        self.layer2 = self._make_layer(block, 128, blocks_num[1], stride=2)
        self.layer3 = self._make_layer(block, 256, blocks_num[2], stride=2)
        self.layer4 = self._make_layer(block, 512, blocks_num[3], stride=2)
        if self.include_top:
            self.avgpool = nn.AdaptiveAvgPool2d((1, 1))  # output size = (1, 1)
            self.fc = nn.Linear(512 * block.expansion, num_classes)

        for m in self.modules():
            if isinstance(m, nn.Conv2d):
                nn.init.kaiming_normal_(m.weight, mode='fan_out', nonlinearity='relu')

    def _make_layer(self, block, channel, block_num, stride=1):
        downsample = None
        if stride != 1 or self.in_channel != channel * block.expansion:
            downsample = nn.Sequential(
                nn.Conv2d(self.in_channel, channel * block.expansion, kernel_size=1, stride=stride, bias=False),
                nn.BatchNorm2d(channel * block.expansion))

        layers = []
        layers.append(block(self.in_channel,
                            channel,
                            downsample=downsample,
                            stride=stride,
                            groups=self.groups,
                            width_per_group=self.width_per_group))
        self.in_channel = channel * block.expansion

        for _ in range(1, block_num):
            layers.append(block(self.in_channel,
                                channel,
                                groups=self.groups,
                                width_per_group=self.width_per_group))

        return nn.Sequential(*layers)

    def forward(self, x):
        x = self.conv1(x)
        x = self.bn1(x)
        x = self.relu(x)
        x = self.maxpool(x)

        x = self.layer1(x)
        x = self.layer2(x)
        x = self.layer3(x)
        x = self.layer4(x)

        if self.include_top:
            x = self.avgpool(x)
            x = torch.flatten(x, 1)
            x = self.fc(x)

        return x


def resnet34(num_classes=1000, include_top=True):
    # https://download.pytorch.org/models/resnet34-333f7ec4.pth
    return ResNet(BasicBlock, [3, 4, 6, 3], num_classes=num_classes, include_top=include_top)


def resnet50(num_classes=1000, include_top=True):
    # https://download.pytorch.org/models/resnet50-19c8e357.pth
    return ResNet(Bottleneck, [3, 4, 6, 3], num_classes=num_classes, include_top=include_top)


def resnet101(num_classes=1000, include_top=True):
    # https://download.pytorch.org/models/resnet101-5d3b4d8f.pth
    return ResNet(Bottleneck, [3, 4, 23, 3], num_classes=num_classes, include_top=include_top)


def resnext50_32x4d(num_classes=1000, include_top=True):
    # https://download.pytorch.org/models/resnext50_32x4d-7cdf4587.pth
    groups = 32
    width_per_group = 4
    return ResNet(Bottleneck, [3, 4, 6, 3],
                  num_classes=num_classes,
                  include_top=include_top,
                  groups=groups,
                  width_per_group=width_per_group)


def resnext101_32x8d(num_classes=1000, include_top=True):
    # https://download.pytorch.org/models/resnext101_32x8d-8ba56ff5.pth
    groups = 32
    width_per_group = 8
    return ResNet(Bottleneck, [3, 4, 23, 3],
                  num_classes=num_classes,
                  include_top=include_top,
                  groups=groups,
                  width_per_group=width_per_group)
2.训练模型:
import os
import sys
import json

import torch
import torch.nn as nn
import torch.optim as optim
from torchvision import transforms, datasets
from tqdm import tqdm

from model import resnet34


def main():
    device = torch.device("cuda:0" if torch.cuda.is_available() else "cpu")
    print("using {} device.".format(device))

    data_transform = {
        "train": transforms.Compose([
                                     transforms.RandomResizedCrop(224),
                                     transforms.RandomHorizontalFlip(),
                                     transforms.ToTensor(),
                                     transforms.Normalize([0.485, 0.456, 0.406], [0.229, 0.224, 0.225])
                                     # transforms.ConvertImageDtype('RGB')
                                     ]),
        "val": transforms.Compose([transforms.Resize(256),
                                   transforms.CenterCrop(224),
                                   transforms.ToTensor(),
                                   transforms.Normalize([0.485, 0.456, 0.406], [0.229, 0.224, 0.225])])}

    train_dataset = datasets.ImageFolder(root='./train',
                                         transform=data_transform["train"])
    train_num = len(train_dataset)
    flower_list = train_dataset.class_to_idx
    cla_dict = dict((val, key) for key, val in flower_list.items())
    json_str = json.dumps(cla_dict, indent=4)
    with open(
            'class_indices.json', 'w') as json_file:
        json_file.write(json_str)

    batch_size = 16
    nw = min([os.cpu_count(), batch_size if batch_size > 1 else 0, 8])  # number of workers
    print('Using {} dataloader workers every process'.format(nw))

    train_loader = torch.utils.data.DataLoader(train_dataset,
                                               batch_size=batch_size, shuffle=True,
                                               num_workers=nw)

    validate_dataset = datasets.ImageFolder(root='./val',
                                            transform=data_transform["val"])
    val_num = len(validate_dataset)
    validate_loader = torch.utils.data.DataLoader(validate_dataset,
                                                  batch_size=batch_size, shuffle=False,
                                                  num_workers=nw)

    print("using {} images for training, {} images for validation.".format(train_num, val_num))

    net = resnet34(num_classes=36)
    net.to(device)

    # define loss function
    loss_function = nn.CrossEntropyLoss()

    # construct an optimizer
    params = [p for p in net.parameters() if p.requires_grad]
    optimizer = optim.Adam(params, lr=0.0001)

    epochs = 15
    best_acc = 0.0
    save_path = './resNet34.pth'
    train_steps = len(train_loader)
    for epoch in range(epochs):
        # train
        net.train()
        running_loss = 0.0
        train_bar = tqdm(train_loader, file=sys.stdout)
        for step, data in enumerate(train_bar):
            images, labels = data
            optimizer.zero_grad()
            logits = net(images.to(device))
            loss = loss_function(logits, labels.to(device))
            loss.backward()
            optimizer.step()

            # print statistics
            running_loss += loss.item()

            train_bar.desc = "train epoch[{}/{}] loss:{:.3f}".format(epoch + 1,
                                                                     epochs,
                                                                     loss)

        # validate
        net.eval()
        acc = 0.0  # accumulate accurate number / epoch
        with torch.no_grad():
            val_bar = tqdm(validate_loader, file=sys.stdout)
            for val_data in val_bar:
                val_images, val_labels = val_data
                outputs = net(val_images.to(device))
                # loss = loss_function(outputs, test_labels)
                predict_y = torch.max(outputs, dim=1)[1]
                acc += torch.eq(predict_y, val_labels.to(device)).sum().item()

                val_bar.desc = "valid epoch[{}/{}]".format(epoch + 1,
                                                           epochs)

        val_accurate = acc / val_num
        print('[epoch %d] train_loss: %.3f  val_accuracy: %.3f' %
              (epoch + 1, running_loss / train_steps, val_accurate))

        if val_accurate > best_acc:
            best_acc = val_accurate
            torch.save(net.state_dict(), save_path)

    print('Finished Training')


if __name__ == '__main__':
    main()

![[附源码]java毕业设计软件项目过程管理系统](https://img-blog.csdnimg.cn/4a956071432a4b5cb72900ee25401729.png)


![[附源码]java毕业设计食材采购平台论文](https://img-blog.csdnimg.cn/641d00c3e8b04ccfbe419a64c8ddf605.png)