P5. 微服务: Bot代码的执行
- 0 概述
- 1 Bot代码执行框架
- 2 Bot代码传递给BotRunningSystem
- 3 微服务: Bot代码执行的实现逻辑
- 3.1 整体微服务逻辑概述
- 3.2 生产者消费者模型实现
- 3.3 consume() 执行代码函数的实现
- 3.4 执行结果返回给 nextStep
- 4 扩展
- 4.1 Bot代码的语言
0 概述
- 本章介绍的是项目中第二个微服务的设计与实现,具体包括如何从前端一步一步获取要执行的代码,如何动态编译与执行不同玩家的代码,执行完成之后结果如何一步一步返回到前端。
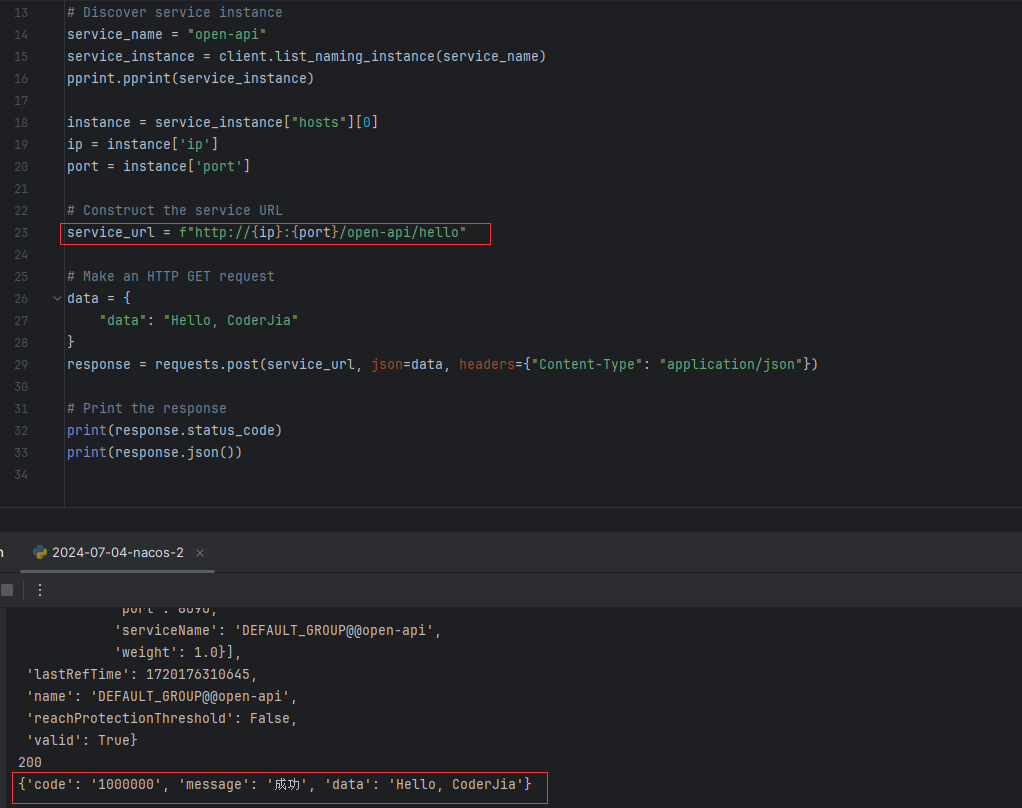
1 Bot代码执行框架
首先要先写一个 api 接收传给该微服务的 Bot 代码,还是 service, service.impl, controller 的顺序实现,在实现完成后要添加 网关 SecurityConfig 和用于微服务之间通信的 RestTemplateComfig。两者的作用在P4. 微服务: 匹配系统(下)中有详细介绍。
具体逻辑先写个调试用的,看看能不能正确接收到传递过来的信息。
@Service
public class BotRunningServiceImpl implements BotRunningService {
    @Override
    public String addBot(Integer userId, String botCode, String input) {
        System.out.println("add bot: " + userId + " " + botCode + " " + input);
        return "add bot success!";
    }
}
另外,整个Bot代码执行微服务的功能是接收代码,把代码扔到队列中,每次运行一段代码,再把运行结果返回给 game 服务器。
执行代码这边先规定用 Java 语言,上线之后可以更换成 docker 中执行其他语言。这边选择的是通过 joor 包的方式,在 Java 中动态编译 Java 代码需要添加依赖 joor-java-8。
2 Bot代码传递给BotRunningSystem
要想让微服务执行 bot 代码首先要正确接收到 botCode,需要根据整个系统的通信路径一层一层改,最开始在 Client 可以选择真人出阵或者选择自己写的代码出阵,绑定前端的变量 select_bot,如果为 -1 则表示真人出战,不然就是 bot_id,用户在请求匹配的时候会把该变量作为 bot_id 参数带上。
前端只要实现一个复选框,再通过
v-model绑定就行了,这边略过。

接下来展示如何一层一层往后传递的过程,正好复习一下之前整个系统的通信过程:
-
Client → WebSocketServer → MatchingSystem
const click_match_btn = () => {
    if (match_btn_info.value === "开始匹配") {
        match_btn_info.value = "取消";
        store.state.pk.socket.send(JSON.stringify({
            event: "start-matching",
            bot_id: select_bot.value,
        }));
    }
}
@OnMessage public void onMessage(String message, Session session) { JSONObject data = JSONObject.parseObject(message); String event = data.getString("event"); if ("start-matching".equals(event)) { startMatching(Integer.parseInt(data.getString("bot_id"))); } } private void startMatching(Integer botId) { System.out.println("Start Matching!"); MultiValueMap<String, String> data = new LinkedMultiValueMap<>(); data.put("user_id", Collections.singletonList(this.user.getId().toString())); data.put("rating", Collections.singletonList(this.user.getRating().toString())); data.put("bot_id", Collections.singletonList(botId.toString())); restTemplate.postForObject(addPlayerUrl, data, String.class); } -
MatchingSystem → MatchingPool
@PostMapping("/player/add/")
public String addPlayer(@RequestParam MultiValueMap<String, String> data) {
    Integer userId = Integer.parseInt(Objects.requireNonNull(data.getFirst("user_id")));
    Integer rating = Integer.parseInt(Objects.requireNonNull(data.getFirst("rating")));
    Integer botId = Integer.parseInt(Objects.requireNonNull(data.getFirst("bot_id")));
    return matchingService.addPlayer(userId, rating, botId);
}
public void addPlayer(Integer userId, Integer rating, Integer botId) { lock.lock(); try { // 这边要记得修改 Player 的属性,让 Player 一直带着 bot players.add(new Player(userId, rating, botId, 0)); } finally { lock.unlock(); } } -
MatchingPool → WebSocketServer
private void sendResult(Player a, Player b) { MultiValueMap<String, String> data = new LinkedMultiValueMap<>(); data.put("a_id", Collections.singletonList(a.getUserId().toString())); data.put("a_bot_id", Collections.singletonList(a.getBotId().toString())); data.put("b_id", Collections.singletonList(b.getUserId().toString())); data.put("b_bot_id", Collections.singletonList(b.getBotId().toString())); restTemplate.postForObject(startGameUrl, data, String.class); }@PostMapping("/pk/game/start/") public String startGame(@RequestParam MultiValueMap<String, String> data) { Integer aId = Integer.parseInt(Objects.requireNonNull(data.getFirst("a_id"))); Integer bId = Integer.parseInt(Objects.requireNonNull(data.getFirst("b_id"))); Integer aBotId = Integer.parseInt(Objects.requireNonNull(data.getFirst("a_bot_id"))); Integer bBotId = Integer.parseInt(Objects.requireNonNull(data.getFirst("b_bot_id"))); // 该方法最后调用的是 WebSockerServer 的 startGame 方法 return startGameService.startGame(aId, bId, aBotId, bBotId); } -
WebSocketServer → Game
public static void startGame(Integer aId, Integer bId, Integer aBotId, Integer bBotId) {
    User a = userMapper.selectById(aId), b = userMapper.selectById(bId);
    // 这边查询的时候,如果是真人出马,那 botId 为 -1,意味着 selectById 找不到,返回 null
    Bot botA = botMapper.selectById(aBotId), botB = botMapper.selectById(bBotId);

    Game game = new Game(
        13,
        14,
        20,
        a.getId(),
        b.getId(),
        botA,
        botB
    );
	/* ... */
}
public Game(Integer rows, Integer cols, Integer inner_walls_count, Integer a_id, Integer b_id, Bot botA, Bot botB) { this.rows = rows; this.cols = cols; this.inner_walls_count = inner_walls_count; this.g = new int[rows][cols]; Integer botIdA = -1, botIdB = -1; String botCodeA = "", botCodeB = ""; // 判断是否为真人出战 if (botA != null) { botIdA = botA.getId(); botCodeA = botA.getContent(); } if (botB != null) { botIdB = botB.getId(); botCodeB = botB.getContent(); } // 同样要更改 Player 属性,让其带着 botId, botCode this.playerA = new Player(a_id, this.rows - 2, 1, new ArrayList<>(), botIdA, botCodeA); this.playerB = new Player(b_id, 1, this.cols - 2, new ArrayList<>(), botIdB, botCodeB); } -
Game → BotRunningSystem
其中
input为当前局面的所有信息,在返回值中可以看到包含了地图信息,双方玩家的坐标和历史移动信息。private void sendBotCode(Player player) { // 如果是真人出马那就直接接收信息 if (player.getBotId().equals(-1)) return; MultiValueMap<String, String> data = new LinkedMultiValueMap<>(); data.put("user_id", Collections.singletonList(player.getId().toString())); data.put("bot_code", Collections.singletonList(player.getBotCode())); data.put("input", Collections.singletonList(getInput(player))); WebSocketServer.restTemplate.postForObject(botAddUrl, data, String.class); } private boolean nextStep() { /* ... */ sendBotCode(playerA); sendBotCode(playerB); /* ... */ }@PostMapping("/bot/add/") public String addBot(@RequestParam MultiValueMap<String, String> data) { Integer userId = Integer.parseInt(Objects.requireNonNull(data.getFirst("user_id"))); String botCode = data.getFirst("bot_code"); String input = data.getFirst("input"); return botRunningService.addBot(userId, botCode, input); } -
其他小细节处理:
-
如果用的是 bot 出战,那就要屏蔽之后真人的输入。
private void move(int direction) {
    if (game.getPlayerA().getId().equals(user.getId())) {
        if (game.getPlayerA().getBotId().equals(-1))
            game.setNextStepA(direction);
    } else if (game.getPlayerB().getId().equals(user.getId())) {
        if (game.getPlayerB().getBotId().equals(-1))
            game.setNextStepB(direction);
    }
}
-
3 微服务: Bot代码执行的实现逻辑
3.1 整体微服务逻辑概述
该微服务的本质是生产者消费者模型: 可以不断接收用户的输入,当接收的信息比较多的时候,会把所有接收到的代码放到队列中,该队列存放的是当前所有的任务。生产者每次发送一个任务,就把该任务放到队列中;消费者是个不断循环的单独的线程,不停地等待新的任务过来,每完成一个工作,就检查队列是否为空,如果队列非空,则从队头拿出代码执行,直到队列中没有任务。
3.2 生产者消费者模型实现
-
消费者线程
BotPoolBotPool不能像MatchPool一样每秒执行一次,应该是一旦有任务进来,就要立刻执行,不能让用户等待。因此不能用sleep的形式实现,这边选择使用条件变量来手动实现一个消息队列。- 线程的启动和之前一样在 SpringBoot 开启之前就启动。
/* 在 BotRunningServiceImpl 中定义 */ /* public final static BotPool botPool = new BotPool(); */ @SpringBootApplication public class BotRunningSystemApplication { public static void main(String[] args) { BotRunningServiceImpl.botPool.start(); SpringApplication.run(BotRunningSystemApplication.class, args); } }-
run本质上是手动实现了一个消息队列。和后面的
addBot(生产者) 一起,模拟个具体场景去理解整个过程。run的具体逻辑过程: 如果bots队列为空,则该线程应该被阻塞住condition.wait(),一旦有新的代码进来了,就要发个信号量唤醒该线程。通过条件变量condition来实现这个过程。队列
bots虽然不是线程安全的,但是我们自己把它管理成线程安全的。bots有两个线程操作,生产者给它加任务,消费者(当前线程)从队列中取出队头代码。所以通过加锁保证线程安全。private final ReentrantLock lock = new ReentrantLock(); private final Condition condition = lock.newCondition(); private final Queue<Bot> bots = new LinkedList<>(); @Override public void run() { while (true) { lock.lock(); if (bots.isEmpty()) { try { // 如果队列为空则阻塞住,await自动包含释放锁的操作 condition.await(); } catch (InterruptedException e) { e.printStackTrace(); lock.unlock(); break; } } else { Bot bot = bots.remove(); lock.unlock(); consume(bot); } } } -
向队列
bots中添加一个任务(生产者)。public void addBot(Integer userId, String botCode, String input) { lock.lock(); try { bots.add(new Bot(userId, botCode, input)); condition.signalAll(); } finally { lock.unlock(); } }@Service public class BotRunningServiceImpl implements BotRunningService { public final static BotPool botPool = new BotPool(); @Override public String addBot(Integer userId, String botCode, String input) { System.out.println("add bot: " + userId + " " + botCode + " " + input); botPool.addBot(userId, botCode, input); return "add bot success!"; } }
3.3 consume() 执行代码函数的实现
方便起见,我们用的是 joor 来动态编译与执行 Java 语言代码(字符串)。
为了让执行代码的时候时间可控,consume 每次要执行一个新的代码,都开一个线程去执行,因为线程如果超时的话会自动断掉。
如果玩家自己实现的代码有问题,那新开的那个线程会崩掉,但没有任何影响,直接执行下一个队头的代码。
-
新开一个辅助类
Consumer作为新的线程,实现一个startTimeout给consume()调用:join(timeout)函数的作用是: 在join之前新开了个新线程去执行run,当前线程阻塞在join,直到满足 (1) 等待时间到达timeout秒,或者是(2) 新线程执行完毕。最后记得不管无论如何,都去中断interrupt新线程。public void startTimeout(long timeout, Bot bot) { this.bot = bot; this.start(); try { this.join(timeout); // 最多等待 timeout 的时间 } catch (InterruptedException e) { e.printStackTrace(); } finally { this.interrupt(); } } -
Consumer动态编译与执行代码过程:-
先在
botrunningsystem.utils下定义一下用户需要实现的接口:public interface BotInterface { Integer nextMove(String input); }并且在
botrunningsystem.utils下随便写一个代码实现,当做是用户传过来的代码(后续用的是前端传给后端的代码)。public class Bot implements com.kob.botrunningsystem.utils.BotInterface { @Override public Integer nextMove(String input) { return 0; } } -
最后调用
joor.Reflect.compile编译并执行一下代码:Reflect.compile()编译代码,参数包括要编译的类所在的包名和具体的类定义。create().get()用来创建并获取编译后的类实例。@Override public void run() { // 编译并且获取实例 BotInterface botInterface = Reflect.compile( "com.kob.botrunningsystem.utils.Bot", "package com.kob.botrunningsystem.utils;\n" + "\n" + "public class Bot implements com.kob.botrunningsystem.utils.BotInterface {\n" + " @Override\n" + " public Integer nextMove(String input) {\n" + " return 0;\n" + " }\n" + "}\n" ).create().get(); // 执行 System.out.println(botInterface.nextMove(bot.getInput())); } -
上面就是基本的调用过程,但是有个问题就是
Reflect编译的时候,重名的类只会编译一次。所以,之后每次执行的时候要保证每个用户的类名不同,这边使用UUID的随机字符串来实现。private String addUid(String code, String uid) { int k = code.indexOf(" implements com.kob.botrunningsystem.utils.BotInterface"); return code.substring(0, k) + uid + code.substring(k); } @Override public void run() { UUID uuid = UUID.randomUUID(); String uid = uuid.toString().substring(0, 8); BotInterface botInterface = Reflect.compile( "com.kob.botrunningsystem.utils.Bot" + uid, addUid(bot.getBotCode(), uid) ).create().get(); System.out.println(botInterface.nextMove(bot.getInput())); }
-
-
最后实现一下
BotPool中的consume:private void consume(Bot bot) { Consumer consumer = new Consumer(); consumer.startTimeout(2000, bot); }
至此,就可以动态地获取用户的输入代码,动态地编译并执行啦~~
别忘了模拟具体场景,看一下具体的执行流程。
下一步需要把执行后的结果返回给 nextStep。
3.4 执行结果返回给 nextStep
在 backend 主服务器上实现一个接收 consume 返回的结果的接口 service, service.impl, controller, SecurityConfig:
@RestController
public class ReceiveBotMoveController {
    @Autowired
    private ReceiveBotMoveService receiveBotMoveService;

    @PostMapping("/pk/receive/bot/move/")
    public String receiveBotMove(@RequestParam MultiValueMap<String, String> data) {
        Integer userId = Integer.parseInt(Objects.requireNonNull(data.getFirst("user_id")));
        Integer direction = Integer.parseInt(Objects.requireNonNull(data.getFirst("direction")));
        return receiveBotMoveService.receiveBotMove(userId, direction);
    }
}
@Service
public class ReceiveBotMoveServiceImpl implements ReceiveBotMoveService {
    @Override
    public String receiveBotMove(Integer userId, Integer direction) {
        System.out.println("receive bot move: " + userId + " direction: " + direction);

        if (WebSocketServer.users.get(userId) != null) {
            Game game = WebSocketServer.users.get(userId).game;
            if (game != null) {
                if (game.getPlayerA().getId().equals(userId)) {
                    game.setNextStepA(direction);
                } else if (game.getPlayerB().getId().equals(userId)) {
                    game.setNextStepB(direction);
                }
            }
        }

        return "receive success";
    }
}
这样就实现接收到 direction 后把 direction 传给 game 的部分了,现在还要写一下 Consumer 怎么把 direction 传给 backend。
复习一下,注入
restTemplate的方法:@Component // 记得加上注解 public class Consumer extends Thread { private static RestTemplate restTemplate; @Autowired public void setRestTemplate(RestTemplate restTemplate) { Consumer.restTemplate = restTemplate; } }
在 Consumer 中使用微服务之间的通信,把 direction 传过去。
public void run() {
	/* ... */
    Integer direction = botInterface.nextMove(bot.getInput());

    MultiValueMap<String, String> data = new LinkedMultiValueMap<>();
    data.put("user_id", Collections.singletonList(bot.getUserId().toString()));
    data.put("direction", Collections.singletonList(direction.toString()));

    restTemplate.postForObject(receiveBotMoveUrl, data, String.class);
}
至此就可以开始调试啦,大功告成~
4 扩展
4.1 Bot代码的语言
在本文实现的系统中只能通过 Java 语言来写 Bot 的具体代码,如果想改成多语言执行只需要改 consume 函数,在项目上线之后每次执行程 Bot 代码需要开一个 docker,在 docker 中来实现。这就涉及到 Java 中如何执行终端命令,以及如何使用 docker 等问题了,后续要进一步拓展的时候可以实现。


![[终端安全]-3 移动终端之硬件安全(TEE)](https://i-blog.csdnimg.cn/direct/99bd7ca849114e8b88dddfb11e27959d.png)