六、快速启动框架:SpringBoot3实战
文章目录
- 六、快速启动框架:SpringBoot3实战
- 一、SpringBoot3介绍
- 二、SpringBoot3配置文件
- 2.1 统一配置管理概述
- 2.2 属性配置文件使用
- 2.3 YAML配置文件使用
- 2.4 批量配置文件注入
- 2.5 多环境配置和使用
- 回顾复习
- 三、SpringBoot3整合SpringMVC
- 3.1 实现过程
- 3.2 web相关配置
- 3.3 静态资源处理
- 3.4 自定义拦截器(SpringMVC配置)
- 回顾复习
- 四、SpringBoot3整合Druid数据源
- 回顾复习
- 五、SpringBoot3整合Mybatis
- 5.1 MyBatis整合步骤
- 5.2 Mybatis整合实践
- 5.3 声明式事务整合配置
- 5.4 AOP整合配置
- 回顾复习
- 六、SpringBoot3项目打包和运行
- 6.1 添加打包插件
- 6.2 执行打包
- 6.3 命令启动和参数说明
- 回顾复习
一、SpringBoot3介绍
1.1 SpringBoot3简介
课程使用SpringBoot版本:3.0.5
https://docs.spring.io/spring-boot/docs/current/reference/html/getting-started.html#getting-started.introducing-spring-boot
到目前为止,你已经学习了多种配置Spring程序的方式。但是无论使用XML、注解、Java配置类还是他们的混合用法,你都会觉得配置文件过于复杂和繁琐,让人头疼!

SpringBoot 帮我们简单、快速地创建一个独立的、生产级别的 Spring 应用(说明:SpringBoot底层是Spring),大多数 SpringBoot 应用只需要编写少量配置即可快速整合 Spring 平台以及第三方技术!
SpringBoot的主要目标是:
- 为所有 Spring 开发提供更快速、可广泛访问的入门体验。
- 开箱即用,设置合理的默认值,但是也可以根据需求进行适当的调整。
- 提供一系列大型项目通用的非功能性程序(如嵌入式服务器、安全性、指标、运行检查等)。
- 约定大于配置,基本不需要主动编写配置类、也不需要 XML 配置文件。
总结:简化开发,简化配置,简化整合,简化部署,简化监控,简化运维。
1.2 系统要求
| 技术&工具 | 版本(or later) |
|---|---|
| maven | 3.6.3 or later 3.6.3 或更高版本 |
| Tomcat | 10.0+ |
| Servlet | 9.0+ |
| JDK | 17+ |
1.3 快速入门
场景:浏览器发送 /hello请求,返回"Hello,Spring Boot 3!"
-
开发步骤
- 创建Maven工程
- 添加依赖(springboot父工程依赖 , web启动器依赖)
- 编写启动引导类(springboot项目运行的入口)
- 编写处理器Controller
- 启动项目
-
创建项目
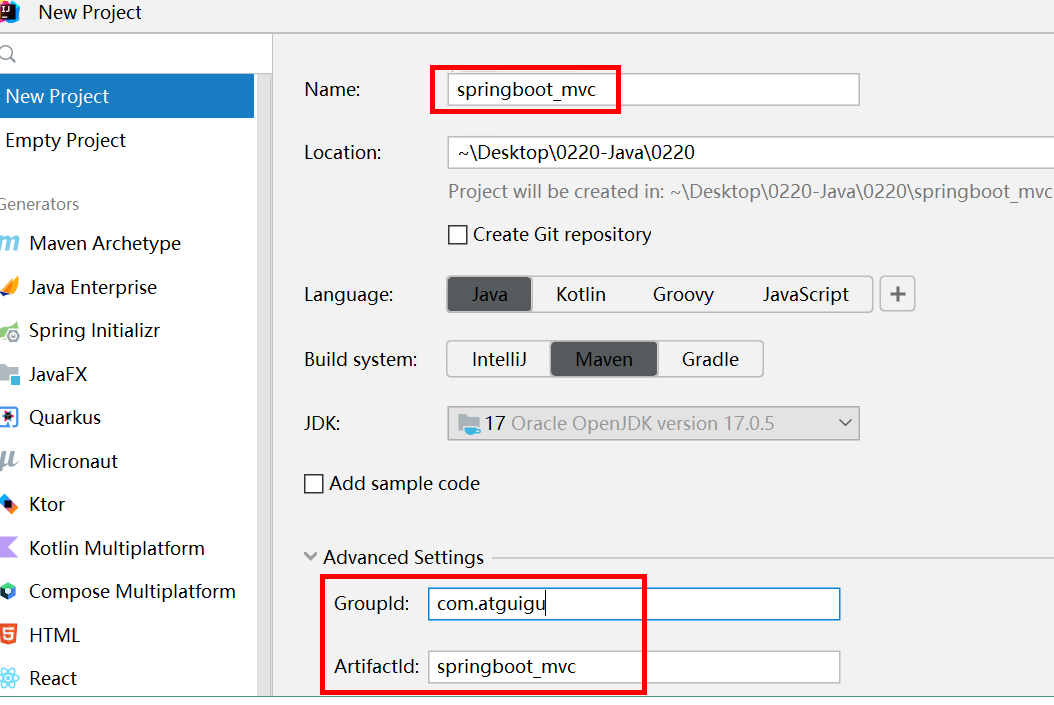
-
添加依赖
3.1 添加父工程坐标
SpringBoot可以帮我们方便的管理项目依赖 , 在Spring Boot提供了一个名为spring-boot-starter-parent的工程,里面已经对各种常用依赖的版本进行了管理,我们的项目需要以这个项目为父工程,这样我们就不用操心依赖的版本问题了,需要什么依赖,直接引入坐标(不需要添加版本)即可!
<!--所有springboot项目都必须继承自 spring-boot-starter-parent-->
<parent>
    <groupId>org.springframework.boot</groupId>
    <artifactId>spring-boot-starter-parent</artifactId>
    <version>3.0.5</version>
</parent>
3.2 添加web启动器
为了让Spring Boot帮我们完成各种自动配置,我们必须引入Spring Boot提供的自动配置依赖,我们称为启动器。因为我们是web项目,这里我们引入web启动器,在 pom.xml 文件中加入如下依赖:
<dependencies> <!--web开发的场景启动器--> <dependency> <groupId>org.springframework.boot</groupId> <artifactId>spring-boot-starter-web</artifactId> </dependency> </dependencies> -
创建启动类
创建package:com.atguigu
创建启动类:MainApplication
package com.atguigu; import org.springframework.boot.SpringApplication; import org.springframework.boot.autoconfigure.SpringBootApplication; /** * @SpringBootApplication是一个特殊的注解,用于标识一个Spring Boot应用程序的入口类。它的主要作用是将三个常用注解组合在一起,简化了配置的过程。 * * 具体而言,@SpringBootApplication注解包含以下三个注解的功能: * @Configuration:将该类标识为应用程序的配置类。它允许使用Java代码定义和配置Bean。 * @EnableAutoConfiguration:启用Spring Boot的自动配置机制。它根据项目的依赖项自动配置Spring应用程序的行为。自动配置根据类路径、注解和配置属性等条件来决定要使用的功能和配置。 * @ComponentScan:自动扫描并加载应用程序中的组件,如控制器、服务、存储库等。它默认扫描@SpringBootApplication注解所在类的包及其子包中的组件。 * * 使用@SpringBootApplication注解,可以将上述三个注解的功能集中在一个注解上,简化了配置文件的编写和组件的加载和扫描过程。它是Spring Boot应用程序的入口点,标识了应用程序的主类, * 并告诉Spring Boot在启动时应如何配置和加载应用程序。 */ @SpringBootApplication public class MainApplication { //SpringApplication.run() 方法是启动 Spring Boot 应用程序的关键步骤。它创建应用程序上下文、 // 自动配置应用程序、启动应用程序,并处理命令行参数,使应用程序能够运行和提供所需的功能 public static void main(String[] args) { SpringApplication.run(MainApplication.class,args); } } -
编写处理器Controller
创建package:com.atguigu.controller
创建类:HelloController
注意: IoC和DI注解需要在启动类的同包或者子包下方可生效!无需指定,约束俗称。
package com.atguigu.controller; import org.springframework.web.bind.annotation.GetMapping; import org.springframework.web.bind.annotation.RestController; @RestController public class HelloController { @GetMapping("/hello") public String hello(){ return "Hello,Spring Boot 3!"; } } -
启动测试
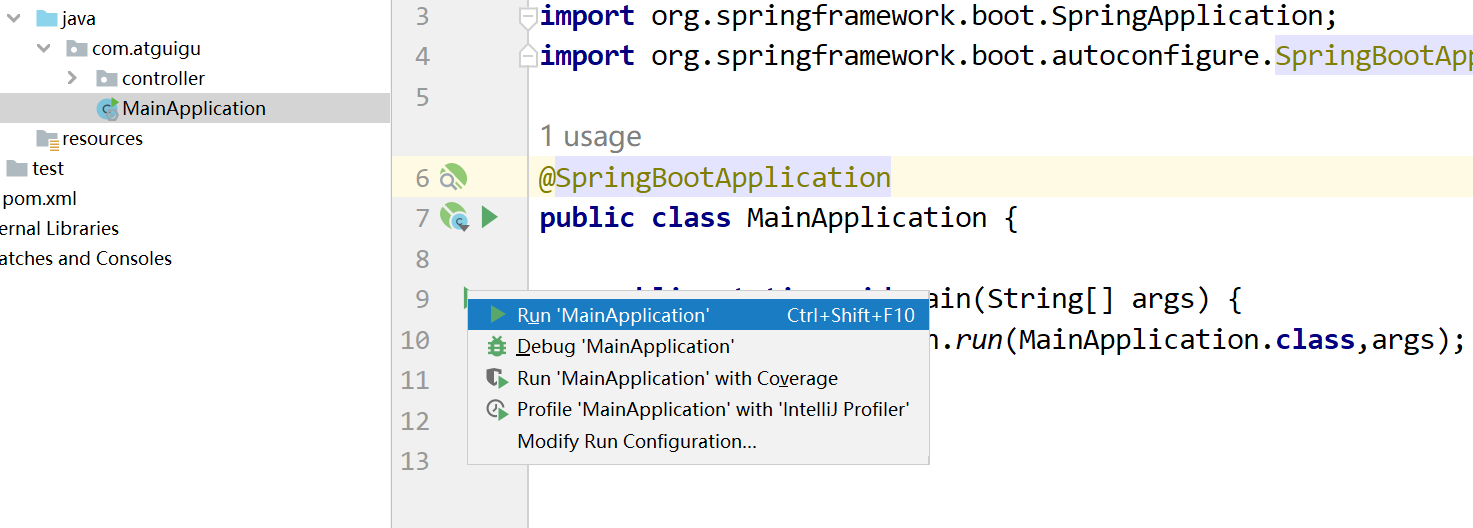
1.4 入门总结
-
为什么依赖不需要写版本?
- 每个boot项目都有一个父项目
spring-boot-starter-parent - parent的父项目是
spring-boot-dependencies - 父项目 版本仲裁中心,把所有常见的jar的依赖版本都声明好了。
- 比如:
mysql-connector-j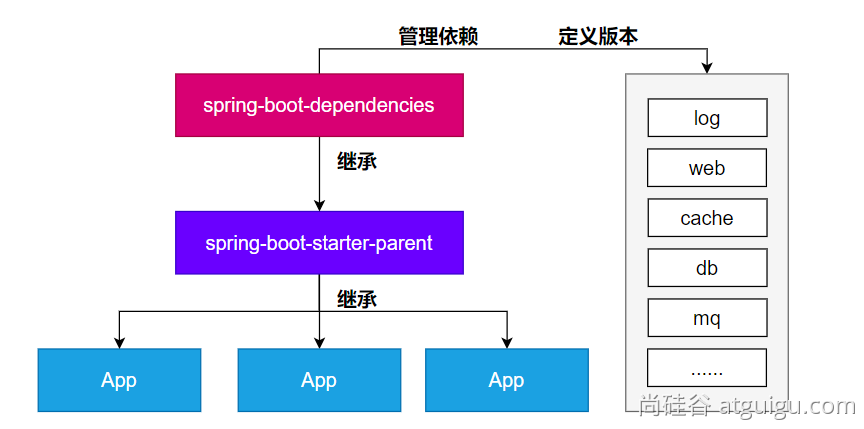
- 每个boot项目都有一个父项目
-
启动器(Starter)是何方神圣?
Spring Boot提供了一种叫做Starter的概念,它是一组预定义的依赖项集合,旨在简化Spring应用程序的配置和构建过程。Starter包含了一组相关的依赖项,以便在启动应用程序时自动引入所需的库、配置和功能。
主要作用如下:
- 简化依赖管理:Spring Boot Starter通过捆绑和管理一组相关的依赖项,减少了手动解析和配置依赖项的工作。只需引入一个相关的Starter依赖,即可获取应用程序所需的全部依赖。
- 自动配置:Spring Boot Starter在应用程序启动时自动配置所需的组件和功能。通过根据类路径和其他设置的自动检测,Starter可以自动配置Spring Bean、数据源、消息传递等常见组件,从而使应用程序的配置变得简单和维护成本降低。
- 提供约定优于配置:Spring Boot Starter遵循“约定优于配置”的原则,通过提供一组默认设置和约定,减少了手动配置的需要。它定义了标准的配置文件命名约定、默认属性值、日志配置等,使得开发者可以更专注于业务逻辑而不是繁琐的配置细节。
- 快速启动和开发应用程序:Spring Boot Starter使得从零开始构建一个完整的Spring Boot应用程序变得容易。它提供了主要领域(如Web开发、数据访问、安全性、消息传递等)的Starter,帮助开发者快速搭建一个具备特定功能的应用程序原型。
- 模块化和可扩展性:Spring Boot Starter的组织结构使得应用程序的不同模块可以进行分离和解耦。每个模块可以有自己的Starter和依赖项,使得应用程序的不同部分可以按需进行开发和扩展。
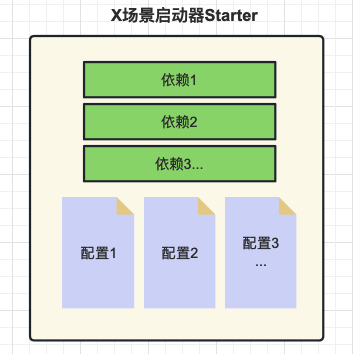
Spring Boot提供了许多预定义的Starter,例如spring-boot-starter-web用于构建Web应用程序,spring-boot-starter-data-jpa用于使用JPA进行数据库访问,spring-boot-starter-security用于安全认证和授权等等。
使用Starter非常简单,只需要在项目的构建文件(例如Maven的pom.xml)中添加所需的Starter依赖,Spring Boot会自动处理依赖管理和配置。
通过使用Starter,开发人员可以方便地引入和配置应用程序所需的功能,避免了手动添加大量的依赖项和编写冗长的配置文件的繁琐过程。同时,Starter也提供了一致的依赖项版本管理,确保依赖项之间的兼容性和稳定性。
spring boot提供的全部启动器地址:
https://docs.spring.io/spring-boot/docs/current/reference/html/using.html#using.build-systems.starters
命名规范:
- 官方提供的场景:命名为:
spring-boot-starter-* - 第三方提供场景:命名为:
*-spring-boot-starter
-
@SpringBootApplication注解的功效?
@SpringBootApplication添加到启动类上,是一个组合注解,他的功效有具体的子注解实现!
@SpringBootConfiguration
@EnableAutoConfiguration
@ComponentScan
public @interface SpringBootApplication {}
@SpringBootApplication注解是Spring Boot框架中的核心注解,它的主要作用是简化和加速Spring Boot应用程序的配置和启动过程。
具体而言,@SpringBootApplication注解起到以下几个主要作用:
- 自动配置:@SpringBootApplication注解包含了@EnableAutoConfiguration注解,用于启用Spring Boot的自动配置机制。自动配置会根据应用程序的依赖项和类路径,自动配置各种常见的Spring配置和功能,减少开发者的手动配置工作。它通过智能地分析类路径、加载配置和条件判断,为应用程序提供适当的默认配置。
- 组件扫描:@SpringBootApplication注解包含了@ComponentScan注解,用于自动扫描并加载应用程序中的组件,例如控制器(Controllers)、服务(Services)、存储库(Repositories)等。它默认会扫描@SpringBootApplication注解所在类的包及其子包中的组件,并将它们纳入Spring Boot应用程序的上下文中,使它们可被自动注入和使用。
- 声明配置类:@SpringBootApplication注解本身就是一个组合注解,它包含了@Configuration注解,将被标注的类声明为配置类。配置类可以包含Spring框架相关的配置、Bean定义,以及其他的自定义配置。通过@SpringBootApplication注解,开发者可以将配置类与启动类合并在一起,使得配置和启动可以同时发生。
总的来说,@SpringBootApplication注解的主要作用是简化Spring Boot应用程序的配置和启动过程。它自动配置应用程序、扫描并加载组件,并将配置和启动类合二为一,简化了开发者的工作量,提高了开发效率。
回顾复习
指明一下,视频中是创建空的工程,然后创建子模块

创建springboot-base-quick-01子模块
导入依赖
<parent>
        <!-- spring-boot-->
        <groupId>org.springframework.boot</groupId>
        <artifactId>spring-boot-starter-parent</artifactId>
        <version>3.0.5</version>
    </parent>
 <!-- 导入对应的启动器即可-->
    <dependencies>

        <!-- starter -> [ spring-webmvc servlet jackson ] -->

        <dependency>
            <groupId>org.springframework.boot</groupId>
            <artifactId>spring-boot-starter-web</artifactId>
            //这里不用写版本,因为上面springboot已经自带声明版本了
        </dependency>
    </dependencies>
在Main类作为启动类,添加注解和Main.class
//1.配置类 @SpringBootConfiguration
//2.自动加载配置 @EnableAutoConfiguration 自动加载其他的配置类
//3.@ComponentScan 默认是当前类所在的包,子包的注解
@SpringBootApplication  //启动类
public class Main {
    public static void main(String[] args) {
        // 1.创建ioc容器,加载配置  2.启动内置的web服务器
        SpringApplication.run(Main.class,args); //自动创建ioc容器,启动tomcat服务器软件
    }
在同Main类同包下创建controller包以及相应的类
package com.atguigu.controller;

import org.springframework.beans.factory.annotation.Value;
import org.springframework.web.bind.annotation.GetMapping;
import org.springframework.web.bind.annotation.RequestMapping;
import org.springframework.web.bind.annotation.RestController;

/**
 * projectName: com.atguigu.controller
 *
 * @author: 赵伟风
 * description:
 */

@RestController
@RequestMapping("hello")
public class HelloController {

    @Value("${zwf.name}")
    private String name;


    @GetMapping("boot")
    public String hello(){
        System.out.println(name);
        return "hello springboot3!!";
    }
}
编写配置类
resources下的application.properties类
# ??springboot?????,??????? key????!
server.port=80
server.servlet.context-path=/ergouzi
#指明端口,指明访问路径

# ?????
zwf.name=???
zwf.age=18
到controller层的类HelloController类中去读值
 @Value("${zwf.name}")
    private String name;


    @GetMapping("boot")
    public String hello(){
        System.out.println(name);
        return "hello springboot3!!";
    }
二、SpringBoot3配置文件
2.1 统一配置管理概述
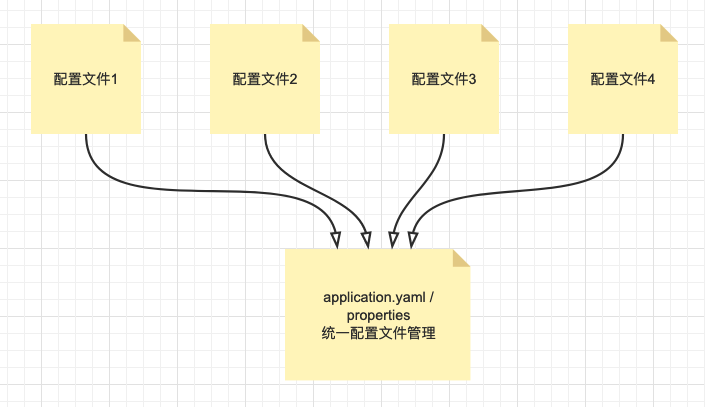
SpringBoot工程下,进行统一的配置管理,你想设置的任何参数(端口号、项目根路径、数据库连接信息等等)都集中到一个固定位置和命名的配置文件(application.properties或application.yml)中!
配置文件应该放置在Spring Boot工程的src/main/resources目录下。这是因为src/main/resources目录是Spring Boot默认的类路径(classpath),配置文件会被自动加载并可供应用程序访问。
功能配置参数说明:
https://docs.spring.io/spring-boot/docs/current/reference/html/application-properties.html#appendix.application-properties
细节总结:
-
集中式管理配置。统一在一个文件完成程序功能参数设置和自定义参数声明 。
-
位置:resources文件夹下,必须命名application 后缀 .properties / .yaml / .yml 。
-
如果同时存在application.properties | application.yml(.yaml) , properties的优先级更高。
-
配置基本都有默认值。
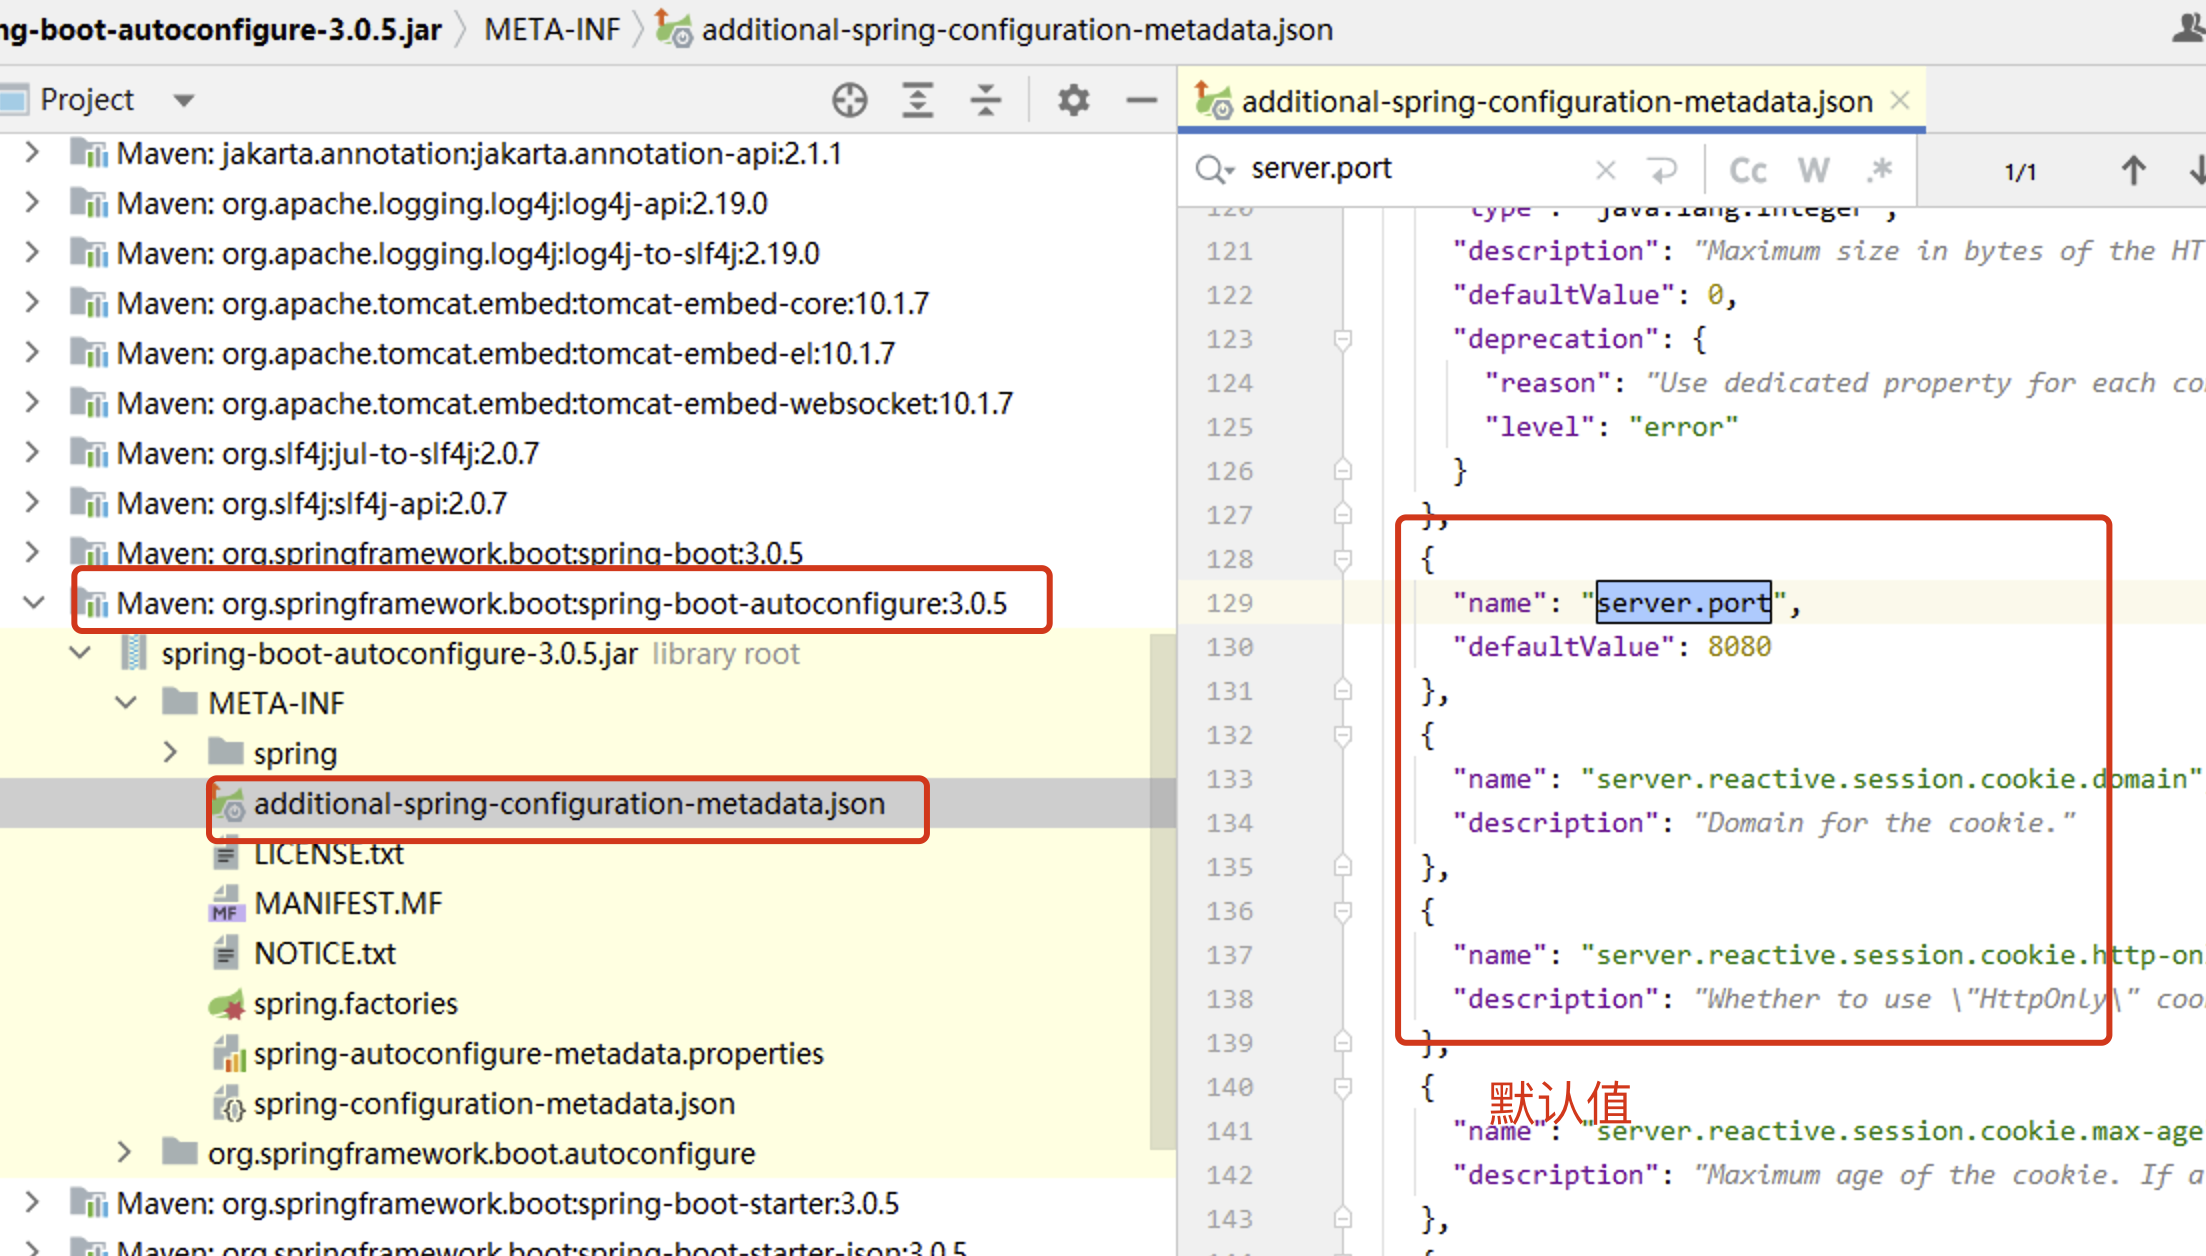
2.2 属性配置文件使用
-
配置文件
在 resource 文件夹下面新建 application.properties 配置文件
# application.properties 为统一配置文件 # 内部包含: 固定功能的key,自定义的key # 此处的配置信息,我们都可以在程序中@Value等注解读取 # 固定的key # 启动端口号 server.port=80 # 自定义 spring.jdbc.datasource.driverClassName=com.mysql.cj.jdbc.driver spring.jdbc.datasource.url=jdbc:mysql:///springboot_01 spring.jdbc.datasource.username=root spring.jdbc.datasource.password=root -
读取配置文件
package com.atguigu.properties; import org.springframework.beans.factory.annotation.Value; import org.springframework.stereotype.Component; @Component public class DataSourceProperties { @Value("${spring.jdbc.datasource.driverClassName}") private String driverClassName; @Value("${spring.jdbc.datasource.url}") private String url; @Value("${spring.jdbc.datasource.username}") private String username; @Value("${spring.jdbc.datasource.password}") private String password; // 生成get set 和 toString方法 public String getDriverClassName() { return driverClassName; } public void setDriverClassName(String driverClassName) { this.driverClassName = driverClassName; } public String getUrl() { return url; } public void setUrl(String url) { this.url = url; } public String getUsername() { return username; } public void setUsername(String username) { this.username = username; } public String getPassword() { return password; } public void setPassword(String password) { this.password = password; } @Override public String toString() { return "DataSourceProperties{" + "driverClassName='" + driverClassName + '\'' + ", url='" + url + '\'' + ", username='" + username + '\'' + ", password='" + password + '\'' + '}'; } } -
测试效果
在controller注入,输出进行测试
@Autowired
private DataSourceProperties dataSourceProperties ;

@RequestMapping(path = "/hello")
public String sayHello() {
  System.out.println(dataSourceProperties);
  return "Hello Spring Boot ! " ;
}
浏览器访问路径,控制台查看效果

2.3 YAML配置文件使用
-
yaml格式介绍
YAML(YAML Ain’t Markup Language)是一种基于层次结构的数据序列化格式,旨在提供一种易读、人类友好的数据表示方式。
与
.properties文件相比,YAML格式有以下优势:- 层次结构:YAML文件使用缩进和冒号来表示层次结构,使得数据之间的关系更加清晰和直观。这样可以更容易理解和维护复杂的配置,特别适用于深层次嵌套的配置情况。
- 自我描述性:YAML文件具有自我描述性,字段和值之间使用冒号分隔,并使用缩进表示层级关系。这使得配置文件更易于阅读和理解,并且可以减少冗余的标点符号和引号。
- 注释支持:YAML格式支持注释,可以在配置文件中添加说明性的注释,使配置更具可读性和可维护性。相比之下,
.properties文件不支持注释,无法提供类似的解释和说明。 - 多行文本:YAML格式支持多行文本的表示,可以更方便地表示长文本或数据块。相比之下,
.properties文件需要使用转义符或将长文本拆分为多行。 - 类型支持:YAML格式天然支持复杂的数据类型,如列表、映射等。这使得在配置文件中表示嵌套结构或数据集合更加容易,而不需要进行额外的解析或转换。
- 更好的可读性:由于YAML格式的特点,它更容易被人类读懂和解释。它减少了配置文件中需要的特殊字符和语法,让配置更加清晰明了,从而减少了错误和歧义。
综上所述,YAML格式相对于.properties文件具有更好的层次结构表示、自我描述性、注释支持、多行文本表示、复杂数据类型支持和更好的可读性。这些特点使YAML成为一种有力的配置文件格式,尤其适用于复杂的配置需求和人类可读的场景。然而,选择使用YAML还是.properties取决于实际需求和团队的偏好,简单的配置可以使用.properties,而复杂的配置可以选择YAML以获得更多的灵活性和可读性
-
yaml语法说明
- 数据结构用树形结构呈现,通过缩进来表示层级,
- 连续的项目(集合)通过减号 ” - ” 来表示
- 键值结构里面的key/value对用冒号 ” : ” 来分隔。
- YAML配置文件的扩展名是yaml 或 yml
- 例如:
# YAML配置文件示例
app_name: 我的应用程序
version: 1.0.0
author: 张三

database:
  host: localhost
  port: 5432
  username: admin
  password: password123

features:
  - 登录
  - 注册
  - 仪表盘

settings:
  analytics: true
  theme: dark
-
配置文件
spring: jdbc: datasource: driverClassName: com.mysql.jdbc.Driver url: jdbc:mysql:///springboot_02 username: root password: root server: port: 80 -
读取配置文件
读取方式和properties一致
package com.atguigu.properties; import org.springframework.beans.factory.annotation.Value; import org.springframework.stereotype.Component; @Component public class DataSourceProperties { @Value("${spring.jdbc.datasource.driverClassName}") private String driverClassName; @Value("${spring.jdbc.datasource.url}") private String url; @Value("${spring.jdbc.datasource.username}") private String username; @Value("${spring.jdbc.datasource.password}") private String password; // 生成get set 和 toString方法 public String getDriverClassName() { return driverClassName; } public void setDriverClassName(String driverClassName) { this.driverClassName = driverClassName; } public String getUrl() { return url; } public void setUrl(String url) { this.url = url; } public String getUsername() { return username; } public void setUsername(String username) { this.username = username; } public String getPassword() { return password; } public void setPassword(String password) { this.password = password; } @Override public String toString() { return "DataSourceProperties{" + "driverClassName='" + driverClassName + '\'' + ", url='" + url + '\'' + ", username='" + username + '\'' + ", password='" + password + '\'' + '}'; } } -
测试效果
在controller注入,输出进行测试
@Autowired
private DataSourceProperties dataSourceProperties ;

@RequestMapping(path = "/hello")
public String sayHello() {
  System.out.println(dataSourceProperties);
  return "Hello Spring Boot ! " ;
}
浏览器访问路径,控制台查看效果

2.4 批量配置文件注入
@ConfigurationProperties是SpringBoot提供的重要注解, 他可以将一些配置属性批量注入到bean对象。
-
创建类,添加属性和注解
在类上通过@ConfigurationProperties注解声明该类要读取属性配置
prefix=“spring.jdbc.datasource” 读取属性文件中前缀为spring.jdbc.datasource的值。前缀和属性名称和配置文件中的key必须要保持一致才可以注入成功
package com.atguigu.properties; import org.springframework.boot.context.properties.ConfigurationProperties; import org.springframework.stereotype.Component; @Component @ConfigurationProperties(prefix = "spring.jdbc.datasource") public class DataSourceConfigurationProperties { private String driverClassName; private String url; private String username; private String password; public String getDriverClassName() { return driverClassName; } public void setDriverClassName(String driverClassName) { this.driverClassName = driverClassName; } public String getUrl() { return url; } public void setUrl(String url) { this.url = url; } public String getUsername() { return username; } public void setUsername(String username) { this.username = username; } public String getPassword() { return password; } public void setPassword(String password) { this.password = password; } @Override public String toString() { return "DataSourceConfigurationProperties{" + "driverClassName='" + driverClassName + '\'' + ", url='" + url + '\'' + ", username='" + username + '\'' + ", password='" + password + '\'' + '}'; } } -
测试效果
@RestController
public class HelloController {

    @Autowired
    private DataSourceProperties dataSourceProperties;

    @Autowired
    private DataSourceConfigurationProperties dataSourceConfigurationProperties;

    @GetMapping("/hello")
    public String hello(){
        System.out.println("dataSourceProperties = " + dataSourceProperties);
        System.out.println("dataSourceConfigurationProperties = " + dataSourceConfigurationProperties);
        return "Hello,Spring Boot 3!";
    }
}
浏览器访问路径,控制台查看效果

2.5 多环境配置和使用
-
需求
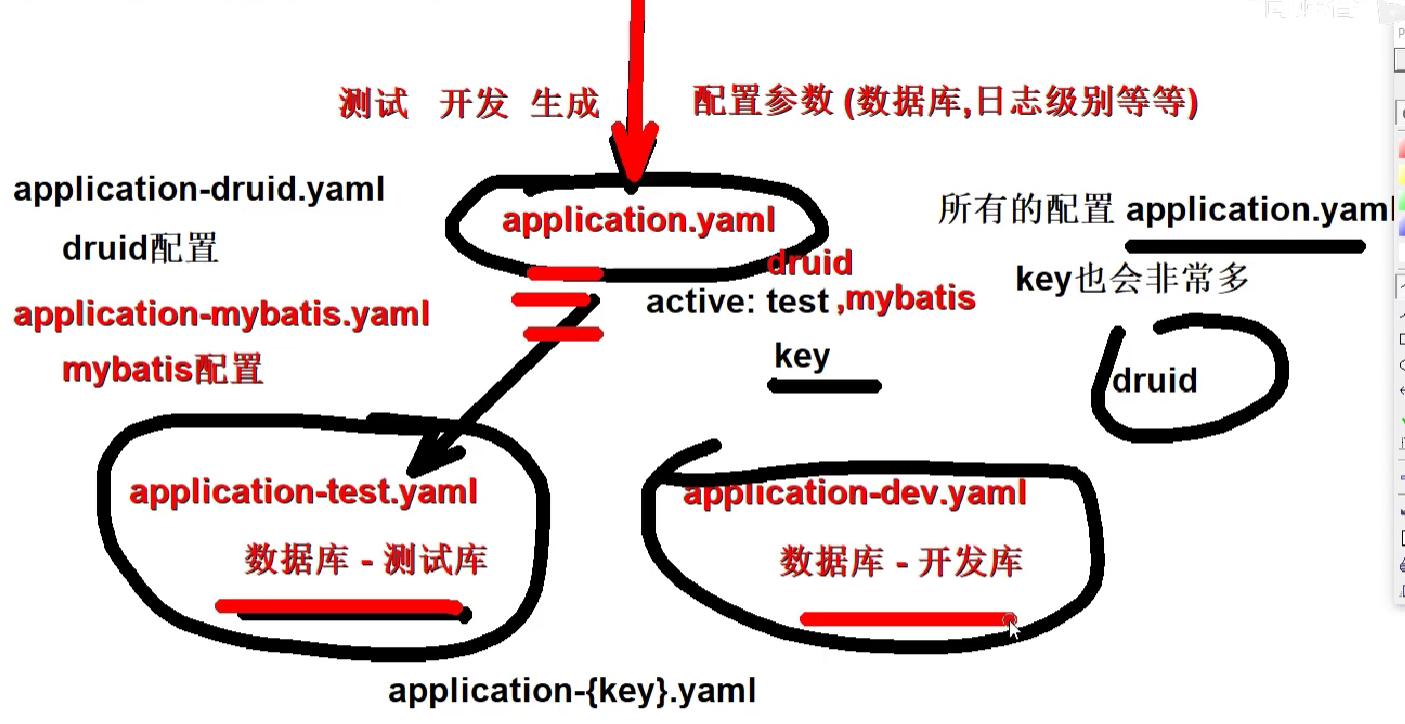
在Spring Boot中,可以使用多环境配置来根据不同的运行环境(如开发、测试、生产)加载不同的配置。SpringBoot支持多环境配置让应用程序在不同的环境中使用不同的配置参数,例如数据库连接信息、日志级别、缓存配置等。
以下是实现Spring Boot多环境配置的常见方法:
- 属性文件分离:将应用程序的配置参数分离到不同的属性文件中,每个环境对应一个属性文件。例如,可以创建
application-dev.properties、application-prod.properties和application-test.properties等文件。在这些文件中,可以定义各自环境的配置参数,如数据库连接信息、端口号等。然后,在application.properties中通过spring.profiles.active属性指定当前使用的环境。Spring Boot会根据该属性来加载对应环境的属性文件,覆盖默认的配置。 - YAML配置文件:与属性文件类似,可以将配置参数分离到不同的YAML文件中,每个环境对应一个文件。例如,可以创建
application-dev.yml、application-prod.yml和application-test.yml等文件。在这些文件中,可以使用YAML语法定义各自环境的配置参数。同样,通过spring.profiles.active属性指定当前的环境,Spring Boot会加载相应的YAML文件。 - 命令行参数(动态):可以通过命令行参数来指定当前的环境。例如,可以使用
--spring.profiles.active=dev来指定使用开发环境的配置。
通过上述方法,Spring Boot会根据当前指定的环境来加载相应的配置文件或参数,从而实现多环境配置。这样可以简化在不同环境之间的配置切换,并且确保应用程序在不同环境中具有正确的配置。
- 属性文件分离:将应用程序的配置参数分离到不同的属性文件中,每个环境对应一个属性文件。例如,可以创建
-
多环境配置(基于方式b实践)
创建开发、测试、生产三个环境的配置文件
application-dev.yml(开发)spring: jdbc: datasource: driverClassName: com.mysql.cj.jdbc.Driver url: jdbc:mysql:///dev username: root password: rootapplication-test.yml(测试)
spring:
  jdbc:
    datasource:
      driverClassName: com.mysql.cj.jdbc.Driver
      url: jdbc:mysql:///test
      username: root
      password: root
application-prod.yml(生产)
spring: jdbc: datasource: driverClassName: com.mysql.cj.jdbc.Driver url: jdbc:mysql:///prod username: root password: root -
环境激活
spring: profiles: active: dev -
测试效果

注意 :
如果设置了spring.profiles.active,并且和application有重叠属性,以active设置优先。
如果设置了spring.profiles.active,和application无重叠属性,application设置依然生效!
回顾复习
创建新模块,springboot-base-application-02(注意如果自己没有创建父工程那就相当于新的项目,重新设置一下,组件名称)
配置依赖,使其成为boot工程
<parent>
        <!-- spring-boot-->
        <groupId>org.springframework.boot</groupId>
        <artifactId>spring-boot-starter-parent</artifactId>
        <version>3.0.5</version>
    </parent>
导入web依赖
 <dependency>
            <groupId>org.springframework.boot</groupId>
            <artifactId>spring-boot-starter-web</artifactId>
        </dependency>
将Main 作为启动类
package com.atguigu;


import org.springframework.boot.SpringApplication;
import org.springframework.boot.autoconfigure.SpringBootApplication;

@SpringBootApplication  //自己是一个配置类,自动加载其他启动器配置类(ioc),扫描当前启动类所在的包和子包的ioc和di注解
public class Main {
    public static void main(String[] args) {
        SpringApplication.run(Main.class,args);
    }
}
配置文件编写方式1:properties
application.properties
# web ????????? ?????
# properties
# key = value

# application???? - springboot - ?????????????? - ??key????
# key???? server.port server.servlet.context-path ????
server.port=80
server.servlet.context-path=/boot

zwf.info.age=18
zwf.info.name=???
zwf.root.username=root
zwf.root.password=123456
方式2:.yml或.yaml都可以
application.yml
# server.port=80
# server.servlet.context-path=/boot

# yaml有层次,可以继承的配置文件格式
# key:
# 缩进key:   -> key.key

# springboot规定的配置,有特殊含义
server:
  port: 80
  servlet:
    context-path: /boot

# 数据库连接信息     测试库  开发的库  上线


zwf:
  user:
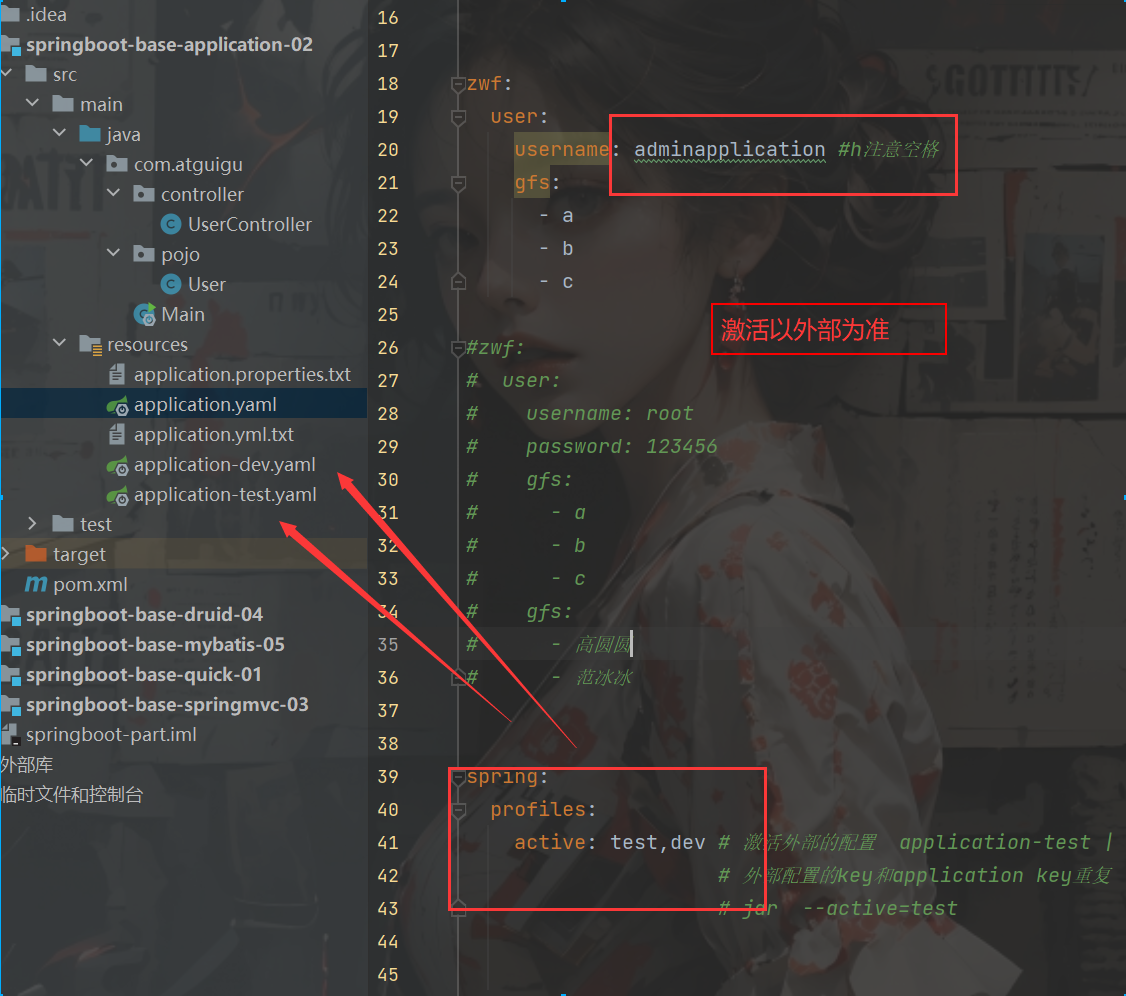
    username: adminapplication #注意空格
    gfs:
      - a
      - b
      - c

#zwf:
#  user:
#    username: root
#    password: 123456
#    gfs:
#      - a
#      - b
#      - c
#    gfs:
#      - 高圆圆
#      - 范冰冰


spring:
  profiles:
    active: test,dev # 激活外部的配置  application-test | application-dev
                     # 外部配置的key和application key重复  外部的覆盖内部!!
                     # jar  --active=test
读取配置的值
方式1:通过…层级的模式
创建pojo包下的User实体类
package com.atguigu.pojo;

import lombok.Data;
import org.springframework.beans.factory.annotation.Value;
import org.springframework.boot.context.properties.ConfigurationProperties;
import org.springframework.stereotype.Component;

import java.util.List;

/**
 * projectName: com.atguigu.pojo
 *
 * @author: 赵伟风
 *
 *   读取配置的方式1: @Value
 *       直接可以在属性上添加即可
 *       @Value(key必须写全了)
 *       @value只能读取单个值
 *   批量配置读取:
 *      @ConfigurationProperties(prefix = "zwf.user") 通用的前缀
 *      实体类
 *        属性名 = 最后一个key的值
 *      优势1: 方便 不用一个一个读取
 *      优势2: 可以给集合类型赋值
 *
 */
@Data
@Component
@ConfigurationProperties(prefix = "zwf.user")
public class User {

    //@Value("${zwf.user.username}") //di
    private String username; //等于key

    //@Value("${zwf.user.password}") //di
    private String password;

    //@Value("${zwf.user.gfs}") //di
    private List<String> gfs;
}
创建controller层的UserController类
package com.atguigu.controller;

import com.atguigu.pojo.User;
import org.springframework.beans.factory.annotation.Autowired;
import org.springframework.web.bind.annotation.GetMapping;
import org.springframework.web.bind.annotation.RequestMapping;
import org.springframework.web.bind.annotation.RestController;

/**
 * projectName: com.atguigu.controller
 *
 * @author: 赵伟风
 * description:
 */

@RestController
@RequestMapping("user")
public class UserController {

    @Autowired
    private User user;

    @GetMapping("show")
    public User show(){
        return user;
    }

}
方式二:批量读取
只需要在类上加上
@ConfigurationProperties(prefix = "zwf.user")
多种环境
三、SpringBoot3整合SpringMVC
3.1 实现过程
-
创建程序
-
引入依赖
<?xml version="1.0" encoding="UTF-8"?> <project xmlns="http://maven.apache.org/POM/4.0.0" xmlns:xsi="http://www.w3.org/2001/XMLSchema-instance" xsi:schemaLocation="http://maven.apache.org/POM/4.0.0 http://maven.apache.org/xsd/maven-4.0.0.xsd"> <modelVersion>4.0.0</modelVersion> <parent> <groupId>org.springframework.boot</groupId> <artifactId>spring-boot-starter-parent</artifactId> <version>3.0.5</version> </parent> <groupId>com.atguigu</groupId> <artifactId>springboot-starter-springmvc-03</artifactId> <version>1.0-SNAPSHOT</version> <properties> <maven.compiler.source>17</maven.compiler.source> <maven.compiler.target>17</maven.compiler.target> <project.build.sourceEncoding>UTF-8</project.build.sourceEncoding> </properties> <dependencies> <!-- web开发的场景启动器 --> <dependency> <groupId>org.springframework.boot</groupId> <artifactId>spring-boot-starter-web</artifactId> </dependency> </dependencies> </project> -
创建启动类
@SpringBootApplication public class MainApplication { public static void main(String[] args) { SpringApplication.run(MainApplication.class,args); } } -
创建实体类
package com.atguigu.pojo; public class User { private String username ; private String password ; private Integer age ; private String sex ; public String getUsername() { return username; } public void setUsername(String username) { this.username = username; } public String getPassword() { return password; } public void setPassword(String password) { this.password = password; } public Integer getAge() { return age; } public void setAge(Integer age) { this.age = age; } public String getSex() { return sex; } public void setSex(String sex) { this.sex = sex; } } -
编写Controller
package com.atguigu.controller; import com.atguigu.pojo.User; import org.springframework.stereotype.Controller; import org.springframework.web.bind.annotation.GetMapping; import org.springframework.web.bind.annotation.RequestMapping; import org.springframework.web.bind.annotation.ResponseBody; @Controller @RequestMapping("/user") public class UserController { @GetMapping("/getUser") @ResponseBody public User getUser(){ User user = new User(); user.setUsername("杨过"); user.setPassword("123456"); user.setAge(18); user.setSex("男"); return user; } } -
访问测试

3.2 web相关配置
位置:application.yml
# web相关的配置
# https://docs.spring.io/spring-boot/docs/current/reference/html/application-properties.html#appendix.application-properties.server
server:
  # 端口号设置
  port: 80
  # 项目根路径
  servlet:
    context-path: /boot
当涉及Spring Boot的Web应用程序配置时,以下是五个重要的配置参数:
server.port: 指定应用程序的HTTP服务器端口号。默认情况下,Spring Boot使用8080作为默认端口。您可以通过在配置文件中设置server.port来更改端口号。server.servlet.context-path: 设置应用程序的上下文路径。这是应用程序在URL中的基本路径。默认情况下,上下文路径为空。您可以通过在配置文件中设置server.servlet.context-path属性来指定自定义的上下文路径。spring.mvc.view.prefix和spring.mvc.view.suffix: 这两个属性用于配置视图解析器的前缀和后缀。视图解析器用于解析控制器返回的视图名称,并将其映射到实际的视图页面。spring.mvc.view.prefix定义视图的前缀,spring.mvc.view.suffix定义视图的后缀。spring.resources.static-locations: 配置静态资源的位置。静态资源可以是CSS、JavaScript、图像等。默认情况下,Spring Boot会将静态资源放在classpath:/static目录下。您可以通过在配置文件中设置spring.resources.static-locations属性来自定义静态资源的位置。spring.http.encoding.charset和spring.http.encoding.enabled: 这两个属性用于配置HTTP请求和响应的字符编码。spring.http.encoding.charset定义字符编码的名称(例如UTF-8),spring.http.encoding.enabled用于启用或禁用字符编码的自动配置。
这些是在Spring Boot的配置文件中与Web应用程序相关的一些重要配置参数。根据您的需求,您可以在配置文件中设置这些参数来定制和配置您的Web应用程序
3.3 静态资源处理
在WEB开发中我们需要引入一些静态资源 , 例如 : HTML , CSS , JS , 图片等 , 如果是普通的项目静态资源可以放在项目的webapp目录下。现在使用Spring Boot做开发 , 项目中没有webapp目录 , 我们的项目是一个jar工程,那么就没有webapp,我们的静态资源该放哪里呢?
-
默认路径
在springboot中就定义了静态资源的默认查找路径:
package org.springframework.boot.autoconfigure.web;
//..................
public static class Resources {
        private static final String[] CLASSPATH_RESOURCE_LOCATIONS = new String[]{"classpath:/META-INF/resources/", "classpath:/resources/", "classpath:/static/", "classpath:/public/"};
        private String[] staticLocations;
        private boolean addMappings;
        private boolean customized;
        private final Chain chain;
        private final Cache cache;

        public Resources() {
            this.staticLocations = CLASSPATH_RESOURCE_LOCATIONS;
            this.addMappings = true;
            this.customized = false;
            this.chain = new Chain();
            this.cache = new Cache();
        }
//...........
默认的静态资源路径为:
· classpath:/META-INF/resources/
· classpath:/resources/
· classpath:/static/
· classpath:/public/
我们只要静态资源放在这些目录中任何一个,SpringMVC都会帮我们处理。 我们习惯会把静态资源放在classpath:/static/ 目录下。在resources目录下创建index.html文件

打开浏览器输入 : http://localhost:8080/index.html
-
覆盖路径
# web相关的配置
# https://docs.spring.io/spring-boot/docs/current/reference/html/application-properties.html#appendix.application-properties.server
server:
  # 端口号设置
  port: 80
  # 项目根路径
  servlet:
    context-path: /boot
spring:
  web:
    resources:
      # 配置静态资源地址,如果设置,会覆盖默认值
      static-locations: classpath:/webapp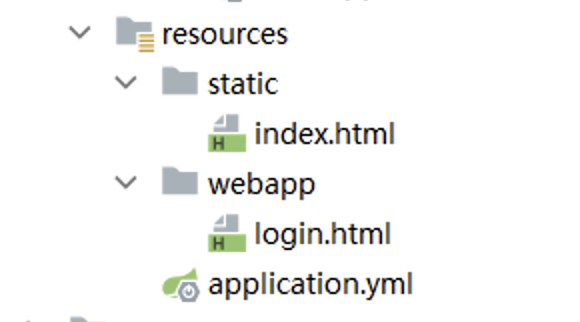
访问地址:http://localhost/boot/login.html
3.4 自定义拦截器(SpringMVC配置)
-
拦截器声明
package com.atguigu.interceptor; import jakarta.servlet.http.HttpServletRequest; import jakarta.servlet.http.HttpServletResponse; import org.springframework.stereotype.Component; import org.springframework.web.servlet.HandlerInterceptor; import org.springframework.web.servlet.ModelAndView; @Component public class MyInterceptor implements HandlerInterceptor { @Override public boolean preHandle(HttpServletRequest request, HttpServletResponse response, Object handler) throws Exception { System.out.println("MyInterceptor拦截器的preHandle方法执行...."); return true; } @Override public void postHandle(HttpServletRequest request, HttpServletResponse response, Object handler, ModelAndView modelAndView) throws Exception { System.out.println("MyInterceptor拦截器的postHandle方法执行...."); } @Override public void afterCompletion(HttpServletRequest request, HttpServletResponse response, Object handler, Exception ex) throws Exception { System.out.println("MyInterceptor拦截器的afterCompletion方法执行...."); } } -
拦截器配置
正常使用配置类,只要保证,配置类要在启动类的同包或者子包方可生效!
package com.atguigu.config; import com.atguigu.interceptor.MyInterceptor; import org.springframework.beans.factory.annotation.Autowired; import org.springframework.context.annotation.Configuration; import org.springframework.web.servlet.config.annotation.InterceptorRegistry; import org.springframework.web.servlet.config.annotation.WebMvcConfigurer; @Configuration public class MvcConfig implements WebMvcConfigurer { @Autowired private MyInterceptor myInterceptor ; /** * /** 拦截当前目录及子目录下的所有路径 /user/** /user/findAll /user/order/findAll * /* 拦截当前目录下的以及子路径 /user/* /user/findAll * @param registry */ @Override public void addInterceptors(InterceptorRegistry registry) { registry.addInterceptor(myInterceptor).addPathPatterns("/**"); } } -
拦截器效果测试

回顾复习
创建springboot-base-springmvc-03模块(注意如果没有父工程那么还是要编写组件)
导入相应的依赖
 <parent>
        <groupId>org.springframework.boot</groupId>
        <artifactId>spring-boot-starter-parent</artifactId>
        <version>3.0.5</version>
    </parent>
    <dependencies>
        <dependency>
            <groupId>org.springframework.boot</groupId>
            <artifactId>spring-boot-starter-web</artifactId>
        </dependency>
    </dependencies>
指定启动类
package com.atguigu;


import org.springframework.boot.SpringApplication;
import org.springframework.boot.autoconfigure.SpringBootApplication;

@SpringBootApplication
public class Main {
    public static void main(String[] args) {
        SpringApplication.run(Main.class,args);
    }
}
controller层编写HelloController类
package com.atguigu.controller;

import org.springframework.stereotype.Controller;
import org.springframework.web.bind.annotation.GetMapping;
import org.springframework.web.bind.annotation.ResponseBody;

/**
 * projectName: com.atguigu.controller
 *
 * @author: 赵伟风
 * description:
 */

@Controller
@ResponseBody
public class HelloController {

    @GetMapping("hello")
    public String ret(){
        return "hello";
    }
}
编写application.yaml
# springmvc相关的web配置
# serverkey
server:
  port: 80 # 端口号 默认是8080
  servlet:
    context-path: /boot #设置项目根路径

spring:
  web:
    resources:
      static-locations: classpath:/webapp  #配置静态资源文件夹
      # 一旦你配置了默认的静态资源文件夹就无法访问了  static public resources META-INF/resources
      # 外部访问静态资源的时候,不需要写静态资源文件夹
访问静态资源
默认的是放在resources下的static包下访问,如果放在其他如:webapp 下则需要设置yml
注意访问路径不用加webapp
spring:
  web:
    resources:
      static-locations: classpath:/webapp  #配置静态资源文件夹
      # 一旦你配置了默认的静态资源文件夹就无法访问了  static public resources META-INF/resources
      # 外部访问静态资源的时候,不需要写静态资源文件夹
拦截器使用
创建interceptor包下的M有Interceptor类
package com.atguigu.interceptor;

import jakarta.servlet.http.HttpServletRequest;
import jakarta.servlet.http.HttpServletResponse;
import org.springframework.web.servlet.HandlerInterceptor;

/**
 * projectName: com.atguigu.interceptor
 *
 * @author: 赵伟风
 * description:
 */
public class MyInterceptor implements HandlerInterceptor {

    @Override
    public boolean preHandle(HttpServletRequest request, HttpServletResponse response, Object handler) throws Exception {
        System.out.println("request = " + request + ", response = " + response + ", handler = " + handler);
        return true;
    }
}
编写配置类
config包下的web M v从Config类
package com.atguigu.config;

import com.atguigu.interceptor.MyInterceptor;
import org.springframework.context.annotation.Configuration;
import org.springframework.web.servlet.config.annotation.InterceptorRegistry;
import org.springframework.web.servlet.config.annotation.WebMvcConfigurer;

/**
 * projectName: com.atguigu.config
 *
 * @author: 赵伟风
 * description:
 */

@Configuration
public class WebMvcConfig  implements WebMvcConfigurer {

    @Override
    public void addInterceptors(InterceptorRegistry registry) {
        registry.addInterceptor(new MyInterceptor());
    }
}
四、SpringBoot3整合Druid数据源
-
创建程序
-
引入依赖
<?xml version="1.0" encoding="UTF-8"?> <project xmlns="http://maven.apache.org/POM/4.0.0" xmlns:xsi="http://www.w3.org/2001/XMLSchema-instance" xsi:schemaLocation="http://maven.apache.org/POM/4.0.0 http://maven.apache.org/xsd/maven-4.0.0.xsd"> <modelVersion>4.0.0</modelVersion> <parent> <groupId>org.springframework.boot</groupId> <artifactId>spring-boot-starter-parent</artifactId> <version>3.0.5</version> </parent> <groupId>com.atguigu</groupId> <artifactId>springboot-starter-druid-04</artifactId> <version>1.0-SNAPSHOT</version> <properties> <maven.compiler.source>17</maven.compiler.source> <maven.compiler.target>17</maven.compiler.target> <project.build.sourceEncoding>UTF-8</project.build.sourceEncoding> </properties> <dependencies> <!-- web开发的场景启动器 --> <dependency> <groupId>org.springframework.boot</groupId> <artifactId>spring-boot-starter-web</artifactId> </dependency> <!-- 数据库相关配置启动器 jdbctemplate 事务相关--> <dependency> <groupId>org.springframework.boot</groupId> <artifactId>spring-boot-starter-jdbc</artifactId> </dependency> <!-- druid启动器的依赖 --> <dependency> <groupId>com.alibaba</groupId> <artifactId>druid-spring-boot-3-starter</artifactId> <version>1.2.18</version> </dependency> <!-- 驱动类--> <dependency> <groupId>mysql</groupId> <artifactId>mysql-connector-java</artifactId> <version>8.0.28</version> </dependency> <dependency> <groupId>org.projectlombok</groupId> <artifactId>lombok</artifactId> <version>1.18.28</version> </dependency> </dependencies> <!-- SpringBoot应用打包插件--> <build> <plugins> <plugin> <groupId>org.springframework.boot</groupId> <artifactId>spring-boot-maven-plugin</artifactId> </plugin> </plugins> </build> </project> -
启动类
@SpringBootApplication public class MainApplication { public static void main(String[] args) { SpringApplication.run(MainApplication.class,args); } } -
配置文件编写
添加druid连接池的基本配置
spring: datasource: # 连接池类型 type: com.alibaba.druid.pool.DruidDataSource # Druid的其他属性配置 springboot3整合情况下,数据库连接信息必须在Druid属性下! druid: url: jdbc:mysql://localhost:3306/day01 username: root password: root driver-class-name: com.mysql.cj.jdbc.Driver # 初始化时建立物理连接的个数 initial-size: 5 # 连接池的最小空闲数量 min-idle: 5 # 连接池最大连接数量 max-active: 20 # 获取连接时最大等待时间,单位毫秒 max-wait: 60000 # 申请连接的时候检测,如果空闲时间大于timeBetweenEvictionRunsMillis,执行validationQuery检测连接是否有效。 test-while-idle: true # 既作为检测的间隔时间又作为testWhileIdel执行的依据 time-between-eviction-runs-millis: 60000 # 销毁线程时检测当前连接的最后活动时间和当前时间差大于该值时,关闭当前连接(配置连接在池中的最小生存时间) min-evictable-idle-time-millis: 30000 # 用来检测数据库连接是否有效的sql 必须是一个查询语句(oracle中为 select 1 from dual) validation-query: select 1 # 申请连接时会执行validationQuery检测连接是否有效,开启会降低性能,默认为true test-on-borrow: false # 归还连接时会执行validationQuery检测连接是否有效,开启会降低性能,默认为true test-on-return: false # 是否缓存preparedStatement, 也就是PSCache,PSCache对支持游标的数据库性能提升巨大,比如说oracle,在mysql下建议关闭。 pool-prepared-statements: false # 要启用PSCache,必须配置大于0,当大于0时,poolPreparedStatements自动触发修改为true。在Druid中,不会存在Oracle下PSCache占用内存过多的问题,可以把这个数值配置大一些,比如说100 max-pool-prepared-statement-per-connection-size: -1 # 合并多个DruidDataSource的监控数据 use-global-data-source-stat: true logging: level: root: debug -
编写Controller
@Slf4j @Controller @RequestMapping("/user") public class UserController { @Autowired private JdbcTemplate jdbcTemplate; @GetMapping("/getUser") @ResponseBody public User getUser(){ String sql = "select * from users where id = ? ; "; User user = jdbcTemplate.queryForObject(sql, new BeanPropertyRowMapper<>(User.class), 1); log.info("查询的user数据为:{}",user.toString()); return user; } } -
启动测试
-
问题解决
通过源码分析,druid-spring-boot-3-starter目前最新版本是1.2.18,虽然适配了SpringBoot3,但缺少自动装配的配置文件,需要手动在resources目录下创建META-INF/spring/org.springframework.boot.autoconfigure.AutoConfiguration.imports,文件内容如下!
com.alibaba.druid.spring.boot3.autoconfigure.DruidDataSourceAutoConfigure
回顾复习
创建springboot-base-druid-04模块
导入依赖
 <parent>
        <groupId>org.springframework.boot</groupId>
        <artifactId>spring-boot-starter-parent</artifactId>
        <version>3.0.5</version>
    </parent>
 <dependencies>
        <!--  web开发的场景启动器 -->
        <dependency>
            <groupId>org.springframework.boot</groupId>
            <artifactId>spring-boot-starter-web</artifactId>
        </dependency>

        <!-- 数据库相关配置启动器 jdbctemplate 事务相关-->
        <dependency>
            <groupId>org.springframework.boot</groupId>
            <artifactId>spring-boot-starter-jdbc</artifactId>
        </dependency>

        <!-- druid启动器的依赖  -->
        <dependency>
            <groupId>com.alibaba</groupId>
            <artifactId>druid-spring-boot-3-starter</artifactId>
            <version>1.2.18</version>
        </dependency>

        <!-- 驱动类-->
        <dependency>
            <groupId>mysql</groupId>
            <artifactId>mysql-connector-java</artifactId>
            <version>8.0.28</version>
        </dependency>

        <dependency>
            <groupId>org.projectlombok</groupId>
            <artifactId>lombok</artifactId>
            <version>1.18.28</version>
        </dependency>
    </dependencies>
创建application.yaml配置文件
spring:
  datasource:
    type: com.alibaba.druid.pool.DruidDataSource  #使用druid连接池
    #username: 账号 # 如果你springboot2整合druid连接池!使用此信息配置账号
    #password:
    druid:
      url: jdbc:mysql://localhost:3306/day01
      username: root
      password: root
      driver-class-name: com.mysql.cj.jdbc.Driver
      # 初始化时建立物理连接的个数
      initial-size: 5
      # 连接池的最小空闲数量
      min-idle: 5
      # 连接池最大连接数量
      max-active: 20
      # 获取连接时最大等待时间,单位毫秒
      max-wait: 60000
      # 申请连接的时候检测,如果空闲时间大于timeBetweenEvictionRunsMillis,执行validationQuery检测连接是否有效。
      test-while-idle: true
      # 既作为检测的间隔时间又作为testWhileIdel执行的依据
      time-between-eviction-runs-millis: 60000
      # 销毁线程时检测当前连接的最后活动时间和当前时间差大于该值时,关闭当前连接(配置连接在池中的最小生存时间)
      min-evictable-idle-time-millis: 30000
      # 用来检测数据库连接是否有效的sql 必须是一个查询语句(oracle中为 select 1 from dual)
      validation-query: select 1
      # 申请连接时会执行validationQuery检测连接是否有效,开启会降低性能,默认为true
      test-on-borrow: false
      # 归还连接时会执行validationQuery检测连接是否有效,开启会降低性能,默认为true
      test-on-return: false
      # 是否缓存preparedStatement, 也就是PSCache,PSCache对支持游标的数据库性能提升巨大,比如说oracle,在mysql下建议关闭。
      pool-prepared-statements: false
      # 要启用PSCache,必须配置大于0,当大于0时,poolPreparedStatements自动触发修改为true。在Druid中,不会存在Oracle下PSCache占用内存过多的问题,可以把这个数值配置大一些,比如说100
      max-pool-prepared-statement-per-connection-size: -1
      # 合并多个DruidDataSource的监控数据
      use-global-data-source-stat: true
注意boot2 是spring:
datasource:
type: com.alibaba.druid.pool.DruidDataSource *#使用druid连接池
#username: 账号 # *如果你springboot2整合druid**连接池!使用此信息配置账号
#password:
但是boot3要变了,如上
创建pojo包下的User类
package com.atguigu.pojo;

import lombok.Data;

/**
 * projectName: com.atguigu.pojo
 *
 * @author: 赵伟风
 * description:
 */

@Data
public class User {

    private Integer id;
    private String name;
    private Integer age;
    private String email;
}
编写controller包下的User Controller类
package com.atguigu.controller;

import com.atguigu.pojo.User;
import org.springframework.beans.factory.annotation.Autowired;
import org.springframework.expression.spel.ast.Literal;
import org.springframework.jdbc.core.BeanPropertyRowMapper;
import org.springframework.jdbc.core.JdbcTemplate;
import org.springframework.web.bind.annotation.GetMapping;
import org.springframework.web.bind.annotation.RequestMapping;
import org.springframework.web.bind.annotation.RestController;

import java.util.List;

/**
 * projectName: com.atguigu.controller
 *
 * @author: 赵伟风
 * description:
 */

@RestController
@RequestMapping("user")
public class UserController {

    @Autowired
    private JdbcTemplate jdbcTemplate;

    @GetMapping("list")
    public List<User> list(){
        //数据库
        String sql ="select * from user;";
        List<User> list = jdbcTemplate.query(sql, new BeanPropertyRowMapper<>(User.class));
        return list;
    }
}
这里不用三层架构,直接写的数据库sql语句
创建启动类Main
package com.atguigu;


import org.springframework.boot.SpringApplication;
import org.springframework.boot.autoconfigure.SpringBootApplication;

@SpringBootApplication
public class Main {
    public static void main(String[] args) {
        SpringApplication.run(Main.class,args);
    }
}
解决druid 在boot3不兼容的方法
在resources目录下创建
org.springframework.boot.autoconfigure.AutoConfiguration.imports文件
在里面写
com.alibaba.druid.spring.boot3.autoconfigure.DruidDataSourceAutoConfigure
即可解决
五、SpringBoot3整合Mybatis
5.1 MyBatis整合步骤
- 导入依赖:在您的Spring Boot项目的构建文件(如pom.xml)中添加MyBatis和数据库驱动的相关依赖。例如,如果使用MySQL数据库,您需要添加MyBatis和MySQL驱动的依赖。
- 配置数据源:在
application.properties或application.yml中配置数据库连接信息,包括数据库URL、用户名、密码、mybatis的功能配置等。 - 创建实体类:创建与数据库表对应的实体类。
- 创建Mapper接口:创建与数据库表交互的Mapper接口。
- 创建Mapper接口SQL实现: 可以使用mapperxml文件或者注解方式
- 创建程序启动类
- 注解扫描:在Spring Boot的主应用类上添加
@MapperScan注解,用于扫描和注册Mapper接口。 - 使用Mapper接口:在需要使用数据库操作的地方,通过依赖注入或直接实例化Mapper接口,并调用其中的方法进行数据库操作。
5.2 Mybatis整合实践
-
创建项目
-
导入依赖
<parent> <groupId>org.springframework.boot</groupId> <artifactId>spring-boot-starter-parent</artifactId> <version>3.0.5</version> </parent> <dependencies> <dependency> <groupId>org.springframework.boot</groupId> <artifactId>spring-boot-starter-web</artifactId> </dependency> <dependency> <groupId>org.mybatis.spring.boot</groupId> <artifactId>mybatis-spring-boot-starter</artifactId> <version>3.0.1</version> </dependency> <!-- 数据库相关配置启动器 --> <dependency> <groupId>org.springframework.boot</groupId> <artifactId>spring-boot-starter-jdbc</artifactId> </dependency> <!-- druid启动器的依赖 --> <dependency> <groupId>com.alibaba</groupId> <artifactId>druid-spring-boot-3-starter</artifactId> <version>1.2.18</version> </dependency> <!-- 驱动类--> <dependency> <groupId>mysql</groupId> <artifactId>mysql-connector-java</artifactId> <version>8.0.28</version> </dependency> <dependency> <groupId>org.projectlombok</groupId> <artifactId>lombok</artifactId> <version>1.18.28</version> </dependency> </dependencies> -
配置文件
server: port: 80 servlet: context-path: / spring: datasource: type: com.alibaba.druid.pool.DruidDataSource druid: url: jdbc:mysql:///day01 username: root password: root driver-class-name: com.mysql.cj.jdbc.Driver mybatis: configuration: # setting配置 auto-mapping-behavior: full map-underscore-to-camel-case: true log-impl: org.apache.ibatis.logging.slf4j.Slf4jImpl type-aliases-package: com.atguigu.pojo # 配置别名 mapper-locations: classpath:/mapper/*.xml # mapperxml位置 -
实体类准备
package com.atguigu.pojo; public class User { private String account ; private String password ; private Integer id ; public String getAccount() { return account; } public void setAccount(String account) { this.account = account; } public String getPassword() { return password; } public void setPassword(String password) { this.password = password; } public Integer getId() { return id; } public void setId(Integer id) { this.id = id; } @Override public String toString() { return "User{" + "account='" + account + '\'' + ", password='" + password + '\'' + ", id=" + id + '}'; } } -
Mapper接口准备
public interface UserMapper { List<User> queryAll(); } -
Mapper接口实现(XML)
位置:resources/mapper/UserMapper.xml
<?xml version="1.0" encoding="UTF-8" ?> <!DOCTYPE mapper PUBLIC "-//mybatis.org//DTD Mapper 3.0//EN" "https://mybatis.org/dtd/mybatis-3-mapper.dtd"> <!-- namespace = 接口的全限定符 --> <mapper namespace="com.atguigu.mapper.UserMapper"> <select id="queryAll" resultType="user"> select * from users </select> </mapper> -
编写三层架构代码
伪代码,不添加业务接口!
- controller
@Slf4j @Controller @RequestMapping("/user") public class UserController { @Autowired private UserService userService; @GetMapping("/list") @ResponseBody public List<User> getUser(){ List<User> userList = userService.findList(); log.info("查询的user数据为:{}",userList); return userList; } } - service
@Slf4j
@Service
public class UserService {

    @Autowired
    private UserMapper userMapper;

    public List<User> findList(){
        List<User> users = userMapper.queryAll();
        log.info("查询全部数据:{}",users);
        return users;
    }
}
- controller
-
启动类和接口扫描
@MapperScan("com.atguigu.mapper") //mapper接口扫描配置 @SpringBootApplication public class MainApplication { public static void main(String[] args) { SpringApplication.run(MainApplication.class,args); } } -
启动测试
5.3 声明式事务整合配置
依赖导入:
 <dependency>
    <groupId>org.springframework.boot</groupId>
    <artifactId>spring-boot-starter-jdbc</artifactId>
</dependency>
注:SpringBoot项目会自动配置一个 DataSourceTransactionManager,所以我们只需在方法(或者类)加上 @Transactional 注解,就自动纳入 Spring 的事务管理了
@Transactional
public void update(){
    User user = new User();
    user.setId(1);
    user.setPassword("test2");
    user.setAccount("test2");
    userMapper.update(user);
}
5.4 AOP整合配置
依赖导入:
<dependency>
    <groupId>org.springframework.boot</groupId>
    <artifactId>spring-boot-starter-aop</artifactId>
</dependency>
直接使用aop注解即可:
@Component
@Aspect
public class LogAdvice {

    @Before("execution(* com..service.*.*(..))")
    public void before(JoinPoint joinPoint){
        System.out.println("LogAdvice.before");
        System.out.println("joinPoint = " + joinPoint);
    }

}
回顾复习
创建模块springboot-base-mybatis-05 还是和上面讲的一样,父工程
导入依赖
 <parent>
        <groupId>org.springframework.boot</groupId>
        <artifactId>spring-boot-starter-parent</artifactId>
        <version>3.0.5</version>
    </parent>
 <dependencies>
            <dependency>
                <groupId>org.springframework.boot</groupId>
                <artifactId>spring-boot-starter-web</artifactId>
            </dependency>

            <dependency>
                <groupId>org.mybatis.spring.boot</groupId>
                <artifactId>mybatis-spring-boot-starter</artifactId>
                <version>3.0.1</version>
            </dependency>

            <!-- 数据库相关配置启动器 -->
            <dependency>
                <groupId>org.springframework.boot</groupId>
                <artifactId>spring-boot-starter-jdbc</artifactId>
            </dependency>

            <!-- druid启动器的依赖  -->
            <dependency>
                <groupId>com.alibaba</groupId>
                <artifactId>druid-spring-boot-3-starter</artifactId>
                <version>1.2.18</version>
            </dependency>

            <!-- 驱动类-->
            <dependency>
                <groupId>mysql</groupId>
                <artifactId>mysql-connector-java</artifactId>
                <version>8.0.28</version>
            </dependency>

            <dependency>
                <groupId>org.projectlombok</groupId>
                <artifactId>lombok</artifactId>
                <version>1.18.28</version>
            </dependency>

        <dependency>
            <groupId>org.springframework.boot</groupId>
            <artifactId>spring-boot-starter-aop</artifactId>
        </dependency>

    </dependencies>
创建Java下的mapper包下的UserMapper接口
package com.atguigu.mapper;

import com.atguigu.pojo.User;

import java.util.List;

/**
 * projectName: com.atguigu.mapper
 *
 * @author: 赵伟风
 * description:
 */
public interface UserMapper {

    List<User> queryAll();

    int delete(int i);
}
创建resources下的mappers下的UserMapper.xml文件
<?xml version="1.0" encoding="UTF-8" ?>
<!DOCTYPE mapper
        PUBLIC "-//mybatis.org//DTD Mapper 3.0//EN"
        "https://mybatis.org/dtd/mybatis-3-mapper.dtd">
<!-- namespace = 接口的全限定符 -->
<mapper namespace="com.atguigu.mapper.UserMapper">

    <select id="queryAll" resultType="user">
        select * from user;
    </select>

    <delete id="delete">
        delete from user where id = #{id}
    </delete>

</mapper>
编写application.yml文件
# druid连接池
spring:
  datasource:
    type: com.alibaba.druid.pool.DruidDataSource
    druid:
      url: jdbc:mysql://localhost:3306/day01
      username: root
      password: root
      driver-class-name: com.mysql.cj.jdbc.Driver

# mybatis -彻底抛弃mybatis-config.xml
# mapperxml文件的位置  settings的配置  别名的配置...
mybatis:
  mapper-locations: classpath:/mappers/*.xml  #指定xml文件的位置
  type-aliases-package: com.atguigu.pojo #起别名
  configuration:
    map-underscore-to-camel-case: true
    auto-mapping-behavior: full
    log-impl: org.apache.ibatis.logging.slf4j.Slf4jImpl
解决druid 在boot3不兼容的方法
在resources目录下创建
org.springframework.boot.autoconfigure.AutoConfiguration.imports文件
在里面写
com.alibaba.druid.spring.boot3.autoconfigure.DruidDataSourceAutoConfigure
编写启动类
package com.atguigu;


import org.mybatis.spring.annotation.MapperScan;
import org.springframework.boot.SpringApplication;
import org.springframework.boot.autoconfigure.SpringBootApplication;


@MapperScan("com.atguigu.mapper") //mapper接口所在的的位置!
@SpringBootApplication
public class Main {
    public static void main(String[] args) {
        SpringApplication.run(Main.class,args);
    }
}
注意:在application.yml文件中指定的是mapper xml文件位置 而在启动类的注解是mapper接口的位置
@MapperScan(“com.atguigu.mapper”) //mapper接口所在的的位置!
然后就是实现功能,Usermapper接口的放吧编写,User Mapper.xml文件中编写,
controller包下的UserController类编写,然后再启动项目
声明式事务
编写service包下的UserService类
package com.atguigu.service;

import com.atguigu.mapper.UserMapper;
import org.springframework.beans.factory.annotation.Autowired;
import org.springframework.stereotype.Service;
import org.springframework.transaction.annotation.Transactional;

/**
 * projectName: com.atguigu.service
 *
 * @author: 赵伟风
 * description:
 */

@Service
public class UserService {

    @Autowired
    private UserMapper userMapper;

    @Transactional
    public void delete( ){
        int rows = userMapper.delete(1);
        System.out.println("rows = " + rows);
//        int i = 1/0;
    }
}
然后去mapper.xml去编写对应的语句
然后到controller包下的UserController类去编写
package com.atguigu.controller;

import com.atguigu.mapper.UserMapper;
import com.atguigu.pojo.User;
import com.atguigu.service.UserService;
import org.springframework.beans.factory.annotation.Autowired;
import org.springframework.web.bind.annotation.GetMapping;
import org.springframework.web.bind.annotation.RequestMapping;
import org.springframework.web.bind.annotation.RestController;

import java.util.List;

/**
 * projectName: com.atguigu.controller
 *
 * @author: 赵伟风
 * description:
 */

@RestController
@RequestMapping("user")
public class UserController {

    @Autowired
    private UserMapper userMapper;


    @Autowired
    private UserService userService;

    @GetMapping
    public List<User> query(){
        userService.delete();
        return null;
    }
}
aop整合配置
导入依赖
<dependency>
    <groupId>org.springframework.boot</groupId>
    <artifactId>spring-boot-starter-aop</artifactId>
</dependency>
编写advice包下的LogAdvice类
package com.atguigu.advice;

import org.aspectj.lang.JoinPoint;
import org.aspectj.lang.annotation.Aspect;
import org.aspectj.lang.annotation.Before;
import org.springframework.core.annotation.Order;
import org.springframework.stereotype.Component;

/**
 * projectName: com.atguigu.advice
 *
 * @author: 赵伟风
 * description:
 */
@Component
@Aspect
@Order(5)
public class LogAdvice {

    @Before("execution(* com..service.*.*(..))")
    public void before(JoinPoint point){
        String className = point.getTarget().getClass().getSimpleName();
        String methodName = point.getSignature().getName();
        System.out.println(className+"::"+methodName+" 开始执行了!");
    }
}
六、SpringBoot3项目打包和运行
6.1 添加打包插件
在Spring Boot项目中添加
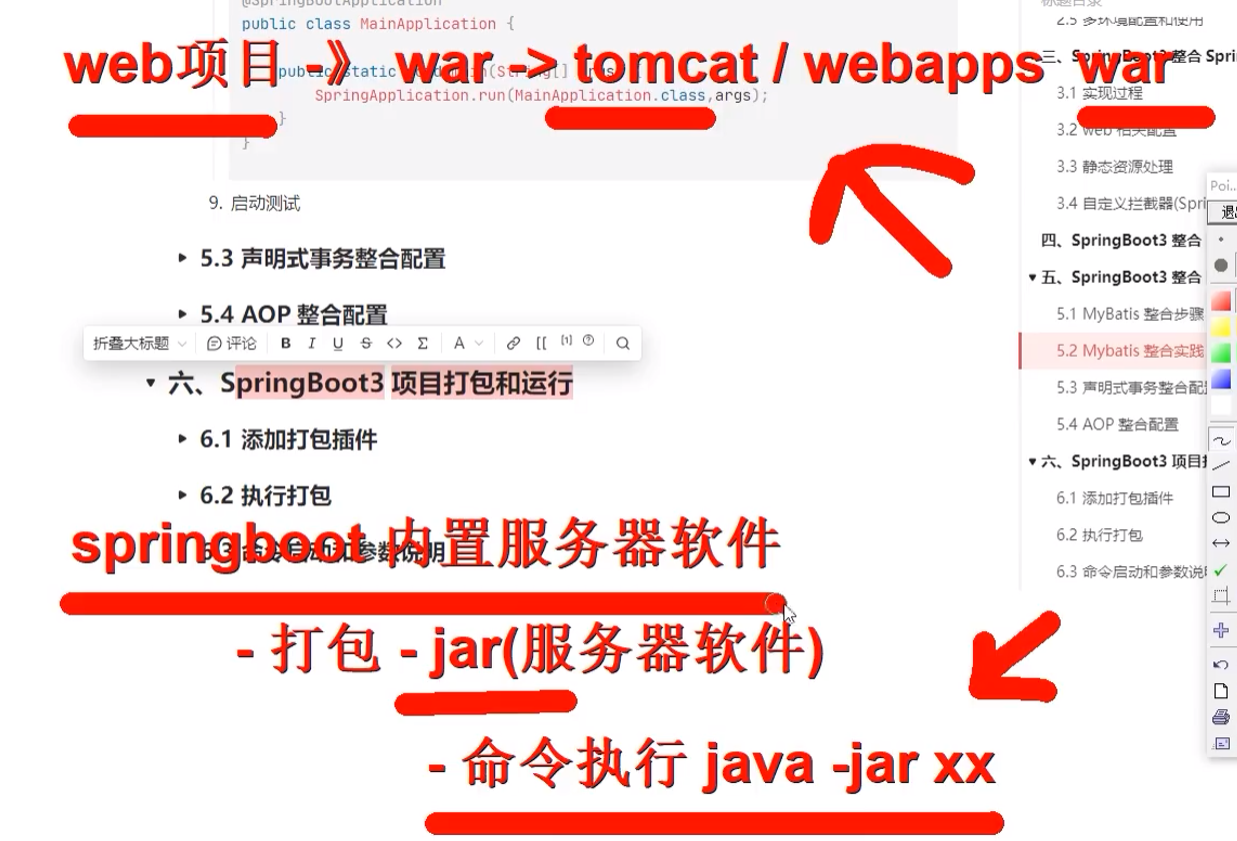
spring-boot-maven-plugin插件是为了支持将项目打包成可执行的可运行jar包。如果不添加spring-boot-maven-plugin插件配置,使用常规的java -jar命令来运行打包后的Spring Boot项目是无法找到应用程序的入口点,因此导致无法运行。
<!--    SpringBoot应用打包插件-->
<build>
    <plugins>
        <plugin>
            <groupId>org.springframework.boot</groupId>
            <artifactId>spring-boot-maven-plugin</artifactId>
        </plugin>
    </plugins>
</build>
6.2 执行打包
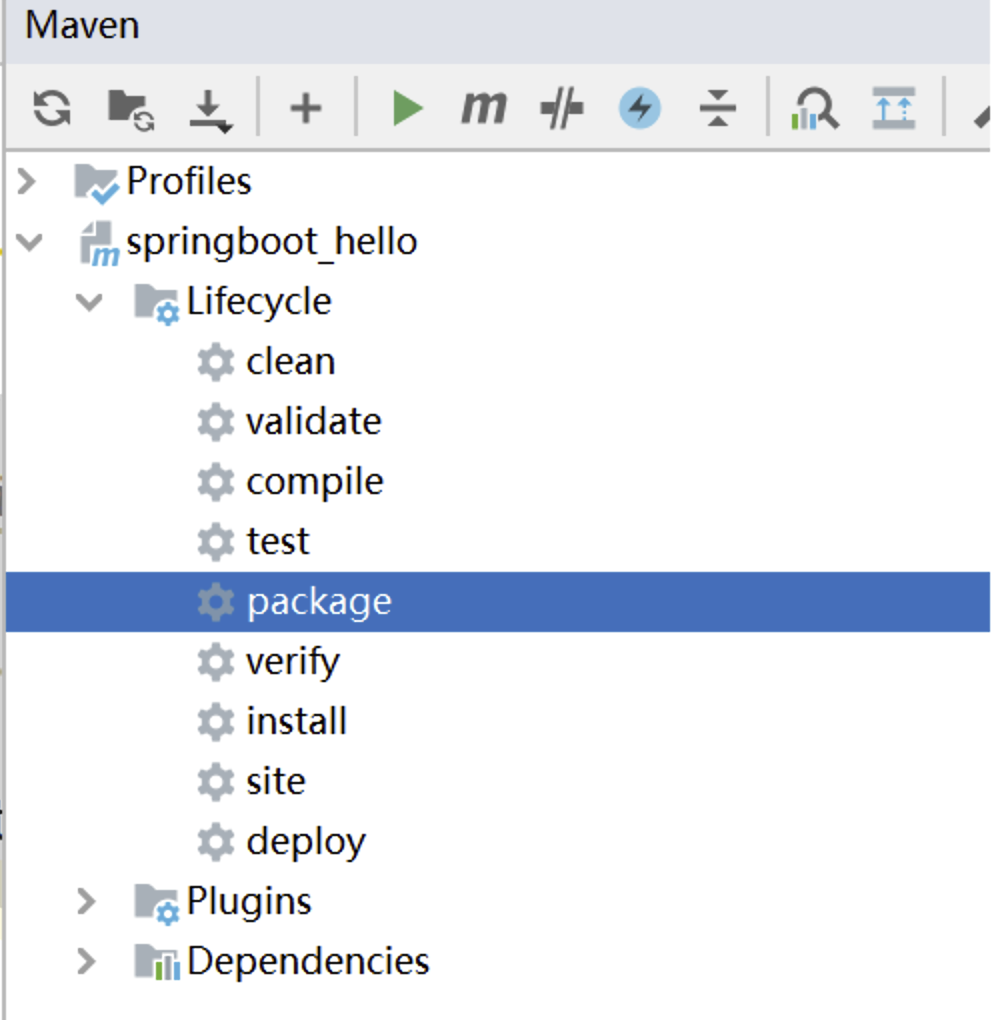
在idea点击package进行打包
可以在编译的target文件中查看jar包
6.3 命令启动和参数说明
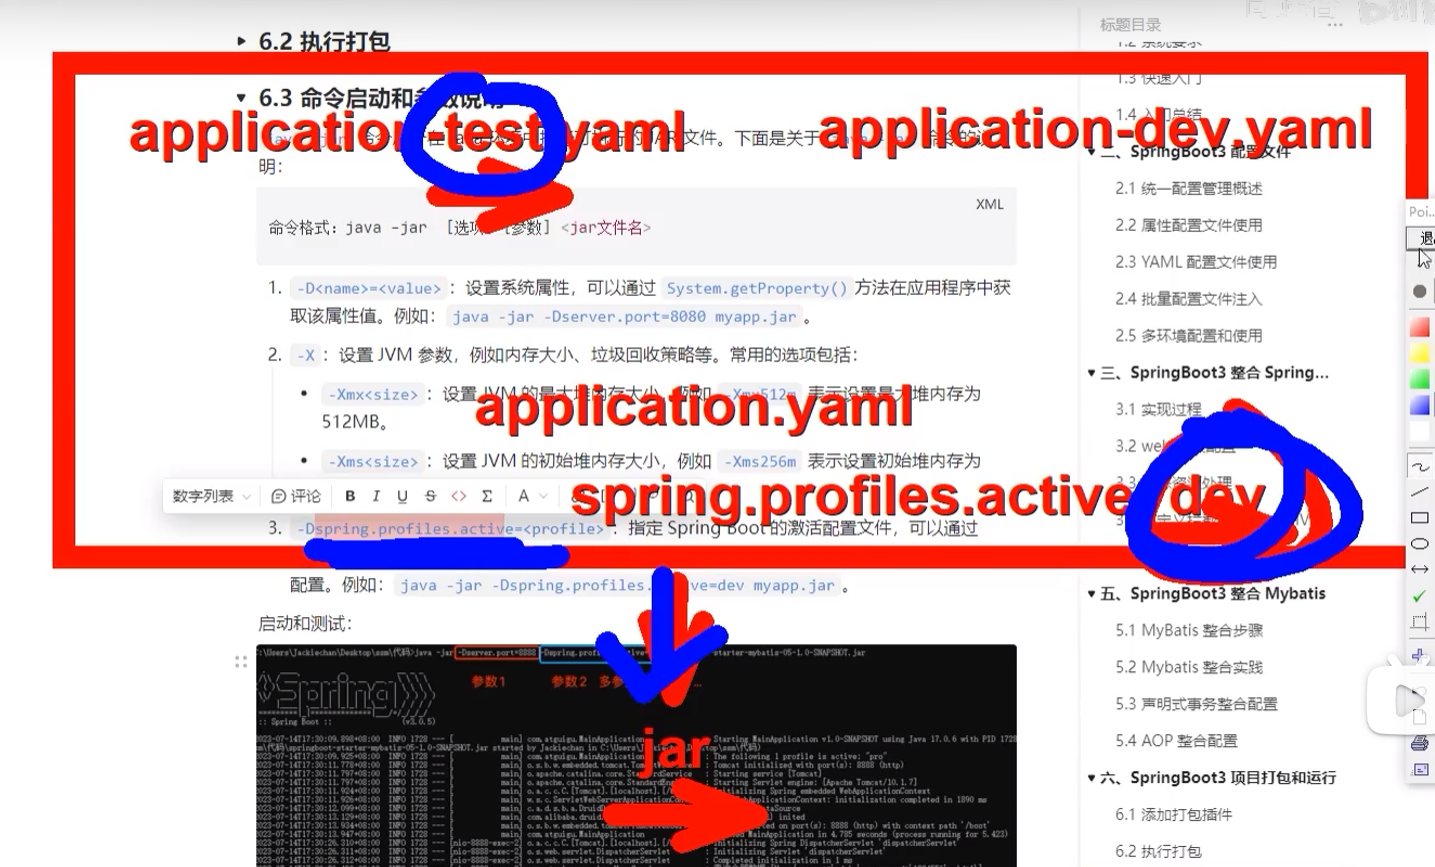
java -jar命令用于在Java环境中执行可执行的JAR文件。下面是关于java -jar命令的说明:
命令格式:java -jar [选项] [参数] <jar文件名>
-D<name>=<value>:设置系统属性,可以通过System.getProperty()方法在应用程序中获取该属性值。例如:java -jar -Dserver.port=8080 myapp.jar。-X:设置JVM参数,例如内存大小、垃圾回收策略等。常用的选项包括:-Xmx<size>:设置JVM的最大堆内存大小,例如-Xmx512m表示设置最大堆内存为512MB。-Xms<size>:设置JVM的初始堆内存大小,例如-Xms256m表示设置初始堆内存为256MB。
-Dspring.profiles.active=<profile>:指定Spring Boot的激活配置文件,可以通过application-<profile>.properties或application-<profile>.yml文件来加载相应的配置。例如:java -jar -Dspring.profiles.active=dev myapp.jar。
启动和测试:

注意: -D 参数必须要在jar之前!否者不生效!
回顾复习
导入插件
    <!--    SpringBoot应用打包插件-->
    <build>
        <plugins>
            <plugin>
                <groupId>org.springframework.boot</groupId>
                <artifactId>spring-boot-maven-plugin</artifactId>
            </plugin>
        </plugins>
    </build>
maven →clear→package
然后target就会出现打包好的 .jar包
将其指定一个文件夹路径 染后在对应的路径下 输入cmd
java -jar tab 补全 ctrl +c 终止
为了后期更改方便通常是在properties.yml文件不写,然后在执行jar包时填写相应的配置
eg:指定端口 Java -jar -Dserver.port=8888 springboot-base-mybatis-05-1.0-SNAPSHOT.jar
eg: Java -jar -Dserver.port=8888 -Dspring.profiles.active=xxxx,jj springboot-base-mybatis-05-1.0-SNAPSHOT.jar


